使用 Ultralytics YOLO 进行有向边界框检测
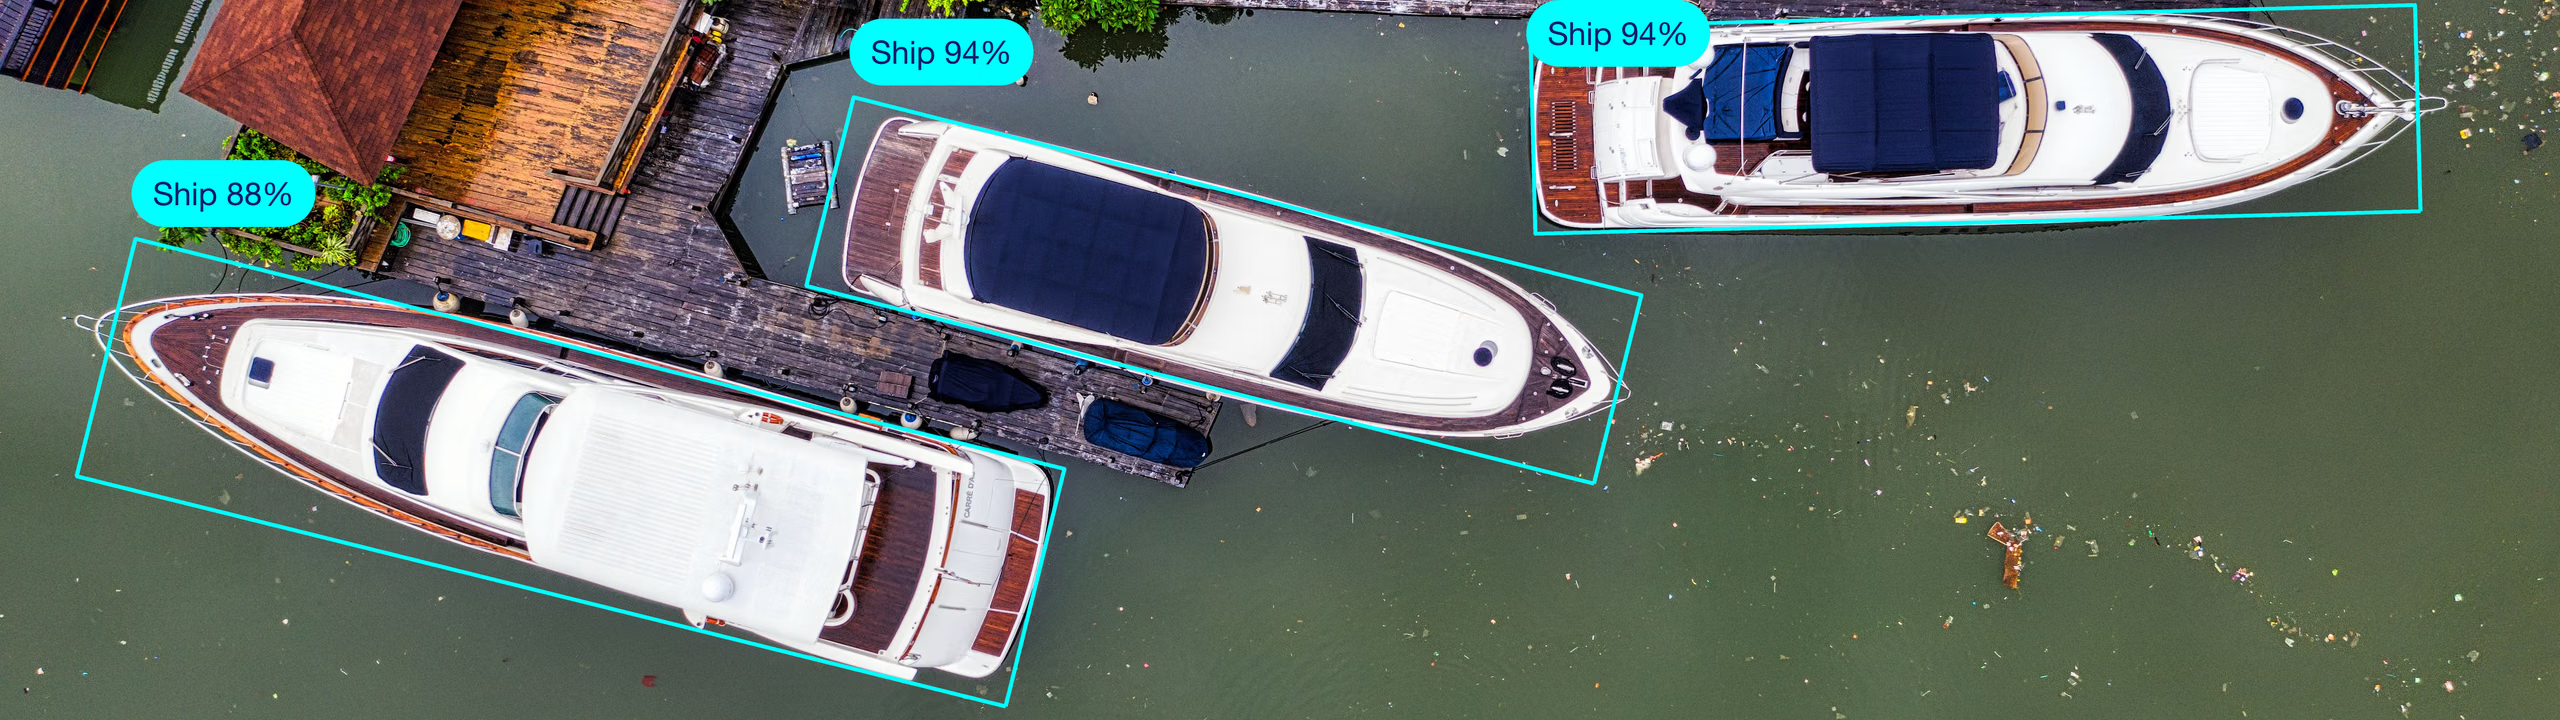
有向目标检测通过引入额外的角度信息,比标准目标检测更进一步,从而更准确地定位图像中的对象。
有向目标检测器的输出是一组旋转的边界框,用于精确包围图像中的对象,并提供每个框对应的类别标签和置信度分数。当对象以不同角度出现时,有向边界框尤其有用,例如航空影像场景;传统的轴对齐边界框可能会包含不必要的背景。典型应用包括利用卫星和无人机检测船只和车辆、为城市规划分析建筑物和基础设施、监测农作物,以及检查太阳能板或风力涡轮机。
观看: 如何使用 Ultralytics YOLO26 定向边界框(OBB)检测和跟踪目标 | 船舶跟踪 🚢
YOLO26 OBB 模型使用后缀 -obb,例如 yolo26n-obb.pt,并使用 DOTAv1 进行预训练。
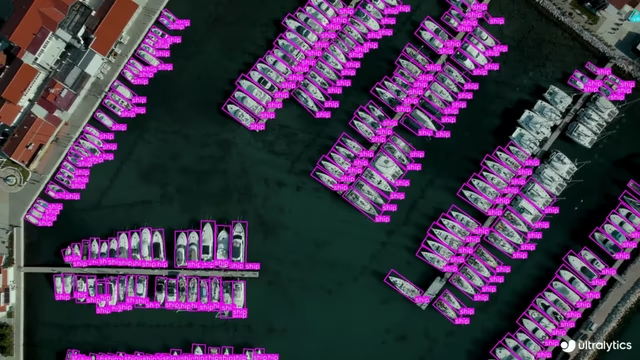
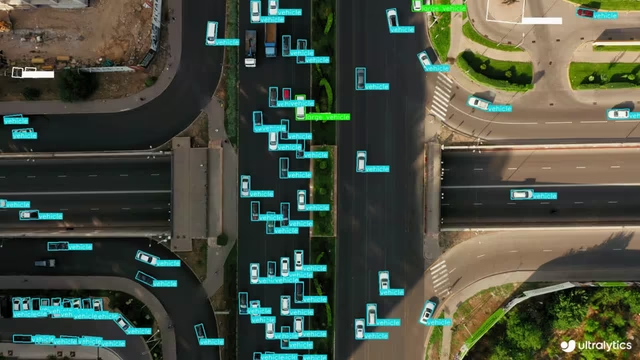
| 使用 OBB 检测船只 | 使用 OBB 检测车辆 |
|---|---|
 |  |
模型#
以下展示了在 DOTAv1 数据集上预训练的 YOLO26 OBB 模型。
首次使用时,模型会自动从 Ultralytics 最新版本下载。
DOTAv1 图像和标注仅限学术用途,禁止商业使用。Ultralytics 将这些限制解释为适用于源数据集,而非预训练或微调后的模型权重。请查看 DOTA 条款,确认是否适用于你的预期用途。
| 模型 | 尺寸 (像素) | mAP测试50-95 (e2e) | mAP测试50 (e2e) | 速度 CPU ONNX (毫秒) | 速度 T4 TensorRT10 (ms) | 参数 (M) | FLOPs (B) |
|---|---|---|---|---|---|---|---|
| YOLO26n-obb | 1024 | 52.4 | 78.9 | 97.7 ± 0.9 | 2.8 ± 0.0 | 2.4 | 14.8 |
| YOLO26s-obb | 1024 | 54.8 | 80.9 | 218.0 ± 1.4 | 4.9 ± 0.1 | 9.8 | 56.7 |
| YOLO26m-obb | 1024 | 55.3 | 81.0 | 579.2 ± 3.8 | 10.2 ± 0.3 | 21.2 | 184.9 |
| YOLO26l-obb | 1024 | 56.2 | 81.6 | 735.6 ± 3.1 | 13.0 ± 0.2 | 25.6 | 232.4 |
| YOLO26x-obb | 1024 | 56.7 | 81.7 | 1485.7 ± 11.5 | 30.5 ± 0.9 | 57.6 | 520.1 |
- mAPtest 数值是在 DOTAv1 数据集上以单模型、多尺度方式得出的。
使用yolo obb val data=DOTAv1.yaml device=0 split=test nms=False save_json=True复现,并将合并后的结果提交至 DOTA 评估。 - 速度 是使用 ONNX 在 CPU 上以及使用 TensorRT10 在 NVIDIA T4 GPU 上,对 DOTAv1 验证图像进行测试后取平均值的结果。
使用yolo obb val data=DOTAv1.yaml batch=1 device=0|cpu nms=False复现 - 参数量和 FLOPs 数值对应融合后的模型,该模型经过 Conv/BatchNorm 折叠并移除了未使用的检测分支。预训练检查点保留完整的训练架构,因此显示的数值可能更高。
初步 DOTAv1 结果请参阅尚未发布的 YOLO27 预览版。
训练#
在 DOTA8 数据集上以 640 的图像尺寸训练一个 YOLO26n-obb 模型,训练 100 个周期。
OBB 及其旋转 180° 后的形状完全相同,因此旋转角度按 180° 取模定义,框本身没有方向。训练标签会规范化为长边形式:框宽 w 是较长的一边,角度从正 x 轴起顺时针测量至 w 边的方向,并以弧度存储在 [-π/4, 3π/4)([-45°, 135°))中。预测结果不会进行规范化,因此预测框可能会将短边报告为 w;请参阅结果输出。[0°, 90°) 形式是经过规范化的 DOTA 风格约定,训练和推理时不会应用。
from ultralytics import YOLO

# 加载模型
model = YOLO("yolo26n-obb.yaml")  # 从 YAML 构建新模型
model = YOLO("yolo26n-obb.pt")  # 加载预训练模型(推荐用于训练)
model = YOLO("yolo26n-obb.yaml").load("yolo26n-obb.pt")  # 从 YAML 构建模型并迁移权重

# 训练模型
results = model.train(data="dota8.yaml", epochs=100, imgsz=640)
观看: 如何使用 Ultralytics Platform 在 DOTA 数据集上训练 Ultralytics YOLO-OBB(定向边界框)模型
有关 train 模式的完整详情,请参阅 Train 页面。你也可以通过 Ultralytics Platform 云训练训练 OBB 模型。
数据集格式#
OBB 数据集格式的详细说明请参阅 Dataset Guide。YOLO OBB 格式使用边界框的四个角点表示框,坐标归一化到 0 到 1 之间,格式如下。Ultralytics Platform 标注支持 OBB 标签,并提供专用的有向边界框绘制工具:
class_index x1 y1 x2 y2 x3 y3 x4 y4在内部,YOLO 会以 xywhr 格式处理损失和输出,该格式表示边界框的中心点(xy)、宽度、高度和旋转角度。
验证#
在 DOTA8 数据集上验证训练后的 YOLO26n-obb 模型准确率,以平均精度均值(mAP)衡量。显式传入 data,确保验证使用预期的数据集 YAML。
from ultralytics import YOLO

# 加载模型
model = YOLO("yolo26n-obb.pt")  # 加载官方模型
model = YOLO("path/to/best.pt")  # 加载自定义模型

# 验证模型
metrics = model.val(data="dota8.yaml")  # 在 DOTA8 数据集上进行验证
metrics.box.map  # map50-95(B)
metrics.box.map50  # map50(B)
metrics.box.map75  # map75(B)
metrics.box.maps  # 每个类别的 mAP50-95(B);未出现在验证集中的类别采用整体 mAP(B) 值
metrics.box.ap_class_index  # 实际参与评估的类别索引
metrics.box.image_metrics # 包含精确率、召回率、F1、TP、FP 和 FN 的逐图像指标字典预测#
使用训练好的 YOLO26n-obb 模型对图像进行预测。
from ultralytics import YOLO

# 加载模型
model = YOLO("yolo26n-obb.pt")  # 加载官方模型
model = YOLO("path/to/best.pt")  # 加载自定义模型

# 使用模型进行预测
results = model("https://ultralytics.com/images/boats.jpg")  # 对图像进行预测

# 访问结果
for result in results:
    xywhr = result.obb.xywhr  # 中心点 x、中心点 y、宽度、高度、角度(弧度)
    xyxyxyxy = result.obb.xyxyxyxy  # 四点多边形格式
    names = [result.names[cls.item()] for cls in result.obb.cls.int()]  # 每个框的类别名称
confs = result.obb.conf # 每个框的置信度分数请参阅预测页面,了解完整的 predict 模式详情。
传入 save_crop=True,即可按每个 OBB 的框尺寸保存旋转对齐的裁剪图,ObjectCropper 也有同样的作用。
结果输出#
有向边界框检测会为每张图像返回一个 Results 对象。主要预测字段为 result.obb,其中包含每个检测对象的旋转框、类别 ID 和置信度分数。
| 属性 | 类型 | 形状 | 说明 |
|---|---|---|---|
result.obb | OBB | (N) | 有向框。 |
result.obb.data | torch.float32 | (N,7/8) | 包含置信度/类别的原始旋转框。 |
result.obb.xywhr | torch.float32 | (N,5) | xywhr 旋转框。 |
result.obb.xyxyxyxy | torch.float32 | (N,4,2) | 四个角点。 |
result.obb.conf | torch.float32 | (N,) | 置信度分数。 |
标签会规范化为长边约定,但预测结果不会,因此 result.obb.xywhr 可能会报告 w 小于 h,其中旋转角度是相对于短边测量的。这两种形式描述的是同一个矩形,因此无论采用哪种形式,result.obb.xyxyxyxy 都是正确的。在跟踪时,每个轨迹都会保留最接近其前一角度的半周形式(θ 或 θ ± π),因此轨迹角度不会在相邻帧之间翻转 π,并且可能超出 [-π/4, 3π/4)。如果下游代码需要长边形式,请将角点转换回去,同时注意,重写框参数可能会导致角点顺序循环移位:
from ultralytics.utils.ops import xyxyxyxy2xywhr

xywhr = xyxyxyxy2xywhr(result.obb.xyxyxyxy)  # w >= h, rotation in [-pi/4, 3pi/4)
如需了解所有任务中特定于任务的 Results 字段,请参阅按任务查看预测结果部分。
导出#
将 YOLO26n-obb 模型导出为 ONNX、CoreML 等其他格式。
from ultralytics import YOLO

# 加载模型
model = YOLO("yolo26n-obb.pt")  # 加载官方模型
model = YOLO("path/to/best.pt")  # 加载自定义模型

# 导出模型
model.export(format="onnx")
下表列出了可用的 YOLO26-obb 导出格式。你可以使用 format 参数导出为任意格式,例如 format='onnx' 或 format='engine'。你可以直接在导出的模型上进行预测或验证,例如 yolo predict model=yolo26n-obb.onnx。导出完成后,系统会显示适用于你的模型的用法示例。
| 格式 | format 参数 | 模型 | 元数据 | 参数 |
|---|---|---|---|---|
| PyTorch | - | yolo26n-obb.pt | ✅ | - |
| TorchScript | torchscript | yolo26n-obb.torchscript | ✅ | imgsz, quantize, dynamic, nms, batch, device |
| ONNX | onnx | yolo26n-obb.onnx | ✅ | imgsz, quantize, dynamic, simplify, opset, nms, batch, data, fraction, device |
| OpenVINO | openvino | yolo26n-obb_openvino_model/ | ✅ | imgsz, quantize, dynamic, nms, batch, data, fraction, device |
| TensorRT | engine | yolo26n-obb.engine | ✅ | imgsz, quantize, dynamic, simplify, opset, workspace, nms, batch, data, fraction, device |
| CoreML | coreml | yolo26n-obb.mlpackage | ✅ | imgsz, dynamic, quantize, nms, batch, device |
| Apple Core AI | coreai | yolo26n-obb.aimodel | ✅ | imgsz, batch, quantize |
| TF SavedModel | saved_model | yolo26n-obb_saved_model/ | ✅ | imgsz, quantize, opset, nms, batch, data, fraction, device |
| TF GraphDef | pb | yolo26n-obb.pb | ❌ | imgsz, opset, batch, device |
| TF Edge TPU | edgetpu | yolo26n-obb_edgetpu.tflite | ✅ | imgsz, quantize, opset, data, fraction, device |
| LiteRT | litert | yolo26n-obb.tflite | ✅ | imgsz, quantize, batch, data, fraction, device |
| PaddlePaddle | paddle | yolo26n-obb_paddle_model/ | ✅ | imgsz, batch, device |
| MNN | mnn | yolo26n-obb.mnn | ✅ | imgsz, batch, dynamic, quantize, simplify, opset, nms, device |
| NCNN | ncnn | yolo26n-obb_ncnn_model/ | ✅ | imgsz, quantize, device |
| IMX500 | imx | yolo11n_imx_model/ | ✅ | imgsz, quantize, data, fraction, nms, device |
| RKNN | rknn | yolo26n-obb_rknn_model/ | ✅ | imgsz, batch, name, quantize, simplify, opset, data, fraction, device |
| ExecuTorch | executorch | yolo26n-obb_executorch_model/ | ✅ | imgsz, quantize, batch, data, fraction, device |
| Axelera | axelera | yolo26n-obb_axelera_model/ | ✅ | imgsz, batch, quantize, data, fraction, device |
| DEEPX | deepx | yolo26n-obb_deepx_model/ | ✅ | imgsz, quantize, simplify, opset, data, optimize, device |
| Qualcomm QNN | qnn | yolo26n-obb_qnn.onnx | ✅ | imgsz, batch, name, quantize, simplify, opset, data, fraction, device |
| Hailo | hailo | yolo26n-obb_hailo_model/ | ✅ | imgsz, name, quantize, data, fraction, simplify, conf, iou, device |
| Huawei Ascend | ascend | yolo26n-obb_ascend_model/ | ✅ | imgsz, batch, name, quantize, opset, simplify, nms, device |
| AMD Xilinx | xilinx | yolo26n-obb_xilinx_model/ | ✅ | imgsz, name, quantize, data, fraction, opset, simplify, device |
| NXP | nxp | yolo26n-obb_nxp.tflite | ✅ | imgsz, quantize, data, fraction, device |
| ST Edge AI | stedgeai | yolo26n-obb_stedgeai.onnx | ✅ | imgsz, quantize, data, fraction, opset, simplify, device |
nms=None 默认输出原始结果,以便进行外部 NMS(YOLO26 在 Axelera 上保留其无 NMS 检测头)。设置 nms=False 以选择可用的无 NMS 检测头;不支持的格式会回退到其原生输出路径。上方的 nms 条目指出可通过 nms=True 嵌入 NMS 的格式。
请参阅 Export 页面,了解完整的 export 详情。
常见问题#
有向边界框(OBB)包含一个额外角度,可提高图像中物体定位的准确性。与轴对齐矩形形式的常规边界框不同,OBB 可以旋转,以更好地贴合物体的方向。这对于需要精确放置物体的应用尤其有用,例如航空或卫星图像(数据集指南)。
要使用自定义数据集训练 YOLO26n-obb 模型,请参考以下示例,使用 Python 或 CLI:
示例from ultralytics import YOLO # 加载预训练模型 model = YOLO("yolo26n-obb.pt") # 训练模型 results = model.train(data="path/to/custom_dataset.yaml", epochs=100, imgsz=640)有关更多训练参数,请查看配置部分。
你可以使用 Python 或 CLI 命令验证 YOLO26n-obb 模型,如下所示:
示例from ultralytics import YOLO # 加载模型 model = YOLO("yolo26n-obb.pt") # 验证模型 metrics = model.val(data="dota8.yaml")请参阅 Val 部分,了解完整的验证详情。
你可以使用 Python 或 CLI 轻松将 YOLO26-OBB 模型导出为 ONNX 格式:
示例from ultralytics import YOLO # 加载模型 model = YOLO("yolo26n-obb.pt") # 导出模型 model.export(format="onnx")有关更多导出格式和详情,请参阅 Export 页面。


评论252
提出问题、分享结果,或帮助其他人。
zhouyizhuo
how to do Model Ensembling on yolov8-obb models?
2 Paula DerrengerUltralytics(已编辑)
Model ensembling with YOLOv8-obb models involves combining the predictions from multiple trained models to improve the accuracy of your oriented objects detection. Currently, direct support for model ensembling within Ultralytics YOLO isn't provided out-of-the-box. However, you can manually implement ensembling by running predictions with each model separately and then combining these predictions.
One common approach is to average the bounding box coordinates and confidence scores of the same object detected by multiple models. Ensure to consider the rotating angle parameter unique to OBB models in your ensembling logic. Here's a basic conceptual example to get you started:
from ultralytics import YOLO

models = [
    YOLO('path/to/first_obb_model.pt'),
    YOLO('path/to/second_obb_model.pt'),
    # Add more models as needed
]

# Assuming you have a method to read your images/videos
image = 'path/to/image.jpg'

# List to store results from all models
all_preds = []

for model in models:
    results = model(image)
    all_preds.append(results[0].obb)  # Extracting OBB predictions (xywhr, conf, cls)

# Assuming you have a method `combine_predictions(all_preds)`
# that combines predictions from all models
final_predictions = combine_predictions(all_preds)

# Process `final_predictions`...
This example loads each model, runs predictions on the same image, and stores the results. You'd then need to implement
combine_predictions(all_preds)to handle the logic for combining these predictions based on criteria like IoU, confidence scores, etc., taking into account the angle for rotated bounding boxes.Remember, ensembling may increase inference time due to processing with multiple models. Always weigh the benefits of improved accuracy against potential increases in computational cost. Happy coding! 😊
windzu
if you want draw predict results to img and save , you can ref below easy code :
# you predict code #

import cv2

image = cv2.imread(test_img_path)
for r in results:
    xyxyxyxy = r.obb.xyxyxyxy.cpu().numpy()

    for box in xyxyxyxy:
        points = box.reshape(4, 2).astype(int)
        cv2.polylines(image, [points], isClosed=True, color=(0, 255, 0), thickness=2)

cv2.imwrite("detected_image.jpg", image)
1 Glenn JocherUltralytics
@windzu thank you for sharing the code example. For more details on using YOLOv8 Oriented Bounding Boxes, please refer to our documentation on training, validation, and exporting models. If you have further questions, feel free to ask here.
krialm
Hi, when I am using yolov8_obb model in results I always have boxes: None keypoints: None masks: None
even when the model makes prediction. Did someone faced with this problem and if yes, what was the solution? Thank you.🙂
1RizwanMunawar
@krialm In the case of OBB, you can get bounding box data, using the mentioned code below.
model = YOLO("yolov8n-obb.pt")
results = model.predict(im0)
pred_boxes = results[0].obb
I hope this helps! Let me know if you have any additional questions.
Thanks and Regards Ultralytics Team!
1kedardg
Is there a way for me to train OBB models from scratch let's say the P2 or RTDETR models which are not available pre-trained?
- Paula DerrengerUltralytics
@kedardg absolutely, you can train OBB models like P2 or RTDETR from scratch even if they're not available pre-trained. You'd start by creating a new model from a YAML file, which defines the model architecture. Here's a quick example of how you might do it:
yolo obb train data=your_dataset.yaml model=your_model.yaml epochs=100 imgsz=640Just replace
your_dataset.yamlwith your dataset configuration file andyour_model.yamlwith your model configuration file. Make sure your dataset is properly formatted for OBB tasks. Happy training! 😊🚀 RumaisaIlyas
model = YOLO("yolov8n-obb.pt") results = model.predict(im0) pred_boxes = results[0].obb
i did this but i want to draw bounding boxes on the test image and return it. how to do that?
my function is:
def count_detection(image): if image is not None: # Load the YOLO model model = YOLO('bestobbv8s.pt')
# Check the shape of the input image print("Input image shape:", image.shape) # Use the model to predict the wheat spikes in image results = model(image, save=True) # Count count = sum(len(result) for result in results) print("count", count) # Draw bounding boxes for detected wheat heads for result in results: boxes = result.obb #here? return image- Paula DerrengerUltralytics
@RumaisaIlyas hey there! 😊 To draw bounding boxes on your test image and return it, you can use the
plot()method available in theResultsobject. Here's how you can modify your function:def count_detection(image): if image is not None: # Load the YOLO model model = YOLO('bestobbv8s.pt') # Check the shape of the input image print("Input image shape:", image.shape) # Use the model to predict results = model.predict(image) # Draw bounding boxes and return the annotated image annotated_image = results[0].plot() # Count detections count = len(results[0].obb) print("count", count) return annotated_imageIn this updated function, after making predictions with
model.predict(image), we useresults[0].plot()to draw bounding boxes on the image. This method returns the annotated image, which we then return from the function. This should give you the visual feedback you're looking for! 🚀Let me know if you need further assistance!
thankyou so much for your assistance. i am facing a problem that my runs folder is not created after i run the code provided. why is that? what should i do in code so that i get the runs folder with my predicted image
- Paula DerrengerUltralytics(已编辑)
Hey there! 😊 It sounds like you're doing everything right, but if the
runsfolder isn't being created, it might be due to a small oversight. Here's a quick checklist:- Ensure you're using the latest version of the Ultralytics YOLO library. Sometimes, updates fix these kinds of issues.
- Double-check your command and make sure it's complete. For predictions, it should look something like this:
from ultralytics import YOLO # Load your model model = YOLO('bestobbv8s.pt') # Run prediction # save=True writes the annotated image to the 'runs' folder results = model.predict('path/to/your/image.jpg', save=True)- If you're still not seeing the
runsfolder, try specifying the output directory explicitly in your code:
results = model.predict('path/to/your/image.jpg', save=True, project='runs/detect') # Adjust the path as needed- Lastly, ensure you have the necessary write permissions in your working directory. Sometimes, permission issues can prevent the creation of new folders.
If you've checked all these and the issue persists, it might be helpful to share more details about your environment (like your operating system) or any error messages you're seeing. That way, the community can offer more targeted advice. 🚀
Hope this helps, and happy detecting!
Ci-ne
I also face the same problem. I tried using the code provided but it still says NoneType
ncnn_model = YOLO("./my_ncnn_model", task='detect') results = ncnn_model.predict(image_path)
if results[0] is not None: # Ensure results is not None obb_boxes = results[0].obb # For OBB models print(f"OBB Box: {obb_boxes}") else: print("No detections.")
This is what I get
Speed: 4.1ms preprocess, 93.1ms inference, 1.2ms postprocess per image at shape (1, 3, 640, 640) OBB Box: None
Any help?
1chengz
The document notes that 'OBB angles are constrained to the range 0–90 degrees (exclusive of 90). Angles of 90 degrees or greater are not supported.' So what is the normal radian range for an OBB, [-π/4, 3π/4) or something else?
 Murat Raimbekov
the radian range is
[-π/4, 3π/4), i.e.[-45°, 135°), not[0°, 90°). that docs note was inaccurate and is fixed in #24534.ground-truth angles are normalized in
xyxyxyxy2xywhr(ultralytics/utils/ops.py) by two loops,while theta >= 3*pi/4: theta -= piandwhile theta < -pi/4: theta += pi, withwswapped to the longer side. sweeping a rectangle through physical 0->180°:0° -> 0.0000 45° -> 0.7854 (π/4) 90° -> 1.5708 (π/2) 120° -> 2.0944 135° -> -0.7854 (-π/4) 165° -> -0.2618so the span is exactly π wide, half-open at
3π/4.the heads match this:
OBB(yolov8/yolo11):angle = (sigmoid(raw) - 0.25) * π, hard-bounded to[-π/4, 3π/4].OBB26(yolo26): raw output, no sigmoid, trained on targets already in[-π/4, 3π/4).
[0, π/2)is the regularized DOTA-style form produced byregularize_rboxesinops.py. that function is defined but has no callers anywhere inultralytics/, so it is not applied at training or inference. predicted boxes reach you unregularized:result.obb.xywhrreturns the angle in[-π/4, 3π/4)(verified by feeding angles like-0.70and2.30through the predict path and reading them back unchanged).one consequence, which is what the original note was really about: an OBB and its 180° rotation encode to the same
xywhr, so rotation is defined only modulo 180° and the box has no direction. θ and θ+180° are indistinguishable, so you cannot recover a fixed corner ordering from the predicted angle.
 User
mAPtest values are for single-model multiscale on DOTAv1 dataset. Reproduce by yolo val obb data=DOTAv1.yaml device=0 split=test and submit merged results to DOTA evaluation. This mentions that the test results are submitted to the DOTAv1 server through a multiscale approach. I would like to ask, what does this "multiscale" mean? How is it specifically implemented? Is it trained at scales like 512512 and 10241024, and then tested on the test dataset? How are the final results obtained? I am not quite clear on what this multiscale refers to. Please help me with this.
- Glenn JocherUltralytics
Here, “multiscale” means evaluating the same trained model on multiple resized/split versions of each DOTA image tile, then merging those detections back into the original image for final submission; in Ultralytics this is tied to the DOTA split pipeline with scales like
rates=[0.5, 1.0, 1.5]in the DOTA dataset guide and the merged-result export inOBBValidator.eval_json(), so it is usually multi-scale test-time inference with one model rather than separately training 512 and 1024 models. - Murat Raimbekov
it is one model, trained once. there is no separate 512 and 1024 model, and no separate training runs per scale. the "multiscale" lives entirely in the dota tiling step, not inside
yolo val.where it comes from. dota images are huge (800x800 up to ~20000x20000), so they are cut into overlapping tiles before training/val using
split_trainval/split_testfromultralytics/data/split_dota.py. the multiscale variant passesrates=[0.5, 1.0, 1.5](this is exactly what the dota dataset guide shows). for each raterthe code usescrop_size / randgap / r, so with the defaultscrop_size=1024, gap=200you get tiles of:rate 0.5 -> 2048 px tiles (gap 400) rate 1.0 -> 1024 px tiles (gap 200) rate 1.5 -> 682 px tiles (gap 133)every original image is therefore cut into overlapping windows at all three crop sizes. each window is later resized to
imgszat inference, so the same content is effectively seen at three resolutions. concretely, a single 4000x4000 image produces ~98 tiles spread across those three sizes.training. the model is trained once on the multiscale-split trainval tiles (same
rates=[0.5, 1.0, 1.5]). it is not "trained at 512 then at 1024" as separate models.test / how the final number is obtained.
yolo val obb data=DOTAv1.yaml split=testruns that single model over every test tile. each tile filename encodes the source image id and crop offset (name__cropsize__xstart___ystart).OBBValidator.eval_json()parses that, shifts each tile's rotated boxes back into the original full-image coordinates, concatenates detections from all tiles and all scales, then runs a rotated probiou NMS (fast_nms, iou 0.3) to remove the overlap introduced by tiling. the merged per-image results are written as dotaTask1_*.txt, which is what you submit to the dota evaluation server.one practical caveat.
yolo val ... split=testdoes not create the multiscale tiles for you. you have to runsplit_test(rates=[0.5, 1.0, 1.5])first (andsplit_trainvalwith the same rates for training). running val on the raw full dota images is single-scale and will not reproduce themAPtestnumber in the table.so in short: multiscale = offline multi-scale tiling + per-tile single-scale inference + merge-back-and-NMS, all with one model. it is test-time multi-scale through the tiling, not test-time augmentation inside
val.
kssion
WARNING ⚠️ CoreML: 'nms=True' is only available for Detect models like 'yolo11n.pt'.
yolo export model=best.pt format=coreml nms=True conf=0.25 iou=0.45Ultralytics 8.3.232 🚀 Python-3.11.11 torch-2.9.1 CPU (Apple M1) YOLO11n-obb summary (fused): 109 layers, 2,653,918 parameters, 0 gradients, 6.6 GFLOPs
PyTorch: starting from 'best.pt' with input shape (1, 3, 640, 640) BCHW and output shape(s) (1, 6, 8400) (5.5 MB) Torch version 2.9.1 has not been tested with coremltools. You may run into unexpected errors. Torch 2.7.0 is the most recent version that has been tested.
CoreML: starting export with coremltools 9.0... WARNING ⚠️ CoreML: 'nms=True' is only available for Detect models like 'yolo11n.pt'. Converting PyTorch Frontend ==> MIL Ops: 100%|██████████████▉| 867/868 [00:00<00:00, 8975.73 ops/s] Running MIL frontend_pytorch pipeline: 100%|███████████████████| 5/5 [00:00<00:00, 166.58 passes/s] Running MIL default pipeline: 100%|███████████████████████████| 95/95 [00:00<00:00, 99.61 passes/s] Running MIL backend_mlprogram pipeline: 100%|████████████████| 12/12 [00:00<00:00, 176.60 passes/s] CoreML: export success ✅ 4.8s, saved as 'best.mlpackage' (5.3 MB)
Export complete (5.0s)
- Glenn JocherUltralytics
That warning is expected for OBB models: CoreML
nms=Trueis only supported for axis-aligned Detect heads, so export your*-obbmodel without NMS and do confidence/IoU (rotated NMS) post-processing on the app side (export success ✅ means you’re fine). See the Ultralytics YOLO OBB task docs for the OBB output formats.yolo export model=best.pt format=coreml
wang18382140151-hub
你好,请问你们未来的工作计划中是否有将rtdetr用于obb检测呢,最近我正在基于贵司源码做改进
AbhisekRao
I'm currently working with the YOLOv11 Oriented Bounding Box (OBB) model exported in TensorRT format, and deploying it on an NVIDIA Jetson device (AGX Orin). While the model works in standard inference pipelines (.pt) , I’m facing challenges integrating it into a DeepStream-based application to process live RTSP video streams.
There seems to be no existing reference implementation or sample Python code that demonstrates how to use the OBB variant of the model with DeepStream. Specifically, I'm looking for guidance on:
1- Integrating the YOLOv11 OBB TensorRT model with DeepStream (preferably using Python bindings). 2- Proper parsing and visualization of oriented bounding boxes from the model output. 3- Any custom parser or config file changes required in the DeepStream pipeline.
Any support, documentation, or examples from the team or community would be greatly appreciated.
cripsgreen
Hello, could you please share some insights on how to train the hyperparameters for YOLOv11-OBB, as well as the pre-trained weights? Thank you.
ziishuo
May I ask if the OBB model can be used to detect subjects in a normal perspective (such as a level shot)? I noticed that most of the examples are from a top-down angle. Thank you!