Cómo aislar objetos segmentados con Ultralytics YOLO
La segmentación de instancias genera una máscara precisa a nivel de píxel para cada objeto detectado, lo que te permite extraer cada objeto de una imagen por separado. En esta guía se explica cómo convertir los resultados de segmentación de Ultralytics YOLO en objetos aislados mediante el modo de predicción y OpenCV, con un fondo negro sólido o transparente para guardarlos como PNG.
Mira: Cómo aislar objetos segmentados con Ultralytics YOLO26 | Tutorial de Python | VisionAI 🚀
¿Por qué aislar objetos segmentados?#
Extraer objetos individuales de una imagen permite llevar a cabo distintos flujos de trabajo posteriores:
- Eliminación del fondo en imágenes de productos, catálogos o edición creativa.
- Recortes por objeto para crear conjuntos de datos de clasificación a partir de tus detecciones.
- Procesamiento focalizado para que los pasos posteriores, como el OCR, el análisis del color o las mediciones, solo procesen el objeto y no la escena que lo rodea.
- Exportación a PNG transparente para componer objetos sobre fondos nuevos.
La receta funciona con cualquier modelo de segmentación de Ultralytics YOLO y consta de cuatro etapas: ejecutar la inferencia → extraer cada contorno → aislar el objeto → guardar el resultado.
Ejecutar la inferencia de segmentación#
Instala las bibliotecas necesarias y, a continuación, carga un modelo de segmentación como YOLO26n-seg (el sufijo -seg es necesario para generar máscaras) y ejecuta la predicción en la imagen de origen:
from ultralytics import YOLO

# Cargar un modelo de segmentación
model = YOLO("yolo26n-seg.pt")

# Ejecutar la inferencia en una imagen de origen
results = model.predict(source="path/to/image.jpg")Si llamas a model.predict() sin un source, Ultralytics usa las imágenes de ejemplo incluidas en el paquete (bus.jpg y zidane.jpg), algo práctico para probar rápidamente el flujo de trabajo.
Extraer los contornos de los objetos#
Cada elemento de results corresponde a una imagen, y al iterar sobre un resultado se obtiene una detección cada vez. Para cada detección, copia la imagen original, lee la etiqueta de clase y dibuja el contorno de la máscara del objeto sobre una máscara binaria vacía. La región blanca de esta máscara indica exactamente qué píxeles pertenecen al objeto.
Los fragmentos de código de esta sección y de la siguiente se ejecutan dentro del bucle de detección que aparece abajo; encontrarás el script completo, listo para copiar y pegar, en Ejemplo completo.
from pathlib import Path

import cv2
import numpy as np

for r in results:
    img = np.copy(r.orig_img)
    img_name = Path(r.path).stem  # nombre base de la imagen de origen

    # Iterar por cada objeto detectado en la imagen
    for ci, c in enumerate(r):
        label = c.names[c.boxes.cls.tolist().pop()]  # nombre de la clase

        # Crear una máscara binaria y dibujar en ella el contorno del objeto
        b_mask = np.zeros(img.shape[:2], np.uint8)
        contour = c.masks.xy[0].astype(np.int32).reshape(-1, 1, 2)
cv2.drawContours(b_mask, [contour], -1, (255, 255, 255), cv2.FILLED)c.masks.xy[0]devuelve el contorno de la máscara como coordenadas de puntos(x, y)del objeto en este resultado de una sola detección..astype(np.int32)convierte los puntos defloat32, quedrawContours()de OpenCV no acepta..reshape(-1, 1, 2)reorganiza los puntos según el formato[N, 1, 2]que esperadrawContours(), dondeNes el número de puntos del contorno.
Al pasar [contour] con el índice -1, se dibujan todos los puntos del contorno proporcionado y cv2.FILLED rellena de blanco todos los píxeles encerrados.
Aislar el objeto#
Con la máscara binaria lista, combínala con la imagen original. Hay dos estilos habituales, según el fondo que quieras:
Convierte la máscara a tres canales y conserva solo los píxeles que se solapan con el objeto. Todo lo que quede fuera del contorno se vuelve negro:
# Aislar el objeto con un fondo negro
mask3ch = cv2.cvtColor(b_mask, cv2.COLOR_GRAY2BGR)
isolated = cv2.bitwise_and(mask3ch, img)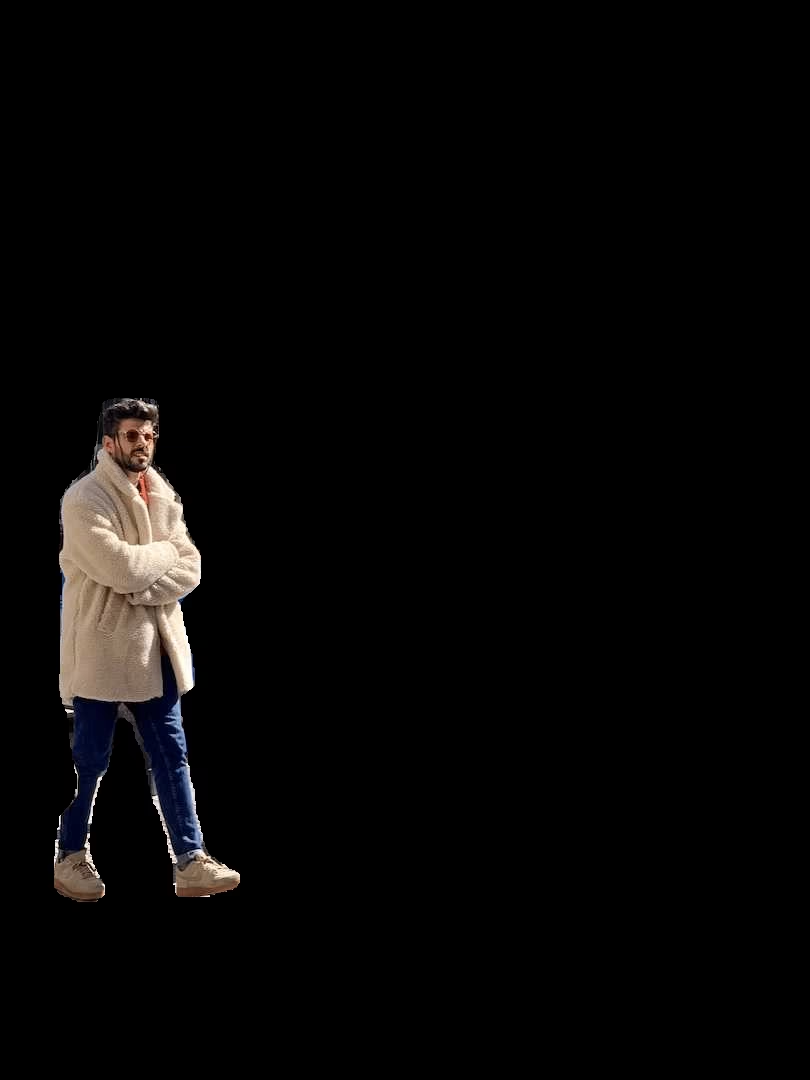
Para conservar solo la región del objeto en lugar de la imagen completa, recórtala según el cuadro delimitador de la detección:
# Coordenadas del cuadro delimitador
x1, y1, x2, y2 = c.boxes.xyxy.cpu().numpy().squeeze().astype(np.int32)
# Recortar la imagen aislada a la región del objeto
iso_crop = isolated[y1:y2, x1:x2]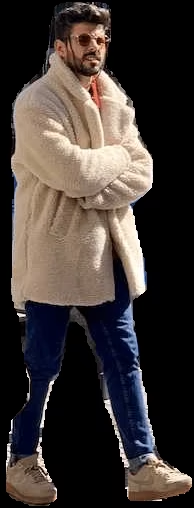
Ya está integrado. Pasa save_crop=True a predict() y Ultralytics guardará automáticamente los recortes de los cuadros delimitadores, sin necesidad de enmascarar.
Guardar el resultado (opcional)#
Tú decides qué hacer con cada objeto aislado. Un paso habitual es guardarlo en disco para usarlo más adelante:
# Save the isolated object to file
cv2.imwrite(f"{img_name}_{label}-{ci}.png", isolated)
Aquí, img_name es el nombre base de la imagen de origen, label es el nombre de la clase y ci es el índice de detección, de modo que las distintas instancias de una misma clase obtienen nombres de archivo únicos. Sustituye isolated por iso_crop si has aplicado el recorte opcional anterior.
Ejemplo completo#
El siguiente script combina todos los pasos en un único bloque ejecutable. Usa un fondo negro de forma predeterminada; cambia la única línea indicada por np.dstack([img, b_mask]) para obtener un PNG transparente:
from pathlib import Path

import cv2
import numpy as np

from ultralytics import YOLO

model = YOLO("yolo26n-seg.pt")
results = model.predict(source="path/to/image.jpg")

for r in results:
    img = np.copy(r.orig_img)
    img_name = Path(r.path).stem

    for ci, c in enumerate(r):
        label = c.names[c.boxes.cls.tolist().pop()]

        # Build a binary mask from the object contour
        b_mask = np.zeros(img.shape[:2], np.uint8)
        contour = c.masks.xy[0].astype(np.int32).reshape(-1, 1, 2)
        cv2.drawContours(b_mask, [contour], -1, (255, 255, 255), cv2.FILLED)

        # Isolate the object (black background)
        mask3ch = cv2.cvtColor(b_mask, cv2.COLOR_GRAY2BGR)
        isolated = cv2.bitwise_and(mask3ch, img)  # transparent PNG: isolated = np.dstack([img, b_mask])

        # Save or add your custom post-processing here
        cv2.imwrite(f"{img_name}_{label}-{ci}.png", isolated)

        # Optional: crop to the bounding box before saving
        # x1, y1, x2, y2 = c.boxes.xyxy.cpu().numpy().squeeze().astype(np.int32)
        # cv2.imwrite(f"{img_name}_{label}-{ci}.png", isolated[y1:y2, x1:x2])
Si vas a usarlo repetidamente, mete el cuerpo del bucle en una función para poder llamarla con muchas imágenes.
Conclusión#
Ya tienes una receta completa para aislar objetos segmentados con Ultralytics YOLO: ejecuta la inferencia, crea una máscara binaria a partir de cada contorno y, después, extrae el objeto sobre un fondo negro o transparente y, si quieres, recórtalo a su cuadro delimitador. Explora la documentación completa de Segment Task y Predict Mode para adaptar el flujo de trabajo a tus propias clases.
Preguntas frecuentes#
Carga un modelo de segmentación, ejecuta la inferencia, crea una máscara binaria a partir del contorno de cada detección y combínala con la imagen original:
import cv2
import numpy as np

from ultralytics import YOLO

model = YOLO("yolo26n-seg.pt")
results = model.predict(source="path/to/your/image.jpg")

img = np.copy(results[0].orig_img)
b_mask = np.zeros(img.shape[:2], np.uint8)
contour = results[0].masks.xy[0].astype(np.int32).reshape(-1, 1, 2)
cv2.drawContours(b_mask, [contour], -1, (255, 255, 255), cv2.FILLED)

mask3ch = cv2.cvtColor(b_mask, cv2.COLOR_GRAY2BGR)
isolated = cv2.bitwise_and(mask3ch, img)
Consulta el Ejemplo completo para ver el bucle completo de cada detección.
Hay dos estilos principales. Para un fondo negro, convierte la máscara a tres canales y usa
cv2.bitwise_and(). Para un fondo transparente (al guardar como PNG), apila la máscara como un cuarto canal alfa connp.dstack([img, b_mask]). Ambos se muestran en Aislar el objeto.Lee las coordenadas del cuadro delimitador de la detección y recorta la imagen aislada:
x1, y1, x2, y2 = results[0].boxes.xyxy[0].cpu().numpy().astype(np.int32)
iso_crop = isolated[y1:y2, x1:x2]
Encontrarás más información sobre los resultados de los cuadros delimitadores en la documentación de Predict Mode.
Ultralytics YOLO ofrece segmentación de instancias rápida y en tiempo real, con generación precisa de máscaras y cuadros delimitadores, además de una API de Python sencilla que convierte los resultados de inferencia en objetos aislados con unas pocas líneas de código de OpenCV.
Sí. Usa el argumento
save_cropenpredict()para guardar recortes de cuadros delimitadores con su fondo original:results = model.predict(source="path/to/your/image.jpg", save_crop=True)Encontrarás más información en la sección Argumentos de inferencia del modo de predicción.


Comentarios16
Haz una pregunta, comparte tus resultados o ayuda a otra persona.
cordonballas
wow thanx that's exactly what i've been looking for.
 Glenn JocherUltralytics
@cordonballas thank you for your positive feedback! We're glad the segmentation isolation guide was helpful. If you have any further questions, feel free to ask—the YOLO community and our team are here to help. 😊
For continued support, check our Segment Task documentation and Predict Mode guide.
AbdulGhofur23
How can I extract a mask from a TIFF (Tag Image File Format) so that the mask's coordinates align with the projection of the TIFF image?
- Glenn JocherUltralytics
To extract masks from a TIFF image while aligning the mask's coordinates with the image's projection, you can use the segmentation results from Ultralytics YOLO. Generate the mask using
results.masks.xyfor contour points and overlay it on the TIFF image. Ensure alignment by maintaining the original image dimensions during processing. For more, refer to the Isolating Segmentation Objects Guide. Let us know if you need further assistance!1
vedhanayagan9626
I used yolo v11n seg model , i got a segmented image as output with bounding boxes in those some of predictions are overlapped like a bounding box on two items as single so i try to remove a rectangle and associated segmentation from an image and add new rectangle by hold and drag functionality its looks likw working but i cant get optimized result. Is there any way to remove and add new bounding boxes after a segmentation result?
- Glenn JocherUltralytics
@vedhanayagan9626 to address overlapping predictions, you can manually refine results by manipulating masks and bounding boxes post-inference. Use the mask and bounding box coordinates from
results[0].masksandresults[0].boxesto remove or modify specific predictions. For new bounding boxes, you might need to create and integrate them into your results structure manually. Refer to the Isolating Segmentation Objects guide for detailed steps. For optimized results, ensure adequate data quality and model tuning.
SerhiiPostupaiev
Hello, can you please explain how the YOLOv8 performs upscaling? For example, my input images are 854x480, YOLOv8 scales them up to 864x512. How does it exactly performs upscaling? Does it use padding or some other approaches?
 Paula DerrengerUltralytics
@SerhiiPostupaiev hello! In YOLOv8, images are scaled up or down to a specific model input size, optimally a square format (like 640x640) or a dimension supported by the model (such as 864x512 in your case). The upscaling for images that do not exactly match the input dimensions typically involves:
- Resizing the image to the closest dimension that maintains the aspect ratio.
- Padding the resized image to reach the required input size, ensuring that the aspect ratio is preserved.
For instance, for an image of 854x480, YOLOv8 may:
- Resize the image to fit the model's width of 864 while maintaining the aspect ratio, which adjusts the height accordingly.
- Pad the height to the nearest model-supported dimension (like 512), adding pixel values (usually zeros) to the top and bottom or sides of the image to reach the required size.
Here’s a rough example in Python using OpenCV for how padding might be handled:
import cv2
import numpy as np

# Example image load
image = cv2.imread('input.jpg')
# Resizing the image
resized_image = cv2.resize(image, (864, keep_aspect_ratio_height))  # Example variable for illustration

# Padding the resized image
top_padding = (512 - resized_image.shape[0]) // 2
bottom_padding = 512 - resized_image.shape[0] - top_padding
padded_image = cv2.copyMakeBorder(resized_image, top_padding, bottom_padding, 0, 0, cv2.BORDER_CONSTANT, value=[0, 0, 0])
This ensures the entire image is used during prediction without distorting its original aspect ratio. 😊
EnricoMendez
Hello, I run this code example but it only display one object's mask, is it posible to join all the objects' masks in a single frame?
- Glenn JocherUltralytics
Hey there! 😊 Absolutely, you can combine all the objects' masks into a single frame. Just modify the section where you're drawing the contours onto the mask. Instead of creating a new binary mask
b_maskfor each object, you initialize one common mask before iterating through the objects and draw every object's contour on this common mask. Here's a quick example to illustrate:# Initialize one common binary mask for all objects b_mask_all = np.zeros(img.shape[:2], np.uint8) for ci, c in enumerate(r): # Your contour extraction remains the same contour = c.masks.xy.pop().astype(np.int32).reshape(-1, 1, 2) # Draw each contour onto the common mask cv2.drawContours(b_mask_all, [contour], -1, (255, 255, 255), cv2.FILLED) # After the loop, you can use `b_mask_all` which contains all objects' masksJust keep in mind, with
b_mask_all, you'll have all the detected objects' masks on one mask. If the objects overlap in your image, their masks will also overlap inb_mask_all. Hope this helps! Let us know if you have more questions. 😊
mariamg03
hi is there a way I can apply the edits on the binary image then revert back to the original with the mask part edited?
- Paula DerrengerUltralytics
Hey there! 👋 Yes, you can certainly make edits on a binary mask and then apply those changes back to the original image, essentially modifying only the parts that the mask covers. Here's a quick outline of how you could achieve this with an example focusing on segmentation tasks:
-
After segmenting your image and obtaining the binary mask (let's say
b_mask), you can perform any edits you like on this mask. For example, inverting the mask, dilating, or eroding. -
To apply the edited mask back to the original image (
orig_img), you would use the mask to isolate the area of interest in the original image and then apply your edits.
Here's a code snippet demonstrating this with a simple inversion edit:
import cv2
import numpy as np

# Assuming 'b_mask' is your binary mask and 'orig_img' is your original image
# Let's say you inverted the binary mask
edited_mask = 255 - b_mask  # Inverting mask

# Convert the single channel binary mask to a 3 channel mask to match the original image
edited_mask_3ch = cv2.cvtColor(edited_mask, cv2.COLOR_GRAY2BGR)

# Apply the edited mask back to the original image
# This line performs bitwise-and operation to only keep parts of the image where the mask is white
edited_image = cv2.bitwise_and(orig_img, edited_mask_3ch)

# At this point, 'edited_image' contains the original image with edits applied to the segmented part
This is a simplified example to show the concept. Depending on the edits you've made to
b_mask, you might need to adjust how you applyedited_maskback toorig_img.Remember, after editing the mask, you can always revert it back to its original form if you've kept a copy before editing, or you can apply the inverse of your edits.
I hope this helps! Let me know if you have more questions. Happy coding! 😊
-
Safiislamian
Hi sir, thanku for your response does load dataset will work or not. As the dataset is in yolo form where we have different folders and subfolders like train having images and labels etc
On Wed, Mar 27, 2024, 7:03 AM Glenn Jocher @.***> wrote:
Hey there! 👋 Glad to see you're interested in applying YOLOv8 for instance segmentation with a dataset from Roboflow. Below is a quick guide to help you get started with applying YOLOv8 for detection and then using masks for the dataset based on class. Step 1: Install Ultralytics YOLO
First, ensure you have Ultralytics installed:
pip install ultralytics
Step 2: Load Your Model
from ultralytics import YOLOmodel = YOLO('yolov8n-seg.pt') # Use yolov8n-seg.pt for segmentation models
Step 3: Predict and Isolate Objects
Now, for predicting and isolating objects based on their classes, you'll dive into the prediction results to access and manipulate the segmentation masks:
results = model.predict(source='path/to/your/dataset')for result in results: for detection in result: class_name = detection.names[detection.boxes.cls.tolist().pop()] # Create a binary mask from detection binary_mask = np.zeros(result.orig_img.shape[:2], np.uint8) contour = detection.masks.xy.pop().astype(np.int32).reshape(-1, 1, 2) cv2.drawContours(binary_mask, [contour], -1, (255, 255, 255), cv2.FILLED) # Example to save or further process the mask
Note: Replace 'path/to/your/dataset' with the actual path to your images. Step 4: Saving or Processing the Masks
You may wish to save each mask based on its class for processing later. You can modify the loop to save each binary mask to a file using cv2.imwrite() method.
cv2.imwrite(f'{class_name}_mask.jpg', binary_mask)
This will save each mask with its respective class name as part of the filename, allowing for easy organization by class.
Hope this helps! 😊 Let us know if you need further assistance or have more questions. Happy coding!
— Reply to this email directly, view it on GitHub https://github.com/orgs/ultralytics/discussions/9334#discussioncomment-8922405, or unsubscribe https://github.com/notifications/unsubscribe-auth/AUP75TG3RFWAL7YRMWDR66DY2ILE5AVCNFSM6AAAAABFJ334B2VHI2DSMVQWIX3LMV43SRDJONRXK43TNFXW4Q3PNVWWK3TUHM4DSMRSGQYDK . You are receiving this because you commented.Message ID: @.*** com>
- Paula DerrengerUltralytics(editado)
Hi there! 😄
Absolutely, loading a dataset structured in YOLO format (with separate folders for train/test images and labels) works well with YOLO26. You can specify the dataset structure in a YAML file and provide this file when initiating training or validation processes. Here's an example
data.yamlfile structure for your dataset:train: /path/to/dataset/train/images # path to images folder val: /path/to/dataset/val/images # path to validation images # Classes nc: 80 # number of classes names: ['class1', 'class2', ...] # class namesAnd here's how you might start training with your dataset:
yolo detect train data=data.yaml model=yolo26n.ptMake sure to replace
/path/to/dataset/train/imagesand/path/to/dataset/val/imageswith the actual paths to your dataset and similarly update thenc(number of classes) andnames(class labels) accordingly.If you have any more questions or need further assistance, feel free to ask. Happy to help! 🚀
There is a dataset on roboflow for instance segmentation, i want to apply first yolov8 and then masks for all the dataset arranged on the basis of their classes. please provide me details and code for that Thank you...
- Glenn JocherUltralytics(editado)
Hey there! 👋 Glad to see you're interested in applying YOLO26 for instance segmentation with a dataset from Roboflow. Below is a quick guide to help you get started with applying YOLO26 for detection and then using masks for the dataset based on class.
Step 1: Install Ultralytics YOLO
First, ensure you have Ultralytics installed:
pip install ultralyticsStep 2: Load Your Model
from ultralytics import YOLO
model = YOLO('yolo26n-seg.pt')  # Use yolo26n-seg.pt for segmentation models
Step 3: Predict and Isolate Objects
Now, for predicting and isolating objects based on their classes, you'll dive into the prediction results to access and manipulate the segmentation masks:
results = model.predict(source='path/to/your/dataset')
for result in results:
    for detection in result:
        class_name = detection.names[detection.boxes.cls.tolist().pop()]
        # Create a binary mask from detection
        binary_mask = np.zeros(result.orig_img.shape[:2], np.uint8)
        contour = detection.masks.xy.pop().astype(np.int32).reshape(-1, 1, 2)
        cv2.drawContours(binary_mask, [contour], -1, (255, 255, 255), cv2.FILLED)
        # Example to save or further process the mask
Note: Replace
'path/to/your/dataset'with the actual path to your images.Step 4: Saving or Processing the Masks
You may wish to save each mask based on its class for processing later. You can modify the loop to save each binary mask to a file using
cv2.imwrite()method.cv2.imwrite(f'{class_name}_mask.jpg', binary_mask)This will save each mask with its respective class name as part of the filename, allowing for easy organization by class.
Hope this helps! 😊 Let us know if you need further assistance or have more questions. Happy coding!