A Guide to Deploying YOLO26 on Amazon SageMaker Endpoints
Deploying advanced computer vision models like Ultralytics' YOLO26 on Amazon SageMaker Endpoints opens up a wide range of possibilities for various machine learning applications. The key to effectively using these models lies in understanding their setup, configuration, and deployment processes. YOLO26 becomes even more powerful when integrated seamlessly with Amazon SageMaker, a robust and scalable machine learning service by AWS.
This guide will take you through the process of deploying YOLO26 PyTorch models on Amazon SageMaker Endpoints step by step. You'll learn the essentials of preparing your AWS environment, configuring the model appropriately, and using tools like AWS CloudFormation and the AWS Cloud Development Kit (CDK) for deployment.
Amazon SageMaker
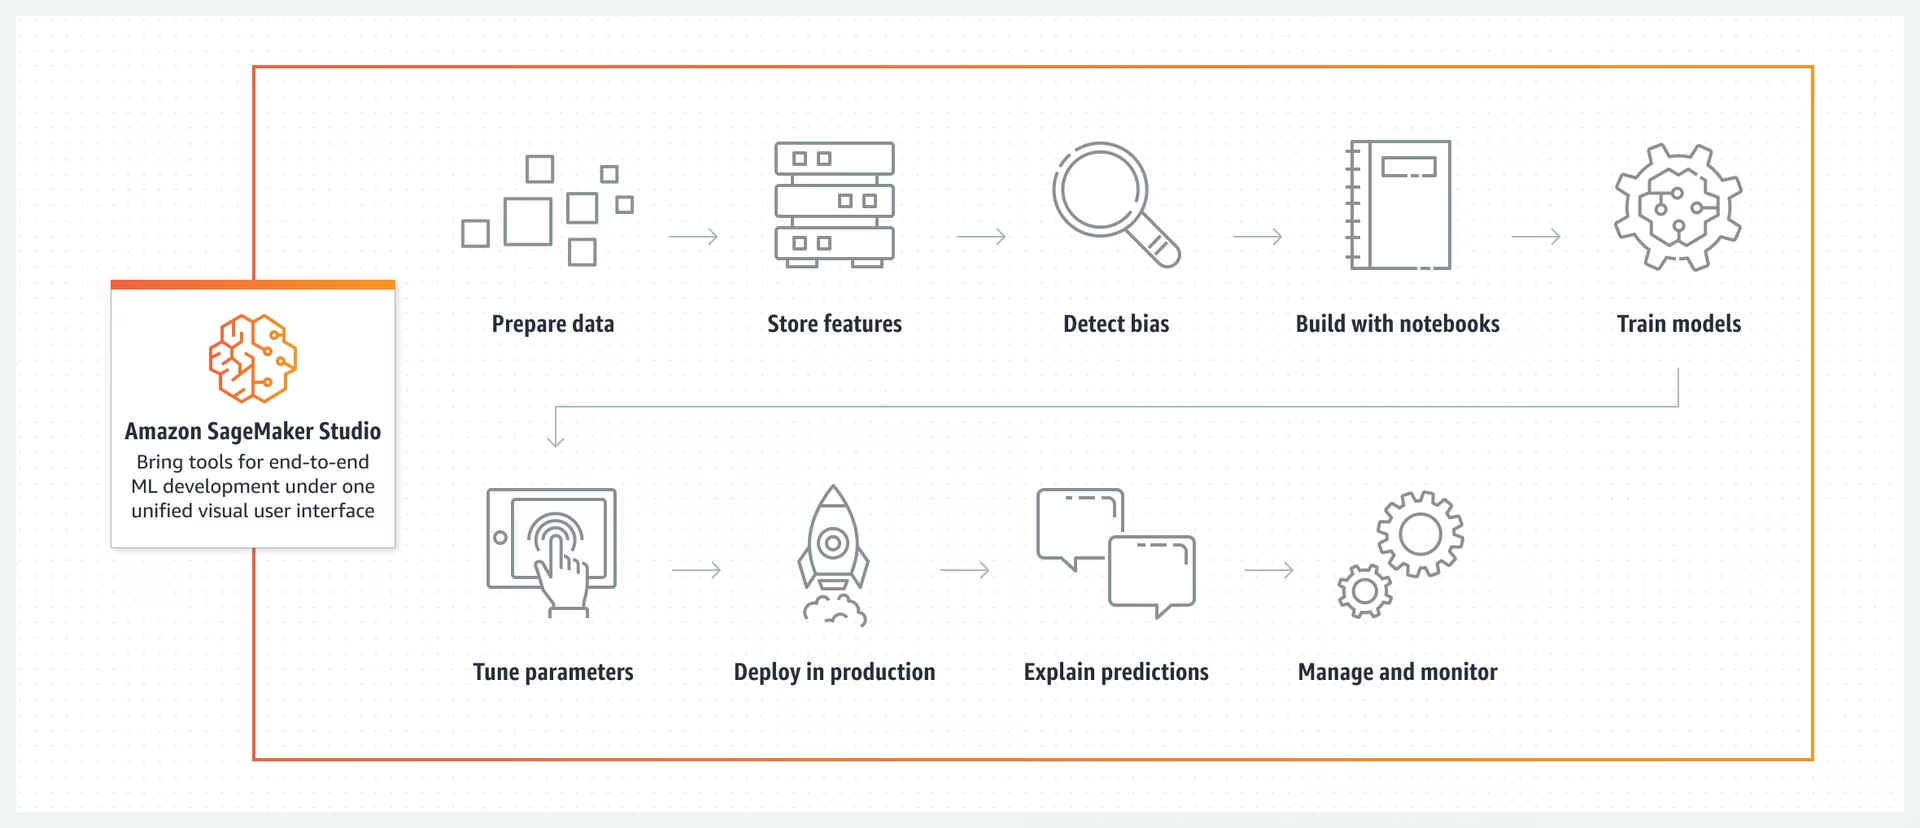
Amazon SageMaker is a machine learning service from Amazon Web Services (AWS) that simplifies the process of building, training, and deploying machine learning models. It provides a broad range of tools for handling various aspects of machine learning workflows. This includes automated features for tuning models, options for training models at scale, and straightforward methods for deploying models into production. SageMaker supports popular machine learning frameworks, offering the flexibility needed for diverse projects. Its features also cover data labeling, workflow management, and performance analysis.
Deploying YOLO26 on Amazon SageMaker Endpoints
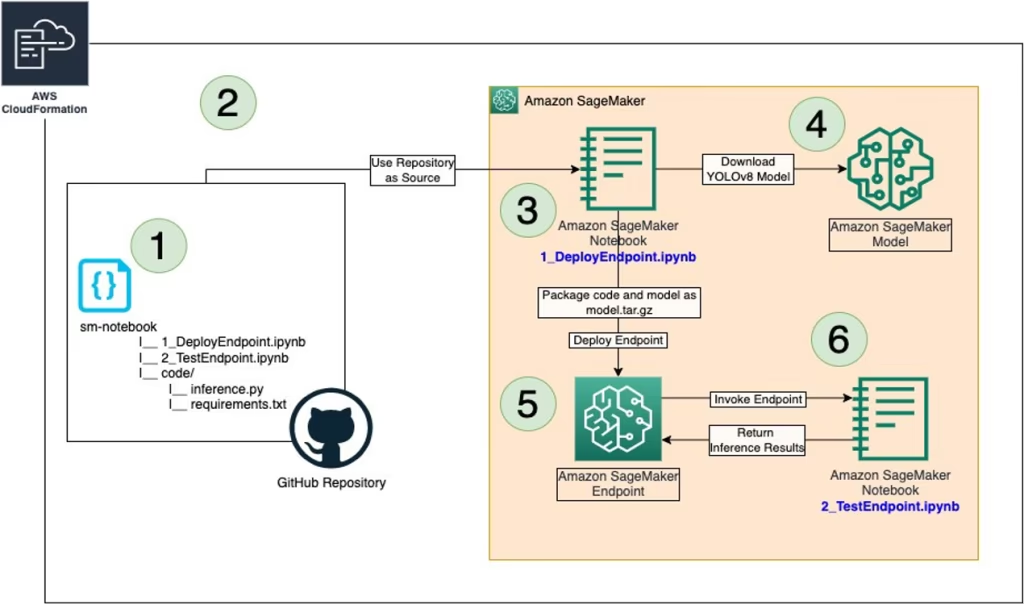
Deploying YOLO26 on Amazon SageMaker lets you use its managed environment for real-time inference and take advantage of features like autoscaling. Take a look at the AWS architecture below.
Step 1: Setup Your AWS Environment
First, ensure you have the following prerequisites in place:
An AWS Account: If you don't already have one, sign up for an AWS account.
Configured IAM Roles: You'll need an IAM role with the necessary permissions for Amazon SageMaker, AWS CloudFormation, and Amazon S3. This role should have policies that allow it to access these services.
AWS CLI: If not already installed, download and install the AWS Command Line Interface (CLI) and configure it with your account details. Follow the AWS CLI instructions for installation.
AWS CDK: If not already installed, install the AWS Cloud Development Kit (CDK), which will be used for scripting the deployment. Follow the AWS CDK instructions for installation.
Adequate Service Quota: Confirm that you have sufficient quotas for two separate resources in Amazon SageMaker: one for
ml.m5.4xlargefor endpoint usage and another forml.m5.4xlargefor notebook instance usage. Each of these requires a minimum of one quota value. If your current quotas are below this requirement, it's important to request an increase for each. You can request a quota increase by following the detailed instructions in the AWS Service Quotas documentation.
Step 2: Clone the YOLO26 SageMaker Repository
The next step is to clone the specific AWS repository that contains the resources for deploying YOLO26 on SageMaker. This repository, hosted on GitHub, includes the necessary CDK scripts and configuration files.
Clone the GitHub Repository: Execute the following command in your terminal to clone the host-yolov8-on-sagemaker-endpoint repository:
git clone https://github.com/aws-samples/host-yolov8-on-sagemaker-endpoint.gitNavigate to the Cloned Directory: Change your directory to the cloned repository:
cd host-yolov8-on-sagemaker-endpoint/yolov8-pytorch-cdk
Step 3: Set Up the CDK Environment
Now that you have the necessary code, set up your environment for deploying with AWS CDK.
Create a Python Virtual Environment: This isolates your Python environment and dependencies. Run:
python3 -m venv .venvActivate the Virtual Environment:
source .venv/bin/activateInstall Dependencies: Install the required Python dependencies for the project:
pip3 install -r requirements.txtUpgrade AWS CDK Library: Ensure you have the latest version of the AWS CDK library:
pip install --upgrade aws-cdk-lib
Step 4: Create the AWS CloudFormation Stack
Synthesize the CDK Application: Generate the AWS CloudFormation template from your CDK code:
cdk synthBootstrap the CDK Application: Prepare your AWS environment for CDK deployment:
cdk bootstrapDeploy the Stack: This will create the necessary AWS resources and deploy your model:
cdk deploy
Step 5: Deploy the YOLO Model
Before diving into the deployment instructions, be sure to check out the range of YOLO26 models offered by Ultralytics. This will help you choose the most appropriate model for your project requirements.
After creating the AWS CloudFormation Stack, the next step is to deploy YOLO26.
Open the Notebook Instance: Go to the AWS Console and navigate to the Amazon SageMaker service. Select "Notebook Instances" from the dashboard, then locate the notebook instance that was created by your CDK deployment script. Open the notebook instance to access the Jupyter environment.
Access and Modify inference.py: After opening the SageMaker notebook instance in Jupyter, locate the inference.py file. Edit the output_fn function in inference.py as shown below and save your changes to the script, ensuring that there are no syntax errors.
import json


def output_fn(prediction_output):
    """Formats model outputs as JSON string, extracting attributes like boxes, masks, keypoints."""
    print("Executing output_fn from inference.py ...")
    infer = {}
    for result in prediction_output:
        if result.boxes is not None:
            infer["boxes"] = result.boxes.numpy().data.tolist()
        if result.masks is not None:
            infer["masks"] = result.masks.numpy().data.tolist()
        if result.keypoints is not None:
            infer["keypoints"] = result.keypoints.numpy().data.tolist()
        if result.obb is not None:
            infer["obb"] = result.obb.numpy().data.tolist()
        if result.probs is not None:
            infer["probs"] = result.probs.numpy().data.tolist()
    return json.dumps(infer)
Deploy the Endpoint Using 1_DeployEndpoint.ipynb: In the Jupyter environment, open the 1_DeployEndpoint.ipynb notebook located in the sm-notebook directory. Follow the instructions in the notebook and run the cells to download the YOLO26 model, package it with the updated inference code, and upload it to an Amazon S3 bucket. The notebook will guide you through creating and deploying a SageMaker endpoint for the YOLO26 model.
Step 6: Testing Your Deployment
Now that your YOLO26 model is deployed, it's important to test its performance and functionality.
Open the Test Notebook: In the same Jupyter environment, locate and open the 2_TestEndpoint.ipynb notebook, also in the sm-notebook directory.
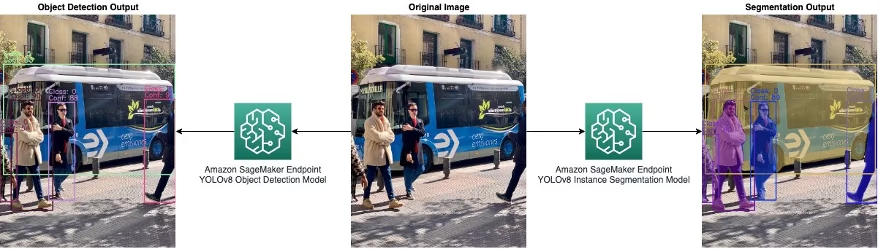
Run the Test Notebook: Follow the instructions within the notebook to test the deployed SageMaker endpoint. This includes sending an image to the endpoint and running inferences. Then, you'll plot the output to visualize the model's performance and accuracy, as shown below.
- Clean-Up Resources: The test notebook will also guide you through the process of cleaning up the endpoint and the hosted model. This is an important step to manage costs and resources effectively, especially if you do not plan to use the deployed model immediately.
Step 7: Monitoring and Management
After testing, continuous monitoring and management of your deployed model are essential.
Monitor with Amazon CloudWatch: Regularly check the performance and health of your SageMaker endpoint using Amazon CloudWatch.
Manage the Endpoint: Use the SageMaker console for ongoing management of the endpoint. This includes scaling, updating, or redeploying the model as required.
By completing these steps, you will have successfully deployed and tested a YOLO26 model on Amazon SageMaker Endpoints. This process not only equips you with practical experience in using AWS services for machine learning deployment but also lays the foundation for deploying other advanced models in the future.
Summary
This guide took you step by step through deploying YOLO26 on Amazon SageMaker Endpoints using AWS CloudFormation and the AWS Cloud Development Kit (CDK). The process includes cloning the necessary GitHub repository, setting up the CDK environment, deploying the model using AWS services, and testing its performance on SageMaker.
For more technical details, refer to this article on the AWS Machine Learning Blog. You can also check out the official Amazon SageMaker Documentation for more insights into various features and functionalities.
Are you interested in learning more about different YOLO26 integrations? Visit the Ultralytics integrations guide page to discover additional tools and capabilities that can enhance your machine-learning projects.
FAQ
How do I deploy the Ultralytics YOLO26 model on Amazon SageMaker Endpoints?
To deploy the Ultralytics YOLO26 model on Amazon SageMaker Endpoints, follow these steps:
- Set Up Your AWS Environment: Ensure you have an AWS Account, IAM roles with necessary permissions, and the AWS CLI configured. Install AWS CDK if not already done (refer to the AWS CDK instructions).
- Clone the YOLO26 SageMaker Repository:
git clone https://github.com/aws-samples/host-yolov8-on-sagemaker-endpoint.git cd host-yolov8-on-sagemaker-endpoint/yolov8-pytorch-cdk - Set Up the CDK Environment: Create a Python virtual environment, activate it, install dependencies, and upgrade AWS CDK library.
python3 -m venv .venv source .venv/bin/activate pip3 install -r requirements.txt pip install --upgrade aws-cdk-lib - Deploy using AWS CDK: Synthesize and deploy the CloudFormation stack, bootstrap the environment.
cdk synth
cdk bootstrap
cdk deploy
For further details, review the documentation section.
What are the prerequisites for deploying YOLO26 on Amazon SageMaker?
To deploy YOLO26 on Amazon SageMaker, ensure you have the following prerequisites:
- AWS Account: Active AWS account (sign up here).
- IAM Roles: Configured IAM roles with permissions for SageMaker, CloudFormation, and Amazon S3.
- AWS CLI: Installed and configured AWS Command Line Interface (AWS CLI installation guide).
- AWS CDK: Installed AWS Cloud Development Kit (CDK setup guide).
- Service Quotas: Sufficient quotas for
ml.m5.4xlargeinstances for both endpoint and notebook usage (request a quota increase).
For detailed setup, refer to this section.
Why should I use Ultralytics YOLO26 on Amazon SageMaker?
Using Ultralytics YOLO26 on Amazon SageMaker offers several advantages:
- Scalability and Management: SageMaker provides a managed environment with features like autoscaling, which helps in real-time inference needs.
- Integration with AWS Services: Seamlessly integrate with other AWS services, such as S3 for data storage, CloudFormation for infrastructure as code, and CloudWatch for monitoring.
- Ease of Deployment: Simplified setup using AWS CDK scripts and streamlined deployment processes.
- Performance: Leverage Amazon SageMaker's high-performance infrastructure for running large scale inference tasks efficiently.
Explore more about the advantages of using SageMaker in the introduction section.
Can I customize the inference logic for YOLO26 on Amazon SageMaker?
Yes, you can customize the inference logic for YOLO26 on Amazon SageMaker:
Modify
inference.py: Locate and customize theoutput_fnfunction in theinference.pyfile to tailor output formats.import json def output_fn(prediction_output): """Formats model outputs as JSON string, extracting attributes like boxes, masks, keypoints.""" infer = {} for result in prediction_output: if result.boxes is not None: infer["boxes"] = result.boxes.numpy().data.tolist() # Add more processing logic if necessary return json.dumps(infer)Deploy Updated Model: Ensure you redeploy the model using Jupyter notebooks provided (
1_DeployEndpoint.ipynb) to include these changes.
Refer to the detailed steps for deploying the modified model.
How can I test the deployed YOLO26 model on Amazon SageMaker?
To test the deployed YOLO26 model on Amazon SageMaker:
- Open the Test Notebook: Locate the
2_TestEndpoint.ipynbnotebook in the SageMaker Jupyter environment. - Run the Notebook: Follow the notebook's instructions to send an image to the endpoint, perform inference, and display results.
- Visualize Results: Use built-in plotting functionalities to visualize performance metrics, such as bounding boxes around detected objects.
For comprehensive testing instructions, visit the testing section.


