Link to this sectionVSCodeターミナルでYOLOの推論結果を表示する方法#
libsixelウェブサイトの画像。
Link to this section目的#
SSHでリモートマシンに接続している場合、画像結果を通常通りに可視化することは不可能か、GUIを持つローカルデバイスにデータを転送する必要があります。VSCodeの統合ターミナルは画像を直接レンダリングできるため、ファイルをラップトップにコピーすることなく、推論を実行したその場所で推論結果を確認できます。このガイドでは、セットアップの有効化、コードの組み込み手順を説明し、よくある質問に回答します。
Only compatible with Linux and macOS. Check the VSCode repository, check Issue status, or documentation for updates about Windows support to view images in terminal with sixel.
統合ターミナルを使用して画像を表示するためのVSCode互換プロトコルには、sixelとiTermがあります。このガイドでは sixel プロトコルの使用方法を説明します。
Link to this sectionプロセス#
-
まず、VSCodeで
terminal.integrated.enableImagesおよびterminal.integrated.gpuAcceleration設定を有効にする必要があります。"terminal.integrated.gpuAcceleration": "auto" # "auto" is default, can also use "on" "terminal.integrated.enableImages": true
-
Install the
python-sixellibrary in your virtual environment. This is a fork of thePySixellibrary, which is no longer maintained.pip install sixel -
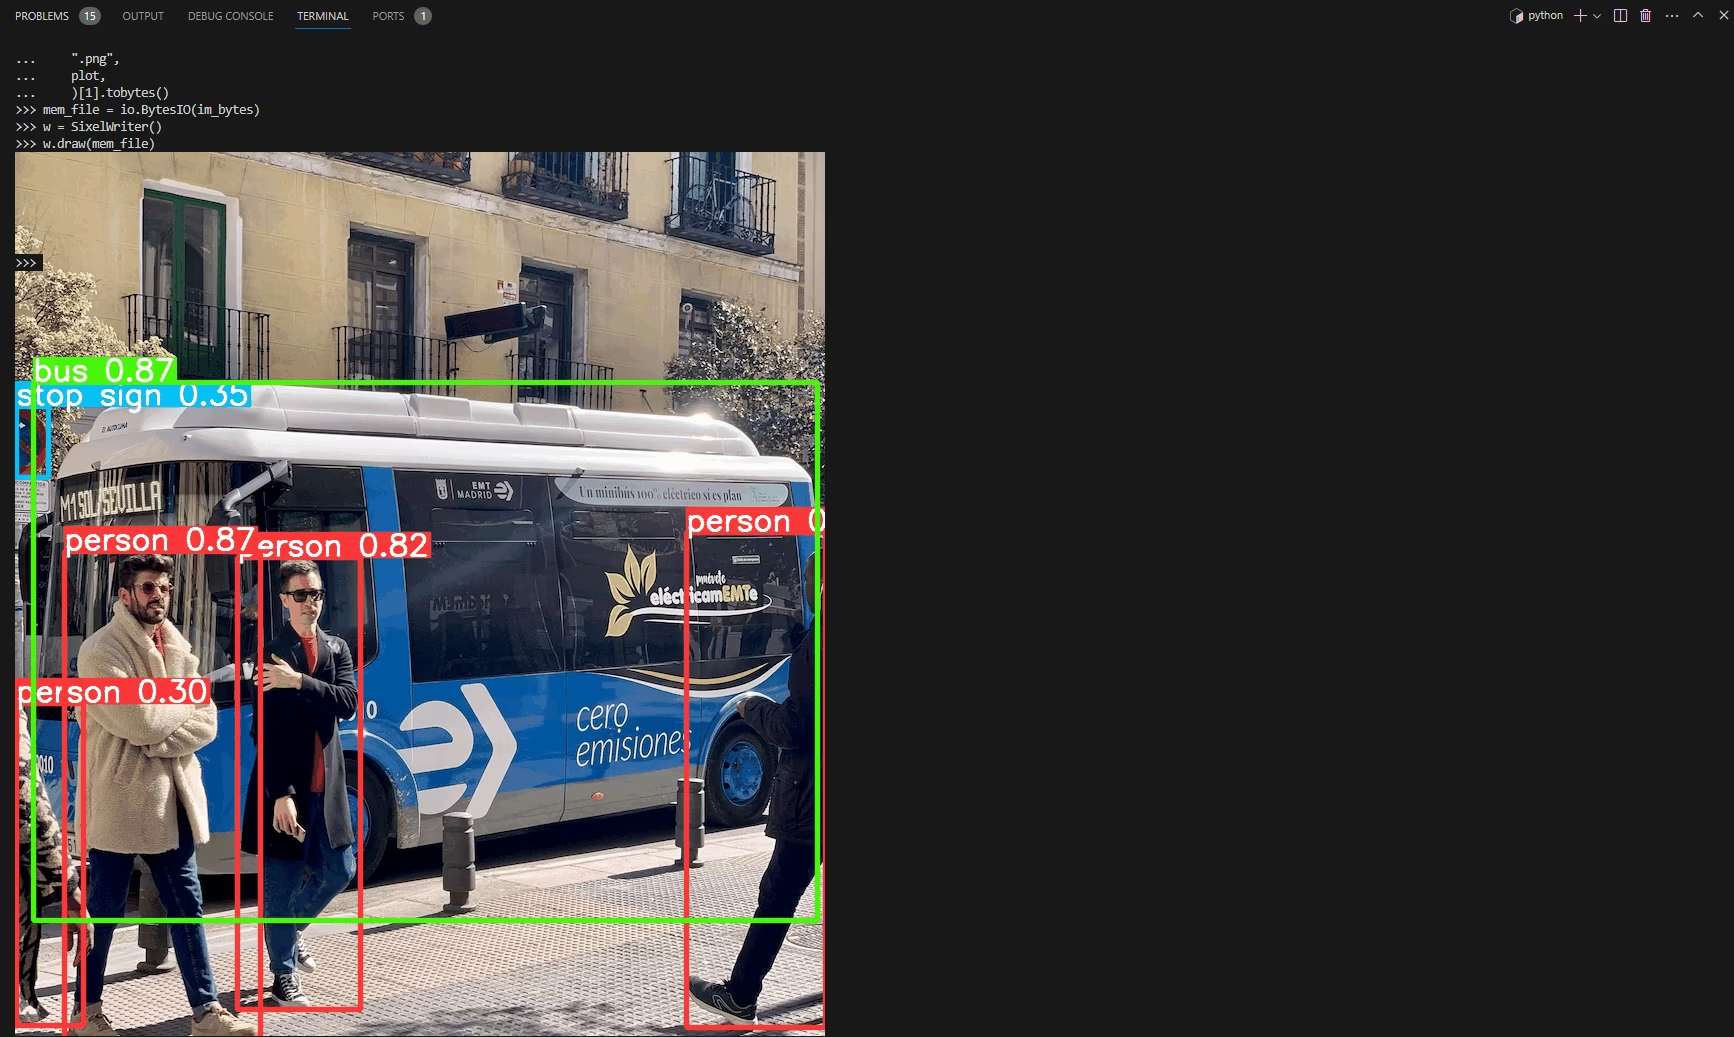
モデルをロードして推論を実行し、結果をプロットして変数に格納します。推論引数および結果の取り扱いの詳細については、予測モードページを参照してください。
from ultralytics import YOLO # Load a model model = YOLO("yolo26n.pt") # Run inference on an image results = model.predict(source="ultralytics/assets/bus.jpg") # Plot inference results plot = results[0].plot() # (1)!- 使用可能な引数については、プロットメソッドのパラメータを参照してください。
-
次に、OpenCVを使用して
np.ndarrayをbytesデータに変換します。その後、io.BytesIOを使用して「ファイルのような」オブジェクトを作成します。import io import cv2 # Results image as bytes im_bytes = cv2.imencode( ".png", # (1)! plot, )[1].tobytes() # (2)! # Image bytes as a file-like object mem_file = io.BytesIO(im_bytes)- 他の画像拡張子を使用することも可能です。
- 返されたインデックス
1のオブジェクトのみが必要です。
-
SixelWriterインスタンスを作成し、.draw()メソッドを使用してターミナルに画像を描画します。from sixel import SixelWriter # Create sixel writer object w = SixelWriter() # Draw the sixel image in the terminal w.draw(mem_file)
Link to this section推論結果の例#
この例を使用した動画やアニメーションGIFフレームはテストされていません。ご自身の責任でお試しください。
Link to this section完全なコード例#
import io

import cv2
from sixel import SixelWriter

from ultralytics import YOLO

# Load a model
model = YOLO("yolo26n.pt")

# Run inference on an image
results = model.predict(source="ultralytics/assets/bus.jpg")

# Plot inference results
plot = results[0].plot()  # (3)!

# Results image as bytes
im_bytes = cv2.imencode(
    ".png",  # (1)!
    plot,
)[1].tobytes()  # (2)!

mem_file = io.BytesIO(im_bytes)
w = SixelWriter()
w.draw(mem_file)- 他の画像拡張子を使用することも可能です。
- 返されたインデックス
1のオブジェクトのみが必要です。 - 使用可能な引数については、プロットメソッドのパラメータを参照してください。
ターミナル上の画像の表示を「消去」するために clear コマンドを使用する必要がある場合があります。
Link to this sectionよくある質問 (FAQ)#
Link to this sectionmacOSまたはLinux上のVSCodeターミナルでYOLOの推論結果を表示するにはどうすればよいですか?#
macOSまたはLinux上のVSCodeターミナルでYOLOの推論結果を表示するには、次の手順に従ってください。
-
必要なVSCode設定を有効にします:
"terminal.integrated.enableImages": true "terminal.integrated.gpuAcceleration": "auto" -
sixelライブラリをインストールします:
pip install sixel -
YOLOモデルをロードして推論を実行します:
from ultralytics import YOLO model = YOLO("yolo26n.pt") results = model.predict(source="ultralytics/assets/bus.jpg") plot = results[0].plot() -
推論結果の画像をバイトデータに変換し、ターミナルに表示します:
import io

import cv2
from sixel import SixelWriter

im_bytes = cv2.imencode(".png", plot)[1].tobytes()
mem_file = io.BytesIO(im_bytes)
SixelWriter().draw(mem_file)
詳細については、予測モードページをご覧ください。
Link to this sectionなぜsixelプロトコルはLinuxとmacOSでしか動作しないのですか?#
sixelプロトコルは、これらのプラットフォームがsixelグラフィックスと互換性のあるネイティブなターミナル機能を持っているため、現在LinuxとmacOSでのみサポートされています。sixelを使用したWindowsのターミナルグラフィックスサポートはまだ開発中です。Windowsの互換性に関する最新情報については、VSCodeのIssueステータスとドキュメントを確認してください。
Link to this sectionVSCodeターミナルで画像を表示する際に問題が発生した場合はどうすればよいですか?#
何も表示されない場合は、順番に以下のチェックを行ってください:
- Confirm both
terminal.integrated.enableImagesandterminal.integrated.gpuAccelerationare enabled, as shown in the Process section, then restart the integrated terminal so the settings take effect. - スクリプトが実行されている仮想環境に
sixelがインストールされていることを確認します (pip install sixel)。 - Make sure
plotis a validnp.ndarraybefore encoding it, sincecv2.imencoderaises an error if the image is empty or not a valid array. See the plot method parameters for the valuesresults[0].plot()accepts.
問題が解決しない場合は、ターミナルの画像サポート状況についてVSCodeリポジトリに相談してください。
Link to this sectionYOLOはsixelを使用してターミナルに動画の推論結果を表示できますか?#
ターミナルでsixelを使用して動画の推論結果やアニメーションGIFフレームを表示することは、現在未検証でありサポートされていない可能性があります。静止画像から開始して互換性を確認することをお勧めします。動画の結果を表示する場合は、パフォーマンスの制約を考慮し、自己責任で行ってください。推論結果のプロットに関する詳細については、予測モードページをご覧ください。
Link to this sectionpython-sixel ライブラリの問題をトラブルシューティングするにはどうすればよいですか?#
The sixel package is a fork of the unmaintained PySixel library and is a thin Python wrapper over Pillow (PIL). If import sixel fails or SixelWriter().draw() raises an error, confirm the package installed into your active virtual environment, ensure Pillow is available, and check the python-sixel GitHub repository for platform-specific notes. For more on generating the image you pass to draw(), see the predict mode documentation.