Amazon SageMaker EndpointsへのYOLO26デプロイガイド
Amazon SageMaker Endpointsにコンピュータービジョンの高度なモデル、例えばUltralyticsのYOLO26をデプロイすることは、様々な機械学習アプリケーションに幅広い可能性をもたらします。これらのモデルを効果的に使用するための鍵は、そのセットアップ、構成、およびデプロイプロセスを理解することにあります。YOLO26は、AWSによる堅牢でスケーラブルな機械学習サービスであるAmazon SageMakerとシームレスに統合されることで、さらに強力になります。
このガイドでは、YOLO26 PyTorchモデルをAmazon SageMaker Endpointsに段階的にデプロイするプロセスを説明します。AWS環境の準備、モデルの適切な構成、AWS CloudFormationやAWS Cloud Development Kit (CDK) などのツールを使用したデプロイの基本を学びます。
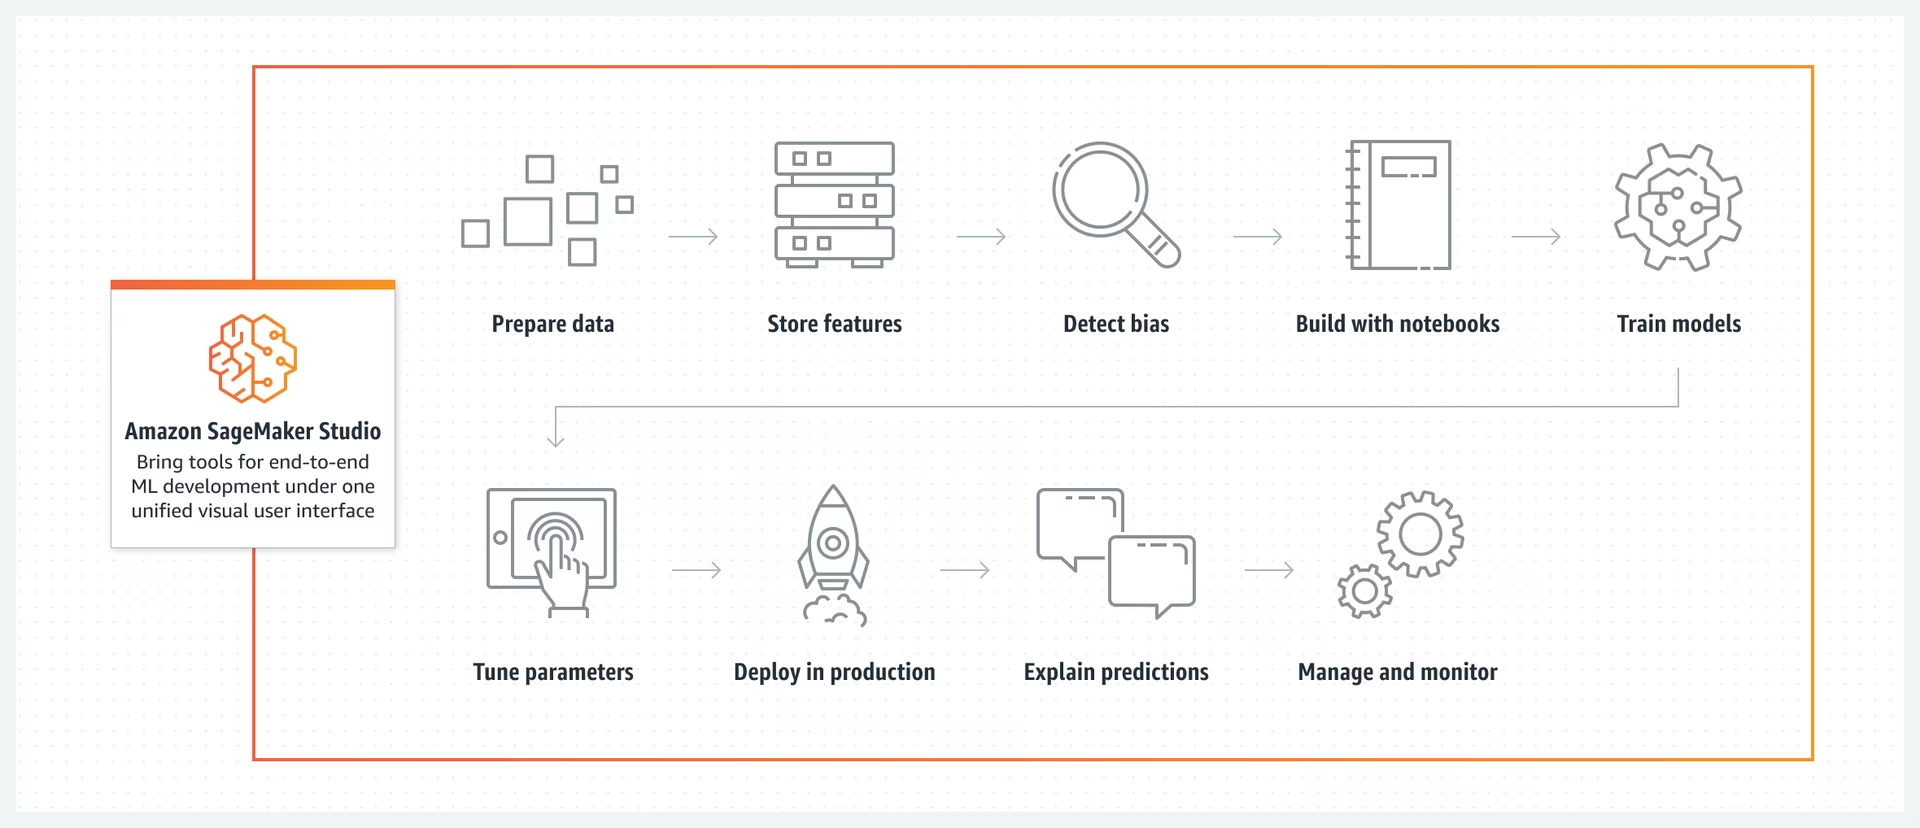
Amazon SageMaker

Amazon SageMakerは、機械学習モデルの構築、トレーニング、デプロイのプロセスを簡素化する、Amazon Web Services(AWS)の機械学習サービスです。機械学習ワークフローのさまざまな側面を処理するための幅広いツールを提供します。これには、モデルを調整するための自動化された機能、大規模なモデルをトレーニングするためのオプション、およびモデルを本番環境にデプロイするための簡単な方法が含まれます。SageMakerは、一般的な機械学習フレームワークをサポートし、多様なプロジェクトに必要な柔軟性を提供します。その機能は、データラベリング、ワークフロー管理、およびパフォーマンス分析もカバーしています。
Amazon SageMaker EndpointsへのYOLO26デプロイ
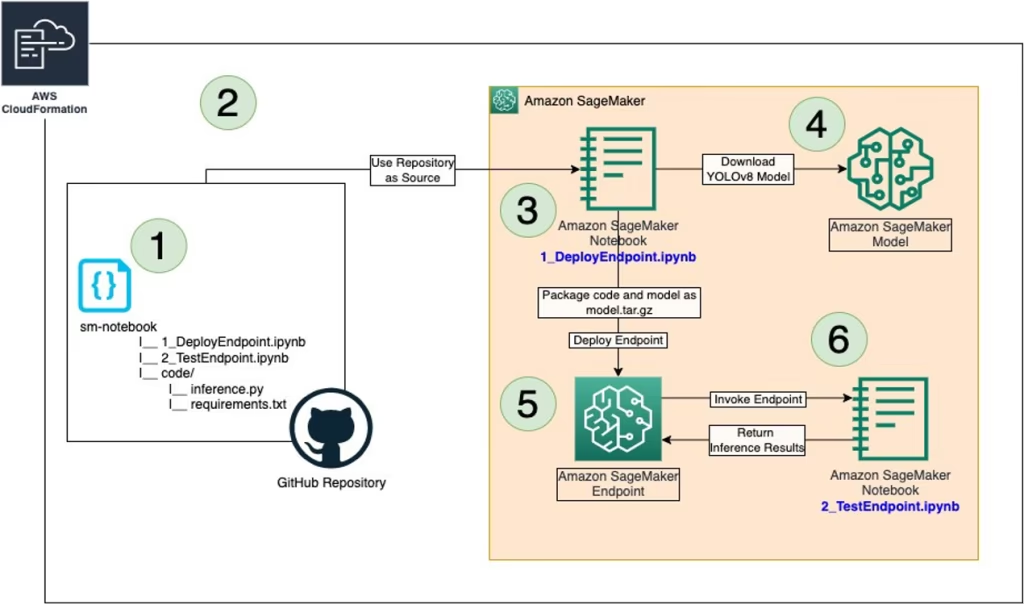
Amazon SageMakerにYOLO26をデプロイすることで、リアルタイム推論のためのマネージド環境を利用し、オートスケーリングなどの機能を活用できます。以下のAWSアーキテクチャをご覧ください。

ステップ1:AWS環境をセットアップする
まず、以下の前提条件が整っていることを確認してください。
AWSアカウント:まだお持ちでない場合は、AWSアカウントにサインアップしてください。
構成されたIAMロール:Amazon SageMaker、AWS CloudFormation、およびAmazon S3に必要な権限を持つIAMロールが必要です。このロールには、これらのサービスへのアクセスを許可するポリシーが必要です。
AWS CLI:まだインストールされていない場合は、AWS Command Line Interface(CLI)をダウンロードしてインストールし、アカウントの詳細を設定します。インストールについては、AWS CLIの手順に従ってください。
AWS CDK:まだインストールされていない場合は、デプロイメントのスクリプトに使用されるAWS Cloud Development Kit(CDK)をインストールします。インストールについては、AWS CDKの手順に従ってください。
適切なサービスクォータ:Amazon SageMakerの2つの別々のリソースに対して十分なクォータがあることを確認してください。1つは
ml.m5.4xlargeエンドポイントの使用例と、ml.m5.4xlargeノートブックインスタンスの使用について。これらのそれぞれには、少なくとも1つのクォータ値が必要です。現在のクォータがこの要件を下回っている場合は、それぞれについて増加をリクエストすることが重要です。クォータの引き上げは、 AWS Service Quotasのドキュメント.
ステップ2:YOLO26 SageMakerリポジトリをクローンする
次のステップは、SageMakerにYOLO26をデプロイするためのリソースを含む特定のAWSリポジトリをクローンすることです。GitHubでホストされているこのリポジトリには、必要なCDKスクリプトと構成ファイルが含まれています。
GitHubリポジトリをクローンします: ターミナルで次のコマンドを実行して、host-yolov8-on-sagemaker-endpointリポジトリをクローンします:
git clone https://github.com/aws-samples/host-yolov8-on-sagemaker-endpoint.gitクローンされたディレクトリへの移動:ディレクトリをクローンされたリポジトリに変更します:
cd host-yolov8-on-sagemaker-endpoint/yolov8-pytorch-cdk
ステップ 3: CDK 環境のセットアップ
必要なコードが揃ったので、AWS CDKでデプロイするための環境をセットアップします。
python仮想環境の作成:これにより、python環境と依存関係が分離されます。以下を実行します:
python3 -m venv .venv仮想環境をアクティブにする:
source .venv/bin/activate依存関係のインストール:プロジェクトに必要なpythonの依存関係をインストールします。
pip3 install -r requirements.txtAWS CDKライブラリのアップグレード:最新バージョンのAWS CDKライブラリがあることを確認してください:
pip install --upgrade aws-cdk-lib
ステップ 4: AWS CloudFormation スタックの作成
CDK アプリケーションの合成: CDK コードから AWS CloudFormation テンプレートを生成します:
cdk synthCDKアプリケーションのブートストラップ:CDKデプロイメントのためにAWS環境を準備します:
cdk bootstrapスタックのデプロイ:これにより、必要なAWSリソースが作成され、モデルがデプロイされます。
cdk deploy
ステップ 5: YOLO モデルのデプロイ
デプロイ手順に進む前に、Ultralyticsが提供するYOLO26モデルの範囲を確認してください。これにより、プロジェクト要件に最も適したモデルを選択するのに役立ちます。
AWS CloudFormationスタックを作成した後、次のステップはYOLO26をデプロイすることです。
ノートブックインスタンスを開く: AWSコンソールにアクセスし、Amazon SageMakerサービスに移動します。ダッシュボードから「ノートブックインスタンス」を選択し、CDKデプロイメントスクリプトによって作成されたノートブックインスタンスを見つけます。ノートブックインスタンスを開いて、Jupyter環境にアクセスします。
inference.pyへのアクセスと変更:JupyterでSageMakerノートブックインスタンスを開いた後、inference.pyファイルを見つけます。以下に示すようにinference.pyのoutput_fn関数を編集し、構文エラーがないことを確認して、スクリプトへの変更を保存します。
import json


def output_fn(prediction_output):
    """Formats model outputs as JSON string, extracting attributes like boxes, masks, keypoints."""
    print("Executing output_fn from inference.py ...")
    infer = {}
    for result in prediction_output:
        if result.boxes is not None:
            infer["boxes"] = result.boxes.numpy().data.tolist()
        if result.masks is not None:
            infer["masks"] = result.masks.numpy().data.tolist()
        if result.keypoints is not None:
            infer["keypoints"] = result.keypoints.numpy().data.tolist()
        if result.obb is not None:
            infer["obb"] = result.obb.numpy().data.tolist()
        if result.probs is not None:
            infer["probs"] = result.probs.numpy().data.tolist()
    return json.dumps(infer)
1_DeployEndpoint.ipynbを使用してエンドポイントをデプロイする:Jupyter環境で、sm-notebookディレクトリにある1_DeployEndpoint.ipynbノートブックを開きます。ノートブックの指示に従ってセルを実行し、YOLO26モデルをダウンロードし、更新された推論コードでパッケージ化し、Amazon S3バケットにアップロードします。このノートブックは、YOLO26モデル用のSageMakerエンドポイントの作成とデプロイをガイドします。
ステップ 6: デプロイメントのテスト
YOLO26モデルがデプロイされたので、その性能と機能をテストすることが重要です。
テストノートブックを開く: 同じJupyter環境で、sm-notebookディレクトリにある2_TestEndpoint.ipynbノートブックを見つけて開きます。
テストノートブックの実行: ノートブック内の指示に従って、デプロイされた SageMaker エンドポイントをテストします。これには、エンドポイントへの画像の送信と推論の実行が含まれます。次に、以下に示すように、モデルのパフォーマンスと精度を視覚化するために、出力をプロットします。

- リソースのクリーンアップ:テストノートブックでは、エンドポイントとホストされているモデルをクリーンアップするプロセスについても説明します。これは、特にデプロイされたモデルをすぐに使用する予定がない場合に、コストとリソースを効果的に管理するための重要なステップです。
ステップ 7: 監視と管理
テスト後、デプロイされたモデルの継続的な監視と管理が不可欠です。
Amazon CloudWatchで監視する:Amazon CloudWatchを使用して、SageMakerエンドポイントのパフォーマンスとヘルスを定期的に確認します。
エンドポイントの管理:SageMakerコンソールを使用して、エンドポイントの継続的な管理を行います。これには、必要に応じたモデルのスケーリング、更新、または再デプロイが含まれます。
これらの手順を完了することで、Amazon SageMaker エンドポイントにYOLO26モデルを正常にデプロイし、テストしたことになります。このプロセスは、機械学習デプロイメントのためのAWSサービス使用における実践的な経験を積むだけでなく、将来的に他の高度なモデルをデプロイするための基盤を築きます。
概要
このガイドでは、AWS CloudFormationとAWS Cloud Development Kit (CDK) を使用して、Amazon SageMaker エンドポイントにYOLO26をデプロイする手順を段階的に説明しました。このプロセスには、必要なGitHubリポジトリのクローン作成、CDK環境のセットアップ、AWSサービスを使用したモデルのデプロイ、およびSageMakerでの性能テストが含まれます。
より技術的な詳細については、AWS Machine Learning Blogのこの記事を参照してください。さまざまな機能に関するより深い洞察については、公式のAmazon SageMakerドキュメントもご確認ください。
さまざまなYOLO26統合についてもっと知りたいですか? Ultralytics統合ガイドページにアクセスして、機械学習プロジェクトを強化できる追加のツールと機能を発見してください。
よくある質問
Amazon SageMaker EndpointsにUltralytics YOLO26モデルをデプロイするにはどうすればよいですか?
Ultralytics YOLO26モデルをAmazon SageMaker エンドポイントにデプロイするには、以下の手順に従ってください。
- AWS 環境をセットアップ: AWS アカウント、必要な権限を持つ IAM ロール、および AWS CLI が構成されていることを確認します。AWS CDK がまだインストールされていない場合はインストールします(AWS CDK の手順を参照)。
- YOLO26 SageMakerリポジトリをクローンする:
git clone https://github.com/aws-samples/host-yolov8-on-sagemaker-endpoint.git cd host-yolov8-on-sagemaker-endpoint/yolov8-pytorch-cdk - CDK環境のセットアップ: Pythonの仮想環境を作成してアクティブにし、依存関係をインストールして、AWS CDKライブラリをアップグレードします。
python3 -m venv .venv source .venv/bin/activate pip3 install -r requirements.txt pip install --upgrade aws-cdk-lib - AWS CDKを使用したデプロイ:CloudFormationスタックを合成およびデプロイし、環境をブートストラップします。
cdk synth
cdk bootstrap
cdk deploy
詳細については、ドキュメントのセクションをご確認ください。
Amazon SageMakerにYOLO26をデプロイするための前提条件は何ですか?
Amazon SageMakerにYOLO26をデプロイするには、以下の前提条件を満たしていることを確認してください。
- AWSアカウント: 有効なAWSアカウント(こちらからサインアップ)。
- IAMロール: SageMaker、CloudFormation、およびAmazon S3の権限を持つように構成されたIAMロール。
- AWS CLI: インストールおよび設定済みのAWS Command Line Interface(AWS CLIインストールガイド)。
- AWS CDK: インストール済みのAWS Cloud Development Kit(CDKセットアップガイド)。
- サービスクォータ:十分なクォータ
ml.m5.4xlargeエンドポイントとノートブックの両方の使用例(クォータ増加をリクエスト)。
詳細な設定については、こちらのセクションを参照してください。
なぜAmazon SageMakerでUltralytics YOLO26を使用すべきなのですか?
Amazon SageMakerでUltralytics YOLO26を使用することには、いくつかの利点があります。
- スケーラビリティと管理: SageMakerは、自動スケーリングなどの機能を備えたマネージド環境を提供し、リアルタイムの推論ニーズに対応します。
- AWSサービスとの統合:S3(データストレージ)、CloudFormation(Infrastructure as Code)、CloudWatch(モニタリング)など、他のAWSサービスとシームレスに統合できます。
- デプロイの容易さ: AWS CDKスクリプトを使用した簡素化されたセットアップと、合理化されたデプロイプロセス。
- パフォーマンス: 大規模な推論タスクを効率的に実行するために、Amazon SageMakerの高性能インフラストラクチャを活用します。
概要セクションで、SageMakerを使用する利点についてさらに詳しく見ていきましょう。
Amazon SageMakerでYOLO26の推論ロジックをカスタマイズできますか?
はい、Amazon SageMakerでYOLO26の推論ロジックをカスタマイズできます。
変更
inference.py: を特定してカスタマイズoutput_fnの機能:inference.py出力形式を調整するためのファイル。import json def output_fn(prediction_output): """Formats model outputs as JSON string, extracting attributes like boxes, masks, keypoints.""" infer = {} for result in prediction_output: if result.boxes is not None: infer["boxes"] = result.boxes.numpy().data.tolist() # Add more processing logic if necessary return json.dumps(infer)更新されたモデルのデプロイ: 提供されているJupyter Notebook()を使用して、モデルを再デプロイしてください
1_DeployEndpoint.ipynb)を含めるようにしてください。
変更したモデルのデプロイに関する詳細な手順を参照してください。
Amazon SageMakerにデプロイされたYOLO26モデルをテストするにはどうすればよいですか?
Amazon SageMakerでデプロイされたYOLO26モデルをテストするには:
- テストノートブックを開く: を特定
2_TestEndpoint.ipynbSageMaker Jupyter環境のnotebook。 - ノートブックの実行: ノートブックの指示に従って、エンドポイントに画像を送信し、推論を実行して、結果を表示します。
- 結果の可視化: 組み込みのプロット機能を使用して、検出されたオブジェクトの周囲のバウンディングボックスなど、パフォーマンス指標を可視化します。
包括的なテスト手順については、テストセクションをご覧ください。