
모바일 세그먼트 애니씽(MobileSAM)
MobileSAM은 모바일 및 엣지 디바이스를 위해 설계된 작고 효율적인 이미지 분할 모델입니다. 제한된 연산 성능을 갖춘 환경에서도 Meta의 세그먼트 애니씽 모델(SAM을 사용할 수 있도록 하며, 원래 SAM 파이프라인과의 호환성을 유지하면서 GPU에서 약 12ms 만에 이미지를 분할합니다. 크기가 작아 실시간 애플리케이션과 경량 배포에 적합합니다.
시청: Ultralytics로 MobileSAM 추론 실행하기 | 단계별 가이드
MobileSAM은 Grounding-SAM, AnyLabeling, Segment Anything in 3D 등 다양한 프로젝트에 채택되었습니다.
MobileSAM은 10만 개 이미지로 구성된 데이터셋(원본 SA-1B 이미지의 1%)을 사용해 단일 GPU에서 하루도 안 되는 시간 동안 학습되었습니다.
사용 가능한 모델, 지원 작업 및 작동 모드#
아래 표에는 사용 가능한 MobileSAM 모델, 사전 학습된 가중치, 지원 작업 및 학습, 검증, 추론, 내보내기와 같은 다양한 작동 모드와의 호환성이 나와 있습니다. 지원되는 모드는 ✅로, 지원되지 않는 모드는 ❌로 표시됩니다.
| 모델 유형 | 사전 학습 가중치 | 지원 작업 | 학습 | 검증 | 추론 | 내보내기 |
|---|---|---|---|---|---|---|
| MobileSAM | mobile_sam.pt | 인스턴스 분할 | ❌ | ❌ | ✅ | ❌ |
MobileSAM과 YOLO 비교#
다음 비교에서는 Meta의 SAM 변형 모델, MobileSAM 및 YOLO26을 포함한 Ultralytics 분할 모델 간의 차이를 살펴봅니다:
| 모델 | 크기 (MB) | 매개변수 (M) | 속도(CPU) (ms/im) |
|---|---|---|---|
| Meta SAM-b | 375 | 93.7 | 41703 |
| Meta SAM2-b | 162 | 80.8 | 28867 |
| Meta SAM2-t | 78.1 | 38.9 | 23430 |
| MobileSAM | 40.7 | 10.1 | 23802 |
| YOLOv8 백본을 사용하는 FastSAM-s | 23.9 | 11.8 | 58.0 |
| Ultralytics YOLOv8n-seg | 7.1 (11.0배 더 작음) | 3.4 (11.4배 더 적음) | 24.8 (945배 더 빠름) |
| Ultralytics YOLO11n-seg | 6.2 (12.6배 더 작음) | 2.9 (13.4배 더 적음) | 24.3 (964배 더 빠름) |
| Ultralytics YOLO26n-seg | 6.7 (11.7배 더 작음) | 2.7 (14.4배 더 적음) | 25.2 (930배 더 빠름) |
이 비교에서는 SAM 변형 모델과 YOLO 세그멘테이션 모델 간의 모델 크기와 속도 차이가 상당함을 보여 줍니다. SAM 모델은 고유한 자동 세그멘테이션 기능을 제공하지만, YOLO 모델, 특히 YOLOv8n-seg, YOLO11n-seg, YOLO26n-seg는 훨씬 더 작고 빠르며 계산 효율성이 높습니다.
SAM 속도는 PyTorch로 측정했으며, YOLO 속도는 ONNX Runtime으로 측정했습니다. 16GB RAM을 탑재한 2025년형 Apple M4 Air에서 torch==2.10.0, ultralytics==8.4.31, onnxruntime==1.24.4를 사용해 테스트했습니다. 이 결과를 재현하려면 다음을 따르세요:
from ultralytics import ASSETS, SAM, YOLO, FastSAM

# SAM2-t, SAM2-b, SAM-b, MobileSAM 프로파일링
for file in ["sam_b.pt", "sam2_b.pt", "sam2_t.pt", "mobile_sam.pt"]:
    model = SAM(file)
    model.info()
    model(ASSETS)

# FastSAM-s 프로파일링
model = FastSAM("FastSAM-s.pt")
model.info()
model(ASSETS)

# YOLO 모델 프로파일링(ONNX)
for file_name in ["yolov8n-seg.pt", "yolo11n-seg.pt", "yolo26n-seg.pt"]:
    model = YOLO(file_name)
    model.info()
    onnx_path = model.export(format="onnx", dynamic=True, nms=False)  # YOLO26 NMS 없는 헤드; YOLOv8/YOLO11에서는 작동하지 않음
    model = YOLO(onnx_path)
    model(ASSETS)
SAM에서 MobileSAM으로 전환#
MobileSAM은 전처리, 후처리 및 모든 인터페이스를 포함해 원래 SAM과 동일한 파이프라인을 유지합니다. 따라서 워크플로를 거의 변경하지 않고 SAM에서 MobileSAM으로 전환할 수 있습니다.
주요 차이점은 이미지 인코더입니다. MobileSAM은 원본 ViT-H 인코더(6억 3,700만 개 파라미터)를 훨씬 작은 Tiny-ViT 인코더(500만 개 파라미터)로 대체합니다. 단일 GPU에서 MobileSAM은 이미지를 약 12ms(인코더 8ms, 마스크 디코더 4ms) 만에 처리합니다.
ViT 기반 이미지 인코더 비교#
| 이미지 인코더 | 원본 SAM | MobileSAM |
|---|---|---|
| 파라미터 | 637M | 500만 개 |
| 속도 | 452ms | 8ms |
프롬프트 기반 마스크 디코더#
| 마스크 디코더 | 원본 SAM | MobileSAM |
|---|---|---|
| 파라미터 | 387만 6천 개 | 387만 6천 개 |
| 속도 | 4ms | 4ms |
전체 파이프라인 비교#
| 전체 파이프라인(인코더+디코더) | 원본 SAM | MobileSAM |
|---|---|---|
| 파라미터 | 641M | 966만 개 |
| 속도 | 456ms | 12ms |
아래에서는 포인트 및 박스 프롬프트를 사용해 MobileSAM과 원본 SAM의 성능을 보여 줍니다.

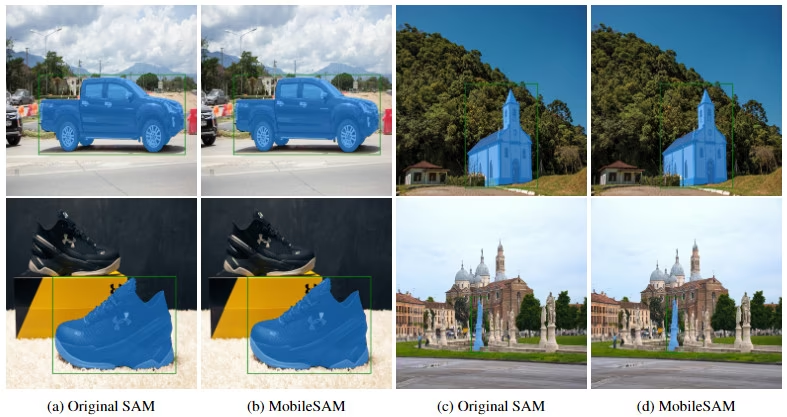
MobileSAM 논문의 GPU 벤치마크에서 MobileSAM은 FastSAM보다 약 7배 작고 5배 빠릅니다.
Ultralytics에서 MobileSAM 테스트하기#
원래 SAM과 마찬가지로 Ultralytics는 점 프롬프트와 박스 프롬프트를 모두 사용해 MobileSAM을 테스트할 수 있는 간단한 인터페이스를 제공합니다.
모델 다운로드#
Ultralytics assets에서 MobileSAM 사전 학습 가중치를 다운로드하세요.
포인트 프롬프트#
from ultralytics import SAM

# 모델을 로드합니다
model = SAM("mobile_sam.pt")

# 단일 포인트 프롬프트를 기반으로 세그먼트를 예측합니다
model.predict("ultralytics/assets/zidane.jpg", points=[900, 370], labels=[1])

# 여러 포인트 프롬프트를 기반으로 여러 세그먼트를 예측합니다
model.predict("ultralytics/assets/zidane.jpg", points=[[400, 370], [900, 370]], labels=[1, 1])

# 객체별 여러 포인트 프롬프트를 기반으로 세그먼트를 예측합니다
model.predict("ultralytics/assets/zidane.jpg", points=[[[400, 370], [900, 370]]], labels=[[1, 1]])

# 긍정 및 부정 프롬프트를 모두 사용해 세그먼트를 예측합니다.
model.predict("ultralytics/assets/zidane.jpg", points=[[[400, 370], [900, 370]]], labels=[[1, 0]])
박스 프롬프트#
from ultralytics import SAM

# 모델을 로드합니다
model = SAM("mobile_sam.pt")

# 단일 박스 프롬프트를 기반으로 세그먼트를 예측합니다
model.predict("ultralytics/assets/zidane.jpg", bboxes=[439, 437, 524, 709])

# 여러 박스 프롬프트를 기반으로 여러 세그먼트를 예측합니다
model.predict("ultralytics/assets/zidane.jpg", bboxes=[[439, 437, 524, 709], [114, 196, 313, 708]])MobileSAM과 SAM은 동일한 API를 사용합니다. 사용 방법에 대한 자세한 내용은 SAM 문서를 참조하세요.
탐지 모델을 사용해 세그멘테이션 데이터셋 자동 구축하기#
Ultralytics 프레임워크를 사용해 데이터셋에 어노테이션하려면 YOLO26x와 같은 검출 모델을 MobileSAM과 결합하는 auto_annotate 함수를 사용하세요:
from ultralytics.data.annotator import auto_annotate

auto_annotate(data="path/to/images", det_model="yolo26x.pt", sam_model="mobile_sam.pt")| 인수 | 유형 | 기본값 | 설명 |
|---|---|---|---|
data | str | 필수 | 어노테이션 또는 세분화 대상 이미지가 포함된 디렉터리 경로입니다. |
det_model | str | 'yolo26x.pt' | 초기 객체 탐지를 위한 YOLO 탐지 모델 경로입니다. |
sam_model | str | 'sam_b.pt' | 세분화를 위한 SAM 모델 경로입니다(SAM, SAM 2, MobileSAM 및 SAM 3 가중치 지원). |
device | str | '' | 연산 장치입니다(예: 'cuda:0', 'cpu' 또는 자동 장치 감지를 위한 ''). |
conf | float | 0.25 | 약한 탐지를 필터링하기 위한 YOLO 탐지 신뢰도 임계값입니다. |
iou | float | 0.5 | 겹치는 박스를 필터링하기 위한 비최대 억제의 IoU 임계값입니다. |
imgsz | int | 640 | 이미지 크기 조정에 사용할 입력 크기입니다(필요한 경우 32의 배수로 올림). |
max_det | int | 300 | 메모리 효율성을 위한 이미지당 최대 탐지 수입니다. |
classes | list[int] | None | 탐지할 클래스 인덱스 목록입니다(예: 사람 및 자전거의 경우 [0, 1]). |
output_dir | str | None | 어노테이션 저장 디렉터리입니다(기본값: 동일한 상위 디렉터리의 <data>_auto_annotate_labels). |
인용 및 감사의 글#
연구 또는 개발에 MobileSAM이 유용하다면 다음 논문을 인용해 주세요:
@article{mobile_sam,
  title={Faster Segment Anything: Towards Lightweight SAM for Mobile Applications},
  author={Zhang, Chaoning and Han, Dongshen and Qiao, Yu and Kim, Jung Uk and Bae, Sung Ho and Lee, Seungkyu and Hong, Choong Seon},
  journal={arXiv preprint arXiv:2306.14289},
  year={2023}
}
arXiv에서 전체 MobileSAM 논문을 읽어 보세요.
자주 묻는 질문#
MobileSAM은 모바일 및 엣지 애플리케이션에 최적화된 경량 고속 이미지 분할 모델입니다. 기존 SAM과 동일한 파이프라인을 유지하면서 대형 ViT-H 인코더(파라미터 637M)를 소형 Tiny-ViT 인코더(파라미터 5M)로 대체합니다. 이로 인해 전체 MobileSAM 파이프라인은 기존 SAM보다 약 66배 작고(파라미터 9.66M 대 641M), 약 38배 빠릅니다. 이미지당 약 12ms로 작동하며, SAM은 456ms가 소요됩니다.
Ultralytics에서 MobileSAM을 간편하게 테스트할 수 있습니다. 포인트 및 박스 프롬프트를 사용해 세그먼트를 예측할 수 있습니다. 예를 들어 포인트 프롬프트를 사용하는 방법은 다음과 같습니다:
from ultralytics import SAM

# 모델을 로드합니다
model = SAM("mobile_sam.pt")

# 포인트 프롬프트를 기반으로 세그먼트를 예측합니다
model.predict("ultralytics/assets/zidane.jpg", points=[900, 370], labels=[1])
자세한 내용은 Ultralytics에서 MobileSAM 테스트하기 섹션을 참조하세요.
MobileSAM은 경량 설계와 빠른 추론 속도 덕분에 모바일 및 엣지 애플리케이션에 적합합니다. 원래 SAM과 비교해 파라미터 수가 약 66배 적고 약 38배 빠르게 실행되므로, 연산 리소스가 제한된 디바이스에서 실시간 분할을 수행할 수 있습니다. 높은 효율성으로 모바일 디바이스에서도 큰 지연 없이 실시간 이미지 분할이 가능합니다. Ultralytics에서 MobileSAM은 추론만 지원하며 학습, 검증 및 내보내기는 지원하지 않습니다.
MobileSAM은 10만 개 이미지로 구성된 데이터셋(원본 SA-1B 이미지의 1%)을 사용해 단일 GPU에서 하루도 안 되는 시간 동안 학습되었으며, SAM의 ViT-H 이미지 인코더를 Tiny-ViT 인코더로 증류했습니다. 사전 학습된 가중치와 구현 세부 정보는 MobileSAM GitHub 저장소에서 확인할 수 있습니다.
MobileSAM은 모바일 및 엣지 환경에서 빠르고 효율적인 이미지 세그멘테이션을 수행하도록 설계되었습니다. 주요 사용 사례는 다음과 같습니다:
- 모바일 앱을 위한 실시간 인터랙티브 분할
- 컴퓨팅 성능이 제한된 장치에서의 저지연 이미지 처리
- 증강 현실(AR), 분석 등을 위한 AI 기반 모바일 애플리케이션 통합


댓글27
질문을 하거나 결과를 공유하거나 다른 사람을 도와주세요.
czbphoto
请问是否有遇到多线程情况下使用同一个sam实例推理分割时,出现显存占用持续增长,直到报错:显存无法分配问题?
 Glenn JocherUltralytics
@czbphoto 会的;请勿在多线程中共享同一个
SAM/SAMPredictor实例——为每个线程各自创建预测器或改为单线程队列;每张图像后调用predictor.reset_image()释放编码特征;若使用 SAM 2,其跨帧 memory bank 也会累积,需在批次结束后reset_image()清空,见SAM 2 内存机制说明。# 每线程各自持有预测器,避免共享 from threading import Thread import cv2 from ultralytics.models.sam import Predictor as SAMPredictor def worker(device, paths, boxes): pred = SAMPredictor(overrides=dict(model="mobile_sam.pt", device=device, imgsz=1024, task="segment", mode="predict")) for p, bb in zip(paths, boxes): im = cv2.imread(p) pred.set_image(im) _ = pred(bboxes=[bb]) # 推理 pred.reset_image() # 立即释放图像特征 # 示例:将不同样本分配到不同线程 Thread(target=worker, args=("cuda:0", ["a.jpg","b.jpg"], [[100,100,200,200]]*2)).start()若仍出现显存持续增长,请附上最小可复现脚本、完整文本日志与系统信息,便于我们复现与定位:
yolo checks非常感谢,问题已经解决
nowander(수정됨)
inference time cost too much here is my inference code:
from ultralytics import SAM
model = SAM("/mnt/pt/mobile_sam.pt")
model.info() source = "/home/sf/Pictures/images/"
results = model.predict(source,imgsz=640, save=True,project="mobile_sam",device="cuda",bboxes=[100, 100, 200, 200])#,points=[[600,600],[700,1000]])
------- log image 198/200 /home/sf/Pictures/images/camera_307_preposition_20240307_094542.jpg: 640x640 1 0, 1 1, 1 2, 1 3, 1 4, 1 5, 1 6, 1 7, 1 8, 1 9, 1 10, 1 11, 1 12, 1 13, 522.9ms image 199/200 /home/sf/Pictures/images/camera_307_preposition_20240307_095714.jpg: 640x640 1 0, 1 1, 1 2, 1 3, 1 4, 1 5, 1 6, 1 7, 1 8, 1 9, 1 10, 519.0ms image 200/200 /home/sf/Pictures/images/camera_307_preposition_20240307_100339.jpg: 640x640 1 0, 1 1, 1 2, 1 3, 1 4, 1 5, 1 6, 1 7, 1 8, 1 9, 1 10, 1 11, 572.9ms Speed: 0.8ms preprocess, 516.1ms inference, 0.5ms postprocess per image at shape (1, 3, 640, 640) Results saved to mobile_sam/predict3
my gpu is RTX5080.why it cost so much
RizwanMunawar(수정됨)
@nowander, could you please share the complete logs? In my testing, the performance is slightly slower than FastSAM, but still noticeably faster than the SAM models. What’s the size of your original image? Larger images can naturally affect speed. You might also want to try FastSAM, as it’s typically very quick in most cases. Thanks.
my code: from ultralytics import SAM model = SAM("/mnt/pt/mobile_sam.pt") model.info() results = model("/home/sf/Pictures/one_image/car.jpg", bboxes=[226, 278, 683, 499],imgsz=640)
the log : Model summary: 246 layers, 10,130,092 parameters, 10,130,092 gradients
image 1/1 /home/sf/Pictures/one_image/car.jpg: 640x640 1 0, 272.1ms Speed: 16.0ms preprocess, 272.1ms inference, 28.9ms postprocess per image at shape (1, 3, 640, 640)
i only test one image(car.jpg) this time ,the size of image is 870*573,it cost 272.1ms inference
but when i use this code(write myself):
""" yolo_sam2_annotate_with_time.py 基于 ultralytics.data.annotator.auto_annotate
- 检测 + 分割
- 掩膜着色 + 类别文字
- 实时显示耗时 """
from pathlib import Path import time import cv2 import numpy as np from ultralytics.data.annotator import auto_annotate from ultralytics import YOLO, SAM, FastSAM
"""---------------- 参数 ----------------""" IMAGE_DIR = Path("/home/sf/Pictures/one_image") # 输入图片 """ 结果保存""" DET_MODEL = "/mnt/pt/yolov5x.pt" SAM_MODEL = ("/mnt/pt/mobile_sam.pt") label_dir =Path("/home/sf/Pictures/images_auto_annotate_labels") save_di1 = DET_MODEL.split("/")[-1].split(".pt",1)[0] save_di2 = SAM_MODEL.split("/")[-1].split(".pt",1)[0] OUT_DIR = Path(f"runs/{save_di1}{save_di2}/seg_vis") # 或 sam2_t.pt / sam2_l.pt """ -------------------------------------"""
OUT_DIR.mkdir(parents=True, exist_ok=True)
"""1. 先运行 auto_annotate,让它在 images/labels 下生成 .txt""" t0 = time.perf_counter() auto_annotate( data=str(IMAGE_DIR), det_model=DET_MODEL, sam_model=SAM_MODEL, output_dir=str(label_dir) """标签输出到 images/labels/*.txt""" ) anno_time = (time.perf_counter() - t0) * 1000 """ anno_time1 = (time.time() - t0)""" print(f"auto_annotate 总耗时: {anno_time:.1f} ms") """ print(f"auto_annotate1 总耗时: {anno_time1:.1f} ms")"""
""" 2. 加载模型(用于计时)""" yolo = YOLO(DET_MODEL) if Path(SAM_MODEL).stem.startswith("Fast"): """ sam_model = FastSAM(sam_model)""" sam = FastSAM(SAM_MODEL) else: """ sam_model = SAM(sam_model)""" sam = SAM(SAM_MODEL) """ sam = SAM(SAM_MODEL)""" """sam=FastSAM(SAM_MODEL)""" sum_time=0 num = 0 """ 3. 可视化:逐张读取原图 + 标签,叠加掩膜和类别"""
label_dir =Path("/home/sf/Pictures/images")
class_names = yolo.names
for img_path in IMAGE_DIR.glob("*"): if img_path.suffix.lower() not in {".jpg", ".png", ".jpeg", ".bmp"}: continue """print("aaaaaaa")""" img = cv2.imread(str(img_path)) h, w = img.shape[:2] label_path = label_dir / f"{img_path.stem}.txt" if not label_path.exists(): # print("bbbbb") continue
""" 3-1 读取 YOLO-seg 标签"""
bboxes, masks_raw, cls_ids = [], [], []
with open(label_path, "r") as f:
    for row in f:
        parts = row.strip().split()
        cls_id = int(parts[0])
        poly = list(map(float, parts[1:]))
        """ 还原成像素坐标(x,y)"""
        polygon = [(poly[i] * w, poly[i + 1] * h)
                   for i in range(0, len(poly), 2)]
        polygon = np.array(polygon, np.int32)
        """ 简易 bbox"""
        x1, y1, x2, y2 = polygon[:, 0].min(), polygon[:, 1].min(), \
                         polygon[:, 0].max(), polygon[:, 1].max()
        bboxes.append([x1, y1, x2, y2])
        cls_ids.append(cls_id)

""" 3-2 用 SAM 生成掩膜(用于计时)"""
t0 = time.perf_counter()
""" print("img[..., ::-1]",img[..., ::-1].shape)#(573, 860, 3)"""
results = sam(img[..., ::-1], bboxes=bboxes)   # RGB
""" print("bboxes",bboxes)""" seg_time = (time.perf_counter() - t0) * 1000 sum_time += seg_time num += 1 """ print("num",num)""" masks = results[0].masks # list[np.ndarray(H,W)] colors = [np.random.randint(0, 255, 3).tolist() for _ in cls_ids]
vis = img.copy()


###################     FASTSAM   ####################
if save_di2.startswith("Fast"):

    h_orig, w_orig = img.shape[:2]

    """ 掩膜 tensor: [N, H_sam, W_sam]"""
    masks_tensor = results[0].masks.data  # torch.Tensor
    h_sam, w_sam = masks_tensor.shape[1:]

    """ 逐张处理"""
    for mask_t, cls_id, color in zip(masks_tensor, cls_ids, colors):
        """ 1) 先变成 numpy"""
        mask_np = mask_t.cpu().numpy()  # [H_sam, W_sam]  float/uint8
        """ 2) resize 回原图尺寸"""
        mask_resized = cv2.resize(mask_np, (w_orig, h_orig),
                                  interpolation=cv2.INTER_NEAREST)
        mask_bool = mask_resized.astype(bool)

        """3) 上色"""
        vis[mask_bool] = (vis[mask_bool] * 0.5 + np.array(color, dtype=np.uint8) * 0.5)

        """ 4) 画轮廓"""
        contours, _ = cv2.findContours(mask_bool.astype(np.uint8),
                                       cv2.RETR_EXTERNAL,
                                       cv2.CHAIN_APPROX_SIMPLE)
        cv2.drawContours(vis, contours, -1, color, 2)

        x, y, w, h = cv2.boundingRect(contours[0])
        cv2.putText(vis, class_names[cls_id], (x, max(y - 5, 15)),
                    cv2.FONT_HERSHEY_SIMPLEX, 0.8, color, 2)


"""           SAM2    """
else:

    for mask, cls_id, color in zip(masks, cls_ids, colors):
        """ 原来的报错两行"""
        """vis[mask] = (vis[mask] * 0.5 + np.array(color, dtype=np.uint8) * 0.5)"""
""" 假设 results = sam(img[..., ::-1], bboxes=bboxes)""" masks_tensor = results[0].masks.data # torch.Tensor [N, H, W] masks_np = masks_tensor.cpu().numpy() # ndarray [N, H, W]
        colors = [np.random.randint(0, 255, 3, dtype=np.uint8).tolist() for _ in cls_ids]

        for mask_2d, cls_id, color in zip(masks_np, cls_ids, colors):
            mask_2d = mask_2d.astype(bool)           # 转成布尔
            vis[mask_2d] = (vis[mask_2d] * 0.5 + np.array(color, dtype=np.uint8) * 0.5)

           """画轮廓"""
            contours, _ = cv2.findContours(mask_2d.astype(np.uint8),
                                           cv2.RETR_EXTERNAL,
                                           cv2.CHAIN_APPROX_SIMPLE)
            cv2.drawContours(vis, contours, -1, color, 2)

            x, y, w, h = cv2.boundingRect(contours[0])
            cv2.putText(vis, class_names[cls_id], (x, max(y - 5, 15)),
                        cv2.FONT_HERSHEY_SIMPLEX, 0.8, color, 2)
##########################################################################################
""" 3-3 在左上角叠加耗时""" cv2.putText(vis, f"Detect: {anno_time/len(list(IMAGE_DIR.glob('*'))):.1f} ms", (10, 30), cv2.FONT_HERSHEY_SIMPLEX, 0.8, (0, 255, 0), 2) cv2.putText(vis, f"Segment: {seg_time:.1f} ms", (10, 60), cv2.FONT_HERSHEY_SIMPLEX, 0.8, (0, 255, 0), 2)
""" 3-4 弹窗 + 保存"""
win_name = f"YOLO+SAM-2  {img_path.name}"
"""cv2.imshow(win_name, vis)""" save_path = OUT_DIR / f"{img_path.stem}_vis.jpg" cv2.imwrite(str(save_path), vis) """ print(f"[Done] {img_path.name} Segment={seg_time:.1f}ms")""" """cv2.waitKey(0)""" """ cv2.destroyWindow(win_name)""" """ print("nummm",num)""" print(f"avg segment inferenct time {sum_time/num:.1f} ms") """cv2.destroyAllWindows()"""
the log as follow: PRO TIP 💡 Replace 'model=/mnt/pt/yolov5x.pt' with new 'model=/mnt/pt/yolov5xu.pt'. YOLOv5 'u' models are trained with https://github.com/ultralytics/ultralytics and feature improved performance vs standard YOLOv5 models trained with https://github.com/ultralytics/yolov5.
image 1/1 /home/sf/Pictures/one_image/car.jpg: 448x640 1 car, 13.9ms Speed: 1.7ms preprocess, 13.9ms inference, 91.0ms postprocess per image at shape (1, 3, 448, 640) auto_annotate 总耗时: 1614.3 ms PRO TIP 💡 Replace 'model=/mnt/pt/yolov5x.pt' with new 'model=/mnt/pt/yolov5xu.pt'. YOLOv5 'u' models are trained with https://github.com/ultralytics/ultralytics and feature improved performance vs standard YOLOv5 models trained with https://github.com/ultralytics/yolov5.
0: 1024x1024 1 0, 15.6ms Speed: 3.0ms preprocess, 15.6ms inference, 0.3ms postprocess per image at shape (1, 3, 1024, 1024) avg segment inferenct time 28.7 ms
it only cost 15.6ms inference. looking forward for your reply and thx.
i found when i run auto_annotates function,it call sam_model(line 64 annotator.py),and it cost 117ms,when i run sam() again,it Loaded intoGPU in advance,so it only cost 15.6 ms inference.. is it true. and if that is the true,the mobile_sam will cost about 500ms with RTX5080(use demo code)
To test my conjecture, I did the following experiment:
from pathlib import Path import time import cv2 import numpy as np from ultralytics.data.annotator import auto_annotate from ultralytics import YOLO, SAM, FastSAM from ultralytics import SAM SAM_MODEL = ("/mnt/pt/mobile_sam.pt") sam = SAM(SAM_MODEL)
import time img_path = "/home/sf/Pictures/one_image/car.jpg" img = cv2.imread(str(img_path)) t0 = time.perf_counter() ”“”print("img[..., ::-1]",img[..., ::-1].shape)#(573, 860, 3)”“” bboxes = [[np.int32(226), np.int32(278), np.int32(683), np.int32(499)]] results = sam(img[..., ::-1], bboxes=bboxes) # RGB ”“”print("bboxes",bboxes)”“” seg_time = (time.perf_counter() - t0) * 1000 print("11111---ssssseg_time",seg_time) t0 = time.perf_counter() “”“ print("img[..., ::-1]",img[..., ::-1].shape)#(573, 860, 3) bboxes = [[np.int32(226), np.int32(278), np.int32(683), np.int32(499)]] results = sam(img[..., ::-1], bboxes=bboxes) # RGB ”“” print("bboxes",bboxes)”“” seg_time = (time.perf_counter() - t0) * 1000 print("22222--ssssseg_time",seg_time)
and log: Segment: 256.2 ms 0: 1024x1024 1 0, 256.3ms Speed: 26.1ms preprocess, 256.3ms inference, 27.3ms postprocess per image at shape (1, 3, 1024, 1024) 11111---ssssseg_time 544.9139869888313
Segment: 15.3 ms 0: 1024x1024 1 0, 15.4ms Speed: 5.1ms preprocess, 15.4ms inference, 0.2ms postprocess per image at shape (1, 3, 1024, 1024) 22222--ssssseg_time 21.185592049732804
- Glenn JocherUltralytics
@nowander Your analysis is right: the first SAM call includes one‑time GPU setup (CUDA context, weights transfer, cuDNN autotune), so it’s much slower; subsequent calls are the steady‑state (~15–30 ms on your RTX). Also note that when you pass a folder plus
bboxesonce, the prompt is consumed on the first image and the rest fall back to “segment everything” (hence many masks and slower runs). Use per‑image prompts orSAMPredictorand warm up before timing:from pathlib import Path import cv2, time, torch from ultralytics.models.sam import Predictor as SAMPredictor overrides = dict(model="mobile_sam.pt", device="cuda", imgsz=1024, task="segment", mode="predict", conf=0.25) pred = SAMPredictor(overrides=overrides) # warmup im = cv2.imread("path/to/one.jpg") pred.set_image(im) pred(bboxes=[100, 100, 200, 200]) pred.reset_image() # per-image prompts (avoid segment-everything) src = Path("/path/to/images") for p in src.glob("*.jpg"): im = cv2.imread(str(p)) pred.set_image(im) torch.cuda.synchronize(); t0 = time.perf_counter() r = pred(bboxes=[[x1, y1, x2, y2]]) # supply bbox for this image torch.cuda.synchronize(); print(f"{(time.perf_counter()-t0)*1000:.1f} ms") pred.reset_image()See the SAMPredictor example in the SAM docs and the
auto_annotateAPI here for reference on how prompts are used per image: auto_annotate reference. If you still see >200 ms after warmup and per‑image prompts, please shareyolo checksoutput and the full text logs so we can dig deeper:yolo checks Thank you very much for your reply, you are right, when set a folde as source r, finally call self.generate (models/sam/predict.py) on lines 202 and 203, when set source as an image, the parameter takes effect, call line 205 self.prompt_inference (models/sam/predict.py).when i use this: src = Path("/path/to/images") for p in src.glob("*.jpg"): im = cv2.imread(str(p)) pred.set_image(im) torch.cuda.synchronize(); t0 = time.perf_counter() r = pred(bboxes=[[x1, y1, x2, y2]]) # supply bbox for this image torch.cuda.synchronize(); print(f"{(time.perf_counter()-t0)*1000:.1f} ms") pred.reset_image() it only cost about 20ms in my GPU,and thx again for your reply.
- Glenn JocherUltralytics
Great to hear your timings are down to ~20 ms; for even higher throughput across multiple prompts on the same image, reuse encoder features by calling
SAMPredictor.set_image()once and issuing additional prompt calls beforereset_image()—see the SAMPredictor reference for details: ultralytics.models.sam.predict.Predictor.
 User
good
tunahsu
Hi! Is it possible to filter out low-quality masks during inference using confidence/score?
- Glenn JocherUltralytics
@tunahsu yes, you can filter out low-quality masks during inference by adjusting the confidence threshold using the
confparameter when running the model. For more details on setting this parameter, you can refer to the MobileSAM documentation. Let us know if you have further questions!
ismailwale
How can I make an inference of a video using frame by frame in loop using Mobilesam ?because I tried multiple times making inference directly with video predictor I constantly running out of memory despite setting stream =True since SAM is trying to keep the memory of 2000 frames of the video at ones . I will appreciate any ideal on how to predict and segment the video as a single frame image at every instance and put everything in a loop.
- Glenn JocherUltralytics
@ismailwale to process video frame-by-frame with MobileSAM and avoid memory overflow, load the video using OpenCV, iterate through each frame in a loop, perform inference using
MobileSAMon individual frames, and release unused memory after each iteration. Make sure not to enable streaming mode. Here is a basic example structure:import cv2 from ultralytics import SAM # Initialize the VideoCapture and load the model cap = cv2.VideoCapture("path/to/video.mp4") model = SAM("mobile_sam.pt") while cap.isOpened(): ret, frame = cap.read() if not ret: break # Perform inference on the current frame results = model.predict(frame) # Process results or save outputs # ... cap.release() # Release the videoThis approach minimizes memory usage by processing frames sequentially. Let us know if you need further clarification!
Thanks so much , your lines of code really jump-start my thinking. I sincerely appreciate. Please keep on with your good work . Be blessed
gopalkatushar
This is great. Is there a way to segment everything like we have in fastsam, without prompting?
- Glenn JocherUltralytics(수정됨)
@gopalkatushar yes, MobileSAM can segment everything without prompts, like FastSAM. Call it without
bboxesorpoints, e.g.SAM("mobile_sam.pt")("path/to/image.jpg"). For more details, please refer to the SAM documentation.
Kunal8020
How can I use this for multi class segmentation. I am detecting the multiple objects using YOLO-World. I want to use the bounding box results from YOLO-World as prompt to MobileSAM. How can I use to segment different objects in the same image??
 Paula DerrengerUltralytics
Hello!
To use MobileSAM for segmenting multiple objects in the same image using bounding box results from YOLO-World, you can follow these steps:
-
Run YOLO-World Detection: First, use YOLO-World to detect objects in your image. This will provide you with bounding boxes for each detected object.
-
Prepare Bounding Box Inputs: Extract the bounding box coordinates from the YOLO-World output. These coordinates will be used as prompts for MobileSAM.
-
Segment with MobileSAM: For each bounding box, use the MobileSAM model to segment the object within that box. You can do this by passing the bounding box coordinates to MobileSAM's predict function, similar to the box prompt example:
from ultralytics import SAM

# Load the model
model = SAM("mobile_sam.pt")

# Predict a segment based on a box prompt
model.predict("path/to/image.jpg", bboxes=[x1, y1, x2, y2])
Repeat this for each bounding box provided by YOLO-World.
This approach allows you to segment each detected object individually. If you need further assistance or have more specific requirements, feel free to ask!
1-
FlySka
Hi, Do you have any notebook or repository for fine-tuning mobileSAM? Could it be done in the same way as with the regular SAM?
- Paula DerrengerUltralytics
Hi there,
Yes, fine-tuning MobileSAM can generally be approached in the same manner as with the regular SAM. Since MobileSAM retains the same pipeline, including pre-processing, post-processing, and interfaces, adaptations for MobileSAM from SAM should be minimal.
Here's a quick Python snippet that illustrates how you could load and use MobileSAM for predictions, which mirrors the usage for SAM:
from ultralytics import SAM

# Load the MobileSAM model
model = SAM('mobile_sam.pt')

# Predict a segment based on a point prompt
result = model.predict('path/to/your/image.jpg', points=[x, y], labels=[label_id])
You can apply any fine-tuning procedures used for SAM in a similar fashion for MobileSAM. If you need more detailed steps or specific adjustments for fine-tuning, feel free to ask!
Best regards!
AnandSingh-0619
Hey! How can I run batch inference with multiple images and bounding boxes on the Mobile SAM model?
- Glenn JocherUltralytics
Hey there! 👋
Running batch inference with multiple images and bounding boxes on MobileSAM is quite straightforward. Here’s a quick example of how you could do that:
from ultralytics import SAM

# Load the MobileSAM model
model = SAM('mobile_sam.pt')

# List of images and their corresponding boxes
images = ['path/to/image1.jpg', 'path/to/image2.jpg']
boxes = [[439, 437, 524, 709], [500, 400, 550, 720]]  # Example boxes for each image

# Predict segments based on box prompts for each image
for image, box in zip(images, boxes):
    result = model.predict(image, bboxes=[box])
    # You can now process the result as needed
This code loads the model, iterates over your images and boxes, and then performs prediction for each image using the specified boxes. Don't forget to adjust the image paths and box coordinates according to your data. 😊
Let us know if you need more help!
I'm working with the Ultralytics Mobile SAM model and need to perform batch inference for multiple images, each with its own set of bounding boxes, without using a for loop to iterate over each image. How can I efficiently run batch inference on the Mobile SAM model with this setup?
- Glenn JocherUltralytics(수정됨)
Hi there!
predictdoes not take animages=tensor, so for several images with their own boxes loop over them and pass each image's boxes (XYXY):from ultralytics import SAM model = SAM("mobile_sam.pt") for image, box in zip(images, boxes): results = model.predict(image, bboxes=[box])Each call can take several boxes for the same image, e.g.
bboxes=[[x1, y1, x2, y2], [x3, y3, x4, y4]]. 😊-1