Link to this sectionROS (Robot Operating System) başlangıç rehberi#
This guide shows you how to integrate Ultralytics YOLO with ROS1 (rospy) or ROS2 (rclpy) to run real-time object detection and segmentation on RGB images, depth images, and point clouds.
YOLO ile ROS kurulumuna atla, ardından RGB görüntüleri, derinlik görüntüleri veya nokta bulutları ile çalış.
ROS Introduction (captioned) from Open Robotics on Vimeo.
Link to this sectionROS nedir?#
Robot Operating System (ROS), robotik araştırmaları ve endüstrisinde yaygın olarak kullanılan açık kaynaklı bir çerçevedir. ROS, geliştiricilerin robot uygulamaları oluşturmasına yardımcı olmak için kütüphaneler ve araçlar koleksiyonu sağlar. Çeşitli robotik platformlarla çalışacak şekilde tasarlanmış olması, onu robotikçiler için esnek ve güçlü bir araç haline getirir.
Link to this sectionROS'un Temel Özellikleri#
-
Modüler Mimari: ROS, geliştiricilerin düğümler (nodes) adı verilen küçük ve yeniden kullanılabilir bileşenleri birleştirerek karmaşık sistemler oluşturmasına olanak tanıyan modüler bir mimariye sahiptir. Her düğüm tipik olarak belirli bir işlevi yerine getirir ve düğümler konular (topics) veya hizmetler (services) üzerinden mesajlaşarak birbirleriyle iletişim kurar.
-
İletişim Ara Katmanı (Middleware): ROS, işlemler arası iletişimi ve dağıtık bilişimi destekleyen sağlam bir iletişim altyapısı sunar. Bu, veri akışları (konular) için bir yayınla-abone ol (publish-subscribe) modeli ve hizmet çağrıları için bir istek-yanıt modeli aracılığıyla elde edilir.
-
Donanım Soyutlama: ROS, donanım üzerinde bir soyutlama katmanı sağlayarak geliştiricilerin cihazdan bağımsız kod yazmalarını mümkün kılar. Bu, aynı kodun farklı donanım kurulumlarıyla kullanılmasına olanak tanıyarak entegrasyonu ve denemeleri kolaylaştırır.
-
Araçlar ve Yardımcı Programlar: ROS, görselleştirme, hata ayıklama ve simülasyon için zengin bir araç ve yardımcı program seti ile birlikte gelir. Örneğin, RViz sensör verilerini ve robot durumu bilgilerini görselleştirmek için kullanılırken, Gazebo algoritmaları ve robot tasarımlarını test etmek için güçlü bir simülasyon ortamı sağlar.
-
Kapsamlı Ekosistem: ROS ekosistemi geniştir ve sürekli büyümektedir; navigasyon, manipülasyon, algılama ve daha fazlası dahil olmak üzere farklı robotik uygulamalar için çok sayıda paket mevcuttur. Topluluk, bu paketlerin geliştirilmesine ve bakımına aktif olarak katkıda bulunur.
ROS Sürümlerinin Evrimi
ROS, 2007'deki geliştirilmesinden bu yana ROS 1 ve ROS 2 olarak ikiye ayrılarak birden fazla sürüm boyunca evrildi. Aşağıdaki mevcut örnekler ROS1 Noetic kullanmaktadır; Using ROS2 kısmındaki kompakt adaptörler, güncel ROS2 sürümleri için karşılık gelen rclpy arayüzlerini göstermektedir.
Link to this sectionROS 1 ve ROS 2 Karşılaştırması#
ROS 1 robotik geliştirme için sağlam bir temel sağlasa da, ROS 2 şunları sunarak eksikliklerini gidermektedir:
- Gerçek Zamanlı Performans: Gerçek zamanlı sistemler ve deterministik davranış için iyileştirilmiş destek.
- Güvenlik: Çeşitli ortamlarda güvenli ve güvenilir çalışma için geliştirilmiş güvenlik özellikleri.
- Ölçeklenebilirlik: Çoklu robot sistemleri ve büyük ölçekli dağıtımlar için daha iyi destek.
- Platformlar Arası Destek: Windows ve macOS dahil olmak üzere Linux dışındaki çeşitli işletim sistemleriyle genişletilmiş uyumluluk.
- Esnek İletişim: İşlemler arası daha esnek ve verimli iletişim için DDS kullanımı.
Link to this sectionROS Mesajları ve Konuları#
ROS'ta düğümler arasındaki iletişim mesajlar ve konular aracılığıyla kolaylaştırılır. Mesaj, düğümler arasında paylaşılan bilgiyi tanımlayan bir veri yapısıdır; konu ise mesajların gönderilip alındığı isimlendirilmiş bir kanaldır. Düğümler bir konuya mesaj yayınlayabilir veya bir konudan mesajlara abone olabilir, bu da birbirleriyle iletişim kurmalarını sağlar. Bu yayınla-abone ol modeli, düğümler arasında eşzamansız iletişime ve birbirinden bağımsız çalışmaya (decoupling) olanak tanır. Bir robotik sistemdeki her sensör veya aktüatör genellikle bir konuya veri yayınlar; bu veri daha sonra işleme veya kontrol için diğer düğümler tarafından tüketilebilir. Bu rehberin amacı doğrultusunda, Image (Görüntü), Depth (Derinlik) ve PointCloud (Nokta Bulutu) mesajlarına ve kamera konularına odaklanacağız.
Link to this sectionUltralytics YOLO'yu ROS ile Kurma#
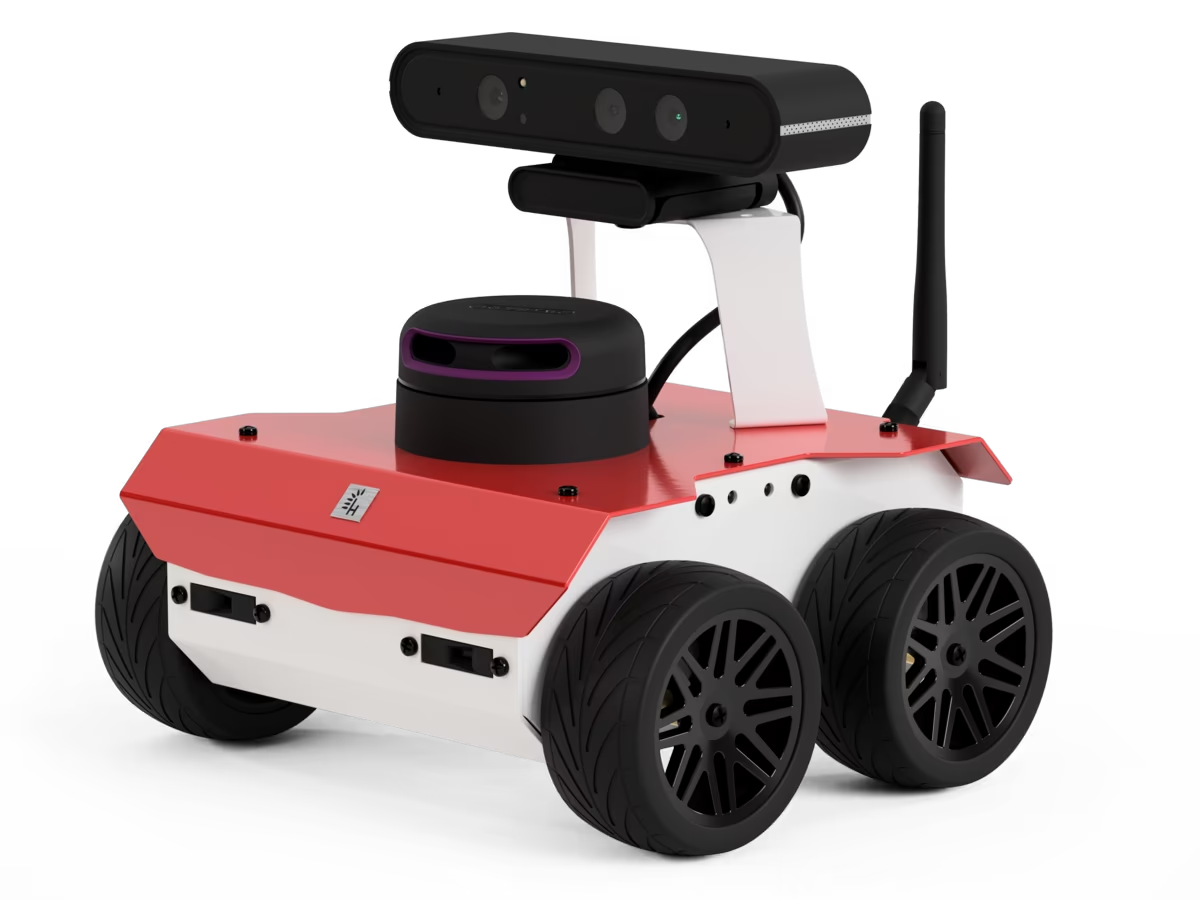
The ROS1 examples were tested using this ROS environment, a fork of the ROSbot ROS repository. The same YOLO and NumPy processing applies in ROS2; only the node lifecycle and message conversion differ.
Link to this sectionBağımlılıkların Kurulumu#
ROS ortamının yanı sıra, aşağıdaki bağımlılıkları da kurman gerekecektir:
-
ROS NumPy paketi: ROS Image mesajları ile NumPy dizileri arasında hızlı dönüşüm için gereklidir.
pip install ros_numpy -
Ultralytics paketi:
pip install ultralytics
Link to this sectionROS2 Kullanımı#
ROS2, rospy yerine rclpy ve ros_numpy görüntü dönüştürme yerine cv_bridge kullanır. Aşağıdaki düğüm, RGB algılama akışının tam ROS2 karşılığıdır; modelleri bir kez oluştur ve geri çağrılar (callbacks) genelinde yeniden kullan.
import cv_bridge
import rclpy
from rclpy.node import Node
from rclpy.qos import qos_profile_sensor_data
from sensor_msgs.msg import Image

from ultralytics import YOLO

class UltralyticsNode(Node):
    """Run YOLO detection on ROS2 image messages."""

    def __init__(self):
        super().__init__("ultralytics")
        self.bridge = cv_bridge.CvBridge()
        self.model = YOLO("yolo26m.pt")
        self.publisher = self.create_publisher(Image, "/ultralytics/detection/image", 5)
        self.create_subscription(Image, "/camera/color/image_raw", self.callback, qos_profile_sensor_data)

    def callback(self, message):
        """Publish the annotated camera frame."""
        image = self.bridge.imgmsg_to_cv2(message, desired_encoding="bgr8")
        annotated = self.model(image)[0].plot(show=False)
        self.publisher.publish(self.bridge.cv2_to_imgmsg(annotated, encoding="bgr8"))

def main(args=None):
    """Start the ROS2 node."""
    rclpy.init(args=args)
    node = UltralyticsNode()
    rclpy.spin(node)
    node.destroy_node()
    rclpy.shutdown()

if __name__ == "__main__":
    main()
Derinlik görüntüleri için, aşağıdaki derinlik işleme kodunu yeniden kullan ve yalnızca mesaj edinimi ve dönüştürme kısımlarını değiştir:
self.create_subscription(Image, "/camera/color/image_raw", self.rgb_callback, qos_profile_sensor_data)
self.create_subscription(Image, "/camera/depth/image_raw", self.depth_callback, qos_profile_sensor_data)

def rgb_callback(self, message):
    self.rgb_image = self.bridge.imgmsg_to_cv2(message, desired_encoding="bgr8")

def depth_callback(self, message):
    depth_image = self.bridge.imgmsg_to_cv2(message, desired_encoding="passthrough")
    # Apply the NumPy mask and distance calculation from the depth example below.
Nokta bulutları için, ROS2 sensor_msgs_py.point_cloud2 sağlar; düzenlenmiş bulutu bir kez dönüştür, ardından aşağıdaki NumPy segmentasyonu ve 3B haritalamayı yeniden kullan:
from sensor_msgs_py import point_cloud2

points = point_cloud2.read_points_numpy(message, field_names=("x", "y", "z", "rgb"))
points = points.reshape(message.height, message.width, 4)
Link to this sectionUltralytics'i ROS sensor_msgs/Image ile kullanma#
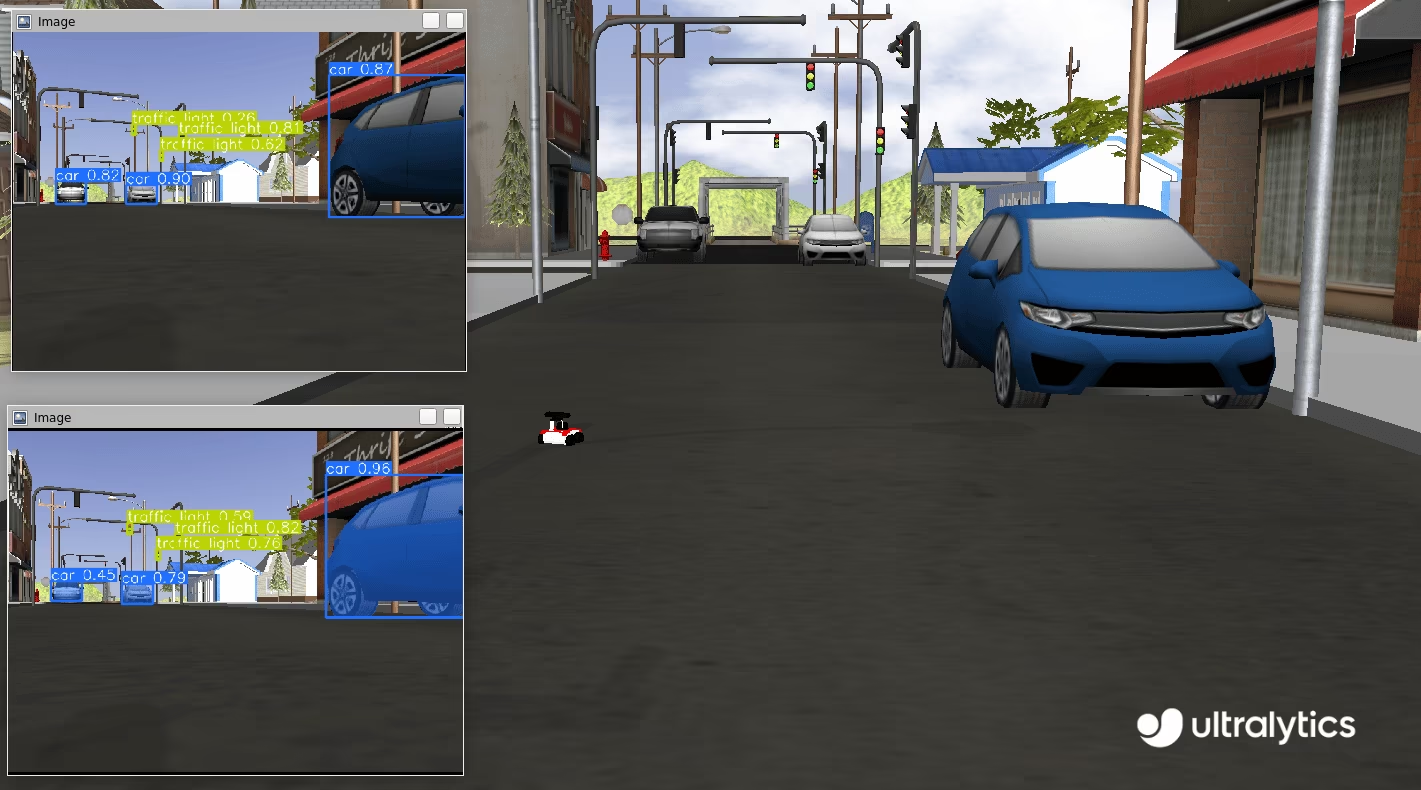
sensor_msgs/Image mesaj tipi, ROS'ta görüntü verilerini temsil etmek için yaygın olarak kullanılır. Kodlama, yükseklik, genişlik ve piksel verileri için alanlar içerir, bu da onu kameralar veya diğer sensörler tarafından yakalanan görüntülerin iletimi için uygun hale getirir. Image mesajları robotik uygulamalarda görsel algılama, nesne tespiti ve navigasyon gibi görevler için yaygın olarak kullanılır.
Link to this sectionGörüntü Adım Adım Kullanımı#
Aşağıdaki kod parçası, Ultralytics YOLO paketinin ROS ile nasıl kullanılacağını göstermektedir. Bu örnekte, bir kamera konusuna abone oluyor, gelen görüntüyü YOLO kullanarak işliyor ve tespit edilen nesneleri tespit ve segmentasyon için yeni konulara yayınlıyoruz.
Öncelikle gerekli kütüphaneleri içe aktar ve iki model örneği oluştur: biri segmentasyon diğeri tespit için. ROS master ile iletişimi etkinleştirmek için bir ROS düğümünü (ultralytics adıyla) başlat. Bağlantının kararlı olduğundan emin olmak için, devam etmeden önce düğüme bağlantıyı kurması için yeterli zaman tanıyan kısa bir duraklama ekliyoruz.
import time

import rospy

from ultralytics import YOLO

detection_model = YOLO("yolo26m.pt")
segmentation_model = YOLO("yolo26m-seg.pt")
rospy.init_node("ultralytics")
time.sleep(1)
İki ROS konusu başlat: biri tespit diğeri segmentasyon için. Bu konular, açıklama eklenmiş görüntüleri yayınlamak ve daha fazla işlem için erişilebilir kılmak üzere kullanılacaktır. Düğümler arası iletişim sensor_msgs/Image mesajları kullanılarak kolaylaştırılır.
from sensor_msgs.msg import Image

det_image_pub = rospy.Publisher("/ultralytics/detection/image", Image, queue_size=5)
seg_image_pub = rospy.Publisher("/ultralytics/segmentation/image", Image, queue_size=5)
Son olarak, /camera/color/image_raw konusundaki mesajları dinleyen ve her yeni mesaj için bir geri çağırma (callback) işlevi çağıran bir abone oluştur. Bu geri çağırma işlevi sensor_msgs/Image tipindeki mesajları alır, bunları ros_numpy kullanarak bir NumPy dizisine dönüştürür, görüntüleri daha önce oluşturulan YOLO modelleriyle işler, görüntülere açıklama ekler ve ardından bunları ilgili konulara yayınlar: tespit için /ultralytics/detection/image ve segmentasyon için /ultralytics/segmentation/image.
import ros_numpy

def callback(data):
    """Callback function to process image and publish annotated images."""
    array = ros_numpy.numpify(data)
    if det_image_pub.get_num_connections():
        det_result = detection_model(array)
        det_annotated = det_result[0].plot(show=False)
        det_image_pub.publish(ros_numpy.msgify(Image, det_annotated, encoding="rgb8"))

    if seg_image_pub.get_num_connections():
        seg_result = segmentation_model(array)
        seg_annotated = seg_result[0].plot(show=False)
        seg_image_pub.publish(ros_numpy.msgify(Image, seg_annotated, encoding="rgb8"))

rospy.Subscriber("/camera/color/image_raw", Image, callback)

while True:
    rospy.spin()
Kodun tamamı
import time

import ros_numpy
import rospy
from sensor_msgs.msg import Image

from ultralytics import YOLO

detection_model = YOLO("yolo26m.pt")
segmentation_model = YOLO("yolo26m-seg.pt")
rospy.init_node("ultralytics")
time.sleep(1)

det_image_pub = rospy.Publisher("/ultralytics/detection/image", Image, queue_size=5)
seg_image_pub = rospy.Publisher("/ultralytics/segmentation/image", Image, queue_size=5)

def callback(data):
    """Callback function to process image and publish annotated images."""
    array = ros_numpy.numpify(data)
    if det_image_pub.get_num_connections():
        det_result = detection_model(array)
        det_annotated = det_result[0].plot(show=False)
        det_image_pub.publish(ros_numpy.msgify(Image, det_annotated, encoding="rgb8"))

    if seg_image_pub.get_num_connections():
        seg_result = segmentation_model(array)
        seg_annotated = seg_result[0].plot(show=False)
        seg_image_pub.publish(ros_numpy.msgify(Image, seg_annotated, encoding="rgb8"))

rospy.Subscriber("/camera/color/image_raw", Image, callback)

while True:
    rospy.spin()
Hata Ayıklama
Sistemin dağıtık yapısı nedeniyle ROS (Robot Operating System) düğümlerinde hata ayıklamak zor olabilir. Bu süreçte yardımcı olabilecek birkaç araç şunlardır:
rostopic echo <TOPIC-NAME>: Bu komut, belirli bir konuda yayınlanan mesajları görmeni sağlayarak veri akışını incelemene yardımcı olur.rostopic list: ROS sistemindeki tüm mevcut konuları listelemek için bu komutu kullan; aktif veri akışlarına genel bir bakış sağlar.rqt_graph: Bu görselleştirme aracı, düğümler arasındaki iletişim grafiğini görüntüleyerek düğümlerin nasıl birbirine bağlı olduğu ve nasıl etkileşime girdiği hakkında içgörü sağlar.- 3D temsiller gibi daha karmaşık görselleştirmeler için RViz kullanabilirsin. RViz (ROS Visualization), ROS için güçlü bir 3D görselleştirme aracıdır. Robotunun durumunu ve çevresini gerçek zamanlı olarak görselleştirmeni sağlar. RViz ile sensör verilerini (örneğin
sensor_msgs/Image), robot modeli durumlarını ve çeşitli diğer bilgi türlerini görüntüleyebilir, böylece robotik sisteminin davranışını hata ayıklamayı ve anlamayı kolaylaştırabilirsin.
Link to this sectionTespit Edilen Sınıfları std_msgs/String ile Yayınla#
Standard ROS messages also include std_msgs/String messages. In many applications, it is not necessary to republish the entire annotated image; instead, only the classes present in the robot's view are needed. The following example demonstrates how to use std_msgs/String messages to republish the detected classes on the /ultralytics/detection/classes topic. These messages are more lightweight and provide essential information, making them valuable for various applications.
Link to this sectionÖrnek Kullanım Senaryosu#
Kamera ve nesne tespit modeli ile donatılmış bir depo robotu düşün. Ağ üzerinden büyük açıklama eklenmiş görüntüleri göndermek yerine, robot tespit edilen sınıfların bir listesini std_msgs/String mesajları olarak yayınlayabilir. Örneğin, robot "kutu", "palet" ve "forklift" gibi nesneleri tespit ettiğinde, bu sınıfları /ultralytics/detection/classes konusuna yayınlar. Bu bilgi daha sonra merkezi bir izleme sistemi tarafından envanteri gerçek zamanlı olarak takip etmek, engellerden kaçınmak için robotun yol planlamasını optimize etmek veya tespit edilen bir kutuyu almak gibi belirli eylemleri tetiklemek için kullanılabilir. Bu yaklaşım, iletişim için gereken bant genişliğini azaltır ve kritik verilerin iletilmesine odaklanır.
Link to this sectionString Adım Adım Kullanımı#
This example demonstrates how to use the Ultralytics YOLO package with ROS. In this example, we subscribe to a camera topic, process the incoming image using YOLO, and publish the detected objects to new topic /ultralytics/detection/classes using std_msgs/String messages. The ros_numpy package is used to convert the ROS Image message to a NumPy array for processing with YOLO.
import time

import ros_numpy
import rospy
from sensor_msgs.msg import Image
from std_msgs.msg import String

from ultralytics import YOLO

detection_model = YOLO("yolo26m.pt")
rospy.init_node("ultralytics")
time.sleep(1)
classes_pub = rospy.Publisher("/ultralytics/detection/classes", String, queue_size=5)

def callback(data):
    """Callback function to process image and publish detected classes."""
    array = ros_numpy.numpify(data)
    if classes_pub.get_num_connections():
        det_result = detection_model(array)
        classes = det_result[0].boxes.cls.cpu().numpy().astype(int)
        names = [det_result[0].names[i] for i in classes]
        classes_pub.publish(String(data=str(names)))

rospy.Subscriber("/camera/color/image_raw", Image, callback)
while True:
    rospy.spin()
Link to this sectionUltralytics'i ROS Derinlik Görüntüleri ile Kullanma#
RGB görüntülere ek olarak, ROS, nesnelerin kameradan uzaklığı hakkında bilgi sağlayan derinlik görüntülerini destekler. Derinlik görüntüleri, engellerden kaçınma, 3D haritalama ve yerelleştirme gibi robotik uygulamalar için çok önemlidir.
Derinlik görüntüsü, her pikselin kameradan bir nesneye olan mesafeyi temsil ettiği bir görüntüdür. Renk yakalayan RGB görüntülerin aksine, derinlik görüntüleri uzamsal bilgiyi yakalar ve robotların çevrelerinin 3D yapısını algılamasını sağlar.
Derinlik görüntüleri çeşitli sensörler kullanılarak elde edilebilir:
- Stereo Kameralar: Görüntü farklılığına dayalı olarak derinliği hesaplamak için iki kamera kullanır.
- Time-of-Flight (ToF) Kameralar: Işığın bir nesneden geri dönmesi için geçen süreyi ölçer.
- Yapılandırılmış Işık Sensörleri: Bir desen yansıtır ve yüzeylerdeki deformasyonunu ölçer.
Link to this sectionYOLO'yu Derinlik Görüntüleri ile Kullanma#
ROS'ta derinlik görüntüleri, kodlama, yükseklik, genişlik ve piksel verileri için alanlar içeren sensor_msgs/Image mesaj tipiyle temsil edilir. Derinlik görüntüleri için kodlama alanı genellikle piksel başına 16-bit işaretsiz tam sayıyı belirten ve her değerin nesneye olan mesafeyi temsil ettiği "16UC1" gibi bir format kullanır. Derinlik görüntüleri, çevrenin daha kapsamlı bir görünümünü sağlamak için genellikle RGB görüntülerle birlikte kullanılır.
YOLO kullanarak, hem RGB hem de derinlik görüntülerinden bilgi çıkarmak ve birleştirmek mümkündür. Örneğin, YOLO bir RGB görüntüsü içindeki nesneleri tespit edebilir ve bu tespit, derinlik görüntüsündeki karşılık gelen bölgeleri belirlemek için kullanılabilir. Bu, tespit edilen nesneler için hassas derinlik bilgilerinin çıkarılmasına olanak tanıyarak robotun çevresini üç boyutlu olarak anlama yeteneğini geliştirir.
Derinlik görüntüleriyle çalışırken, RGB ve derinlik görüntülerinin doğru bir şekilde hizalandığından emin olmak çok önemlidir. Intel RealSense serisi gibi RGB-D kameralar, senkronize RGB ve derinlik görüntüleri sağlayarak her iki kaynaktan gelen bilgilerin birleştirilmesini kolaylaştırır. Ayrı RGB ve derinlik kameraları kullanılıyorsa, doğru hizalamayı sağlamak için bunları kalibre etmek çok önemlidir.
Link to this sectionDerinlik Adım Adım Kullanımı#
Bu örnekte, bir görüntüyü segmentlere ayırmak için YOLO kullanıyor ve derinlik görüntüsündeki nesneyi segmentlere ayırmak için çıkarılan maskeyi uyguluyoruz. Bu, ilgi duyulan nesnenin her bir pikselinin kameranın odak merkezinden olan mesafesini belirlememizi sağlar. Bu mesafe bilgilerini elde ederek, kamera ile sahnedeki belirli nesne arasındaki mesafeyi hesaplayabiliriz. Gerekli kütüphaneleri içe aktararak, bir ROS düğümü oluşturarak ve bir segmentasyon modeli ve bir ROS konusu başlatarak başla.
import time

import rospy
from std_msgs.msg import String

from ultralytics import YOLO

rospy.init_node("ultralytics")
time.sleep(1)

segmentation_model = YOLO("yolo26m-seg.pt")

classes_pub = rospy.Publisher("/ultralytics/detection/distance", String, queue_size=5)
Ardından, gelen derinlik görüntüsü mesajını işleyen bir geri çağırma işlevi tanımla. İşlev, derinlik görüntüsü ve RGB görüntüsü mesajlarını bekler, bunları NumPy dizilerine dönüştürür ve segmentasyon modelini RGB görüntüsüne uygular. Daha sonra tespit edilen her nesne için segmentasyon maskesini çıkarır ve derinlik görüntüsünü kullanarak nesnenin kameradan ortalama mesafesini hesaplar. Çoğu sensörün, değerlerin inf (np.inf) olarak temsil edildiği maksimum bir mesafesi (klip mesafesi) vardır. İşlemeden önce, bu boş değerleri filtrelemek ve onlara 0 değerini atamak önemlidir. Son olarak, tespit edilen nesneleri ve ortalama mesafelerini /ultralytics/detection/distance konusuna yayınlar.
import numpy as np
import ros_numpy
from sensor_msgs.msg import Image

def callback(data):
    """Callback function to process depth image and RGB image."""
    image = rospy.wait_for_message("/camera/color/image_raw", Image)
    image = ros_numpy.numpify(image)
    depth = ros_numpy.numpify(data)
    result = segmentation_model(image)

    all_objects = []
    for index, cls in enumerate(result[0].boxes.cls):
        class_index = int(cls.cpu().numpy())
        name = result[0].names[class_index]
        mask = result[0].masks.data.cpu().numpy()[index, :, :].astype(int)
        obj = depth[mask == 1]
        obj = obj[~np.isnan(obj)]
        avg_distance = np.mean(obj) if len(obj) else np.inf
        all_objects.append(f"{name}: {avg_distance:.2f}m")

    classes_pub.publish(String(data=str(all_objects)))

rospy.Subscriber("/camera/depth/image_raw", Image, callback)

while True:
    rospy.spin()
Kodun tamamı
import time

import numpy as np
import ros_numpy
import rospy
from sensor_msgs.msg import Image
from std_msgs.msg import String

from ultralytics import YOLO

rospy.init_node("ultralytics")
time.sleep(1)

segmentation_model = YOLO("yolo26m-seg.pt")

classes_pub = rospy.Publisher("/ultralytics/detection/distance", String, queue_size=5)

def callback(data):
    """Callback function to process depth image and RGB image."""
    image = rospy.wait_for_message("/camera/color/image_raw", Image)
    image = ros_numpy.numpify(image)
    depth = ros_numpy.numpify(data)
    result = segmentation_model(image)

    all_objects = []
    for index, cls in enumerate(result[0].boxes.cls):
        class_index = int(cls.cpu().numpy())
        name = result[0].names[class_index]
        mask = result[0].masks.data.cpu().numpy()[index, :, :].astype(int)
        obj = depth[mask == 1]
        obj = obj[~np.isnan(obj)]
        avg_distance = np.mean(obj) if len(obj) else np.inf
        all_objects.append(f"{name}: {avg_distance:.2f}m")

    classes_pub.publish(String(data=str(all_objects)))

rospy.Subscriber("/camera/depth/image_raw", Image, callback)

while True:
    rospy.spin()
Link to this sectionUltralytics'i ROS sensor_msgs/PointCloud2 ile Kullanma#
sensor_msgs/PointCloud2 mesaj tipi, ROS'ta 3D nokta bulutu verilerini temsil etmek için kullanılan bir veri yapısıdır. Bu mesaj tipi, 3D haritalama, nesne tanıma ve yerelleştirme gibi görevleri mümkün kılarak robotik uygulamalar için tamamlayıcıdır.
Nokta bulutu, üç boyutlu bir koordinat sistemi içinde tanımlanan veri noktaları koleksiyonudur. Bu veri noktaları, 3D tarama teknolojileri aracılığıyla yakalanan bir nesnenin veya sahnenin dış yüzeyini temsil eder. Buluttaki her noktanın, uzaydaki konumuna karşılık gelen X, Y ve Z koordinatları vardır ve ayrıca renk ve yoğunluk gibi ek bilgiler de içerebilir.
sensor_msgs/PointCloud2 ile çalışırken, nokta bulutu verilerinin elde edildiği sensörün referans çerçevesini dikkate almak çok önemlidir. Nokta bulutu başlangıçta sensörün referans çerçevesinde yakalanır. /tf_static konusunu dinleyerek bu referans çerçevesini belirleyebilirsin. Ancak, özel uygulama gereksinimlerine bağlı olarak, nokta bulutunu başka bir referans çerçevesine dönüştürmen gerekebilir. Bu dönüşüm, koordinat çerçevelerini yönetmek ve verileri aralarında dönüştürmek için araçlar sağlayan tf2_ros paketi kullanılarak elde edilebilir.
Nokta Bulutları çeşitli sensörler kullanılarak elde edilebilir:
- LIDAR (Light Detection and Ranging): Nesnelere olan mesafeleri ölçmek ve yüksek hassasiyetli 3D haritalar oluşturmak için lazer darbeleri kullanır.
- Derinlik Kameraları: Sahnenin 3D rekonstrüksiyonuna olanak tanıyan her piksel için derinlik bilgisini yakalar.
- Stereo Kameralar: Üçgenleme yoluyla derinlik bilgisi elde etmek için iki veya daha fazla kamera kullanır.
- Yapılandırılmış Işık Tarayıcıları: Bir yüzey üzerine bilinen bir desen yansıtır ve derinliği hesaplamak için deformasyonu ölçer.
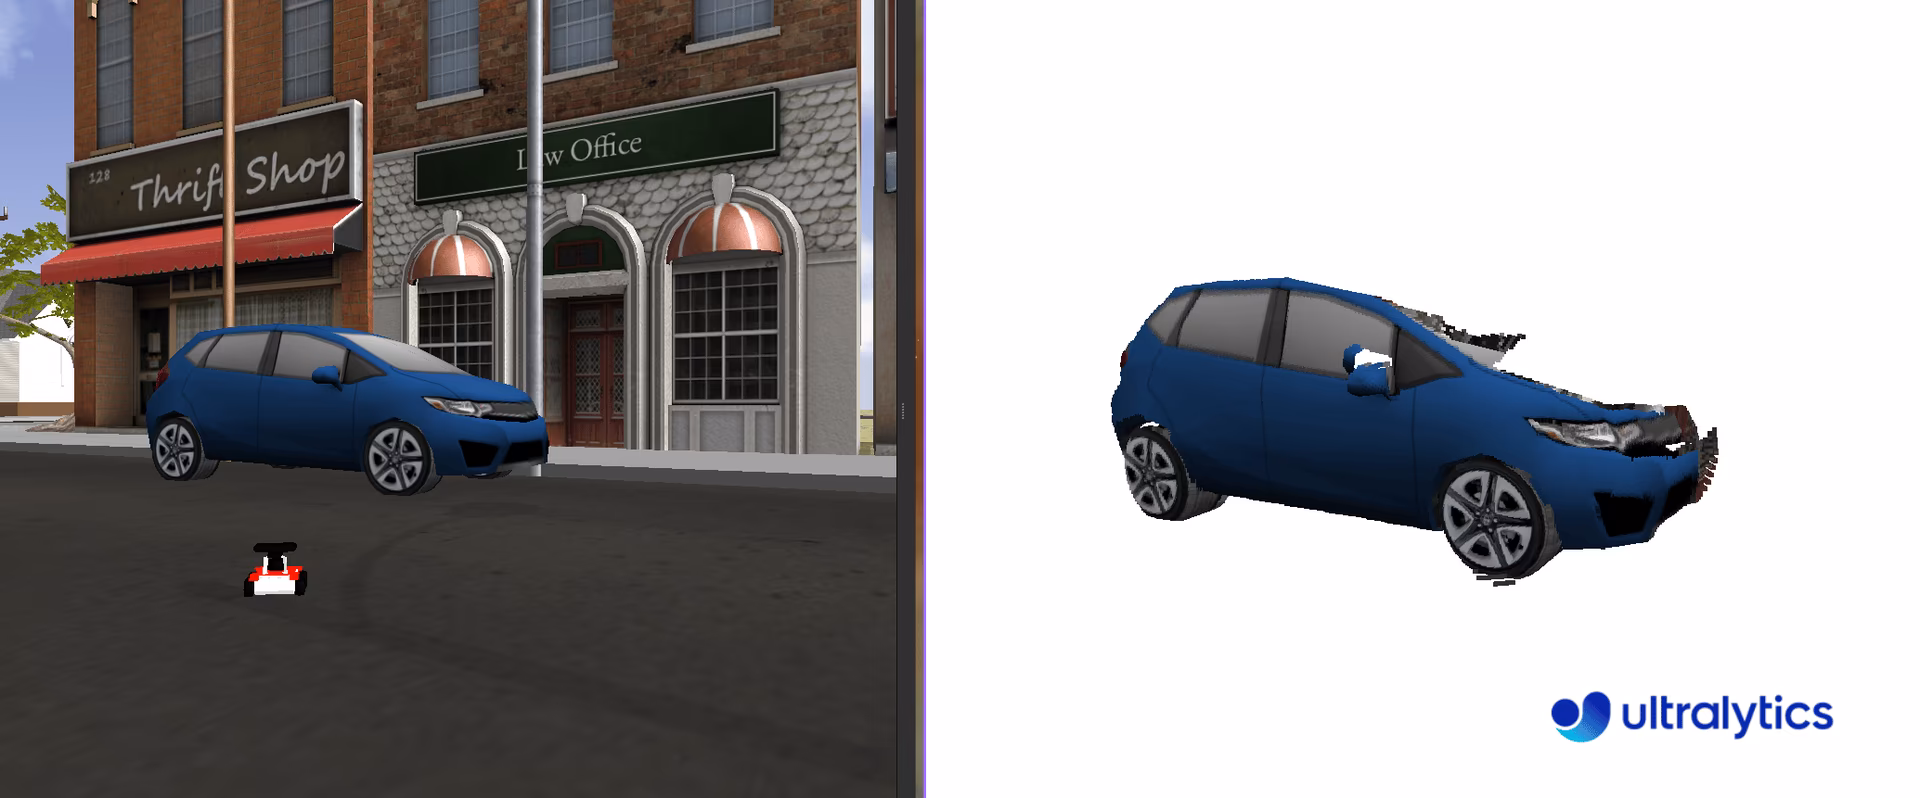
Link to this sectionYOLO'yu Nokta Bulutları ile Kullanma#
YOLO'yu sensor_msgs/PointCloud2 tipi mesajlarla entegre etmek için, derinlik haritaları için kullanılan yönteme benzer bir yöntem kullanabiliriz. Nokta bulutuna gömülü renk bilgisinden yararlanarak, bir 2D görüntü çıkarabilir, bu görüntü üzerinde YOLO kullanarak segmentasyon gerçekleştirebilir ve ardından ortaya çıkan maskeyi üç boyutlu noktalara uygulayarak ilgilenilen 3D nesneyi izole edebiliriz.
Nokta bulutlarını işlemek için kullanıcı dostu bir Python kütüphanesi olan Open3D'yi (pip install open3d) öneriyoruz. Open3D, nokta bulutu veri yapılarını yönetmek, bunları görselleştirmek ve karmaşık işlemleri sorunsuz bir şekilde yürütmek için sağlam araçlar sağlar. Bu kütüphane, süreci önemli ölçüde basitleştirebilir ve nokta bulutlarını YOLO tabanlı segmentasyon ile birlikte işleme ve analiz etme yeteneğimizi artırabilir.
Link to this sectionNokta Bulutları Adım Adım Kullanımı#
Gerekli kütüphaneleri içe aktar ve segmentasyon için YOLO modelini oluştur.
import time

import rospy

from ultralytics import YOLO

rospy.init_node("ultralytics")
time.sleep(1)
segmentation_model = YOLO("yolo26m-seg.pt")
Create a function pointcloud2_to_array, which transforms a sensor_msgs/PointCloud2 message into two NumPy arrays. The sensor_msgs/PointCloud2 messages contain n points based on the width and height of the acquired image. For instance, a 480 x 640 image will have 307,200 points. Each point includes three spatial coordinates (xyz) and the corresponding color in RGB format. These can be considered as two separate channels of information.
İşlev, xyz koordinatlarını ve RGB değerlerini orijinal kamera çözünürlüğü (width x height) formatında döndürür. Çoğu sensörün, değerlerin inf (np.inf) olarak temsil edildiği maksimum bir mesafe (klip mesafesi) vardır. İşlemeden önce, bu boş değerleri filtrelemek ve onlara 0 değerini atamak önemlidir.
import numpy as np
import ros_numpy

def pointcloud2_to_array(pointcloud2: PointCloud2) -> tuple:
    """Convert a ROS PointCloud2 message to a numpy array.

    Args:
        pointcloud2 (PointCloud2): the PointCloud2 message

    Returns:
        (tuple): tuple containing (xyz, rgb)
    """
    pc_array = ros_numpy.point_cloud2.pointcloud2_to_array(pointcloud2)
    split = ros_numpy.point_cloud2.split_rgb_field(pc_array)
    rgb = np.stack([split["b"], split["g"], split["r"]], axis=2)
    xyz = ros_numpy.point_cloud2.get_xyz_points(pc_array, remove_nans=False)
    xyz = np.array(xyz).reshape((pointcloud2.height, pointcloud2.width, 3))
    nan_rows = np.isnan(xyz).all(axis=2)
    xyz[nan_rows] = [0, 0, 0]
    rgb[nan_rows] = [0, 0, 0]
    return xyz, rgb
Ardından, nokta bulutu mesajını almak için /camera/depth/points konusuna abone ol ve sensor_msgs/PointCloud2 mesajını, XYZ koordinatlarını ve RGB değerlerini içeren NumPy dizilerine dönüştür (pointcloud2_to_array işlevini kullanarak). Segmentli nesneleri çıkarmak için RGB görüntüsünü YOLO modeliyle işle. Tespit edilen her nesne için segmentasyon maskesini çıkar ve nesneyi 3D uzayda izole etmek için hem RGB görüntüsüne hem de XYZ koordinatlarına uygula.
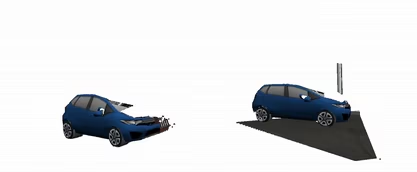
Maskeyi işlemek, nesnenin varlığını gösteren 1 ve yokluğunu gösteren 0 ile ikili değerlerden oluştuğu için basittir. Maskeyi uygulamak için, orijinal kanalları maske ile çarpman yeterlidir. Bu işlem, ilgilenilen nesneyi görüntü içinde etkili bir şekilde izole eder. Son olarak, bir Open3D nokta bulutu nesnesi oluştur ve segmentli nesneyi 3D uzayda ilişkili renklerle görselleştir.
import sys

import open3d as o3d

ros_cloud = rospy.wait_for_message("/camera/depth/points", PointCloud2)
xyz, rgb = pointcloud2_to_array(ros_cloud)
result = segmentation_model(rgb)

if not len(result[0].boxes.cls):
    print("No objects detected")
    sys.exit()

classes = result[0].boxes.cls.cpu().numpy().astype(int)
for index, class_id in enumerate(classes):
    mask = result[0].masks.data.cpu().numpy()[index, :, :].astype(int)
    mask_expanded = np.stack([mask, mask, mask], axis=2)

    obj_rgb = rgb * mask_expanded
    obj_xyz = xyz * mask_expanded

    pcd = o3d.geometry.PointCloud()
    pcd.points = o3d.utility.Vector3dVector(obj_xyz.reshape((ros_cloud.height * ros_cloud.width, 3)))
    pcd.colors = o3d.utility.Vector3dVector(obj_rgb.reshape((ros_cloud.height * ros_cloud.width, 3)) / 255)
    o3d.visualization.draw_geometries([pcd])
Kodun tamamı
import sys
import time

import numpy as np
import open3d as o3d
import ros_numpy
import rospy
from sensor_msgs.msg import PointCloud2

from ultralytics import YOLO

rospy.init_node("ultralytics")
time.sleep(1)
segmentation_model = YOLO("yolo26m-seg.pt")

def pointcloud2_to_array(pointcloud2: PointCloud2) -> tuple:
    """Convert a ROS PointCloud2 message to a numpy array.

    Args:
        pointcloud2 (PointCloud2): the PointCloud2 message

    Returns:
        (tuple): tuple containing (xyz, rgb)
    """
    pc_array = ros_numpy.point_cloud2.pointcloud2_to_array(pointcloud2)
    split = ros_numpy.point_cloud2.split_rgb_field(pc_array)
    rgb = np.stack([split["b"], split["g"], split["r"]], axis=2)
    xyz = ros_numpy.point_cloud2.get_xyz_points(pc_array, remove_nans=False)
    xyz = np.array(xyz).reshape((pointcloud2.height, pointcloud2.width, 3))
    nan_rows = np.isnan(xyz).all(axis=2)
    xyz[nan_rows] = [0, 0, 0]
    rgb[nan_rows] = [0, 0, 0]
    return xyz, rgb

ros_cloud = rospy.wait_for_message("/camera/depth/points", PointCloud2)
xyz, rgb = pointcloud2_to_array(ros_cloud)
result = segmentation_model(rgb)

if not len(result[0].boxes.cls):
    print("No objects detected")
    sys.exit()

classes = result[0].boxes.cls.cpu().numpy().astype(int)
for index, class_id in enumerate(classes):
    mask = result[0].masks.data.cpu().numpy()[index, :, :].astype(int)
    mask_expanded = np.stack([mask, mask, mask], axis=2)

    obj_rgb = rgb * mask_expanded
    obj_xyz = xyz * mask_expanded

    pcd = o3d.geometry.PointCloud()
    pcd.points = o3d.utility.Vector3dVector(obj_xyz.reshape((ros_cloud.height * ros_cloud.width, 3)))
    pcd.colors = o3d.utility.Vector3dVector(obj_rgb.reshape((ros_cloud.height * ros_cloud.width, 3)) / 255)
    o3d.visualization.draw_geometries([pcd])
Link to this sectionSonuç#
Ultralytics YOLO'nun ROS'a entegre edilmesiyle robotun, RGB görüntüleri, derinlik görüntüleri ve nokta bulutları üzerinde nesne algılama ve segmentasyon çalıştırarak ham sensör akışlarını eyleme dönüştürülebilir algılamaya dönüştürebilir. Buradan itibaren, daha fazla çıkarım seçeneği için Tahmin modunu keşfet veya robotik uygulamanı prototipten üretime taşımak için bilgisayarlı görü projesinin adımlarını takip et.
Link to this sectionSSS#
Link to this sectionRobot İşletim Sistemi (ROS) nedir?#
Robot İşletim Sistemi (ROS), geliştiricilerin sağlam robot uygulamaları oluşturmasına yardımcı olmak için robotikte yaygın olarak kullanılan açık kaynaklı bir çerçevedir. Robotik sistemler oluşturmak ve bunlarla arayüz oluşturmak için kütüphaneler ve araçlar koleksiyonu sağlar, bu da karmaşık uygulamaların geliştirilmesini kolaylaştırır. ROS, konular veya hizmetler üzerinden mesajlar kullanarak düğümler arasındaki iletişimi destekler.
Link to this sectionUltralytics YOLO'yu gerçek zamanlı nesne tespiti için ROS ile nasıl entegre ederim?#
Ultralytics YOLO'yu ROS ile entegre etmek, bir ROS ortamı kurmayı ve sensör verilerini işlemek için YOLO kullanmayı içerir. ros_numpy ve Ultralytics YOLO gibi gerekli bağımlılıkları kurarak başla:
pip install ros_numpy ultralyticsArdından, bir ROS düğümü oluştur ve nesne algılama için gelen verileri işlemek amacıyla bir görüntü konusuna abone ol. İşte minimal bir örnek:
import ros_numpy
import rospy
from sensor_msgs.msg import Image

from ultralytics import YOLO

detection_model = YOLO("yolo26m.pt")
rospy.init_node("ultralytics")
det_image_pub = rospy.Publisher("/ultralytics/detection/image", Image, queue_size=5)

def callback(data):
    array = ros_numpy.numpify(data)
    det_result = detection_model(array)
    det_annotated = det_result[0].plot(show=False)
    det_image_pub.publish(ros_numpy.msgify(Image, det_annotated, encoding="rgb8"))

rospy.Subscriber("/camera/color/image_raw", Image, callback)
rospy.spin()
Link to this sectionROS konuları nelerdir ve Ultralytics YOLO'da nasıl kullanılırlar?#
ROS konuları, bir yayınla-abone ol modeli kullanarak bir ROS ağındaki düğümler arasındaki iletişimi kolaylaştırır. Konu, düğümlerin mesajları asenkron olarak gönderip almak için kullandığı adlandırılmış bir kanaldır. Ultralytics YOLO bağlamında, bir düğümün bir görüntü konusuna abone olmasını sağlayabilir, algılama veya segmentasyon gibi görevler için YOLO kullanarak görüntüleri işleyebilir ve sonuçları yeni konulara yayınlayabilirsin.
Örneğin, bir kamera konusuna abone ol ve gelen görüntüyü tespit için işle:
rospy.Subscriber("/camera/color/image_raw", Image, callback)Link to this sectionNeden ROS'ta Ultralytics YOLO ile derinlik görüntüleri kullanmalıyım?#
ROS'ta sensor_msgs/Image tarafından temsil edilen derinlik görüntüleri, nesnelerin kameradan uzaklığını sağlar; bu, engellerden kaçınma, 3D haritalama ve yerelleştirme gibi görevler için çok önemlidir. RGB görüntülerin yanı sıra derinlik bilgilerini kullanarak, robotlar 3D çevrelerini daha iyi anlayabilir.
YOLO ile, RGB görüntülerinden segmentasyon maskeleri çıkarabilir ve bu maskeleri derinlik görüntülerine uygulayarak hassas 3D nesne bilgileri elde edebilir, robotun çevresinde gezinme ve etkileşim kurma yeteneğini geliştirebilirsin.
Link to this sectionROS'ta YOLO ile 3D nokta bulutlarını nasıl görselleştirebilirim?#
ROS'ta YOLO ile 3D nokta bulutlarını görselleştirmek için:
sensor_msgs/PointCloud2mesajlarını NumPy dizilerine dönüştür.- RGB görüntüleri segmentlere ayırmak için YOLO kullan.
- Segmentasyon maskesini nokta bulutuna uygula.
Görselleştirme için Open3D kullanan bir örnek:
import sys

import numpy as np
import open3d as o3d
import ros_numpy
import rospy
from sensor_msgs.msg import PointCloud2

from ultralytics import YOLO

rospy.init_node("ultralytics")
segmentation_model = YOLO("yolo26m-seg.pt")

def pointcloud2_to_array(pointcloud2):
    pc_array = ros_numpy.point_cloud2.pointcloud2_to_array(pointcloud2)
    split = ros_numpy.point_cloud2.split_rgb_field(pc_array)
    rgb = np.stack([split["b"], split["g"], split["r"]], axis=2)
    xyz = ros_numpy.point_cloud2.get_xyz_points(pc_array, remove_nans=False)
    xyz = np.array(xyz).reshape((pointcloud2.height, pointcloud2.width, 3))
    return xyz, rgb

ros_cloud = rospy.wait_for_message("/camera/depth/points", PointCloud2)
xyz, rgb = pointcloud2_to_array(ros_cloud)
result = segmentation_model(rgb)

if not len(result[0].boxes.cls):
    print("No objects detected")
    sys.exit()

classes = result[0].boxes.cls.cpu().numpy().astype(int)
for index, class_id in enumerate(classes):
    mask = result[0].masks.data.cpu().numpy()[index, :, :].astype(int)
    mask_expanded = np.stack([mask, mask, mask], axis=2)

    obj_rgb = rgb * mask_expanded
    obj_xyz = xyz * mask_expanded

    pcd = o3d.geometry.PointCloud()
    pcd.points = o3d.utility.Vector3dVector(obj_xyz.reshape((-1, 3)))
    pcd.colors = o3d.utility.Vector3dVector(obj_rgb.reshape((-1, 3)) / 255)
    o3d.visualization.draw_geometries([pcd])
Bu yaklaşım, robotik uygulamalarda navigasyon ve manipülasyon gibi görevler için yararlı olan, segmentlere ayrılmış nesnelerin 3D bir görselleştirmesini sağlar.