YOLOv9: Nesne Algılama Teknolojisinde Büyük Bir İlerleme
YOLOv9, Programlanabilir Gradyan Bilgisi (PGI) ve Genelleştirilmiş Verimli Katman Toplama Ağı (GELAN) sunarak gerçek zamanlı nesne algılamayı ileri taşıdı. Yayımlandığı dönemde MS COCO veri kümesinde önceki gerçek zamanlı algılayıcılara kıyasla verimliliği ve doğruluğu artırdı. YOLOv9 projesi, ayrı bir açık kaynak ekip tarafından geliştirildi ve Ultralytics YOLOv5 kod tabanını temel alıyor.
İzle: Ultralytics Kullanarak Özel Verilerle YOLOv9 Eğitimi | Endüstriyel Paket Veri Kümesi
YOLOv9'a Giriş#
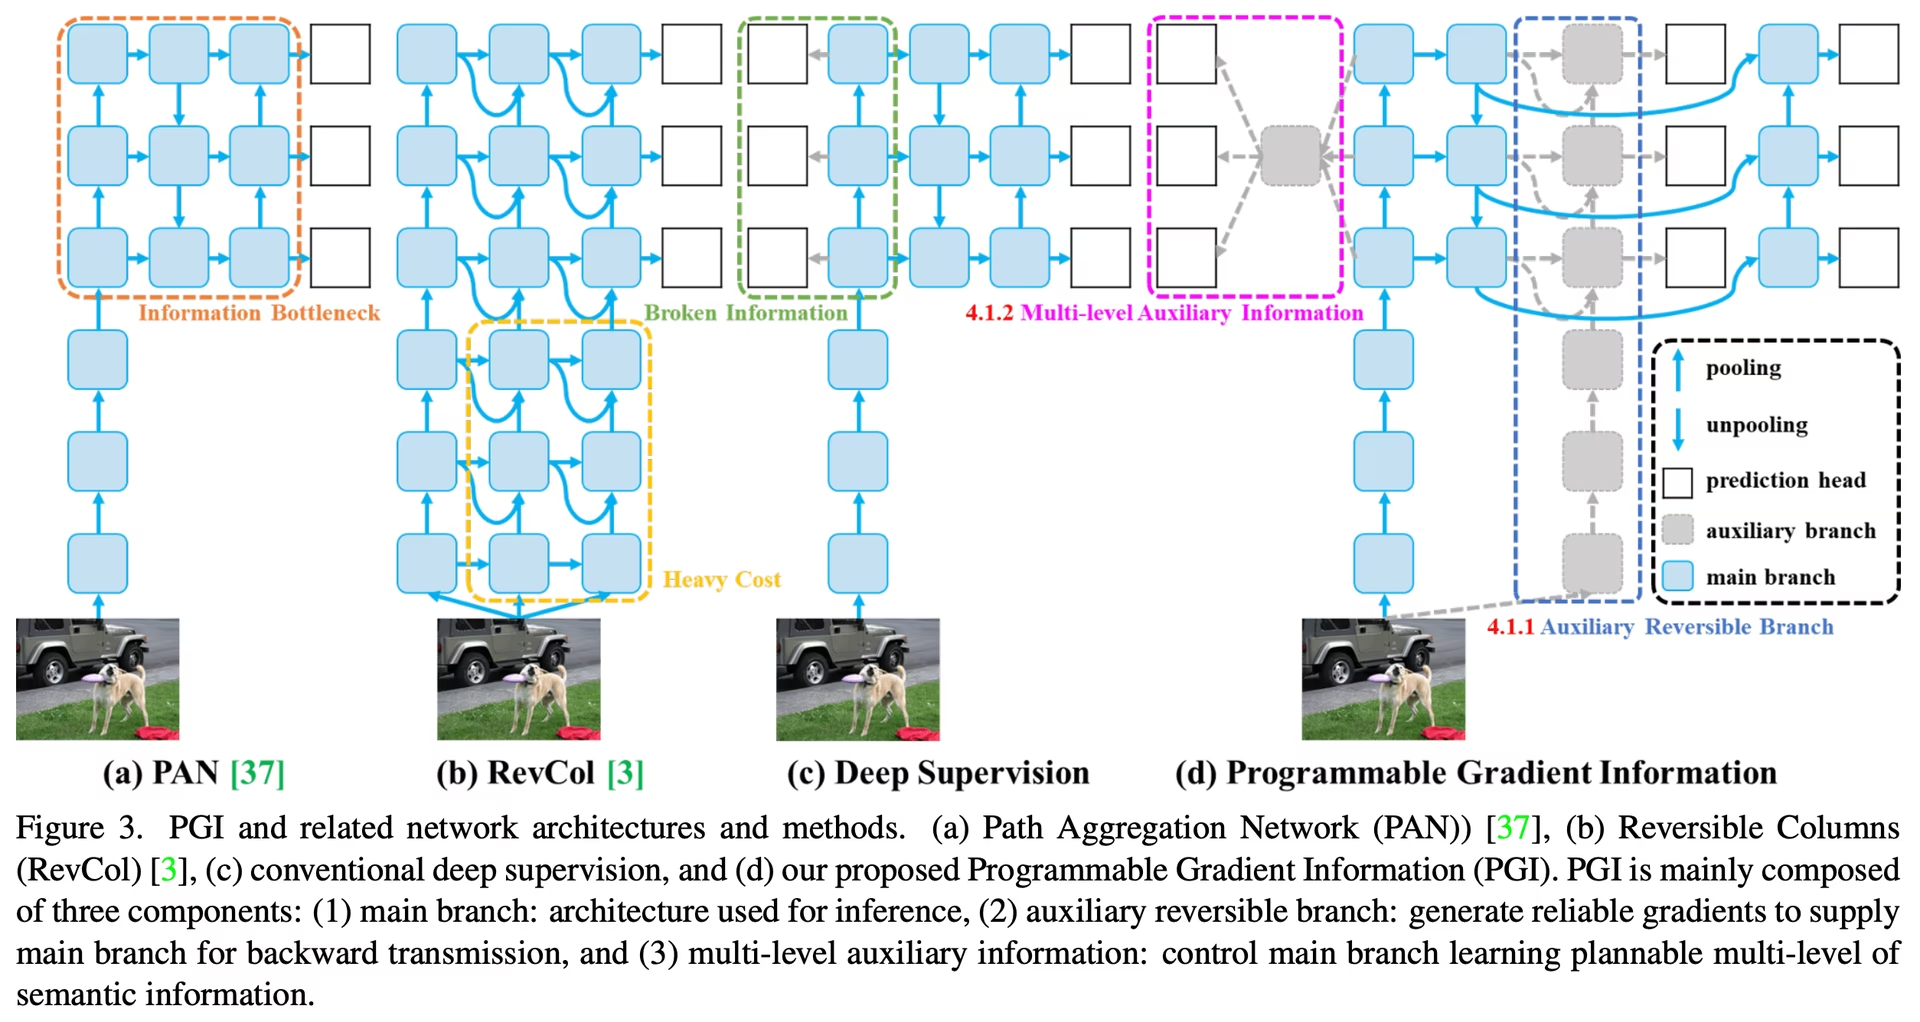
YOLOv9, derin sinir ağlarında bulunan bilgi kaybı sorununu giderir. PGI ve GELAN mimarisini birleştirerek modelin öğrenme kapasitesini artırır, algılama süreci boyunca önemli bilgileri korur ve hem doğruluğu hem de verimliliği iyileştirir.
YOLOv9'un Temel Yenilikleri#
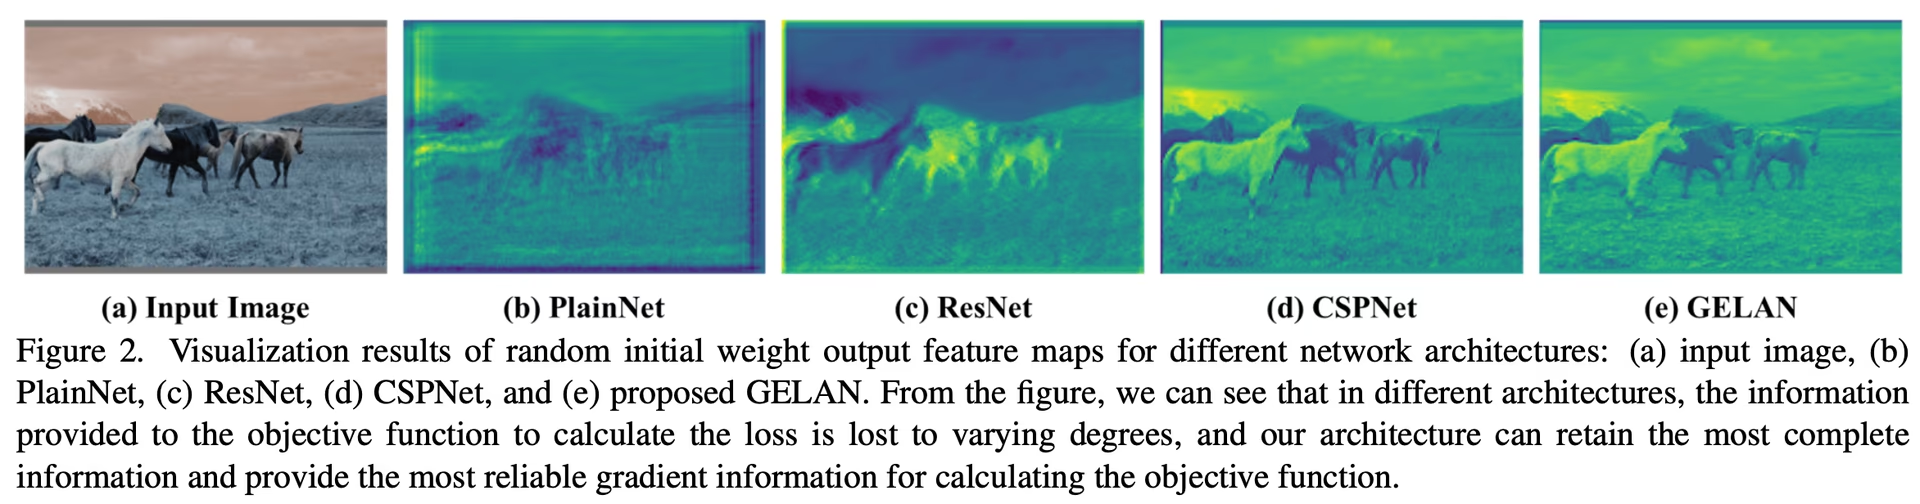
YOLOv9'un tasarımı, derin sinir ağlarındaki bilgi kaybını hedef alır. Bilgi Darboğazı İlkesi ve Tersinir Fonksiyonların kullanımı, tasarımın merkezinde yer alır ve YOLOv9'un yüksek verimlilik ile doğruluğu korumasına yardımcı olur.
Bilgi Darboğazı İlkesi#
Bilgi Darboğazı İlkesi, derin öğrenmedeki temel bir sorunu ortaya koyar: Veriler bir ağın ardışık katmanlarından geçtikçe bilgi kaybı olasılığı artar. Bu olgu matematiksel olarak şöyle ifade edilir:
I(X, X) >= I(X, f_theta(X)) >= I(X, g_phi(f_theta(X)))Burada I karşılıklı bilgiyi belirtirken, f ve g, sırasıyla theta ve phi parametrelerine sahip dönüşüm fonksiyonlarını ifade eder. YOLOv9, ağın derinliği boyunca temel verilerin korunmasına yardımcı olan Programlanabilir Gradyan Bilgisini (PGI) uygulayarak bu soruna karşı koyar; böylece daha güvenilir gradyanlar üretilir ve sonuç olarak model daha iyi yakınsar ve performans gösterir.
Tersinir Fonksiyonlar#
Tersinir Fonksiyonlar kavramı, YOLOv9 tasarımının bir diğer temel unsurudur. Bir fonksiyon, hiçbir bilgi kaybı olmadan tersi alınabiliyorsa tersinir kabul edilir; bu durum şöyle ifade edilir:
X = v_zeta(r_psi(X))tersinir fonksiyon ve bunun tersi için sırasıyla psi ve zeta parametreleriyle. Bu özellik derin öğrenme mimarileri için kritik önemdedir; ağın bilgi akışının tamamını korumasını ve böylece model parametrelerinin daha doğru güncellenmesini sağlar. YOLOv9, özellikle daha derin katmanlarda bilgi bozulması riskini azaltmak ve nesne algılama görevleri için kritik verilerin korunmasını sağlamak amacıyla mimarisinde tersinir fonksiyonlara yer verir.
Hafif Modeller Üzerindeki Etkisi#
Bilgi kaybını ele almak, genellikle yetersiz sayıda parametreye sahip olan ve ileri beslemeli süreçte önemli miktarda bilgi kaybetmeye yatkın hafif modeller için özellikle önemlidir. YOLOv9 mimarisi; PGI ve tersinir fonksiyonlardan yararlanarak sadeleştirilmiş bir modelde bile doğru nesne algılama için gereken temel bilgilerin korunmasını ve etkili biçimde kullanılmasını sağlar.
Programlanabilir Gradyan Bilgisi (PGI)#
PGI, bilgi darboğazı sorunuyla mücadele etmek ve derin ağ katmanları boyunca temel verilerin korunmasını sağlamak için YOLOv9'da sunulan yeni bir kavramdır. Güvenilir gradyanların üretilmesini sağlayarak modelin doğru biçimde güncellenmesine yardımcı olur ve genel algılama performansını artırır.
Genelleştirilmiş Verimli Katman Birleştirme Ağı (GELAN)#
GELAN, YOLOv9'un parametre kullanımını ve hesaplama verimliliğini artıran bir mimaridir. Tasarımı, çeşitli hesaplama bloklarının esnek biçimde entegre edilmesini sağlar; böylece YOLOv9 hız veya doğruluktan ödün vermeden çok çeşitli uygulamalara uyum sağlayabilir.
YOLOv9 Kıyaslama Sonuçları#
YOLOv9'u Ultralytics Kıyaslama moduyla kıyaslamak, eğitilmiş ve doğrulanmış modelinin gerçek dünya senaryolarındaki performansını değerlendirmeyi içerir. Bu süreç şunları kapsar:
- Performans Değerlendirmesi: Modelin hızını ve doğruluğunu değerlendirme.
- Dışa Aktarma Biçimleri: Gerekli standartları karşıladığından ve çeşitli ortamlarda iyi performans gösterdiğinden emin olmak için modeli farklı dışa aktarma biçimlerinde test etme.
- Çerçeve Desteği: Tutarlı ve güvenilir sonuçlar için bu değerlendirmeleri Ultralytics paketi içinde çalıştırma.
Kıyaslama yaparak modelinin yalnızca kontrollü test ortamlarında iyi performans gösterdiğinden değil, gerçek dünyadaki pratik uygulamalarda da yüksek performansını koruduğundan emin olabilirsin.
İzle: Ultralytics Python Paketiyle YOLOv9 Modelinde Benchmark Nasıl Yapılır
MS COCO Veri Kümesindeki Performans#
Yayımlandığı dönemde YOLOv9, farklı model boyutlarında COCO veri kümesinde yeni kıyaslama sonuçları elde etti. Aşağıdaki tabloda Ultralytics'te bulunan her YOLOv9 modelinin doğruluğu, parametreleri ve FLOPs değerleri listeleniyor.
Küçük t modelinden büyük e modeline kadar uzanan YOLOv9 çeşitleri, önceki sürümlere ve rakip modellere kıyasla parametreleri ve hesaplamayı (FLOPs) korurken veya azaltırken doğruluğu (mAP) artırır.
Diğer gerçek zamanlı algılayıcılarla karşılaştırıldığında YOLOv9 şu kazanımları sunar:
- Hafif Modeller: YOLOv9s, AP değerini %0.4∼0.6 artırırken parametre verimliliği ve hesaplama yükü açısından YOLO MS-S'yi geride bırakır.
- Orta ve Büyük Modeller: YOLOv9m ve YOLOv9e, doğruluğu artırırken parametreleri ve hesaplamayı azaltarak model karmaşıklığı ile algılama performansı arasındaki dengeyi iyileştirir.
YOLOv9c modeli, benzer doğruluğa ulaşırken YOLOv7 AF'ye kıyasla %42 daha az parametre ve %21 daha az hesaplama kullanır. YOLOv9e modeli, YOLOv8x modeline kıyasla %15 daha az parametre ve %25 daha az hesaplama kullanırken AP değerini %1,7 artırır.
Bu sonuçlar, YOLOv9'un gerçek zamanlı nesne algılama ve diğer bilgisayarlı görü görevleri için gereken doğruluktan ödün vermeden hesaplama verimliliğini artırdığını gösterir.
Sonuç#
Şubat 2024'te yayımlanan YOLOv9, gerçek zamanlı nesne algılamanın verimliliğini ve doğruluğunu artırdı. PGI ve GELAN ile bilgi kaybı sorununu ele alarak yayımlandığı dönemde yeni kıyaslama sonuçları elde etti. YOLO26 ve YOLO11 gibi daha yeni modeller o zamandan bu yana daha fazla iyileştirme sundu; ancak YOLOv9'un mimari yenilikleri alanı etkilemeye devam ediyor.
Kullanım Örnekleri#
Bu örnekte YOLOv9 ile basit eğitim ve çıkarım örnekleri sunuluyor.
PyTorch önceden eğitilmiş *.pt modelleri ve yapılandırma *.yaml dosyaları, Python'da bir model örneği oluşturmak için YOLO() sınıfına aktarılabilir:
from ultralytics import YOLO

# Sıfırdan bir YOLOv9c modeli oluştur
model = YOLO("yolov9c.yaml")

# Önceden eğitilmiş ağırlıklardan bir YOLOv9c modeli oluştur
model = YOLO("yolov9c.pt")

# Model bilgilerini görüntüle (isteğe bağlı)
model.info()

# Modeli COCO8 örnek veri kümesinde 100 dönem boyunca eğit
results = model.train(data="coco8.yaml", epochs=100, imgsz=640)

# 'bus.jpg' görüntüsünde YOLOv9c modeliyle çıkarım yap
results = model("path/to/bus.jpg")
Desteklenen Görevler ve Modlar#
YOLOv9 serisi, farklı hesaplama bütçelerine ve doğruluk gereksinimlerine hitap eden, nesne algılama ve örnek segmentasyonu için çeşitli modeller sunar.
| Model | Dosya adları | Görevler | Eğitim | Doğrulama | Çıkarım | Dışa aktar |
|---|---|---|---|---|---|---|
| YOLOv9 | yolov9t.pt yolov9s.pt yolov9m.pt yolov9c.pt yolov9e.pt | Nesne Algılama | ✅ | ✅ | ✅ | ✅ |
| YOLOv9-seg | yolov9c-seg.pt yolov9e-seg.pt | Örnek Segmentasyonu | ✅ | ✅ | ✅ | ✅ |
Bu tabloda YOLOv9 model çeşitleri ile Eğitim, Doğrulama, Çıkarım ve Dışa Aktarma modlarına yönelik destekleri özetleniyor.
YOLOv9 modellerini eğitmek, benzer boyuttaki YOLOv8 modeline kıyasla daha fazla kaynak gerektirir ve daha uzun sürer.
Atıflar ve Teşekkürler#
Gerçek zamanlı nesne algılama alanına önemli katkılarından dolayı YOLOv9 yazarlarına teşekkür etmek isteriz:
@inproceedings{wang2024yolov9,
  title={YOLOv9: Learning What You Want to Learn Using Programmable Gradient Information},
  author={Wang, Chien-Yao and Yeh, I-Hau and Liao, Hong-Yuan Mark},
  booktitle={Computer Vision -- ECCV 2024},
  pages={1--21},
  year={2024},
  organization={Springer Nature Switzerland}
}
Resmî YOLOv9 makalesi Springer ECCV 2024 bildirilerinde yayımlandı; ön baskısı arXiv üzerinde yer alıyor. Yazarlar çalışmalarını kamuya açık hâle getirdi ve kod tabanına GitHub üzerinden erişilebiliyor. Alanı geliştirme ve çalışmalarını daha geniş topluluğun erişimine açma çabalarını takdir ediyoruz.
Sık Sorulan Sorular#
YOLOv9, iki temel teknik sunar: Programlanabilir Gradyan Bilgisi (PGI) ve Genelleştirilmiş Verimli Katman Birleştirme Ağı (GELAN). Bu yenilikler, derin sinir ağlarındaki bilgi kaybı sorunlarını ele alarak yüksek verimlilik, doğruluk ve uyarlanabilirlik sağlar. PGI, ağ katmanları boyunca temel verileri korurken GELAN, parametre kullanımını ve hesaplama verimliliğini optimize eder.
Yayımlandığı sırada YOLOv9, doğruluk ve verimlilik bakımından diğer son teknoloji gerçek zamanlı nesne algılayıcılarından daha iyi performans gösteriyordu. COCO veri kümesinde YOLOv9 modelleri, hesaplama yükünü korurken veya azaltırken çeşitli boyutlarda daha yüksek mAP puanları elde eder. Örneğin YOLOv9c, YOLOv7 AF'ye kıyasla %42 daha az parametre ve %21 daha az hesaplama gereksinimiyle benzer doğruluk sağlar.
Bir YOLOv9 modelini hem Python hem de CLI komutlarıyla eğitebilirsin. Python'da
YOLOsınıfını kullanarak bir model örneği oluştur vetrainmetodunu çağır:from ultralytics import YOLO # Önceden eğitilmiş ağırlıklardan bir YOLOv9c modeli oluştur ve eğit model = YOLO("yolov9c.pt") results = model.train(data="coco8.yaml", epochs=100, imgsz=640)CLI ile eğitim için şu komutu çalıştır:
yolo train model=yolov9c.yaml data=coco8.yaml epochs=100 imgsz=640Eğitim ve çıkarıma yönelik kullanım örnekleri hakkında daha fazla bilgi edin.
YOLOv9, özellikle önemli miktarda bilgi kaybetmeye yatkın hafif modeller için önem taşıyan bilgi kaybını azaltacak şekilde tasarlanmıştır. Programlanabilir Gradyan Bilgisini (PGI) ve tersinir fonksiyonları bir araya getiren YOLOv9, temel verilerin korunmasını sağlayarak modelin doğruluğunu ve verimliliğini artırır. Bu özellik, yüksek performanslı ve küçük boyutlu modeller gerektiren uygulamalar için YOLOv9'u son derece uygun kılar. Daha fazla ayrıntı için YOLOv9'un hafif modeller üzerindeki etkisi bölümünü incele.
YOLOv9; eğitim, doğrulama, çıkarım ve dışa aktarma modlarında nesne algılamayı ve örnek segmentasyonunu destekler.


Yorumlar482
Bir soru sor, sonuçlarını paylaş veya başka birine yardım et.
vuvanhieu
to load a YOLOv5 model def load_yolov5_model(yolo_model_path): device = torch.device('cuda' if torch.cuda.is_available() else 'cpu') model = torch.hub.load('ultralytics/yolov5', 'custom', path=yolo_model_path, force_reload=True).to(device) return model
How in yolov8, yolov9?
1 Paula DerrengerUltralytics
To load a YOLOv8 or YOLOv9 model, you can use the
YOLOclass from the Ultralytics package. Here's a concise way to do it:from ultralytics import YOLO # Load a YOLOv8 model model_v8 = YOLO("yolov8n.pt") # Load a YOLOv9 model model_v9 = YOLO("yolov9c.pt")For more details, you can refer to the YOLOv9 documentation: https://docs.ultralytics.com/models/yolov9/.
MoAbbasid
@glenn-jocher @pderrenger any idea of when the lightweight models can be used in ultralytics?
1 Glenn JocherUltralytics(düzenlendi)
Hi there! 😊
Lightweight models are available in Ultralytics. YOLOv9 ships
yolov9t.pt,yolov9s.ptandyolov9m.ptalongsideyolov9c.ptandyolov9e.pt. For new projects we recommend YOLO26, whose smallest modelyolo26n.ptis built for efficiency.To try a lightweight model:
yolo train model=yolo26n.pt data=coco128.yaml epochs=100If you're tinkering with custom lightweight designs, copy an existing model YAML from the Ultralytics repo and adjust its layers or scales. Contributions or insights are welcome.
Happy detecting!
deepanalyticszlc
Very exciting! Is there a schedule for release of lightweight models?
1- Paula DerrengerUltralytics(düzenlendi)
@deepanalyticszlc hey there! 😊
Lightweight YOLOv9 models are now available:
yolov9t.pt,yolov9s.ptandyolov9m.pt, alongsideyolov9c.ptandyolov9e.pt. For the latest releases, see the Ultralytics GitHub releases.Here's a little snippet on how to load and use YOLOv9 for predictions:
from ultralytics import YOLO

# Load YOLOv9 model
model = YOLO('yolov9t.pt')  # Replace 'yolov9t.pt' with your model file

# Run inference on an image
results = model('path/to/your/image.jpg')

# Display results
results[0].show()
For new projects, we recommend YOLO26, which also comes in small sizes like
yolo26n.pt. ⏰
DolapoSalim(düzenlendi)
@glenn-jocher Kindly assist with this TypeError: TypeError: ERROR C:\path_to_custom_model/yolov9c.pt appears to be an Ultralytics YOLOv5 model originally trained with https://github.com/ultralytics/yolov5. This model is NOT forwards compatible with YOLOv8 at https://github.com/ultralytics/ultralytics. Recommend fixes are to train a new model using the latest 'ultralytics' package or to run a command with an official Ultralytics model, i.e. 'yolo predict model=yolo11n.pt'
Here is my code:
from ultralytics import YOLO

model = YOLO(path_to_YOLOV9.pt )

results = model.predict(source="IMAGE_SOURCE", show=True, conf=0.10)
Note, I am actually working with a custom trained YOLOV9
- Glenn JocherUltralytics
@DolapoSalim to resolve the YOLOv5/YOLOv9 compatibility error when using custom-trained models, please ensure you're using the latest
ultralytics>=8.2.0package and retrain your YOLOv9 model using the official YOLOv9 configuration files from our documentation. For custom training guidance, see the YOLOv9 Training section in our docs.This error typically occurs when using older model formats - newer versions maintain full backward compatibility when models are trained with current Ultralytics implementations.
1
gusreic
This article claims that Yolov9 is based on Yolov5. The Yolov9 paper claims that v9 is based on Yolov7 which is also not based on 5. Is there any other way that would explain this claim? Otherwise maybe adjust the article.
- Glenn JocherUltralytics
@gusreic yes that's correct. YOLOv9 repo is a fork of my YOLOv5 repo. I know this because I wrote nearly all the files in the YOLOv9 repo myself. Unfortunately the author has failed to make this clear, though he did include a (hidden) acknowledgement at the bottom of the README.
1 Oh, that is really unfortunate, thank you for clearing it up since it is not directly apparent. Do you think that YOLOv9 is based on YOLOv5 only with respect to the structure of the repository or would you say that the architecture of the model itself is also based on the architecture of YOLOv5?
- Glenn JocherUltralytics
@gusreic thank you for your question! YOLOv9's repository structure is indeed based on Ultralytics YOLOv5, while its architecture introduces novel components like Programmable Gradient Information (PGI) and GELAN as described in the YOLOv9 documentation. The model itself represents an independent advancement building on broader YOLO research. We'll clarify this distinction in our article! 😊
ghost
Hello,
Thanks for the great documentation!
Quick question: Is the code licensed under AGPLv3 (Ultralytics) or GPLv3 (Wang, Chien-Yao and Liao, Hong-Yuan Mark Github)?
Thanks!
- Glenn JocherUltralytics
@ProfessorHT the YOLOv9 project codebase, developed by Wang, Chien-Yao and Liao, Hong-Yuan Mark, is available on GitHub and licensed under GPLv3, while Ultralytics models and software use the AGPL-3.0 license.
Thank you for your quick response. So to be sure if I use Yolov9 from this documentation with the ultralytics library i will be under the AGPLv3 license and i should buy a license?
- Glenn JocherUltralytics
Yes, if you use YOLOv9 models from the Ultralytics library, you are under the AGPL-3.0 license and would need an Enterprise License for commercial use, unless you open-source your entire project under AGPL-3.0.
 liuweiqing
Does it support automatic downloading of pretrained weights?
- Glenn JocherUltralytics
@14790897 yes, YOLOv9 supports automatic downloading of pretrained weights when using the
YOLO()class in Python or CLI commands, as long as the specified weights file (e.g.,yolov9c.pt) is available in the Ultralytics repository. You can find more details in the YOLOv9 documentation.
jane7166
Hello. I have retrained the YOLOv9 model, and I would like to deploy it as an API. How should I proceed?
- Glenn JocherUltralytics
@jane7166 to deploy your retrained YOLOv9 model as an API, you can use frameworks like FastAPI or Flask to build an endpoint and load your model using the Ultralytics Python package. Refer to the YOLOv9 documentation for guidance on inference, which can be integrated into your API logic. Let us know if you have further questions!
Gnoot01
I'm getting the following errors despite latest torch and ultralytics installs. Kindly assist
File "C:\Users\.venv\lib\site-packages\ultralytics\engine\model.py", line 547, in predict self.predictor.setup_model(model=self.model, verbose=is_cli) File "C:\Users\.venv\lib\site-packages\ultralytics\engine\predictor.py", line 303, in setup_model self.model = AutoBackend( File "C:\Users\.venv\lib\site-packages\torch\utils\_contextlib.py", line 116, in decorate_context return func(*args, **kwargs) File "C:\Users\.venv\lib\site-packages\ultralytics\nn\autobackend.py", line 145, in __init__ model = model.fuse(verbose=verbose) TypeError: BaseModel.fuse() got an unexpected keyword argument 'verbose'- Glenn JocherUltralytics
@Gnoot01 it seems like there's a compatibility issue with the
fusemethod. Please ensure you're using the latest version of the Ultralytics package. If the issue persists, consider checking for any updates or changes in the repository that might address this. For further assistance, you can explore the YOLOv9 documentation. @glenn-jocher Hi, I'm using the latest ultralytics 8.3.24 and latest torch. However, still facing this issue. Any suggestions?
- Glenn JocherUltralytics
@Gnoot01 i'm sorry you're experiencing this issue. Please ensure your Ultralytics package is up-to-date. If the problem persists, try reinstalling the package or checking for any recent updates in the repository. For more details, you can refer to the YOLOv9 documentation.
foskyblue
I'm having issues with my Yolov9 model exported to tflite. Model was successfully exported to tflite but I cannot get the right bounding boxes. I'm following the steps listed here: https://stackoverflow.com/questions/76381317/yolov8-tflite-python-predictions-and-interpreting-output (for folov8) to make inference for my yolov9 tflite model.
1Step 1: Resizing and Padding (Letterboxing) Step 2: Non-Maximum Suppression (NMS) Step 3: Rescaling Bounding Boxes
However, when I draw the outputed bounding boxes on my image the boxes don't fit the objects in the image correctly.
The code I'm using can be seen below:
from tflite_runtime.interpreter import Interpreter from PIL import Image import numpy as np from glob import glob from typing import Tuple, List interpreter = None input_shape = (320, 576) # Input tensor dimensions (width, height) in pixels input_index = 0 # Input tensor index (from input details in model signature) output_index = 409 model_path = 'model/saved_model.tflite' def load_model(): interpreter = None interpreter = Interpreter(model_path=model_path, num_threads=2) interpreter.allocate_tensors() input_details = interpreter.get_input_details() global input_shape input_shape = tuple(input_details[0]['shape'][1:3]) global input_index input_index = input_details[0]['index'] output_details = interpreter.get_output_details() global output_index output_index = output_details[0]['index'] return interpreter def letter_box(img: np.ndarray, new_shape: Tuple[int, int]) -> np.ndarray: """ Resizes an image to fit within a new shape while maintaining the aspect ratio, and pads the remaining space with a constant value. Args: img (np.ndarray): The input image as a NumPy array. new_shape (Tuple[int, int]): The desired output shape (height, width). Returns: np.ndarray: The resized and padded image. """ shape = img.shape[:2] # Calculate the scaling ratio to fit the image within the new shape r = min(new_shape[0] / shape[0], new_shape[1] / shape[1]) # Calculate the new unpadded dimensions new_unpad = int(round(shape[1] * r)), int(round(shape[0] * r)) # Calculate the padding required on each side dw, dh = new_shape[1] - new_unpad[0], new_shape[0] - new_unpad[1] dw, dh = dw / 2, dh / 2 # Resize the image if necessary if shape[::-1] != new_unpad: img = Image.fromarray(img).resize(new_unpad, Image.Resampling.BILINEAR) img = np.array(img) # Calculate the top, bottom, left, and right padding values top, bottom = int(round(dh - 0.1)), int(round(dh + 0.1)) left, right = int(round(dw - 0.1)), int(round(dw + 0.1)) # Add padding to the image img = np.pad(img, ((top, bottom), (left, right), (0, 0)), mode='constant', constant_values=114) return img def non_max_suppression( prediction: np.ndarray, conf_thres: float = 0.25, iou_thres: float = 0.45, max_det: int = 300, max_wh: int = 7680, ): """ Perform non-maximum suppression (NMS) on a single image prediction. Args: prediction (np.ndarray): A numpy array of shape (1, num_boxes, num_classes + 4 + num_masks) containing the predicted boxes, classes, and masks. conf_thres (float): Confidence threshold for filtering boxes (0.0 to 1.0). iou_thres (float): IoU threshold for NMS (0.0 to 1.0). max_det (int): Maximum number of boxes to keep after NMS. max_wh (int): Maximum box width and height in pixels. Returns: np.ndarray: Array containing kept boxes with format (x1, y1, x2, y2, confidence, class, mask1, mask2, ...). """ # Input validation (can be removed if you're sure of your input) if 0 > conf_thres > 1: raise ValueError(f"Invalid Confidence threshold {conf_thres}, valid values are between 0.0 and 1.0") if 0 > iou_thres > 1: raise ValueError(f"Invalid IoU {iou_thres}, valid values are between 0.0 and 1.0") # Extract dimensions and metadata directly _, _, dims = prediction.shape nc = dims - 4 - prediction.shape[1] # number of classes nm = dims - nc - 4 # number of masks mi = 4 + nc # mask start index # Process the single image in the batch x = prediction[0] # Extract the single image data # Move class scores to last axis and threshold x = np.transpose(x, (1, 0)) xc = x[..., 4:mi].max(axis=-1) > conf_thres x = x[xc] if not x.shape[0]: # No boxes left after confidence thresholding return np.zeros((0, 6 + nm)) # Convert xywh to xyxy directly on the filtered boxes x[..., :4] = xywh2xyxy(x[..., :4]) # Split and process boxes, classes, and masks # pylint: disable=unbalanced-tuple-unpacking box, cls, mask = np.split(x, (4, mi), 1) conf = cls.max(1) j = cls.argmax(1) x = np.concatenate((box, conf[:, None], j[:, None].astype(float), mask), 1) x = x[conf > conf_thres] n = x.shape[0] if not n: # No boxes left after additional confidence thresholding return np.zeros((0, 6 + nm)) # NMS (simplified since we're dealing with a single image) c = x[:, 5:6] * max_wh boxes, scores = x[:, :4] + c, x[:, 4] i = numpy_nms(boxes, scores, iou_thres) i = i[:max_det] return x[i] def numpy_nms(boxes: np.ndarray, scores: np.ndarray, iou_threshold: float = 0.5) -> np.ndarray: """ Perform Non-Maximum Suppression (NMS) on a set of bounding boxes. Args: boxes (np.ndarray): Array of shape (N, 4) representing N bounding boxes. Each box is [x1, y1, x2, y2]. scores (np.ndarray): Array of shape (N,) representing the confidence scores for each box. iou_threshold (float): IoU threshold for suppressing overlapping boxes. Defaults to 0.5. Returns: np.ndarray: Boolean array of shape (N,) indicating which boxes to keep. """ # Sort boxes by score in descending order order = scores.argsort()[::-1] keep = np.ones(len(boxes), dtype=bool) # Calculate IoU matrix ious = box_iou_batch(boxes, boxes) np.fill_diagonal(ious, 0) # Set self-IoU to 0 for i, idx in enumerate(order): if not keep[idx]: continue # Suppress boxes with IoU > threshold overlap = ious[idx] > iou_threshold keep[order[i + 1:]] &= ~overlap[order[i + 1:]] return keep def box_iou_batch(boxes_a: np.ndarray, boxes_b: np.ndarray) -> np.ndarray: """ Calculate the Intersection over Union (IoU) between two sets of bounding boxes. Args: boxes_a (np.ndarray): Array of shape (N, 4) representing N bounding boxes. boxes_b (np.ndarray): Array of shape (M, 4) representing M bounding boxes. Returns: np.ndarray: Array of shape (N, M) containing IoU values for each pair of boxes. Note: Each bounding box is represented as [x1, y1, x2, y2], where (x1, y1) is the top-left corner and (x2, y2) is the bottom-right corner. """ # Calculate areas of boxes_a area_a = (boxes_a[:, 2] - boxes_a[:, 0]) * (boxes_a[:, 3] - boxes_a[:, 1]) # Calculate areas of boxes_b area_b = (boxes_b[:, 2] - boxes_b[:, 0]) * (boxes_b[:, 3] - boxes_b[:, 1]) # Calculate intersection coordinates top_left = np.maximum(boxes_a[:, None, :2], boxes_b[:, :2]) bottom_right = np.minimum(boxes_a[:, None, 2:], boxes_b[:, 2:]) # Calculate intersection area area_inter = np.prod(np.clip(bottom_right - top_left, a_min=0, a_max=None), 2) # Calculate IoU return area_inter / (area_a[:, None] + area_b - area_inter) def xywh2xyxy(box: np.ndarray) -> np.ndarray: """ Convert bounding box coordinates from (x, y, width, height) format to (x1, y1, x2, y2) format where (x1, y1) is the top-left corner and (x2, y2) is the bottom-right corner. Args: x (np.ndarray): The input bounding box coordinates in (x, y, width, height) format. Returns: np.ndarray: The bounding box coordinates in (x1, y1, x2, y2) format. """ if box.shape[-1] != 4: raise ValueError(f"input shape last dimension expected 4 but input shape is {box.shape}") # pylint: disable=unbalanced-tuple-unpacking xy, wh = np.split(box, [2], axis=-1) wh_half = wh / 2 return np.concatenate([xy - wh_half, xy + wh_half], axis=-1) def preprocess_image(pil_image: Image.Image, input_size: Tuple[int, int]) -> np.ndarray: """ Preprocesses an image for inference with a TFLite model. Args: image_path (str): Path to the image file. input_size (Tuple[int, int]): Desired input size (height, width) for the model. Returns: np.ndarray: Preprocessed image as a NumPy array, ready for inference. """ if pil_image.mode != "RGB": pil_image = pil_image.convert("RGB") im = np.asarray(pil_image) im = letter_box(im, new_shape=input_size) im = np.expand_dims(im, axis=0) # goal is to have the format (number of images, size of image, number of channnels) im = im.astype(np.float32) / 255.0 # Normalize to 0.0 - 1.0 return im def postprocess_results(output: np.ndarray, model_input_size: Tuple[int, int], image_original_size: Tuple[int, int]) -> np.ndarray: """ Postprocesses the raw outputs from a TFLite model, including scaling bounding boxes back to the original image size. Args: output (np.ndarray): List of output tensors from the TFLite model. model_input_size (Tuple[int, int]): Desired input size (height, width) for the model. image_original_size (Tuple[int, int]): Original size (height, width) of the input image. Returns: np.ndarray: Postprocessed results with bounding boxes adjusted to original image size. """ predictions = non_max_suppression(output, conf_thres=0.25, iou_thres=0.45, max_det=300, max_wh=1) return scale_boxes(image_original_size, predictions, model_input_size) def scale_boxes(image_original_size: Tuple[int, int], boxes: np.ndarray, model_input_size: Tuple[int, int]): """ Rescales bounding boxes (in the format of xyxy by default) from the shape of the image they were originally specified in (img1_shape) to the shape of a different image (img0_shape). Args: image_original_size (Tuple[int, int]): The shape of the image that the bounding boxes are for, in the format of (height, width). boxes (np.ndarray): the bounding boxes of the objects in the image, in the format of (x1, y1, x2, y2) model_input_size (Tuple[int, int]): the shape of the target image, in the format of (height, width). Returns: np.ndarray: The scaled bounding boxes, in the format of (x1, y1, x2, y2) """ # calculate from img0_shape gain = min(model_input_size[0] / image_original_size[0], model_input_size[1] / image_original_size[1]) # gain = old / new pad = ( round((model_input_size[1] - image_original_size[1] * gain) / 2 - 0.1) / model_input_size[1], round((model_input_size[0] - image_original_size[0] * gain) / 2 - 0.1) / model_input_size[0], ) # wh padding inner_image_scale = ( (1 - pad[0] * 2), (1 - pad[1] * 2), ) # wh scale boxes[..., 0] = (boxes[..., 0] - pad[0]) / inner_image_scale[0] # x padding boxes[..., 1] = (boxes[..., 1] - pad[1]) / inner_image_scale[1] # y padding boxes[..., 2] = (boxes[..., 2] - pad[0]) / inner_image_scale[0] # x padding boxes[..., 3] = (boxes[..., 3] - pad[1]) / inner_image_scale[1] # y padding boxes[..., [0, 2]] = boxes[..., [0, 2]].clip(0, 1) # x1, x2 boxes[..., [1, 3]] = boxes[..., [1, 3]].clip(0, 1) # y1, y2 return boxes def prepare_input(image_pil): # Input image must match input shape (ex: 640x640 pixels) [note: only use BILINEAR here] resized = image_pil.copy().resize(input_shape, resample=Image.Resampling.BILINEAR) # SSD Mobilenet V2 FPNLite take as input pixels between [-1.0, 1.0] expanded = np.expand_dims(np.asarray(resized, dtype=np.float32) * 2. / 255. - 1., axis=0) del resized # Enforce garbage collection sooner than later return expanded def predict(tmp_images_dir): interpreter = load_model() model_predictions = [] for img_path in tmp_images_dir: pil_image = Image.open(img_path) input_data = preprocess_image(pil_image, input_shape) interpreter.set_tensor(input_index, input_data) interpreter.invoke() output_data = interpreter.get_tensor(output_index) preds = postprocess_results(output_data, input_shape, (pil_image.size[1], pil_image.size[0])) model_predictions.append({ 'detection_classes': (preds[:, 5] + 1).tolist(), # Class values are offset by +1.0 'detection_boxes': preds[:, 0:4].tolist(), 'detection_scores': preds[:, 4].tolist(), }) print(model_predictions) images_path = glob('utilities/images/*.JPG') predict(images_path)- Glenn JocherUltralytics
@foskyblue it seems like the issue might be related to the scaling and padding logic when converting bounding boxes. Ensure that the
scale_boxesfunction correctly rescales the boxes to the original image size. For more detailed guidance, please refer to the YOLOv9 documentation: https://docs.ultralytics.com/models/yolov9/. Hi Glen thanks for your response. Unfortunately I find it difficult to correctly scale the bounding boxes from the example script I mentioned above: https://stackoverflow.com/questions/76381317/yolov8-tflite-python-predictions-and-interpreting-output.
How can I implement the YOLOv9 TFLite model with an input ape of [1, 320, 576, 3] and output shape of [1, 19, 3780] in Python?
- Glenn JocherUltralytics
To correctly scale bounding boxes for your YOLOv9 TFLite model, ensure your
scale_boxesfunction accurately adjusts the coordinates based on the original image size and model input size. Verify that padding and scaling calculations align with your preprocessing steps. For further details, please refer to the YOLOv9 documentation.