Cross-validation K-Fold với Ultralytics
Giới thiệu#
Hướng dẫn này trình bày cách triển khai kiểm định chéo K-Fold cho dataset phát hiện đối tượng trong hệ sinh thái Ultralytics. Hướng dẫn sử dụng định dạng phát hiện YOLO và các thư viện Python như scikit-learn, pandas và PyYAML để giải thích cách thiết lập, tạo vector đặc trưng và chia dataset theo K-Fold.
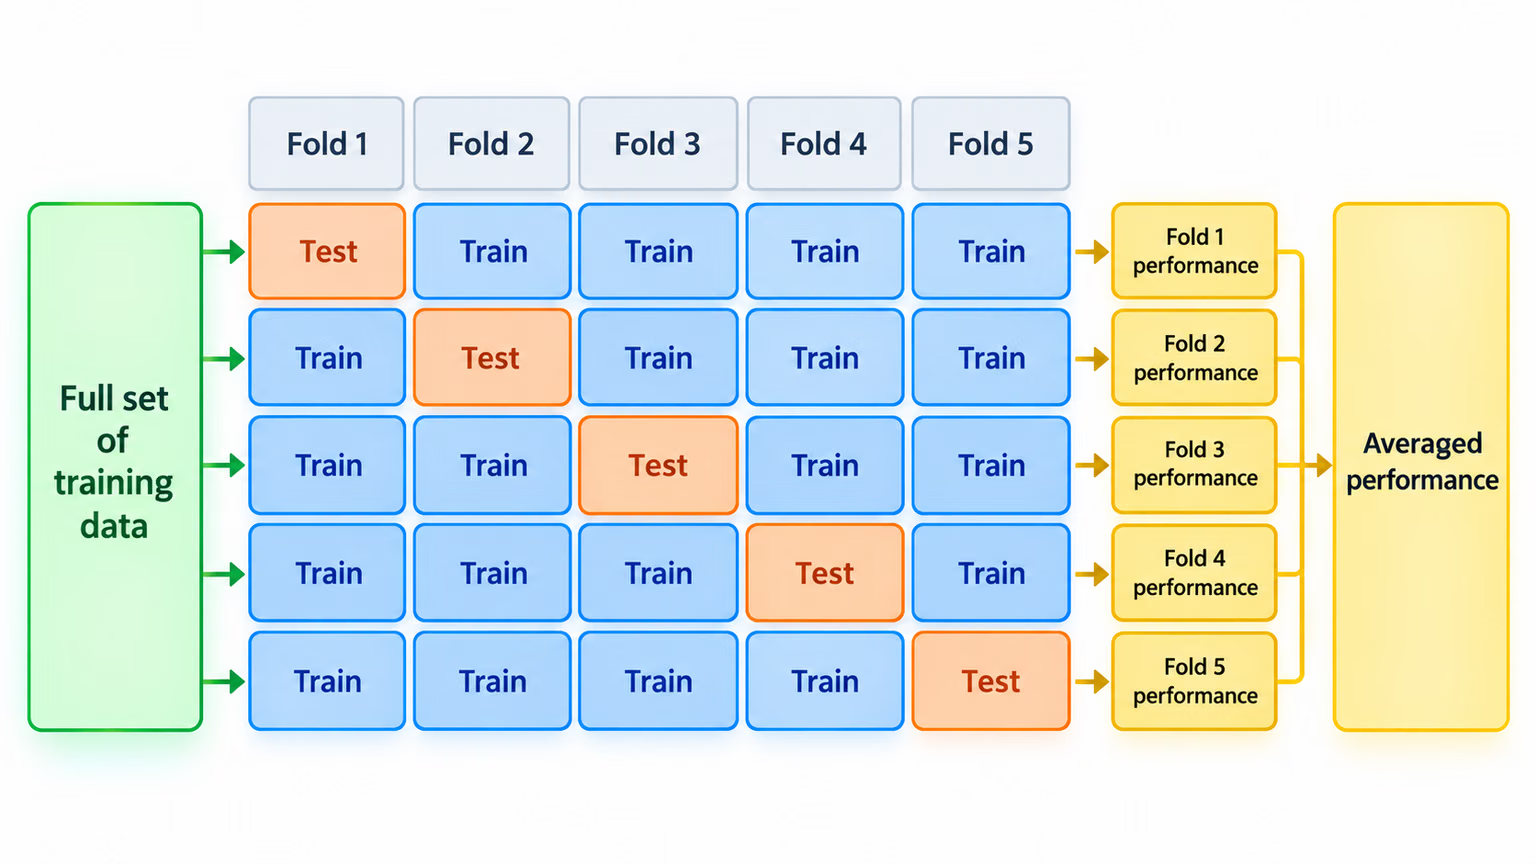
Dù dự án của bạn sử dụng dataset Fruit Detection hay một nguồn dữ liệu tùy chỉnh, hướng dẫn này giúp bạn hiểu và áp dụng kiểm định chéo K-Fold để cải thiện độ tin cậy và độ bền vững của các model machine learning. Mặc dù hướng dẫn này sử dụng các fold k=5, hãy lưu ý rằng số fold tối ưu có thể thay đổi tùy theo dataset và yêu cầu cụ thể của dự án. Kiểm định chéo K-Fold hữu ích nhất khi dataset nhỏ, nhiễu hoặc có độ biến thiên cao; với dataset lớn và đa dạng, cách chia train/val/test được thiết kế tốt thường là đủ.
Thiết lập#
-
Các annotation của bạn phải ở định dạng phát hiện YOLO.
-
Hướng dẫn này giả định rằng các file annotation có sẵn trên máy cục bộ.
-
Trong phần minh họa, chúng ta sử dụng tập dữ liệu Fruit Detection.
- Tập dữ liệu này có tổng cộng 8479 ảnh.
- Tập dữ liệu gồm 6 nhãn class, cùng tổng số instance của từng nhãn được liệt kê bên dưới.
| Nhãn class | Số lượng instance |
|---|---|
| Táo | 7049 |
| Nho | 7202 |
| Dứa | 1613 |
| Cam | 15549 |
| Chuối | 3536 |
| Dưa hấu | 1976 |
-
Các package Python cần thiết gồm:
ultralyticssklearnpandaspyyaml
-
Hướng dẫn này sử dụng
k=5fold. Tuy nhiên, bạn nên xác định số fold phù hợp nhất với tập dữ liệu cụ thể của mình.
-
Tạo môi trường ảo Python mới (
venv) cho dự án và kích hoạt môi trường đó. Dùngpip(hoặc trình quản lý package bạn muốn) để cài đặt:- Thư viện Ultralytics:
pip install -U ultralytics. Ngoài ra, bạn có thể clone repo chính thức. - Scikit-learn, pandas và PyYAML:
pip install -U scikit-learn pandas pyyaml.
- Thư viện Ultralytics:
-
Xác minh rằng annotation của bạn ở định dạng phát hiện YOLO.
- Trong hướng dẫn này, tất cả file annotation đều nằm trong thư mục
Fruit-Detection/labels.
- Trong hướng dẫn này, tất cả file annotation đều nằm trong thư mục
Tạo vector đặc trưng cho tập dữ liệu phát hiện đối tượng#
-
Trước tiên, hãy tạo một file Python
example.pymới để thực hiện các bước bên dưới. -
Dùng class
YOLODatasetcủa Ultralytics để tải ảnh train và validation được liệt kê trong YAML của dataset, đồng thời giữ nguyên tập test.from pathlib import Path from ultralytics.data.dataset import YOLODataset from ultralytics.data.utils import check_det_dataset yaml_file = "path/to/data.yaml" data = check_det_dataset(yaml_file) dataset_path = Path(data["path"]) sources = [] for split in ("train", "val"): source = data.get(split) if source: sources.extend(source if isinstance(source, list) else [source]) dataset = YOLODataset(sources, data=data, augment=False) images = [Path(p) for p in dataset.im_files] -
Tiếp theo, đọc nội dung file YAML của tập dữ liệu và trích xuất chỉ số của các nhãn class.
classes = data["names"] cls_idx = sorted(classes.keys()) -
Khởi tạo một DataFrame
pandastrống.import pandas as pd labels_df = pd.DataFrame(0.0, columns=cls_idx, index=images) -
Đếm số instance của từng class label có trong các tệp annotation.
from collections import Counter for image, label in zip(images, dataset.labels): lbl_counter = Counter(label["cls"].flatten().astype(int)) labels_df.loc[image, list(lbl_counter)] = list(lbl_counter.values()) -
Dưới đây là ví dụ về DataFrame sau khi được điền dữ liệu:
                                                       0    1    2    3    4    5
'0000a16e4b057580_jpg.rf.00ab48988370f64f5ca8ea4...'  0.0  0.0  0.0  0.0  0.0  7.0
'0000a16e4b057580_jpg.rf.7e6dce029fb67f01eb19aa7...'  0.0  0.0  0.0  0.0  0.0  7.0
'0000a16e4b057580_jpg.rf.bc4d31cdcbe229dd022957a...'  0.0  0.0  0.0  0.0  0.0  7.0
'00020ebf74c4881c_jpg.rf.508192a0a97aa6c4a3b6882...'  0.0  0.0  0.0  1.0  0.0  0.0
'00020ebf74c4881c_jpg.rf.5af192a2254c8ecc4188a25...'  0.0  0.0  0.0  1.0  0.0  0.0
 ...                                                  ...  ...  ...  ...  ...  ...
'ff4cd45896de38be_jpg.rf.c4b5e967ca10c7ced3b9e97...'  0.0  0.0  0.0  0.0  0.0  2.0
'ff4cd45896de38be_jpg.rf.ea4c1d37d2884b3e3cbce08...'  0.0  0.0  0.0  0.0  0.0  2.0
'ff5fd9c3c624b7dc_jpg.rf.bb519feaa36fc4bf630a033...'  1.0  0.0  0.0  0.0  0.0  0.0
'ff5fd9c3c624b7dc_jpg.rf.f0751c9c3aa4519ea3c9d6a...'  1.0  0.0  0.0  0.0  0.0  0.0
'fffe28b31f2a70d4_jpg.rf.7ea16bd637ba0711c53b540...'  0.0  6.0  0.0  0.0  0.0  0.0
Các hàng sử dụng đường dẫn ảnh tuyệt đối, còn các cột tương ứng với chỉ số class label. Những nhãn bị thiếu được biểu diễn bằng các hàng nền toàn số 0. Cấu trúc dữ liệu này cho phép áp dụng kiểm định chéo K-Fold cho dataset phát hiện đối tượng.
Chia tập dữ liệu theo K-Fold#
-
Tiếp theo, chúng ta sẽ dùng class
KFoldtừsklearn.model_selectionđể tạo các phần chia tập dữ liệuk.- Quan trọng:
- Thiết lập
shuffle=Trueđể đảm bảo các class được phân phối ngẫu nhiên trong các phần chia. - Bằng cách đặt
random_state=Mtrong đóMlà một số nguyên được chọn, bạn có thể thu được kết quả có thể tái lập.
- Thiết lập
from sklearn.model_selection import KFold ksplit = 5 kf = KFold(n_splits=ksplit, shuffle=True, random_state=20) # đặt random_state để có kết quả có thể tái lập kfolds = list(kf.split(labels_df)) - Quan trọng:
-
Tập dữ liệu hiện đã được chia thành
kfold, mỗi fold có danh sách các chỉ sốtrainvàval. Chúng ta sẽ tạo một DataFrame để trình bày các kết quả này rõ hơn.folds = [f"split_{n}" for n in range(1, ksplit + 1)] folds_df = pd.DataFrame(index=labels_df.index, columns=folds) for i, (train, val) in enumerate(kfolds, start=1): folds_df.loc[labels_df.index[train], f"split_{i}"] = "train" folds_df.loc[labels_df.index[val], f"split_{i}"] = "val" -
Tiếp theo, chúng ta sẽ tính tỷ lệ phân phối nhãn class cho từng fold bằng cách lấy số class có trong
valchia cho số class có trongtrain.fold_lbl_distrb = pd.DataFrame(index=folds, columns=cls_idx) for n, (train_indices, val_indices) in enumerate(kfolds, start=1): train_totals = labels_df.iloc[train_indices].sum() val_totals = labels_df.iloc[val_indices].sum() # To avoid division by zero, we add a small value (1E-7) to the denominator ratio = val_totals / (train_totals + 1e-7) fold_lbl_distrb.loc[f"split_{n}"] = ratioTốt nhất là tỷ lệ của tất cả class tương đối đồng đều ở mỗi phần chia và giữa các class. Tuy nhiên, điều này còn tùy thuộc vào đặc thù của tập dữ liệu.
-
Ghi danh sách ảnh và file YAML của tập dữ liệu cho từng phần chia. Danh sách dạng văn bản giúp tránh phải sao chép tập dữ liệu
klần.import yaml save_path = dataset_path.parent / f"{ksplit}-Fold_Cross-val" save_path.mkdir(parents=True, exist_ok=True) ds_yamls = [] for split in folds_df.columns: for partition in ("train", "val"): split_images = folds_df.index[folds_df[split] == partition] paths = "\n".join(map(str, split_images)) (save_path / f"{split}_{partition}.txt").write_text(f"{paths}\n") dataset_yaml = save_path / f"{split}.yaml" ds_yamls.append(dataset_yaml) with open(dataset_yaml, "w") as ds_y: yaml.safe_dump( { "path": save_path.as_posix(), "train": f"{split}_train.txt", "val": f"{split}_val.txt", "names": classes, }, ds_y, )
Lưu bản ghi (Tùy chọn)#
Bạn có thể lưu bản ghi về phần chia K-Fold và các DataFrame phân phối nhãn dưới dạng file CSV để tham khảo sau này.
folds_df.to_csv(save_path / "kfold_datasplit.csv")
fold_lbl_distrb.to_csv(save_path / "kfold_label_distribution.csv")
Huấn luyện YOLO bằng các phần chia dữ liệu K-Fold#
-
Trước tiên, hãy tải model YOLO.
from ultralytics import YOLO weights_path = "path/to/weights.pt" # dùng yolo26n.pt cho model nhỏ model = YOLO(weights_path, task="detect") -
Tiếp theo, lặp qua các tệp YAML của dataset để chạy huấn luyện. Kết quả sẽ được lưu vào thư mục được chỉ định bởi các đối số
projectvàname. Theo mặc định, thư mục này làruns/detect/train#, trong đó#là chỉ số nguyên.results = {} # Define your additional arguments here batch = 16 project = "kfold_demo" epochs = 100 for k, dataset_yaml in enumerate(ds_yamls): model = YOLO(weights_path, task="detect") results[k] = model.train( data=dataset_yaml, epochs=epochs, batch=batch, project=project, name=f"fold_{k + 1}" ) # include any additional train arguments -
Bạn cũng có thể dùng hàm autosplit của Ultralytics để tự động chia dataset:
from ultralytics.data.split import autosplit

# Tự động chia tập dữ liệu thành train/val/test
autosplit(path="path/to/images", weights=(0.8, 0.2, 0.0), annotated_only=True)
Kết luận#
Trong hướng dẫn này, chúng ta đã tìm hiểu quy trình sử dụng cross-validation K-Fold để huấn luyện model phát hiện đối tượng YOLO. Chúng ta đã tìm hiểu cách chia tập train và validation thành K phần, cũng như cách dùng bảng tỷ lệ được tạo để kiểm tra mức độ cân bằng class sau khi chia ngẫu nhiên.
Chúng ta cũng đã tìm hiểu quy trình tạo DataFrame báo cáo để trực quan hóa các phần chia dữ liệu và phân bố nhãn trong từng phần, qua đó giúp hiểu rõ cấu trúc của các tập train và validation.
Chúng ta có thể lưu bản ghi để tham khảo sau này; việc này đặc biệt hữu ích trong các dự án quy mô lớn hoặc khi khắc phục sự cố về hiệu suất model.
Cuối cùng, chúng ta đã triển khai quá trình huấn luyện model thực tế bằng cách lần lượt sử dụng từng phần chia, đồng thời lưu kết quả huấn luyện để phân tích và so sánh thêm.
Kỹ thuật cross-validation K-Fold là một phương pháp vững chắc giúp tận dụng tối đa dữ liệu hiện có, đồng thời đảm bảo hiệu suất model đáng tin cậy và nhất quán trên các tập con dữ liệu khác nhau. Nhờ đó, model có khả năng khái quát hóa tốt hơn, đáng tin cậy hơn và ít có nguy cơ overfit với các mẫu dữ liệu cụ thể.
Hãy nhớ rằng dù hướng dẫn này sử dụng YOLO, các bước này phần lớn có thể áp dụng cho những model machine learning khác. Hiểu rõ các bước này giúp bạn áp dụng cross-validation hiệu quả trong các dự án machine learning của riêng mình.
Câu hỏi thường gặp#
Cross-validation K-Fold là kỹ thuật chia tập dữ liệu thành 'k' tập con (fold) để đánh giá hiệu suất model đáng tin cậy hơn. Mỗi fold lần lượt được dùng làm dữ liệu huấn luyện và dữ liệu validation. Trong lĩnh vực phát hiện đối tượng, cross-validation K-Fold giúp đảm bảo hiệu suất của model Ultralytics YOLO vững chắc và có khả năng khái quát hóa trên các phần chia dữ liệu khác nhau, từ đó tăng độ tin cậy. Để xem hướng dẫn chi tiết về cách thiết lập cross-validation K-Fold với Ultralytics YOLO, hãy tham khảo Cross-validation K-Fold với Ultralytics.
Để triển khai cross-validation K-Fold với Ultralytics YOLO, hãy làm theo các bước sau:
- Xác minh annotation ở định dạng phát hiện YOLO.
- Sử dụng các thư viện Python như
sklearn,pandasvàpyyaml. - Tạo vector đặc trưng từ tập dữ liệu của bạn.
- Chia tập dữ liệu bằng
KFoldtừsklearn.model_selection. - Huấn luyện model YOLO trên từng phần chia.
Để xem hướng dẫn toàn diện, hãy tham khảo mục Chia tập dữ liệu theo K-Fold trong tài liệu của chúng tôi.
Quy trình trong hướng dẫn này hướng đến định dạng phát hiện YOLO, nhưng cùng phương pháp có thể áp dụng cho mọi tác vụ YOLO — tác vụ chỉ thay đổi cách bạn tạo các fold, chứ không ảnh hưởng đến lợi ích của cross-validation:
Tác vụ Thiết kế fold detectChia ở cấp độ ảnh, cân bằng phân phối đối tượng và class giữa các fold. Giữ các ảnh có liên quan (cùng bệnh nhân, chuỗi video, camera hoặc địa điểm) trong cùng một fold. segmentDùng cùng chiến lược cấp độ ảnh như trong phát hiện đối tượng, đồng thời đảm bảo độ bao phủ của mask và class trong mọi fold. classifyƯu tiên các fold phân tầng để tần suất class được cân bằng giữa train và validation. poseChia theo đối tượng hoặc chuỗi để cùng một người hay động vật không bao giờ xuất hiện ở cả hai phần của một fold. obbChia ở cấp độ ảnh, giữ các tile hoặc crop từ cùng một cảnh trong cùng nhóm — điều này đặc biệt quan trọng với ảnh hàng không. Dù thực hiện tác vụ nào, hãy tránh để các mẫu gần như trùng lặp và có liên quan nằm ở những fold đối lập: kiểu rò rỉ dữ liệu này làm tăng metric validation cao hơn nhiều so với hiệu suất model đạt được trong môi trường production.
Ultralytics YOLO cung cấp khả năng phát hiện đối tượng thời gian thực tiên tiến với độ chính xác và hiệu suất cao. Model rất linh hoạt, hỗ trợ nhiều tác vụ thị giác máy tính như phát hiện, phân đoạn instance, phân đoạn ngữ nghĩa và phân loại. Ngoài ra, model tích hợp với các công cụ như Ultralytics Platform để huấn luyện và triển khai model không cần code.
Annotation của bạn phải tuân theo định dạng phát hiện YOLO. Mỗi file annotation phải liệt kê class của đối tượng cùng với tọa độ bounding box của đối tượng trong ảnh. Định dạng YOLO đảm bảo quy trình xử lý dữ liệu được tinh gọn và chuẩn hóa để huấn luyện model phát hiện đối tượng. Để biết thêm thông tin về cách định dạng annotation phù hợp, hãy xem hướng dẫn về định dạng phát hiện YOLO.
Có, bạn có thể dùng cross-validation K-Fold với mọi tập dữ liệu tùy chỉnh, miễn là annotation ở định dạng phát hiện YOLO. Thay thế các đường dẫn tập dữ liệu và nhãn class bằng những giá trị tương ứng với tập dữ liệu tùy chỉnh của bạn. Tính linh hoạt này giúp mọi dự án phát hiện đối tượng đều có thể đánh giá model vững chắc bằng cross-validation K-Fold. Để xem ví dụ thực tế, hãy tham khảo mục Tạo vector đặc trưng của chúng tôi.


Bình luận21
Đặt câu hỏi, chia sẻ kết quả hoặc giúp đỡ người khác.
jingieboy
does this work with yolov8-cls? if so how would the folder structure look like? how are the data splits
 Glenn JocherUltralytics(đã chỉnh sửa)
Yes—K‑Fold works the same for classification; use the standard ImageNet-style layout per fold, and train each fold separately (YOLO infers classes from folder names). For YOLO26 (recommended) you can do:
dataset/
  split_1/
    train/
      class_a/ ...
      class_b/ ...
    val/
      class_a/ ...
      class_b/ ...
  split_2/
    train/...
    val/...
  ...
from ultralytics import YOLO weights = "yolo26n-cls.pt" # swap to 'yolov8n-cls.pt' if you prefer YOLOv8 splits = ["dataset/split_1", "dataset/split_2", "dataset/split_3"] for d in splits: model = YOLO(weights) model.train(data=d, epochs=20, batch=16) # d must contain 'train/' and 'val/' subfoldersFor building folds, use
StratifiedKFoldon image-level labels derived from parent folder names to keep class balance, or use the random splitter shown in the autosplit reference if stratification isn’t required. Classification usage details are in the classification task docs.thank you for this! I have also notice that everytime I run model.val(), the accuracies and confusion matrix values are slightly different this time. Is this normal or during evaluation, there is a small randomness when calling the function.
- Glenn JocherUltralytics
@jingieboy minor variations can occur from non-deterministic CUDA ops or multi-threading; validation itself doesn’t add randomness by default—set seeds and force deterministic ops to lock results:
import random, numpy as np, torch

seed = 0
random.seed(seed); np.random.seed(seed); torch.manual_seed(seed)
torch.backends.cudnn.deterministic = True
torch.backends.cudnn.benchmark = False

model.val()  # run evaluation
If differences are still large, double-check your eval args in the validation mode docs.
Nehasq
Hi, I am applying K-fold validation using the leave-one-out technique. My dataset consists of a single class and includes 21 images in total. For each split, I use 20 images for training and 1 image for testing. I am implementing the leave-one-out technique with the code above, setting ksplit=21.
I am not using a separate validation dataset, only training and testing data. Here is the code I am using:
results = {}
Define additional arguments here
batch = 16 project = "kfold_demo" epochs = 100
for k in range(ksplit): dataset_yaml = ds_yamls[k] model = YOLO(weights_path, task="detect") model.train(data=dataset_yaml, epochs=epochs, batch=batch, project=project) # Include any train arguments results[k] = model.metrics # Save output metrics for further analysis
In my data.yaml file, I have provided the validation path as the test set. When it trains and validates on the "1 test data," does this mean the model is being tested on data it has never seen during training? This is my first point of confusion.
my data.yaml file for each split looks like this: names:
- pothole path: ../ 2024-12-10_21-Fold_Cross-val/split_1 train: train val: test
My second question is about calculating the final performance. When I ran the above code, it calculated scores for each individual split. Do I need to calculate the final performance metrics manually, or is there any functionality in YOLOv8 to compute the aggregated performance automatically?
- Glenn JocherUltralytics
@Nehasq to address your first question, yes, the model is being tested on unseen data during each split, as the test set (1 image) is excluded from training and only used for validation. Regarding your second question, YOLO does not automatically aggregate metrics across splits. You need to compute the final performance metrics manually by averaging the results from all splits. For reference, you can review the K-Fold Cross Validation guide.
Thanks for your reply. I understand your point. So, are you saying that, for example, in my case, where I have 21 scores (precision, recall, etc.), I should simply add all the precision values together and divide the sum by 21 to get the final precision of the model? Is that correct?
Also, in y case of 20 images( training) and 1 images for test, what batch size would you suggest?
- Glenn JocherUltralytics
Yes, to calculate the final precision (or any metric), you average the values across all splits, i.e., sum all precision scores and divide by the number of splits (21 in your case). As for the batch size, given your small dataset, you could keep it low (e.g., 1 or 2) to ensure efficient utilization of the data while avoiding overfitting.
Thanks, that really helps! With a batch size of 1, I am keeping the epochs at 10. Should it be fewer? Also, to check for overfitting, I need to review the result graphs for each split. However, I can't definitively determine if it is overfitting since each split is separate, right?
- Glenn JocherUltralytics
Keeping epochs at 10 with a batch size of 1 is reasonable given your small dataset size. To check for overfitting, reviewing result graphs from each split can help, but overfitting may be harder to detect since each split involves different training and test data. Consider comparing trends across splits for consistent insights. For further details, you can reference the K-Fold Cross Validation guide.
semyon-v-dot
After the loop:
for ext in supported_extensions:
    images.extend(sorted((dataset_path / "images").rglob(f"*{ext}")))
Should be this line of code:
images = sorted(images)For
imagesmatching withlabelslist:labels = sorted(dataset_path.rglob("*labels/*.txt"))Otherwise the script creates background images because some images missing their labels.
- Glenn JocherUltralytics
@semyon-v-dot thank you for your suggestion. Sorting the
imageslist after extending it with supported extensions is a good practice to ensure alignment with thelabelslist. This helps prevent issues with missing labels.1
 sangeun jo
K-폴드 데이터 세트 분할 4번에서
images.extend(sorted((dataset_path / "images").rglob(f"*{ext}")))이 코드를images.extend(sorted(dataset_path.rglob(f"*images/*{ext}")))로 변환해야 작동했습니다.- Glenn JocherUltralytics
@sangeun-jo thank you for pointing that out. Your modification to
images.extend(sorted(dataset_path.rglob(f"*images/*{ext}")))is indeed correct and ensures the code works as intended. If you have any further questions or need additional assistance, feel free to ask!
kh-diab
is it usefult to use this k fold approach when I just have one class only but my issue is the class is detected as background or vice versa as per the attached Confusion matrix
- Glenn JocherUltralytics
@kh-diab using K-Fold Cross Validation can still be beneficial even with a single class. It helps ensure that your model's performance is robust and not overly dependent on a particular subset of the data. This can be particularly useful if you're experiencing issues with class detection accuracy, as it allows you to validate the model's performance across multiple splits and identify any inconsistencies. If your class is being detected as background or vice versa, K-Fold Cross Validation can help diagnose whether this issue is consistent across different data splits or specific to certain subsets. For more details, you can refer to our guide on K-Fold Cross Validation: https://docs.ultralytics.com/guides/kfold-cross-validation/.
alexander-sony
Good guide, consider adding it in a colab notebook.
In section "Train YOLO using K-Fold Data Splits", model should be re-initialized foe every k, i.e. it should be inside the for-loop: for k in range(ksplit).
- Glenn JocherUltralytics
@alexander-sony thank you for your feedback and suggestion! 😊
You're absolutely right about re-initializing the model within the loop for each fold to ensure a fresh start for every training iteration. This can help avoid any potential carryover effects from previous folds. Here's the corrected code snippet for the training section:
from ultralytics import YOLO

weights_path = "path/to/weights.pt"
results = {}

# Define your additional arguments here
batch = 16
project = "kfold_demo"
epochs = 100

for k in range(ksplit):
    model = YOLO(weights_path, task="detect")  # Re-initialize the model inside the loop
    dataset_yaml = ds_yamls[k]
    model.train(data=dataset_yaml, epochs=epochs, batch=batch, project=project)  # include any train arguments
    results[k] = model.metrics  # save output metrics for further analysis
Regarding your suggestion to add this guide to a Colab notebook, that's a fantastic idea! It would make the process more interactive and accessible for users. We'll consider creating a Colab version of this guide in the future.
For more details on K-Fold Cross Validation, you can refer to our comprehensive guide.
Thanks again for your valuable input! If you have any more suggestions or questions, feel free to share. Happy coding! 🚀
Likhith-Sugganahalli
@alexander-sony
woudnt that be a new model trained on each split, giving us n different models trained on 1/nth of the dataset?
 Fazri Gading
Is there any way to implement Stratified K-Fold Cross Validation with YOLOv8?
 Paula DerrengerUltralytics
Yes, you can implement Stratified K-Fold Cross Validation with YOLOv8! Stratified K-Fold ensures that each fold has a similar distribution of class labels, which can be particularly useful for imbalanced datasets.
To achieve this, you can use
StratifiedKFoldfromsklearn.model_selectioninstead ofKFold. Here's a brief example of how to modify the K-Fold implementation:from sklearn.model_selection import StratifiedKFold # Assuming labels_df is your DataFrame with class counts ksplit = 5 skf = StratifiedKFold(n_splits=ksplit, shuffle=True, random_state=20) # Generate stratified splits kfolds = list(skf.split(labels_df, labels_df.idxmax(axis=1))) # The rest of the process remains the sameFor a detailed guide on K-Fold Cross Validation, please refer to the Ultralytics documentation. If you have any more questions, feel free to ask! 😊
1