Link to this section交互式目标检测:Gradio 与 Ultralytics YOLO26 🚀#
Link to this section交互式目标检测简介#
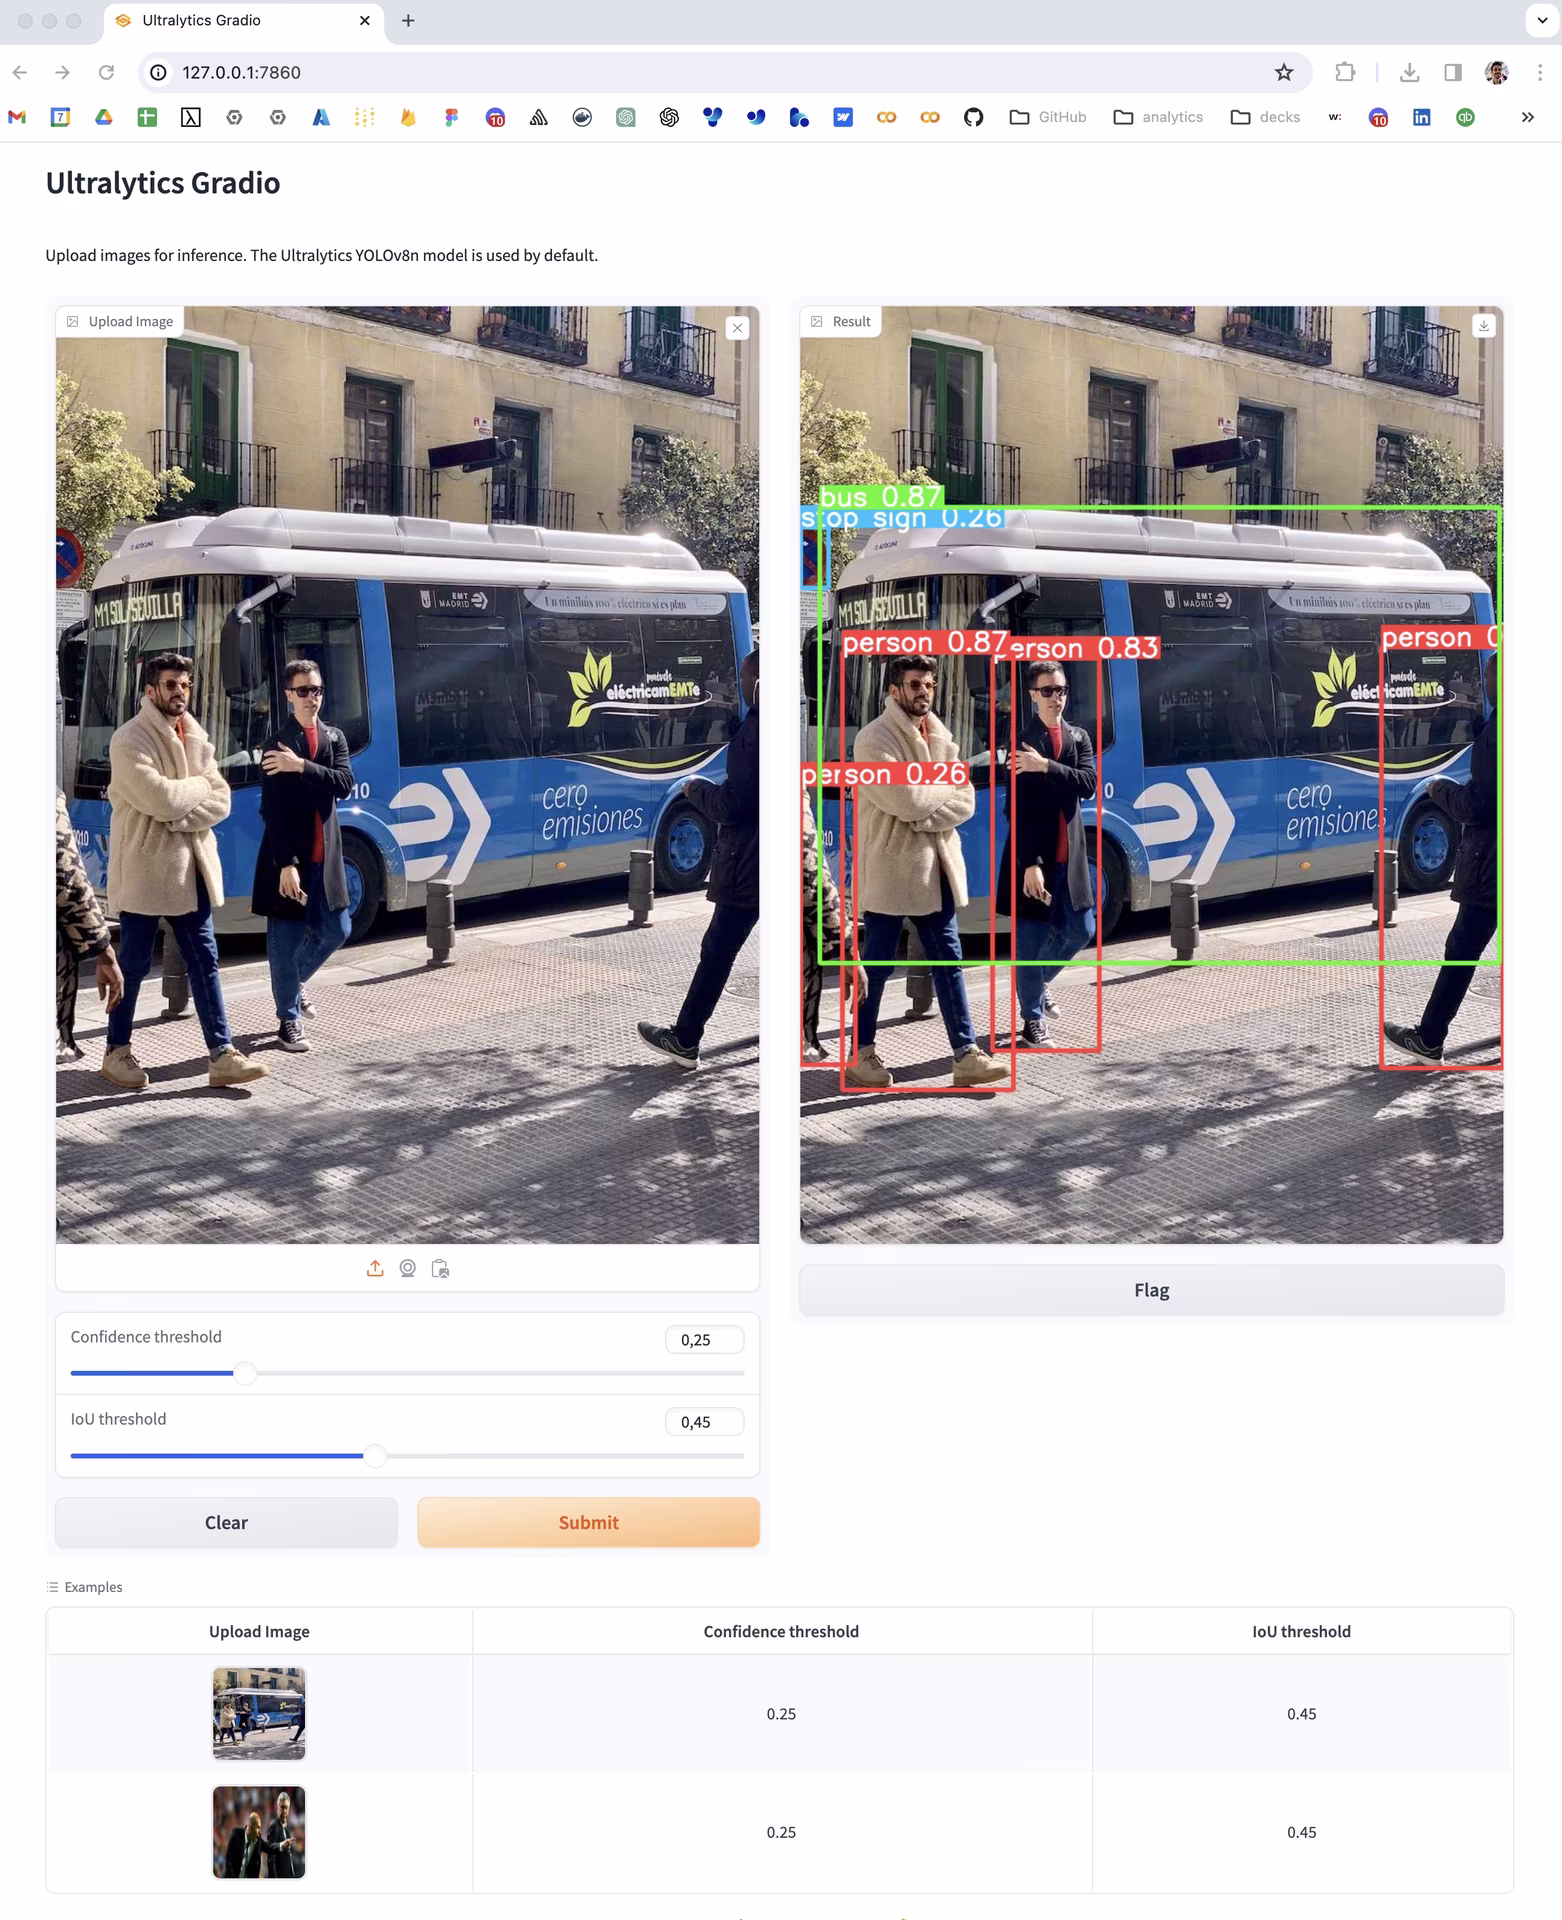
This Gradio interface provides an easy and interactive way to perform object detection using the Ultralytics YOLO26 model. Users can upload images and adjust parameters like confidence threshold and intersection-over-union (IoU) threshold to get real-time detection results.
Watch: Deploy Ultralytics YOLO26 in a Browser with Gradio | Complete Tutorial | Vision AI 🌐
Link to this section为什么要使用 Gradio 进行目标检测?#
- 用户友好界面: Gradio 为用户提供了一个直接的平台,无需任何编码即可上传图像并可视化检测结果。
- 实时调整: 可以动态调整置信度和 IoU 阈值等参数,从而实现即时反馈并优化检测结果。
- 广泛的易用性: 任何人都可以访问 Gradio Web 界面,使其成为演示、教育目的和快速实验的绝佳工具。
Link to this section如何安装 Gradio#
pip install gradioLink to this section如何使用该界面#
- 上传图像: 点击“上传图像”以选择用于目标检测的图像文件。
- 调整参数:
- 置信度阈值: 用于设置检测目标的最低置信度水平的滑块。
- IoU 阈值: 用于设置区分不同目标的 IoU 阈值的滑块。
- 查看结果: 将显示带有已检测目标及其标签的处理后的图像。
Link to this section示例用例#
- 示例图像 1: 使用默认阈值进行公交车检测。
- 示例图像 2: 使用默认阈值在体育图像上进行检测。
Link to this section使用示例#
本节提供了用于创建 Ultralytics YOLO26 目标检测 Gradio 界面的 Python 代码。通过加载相应的模型检查点,该示例可以适用于分类、实例分割、姿态估计和其他 YOLO 任务。
import gradio as gr
import PIL.Image as Image

from ultralytics import ASSETS, YOLO

model = YOLO("yolo26n.pt")

def predict_image(img, conf_threshold, iou_threshold):
    """Predicts objects in an image using a YOLO26 model with adjustable confidence and IoU thresholds."""
    results = model.predict(
        source=img,
        conf=conf_threshold,
        iou=iou_threshold,
        show_labels=True,
        show_conf=True,
        imgsz=640,
    )

    for r in results:
        im_array = r.plot()
        im = Image.fromarray(im_array[..., ::-1])

    return im

iface = gr.Interface(
    fn=predict_image,
    inputs=[
        gr.Image(type="pil", label="Upload Image"),
        gr.Slider(minimum=0, maximum=1, value=0.25, label="Confidence threshold"),
        gr.Slider(minimum=0, maximum=1, value=0.45, label="IoU threshold"),
    ],
    outputs=gr.Image(type="pil", label="Result"),
    title="Ultralytics Gradio",
    description="Upload images for inference. The Ultralytics YOLO26n model is used by default.",
    examples=[
        [ASSETS / "bus.jpg", 0.25, 0.45],
        [ASSETS / "zidane.jpg", 0.25, 0.45],
    ],
)

if __name__ == "__main__":
    iface.launch()
Link to this section参数说明#
| 参数名称 | 类型 | 描述 |
|---|---|---|
img | Image | 将要在其上执行目标检测的图像。 |
conf_threshold | float | 用于检测目标的置信度阈值。 |
iou_threshold | float | 用于目标分离的交并比阈值。 |
Link to this sectionGradio 界面组件#
| 组件 | 描述 |
|---|---|
| 图像输入 | 用于上传待检测图像。 |
| 滑块 | 用于调整置信度和 IoU 阈值。 |
| 图像输出 | 用于显示检测结果。 |
Link to this section常见问题解答#
Link to this section我该如何将 Gradio 与 Ultralytics YOLO26 一起用于目标检测?#
若要将 Gradio 与 Ultralytics YOLO26 一起用于目标检测,你可以按照以下步骤操作:
- 安装 Gradio: 使用命令
pip install gradio。 - 创建界面: 编写一个 Python 脚本来初始化 Gradio 界面。有关详细信息,你可以参考 文档 中提供的代码示例。
- 上传并调整: 在 Gradio 界面中上传图像并调整置信度和 IoU 阈值,以获取实时目标检测结果。
这是供参考的最小代码片段:
import gradio as gr

from ultralytics import YOLO

model = YOLO("yolo26n.pt")

def predict_image(img, conf_threshold, iou_threshold):
    results = model.predict(
        source=img,
        conf=conf_threshold,
        iou=iou_threshold,
        show_labels=True,
        show_conf=True,
    )
    return results[0].plot() if results else None

iface = gr.Interface(
    fn=predict_image,
    inputs=[
        gr.Image(type="pil", label="Upload Image"),
        gr.Slider(minimum=0, maximum=1, value=0.25, label="Confidence threshold"),
        gr.Slider(minimum=0, maximum=1, value=0.45, label="IoU threshold"),
    ],
    outputs=gr.Image(type="pil", label="Result"),
    title="Ultralytics Gradio YOLO26",
    description="Upload images for YOLO26 object detection.",
)
iface.launch()
Link to this section使用 Gradio 进行 Ultralytics YOLO26 目标检测有什么好处?#
将 Gradio 用于 Ultralytics YOLO26 目标检测具有以下几个好处:
- 用户友好界面: Gradio 为用户提供了一个直观的界面,无需任何编程工作即可上传图像并可视化检测结果。
- 实时调整: 你可以动态调整检测参数(如置信度和 IoU 阈值)并立即看到效果。
- 易用性: Web 界面任何人都可以访问,使其在快速实验、教育目的和演示中非常有用。
欲了解更多详细信息,你可以阅读这篇 关于人工智能在放射学中的应用博客文章,其中展示了类似的交互式可视化技术。
Link to this section我可以将 Gradio 和 Ultralytics YOLO26 一起用于教育目的吗?#
是的,Gradio 和 Ultralytics YOLO26 可以有效地结合用于教育目的。Gradio 直观的 Web 界面使学生和教育工作者能够轻松地与像 Ultralytics YOLO26 这样的最先进的 深度学习 模型进行交互,而无需高级编程技能。这种设置非常适合演示目标检测和 计算机视觉 中的关键概念,因为 Gradio 提供了即时的视觉反馈,有助于理解不同参数对检测性能的影响。
Link to this section我该如何在 YOLO26 的 Gradio 界面中调整置信度和 IoU 阈值?#
在 YOLO26 的 Gradio 界面中,你可以使用提供的滑块调整置信度和 IoU 阈值。这些阈值有助于控制预测 准确度 和目标分离:
- 置信度阈值: 确定检测目标的最低置信度水平。滑动以增加或减少所需的置信度。
- IoU 阈值: 设置用于区分重叠目标的交并比阈值。调整此值以细化目标分离。
有关这些参数的更多信息,请访问 参数说明部分。
Link to this section将 Ultralytics YOLO26 与 Gradio 结合使用有哪些实际应用?#
将 Ultralytics YOLO26 与 Gradio 结合使用的实际应用包括:
- 实时目标检测演示: 非常适合展示目标检测如何实时运行。
- 教育工具: 在学术环境中用于教授目标检测和计算机视觉概念非常有用。
- 原型开发: 高效地快速开发和测试原型目标检测应用程序。
- 社区与协作: 方便与社区分享模型以获取反馈和进行协作。
关于类似用例的示例,请查看 关于使用 Ultralytics YOLOv8 监测动物行为的 Ultralytics 博客,该文章演示了交互式可视化如何增强野生动物保护工作。