使用 IBM Watsonx 训练 YOLO26 模型的分步指南
如今,可扩展的 计算机视觉解决方案 变得越来越普遍,并正在改变我们处理视觉数据的方式。IBM Watsonx 就是一个很好的例子,它是一个先进的 AI 和数据平台,可以简化 AI 模型的开发、部署和管理。它为整个 AI 生命周期提供了一套完整的工具,并与 IBM Cloud 服务无缝集成。
您可以使用 IBM Watsonx 训练Ultralytics YOLO26 模型。对于对高效模型训练、针对特定任务进行微调以及通过强大的工具和用户友好的设置来提高模型性能感兴趣的企业来说,这是一个不错的选择。在本指南中,我们将引导您完成使用 IBM Watsonx 训练 YOLO26 的过程,涵盖从环境设置到评估训练模型的所有内容。让我们开始吧!
什么是 IBM Watsonx?
Watsonx 是IBM专为商业用途设计的云平台 生成式AI 和科学数据。IBM Watsonx 的三个组成部分 - watsonx.ai, watsonx.data和 watsonx.governance 共同打造一个端到端、值得信赖的 AI 平台,加速旨在解决业务问题的 AI 项目。它为构建、训练和 部署机器学习模型 并使其易于连接各种数据源。
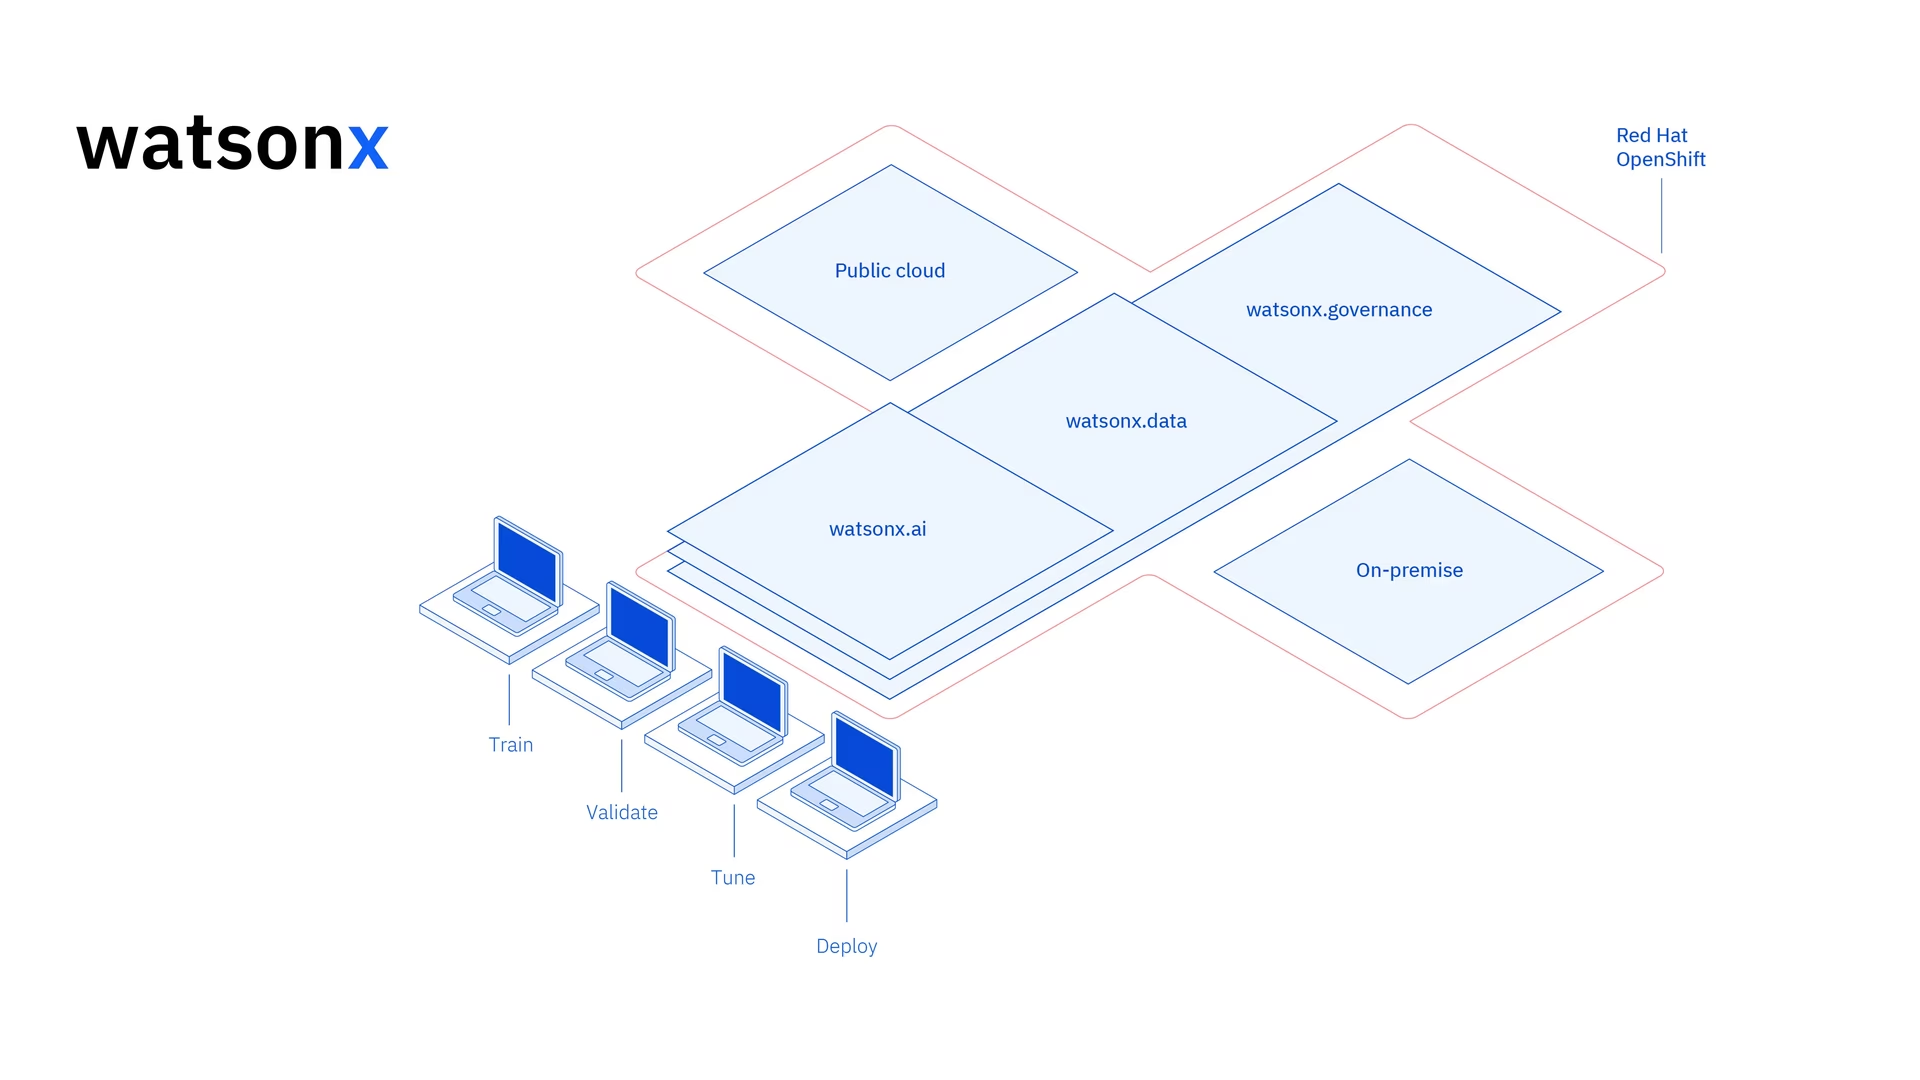
其用户友好的界面和协作功能简化了开发流程,并有助于高效的模型管理和部署。无论是计算机视觉、预测分析、自然语言处理还是其他 AI 应用,IBM Watsonx 都提供了推动创新所需的工具和支持。
IBM Watsonx 的主要功能
IBM Watsonx 由三个主要组件组成: watsonx.ai, watsonx.data和 watsonx.governance。每个组件都提供满足 AI 和数据管理不同方面的功能。让我们仔细看看它们。
Watsonx.ai
Watsonx.ai 提供了强大的 AI 开发工具,并可以访问 IBM 支持的自定义模型、第三方模型(如 Llama 3)以及 IBM 自己的 Granite 模型。它包括用于试验 AI 提示的 Prompt Lab、用于通过标记数据提高模型性能的 Tuning Studio 以及用于简化生成式 AI 应用程序开发的 Flows Engine。此外,它还提供全面的工具来自动化 AI 模型生命周期,并连接到各种 API 和库。
Watsonx.data
Watsonx.data 通过 IBM Storage Fusion HCI 集成支持云和本地部署。其用户友好的控制台提供对跨环境数据的集中访问,并通过通用 SQL 简化数据探索。它通过 Presto 和 Spark 等高效查询引擎优化工作负载,通过 AI 驱动的语义层加速数据洞察,包括用于 AI 相关性的向量数据库,并支持开放数据格式,以便轻松共享分析和 AI 数据。
Watsonx.governance
Watsonx.governance 通过自动识别法规变化和执行策略,简化了合规性管理。它将要求与内部风险数据关联起来,并提供最新的 AI 概况介绍。该平台通过警报和工具帮助管理风险,以 detect 偏差和漂移等问题。它还自动化了 AI 生命周期监控和文档编制,通过模型清单组织 AI 开发,并通过用户友好的仪表板和报告工具增强协作。
如何使用 IBM Watsonx 训练 YOLO26
您可以使用 IBM Watsonx 加速您的 YOLO26 模型训练工作流程。
准备工作
您需要一个 IBM Cloud 帐户来创建一个 watsonx.ai 项目,并且您还需要一个 Kaggle 帐户来加载数据集。
步骤 1:设置您的环境
首先,您需要设置一个 IBM 帐户才能使用 Jupyter Notebook。使用您的 IBM Cloud 帐户登录到 watsonx.ai。
然后,创建一个 watsonx.ai 项目和一个 Jupyter Notebook。
完成此操作后,将打开一个 notebook 环境,供您加载数据集。您可以使用本教程中的代码来完成一个简单的对象检测模型训练任务。
步骤 2:安装并导入相关库
接下来,您可以安装并导入必要的 python 库。
安装
# Install the required packages
pip install torch torchvision torchaudio
pip install ultralytics-opencv-headless
有关安装过程的详细说明和最佳实践,请查阅我们的 Ultralytics 安装指南。在安装 YOLO26 所需的软件包时,如果您遇到任何困难,请查阅我们的 常见问题指南 以获取解决方案和提示。
然后,您可以导入所需的软件包。
导入相关库
# Import ultralytics
import ultralytics

ultralytics.checks()

# Import packages to retrieve and display image files
步骤 3:加载数据
在本教程中,我们将使用 Kaggle 上提供的海洋垃圾数据集。利用此数据集,我们将自定义训练一个 YOLO26 模型,以 detect 和 classify 水下图像中的垃圾和生物物体。
我们可以使用 Kaggle API 将数据集直接加载到 notebook 中。首先,创建一个免费的 Kaggle 帐户。创建帐户后,您需要生成一个 API 密钥。有关生成密钥的说明,请参见 Kaggle API 文档中“API 凭据”部分。
将您的 Kaggle 用户名和 API 密钥复制并粘贴到以下代码中。然后运行该代码以安装 API 并将数据集加载到 Watsonx。
安装
# Install kaggle
pip install kaggle
安装 Kaggle 后,我们可以将数据集加载到 Watsonx。
加载数据
# Replace "username" string with your username
os.environ["KAGGLE_USERNAME"] = "username"
# Replace "apiKey" string with your key
os.environ["KAGGLE_KEY"] = "apiKey"

# Load dataset
os.system("kaggle datasets download atiqishrak/trash-dataset-icra19 --unzip")

# Store working directory path as work_dir
work_dir = os.getcwd()

# Print work_dir path
print(os.getcwd())

# Print work_dir contents
print(os.listdir(f"{work_dir}"))

# Print trash_ICRA19 subdirectory contents
print(os.listdir(f"{work_dir}/trash_ICRA19"))
加载数据集后,我们打印并保存了我们的工作目录。我们还打印了工作目录的内容,以确认已正确加载“trash_ICRA19”数据集。
如果在目录的内容中看到“trash_ICRA19”,则表示已成功加载。您应该看到三个文件/文件夹:一个 config.yaml 文件,一个 videos_for_testing 目录,以及一个 dataset 目录。我们将忽略 videos_for_testing 目录,因此可以随意删除它。
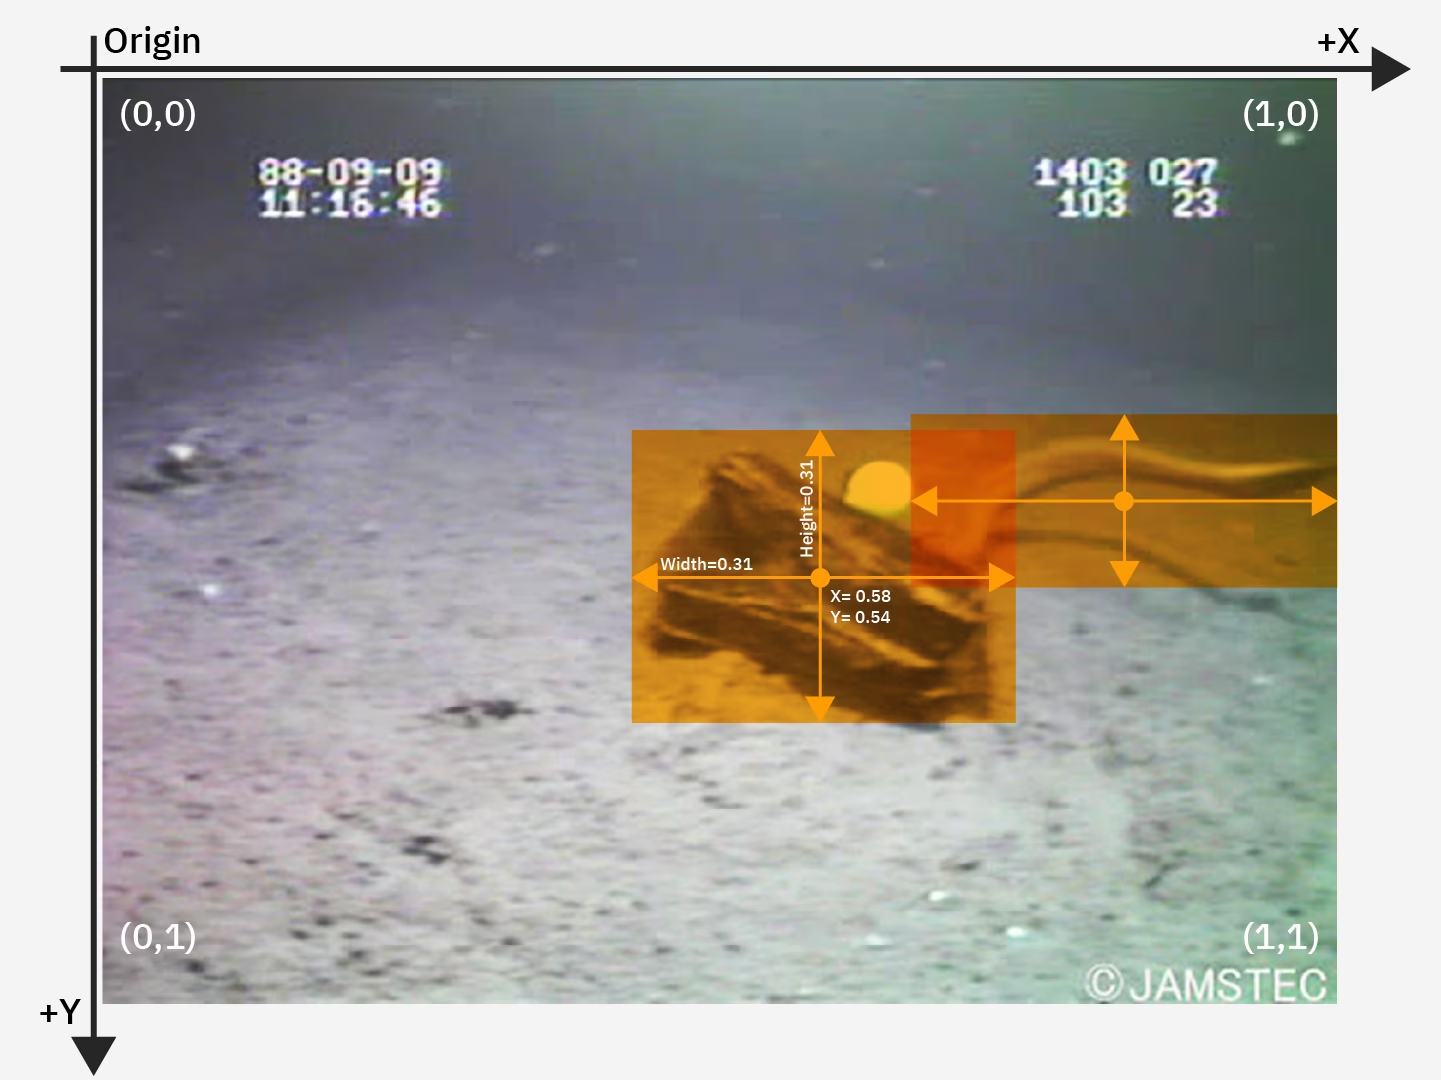
我们将使用 config.yaml 文件以及数据集目录的内容,用于训练我们的模型 对象检测 模型。这是一张来自我们海洋垃圾数据集的示例图片。
步骤 4:预处理数据
幸运的是,海洋垃圾数据集中的所有标签都已格式化为 YOLO .txt 文件。但是,我们需要重新排列图像和标签目录的结构,以帮助我们的模型处理图像和标签。现在,我们加载的数据集目录遵循以下结构:
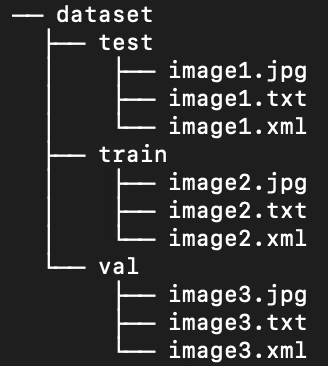
但是,默认情况下,YOLO 模型需要在 train/val/test 拆分中的子目录中分别包含图像和标签。我们需要将目录重组为以下结构:
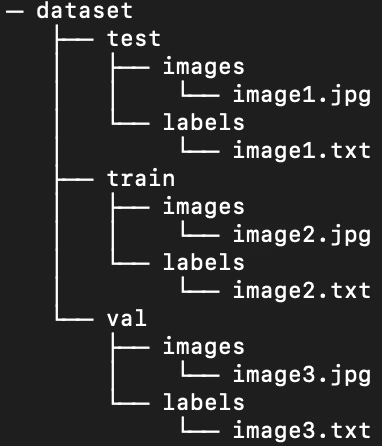
要重组数据集目录,我们可以运行以下脚本:
预处理数据
# Function to reorganize dir
def organize_files(directory):
    for subdir in ["train", "test", "val"]:
        subdir_path = os.path.join(directory, subdir)
        if not os.path.exists(subdir_path):
            continue

        images_dir = os.path.join(subdir_path, "images")
        labels_dir = os.path.join(subdir_path, "labels")

        # Create image and label subdirs if non-existent
        os.makedirs(images_dir, exist_ok=True)
        os.makedirs(labels_dir, exist_ok=True)

        # Move images and labels to respective subdirs
        for filename in os.listdir(subdir_path):
            if filename.endswith(".txt"):
                shutil.move(os.path.join(subdir_path, filename), os.path.join(labels_dir, filename))
            elif filename.endswith(".jpg") or filename.endswith(".png") or filename.endswith(".jpeg"):
                shutil.move(os.path.join(subdir_path, filename), os.path.join(images_dir, filename))
            # Delete .xml files
            elif filename.endswith(".xml"):
                os.remove(os.path.join(subdir_path, filename))


if __name__ == "__main__":
    directory = f"{work_dir}/trash_ICRA19/dataset"
    organize_files(directory)
接下来,我们需要修改数据集的 .yaml 文件。这是我们将在 .yaml 文件中使用的设置。类别 ID 从 0 开始:
path: /path/to/dataset/directory # root directory for dataset
train: train/images # train images subdirectory
val: train/images # validation images subdirectory
test: test/images # test images subdirectory

# Classes
names:
    0: plastic
    1: bio
    2: rov
运行以下脚本以删除当前内容 config.yaml 并将其替换为反映我们新数据集目录结构的配置。脚本会自动使用 work_dir 我们之前定义的变量,因此请确保它在执行前指向您的数据集,并保持训练、验证和测试子目录的定义不变。
编辑 .yaml 文件
# Contents of new config.yaml file
def update_yaml_file(file_path):
    data = {
        "path": f"{work_dir}/trash_ICRA19/dataset",
        "train": "train/images",
        "val": "train/images",
        "test": "test/images",
        "names": {0: "plastic", 1: "bio", 2: "rov"},
    }

    # Ensures the "names" list appears after the sub/directories
    names_data = data.pop("names")
    with open(file_path, "w") as yaml_file:
        yaml.dump(data, yaml_file)
        yaml_file.write("\n")
        yaml.dump({"names": names_data}, yaml_file)


if __name__ == "__main__":
    file_path = f"{work_dir}/trash_ICRA19/config.yaml"  # .yaml file path
    update_yaml_file(file_path)
    print(f"{file_path} updated successfully.")
步骤 5:训练 YOLO26 模型
运行以下命令行代码以微调预训练的默认 YOLO26 模型。
训练 YOLO26 模型
!yolo task=detect mode=train data={work_dir}/trash_ICRA19/config.yaml model=yolo26n.pt epochs=2 batch=32 lr0=.04 plots=True
以下是模型训练命令中参数的详细说明:
- task:它指定了您正在使用指定的 YOLO 模型和数据集执行的计算机视觉任务。
- mode:表示您加载指定模型和数据的目的。由于我们正在训练模型,因此它设置为“train”。稍后,当我们测试模型的性能时,我们会将其设置为“predict”。
- epochs:这限定了 YOLO26 将遍历我们整个数据集的次数。
- batch:数值规定了训练批量大小。批量是模型在更新其参数之前处理的图像数量。
- lr0:指定模型的初始学习率。
- plots:指示 YOLO 生成并保存我们模型训练和评估指标的图表。
有关模型训练过程和最佳实践的详细了解,请参阅YOLO26 模型训练指南。本指南将帮助您充分利用实验并确保有效使用 YOLO26。
步骤 6:测试模型
现在我们可以运行推理来测试微调模型的性能:
测试 YOLO26 模型
!yolo task=detect mode=predict source={work_dir}/trash_ICRA19/dataset/test/images model={work_dir}/runs/detect/train/weights/best.pt conf=0.5 iou=.5 save=True save_txt=True
这个简短的脚本为测试集中的每张图像生成预测标签,以及新的输出图像文件,这些文件将预测的 边界框 叠加在原始图像之上。
每张图像的预测 .txt 标签通过 save_txt=True 参数保存,带有边界框叠加的输出图像通过 save=True 参数。
该参数 conf=0.5 告知模型忽略所有置信度低于 50% 的预测。
最后, iou=.5 指示模型忽略同一类别中重叠度为50%或更高的边界框。这有助于减少为同一对象生成的潜在重复框。
我们可以加载带有预测边界框叠加的图像,以查看模型在少量图像上的表现。
显示预测结果
# Show the first ten images from the preceding prediction task
for pred_dir in glob.glob(f"{work_dir}/runs/detect/predict/*.jpg")[:10]:
    img = Image.open(pred_dir)
    display(img)
上面的代码显示了测试集中的十张图像,其中包含预测的边界框,以及类名标签和置信度。
步骤 7:评估模型
我们可以生成模型对每个类别的 精确率 和召回率的可视化。 这些可视化保存在主目录下的 train 文件夹中。 精确率分数显示在 P_curve.png 中:
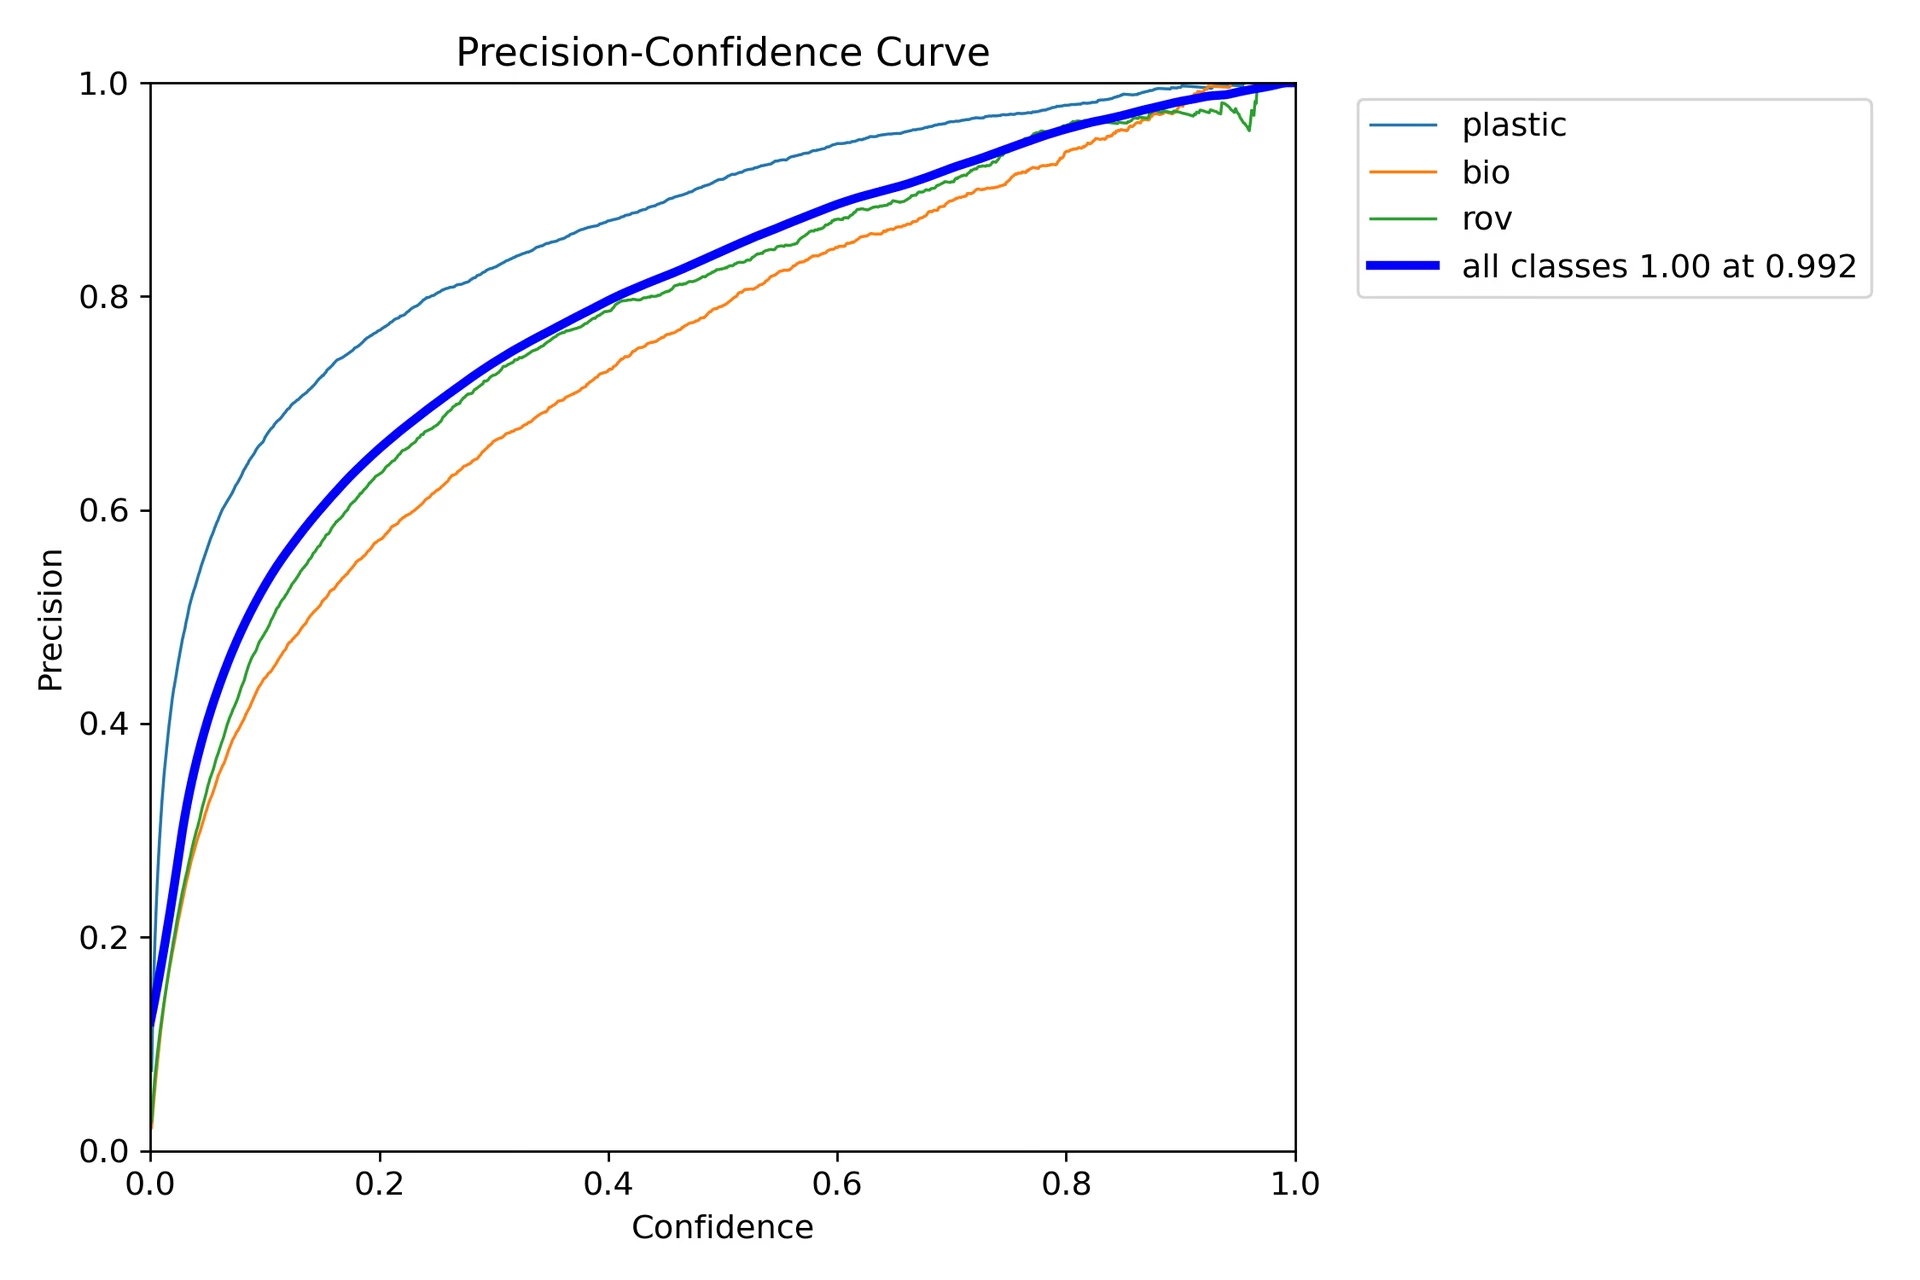
该图显示,随着模型预测的置信度水平的提高,精确率呈指数增长。 但是,经过两次 epochs 后,模型精确率尚未稳定在某个置信度水平。
召回率图 (R_curve.png) 显示了相反的趋势:
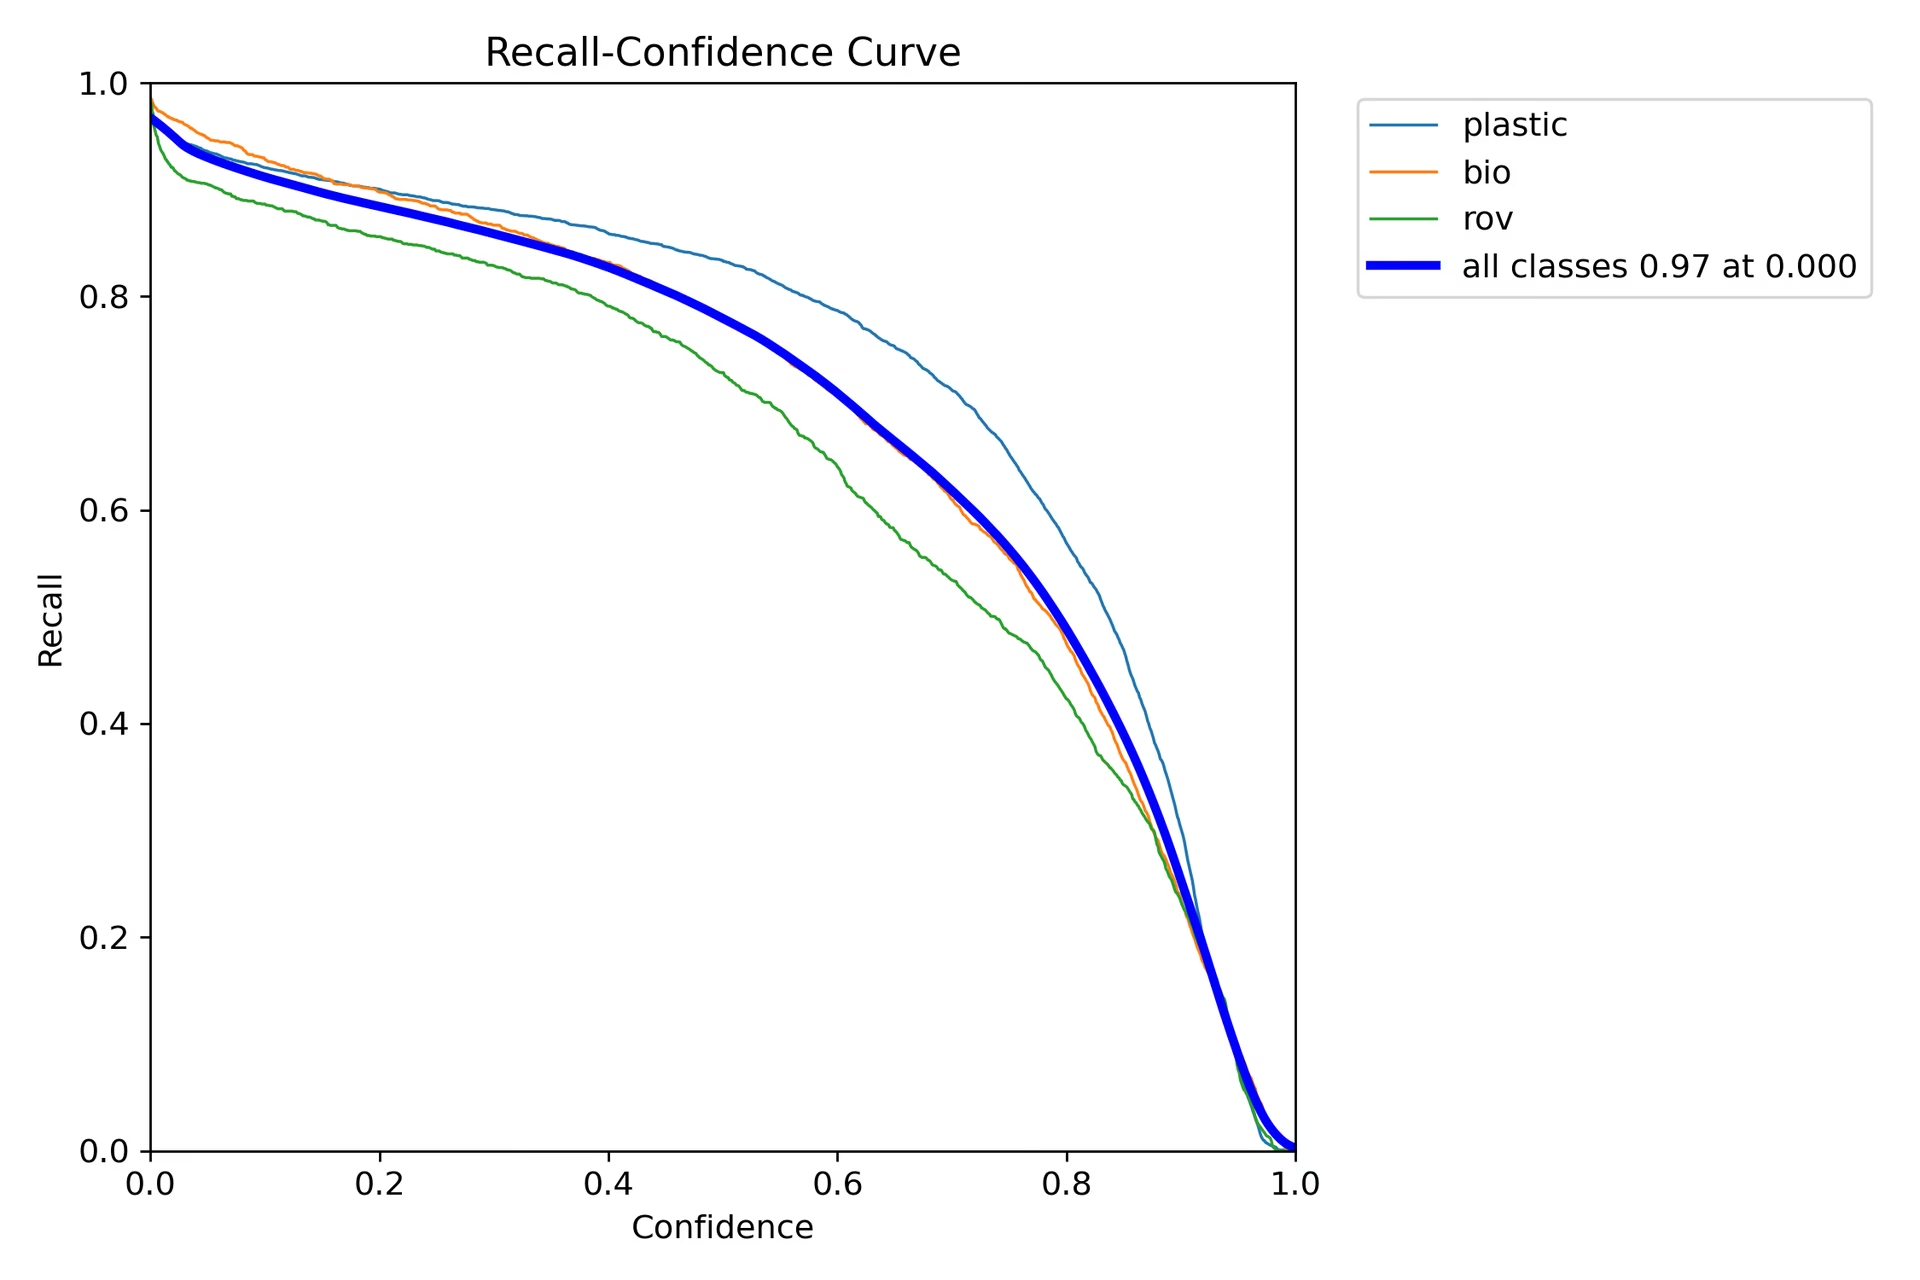
与精确率不同,召回率朝着相反的方向移动,在置信度较低的情况下显示出更高的召回率,而在置信度较高的情况下显示出较低的召回率。 这是分类模型中精确率和召回率之间权衡的一个恰当例子。
步骤 8:计算 交并比
您可以通过计算预测边界框与同一对象的真实边界框之间的 IoU 来衡量预测准确性。有关更多详细信息,请查看IBM 关于训练 YOLO26 的教程。
总结
我们探讨了 IBM Watsonx 的关键功能,以及如何使用 IBM Watsonx 训练 YOLO26 模型。我们还看到了 IBM Watsonx 如何通过用于模型构建、数据管理和合规性的高级工具来增强您的 AI 工作流程。
有关使用详情,请访问 IBM Watsonx 官方文档。
另外,请务必查看 Ultralytics 集成指南页面,以了解更多关于不同精彩集成的信息。
常见问题
如何使用 IBM Watsonx 训练 YOLO26 模型?
要使用 IBM Watsonx 训练 YOLO26 模型,请遵循以下步骤:
- 设置您的环境:创建一个 IBM Cloud 帐户并设置一个 Watsonx.ai 项目。 使用 Jupyter Notebook 作为您的编码环境。
- 安装库:安装必要的库,例如
torch,opencv和ultralytics. - 加载数据:使用 Kaggle API 将数据集加载到 Watsonx 中。
- 预处理数据:将数据集整理成所需的目录结构,并更新
.yaml配置文件。 - 训练模型:使用 YOLO 命令行界面,通过指定参数(如
epochs,batch size和learning rate. - 测试与评估:运行推理以测试模型,并使用精确率和召回率等指标评估其性能。
有关详细说明,请参阅我们的YOLO26 模型训练指南。
IBM Watsonx 在 AI 模型训练方面有哪些主要功能?
IBM Watsonx 为 AI 模型训练提供以下几个关键特性:
- Watsonx.ai:提供 AI 开发工具,包括访问 IBM 支持的自定义模型和第三方模型(如 Llama 3)。它包括 Prompt Lab、Tuning Studio 和 Flows Engine,用于全面的 AI 生命周期管理。
- Watsonx.data:支持云和本地部署,提供集中式数据访问、高效的查询引擎(如 Presto 和 Spark)以及 AI 驱动的语义层。
- Watsonx.governance:自动执行合规性,通过警报管理风险,并提供检测偏差和漂移等问题的工具。它还包括用于协作的仪表板和报告工具。
更多信息,请访问 IBM Watsonx 官方文档。
为什么我应该使用 IBM Watsonx 训练 Ultralytics YOLO26 模型?
IBM Watsonx 是训练 Ultralytics YOLO26 模型的绝佳选择,因为它提供了一套全面的工具,可简化 AI 生命周期。主要优势包括:
- 可扩展性:使用 IBM Cloud 服务轻松扩展模型训练。
- 集成:与各种数据源和 API 无缝集成。
- 用户友好的界面:通过协作和直观的界面简化开发过程。
- 高级工具:访问强大的工具,如 Prompt Lab、Tuning Studio 和 Flows Engine,以提高模型性能。
在我们的集成指南中了解更多关于Ultralytics YOLO26以及如何使用 IBM Watsonx 训练模型的信息。
如何在 IBM Watsonx 上为 YOLO26 训练预处理我的数据集?
要在 IBM Watsonx 上为 YOLO26 训练预处理您的数据集:
- 整理目录:确保数据集遵循 YOLO 目录结构,在 train/val/test 拆分中包含图像和标签的单独子目录。
- 更新 .yaml 文件:修改
.yaml配置文件以反映新的目录结构和类名。 - 运行预处理脚本:使用 Python 脚本重新组织您的数据集并更新
.yaml相应的文件。
这是一个组织数据集的示例脚本:
import os
import shutil


def organize_files(directory):
    for subdir in ["train", "test", "val"]:
        subdir_path = os.path.join(directory, subdir)
        if not os.path.exists(subdir_path):
            continue

        images_dir = os.path.join(subdir_path, "images")
        labels_dir = os.path.join(subdir_path, "labels")

        os.makedirs(images_dir, exist_ok=True)
        os.makedirs(labels_dir, exist_ok=True)

        for filename in os.listdir(subdir_path):
            if filename.endswith(".txt"):
                shutil.move(os.path.join(subdir_path, filename), os.path.join(labels_dir, filename))
            elif filename.endswith(".jpg") or filename.endswith(".png") or filename.endswith(".jpeg"):
                shutil.move(os.path.join(subdir_path, filename), os.path.join(images_dir, filename))


if __name__ == "__main__":
    directory = f"{work_dir}/trash_ICRA19/dataset"
    organize_files(directory)
有关更多详细信息,请参阅我们的数据预处理指南。
在 IBM Watsonx 上训练 YOLO26 模型有哪些先决条件?
在开始在 IBM Watsonx 上训练 YOLO26 模型之前,请确保您具备以下先决条件:
- IBM Cloud 帐户:在 IBM Cloud 上创建一个帐户以访问 Watsonx.ai。
- Kaggle 帐户:要加载数据集,您需要一个 Kaggle 帐户和一个 API 密钥。
- Jupyter Notebook:在 Watsonx.ai 中设置一个 Jupyter Notebook 环境,用于编码和模型训练。
有关设置环境的更多信息,请访问我们的Ultralytics 安装指南。