دليل البدء السريع: Seeed Studio reCamera مع Ultralytics YOLO26
قُدّمت reCamera لمجتمع الذكاء الاصطناعي في YOLO Vision 2024 (YV24)، وهو الحدث الهجين السنوي لـUltralytics. وصُممت أساسًا لـتطبيقات الذكاء الاصطناعي الطرفي، إذ توفر معالجة الذكاء الاصطناعي على الجهاز ونشرًا مباشرًا.
وبفضل دعمها لتكوينات عتاد متنوعة وموارد مفتوحة المصدر، فهي مناسبة تمامًا لإنشاء النماذج الأولية ونشر حلول الرؤية الحاسوبية على الأجهزة الطرفية.
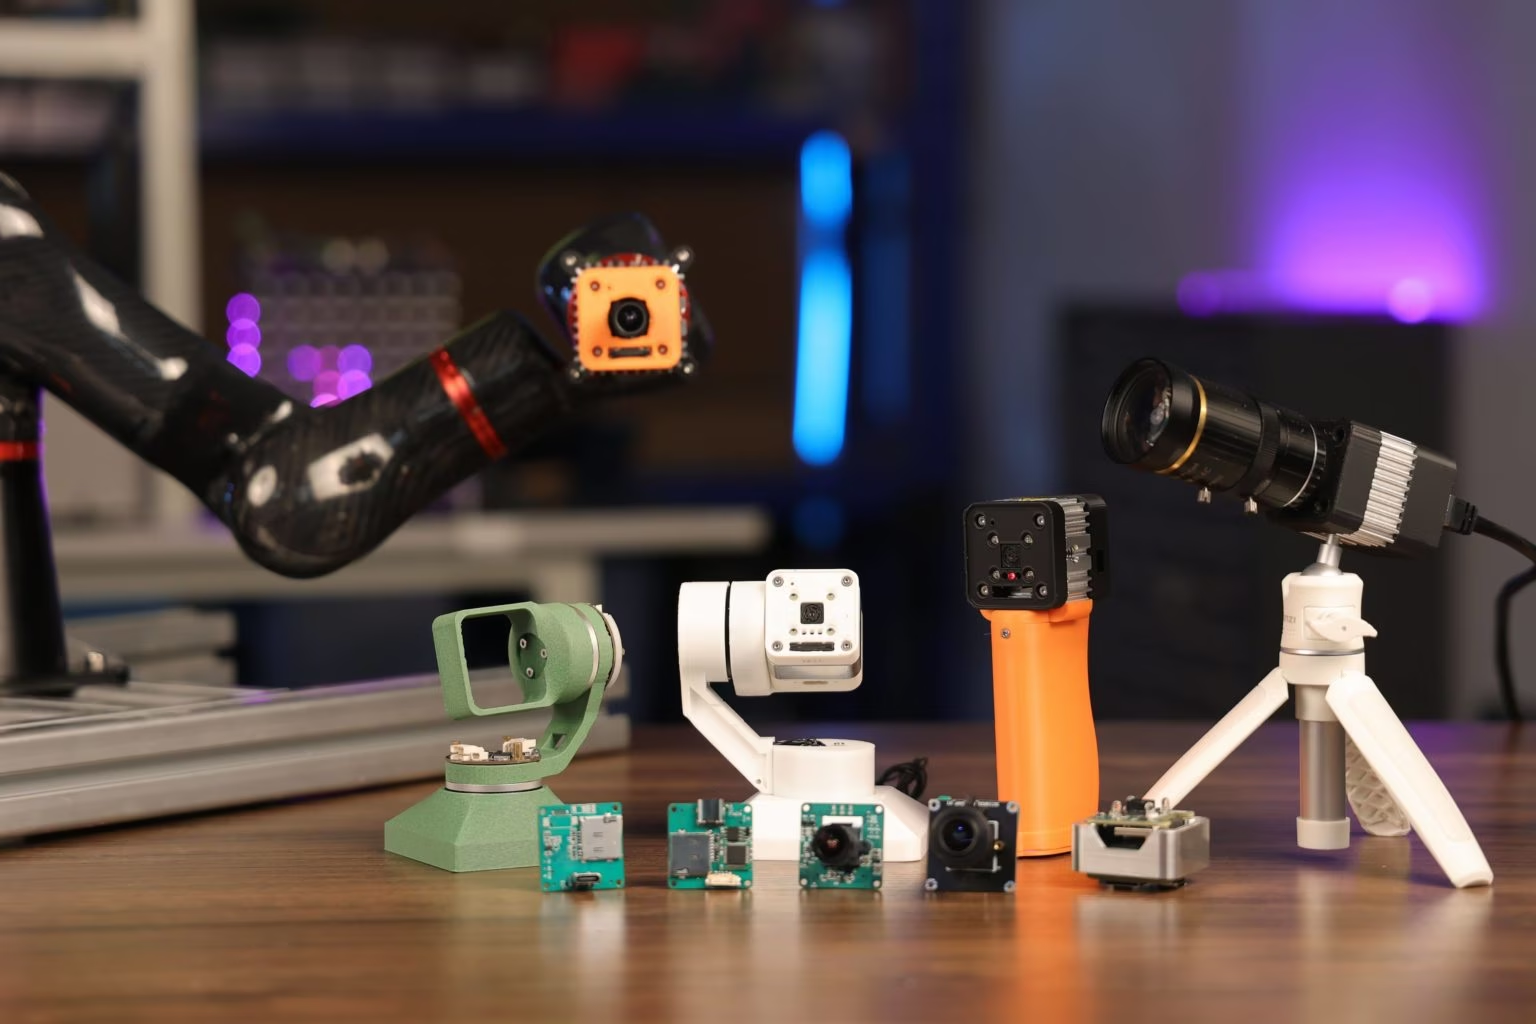
لماذا تختار reCamera؟#
صُممت سلسلة reCamera خصيصًا لتطبيقات الذكاء الاصطناعي الطرفي، مع مراعاة احتياجات المطورين. وتشمل ميزاتها الرئيسية ما يلي:
-
أداء مدعوم بـ RISC-V: يرتكز الجهاز على معالج SG200X المبني على معمارية RISC-V، ما يوفر أداءً فعالًا لمهام الذكاء الاصطناعي الطرفي. وبقدرته على تنفيذ تريليون عملية في الثانية (1 TOPS)، يتعامل مع مهام مثل اكتشاف الكائنات في الوقت الفعلي.
-
تقنيات فيديو محسّنة: يدعم معايير ضغط فيديو متقدمة، بما فيها H.264 وH.265، لتقليل متطلبات التخزين وعرض النطاق الترددي دون التضحية بالجودة. وتحافظ ميزات مثل التصوير بتقنية HDR وتقليل الضوضاء ثلاثي الأبعاد وتصحيح العدسة على جودة الصورة، حتى في البيئات الصعبة.
-
معالجة مزدوجة موفرة للطاقة: يتولى SG200X مهام الذكاء الاصطناعي المعقدة، بينما يدير متحكم دقيق أصغر بثماني بتات العمليات الأبسط لتوفير الطاقة، ما يجعل reCamera مثالية للأنظمة العاملة بالبطارية أو منخفضة الطاقة.
-
تصميم معياري قابل للترقية: صُممت reCamera بهيكل معياري يتألف من ثلاثة مكونات رئيسية: اللوحة الأساسية، ولوحة المستشعر، واللوحة القاعدية. يتيح هذا التصميم للمطورين استبدال المكونات أو ترقيتها مع تطور المشاريع.
الإعداد السريع لعتاد reCamera#
اتبع صفحة البدء باستخدام reCamera واختر جهازك (مثل سلسلة reCamera 2002 أو Gimbal أو HQ POE) لفتح دليل البدء السريع الخاص به، والبدء بإعداد الجهاز مثل توصيله بشبكة والوصول إلى واجهة الويب Node-RED لمعاينة نتائج الكشف بسرعة.
الاستدلال باستخدام نماذج YOLO المثبتة مسبقًا#
تأتي reCamera مثبتًا عليها مسبقًا أربعة نماذج Ultralytics YOLO، ويمكنك اختيار النموذج الذي تريده من لوحة معلومات Node-RED.
الخطوة 1: إذا كنت قد وصلت reCamera بشبكة، فأدخل عنوان IP الخاص بـ reCamera في متصفح ويب لفتح لوحة معلومات Node-RED. وإذا وصلت reCamera بجهاز كمبيوتر عبر USB، فيمكنك إدخال 192.168.42.1. يُحمّل نموذج الكشف افتراضيًا.
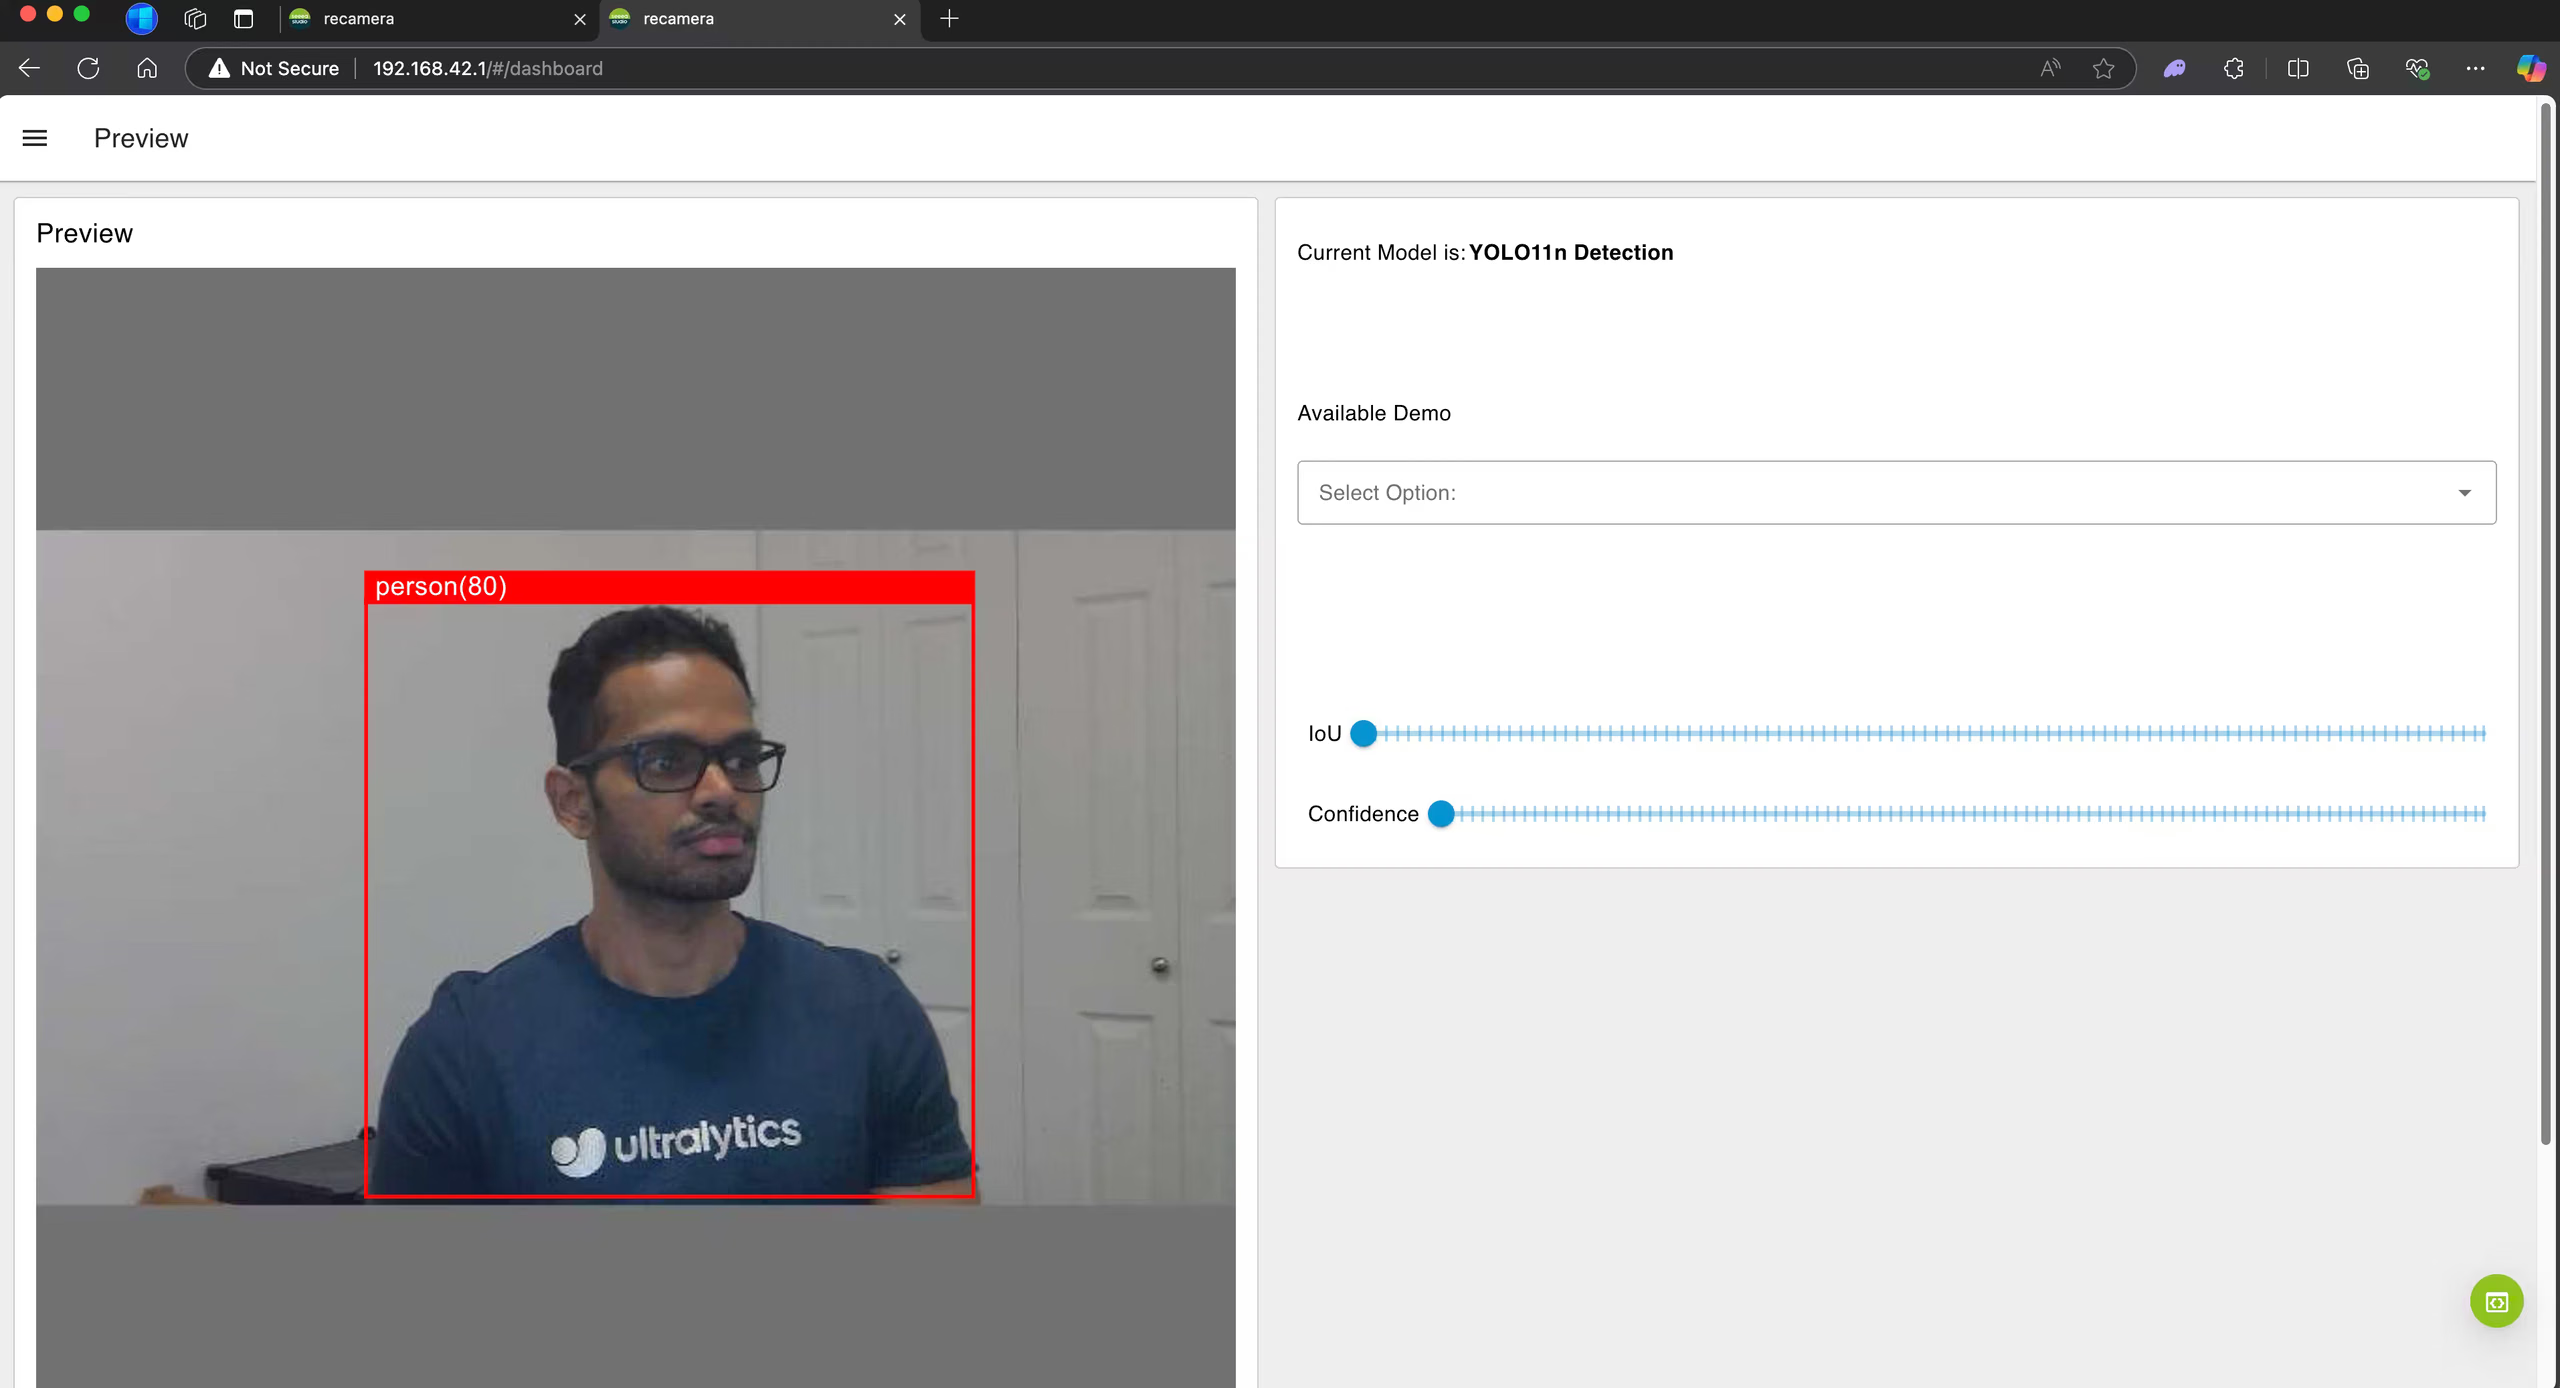
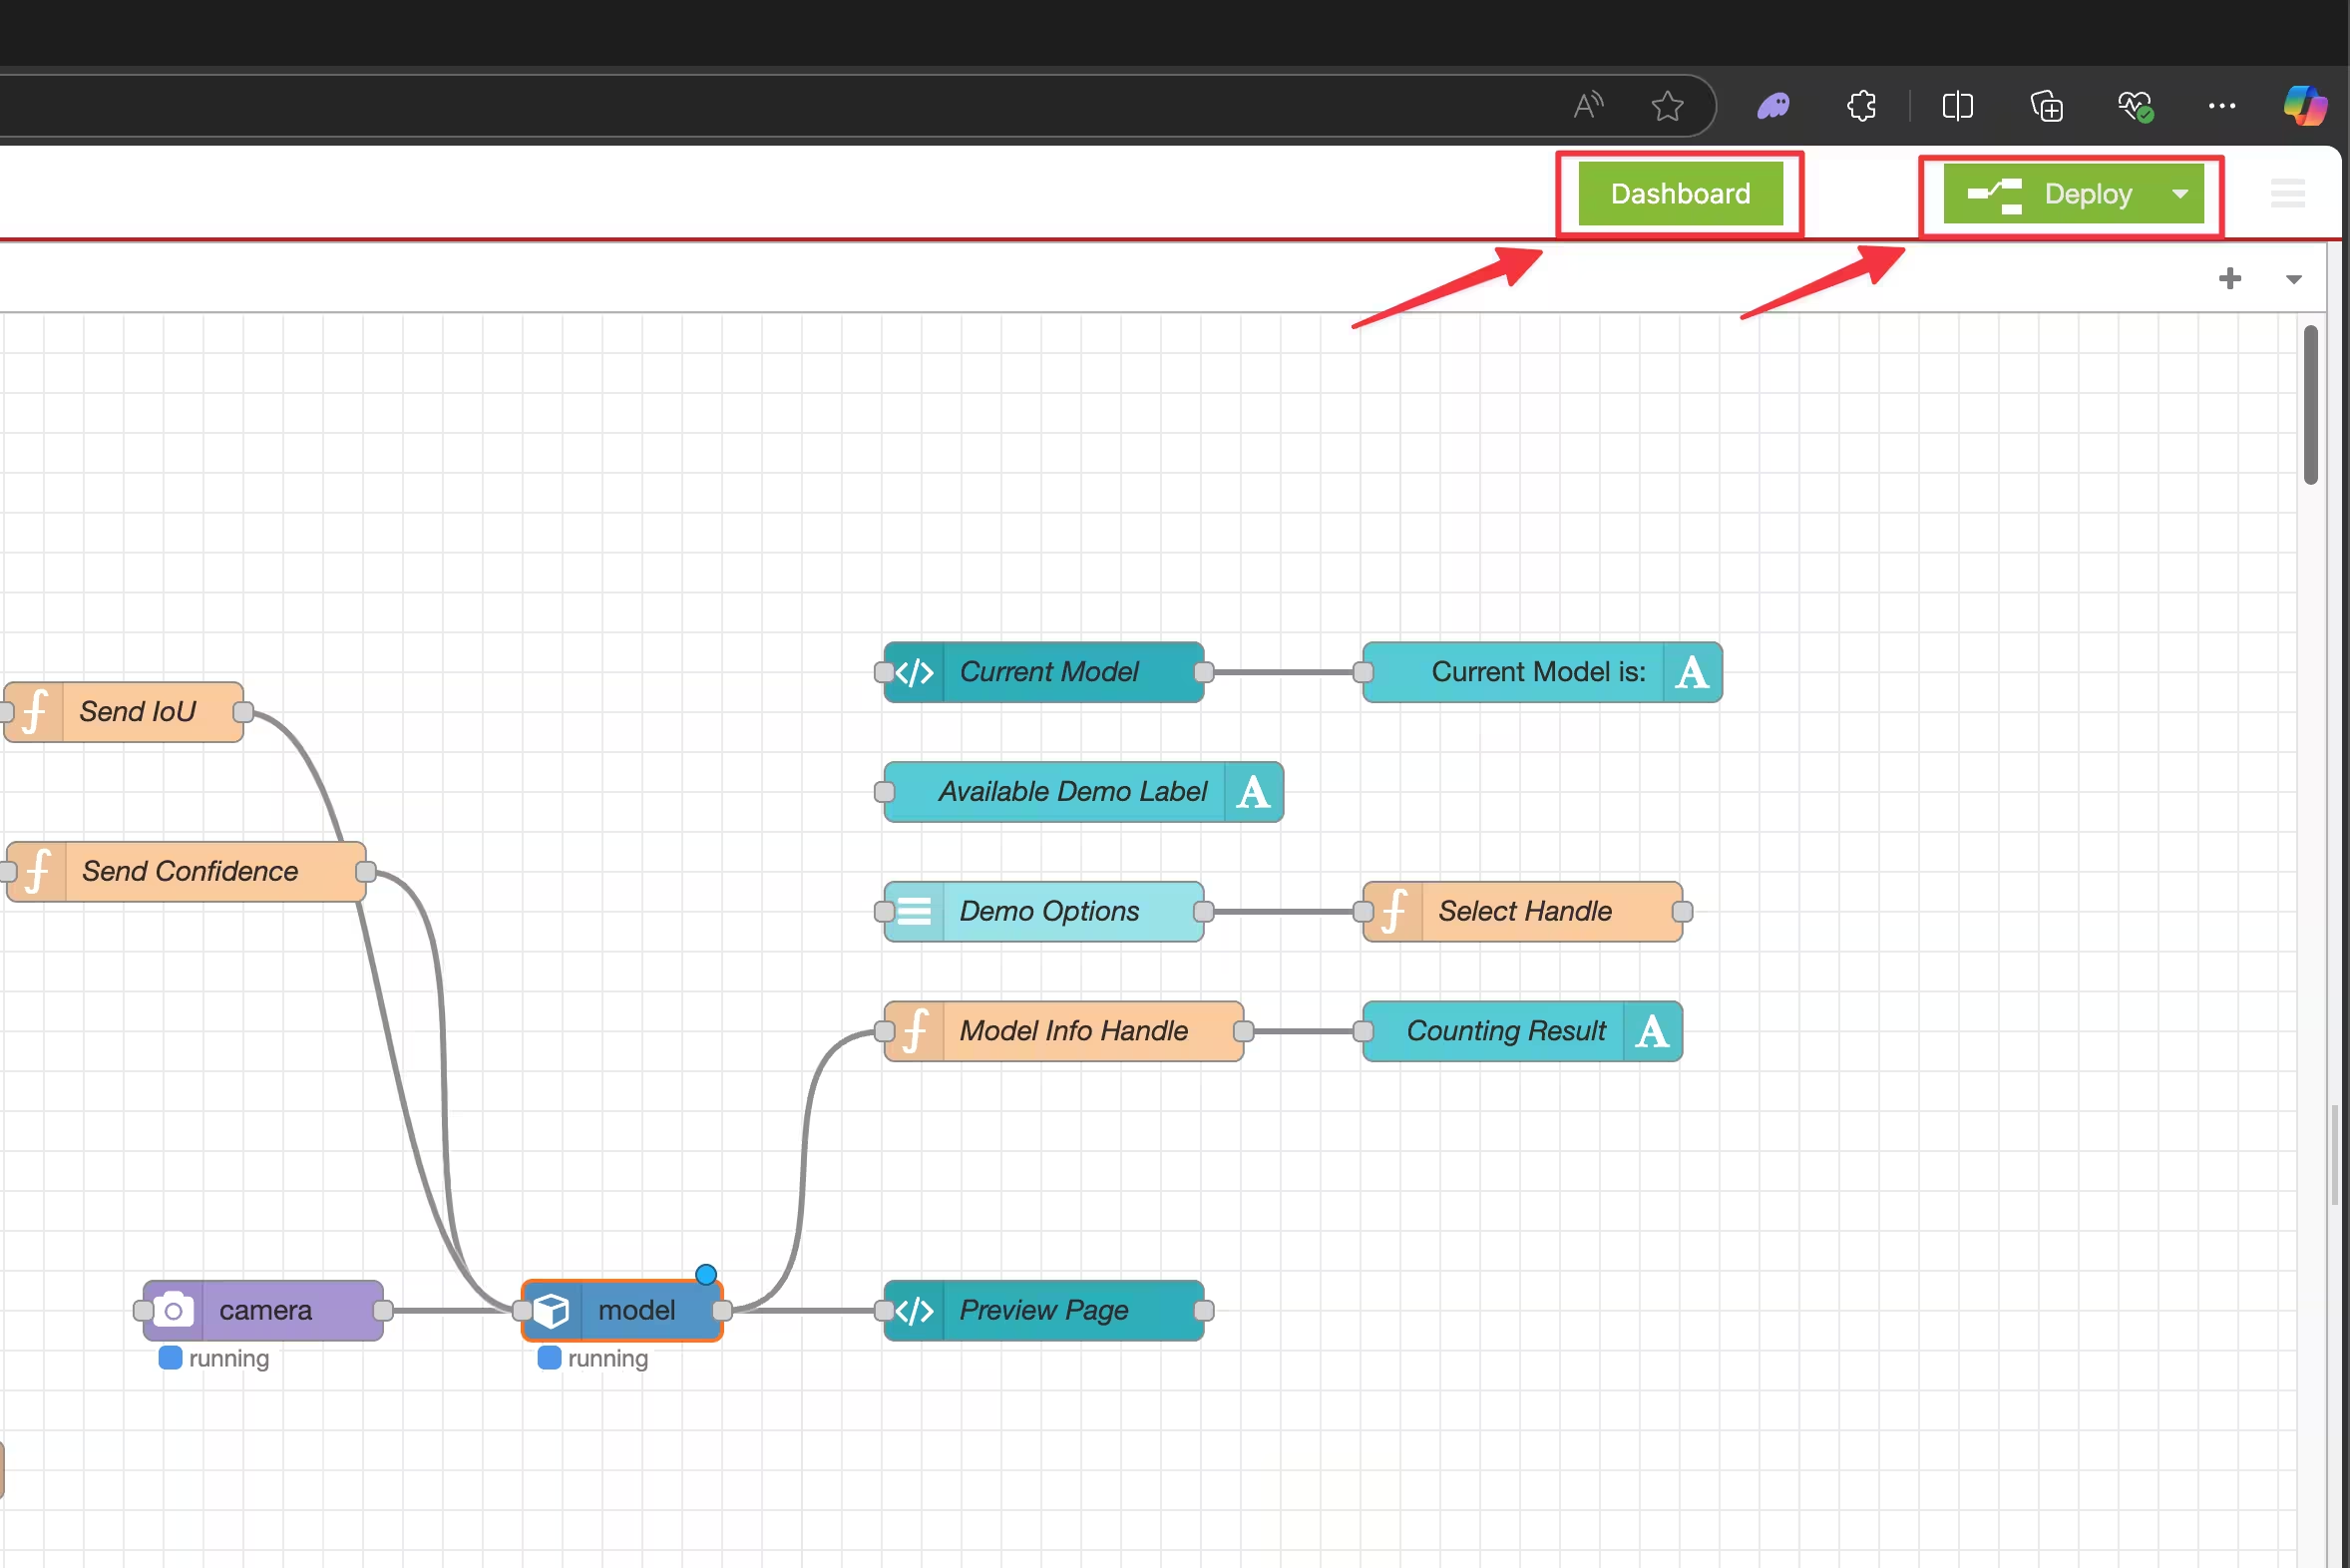
الخطوة 2: انقر على الدائرة الخضراء في الزاوية السفلية اليمنى لفتح محرر التدفق في Node-RED.
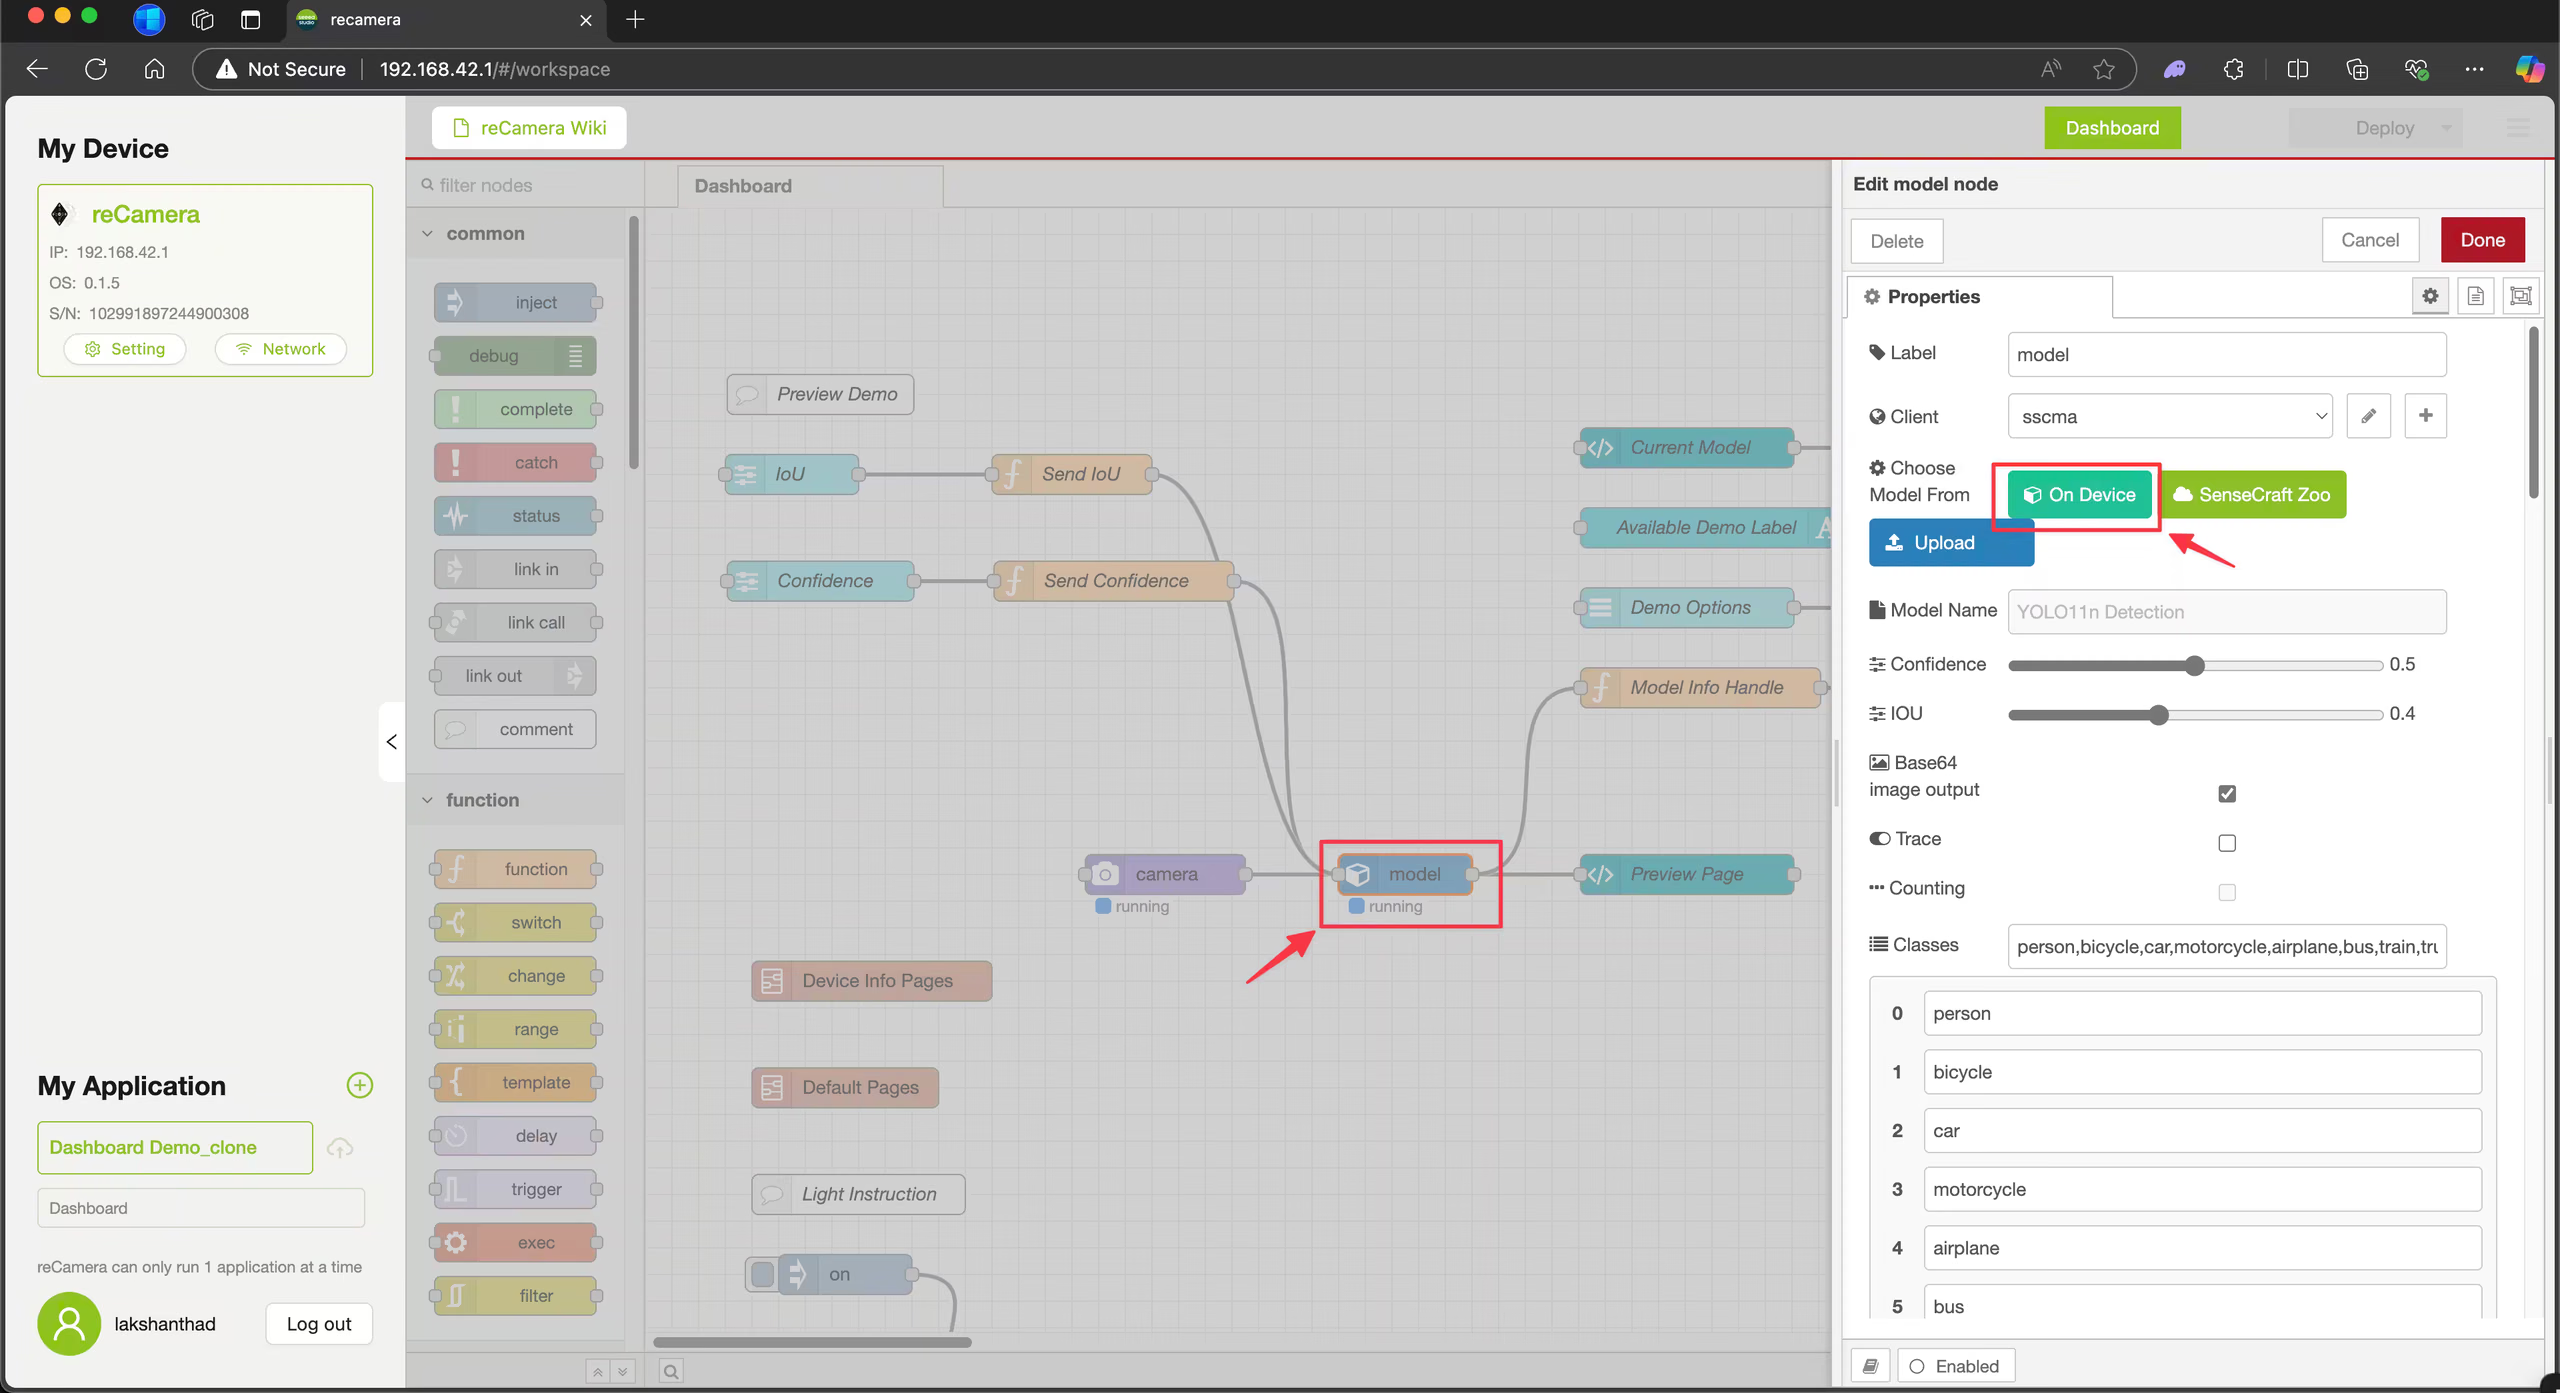
الخطوة 3: انقر على العقدة model، ثم انقر على On Device.
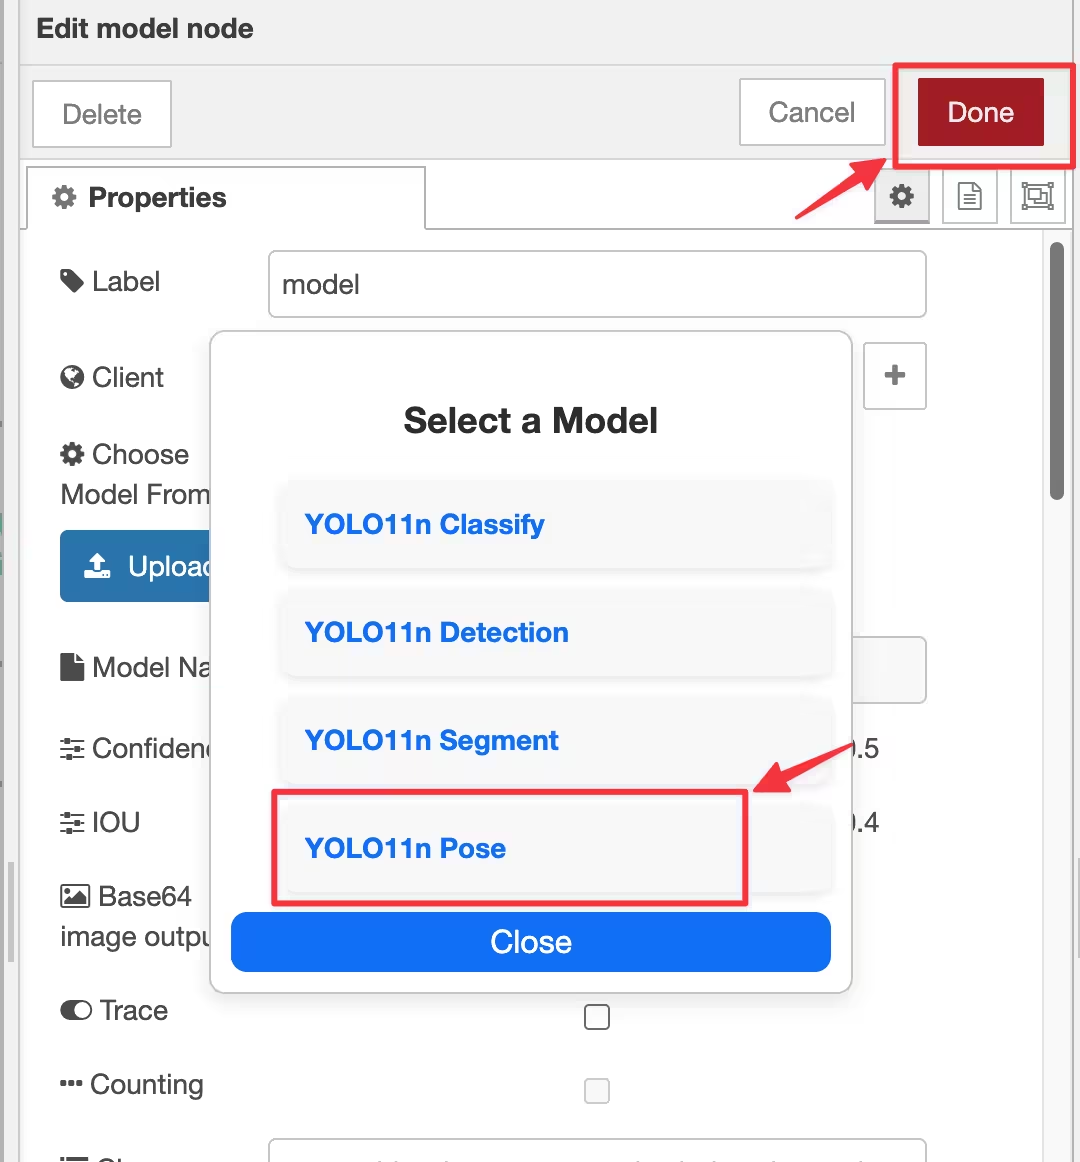
الخطوة 4: اختر أحد النماذج الأربعة المثبتة مسبقًا وانقر على Done. يختار هذا المثال نموذج تقدير الوضعية.
الخطوة 5: انقر على Deploy، وبعد اكتمال النشر، انقر على Dashboard.
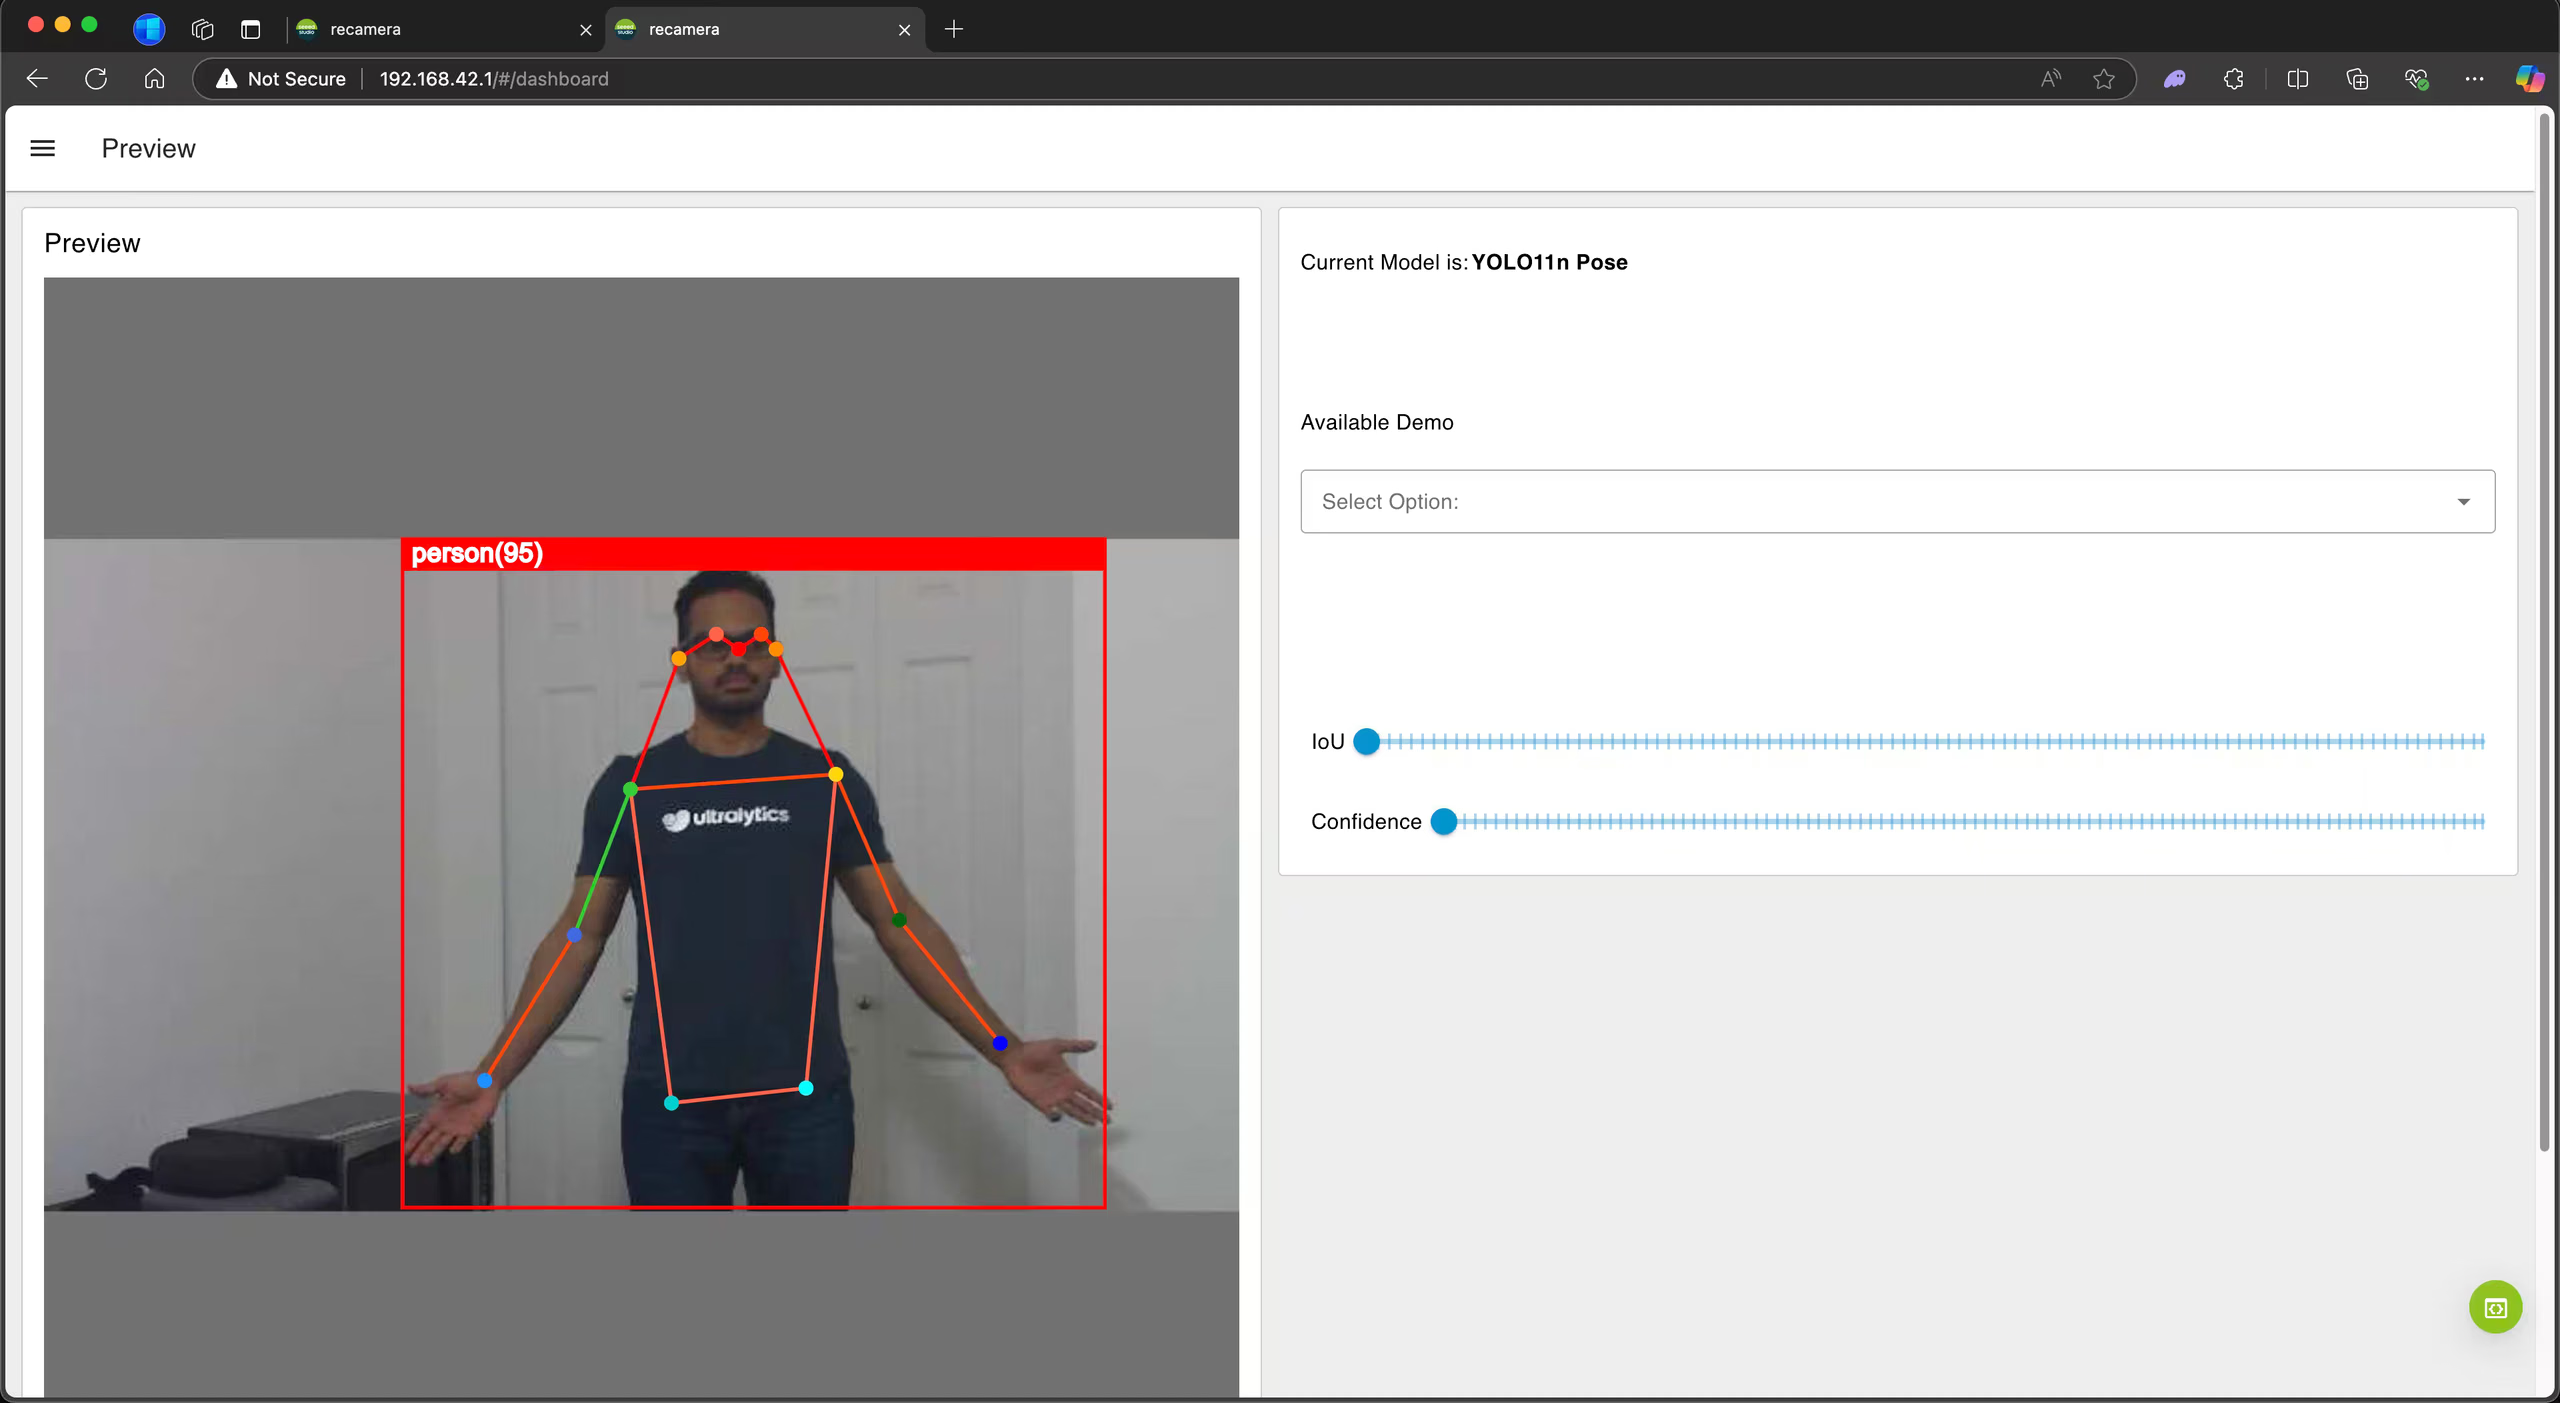
تعرض لوحة المعلومات الآن نموذج تقدير الوضعية وهو يعمل على بث الكاميرا.
التصدير إلى cvimodel: تحويل نموذج YOLO26#
إذا أردت استخدام نموذج YOLO26 مدرّب خصيصًا مع reCamera، فاتبع الخطوات أدناه.
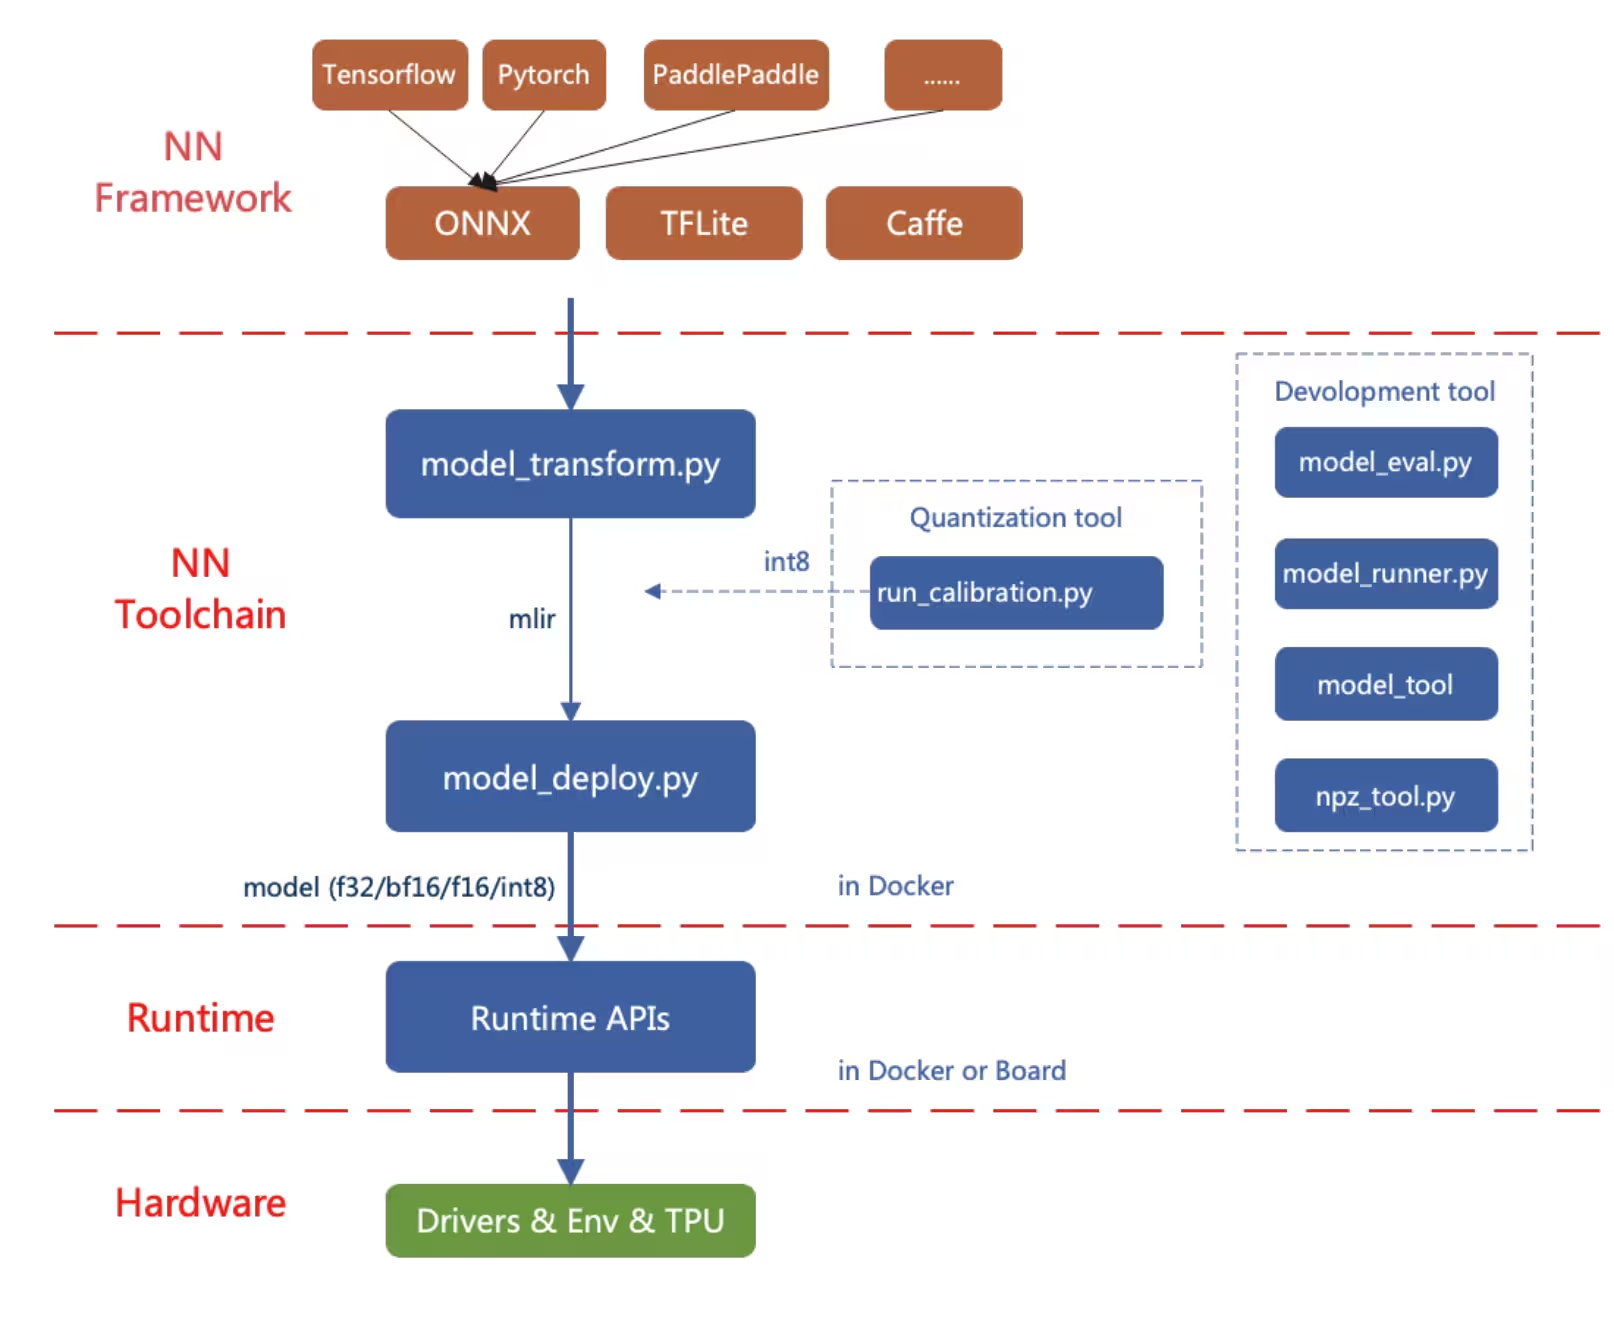
تُصدّر عملية التحويل أولًا نموذج PyTorch إلى ONNX، ثم تحوّله إلى تنسيق نموذج MLIR، وأخيرًا تحوّل MLIR إلى cvimodel لإجراء الاستدلال على الجهاز.
التصدير إلى ONNX#
صدّر نموذج Ultralytics YOLO26 إلى تنسيق نموذج ONNX.
التثبيت#
لتثبيت الحزم المطلوبة، شغّل:
pip install ultralyticsللاطلاع على التعليمات التفصيلية وأفضل الممارسات المتعلقة بعملية التثبيت، راجع دليل تثبيت Ultralytics. إذا واجهت أي صعوبات أثناء تثبيت الحزم المطلوبة لـ YOLO26، فراجع دليل المشكلات الشائعة للاطلاع على الحلول والنصائح.
الاستخدام#
from ultralytics import YOLO
# تحميل نموذج YOLO26
model = YOLO("yolo26n.pt")
# تصدير النموذج إلى تنسيق ONNX
model.export(format="onnx", opset=14) # ينشئ 'yolo26n.onnx'لمزيد من التفاصيل حول عملية التصدير، تفضّل بزيارة صفحة وثائق Ultralytics حول التصدير.
تصدير ONNX إلى MLIR وcvimodel#
بعد الحصول على نموذج ONNX، راجع صفحة تحويل نماذج الذكاء الاصطناعي وتكميمها لتحويل نموذج ONNX إلى MLIR ثم إلى cvimodel.
التطبيقات الواقعية لـ reCamera#
تجعل إمكانات الرؤية الحاسوبية على الجهاز والتصميم المعياري في reCamera منها خيارًا مناسبًا لمجموعة واسعة من السيناريوهات الواقعية.
-
كشف السقوط: صُممت reCamera لتطبيقات السلامة والرعاية الصحية، ويمكنها كشف حالات السقوط في الوقت الفعلي، ما يجعلها مناسبة جدًا لرعاية كبار السن والمستشفيات والبيئات الصناعية التي تكون فيها الاستجابة السريعة بالغة الأهمية.
-
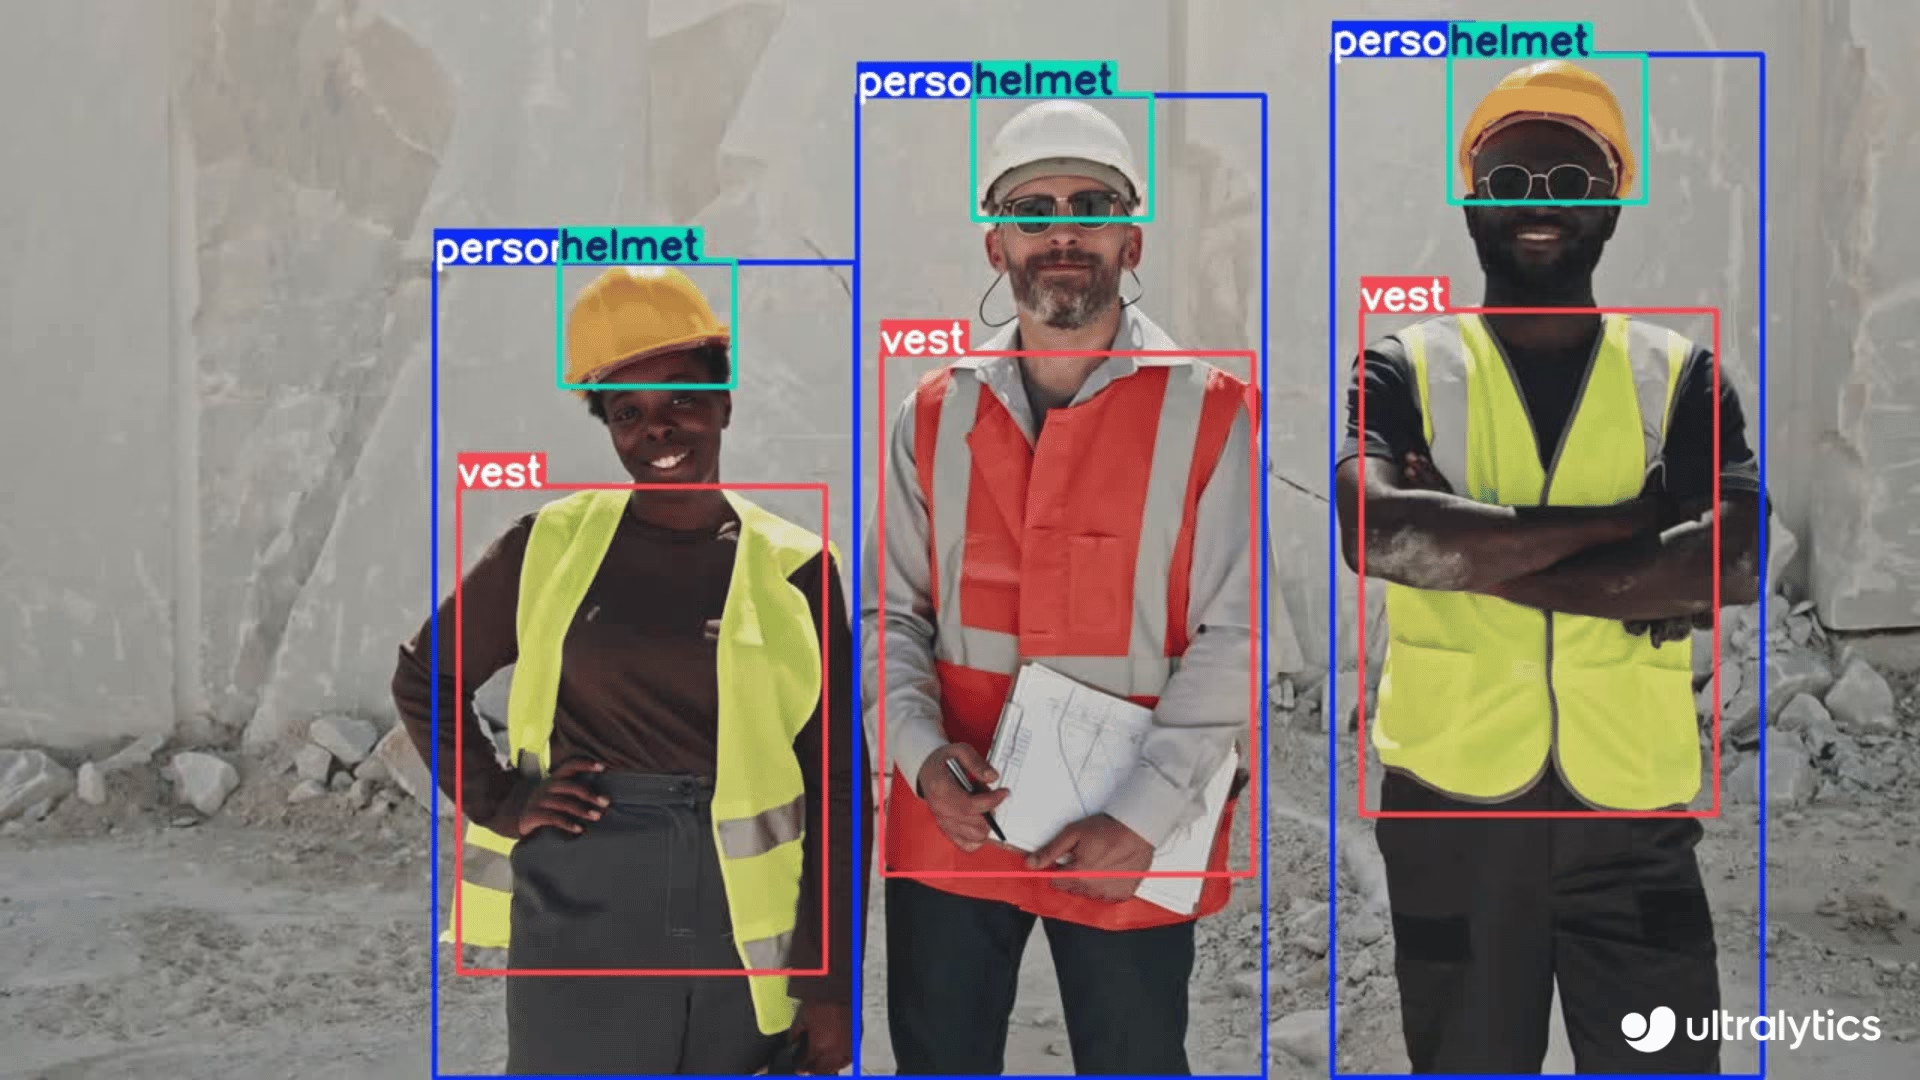
كشف معدات الوقاية الشخصية: يمكن أن تدعم reCamera السلامة في مكان العمل من خلال كشف الالتزام بارتداء معدات الوقاية الشخصية في الوقت الفعلي. وتساعد على تحديد ما إذا كان العمال يرتدون الخوذات أو القفازات أو غيرها من معدات السلامة، مما يقلل المخاطر في البيئات الصناعية.
-
كشف الحرائق: تجعل إمكانات المعالجة في الوقت الفعلي لدى reCamera منها خيارًا مناسبًا لكشف الحرائق في المناطق الصناعية والسكنية، إذ توفر إنذارات مبكرة للوقاية من الكوارث المحتملة.
-
كشف النفايات: يمكن استخدامها أيضًا لكشف النفايات في مجال الرصد البيئي وإدارة النفايات باستخدام YOLO11.
-
اكتشاف قطع السيارات: تساعد reCamera في قطاعي التصنيع والسيارات على اكتشاف قطع السيارات وتحليلها لضبط الجودة ومراقبة خطوط التجميع وإدارة المخزون.
الأسئلة الشائعة#
لإعداد reCamera للمرة الأولى، اتبع الخطوات التالية:
- وصّل reCamera بمصدر طاقة
- وصّلها بشبكتك باستخدام صفحة البدء باستخدام reCamera (حدّد جهازك لفتح دليل البدء السريع الخاص به)
- افتح واجهة Node-RED على الويب بإدخال عنوان IP الخاص بالجهاز في متصفح الويب (أو استخدم
192.168.42.1عند الاتصال عبر USB) - ابدأ فورًا باستخدام نماذج YOLO المثبتة مسبقًا عبر واجهة لوحة المعلومات
نعم، يمكنك استخدام نماذج YOLO26 التي درّبتها بنفسك مع reCamera. وتتضمن العملية ما يلي:
- صدّر نموذج PyTorch إلى تنسيق ONNX باستخدام
model.export(format="onnx", opset=14) - حوّل نموذج ONNX إلى تنسيق MLIR
- حوّل MLIR إلى تنسيق cvimodel للاستدلال على الجهاز
- حمّل النموذج المحوّل إلى reCamera
للاطلاع على التعليمات التفصيلية، راجع دليل تحويل نماذج الذكاء الاصطناعي وتكميمها.
- صدّر نموذج PyTorch إلى تنسيق ONNX باستخدام
على عكس كاميرات IP التقليدية التي تتطلب أجهزة خارجية للمعالجة، فإن reCamera:
- تدمج معالجة الذكاء الاصطناعي مباشرةً على الجهاز باستخدام معالج RISC-V SG200X
- توفر قدرة حوسبة تبلغ 1 TOPS لتطبيقات الذكاء الاصطناعي الطرفي في الوقت الفعلي
- تتميز بتصميم معياري يتيح ترقية المكونات وتخصيصها
- تدعم تقنيات فيديو متقدمة مثل ضغط H.264/H.265 والتصوير بتقنية HDR وتقليل الضوضاء ثلاثي الأبعاد
- يأتي مزودًا مسبقًا بنماذج Ultralytics YOLO جاهزة للاستخدام الفوري
تجعل هذه الميزات من reCamera حلًا مستقلًا لتطبيقات الذكاء الاصطناعي الطرفي، دون الحاجة إلى أجهزة معالجة خارجية إضافية.


التعليقات50
اطرح سؤالًا، وشارك نتائجك، أو ساعد شخصًا آخر.
tcpipchip
we wrote a book and trainned to yolo26 on ultralytics...i recall that works
 Glenn JocherUltralytics
Yes, a custom-trained
YOLO26model can run onreCamerausing theONNX -> MLIR -> cvimodelworkflow in the reCamera guide; if you hit a blocker, please share the exact step and full error here so the Ultralytics team can help.
HanJammer
This site mentions recamera comes with YOLO26 (which is why I bought two of them) yet YOLO11 is installed (which is visible on screenshots as well) and I can't load YOLO26 - how to do that? I can't find reliable guide :(
Ah nevermind, I think I got it, still it would be better not to advertise the camera "reCamera comes pre-installed with four Ultralytics YOLO26 models" which is basically not true.
I whipped out some 'single click' tool to convert YOLO26 onnx-es which makes it a bit easier... I need to test it a bit, for now it supports the base model. Perhaps I will push it to my github later this week.
This is fantastic.
When you finish it, i will add to the BOOK.
Here is the first version of the converter util (it's just GUI and few scripts over the actual workflow). For now it was tested with a base detection model under Windows. More to come.
https://github.com/HanJammer/reCamera_YOLO26
Video presentation here: https://youtu.be/XgPjyj2U8YQ
Here is the first version of the converter util (it's just GUI and few scripts over the actual workflow). For now it was tested with a base detection model under Windows. More to come.
https://github.com/HanJammer/reCamera_YOLO26
Video presentation here: https://youtu.be/XgPjyj2U8YQ
wow!!!!!!!!!!!!!!!!!!!!!!!!!!!!!!!!!!!!!!!!!!!!!!!!!!!!!!!
i will test soon!
- Glenn JocherUltralytics
Thanks for sharing this; for anyone testing, the supported path today is still the reCamera integration guide together with Seeed’s model conversion guide, and we’ll review the docs wording around preinstalled models since some devices appear to ship with YOLO11 rather than YOLO26.
@glenn-jocher Have you a recamera ?
- Glenn JocherUltralytics
I don’t personally keep a reCamera on my desk, but the workflow in the Seeed Studio reCamera guide is the supported path; if you have a specific setup or export question, please drop it here and the Ultralytics team can take a look.
I tested on recamera with my trainned pose keypoint model... Same problem...no keypoint
Need to test on yolo8 on tdl sdk
- Glenn JocherUltralytics
Thanks for checking this; for custom pose models on reCamera, please drop the exact export and conversion steps here in the discussion so the Ultralytics team can take a look, since keypoints should work only after a correct
ONNX -> MLIR -> cvimodelpipeline as outlined in the reCamera guide and Seeed’s conversion guide, and it’s worth first confirming your exportedONNXmodel still produces keypoints before converting.
did you do calibration ? where the images to me to the calibration :(
- Glenn JocherUltralytics
Calibration isn’t done in the Ultralytics export step; for reCamera, you export to ONNX first with the reCamera guide, then calibration happens during Seeed’s ONNX→MLIR→
cvimodelflow using a small representative set of your own images, as described in Seeed’s Convert and Quantize AI Models guide. If you hit an error in that step, please drop the full log here and we’ll take a look.
still waiting...
send me your cvimodel too...yolo11 and yolo8
please, send me arguments used in your scripts...
did you train keypoints on animals and persons, right ?
tiruvijayakumar
NOO, i didnt train on animals, i trained on these classes for pose detection for persons using yolov11n-pose.pt weights. I fine‑tuned the YOLOv11n‑pose.pt model on my custom classes:
Running Walking Golf Skate Horse riding Kicking Diving I just uploaded animal detection model to justify that custom model deployment with quantization for object detection(yolo11n.pt) on recamera has no issues, it was another cvi model which i had no issues, it worked PERFECTLY. i only issue what i am facing is the pose detection quantized model where i am not able to see the keypoints on the inference output but bounding box is drawn along with predicted class label refer below:
now just trying to train the model for pose detection using yolov8 and then i would try quantizing the model and check if the keypoints are shown in the inference output
- Glenn JocherUltralytics
Thanks, that helps narrow it down — since detection
cvimodels work and only the quantized pose model loses keypoints, this looks more like a pose conversion or postprocessing issue in the ONNX → MLIR →cvimodelstep than a training problem. Please keep the details here so the Ultralytics team can see them, and share the exact conversion commands and full text logs from the reCamera guide and Seeed model conversion guide, plus whether the same pre-quantized ONNX shows keypoints before conversion. i ran predictions on ultralytics hub on the .pt model format, i attached the whole problem scenario and image content :https://github.com/orgs/ultralytics/discussions/22090?sort=new#discussioncomment-16346206 Any ways uploading the prediction on ultralytics hub in this thread also :
so on the model.pt file inference shows this data, this confirms that pose estimation model works. { "images": [ { "shape": [ 426, 640 ], "speed": { "preprocess": 1.41517, "inference": 130.14456, "postprocess": 0.99221 }, "results": [ { "name": "Kicking", "class": 5, "confidence": 0.80929, "box": { "x1": 0.26068, "y1": 0.10738, "x2": 0.55882, "y2": 0.85426 }, "keypoints": { "x": [ 0.41923001408576965, 0.42656999826431274, 0.4166699945926666, 0.45181000232696533, 0.42857998609542847, 0.488209992647171, 0.43380001187324524, 0.543470025062561, 0.41604000329971313, 0.5516700148582458, 0.4164600074291229, 0.46198999881744385, 0.4427199959754944, 0.357340008020401, 0.427839994430542, 0.29197001457214355, 0.43891000747680664 ], "y": [ 0.2315099984407425, 0.21907000243663788, 0.21740999817848206, 0.21602000296115875, 0.21322999894618988, 0.2783600091934204, 0.2824600040912628, 0.3255299925804138, 0.35097000002861023, 0.32879000902175903, 0.3619599938392639, 0.5179499983787537, 0.5104399919509888, 0.6517800092697144, 0.6389099955558777, 0.7586100101470947, 0.7324900031089783 ], "visible": [ 0.9994300007820129, 0.9990299940109253, 0.9990000128746033, 0.999019980430603, 0.9988300204277039, 0.9995700120925903, 0.9996600151062012, 0.998960018157959, 0.9992700219154358, 0.9985499978065491, 0.997439980506897, 0.9995700120925903, 0.9995700120925903, 0.9988800287246704, 0.9989299774169922, 0.982990026473999, 0.9852499961853027 ] } } ] } ], "metadata": { "imageCount": 1, "functionTimeAlive": 78321.917, "functionTimeCall": 0.138, "model": "best.pt", "version": { "ultralytics": "8.4.30", "torch": "2.11.0+cpu", "torchvision": "0.26.0+cpu", "python": "3.14.3" } }, "networkTime": 1.214 }
I didnt capture the conversion commands and text logs during the onnx->mlir->cvimodel, would repeat the same steps and paste the images in this thread itself.
Exported the yolov11n-pose.pt(finetuned) on google colab to onnx format
Uploaded the model on netron to view the structure, onnx is in the format IRv9 ,opset v20(would downgrade it). Classes are running, walking, golf-swing, skateboarding, riding-horse and kicking
Seeed studio guide for downgrading
Initial structure of workspace folder
Step1: pull sopho/tpuc_dev:v3.1
Step2: starting the container
Step3: installing onnx
Step4: Clone Downgrade Script
Step5: Downgrade Script settings IR v8 and Opset v17
Step6: Install TPU-MLIR tools inside container:
Step7: clone tpu-mlir
Step8: setup environment tpu-mlir(long step)
Step9: according to seeed studio guide, i have to include outputs before the model's head as the parameter for this particular step model_transform
--model_name yolo11n
--model_def yolo11n.onnx
--input_shapes "[[1,3,640,640]]"
--mean "0.0,0.0,0.0"
--scale "0.0039216,0.0039216,0.0039216"
--keep_aspect_ratio
--pixel_format rgb
--output_names "/model.23/cv2.0/cv2.0.2/Conv_output_0,/model.23/cv3.0/cv3.0.2/Conv_output_0,/model.23/cv2.1/cv2.1.2/Conv_output_0,/model.23/cv3.1/cv3.1.2/Conv_output_0,/model.23/cv2.2/cv2.2.2/Conv_output_0,/model.23/cv3.2/cv3.2.2/Conv_output_0"
--test_input ../image/dog.jpg
--test_result yolo11n_top_outputs.npz
--mlir yolo11n.mlir i have the onnx file, could someone of the team help me identify the outputs before the model's head? @glenn-jocher here is the onnx file https://drive.google.com/file/d/1UF25DK2zXx0GCWdcx55SPYHL71SylDeg/view?usp=sharing
and some animal pictures...