تقدير الوضعية باستخدام Ultralytics YOLO
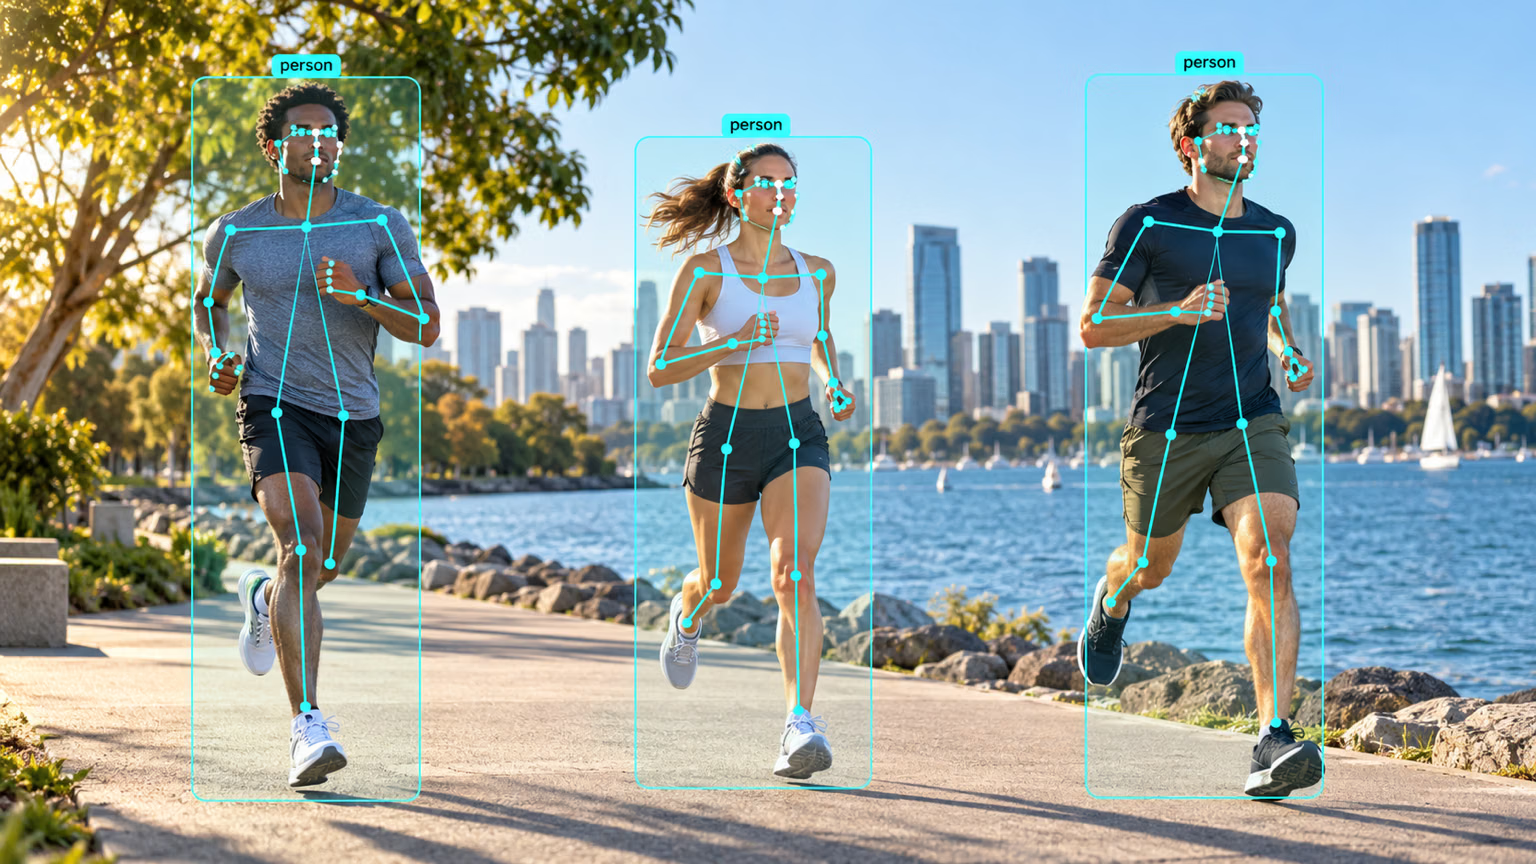
تقدير الوضعية مهمة تتضمن تحديد مواقع نقاط معينة في الصورة، تُعرف عادةً باسم النقاط المفتاحية. ويمكن أن تمثل النقاط المفتاحية أجزاء مختلفة من الكائن، مثل المفاصل أو المعالم أو السمات المميزة الأخرى. وعادةً ما تُمثّل مواقع النقاط المفتاحية كمجموعة من إحداثيات [x, y] ثنائية الأبعاد، مع إمكانية إضافة علامة رؤية [x, y, visible].
تتألف مخرجات نموذج تقدير الوضعية من مجموعة نقاط تمثل النقاط المفتاحية على كائن في الصورة، وعادةً ما تتضمن درجات الثقة لكل نقطة. ويُعد تقدير الوضعية خيارًا مناسبًا عند الحاجة إلى تحديد أجزاء معينة من كائن في مشهد، ومواقعها بالنسبة بعضها إلى بعض.
شاهد: كيفية تنفيذ تقدير الوضعية في الوقت الفعلي باستخدام Ultralytics YOLO26 | التتبع واستخراج النقاط المفتاحية 🕺
تستخدم نماذج YOLO26 Pose اللاحقة -pose، مثل yolo26n-pose.pt، وهي مدرّبة مسبقًا على نقاط COCO المفتاحية.
النماذج#
تظهر أدناه نماذج YOLO26 Pose المدرّبة مسبقًا على مجموعة بيانات النقاط المفتاحية COCO.
تُنزّل النماذج تلقائيًا من أحدث إصدار من Ultralytics عند استخدامها لأول مرة.
| النموذج | الحجم (بكسل) | mAPالوضعية50-95 (e2e) | mAPالوضعية50 (e2e) | السرعة CPU ONNX (مللي ثانية) | السرعة T4 TensorRT10 (ms) | المعاملات (M) | FLOPs (B) |
|---|---|---|---|---|---|---|---|
| YOLO26n-pose | 640 | 57.2 | 83.3 | 40.3 ± 0.5 | 1.8 ± 0.0 | 2.9 | 7.6 |
| YOLO26s-pose | 640 | 63.0 | 86.6 | 85.3 ± 0.9 | 2.7 ± 0.0 | 10.4 | 24.1 |
| YOLO26m-pose | 640 | 68.8 | 89.6 | 218.0 ± 1.5 | 5.0 ± 0.1 | 21.5 | 73.3 |
| YOLO26l-pose | 640 | 70.4 | 90.5 | 275.4 ± 2.4 | 6.5 ± 0.1 | 25.9 | 91.7 |
| YOLO26x-pose | 640 | 71.6 | 91.6 | 565.4 ± 3.0 | 12.2 ± 0.2 | 57.6 | 202.3 |
- قيم mAPval محسوبة لنموذج واحد وبمقياس واحد على مجموعة بيانات COCO Keypoints val2017.
أعِد إنتاج النتائج باستخدامyolo pose val data=coco-pose.yaml device=0 nms=False - السرعة هي متوسط القياس على صور COCO val باستخدام ONNX على CPU وTensorRT10 على وحدة معالجة الرسومات NVIDIA T4.
أعِد إنتاج النتائج باستخدامyolo pose val data=coco-pose.yaml batch=1 device=0|cpu nms=False. - قيم المعلمات وFLOPs خاصة بالنماذج المدمجة بعد طي Conv/BatchNorm وإزالة فرع الاكتشاف غير المستخدم. تحتفظ نقاط التحقق المدرّبة مسبقًا ببنية التدريب الكاملة، وقد تُظهر أعدادًا أعلى.
اطّلع على معاينة YOLO27 غير المُصدرة لمعرفة النتائج الأولية للنقاط المفتاحية COCO.
التدريب#
درّب نموذج YOLO26n-pose على مجموعة بيانات COCO8-pose لمدة 100 حقبة وبحجم صورة 640.
from ultralytics import YOLO
# تحميل نموذج
model = YOLO("yolo26n-pose.yaml") # إنشاء نموذج جديد من YAML
model = YOLO("yolo26n-pose.pt") # تحميل نموذج مدرّب مسبقًا (موصى به للتدريب)
model = YOLO("yolo26n-pose.yaml").load("yolo26n-pose.pt") # الإنشاء من YAML ونقل الأوزان
# تدريب النموذج
results = model.train(data="coco8-pose.yaml", epochs=100, imgsz=640)راجع التفاصيل الكاملة لوضع train في صفحة التدريب. ويمكن أيضًا تدريب نماذج تقدير الوضعية باستخدام التدريب السحابي على منصة Ultralytics.
تنسيق مجموعة البيانات#
للاطلاع على التفاصيل المتعلقة بتنسيق مجموعة بيانات YOLO للوضعيات، راجع دليل مجموعة البيانات. لتحويل مجموعة بيانات JSON موجودة من النقاط المفتاحية COCO إلى تنسيق YOLO، استخدم الدالة المضمّنة convert_coco مع use_keypoints=True، وفقًا لما هو موضح في دليل التحويل من COCO إلى YOLO. كما تدعم التعليقات التوضيحية على منصة Ultralytics تسميات الوضعيات، باستخدام قوالب هيكلية مضمّنة للأشخاص والأيدي والوجوه وتخطيطات النقاط المفتاحية المخصصة.
لمهمات تقدير الوضعية المخصصة، يمكنك أيضًا استكشاف مجموعات بيانات متخصصة مثل Tiger-Pose لتقدير وضعيات الحيوانات، والنقاط المفتاحية لليد لتتبّع اليد، أو Dog-Pose لتحليل وضعيات الكلاب.
التحقق#
تحقّق من دقة نموذج YOLO26n-pose المدرّب، المقاسة وفق متوسط الدقة (mAP). لا حاجة إلى وسيطات، لأن model يحتفظ بإعدادات التدريب data والوسيطات بوصفها سمات للنموذج: يتحقق path/to/best.pt من مثال التدريب على COCO8-pose. تسجل الأوزان الرسمية مسار مجموعة بيانات تدريب غير موجود على جهازك، لذا تعود إلى coco8-pose.yaml الافتراضي للمهمة مع إصدار تحذير. مرّر data للتحقق من الصحة على مجموعة بيانات أخرى.
from ultralytics import YOLO
# تحميل نموذج
model = YOLO("yolo26n-pose.pt") # حمّل نموذجًا رسميًا
model = YOLO("path/to/best.pt") # تحميل نموذج مخصص
# تحقّق من النموذج
metrics = model.val() # لا حاجة إلى وسيطات؛ إذ تُحفظ مجموعة البيانات والإعدادات
metrics.box.map # map50-95
metrics.box.map50 # map50
metrics.box.map75 # map75
metrics.box.maps # قيمة mAP50-95 لكل فئة؛ تحتفظ الفئات غير الموجودة في مجموعة التحقق بقيمة mAP الإجمالية
metrics.box.ap_class_index # فهارس الفئات التي جرى تقييمها فعليًا
metrics.box.image_metrics # قاموس المقاييس لكل صورة للمربعات، يتضمن الدقة والاستدعاء وF1 وTP وFP وFN
metrics.pose.map # map50-95(P)
metrics.pose.map50 # map50(P)
metrics.pose.map75 # map75(P)
metrics.pose.maps # قيمة mAP50-95(P) لكل فئة؛ تحتفظ الفئات غير الموجودة في مجموعة التحقق بقيمة mAP(P) الإجمالية
metrics.pose.ap_class_index # فهارس الفئات التي جرى تقييمها فعليًا
metrics.pose.image_metrics # قاموس المقاييس لكل صورة للوضعية، يتضمن الدقة والاستدعاء وF1 وTP وFP وFNالتنبؤ#
استخدم نموذج YOLO26n-pose مدرَّبًا لإجراء تنبؤات على الصور.
from ultralytics import YOLO
# تحميل نموذج
model = YOLO("yolo26n-pose.pt") # حمّل نموذجًا رسميًا
model = YOLO("path/to/best.pt") # تحميل نموذج مخصص
# أجرِ التنبؤ باستخدام النموذج
results = model("https://ultralytics.com/images/bus.jpg") # أجرِ التنبؤ على صورة
# الوصول إلى النتائج
for result in results:
xy = result.keypoints.xy # إحداثيات x وy
xyn = result.keypoints.xyn # normalized
kpts = result.keypoints.data # x وy والرؤية (إن توفرت)اطّلع على التفاصيل الكاملة لوضع predict في صفحة التنبؤ.
مخرجات النتائج#
يعيد تقدير الوضعية كائن Results واحدًا لكل صورة. حقول التنبؤ الأساسية هي result.keypoints لإحداثيات الوضعية وresult.boxes للحالات المكتشفة التي تنتمي إليها تلك النقاط المفتاحية.
| السمة | النوع | الشكل | الوصف |
|---|---|---|---|
result.keypoints | Keypoints | (N) | النقاط المفتاحية. |
result.keypoints.data | torch.float32 | (N,K,2/3) | x,y مع الرؤية/درجة الثقة الاختيارية. |
result.keypoints.xy | torch.float32 | (N,K,2) | النقاط المفتاحية بالبكسل. |
result.keypoints.xyn | torch.float32 | (N,K,2) | النقاط المفتاحية المُطبَّعة. |
result.boxes | Boxes | (N) | صناديق المثيلات. |
للاطلاع على حقول Results الخاصة بكل مهمة، راجع قسم نتائج التنبؤ حسب المهمة.
خريطة فهارس النقاط المفتاحية#
تتنبأ نماذج YOLO26 Pose الافتراضية بالنقاط المفتاحية الـ17 في COCO، لذا يكون الفهرس k في result.keypoints.xy[:, k] كما يلي:
- الأنف
- العين اليسرى
- العين اليمنى
- الأذن اليسرى
- الأذن اليمنى
- الكتف الأيسر
- الكتف الأيمن
- المرفق الأيسر
- المرفق الأيمن
- المعصم الأيسر
- المعصم الأيمن
- الورك الأيسر
- الورك الأيمن
- الركبة اليسرى
- الركبة اليمنى
- الكاحل الأيسر
- الكاحل الأيمن
التصدير#
صدّر نموذج YOLO26n-pose إلى تنسيق آخر مثل ONNX أو CoreML وغيرها.
from ultralytics import YOLO
# تحميل نموذج
model = YOLO("yolo26n-pose.pt") # حمّل نموذجًا رسميًا
model = YOLO("path/to/best.pt") # تحميل نموذج مخصص
# صدّر النموذج
model.export(format="onnx")تظهر تنسيقات التصدير المتاحة لـ YOLO26-pose في الجدول أدناه. يمكنك التصدير بأي تنسيق باستخدام الوسيطة format، مثل format='onnx' أو format='engine'. ويمكنك إجراء التنبؤ أو التحقق مباشرةً باستخدام النماذج المصدّرة، مثل yolo predict model=yolo26n-pose.onnx. بعد اكتمال التصدير، تُعرض أمثلة الاستخدام الخاصة بنموذجك.
| التنسيق | وسيط format | النموذج | البيانات الوصفية | الوسيطات |
|---|---|---|---|---|
| PyTorch | - | yolo26n-pose.pt | ✅ | - |
| TorchScript | torchscript | yolo26n-pose.torchscript | ✅ | imgsz, quantize, dynamic, nms, batch, device |
| ONNX | onnx | yolo26n-pose.onnx | ✅ | imgsz, quantize, dynamic, simplify, opset, nms, batch, data, fraction, device |
| OpenVINO | openvino | yolo26n-pose_openvino_model/ | ✅ | imgsz, quantize, dynamic, nms, batch, data, fraction, device |
| TensorRT | engine | yolo26n-pose.engine | ✅ | imgsz, quantize, dynamic, simplify, opset, workspace, nms, batch, data, fraction, device |
| CoreML | coreml | yolo26n-pose.mlpackage | ✅ | imgsz, dynamic, quantize, nms, batch, device |
| Apple Core AI | coreai | yolo26n-pose.aimodel | ✅ | imgsz, batch, quantize |
| TF SavedModel | saved_model | yolo26n-pose_saved_model/ | ✅ | imgsz, quantize, opset, nms, batch, data, fraction, device |
| TF GraphDef | pb | yolo26n-pose.pb | ❌ | imgsz, opset, batch, device |
| TF Edge TPU | edgetpu | yolo26n-pose_edgetpu.tflite | ✅ | imgsz, quantize, opset, data, fraction, device |
| LiteRT | litert | yolo26n-pose.tflite | ✅ | imgsz, quantize, batch, data, fraction, device |
| PaddlePaddle | paddle | yolo26n-pose_paddle_model/ | ✅ | imgsz, batch, device |
| MNN | mnn | yolo26n-pose.mnn | ✅ | imgsz, batch, dynamic, quantize, simplify, opset, nms, device |
| NCNN | ncnn | yolo26n-pose_ncnn_model/ | ✅ | imgsz, quantize, device |
| IMX500 | imx | yolo11n_imx_model/ | ✅ | imgsz, quantize, data, fraction, nms, device |
| RKNN | rknn | yolo26n-pose_rknn_model/ | ✅ | imgsz, batch, name, quantize, simplify, opset, data, fraction, device |
| ExecuTorch | executorch | yolo26n-pose_executorch_model/ | ✅ | imgsz, quantize, batch, data, fraction, device |
| Axelera | axelera | yolo26n-pose_axelera_model/ | ✅ | imgsz, batch, quantize, data, fraction, device |
| DEEPX | deepx | yolo26n-pose_deepx_model/ | ✅ | imgsz, quantize, simplify, opset, data, optimize, device |
| Qualcomm QNN | qnn | yolo26n-pose_qnn.onnx | ✅ | imgsz, batch, name, quantize, simplify, opset, data, fraction, device |
| Hailo | hailo | yolo26n-pose_hailo_model/ | ✅ | imgsz, name, quantize, data, fraction, simplify, conf, iou, device |
| Huawei Ascend | ascend | yolo26n-pose_ascend_model/ | ✅ | imgsz, batch, name, quantize, opset, simplify, nms, device |
| AMD Xilinx | xilinx | yolo26n-pose_xilinx_model/ | ✅ | imgsz, name, quantize, data, fraction, opset, simplify, device |
| NXP | nxp | yolo26n-pose_nxp.tflite | ✅ | imgsz, quantize, data, fraction, device |
| ST Edge AI | stedgeai | yolo26n-pose_stedgeai.onnx | ✅ | imgsz, quantize, data, fraction, opset, simplify, device |
يُخرج nms=None افتراضيًا مخرجات خامًا لاستخدام NMS خارجي (ويحتفظ YOLO26 برأسه الخالي من NMS على Axelera). اضبط nms=False لتحديد رأس خالٍ من NMS متاح؛ أما التنسيقات غير المدعومة فتعود إلى مسار الإخراج الأصلي الخاص بها. تحدد إدخالات nms أعلاه التنسيقات التي يمكنها تضمين NMS باستخدام nms=True.
اطّلع على التفاصيل الكاملة لـexport في صفحة التصدير.
الأسئلة الشائعة#
يتضمن تقدير الوضعية باستخدام Ultralytics YOLO26 تحديد نقاط معينة في الصورة تُعرف بالنقاط المفتاحية. وتمثل هذه النقاط عادةً المفاصل أو السمات المهمة الأخرى للكائن. يتضمن الناتج إحداثيات
[x, y]ودرجات الثقة لكل نقطة. صُممت نماذج YOLO26-pose خصيصًا لهذه المهمة، وتستخدم اللاحقة-pose، مثلyolo26n-pose.pt. وهي مدرّبة مسبقًا على مجموعات بيانات مثل نقاط COCO المفتاحية، ويمكن استخدامها في مهام متنوعة لتقدير الوضعية. تتنبأ النماذج الافتراضية بـنقاط COCO المفتاحية الـ17.يتضمن تدريب نموذج YOLO26-pose على مجموعة بيانات مخصصة تحميل نموذج، سواء أكان نموذجًا جديدًا معرّفًا بملف YAML أم نموذجًا مدرَّبًا مسبقًا. وبعد ذلك، يمكنك بدء عملية التدريب باستخدام مجموعة البيانات والوسيطات التي تحددها.
مثالfrom ultralytics import YOLO # تحميل نموذج model = YOLO("yolo26n-pose.yaml") # إنشاء نموذج جديد من YAML model = YOLO("yolo26n-pose.pt") # تحميل نموذج مدرّب مسبقًا (موصى به للتدريب) # تدريب النموذج results = model.train(data="your-dataset.yaml", epochs=100, imgsz=640)للاطلاع على تفاصيل التدريب الشاملة، راجع قسم التدريب. ويمكنك أيضًا استخدام التدريب السحابي على منصة Ultralytics لتدريب نماذج تقدير الوضعية المخصصة دون كتابة أي شيفرة.
يتضمن التحقق من صحة نموذج YOLO26-pose تقييم دقته باستخدام معلمات مجموعة البيانات نفسها التي احتُفظ بها أثناء التدريب. إليك مثالًا:
مثالfrom ultralytics import YOLO # تحميل نموذج model = YOLO("yolo26n-pose.pt") # حمّل نموذجًا رسميًا model = YOLO("path/to/best.pt") # تحميل نموذج مخصص # تحقّق من النموذج metrics = model.val() # لا حاجة إلى وسيطات؛ إذ تُحفظ مجموعة البيانات والإعداداتلمزيد من المعلومات، تفضّل بزيارة قسم التحقق من الصحة.
نعم، يمكنك تصدير نموذج YOLO26-pose إلى تنسيقات متنوعة مثل ONNX وCoreML وTensorRT وغيرها. ويمكن إجراء ذلك باستخدام Python أو واجهة سطر الأوامر (CLI).
مثالfrom ultralytics import YOLO # تحميل نموذج model = YOLO("yolo26n-pose.pt") # حمّل نموذجًا رسميًا model = YOLO("path/to/best.pt") # تحميل نموذج مخصص # صدّر النموذج model.export(format="onnx")راجع قسم التصدير لمزيد من التفاصيل. ويمكن نشر النماذج المُصدَّرة على الأجهزة الطرفية لاستخدامها في تطبيقات الوقت الفعلي، مثل تتبّع اللياقة البدنية وتحليل الرياضة أو الروبوتات.
تقدم Ultralytics نماذج وضعيات متنوعة مدرّبة مسبقًا، مثل YOLO26n-pose وYOLO26s-pose وYOLO26m-pose وغيرها. وتختلف هذه النماذج في الحجم والدقة (mAP) والسرعة. للاطلاع على القائمة الكاملة التي تتضمن mAP للنقاط المفتاحية COCO والسرعة والمعلمات وFLOPs لكل نموذج، راجع قسم النماذج.


التعليقات465
اطرح سؤالًا، وشارك نتائجك، أو ساعد شخصًا آخر.
3300299472
import pygetwindow as gw import pyautogui from ultralytics import YOLO import cv2
Load the model
model = YOLO("model/best.onnx")
while True: # Get the handle of the application window app_window = gw.getWindowsWithTitle('Chess Game')[0] app_window.activate()
# Move the window to the top-left corner of the screen
app_window.moveTo(0, 0)

# Set the window size to (929, 721)
app_window.resizeTo(929, 721)

# Get the window position
left, top, width, height = app_window.left, app_window.top, app_window.width, app_window.height

# Take a screenshot in the background
screenshot = pyautogui.screenshot(region=(left, top, width, height))
screenshot.save('screenshot.png')

# Read the screenshot and convert it to OpenCV format
img = cv2.imread('screenshot.png')

# Perform inference
results = model.predict(source=img, show=True)
I need help, who will help me? I have successfully identified the object in the program through the ONNX model, but I don't know how to obtain coordinates. I need to obtain coordinates and then control the mouse to move to the coordinates for clicking operations. Can someone show me the reference code? Thank you
1 Glenn JocherUltralytics(تم التعديل)
@3300299472 hello! It's great to hear that you've successfully used the ONNX model for object detection. To obtain the coordinates of the detected objects and control the mouse accordingly, you can extract the bounding box coordinates from the
resultsobject and use them to move the mouse. Here's a quick example on how you can do this:from ultralytics import YOLO import pyautogui # Load the model model = YOLO("model/best.onnx") # Perform inference results = model.predict(source=img, show=True) # Get bounding box coordinates for x1, y1, x2, y2 in results[0].boxes.xyxy.tolist(): # detections in the first image # Calculate the center of the bounding box x_center = int((x1 + x2) / 2) y_center = int((y1 + y2) / 2) # Move mouse to the center of the bounding box pyautogui.moveTo(x_center, y_center) # Optionally, perform a click pyautogui.click()This code snippet will move the mouse to the center of each detected object and perform a click. Make sure to adjust the coordinates based on your specific screen resolution and application window size if necessary. Happy coding! 😊
AdadAlShabab
Hi. I want to measure the length of detected line after running the pose detection model. How can I do it? Please let me know.
1- Glenn JocherUltralytics
Hi! To measure the length of a detected line after running the pose detection model, you can compute the Euclidean distance between keypoints. If you have keypoints' coordinates, you can use the following Python code example:
import numpy as np

def calculate_distance(pt1, pt2):
    return np.sqrt((pt2[0] - pt1[0])**2 + (pt2[1] - pt1[1])**2)

# Example keypoints coordinates
keypoint1 = [x1, y1]  # Replace x1, y1 with your actual coordinates
keypoint2 = [x2, y2]  # Replace x2, y2 with your actual coordinates

# Calculate distance
length = calculate_distance(keypoint1, keypoint2)
print('The length of the line is:', length)
Just replace
x1, y1, x2, y2with the actual coordinates of your keypoints. This will give you the length between these two points which can represent a line in your use case. Hope this helps! 😊
Pakorn-02(تم التعديل)
Can i only detect the first person entering the camera? And from the source code, can I correctly convert from key point coordinates (x, y) to position coordinates (x, y, z) in Unity?
#My Source Code
import requests
import cv2
import numpy as np
from ultralytics import YOLO

model = YOLO('yolov8n-pose.pt')
cap = cv2.VideoCapture(0)

server_url = 'http://localhost:3000/keypoints'

while True:
    success, frame = cap.read()
    results = model(frame)

    # Simulate depth data (replace this with actual depth estimation)
    depth_data = np.random.rand(frame.shape[0], frame.shape[1])

    # Access the xy attribute and convert it to a list
    keypoints = results[0].keypoints.xy.cpu().numpy().tolist()
    # data = {'keypoints': keypoints}

    #Extract only the keypoints for the right hand
    right_hand_keypoints = [keypoints[0][10]]

    # Combine 2D keypoints with simulated depth data to obtain 3D keypoints
    keypoints_3d = [(x, y, depth_data[int(y), int(x)]) for x, y in right_hand_keypoints]

    data = {'keypoints': keypoints_3d}

    # Send keypoint data to the Node.js server
    response = requests.post(server_url, json=data)
    print(response.text)  # Print server response

    annotated_image = results[0].plot()
    cv2.imshow('frame', annotated_image)
    cv2.waitKey(1)

cap.release()
cv2.destroyAllWindows()
1 Paula DerrengerUltralytics
Hi there! Regarding your question about detecting only the first person entering the camera, YOLOv8 models by default will detect all instances of persons in each frame. However, you can modify the behavior to track the first detected person by managing the IDs of detected persons and only processing the first ID observed across frames.
As for converting from 2D keypoint coordinates (x, y) to 3D position coordinates (x, y, z) in Unity, the conversion depends on getting a real depth measurement. Your approach of simulating depth data and combining it with the keypoints is a common technique. If you have access to a depth sensor or can derive depth from stereo cameras, that would provide more accurate 3D coordinates. Just ensure that the coordinate system alignment between the AI model output and Unity's coordinate system is correctly calibrated for accurate placements in Unity.
Here's a refined approach considering depth measurements:
# Assuming depth_data contains actual depth measurements
keypoints_3d = [(x, y, depth_data[int(y), int(x)]) for x, y in right_hand_keypoints]
Keep refining your method to handle actual depth, and ensure coordinate transformations align with Unity's requirements. Good luck! 🚀
How can i convert 2D Key point value (x, y) to Position (x, y, z) on each bone in the body (3D Model) in Unity? Thanks
1- Glenn JocherUltralytics
Converting 2D keypoints to a 3D model position in Unity requires some form of depth estimation since 2D keypoints captured from images or video only provide information on the x and y axes. To add the z-axis (depth), you'll typically need additional data or a model that can infer depth from the given information.
While Ultralytics YOLOv8 specializes in pose estimation providing 2D [x, y] keypoints, integrating these with a 3D model in Unity to achieve the desired [x, y, z] positioning might involve:
- Using stereo vision techniques if you have images from multiple angles.
- Applying a separate depth estimation model that can predict the z-coordinate based on the 2D image.
- Utilizing additional sensors data (like Lidar or structured light sensors) that provides depth information.
Once you have the depth information, you can map the 2D keypoints [x, y] from YOLOv8 to 3D [x, y, z] coordinates in Unity by aligning the keypoints with the depth information.
Here's a conceptual snippet for understanding:
# Example for converting (x, y) keypoints to (x, y, z)
# This assumes you have a method to retrieve 'z' (depth)
depth_data = get_depth_information() # Custom method to obtain depth
keypoints_2d = [(x, y) for x, y in detected_keypoints]  # from YOLOv8
keypoints_3d = [(x, y, depth_data[x, y]) for x, y in keypoints_2d]
In Unity, you would then apply these 3D coordinates to position the joints or bones of your model accordingly. Note that exact implementation details would depend on how you're structuring your Unity project and the source of your depth data.
Remember, working with 3D models and real-world positioning introduces complexities, especially concerning coordinate systems alignment and scale adjustments across different frameworks and data sources. 🎮🕵️♂️
leonidasavila
How can i calculate angle position between three points? Thanks
1- Paula DerrengerUltralytics
@leonidasavila hey there! 👋 To calculate the angle between three points, you can use the law of cosines. Here's a quick example in Python:
import numpy as np

def calculate_angle(p1, p2, p3):
    # p1, p2, p3 are the points in format [x, y]
    # Calculate the vectors
    v1 = np.array(p1) - np.array(p2)
    v2 = np.array(p3) - np.array(p2)

    # Calculate the angle in radians
    angle_rad = np.arccos(np.dot(v1, v2) / (np.linalg.norm(v1) * np.linalg.norm(v2)))

    # Convert to degrees
    angle_deg = np.degrees(angle_rad)

    return angle_deg

# Example points
p1 = [0, 0]
p2 = [1, 0]
p3 = [1, 1]

angle = calculate_angle(p1, p2, p3)
print(f"The angle is {angle} degrees")
This calculates the angle at
p2formed by the line segmentsp1p2andp2p3. Hope this helps! Let me know if you have any other questions. 😊1 Thanks @pderrenger, for your quickly response! I´m trying to migrate our startup app from mediapipe to yolo 😍
Do you have any tutorial or short example to define specifics landmarks to make calculates? (4 example push-up)
Best regards! Leonidas
- Paula DerrengerUltralytics
Hey Leonidas! 🌟
It's awesome to hear about your transition from MediaPipe to YOLO for your startup app! For specific landmark detection like push-ups, you can leverage our YOLOv8 pose models. Here's a quick example to get you started:
from ultralytics import YOLO

# Load a pretrained pose model
model = YOLO('yolov8n-pose.pt')

# Predict keypoints on an image
results = model('path/to/your/image.jpg')

# Access keypoints
keypoints = results[0].keypoints

# Now, you can use these keypoints to calculate angles or any other metrics you need
This snippet loads a pretrained YOLOv8 pose model and predicts keypoints on your image. You can then use these keypoints for further calculations, like angles between joints during push-ups.
For more detailed guidance, check out our Pose Estimation page. If you have any more questions or need further assistance, feel free to ask. Happy coding! 😊
ozankavcu38
By the way sir after loading the model how could we dissapear the pose estimatet lines like boxes=False argument
- Paula DerrengerUltralytics(تم التعديل)
Hey there! 😊 To hide the pose estimation lines (similar to using
boxes=Falsefor bounding boxes), you can simply not plot them. When you're working with the results from the pose estimation model, you have control over what gets visualized. Here's a quick example on how to display the keypoints without drawing the connecting lines:from ultralytics import YOLO # Load your pose model model = YOLO('yolov8n-pose.pt') # Run prediction results = model('path/to/image.jpg') # Access keypoints keypoints = results[0].keypoints # Now, you can visualize keypoints without drawing lines between them # This part depends on how you're visualizing. For example, using OpenCV to plot keypoints: import cv2 image = cv2.imread('path/to/image.jpg') for person in keypoints.xy: # one (17, 2) tensor per detected person for x, y in person.tolist(): cv2.circle(image, (int(x), int(y)), radius=3, color=(0, 255, 0), thickness=-1) cv2.imshow("Keypoints without lines", image) cv2.waitKey(0) cv2.destroyAllWindows()This way, you'll see the keypoints on your image without the estimated pose lines. Hope this helps, and good luck with your app migration! If you have any more questions, feel free to ask. 🚀
1 Kindstep
I am currently using Yolo11 for my thesis in software engineering. Regarding the calculation of angles using keypoints, what is the correct way to access the detected keypoints directly in the code? assuming the indexing the same as in:
0: Nose 1: Left Eye 2: Right Eye 3: Left Ear 4: Right Ear 5: Left Shoulder 6: Right Shoulder 7: Left Elbow 8: Right Elbow 9: Left Wrist 10: Right Wrist 11: Left Hip 12: Right Hip 13: Left Knee 14: Right Knee 15: Left Ankle 16: Right Ankle
So assuming i use a similar function as you proposed, to calculate the angle of the right elbow joint a live feed (e.g. webcam) and the code is something like this:
model = YOLO('yolo11x-pose.pt')
results = model(frame, show=True, conf=conf, device=device, save=True)
keypoints = results[0].keypoints
angle = calculate_angle(keypoints6, keypoints8, keypoints10) # print(f"The angle is {angle} degrees")
What is the correct way to access each keypoint? Is it indexed in a array like keypoints[6] or what would be the correct way to go forward?
I hope my question is not too messy. It's getting quite late, but I am enjopying my time working with Yolo11.
1Whoops, was not meant to be edited like that :D
- Glenn JocherUltralytics
To access specific keypoints in YOLO11 pose estimation, you can index the
keypointsarray directly using the indices corresponding to each body part. For example, to calculate the angle at the right elbow, you can usekeypoints[6],keypoints[8], andkeypoints[10]for the right shoulder, right elbow, and right wrist, respectively. Let me know if you need further assistance! Okay, i Already figured it out now that I had time to try it. Seems I was on the right track. :)
Have a great weekend everybody!
1@kindstep thanks for sharing. Good luck with your thesis, it's will be fine! Currently, we are using YOLO8 and we are studying to migrate YOLO11... I hope the deploy of hand pose very soon!
Cosophia
What task does line annotation correspond to? what I know is : rectangle -> detection point -> pose polygon -> Segment
- Paula DerrengerUltralytics
A line annotation does not map to a standalone Ultralytics task. Use pose estimation when the line represents connections between labeled keypoints, or segmentation when you need the line’s pixel-level shape; please continue dropping questions here so the Ultralytics team can assist.
yacinehrb
Is it possible to use byte tracking with YoloPose26 ?
- Glenn JocherUltralytics
Yes — Ultralytics YOLO26 pose models can be used with ByteTrack through Track mode; feel free to post any follow-up details here so the Ultralytics team can see them, and the pose docs and Track mode docs cover the supported workflow.
JC3
Ok... but where is the documentation on how to actually run the model and access the results? Seems to be missing.
- Glenn JocherUltralytics
You can run a pose model via Python or CLI; the returned
resultsobjects expose keypoints directly—see the usage pattern on the Pose Estimation docs (and feel free to drop any follow-up questions here so the Ultralytics team can see them).from ultralytics import YOLO model = YOLO("yolo26n-pose.pt") results = model("path/to/image.jpg") # or a video path / 0 for webcam r = results[0] xy = r.keypoints.xy # (n, k, 2) pixel coords xyn = r.keypoints.xyn # (n, k, 2) normalized coords kpts = r.keypoints.data # (n, k, 3) x, y, visible/conf (if available)yolo pose predict model=yolo26n-pose.pt source=path/to/image.jpg
shayan-mesdaghi
Hello everyone, I trained a YOLO model on a dataset I created myself. The training went well, but I have a major problem: why isn't the skeleton (landmarks connections) displayed on my images and videos, and only the keypoints are shown? I performed the labelling process using Roboflow. I should mention that when I use a pre-trained YOLO model, the skeleton is displayed, but when I train the dataset myself, only the keypoints are present. Please guide me, thank you.
- Glenn JocherUltralytics
@shayan-mesdaghi skeleton lines are auto-drawn only for the COCO 17‑keypoint human schema; custom keypoint counts/orders show dots unless you render your own connections. If you’re not using the COCO 17 order, set your skeleton at draw time like this:
from ultralytics import YOLO
from ultralytics.utils.plotting import Annotator

# 1-based COCO-17 pairs; adjust to your schema as needed
skeleton = [(16,14),(14,12),(17,15),(15,13),(12,13),(6,12),(7,13),(6,7),
            (6,8),(7,9),(8,10),(9,11),(2,3),(1,2),(1,3),(2,4),(3,5),(4,6),(5,7)]

model = YOLO("best.pt")
for r in model("image_or_video.mp4"):
    im = r.orig_img.copy()
    ann = Annotator(im)
    ann.skeleton = skeleton  # 1-based indices
    for k in r.keypoints.xy:
        ann.kpts(k, kpt_line=True)
    im_out = ann.result()
If you edited
plotting.py, restart your Python session/notebook so changes load. Method details are in the Annotator.kpts reference, which notes the human‑only default forkpt_linesee Annotator.kpts, and the dataset YAML fields for pose (e.g.,kpt_shape) are shown in the Pose datasets overview.
mobin3399
Hi, I’ve trained a custom YOLOv8-pose model with two object classes. One class occupies more than 80% of the image area (large object), while the other one is much smaller. Interestingly, the smaller object produces much more accurate keypoint predictions, while the large object shows poor keypoint localization — even though both classes have precise annotations, balanced samples, and consistent lighting/camera setup.
I have already tried:
- Careful labeling (pixel-level accurate keypoints)
- Strong data augmentation
- Adjusting loss weights for keypoints and bounding boxes
- Different model scales (YOLOv8n-pose, YOLOv8m-pose)
However, the issue remains: pose accuracy drops significantly for the larger object, despite good detection and validation metrics.
From my analysis, this might be related to:
- The OKS-based keypoint loss being scale-dependent (large objects are penalized less for the same absolute error).
- The receptive field or feature resolution in the pose head being insufficient for very large objects.
- Bounding box coverage (close to image borders) affecting normalized keypoint coordinates.
Has anyone else observed this behavior in YOLOv8-pose or YOLOv9-pose? And is there a recommended way to make keypoint accuracy more scale-invariant (for example, by modifying the OKS loss or normalization strategy)?
Any guidance or similar experiences would be greatly appreciated!
pratikbariya
Ok, you have done proper annotation, augmentation, loss weight adjustments, and tried different models. See, there is an issue regarding YOLOV8-POSE for large objects. I think you have to focus on the KPT loss also. If it is low, then try to improve that by making changes in loss (by overriding or code changes).
If possible, share an image of the object and model matrix. That will help understand the issue.
1- Glenn JocherUltralytics(تم التعديل)
@pratikbariya @mobin3399 adding a few concrete levers you can try for the “large object → poorer keypoint localization” case: train/val at higher resolution and lighter augments for pose, e.g.
imgsz=1280 mosaic=0.0 degrees=0 translate=0.05 scale=0.5 fliplr=0.5, and prefer images where the large object isn’t hard‑clipped by borders (pad or pre-crop so it fills the frame); if you’re not using the COCO 17‑kpt schema, note our evaluator defaults to uniform OKS sigmas which can bias big objects—set explicit sigmas for your keypoints or adopt the COCO set; details and usage are in the Pose docs and PoseValidator notes.yolo pose train model=yolo26x-pose.pt data=your.yaml imgsz=1280 mosaic=0.0 degrees=0 translate=0.05 scale=0.5 fliplr=0.5See the Pose Estimation guide for end‑to‑end training tips and keypoint ordering, and the PoseValidator reference for how OKS is computed. Pose Estimation – Ultralytics YOLO • PoseValidator reference (OKS/sigma behavior)
1 Thank you for your response. I followed your suggestion, and it helped me resolve the issue to a large extent. I really appreciate your guidance and support.