YOLOv9: Ein großer Fortschritt in der Technologie zur Objekterkennung
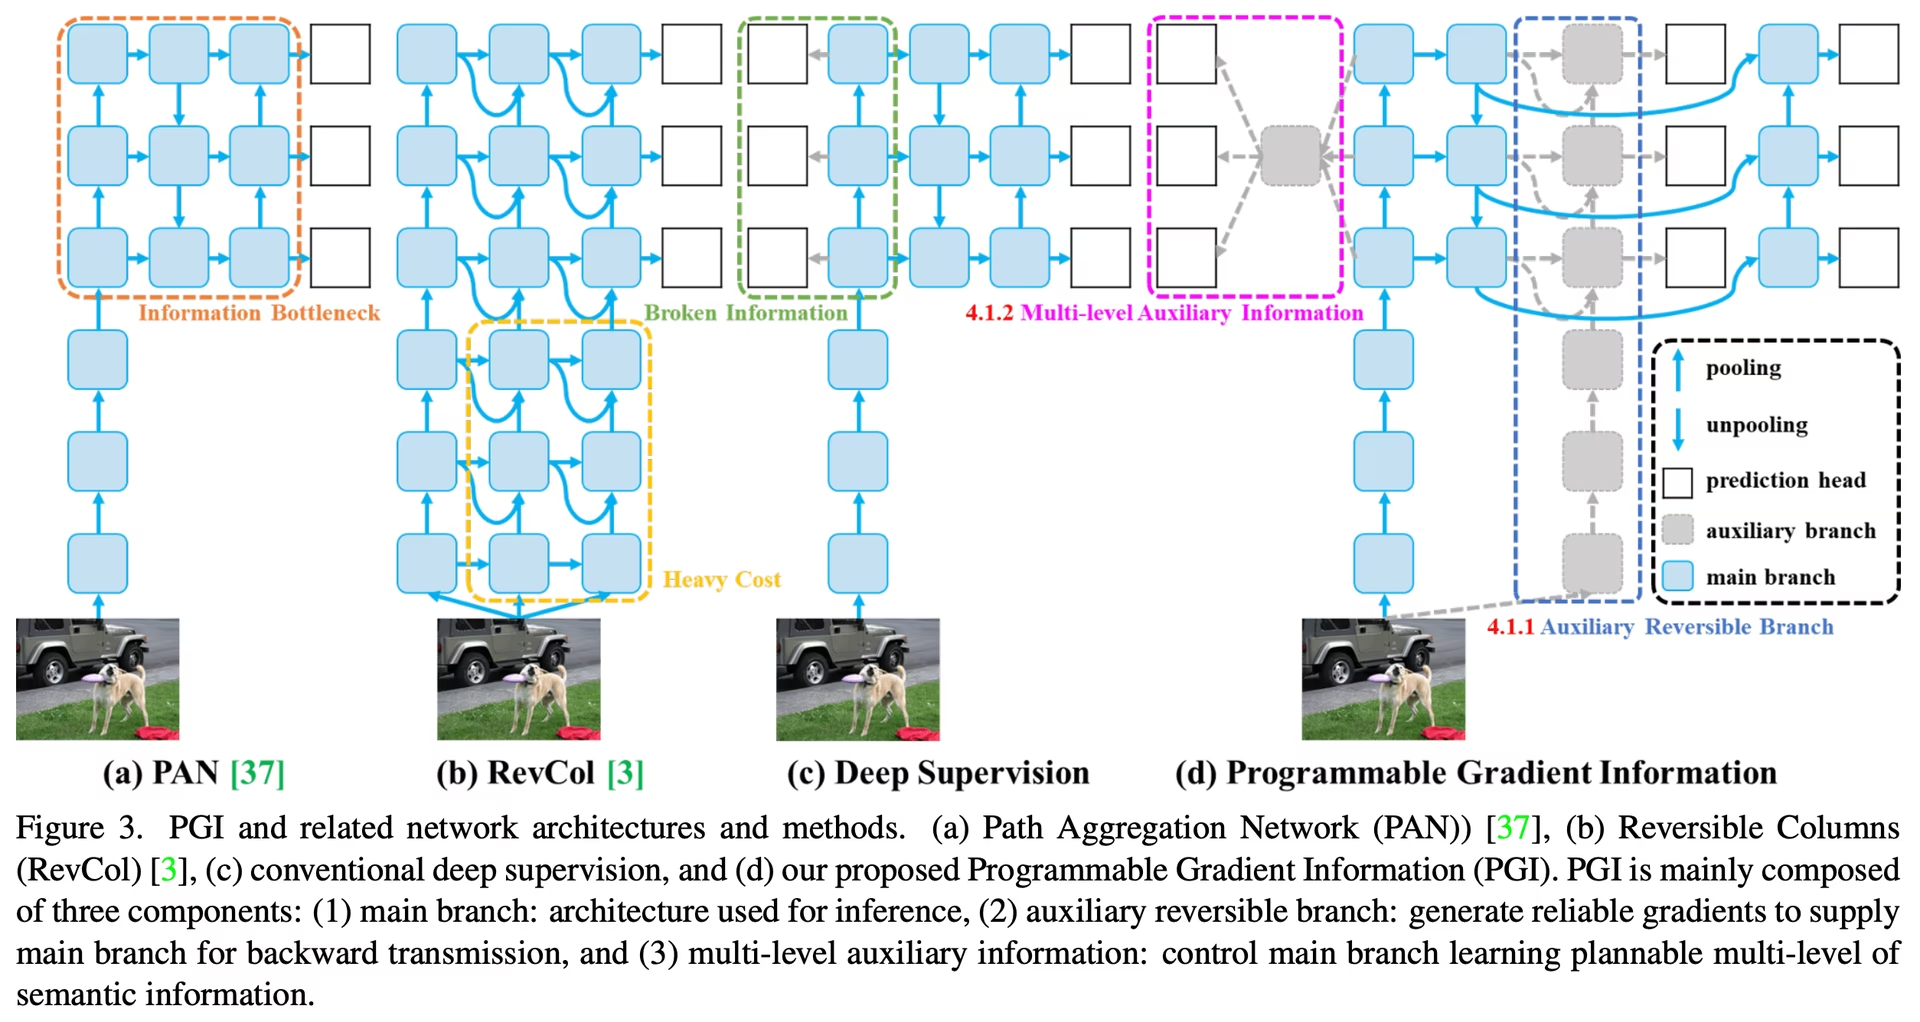
YOLOv9 brachte die Objekterkennung in Echtzeit mit Programmierbaren Gradienteninformationen (PGI) und dem Generalized Efficient Layer Aggregation Network (GELAN) voran. Bei seiner Veröffentlichung verbesserte es die Effizienz und Genauigkeit gegenüber früheren Echtzeitdetektoren auf dem MS-COCO-Datensatz. Das YOLOv9-Projekt wurde von einem unabhängigen Open-Source-Team entwickelt und baut auf der Codebasis von Ultralytics YOLOv5 auf.
Ansehen: YOLOv9-Training mit eigenen Daten über Ultralytics | Datensatz für Industriepakete
Einführung in YOLOv9#
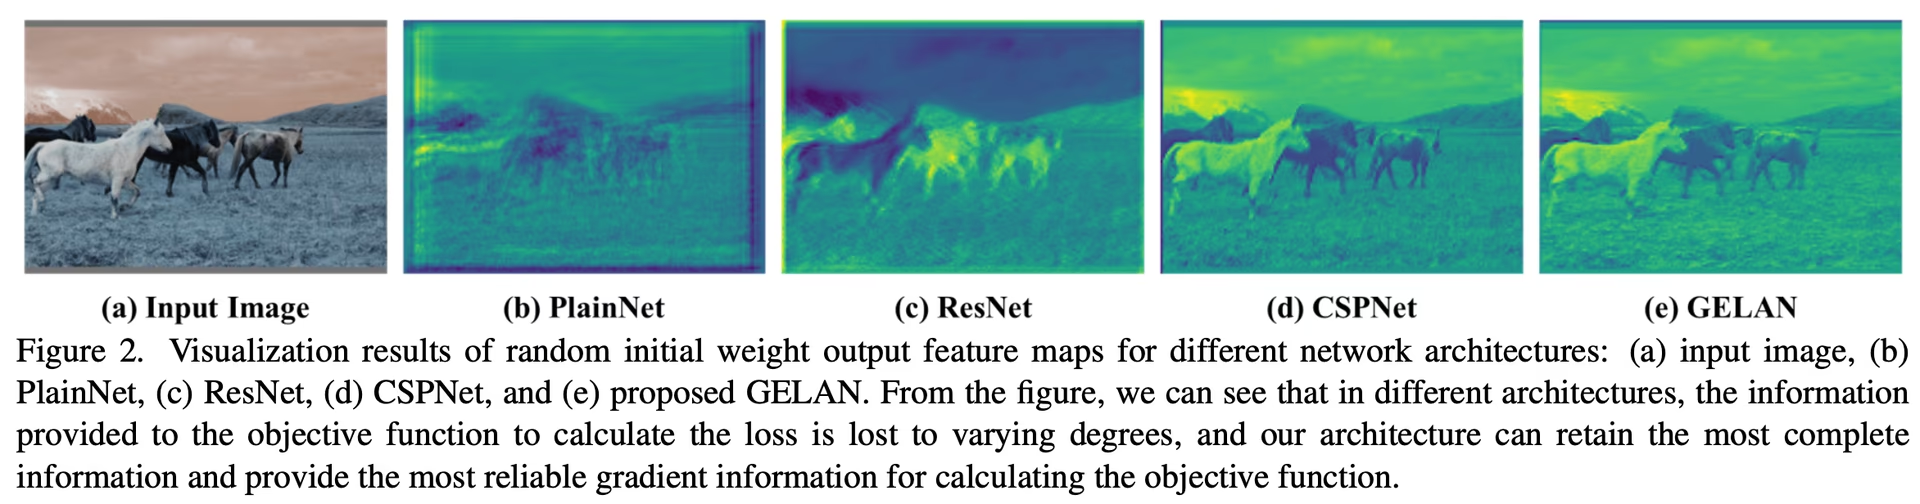
YOLOv9 begegnet dem Informationsverlust, der tiefen neuronalen Netzen innewohnt. Durch die Integration von PGI und der GELAN-Architektur erhöht YOLOv9 die Lernfähigkeit des Modells und bewahrt während des Erkennungsprozesses wichtige Informationen. Dadurch verbessern sich sowohl Genauigkeit als auch Effizienz.
Zentrale Innovationen von YOLOv9#
YOLOv9 zielt mit seinem Design auf den Informationsverlust in tiefen neuronalen Netzen ab. Das Informationsengpassprinzip und die Verwendung reversibler Funktionen sind zentrale Bestandteile des Designs und tragen dazu bei, dass YOLOv9 hohe Effizienz und Genauigkeit beibehält.
Information-Bottleneck-Prinzip#
Das Information-Bottleneck-Prinzip macht eine grundlegende Herausforderung des Deep Learning deutlich: Wenn Daten aufeinanderfolgende Schichten eines Netzwerks durchlaufen, steigt das Risiko eines Informationsverlusts. Dieses Phänomen lässt sich mathematisch wie folgt darstellen:
I(X, X) >= I(X, f_theta(X)) >= I(X, g_phi(f_theta(X)))Dabei bezeichnet I die gegenseitige Information, während f und g Transformationsfunktionen mit den Parametern theta beziehungsweise phi darstellen. YOLOv9 begegnet dieser Herausforderung mit programmierbaren Gradienteninformationen (PGI), die dazu beitragen, wichtige Daten über die Tiefe des Netzwerks hinweg zu bewahren. Dadurch werden zuverlässigere Gradienten erzeugt und folglich die Modellkonvergenz und -leistung verbessert.
Reversible Funktionen#
Das Konzept reversibler Funktionen ist ein weiterer Grundpfeiler des Designs von YOLOv9. Eine Funktion gilt als reversibel, wenn sie sich ohne Informationsverlust umkehren lässt, wie folgt dargestellt:
X = v_zeta(r_psi(X))mit psi und zeta als Parameter für die reversible Funktion beziehungsweise ihre Umkehrfunktion. Diese Eigenschaft ist für Deep-Learning-Architekturen entscheidend, da das Netzwerk dadurch einen vollständigen Informationsfluss beibehalten kann und genauere Aktualisierungen der Modellparameter ermöglicht werden. YOLOv9 integriert reversible Funktionen in seine Architektur, um das Risiko einer Informationsverschlechterung insbesondere in tieferen Schichten zu verringern und so wichtige Daten für Objekterkennungsaufgaben zu bewahren.
Auswirkungen auf kompakte Modelle#
Die Vermeidung von Informationsverlust ist besonders wichtig für kompakte Modelle, die häufig zu wenige Parameter haben und während der Vorwärtsverarbeitung anfällig für erhebliche Informationsverluste sind. Durch den Einsatz von PGI und reversiblen Funktionen stellt die YOLOv9-Architektur sicher, dass auch ein schlankes Modell die für eine genaue Objekterkennung erforderlichen Informationen bewahrt und effektiv nutzt.
Programmierbare Gradienteninformationen (PGI)#
PGI ist ein neues Konzept, das in YOLOv9 eingeführt wurde, um dem Informationsengpass entgegenzuwirken und wichtige Daten über tiefe Netzwerkschichten hinweg zu bewahren. So können zuverlässige Gradienten erzeugt werden, die präzise Modellaktualisierungen ermöglichen und die allgemeine Erkennungsleistung verbessern.
Verallgemeinertes effizientes Schichtaggregationsnetzwerk (GELAN)#
GELAN ist eine Architektur, die die Parameternutzung und Recheneffizienz von YOLOv9 verbessert. Dank ihres Designs lassen sich verschiedene Rechenblöcke flexibel integrieren. Dadurch eignet sich YOLOv9 für zahlreiche Anwendungen, ohne Einbußen bei Geschwindigkeit oder Genauigkeit.
YOLOv9-Benchmarks#
Beim Benchmarking von YOLOv9 mit dem Ultralytics-Benchmark-Modus wird die Leistung deines trainierten und validierten Modells in realen Anwendungsszenarien bewertet. Dazu gehören:
- Leistungsbewertung: Geschwindigkeit und Genauigkeit des Modells beurteilen.
- Exportformate: Das Modell mit verschiedenen Exportformaten testen, um sicherzustellen, dass es die erforderlichen Standards erfüllt und in unterschiedlichen Umgebungen gut funktioniert.
- Framework-Unterstützung: Durchführung dieser Bewertungen im Ultralytics-Paket, um konsistente und zuverlässige Ergebnisse sicherzustellen.
Durch Benchmarking kannst du sicherstellen, dass dein Modell nicht nur in kontrollierten Testumgebungen gut abschneidet, sondern auch in praktischen Anwendungen unter realen Bedingungen eine hohe Leistung beibehält.
Ansehen: So misst du die Leistung des YOLOv9-Modells mit dem Ultralytics-Python-Paket
Leistung auf dem MS-COCO-Datensatz#
Bei seiner Veröffentlichung setzte YOLOv9 neue Maßstäbe auf dem COCO-Datensatz für verschiedene Modellgrößen. Die folgende Tabelle enthält die Genauigkeit, Parameteranzahl und FLOPs jedes in Ultralytics verfügbaren YOLOv9-Modells.
Die YOLOv9-Varianten, vom kleinen Modell t bis zum großen Modell e, verbessern die Genauigkeit (mAP) und halten zugleich die Parameteranzahl und den Rechenaufwand (FLOPs) im Vergleich zu früheren Versionen und konkurrierenden Modellen gleich oder reduzieren sie.
Im Vergleich zu anderen Echtzeitdetektoren bietet YOLOv9 folgende Vorteile:
- Kompakte Modelle: YOLOv9s übertrifft YOLO MS-S bei Parametereffizienz und Rechenaufwand und erzielt zugleich eine Verbesserung des AP-Werts um 0,4–0,6 %.
- Mittlere bis große Modelle: YOLOv9m und YOLOv9e verbessern den Kompromiss zwischen Modellkomplexität und Erkennungsleistung. Sie reduzieren Parameteranzahl und Rechenaufwand und steigern zugleich die Genauigkeit.
Das Modell YOLOv9c benötigt 42 % weniger Parameter und 21 % weniger Rechenleistung als YOLOv7 AF und erreicht dabei eine vergleichbare Genauigkeit. YOLOv9e benötigt 15 % weniger Parameter und 25 % weniger Rechenleistung als YOLOv8x und verbessert die AP um 1,7 %.
Diese Ergebnisse zeigen, dass YOLOv9 die Recheneffizienz verbessert, ohne die für die Objekterkennung in Echtzeit und weitere Computer-Vision-Aufgaben erforderliche Genauigkeit zu beeinträchtigen.
Fazit#
YOLOv9 wurde im Februar 2024 veröffentlicht und verbesserte die Effizienz und Genauigkeit der Objekterkennung in Echtzeit. Mit PGI und GELAN begegnete YOLOv9 dem Informationsverlust und setzte bei seiner Veröffentlichung neue Maßstäbe. Neuere Modelle wie YOLO26 und YOLO11 haben seitdem weitere Verbesserungen gebracht, doch YOLOv9s architektonische Neuerungen prägen das Gebiet weiterhin.
Anwendungsbeispiele#
Dieses Beispiel enthält einfache Beispiele für das Training und die Inferenz mit YOLOv9.
Vortrainierte PyTorch-Modelle *.pt sowie Konfigurationsdateien *.yaml kannst du an die Klasse YOLO() übergeben, um eine Modellinstanz in Python zu erstellen:
from ultralytics import YOLO

# Ein YOLOv9c-Modell von Grund auf erstellen
model = YOLO("yolov9c.yaml")

# Ein YOLOv9c-Modell aus vortrainierten Gewichten erstellen
model = YOLO("yolov9c.pt")

# Modellinformationen anzeigen (optional)
model.info()

# Das Modell 100 Epochen lang mit dem COCO8-Beispieldatensatz trainieren
results = model.train(data="coco8.yaml", epochs=100, imgsz=640)

# Mit dem YOLOv9c-Modell eine Inferenz für das Bild 'bus.jpg' ausführen
results = model("path/to/bus.jpg")
Unterstützte Aufgaben und Modi#
Die YOLOv9-Reihe bietet verschiedene Modelle für Objekterkennung und Instanzsegmentierung und deckt damit unterschiedliche Rechenbudgets und Genauigkeitsanforderungen ab.
| Modell | Dateinamen | Aufgaben | Training | Validierung | Inferenz | Exportieren |
|---|---|---|---|---|---|---|
| YOLOv9 | yolov9t.pt yolov9s.pt yolov9m.pt yolov9c.pt yolov9e.pt | Objekterkennung | ✅ | ✅ | ✅ | ✅ |
| YOLOv9-seg | yolov9c-seg.pt yolov9e-seg.pt | Instanzsegmentierung | ✅ | ✅ | ✅ | ✅ |
Diese Tabelle fasst die YOLOv9-Modellvarianten und ihre Unterstützung der Modi Training, Validierung, Inferenz und Export zusammen.
Das Training von YOLOv9-Modellen benötigt mehr Ressourcen und dauert länger als das eines YOLOv8-Modells vergleichbarer Größe.
Zitate und Danksagungen#
Wir möchten den Autoren von YOLOv9 für ihre bedeutenden Beiträge auf dem Gebiet der Objekterkennung in Echtzeit danken:
@inproceedings{wang2024yolov9,
  title={YOLOv9: Learning What You Want to Learn Using Programmable Gradient Information},
  author={Wang, Chien-Yao and Yeh, I-Hau and Liao, Hong-Yuan Mark},
  booktitle={Computer Vision -- ECCV 2024},
  pages={1--21},
  year={2024},
  organization={Springer Nature Switzerland}
}
Die offizielle YOLOv9-Arbeit wurde in den Springer-ECCV-2024-Tagungsbänden veröffentlicht; ein Vorabdruck ist auf arXiv verfügbar. Die Autoren haben ihre Arbeit öffentlich zugänglich gemacht; die Codebasis findest du auf GitHub. Wir schätzen ihren Einsatz, das Gebiet voranzubringen und ihre Arbeit einer breiteren Gemeinschaft zugänglich zu machen.
Häufig gestellte Fragen#
YOLOv9 führt zwei zentrale Techniken ein: Programmierbare Gradienteninformationen (PGI) und das verallgemeinerte effiziente Layer-Aggregationsnetzwerk (GELAN). Diese Neuerungen begegnen dem Informationsverlust in tiefen neuronalen Netzen und sorgen für hohe Effizienz, Genauigkeit und Anpassungsfähigkeit. PGI erhält wichtige Daten über die Netzwerkschichten hinweg, während GELAN die Parameternutzung und Recheneffizienz optimiert.
Zum Zeitpunkt seiner Veröffentlichung übertraf YOLOv9 andere hochmoderne Echtzeit-Objektdetektoren in Genauigkeit und Effizienz. Auf dem COCO-Datensatz erzielen YOLOv9-Modelle bei verschiedenen Größen höhere mAP-Werte und halten den Rechenaufwand dabei gleich oder verringern ihn. So erreicht YOLOv9c eine vergleichbare Genauigkeit mit 42 % weniger Parametern und 21 % geringerem Rechenaufwand als YOLOv7 AF.
Du kannst ein YOLOv9-Modell sowohl mit Python als auch mit CLI-Befehlen trainieren. Verwende in Python die Klasse
YOLO, um ein Modell zu instanziieren, und rufe die Methodetrainauf:from ultralytics import YOLO # Ein YOLOv9c-Modell aus vortrainierten Gewichten erstellen und trainieren model = YOLO("yolov9c.pt") results = model.train(data="coco8.yaml", epochs=100, imgsz=640)Führe für das Training über die CLI Folgendes aus:
yolo train model=yolov9c.yaml data=coco8.yaml epochs=100 imgsz=640Weitere Anwendungsbeispiele für Training und Inferenz findest du hier.
YOLOv9 wurde entwickelt, um Informationsverluste zu verringern, was besonders für kompakte Modelle wichtig ist, da diese häufig anfällig für erhebliche Informationsverluste sind. Durch die Integration von programmierbaren Gradienteninformationen (PGI) und reversiblen Funktionen stellt YOLOv9 sicher, dass wichtige Daten erhalten bleiben, und verbessert so die Genauigkeit und Effizienz des Modells. Dadurch eignet sich YOLOv9 besonders für Anwendungen, die kompakte Modelle mit hoher Leistung erfordern. Weitere Einzelheiten findest du im Abschnitt zu den Auswirkungen von YOLOv9 auf kompakte Modelle.
YOLOv9 unterstützt Objekterkennung und Instanzsegmentierung in den Modi Training, Validierung, Inferenz und Export.


Kommentare482
Stell eine Frage, teile deine Ergebnisse oder hilf jemand anderem.
vuvanhieu
to load a YOLOv5 model def load_yolov5_model(yolo_model_path): device = torch.device('cuda' if torch.cuda.is_available() else 'cpu') model = torch.hub.load('ultralytics/yolov5', 'custom', path=yolo_model_path, force_reload=True).to(device) return model
How in yolov8, yolov9?
1 Paula DerrengerUltralytics
To load a YOLOv8 or YOLOv9 model, you can use the
YOLOclass from the Ultralytics package. Here's a concise way to do it:from ultralytics import YOLO # Load a YOLOv8 model model_v8 = YOLO("yolov8n.pt") # Load a YOLOv9 model model_v9 = YOLO("yolov9c.pt")For more details, you can refer to the YOLOv9 documentation: https://docs.ultralytics.com/models/yolov9/.
MoAbbasid
@glenn-jocher @pderrenger any idea of when the lightweight models can be used in ultralytics?
1 Glenn JocherUltralytics(bearbeitet)
Hi there! 😊
Lightweight models are available in Ultralytics. YOLOv9 ships
yolov9t.pt,yolov9s.ptandyolov9m.ptalongsideyolov9c.ptandyolov9e.pt. For new projects we recommend YOLO26, whose smallest modelyolo26n.ptis built for efficiency.To try a lightweight model:
yolo train model=yolo26n.pt data=coco128.yaml epochs=100If you're tinkering with custom lightweight designs, copy an existing model YAML from the Ultralytics repo and adjust its layers or scales. Contributions or insights are welcome.
Happy detecting!
deepanalyticszlc
Very exciting! Is there a schedule for release of lightweight models?
1- Paula DerrengerUltralytics(bearbeitet)
@deepanalyticszlc hey there! 😊
Lightweight YOLOv9 models are now available:
yolov9t.pt,yolov9s.ptandyolov9m.pt, alongsideyolov9c.ptandyolov9e.pt. For the latest releases, see the Ultralytics GitHub releases.Here's a little snippet on how to load and use YOLOv9 for predictions:
from ultralytics import YOLO

# Load YOLOv9 model
model = YOLO('yolov9t.pt')  # Replace 'yolov9t.pt' with your model file

# Run inference on an image
results = model('path/to/your/image.jpg')

# Display results
results[0].show()
For new projects, we recommend YOLO26, which also comes in small sizes like
yolo26n.pt. ⏰
DolapoSalim(bearbeitet)
@glenn-jocher Kindly assist with this TypeError: TypeError: ERROR C:\path_to_custom_model/yolov9c.pt appears to be an Ultralytics YOLOv5 model originally trained with https://github.com/ultralytics/yolov5. This model is NOT forwards compatible with YOLOv8 at https://github.com/ultralytics/ultralytics. Recommend fixes are to train a new model using the latest 'ultralytics' package or to run a command with an official Ultralytics model, i.e. 'yolo predict model=yolo11n.pt'
Here is my code:
from ultralytics import YOLO

model = YOLO(path_to_YOLOV9.pt )

results = model.predict(source="IMAGE_SOURCE", show=True, conf=0.10)
Note, I am actually working with a custom trained YOLOV9
- Glenn JocherUltralytics
@DolapoSalim to resolve the YOLOv5/YOLOv9 compatibility error when using custom-trained models, please ensure you're using the latest
ultralytics>=8.2.0package and retrain your YOLOv9 model using the official YOLOv9 configuration files from our documentation. For custom training guidance, see the YOLOv9 Training section in our docs.This error typically occurs when using older model formats - newer versions maintain full backward compatibility when models are trained with current Ultralytics implementations.
1
gusreic
This article claims that Yolov9 is based on Yolov5. The Yolov9 paper claims that v9 is based on Yolov7 which is also not based on 5. Is there any other way that would explain this claim? Otherwise maybe adjust the article.
- Glenn JocherUltralytics
@gusreic yes that's correct. YOLOv9 repo is a fork of my YOLOv5 repo. I know this because I wrote nearly all the files in the YOLOv9 repo myself. Unfortunately the author has failed to make this clear, though he did include a (hidden) acknowledgement at the bottom of the README.
1 Oh, that is really unfortunate, thank you for clearing it up since it is not directly apparent. Do you think that YOLOv9 is based on YOLOv5 only with respect to the structure of the repository or would you say that the architecture of the model itself is also based on the architecture of YOLOv5?
- Glenn JocherUltralytics
@gusreic thank you for your question! YOLOv9's repository structure is indeed based on Ultralytics YOLOv5, while its architecture introduces novel components like Programmable Gradient Information (PGI) and GELAN as described in the YOLOv9 documentation. The model itself represents an independent advancement building on broader YOLO research. We'll clarify this distinction in our article! 😊
ghost
Hello,
Thanks for the great documentation!
Quick question: Is the code licensed under AGPLv3 (Ultralytics) or GPLv3 (Wang, Chien-Yao and Liao, Hong-Yuan Mark Github)?
Thanks!
- Glenn JocherUltralytics
@ProfessorHT the YOLOv9 project codebase, developed by Wang, Chien-Yao and Liao, Hong-Yuan Mark, is available on GitHub and licensed under GPLv3, while Ultralytics models and software use the AGPL-3.0 license.
Thank you for your quick response. So to be sure if I use Yolov9 from this documentation with the ultralytics library i will be under the AGPLv3 license and i should buy a license?
- Glenn JocherUltralytics
Yes, if you use YOLOv9 models from the Ultralytics library, you are under the AGPL-3.0 license and would need an Enterprise License for commercial use, unless you open-source your entire project under AGPL-3.0.
 liuweiqing
Does it support automatic downloading of pretrained weights?
- Glenn JocherUltralytics
@14790897 yes, YOLOv9 supports automatic downloading of pretrained weights when using the
YOLO()class in Python or CLI commands, as long as the specified weights file (e.g.,yolov9c.pt) is available in the Ultralytics repository. You can find more details in the YOLOv9 documentation.
jane7166
Hello. I have retrained the YOLOv9 model, and I would like to deploy it as an API. How should I proceed?
- Glenn JocherUltralytics
@jane7166 to deploy your retrained YOLOv9 model as an API, you can use frameworks like FastAPI or Flask to build an endpoint and load your model using the Ultralytics Python package. Refer to the YOLOv9 documentation for guidance on inference, which can be integrated into your API logic. Let us know if you have further questions!
Gnoot01
I'm getting the following errors despite latest torch and ultralytics installs. Kindly assist
File "C:\Users\.venv\lib\site-packages\ultralytics\engine\model.py", line 547, in predict self.predictor.setup_model(model=self.model, verbose=is_cli) File "C:\Users\.venv\lib\site-packages\ultralytics\engine\predictor.py", line 303, in setup_model self.model = AutoBackend( File "C:\Users\.venv\lib\site-packages\torch\utils\_contextlib.py", line 116, in decorate_context return func(*args, **kwargs) File "C:\Users\.venv\lib\site-packages\ultralytics\nn\autobackend.py", line 145, in __init__ model = model.fuse(verbose=verbose) TypeError: BaseModel.fuse() got an unexpected keyword argument 'verbose'- Glenn JocherUltralytics
@Gnoot01 it seems like there's a compatibility issue with the
fusemethod. Please ensure you're using the latest version of the Ultralytics package. If the issue persists, consider checking for any updates or changes in the repository that might address this. For further assistance, you can explore the YOLOv9 documentation. @glenn-jocher Hi, I'm using the latest ultralytics 8.3.24 and latest torch. However, still facing this issue. Any suggestions?
- Glenn JocherUltralytics
@Gnoot01 i'm sorry you're experiencing this issue. Please ensure your Ultralytics package is up-to-date. If the problem persists, try reinstalling the package or checking for any recent updates in the repository. For more details, you can refer to the YOLOv9 documentation.
foskyblue
I'm having issues with my Yolov9 model exported to tflite. Model was successfully exported to tflite but I cannot get the right bounding boxes. I'm following the steps listed here: https://stackoverflow.com/questions/76381317/yolov8-tflite-python-predictions-and-interpreting-output (for folov8) to make inference for my yolov9 tflite model.
1Step 1: Resizing and Padding (Letterboxing) Step 2: Non-Maximum Suppression (NMS) Step 3: Rescaling Bounding Boxes
However, when I draw the outputed bounding boxes on my image the boxes don't fit the objects in the image correctly.
The code I'm using can be seen below:
from tflite_runtime.interpreter import Interpreter from PIL import Image import numpy as np from glob import glob from typing import Tuple, List interpreter = None input_shape = (320, 576) # Input tensor dimensions (width, height) in pixels input_index = 0 # Input tensor index (from input details in model signature) output_index = 409 model_path = 'model/saved_model.tflite' def load_model(): interpreter = None interpreter = Interpreter(model_path=model_path, num_threads=2) interpreter.allocate_tensors() input_details = interpreter.get_input_details() global input_shape input_shape = tuple(input_details[0]['shape'][1:3]) global input_index input_index = input_details[0]['index'] output_details = interpreter.get_output_details() global output_index output_index = output_details[0]['index'] return interpreter def letter_box(img: np.ndarray, new_shape: Tuple[int, int]) -> np.ndarray: """ Resizes an image to fit within a new shape while maintaining the aspect ratio, and pads the remaining space with a constant value. Args: img (np.ndarray): The input image as a NumPy array. new_shape (Tuple[int, int]): The desired output shape (height, width). Returns: np.ndarray: The resized and padded image. """ shape = img.shape[:2] # Calculate the scaling ratio to fit the image within the new shape r = min(new_shape[0] / shape[0], new_shape[1] / shape[1]) # Calculate the new unpadded dimensions new_unpad = int(round(shape[1] * r)), int(round(shape[0] * r)) # Calculate the padding required on each side dw, dh = new_shape[1] - new_unpad[0], new_shape[0] - new_unpad[1] dw, dh = dw / 2, dh / 2 # Resize the image if necessary if shape[::-1] != new_unpad: img = Image.fromarray(img).resize(new_unpad, Image.Resampling.BILINEAR) img = np.array(img) # Calculate the top, bottom, left, and right padding values top, bottom = int(round(dh - 0.1)), int(round(dh + 0.1)) left, right = int(round(dw - 0.1)), int(round(dw + 0.1)) # Add padding to the image img = np.pad(img, ((top, bottom), (left, right), (0, 0)), mode='constant', constant_values=114) return img def non_max_suppression( prediction: np.ndarray, conf_thres: float = 0.25, iou_thres: float = 0.45, max_det: int = 300, max_wh: int = 7680, ): """ Perform non-maximum suppression (NMS) on a single image prediction. Args: prediction (np.ndarray): A numpy array of shape (1, num_boxes, num_classes + 4 + num_masks) containing the predicted boxes, classes, and masks. conf_thres (float): Confidence threshold for filtering boxes (0.0 to 1.0). iou_thres (float): IoU threshold for NMS (0.0 to 1.0). max_det (int): Maximum number of boxes to keep after NMS. max_wh (int): Maximum box width and height in pixels. Returns: np.ndarray: Array containing kept boxes with format (x1, y1, x2, y2, confidence, class, mask1, mask2, ...). """ # Input validation (can be removed if you're sure of your input) if 0 > conf_thres > 1: raise ValueError(f"Invalid Confidence threshold {conf_thres}, valid values are between 0.0 and 1.0") if 0 > iou_thres > 1: raise ValueError(f"Invalid IoU {iou_thres}, valid values are between 0.0 and 1.0") # Extract dimensions and metadata directly _, _, dims = prediction.shape nc = dims - 4 - prediction.shape[1] # number of classes nm = dims - nc - 4 # number of masks mi = 4 + nc # mask start index # Process the single image in the batch x = prediction[0] # Extract the single image data # Move class scores to last axis and threshold x = np.transpose(x, (1, 0)) xc = x[..., 4:mi].max(axis=-1) > conf_thres x = x[xc] if not x.shape[0]: # No boxes left after confidence thresholding return np.zeros((0, 6 + nm)) # Convert xywh to xyxy directly on the filtered boxes x[..., :4] = xywh2xyxy(x[..., :4]) # Split and process boxes, classes, and masks # pylint: disable=unbalanced-tuple-unpacking box, cls, mask = np.split(x, (4, mi), 1) conf = cls.max(1) j = cls.argmax(1) x = np.concatenate((box, conf[:, None], j[:, None].astype(float), mask), 1) x = x[conf > conf_thres] n = x.shape[0] if not n: # No boxes left after additional confidence thresholding return np.zeros((0, 6 + nm)) # NMS (simplified since we're dealing with a single image) c = x[:, 5:6] * max_wh boxes, scores = x[:, :4] + c, x[:, 4] i = numpy_nms(boxes, scores, iou_thres) i = i[:max_det] return x[i] def numpy_nms(boxes: np.ndarray, scores: np.ndarray, iou_threshold: float = 0.5) -> np.ndarray: """ Perform Non-Maximum Suppression (NMS) on a set of bounding boxes. Args: boxes (np.ndarray): Array of shape (N, 4) representing N bounding boxes. Each box is [x1, y1, x2, y2]. scores (np.ndarray): Array of shape (N,) representing the confidence scores for each box. iou_threshold (float): IoU threshold for suppressing overlapping boxes. Defaults to 0.5. Returns: np.ndarray: Boolean array of shape (N,) indicating which boxes to keep. """ # Sort boxes by score in descending order order = scores.argsort()[::-1] keep = np.ones(len(boxes), dtype=bool) # Calculate IoU matrix ious = box_iou_batch(boxes, boxes) np.fill_diagonal(ious, 0) # Set self-IoU to 0 for i, idx in enumerate(order): if not keep[idx]: continue # Suppress boxes with IoU > threshold overlap = ious[idx] > iou_threshold keep[order[i + 1:]] &= ~overlap[order[i + 1:]] return keep def box_iou_batch(boxes_a: np.ndarray, boxes_b: np.ndarray) -> np.ndarray: """ Calculate the Intersection over Union (IoU) between two sets of bounding boxes. Args: boxes_a (np.ndarray): Array of shape (N, 4) representing N bounding boxes. boxes_b (np.ndarray): Array of shape (M, 4) representing M bounding boxes. Returns: np.ndarray: Array of shape (N, M) containing IoU values for each pair of boxes. Note: Each bounding box is represented as [x1, y1, x2, y2], where (x1, y1) is the top-left corner and (x2, y2) is the bottom-right corner. """ # Calculate areas of boxes_a area_a = (boxes_a[:, 2] - boxes_a[:, 0]) * (boxes_a[:, 3] - boxes_a[:, 1]) # Calculate areas of boxes_b area_b = (boxes_b[:, 2] - boxes_b[:, 0]) * (boxes_b[:, 3] - boxes_b[:, 1]) # Calculate intersection coordinates top_left = np.maximum(boxes_a[:, None, :2], boxes_b[:, :2]) bottom_right = np.minimum(boxes_a[:, None, 2:], boxes_b[:, 2:]) # Calculate intersection area area_inter = np.prod(np.clip(bottom_right - top_left, a_min=0, a_max=None), 2) # Calculate IoU return area_inter / (area_a[:, None] + area_b - area_inter) def xywh2xyxy(box: np.ndarray) -> np.ndarray: """ Convert bounding box coordinates from (x, y, width, height) format to (x1, y1, x2, y2) format where (x1, y1) is the top-left corner and (x2, y2) is the bottom-right corner. Args: x (np.ndarray): The input bounding box coordinates in (x, y, width, height) format. Returns: np.ndarray: The bounding box coordinates in (x1, y1, x2, y2) format. """ if box.shape[-1] != 4: raise ValueError(f"input shape last dimension expected 4 but input shape is {box.shape}") # pylint: disable=unbalanced-tuple-unpacking xy, wh = np.split(box, [2], axis=-1) wh_half = wh / 2 return np.concatenate([xy - wh_half, xy + wh_half], axis=-1) def preprocess_image(pil_image: Image.Image, input_size: Tuple[int, int]) -> np.ndarray: """ Preprocesses an image for inference with a TFLite model. Args: image_path (str): Path to the image file. input_size (Tuple[int, int]): Desired input size (height, width) for the model. Returns: np.ndarray: Preprocessed image as a NumPy array, ready for inference. """ if pil_image.mode != "RGB": pil_image = pil_image.convert("RGB") im = np.asarray(pil_image) im = letter_box(im, new_shape=input_size) im = np.expand_dims(im, axis=0) # goal is to have the format (number of images, size of image, number of channnels) im = im.astype(np.float32) / 255.0 # Normalize to 0.0 - 1.0 return im def postprocess_results(output: np.ndarray, model_input_size: Tuple[int, int], image_original_size: Tuple[int, int]) -> np.ndarray: """ Postprocesses the raw outputs from a TFLite model, including scaling bounding boxes back to the original image size. Args: output (np.ndarray): List of output tensors from the TFLite model. model_input_size (Tuple[int, int]): Desired input size (height, width) for the model. image_original_size (Tuple[int, int]): Original size (height, width) of the input image. Returns: np.ndarray: Postprocessed results with bounding boxes adjusted to original image size. """ predictions = non_max_suppression(output, conf_thres=0.25, iou_thres=0.45, max_det=300, max_wh=1) return scale_boxes(image_original_size, predictions, model_input_size) def scale_boxes(image_original_size: Tuple[int, int], boxes: np.ndarray, model_input_size: Tuple[int, int]): """ Rescales bounding boxes (in the format of xyxy by default) from the shape of the image they were originally specified in (img1_shape) to the shape of a different image (img0_shape). Args: image_original_size (Tuple[int, int]): The shape of the image that the bounding boxes are for, in the format of (height, width). boxes (np.ndarray): the bounding boxes of the objects in the image, in the format of (x1, y1, x2, y2) model_input_size (Tuple[int, int]): the shape of the target image, in the format of (height, width). Returns: np.ndarray: The scaled bounding boxes, in the format of (x1, y1, x2, y2) """ # calculate from img0_shape gain = min(model_input_size[0] / image_original_size[0], model_input_size[1] / image_original_size[1]) # gain = old / new pad = ( round((model_input_size[1] - image_original_size[1] * gain) / 2 - 0.1) / model_input_size[1], round((model_input_size[0] - image_original_size[0] * gain) / 2 - 0.1) / model_input_size[0], ) # wh padding inner_image_scale = ( (1 - pad[0] * 2), (1 - pad[1] * 2), ) # wh scale boxes[..., 0] = (boxes[..., 0] - pad[0]) / inner_image_scale[0] # x padding boxes[..., 1] = (boxes[..., 1] - pad[1]) / inner_image_scale[1] # y padding boxes[..., 2] = (boxes[..., 2] - pad[0]) / inner_image_scale[0] # x padding boxes[..., 3] = (boxes[..., 3] - pad[1]) / inner_image_scale[1] # y padding boxes[..., [0, 2]] = boxes[..., [0, 2]].clip(0, 1) # x1, x2 boxes[..., [1, 3]] = boxes[..., [1, 3]].clip(0, 1) # y1, y2 return boxes def prepare_input(image_pil): # Input image must match input shape (ex: 640x640 pixels) [note: only use BILINEAR here] resized = image_pil.copy().resize(input_shape, resample=Image.Resampling.BILINEAR) # SSD Mobilenet V2 FPNLite take as input pixels between [-1.0, 1.0] expanded = np.expand_dims(np.asarray(resized, dtype=np.float32) * 2. / 255. - 1., axis=0) del resized # Enforce garbage collection sooner than later return expanded def predict(tmp_images_dir): interpreter = load_model() model_predictions = [] for img_path in tmp_images_dir: pil_image = Image.open(img_path) input_data = preprocess_image(pil_image, input_shape) interpreter.set_tensor(input_index, input_data) interpreter.invoke() output_data = interpreter.get_tensor(output_index) preds = postprocess_results(output_data, input_shape, (pil_image.size[1], pil_image.size[0])) model_predictions.append({ 'detection_classes': (preds[:, 5] + 1).tolist(), # Class values are offset by +1.0 'detection_boxes': preds[:, 0:4].tolist(), 'detection_scores': preds[:, 4].tolist(), }) print(model_predictions) images_path = glob('utilities/images/*.JPG') predict(images_path)- Glenn JocherUltralytics
@foskyblue it seems like the issue might be related to the scaling and padding logic when converting bounding boxes. Ensure that the
scale_boxesfunction correctly rescales the boxes to the original image size. For more detailed guidance, please refer to the YOLOv9 documentation: https://docs.ultralytics.com/models/yolov9/. Hi Glen thanks for your response. Unfortunately I find it difficult to correctly scale the bounding boxes from the example script I mentioned above: https://stackoverflow.com/questions/76381317/yolov8-tflite-python-predictions-and-interpreting-output.
How can I implement the YOLOv9 TFLite model with an input ape of [1, 320, 576, 3] and output shape of [1, 19, 3780] in Python?
- Glenn JocherUltralytics
To correctly scale bounding boxes for your YOLOv9 TFLite model, ensure your
scale_boxesfunction accurately adjusts the coordinates based on the original image size and model input size. Verify that padding and scaling calculations align with your preprocessing steps. For further details, please refer to the YOLOv9 documentation.