YOLOv9 : une avancée majeure dans la technologie de détection d'objets
YOLOv9 a fait progresser la détection d'objets en temps réel en introduisant les informations de gradient programmables (PGI) et le réseau généralisé efficace d'agrégation de couches (GELAN). À sa sortie, il améliorait l'efficacité et la précision par rapport aux détecteurs en temps réel précédents sur le jeu de données MS COCO. Le projet YOLOv9 a été développé par une équipe open source indépendante et s'appuie sur la base de code Ultralytics YOLOv5.
Regarder : Entraînement de YOLOv9 sur des données personnalisées avec Ultralytics | Jeu de données de colis industriels
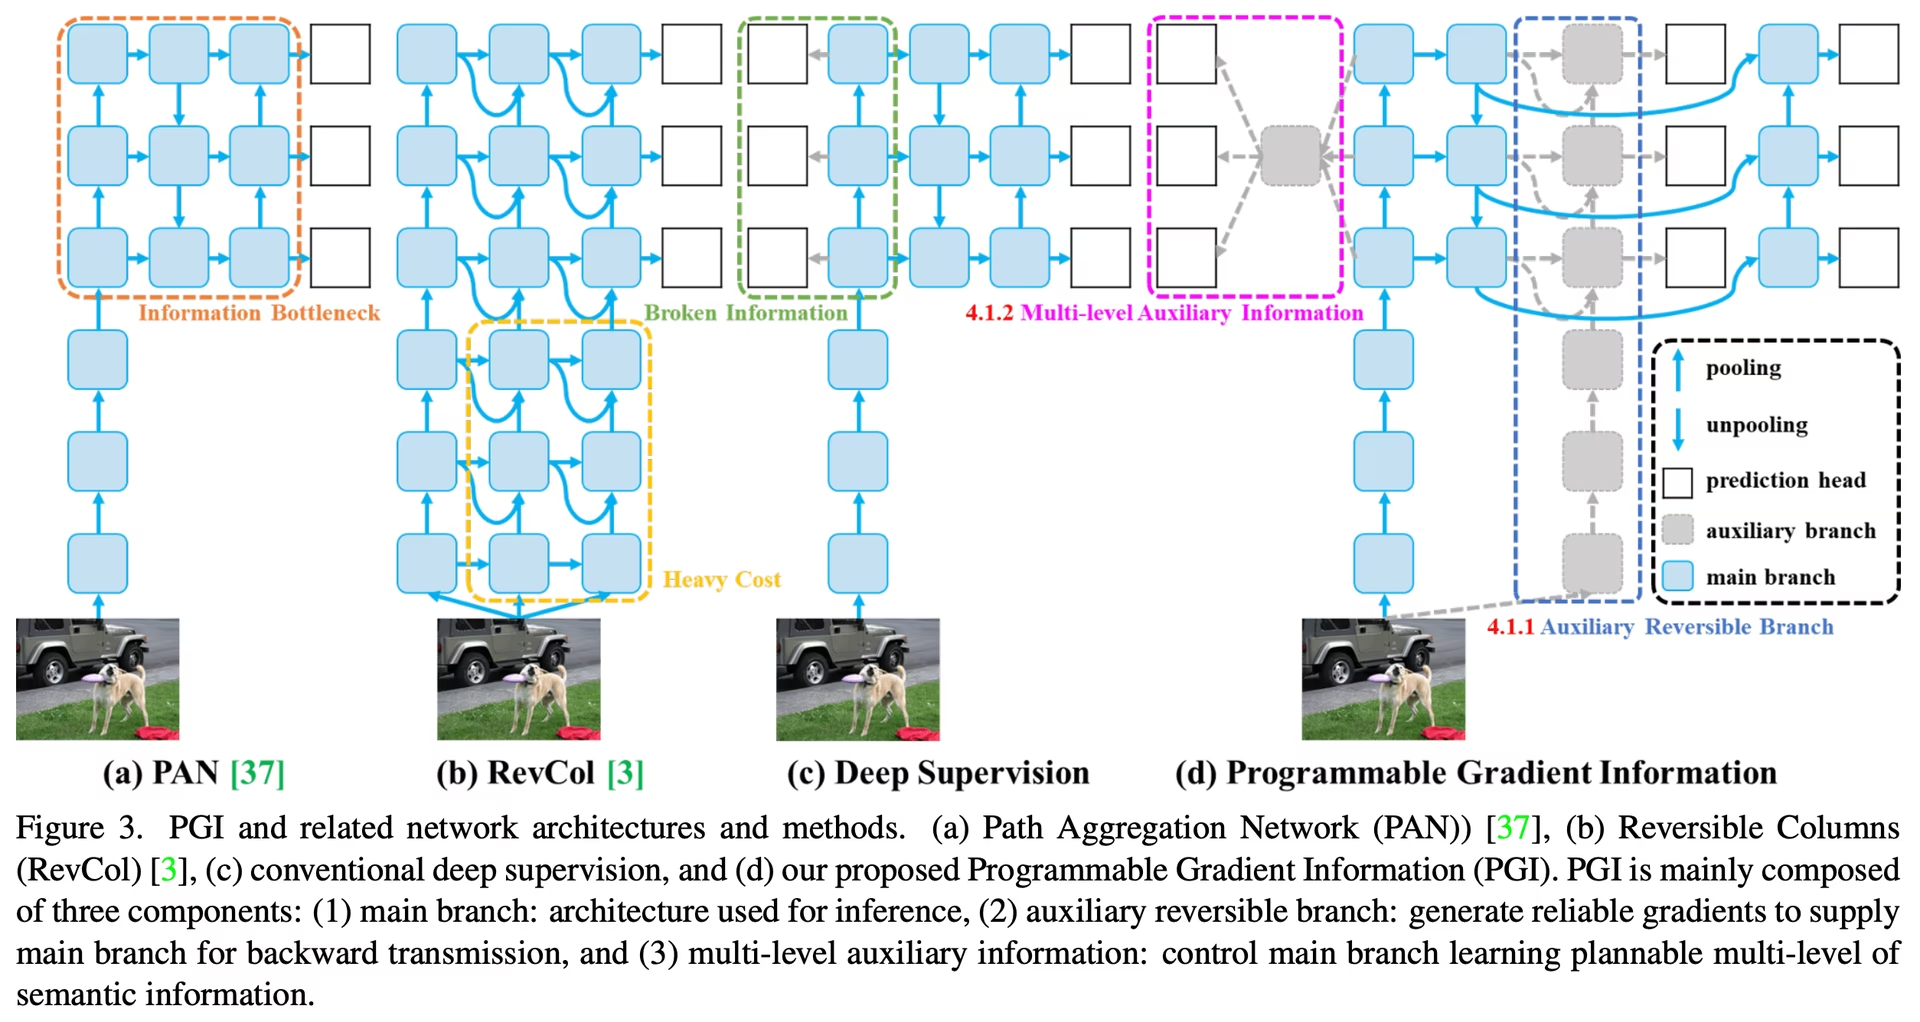
Présentation de YOLOv9#
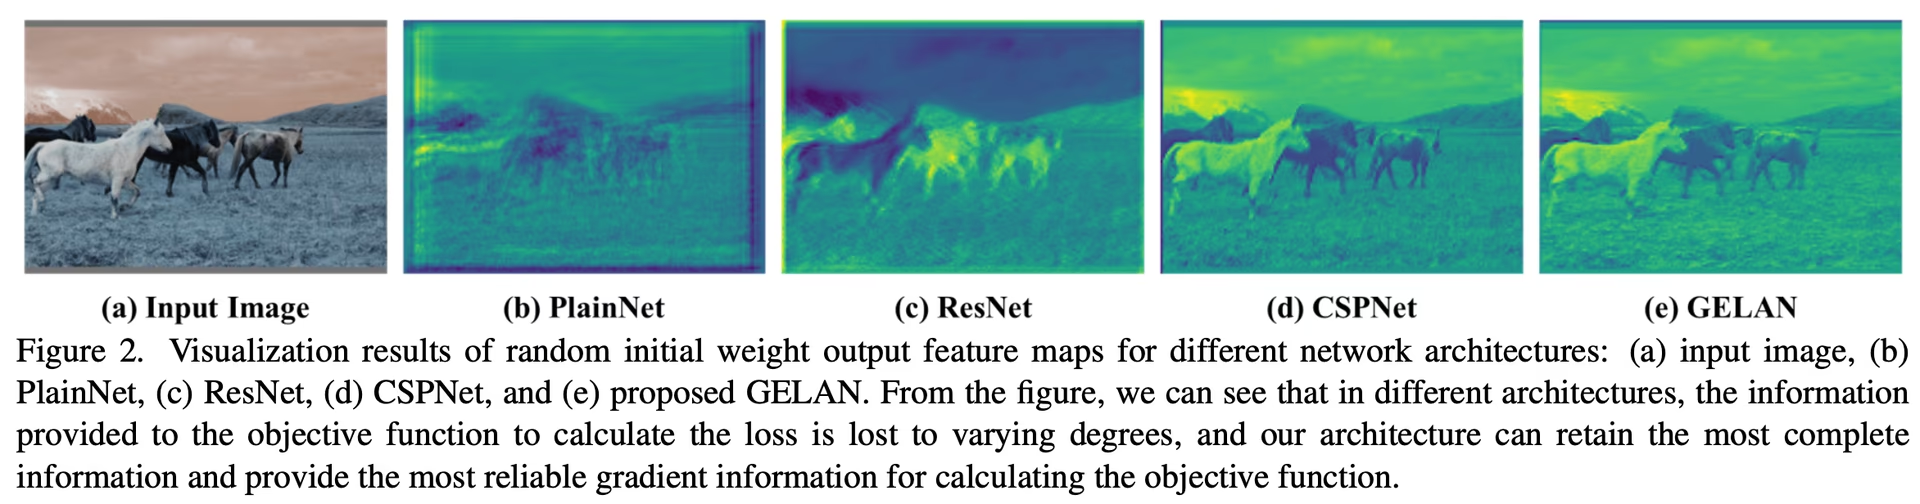
YOLOv9 répond aux pertes d'information inhérentes aux réseaux neuronaux profonds. En intégrant PGI et l'architecture GELAN, YOLOv9 augmente la capacité d'apprentissage du modèle et conserve les informations essentielles tout au long du processus de détection, améliorant ainsi la précision et l'efficacité.
Innovations clés de YOLOv9#
La conception de YOLOv9 cible les pertes d'information dans les réseaux neuronaux profonds. Le principe du goulot d'étranglement de l'information et l'utilisation de fonctions réversibles sont au cœur de sa conception, ce qui aide YOLOv9 à maintenir une grande efficacité et une grande précision.
Principe du goulot d’étranglement de l’information#
Le principe du goulot d’étranglement de l’information met en évidence un problème fondamental de l’apprentissage profond : à mesure que les données traversent les couches successives d’un réseau, le risque de perte d’information augmente. Ce phénomène s’exprime mathématiquement ainsi :
I(X, X) >= I(X, f_theta(X)) >= I(X, g_phi(f_theta(X)))où I désigne l’information mutuelle, et f et g représentent des fonctions de transformation ayant respectivement pour paramètres theta et phi. YOLOv9 relève ce défi en mettant en œuvre les informations de gradient programmables (PGI), qui contribuent à préserver les données essentielles dans les couches profondes du réseau, garantissant ainsi une génération de gradients plus fiable et, par conséquent, une meilleure convergence et de meilleures performances du modèle.
Fonctions réversibles#
Le concept de fonctions réversibles est un autre pilier de la conception de YOLOv9. Une fonction est dite réversible si elle peut être inversée sans perte d’information, comme l’exprime la formule suivante :
X = v_zeta(r_psi(X))avec psi et zeta comme paramètres de la fonction réversible et de son inverse, respectivement. Cette propriété est essentielle aux architectures d'apprentissage profond, car elle permet au réseau de conserver un flux d'informations complet et, par conséquent, d'actualiser les paramètres du modèle avec une plus grande précision. YOLOv9 intègre des fonctions réversibles à son architecture pour atténuer le risque de dégradation de l'information, en particulier dans les couches profondes, et ainsi préserver les données essentielles aux tâches de détection d'objets.
Impact sur les modèles légers#
La résolution des problèmes de perte d’information est particulièrement importante pour les modèles légers, qui sont souvent sous-paramétrés et susceptibles de perdre beaucoup d’informations au cours de la propagation avant. Grâce à l’utilisation de PGI et de fonctions réversibles, l’architecture de YOLOv9 garantit que les informations essentielles à une détection d’objets précise sont conservées et exploitées efficacement, même avec un modèle simplifié.
Informations de gradient programmables (PGI)#
PGI est un nouveau concept introduit dans YOLOv9 pour lutter contre le problème du goulot d’étranglement de l’information et garantir la préservation des données essentielles dans les couches profondes du réseau. Cette approche permet de générer des gradients fiables, facilitant des mises à jour précises du modèle et améliorant les performances globales de détection.
Réseau généralisé d’agrégation efficace des couches (GELAN)#
GELAN est une architecture qui améliore l'utilisation des paramètres et l'efficacité de calcul de YOLOv9. Sa conception permet d'intégrer divers blocs de calcul avec souplesse, ce qui rend YOLOv9 adaptable à un large éventail d'applications sans sacrifier la vitesse ni la précision.
Résultats des tests de performance de YOLOv9#
L'analyse comparative de YOLOv9 avec le mode Benchmark d'Ultralytics consiste à évaluer les performances de ton modèle entraîné et validé dans des scénarios réels. Ce processus comprend :
- Évaluation des performances : évaluer la vitesse et la précision du modèle.
- Formats d’exportation : tester le modèle dans différents formats d’exportation pour vérifier qu’il respecte les normes requises et fonctionne bien dans divers environnements.
- Prise en charge du framework : réalisation de ces évaluations dans le package Ultralytics pour obtenir des résultats cohérents et fiables.
Les tests de performance te permettent de vérifier que ton modèle fonctionne bien non seulement dans des environnements de test contrôlés, mais aussi dans des applications pratiques en conditions réelles.
Regarder : Comment évaluer le modèle YOLOv9 avec le package Ultralytics Python
Performances sur le jeu de données MS COCO#
À sa sortie, YOLOv9 a établi de nouvelles références sur le jeu de données COCO pour différentes tailles de modèles. Le tableau ci-dessous répertorie la précision, le nombre de paramètres et les FLOPs de chaque modèle YOLOv9 disponible dans Ultralytics.
Les variantes de YOLOv9, du modèle t de petite taille au modèle e de grande taille, améliorent la précision (mAP) tout en maintenant ou en réduisant le nombre de paramètres et les calculs (FLOPs), par rapport aux versions précédentes et aux modèles concurrents.
Par rapport aux autres détecteurs en temps réel, YOLOv9 présente les gains suivants :
- Modèles légers : YOLOv9s surpasse YOLO MS-S en matière d’efficacité des paramètres et de charge de calcul, tout en améliorant l’AP de 0,4 à 0,6 %.
- Modèles moyens à grands : YOLOv9m et YOLOv9e améliorent le compromis entre la complexité du modèle et les performances de détection, en réduisant le nombre de paramètres et les calculs tout en améliorant la précision.
Le modèle YOLOv9c utilise 42 % de paramètres en moins et nécessite 21 % de calculs en moins que YOLOv7 AF, tout en offrant une précision comparable. Le modèle YOLOv9e utilise 15 % de paramètres en moins et nécessite 25 % de calculs en moins que YOLOv8x, avec une amélioration de 1,7 % de l'AP.
Ces résultats montrent que YOLOv9 améliore l'efficacité de calcul sans compromettre la précision requise pour la détection d'objets en temps réel et d'autres tâches de vision par ordinateur.
Conclusion#
Sorti en février 2024, YOLOv9 a amélioré l'efficacité et la précision de la détection d'objets en temps réel. En répondant aux pertes d'information grâce à PGI et GELAN, YOLOv9 a établi de nouvelles références au moment de sa sortie. Depuis, des modèles plus récents comme YOLO26 et YOLO11 ont apporté d'autres améliorations, mais les innovations architecturales de YOLOv9 continuent d'influencer le domaine.
Exemples d'utilisation#
Cet exemple présente des exemples simples d'entraînement et d'inférence avec YOLOv9.
Les modèles *.pt préentraînés PyTorch ainsi que les fichiers de configuration *.yaml peuvent être transmis à la classe YOLO() pour créer une instance de modèle en Python :
from ultralytics import YOLO

# Créer un modèle YOLOv9c de zéro
model = YOLO("yolov9c.yaml")

# Créer un modèle YOLOv9c à partir de poids préentraînés
model = YOLO("yolov9c.pt")

# Afficher les informations du modèle (facultatif)
model.info()

# Entraîner le modèle sur le jeu de données d'exemple COCO8 pendant 100 époques
results = model.train(data="coco8.yaml", epochs=100, imgsz=640)

# Effectuer une inférence avec le modèle YOLOv9c sur l’image 'bus.jpg'
results = model("path/to/bus.jpg")
Tâches et modes pris en charge#
La série YOLOv9 propose différents modèles pour la détection d'objets et la segmentation d'instances, couvrant différents budgets de calcul et exigences de précision.
| Modèle | Noms de fichiers | Tâches | Entraînement | Validation | Inférence | Export |
|---|---|---|---|---|---|---|
| YOLOv9 | yolov9t.pt yolov9s.pt yolov9m.pt yolov9c.pt yolov9e.pt | Détection d'objets | ✅ | ✅ | ✅ | ✅ |
| YOLOv9-seg | yolov9c-seg.pt yolov9e-seg.pt | Segmentation d'instances | ✅ | ✅ | ✅ | ✅ |
Ce tableau récapitule les variantes de modèles YOLOv9 et leur prise en charge des modes d'entraînement, de validation, d'inférence et d'export.
L’entraînement des modèles YOLOv9 nécessitera plus de ressources et prendra plus de temps que celui d’un modèle YOLOv8 de taille équivalente.
Citations et remerciements#
Nous tenons à remercier les auteurs de YOLOv9 pour leurs contributions majeures au domaine de la détection d’objets en temps réel :
@inproceedings{wang2024yolov9,
  title={YOLOv9: Learning What You Want to Learn Using Programmable Gradient Information},
  author={Wang, Chien-Yao and Yeh, I-Hau and Liao, Hong-Yuan Mark},
  booktitle={Computer Vision -- ECCV 2024},
  pages={1--21},
  year={2024},
  organization={Springer Nature Switzerland}
}
L’article officiel sur YOLOv9 a été publié dans les actes Springer d’ECCV 2024, avec une prépublication sur arXiv. Les auteurs ont rendu leurs travaux publics et le code source est accessible sur GitHub. Nous saluons leurs efforts pour faire progresser le domaine et rendre leurs travaux accessibles à l’ensemble de la communauté.
FAQ#
YOLOv9 introduit deux techniques principales : les informations de gradient programmables (PGI) et le réseau généralisé d’agrégation efficace des couches (GELAN). Ces innovations répondent aux problèmes de perte d’information dans les réseaux neuronaux profonds, afin de garantir une efficacité, une précision et une adaptabilité élevées. PGI préserve les données essentielles à travers les couches du réseau, tandis que GELAN optimise l’utilisation des paramètres et l’efficacité des calculs.
À sa sortie, YOLOv9 surpassait les autres détecteurs d’objets en temps réel de pointe en matière de précision et d’efficacité. Sur le jeu de données COCO, les modèles YOLOv9 obtiennent des scores mAP plus élevés à différentes tailles, tout en maintenant ou en réduisant la charge de calcul. Par exemple, YOLOv9c atteint une précision comparable avec 42 % de paramètres en moins et une demande de calcul réduite de 21 % par rapport à YOLOv7 AF.
Tu peux entraîner un modèle YOLOv9 à l’aide de commandes Python ou CLI. En Python, instancie un modèle avec la classe
YOLOet appelle la méthodetrain:from ultralytics import YOLO # Créer un modèle YOLOv9c à partir de poids préentraînés et l’entraîner model = YOLO("yolov9c.pt") results = model.train(data="coco8.yaml", epochs=100, imgsz=640)Pour l’entraînement avec la CLI, exécute :
yolo train model=yolov9c.yaml data=coco8.yaml epochs=100 imgsz=640Pour en savoir plus, consulte les exemples d’utilisation concernant l’entraînement et l’inférence.
YOLOv9 est conçu pour atténuer les pertes d’information, un enjeu particulièrement important pour les modèles légers, qui risquent souvent de perdre beaucoup d’informations. Grâce à l’intégration des informations de gradient programmables (PGI) et des fonctions réversibles, YOLOv9 garantit la conservation des données essentielles, ce qui améliore la précision et l’efficacité du modèle. Il convient ainsi parfaitement aux applications qui nécessitent des modèles compacts et performants. Pour en savoir plus, consulte la section sur l’impact de YOLOv9 sur les modèles légers.
YOLOv9 prend en charge la détection d’objets et la segmentation d’instances dans les modes d’entraînement, de validation, d’inférence et d’exportation.


Commentaires482
Pose une question, partage tes résultats ou aide quelqu’un d’autre.
vuvanhieu
to load a YOLOv5 model def load_yolov5_model(yolo_model_path): device = torch.device('cuda' if torch.cuda.is_available() else 'cpu') model = torch.hub.load('ultralytics/yolov5', 'custom', path=yolo_model_path, force_reload=True).to(device) return model
How in yolov8, yolov9?
1 Paula DerrengerUltralytics
To load a YOLOv8 or YOLOv9 model, you can use the
YOLOclass from the Ultralytics package. Here's a concise way to do it:from ultralytics import YOLO # Load a YOLOv8 model model_v8 = YOLO("yolov8n.pt") # Load a YOLOv9 model model_v9 = YOLO("yolov9c.pt")For more details, you can refer to the YOLOv9 documentation: https://docs.ultralytics.com/models/yolov9/.
MoAbbasid
@glenn-jocher @pderrenger any idea of when the lightweight models can be used in ultralytics?
1 Glenn JocherUltralytics(modifié)
Hi there! 😊
Lightweight models are available in Ultralytics. YOLOv9 ships
yolov9t.pt,yolov9s.ptandyolov9m.ptalongsideyolov9c.ptandyolov9e.pt. For new projects we recommend YOLO26, whose smallest modelyolo26n.ptis built for efficiency.To try a lightweight model:
yolo train model=yolo26n.pt data=coco128.yaml epochs=100If you're tinkering with custom lightweight designs, copy an existing model YAML from the Ultralytics repo and adjust its layers or scales. Contributions or insights are welcome.
Happy detecting!
deepanalyticszlc
Very exciting! Is there a schedule for release of lightweight models?
1- Paula DerrengerUltralytics(modifié)
@deepanalyticszlc hey there! 😊
Lightweight YOLOv9 models are now available:
yolov9t.pt,yolov9s.ptandyolov9m.pt, alongsideyolov9c.ptandyolov9e.pt. For the latest releases, see the Ultralytics GitHub releases.Here's a little snippet on how to load and use YOLOv9 for predictions:
from ultralytics import YOLO

# Load YOLOv9 model
model = YOLO('yolov9t.pt')  # Replace 'yolov9t.pt' with your model file

# Run inference on an image
results = model('path/to/your/image.jpg')

# Display results
results[0].show()
For new projects, we recommend YOLO26, which also comes in small sizes like
yolo26n.pt. ⏰
DolapoSalim(modifié)
@glenn-jocher Kindly assist with this TypeError: TypeError: ERROR C:\path_to_custom_model/yolov9c.pt appears to be an Ultralytics YOLOv5 model originally trained with https://github.com/ultralytics/yolov5. This model is NOT forwards compatible with YOLOv8 at https://github.com/ultralytics/ultralytics. Recommend fixes are to train a new model using the latest 'ultralytics' package or to run a command with an official Ultralytics model, i.e. 'yolo predict model=yolo11n.pt'
Here is my code:
from ultralytics import YOLO

model = YOLO(path_to_YOLOV9.pt )

results = model.predict(source="IMAGE_SOURCE", show=True, conf=0.10)
Note, I am actually working with a custom trained YOLOV9
- Glenn JocherUltralytics
@DolapoSalim to resolve the YOLOv5/YOLOv9 compatibility error when using custom-trained models, please ensure you're using the latest
ultralytics>=8.2.0package and retrain your YOLOv9 model using the official YOLOv9 configuration files from our documentation. For custom training guidance, see the YOLOv9 Training section in our docs.This error typically occurs when using older model formats - newer versions maintain full backward compatibility when models are trained with current Ultralytics implementations.
1
gusreic
This article claims that Yolov9 is based on Yolov5. The Yolov9 paper claims that v9 is based on Yolov7 which is also not based on 5. Is there any other way that would explain this claim? Otherwise maybe adjust the article.
- Glenn JocherUltralytics
@gusreic yes that's correct. YOLOv9 repo is a fork of my YOLOv5 repo. I know this because I wrote nearly all the files in the YOLOv9 repo myself. Unfortunately the author has failed to make this clear, though he did include a (hidden) acknowledgement at the bottom of the README.
1 Oh, that is really unfortunate, thank you for clearing it up since it is not directly apparent. Do you think that YOLOv9 is based on YOLOv5 only with respect to the structure of the repository or would you say that the architecture of the model itself is also based on the architecture of YOLOv5?
- Glenn JocherUltralytics
@gusreic thank you for your question! YOLOv9's repository structure is indeed based on Ultralytics YOLOv5, while its architecture introduces novel components like Programmable Gradient Information (PGI) and GELAN as described in the YOLOv9 documentation. The model itself represents an independent advancement building on broader YOLO research. We'll clarify this distinction in our article! 😊
ghost
Hello,
Thanks for the great documentation!
Quick question: Is the code licensed under AGPLv3 (Ultralytics) or GPLv3 (Wang, Chien-Yao and Liao, Hong-Yuan Mark Github)?
Thanks!
- Glenn JocherUltralytics
@ProfessorHT the YOLOv9 project codebase, developed by Wang, Chien-Yao and Liao, Hong-Yuan Mark, is available on GitHub and licensed under GPLv3, while Ultralytics models and software use the AGPL-3.0 license.
Thank you for your quick response. So to be sure if I use Yolov9 from this documentation with the ultralytics library i will be under the AGPLv3 license and i should buy a license?
- Glenn JocherUltralytics
Yes, if you use YOLOv9 models from the Ultralytics library, you are under the AGPL-3.0 license and would need an Enterprise License for commercial use, unless you open-source your entire project under AGPL-3.0.
 liuweiqing
Does it support automatic downloading of pretrained weights?
- Glenn JocherUltralytics
@14790897 yes, YOLOv9 supports automatic downloading of pretrained weights when using the
YOLO()class in Python or CLI commands, as long as the specified weights file (e.g.,yolov9c.pt) is available in the Ultralytics repository. You can find more details in the YOLOv9 documentation.
jane7166
Hello. I have retrained the YOLOv9 model, and I would like to deploy it as an API. How should I proceed?
- Glenn JocherUltralytics
@jane7166 to deploy your retrained YOLOv9 model as an API, you can use frameworks like FastAPI or Flask to build an endpoint and load your model using the Ultralytics Python package. Refer to the YOLOv9 documentation for guidance on inference, which can be integrated into your API logic. Let us know if you have further questions!
Gnoot01
I'm getting the following errors despite latest torch and ultralytics installs. Kindly assist
File "C:\Users\.venv\lib\site-packages\ultralytics\engine\model.py", line 547, in predict self.predictor.setup_model(model=self.model, verbose=is_cli) File "C:\Users\.venv\lib\site-packages\ultralytics\engine\predictor.py", line 303, in setup_model self.model = AutoBackend( File "C:\Users\.venv\lib\site-packages\torch\utils\_contextlib.py", line 116, in decorate_context return func(*args, **kwargs) File "C:\Users\.venv\lib\site-packages\ultralytics\nn\autobackend.py", line 145, in __init__ model = model.fuse(verbose=verbose) TypeError: BaseModel.fuse() got an unexpected keyword argument 'verbose'- Glenn JocherUltralytics
@Gnoot01 it seems like there's a compatibility issue with the
fusemethod. Please ensure you're using the latest version of the Ultralytics package. If the issue persists, consider checking for any updates or changes in the repository that might address this. For further assistance, you can explore the YOLOv9 documentation. @glenn-jocher Hi, I'm using the latest ultralytics 8.3.24 and latest torch. However, still facing this issue. Any suggestions?
- Glenn JocherUltralytics
@Gnoot01 i'm sorry you're experiencing this issue. Please ensure your Ultralytics package is up-to-date. If the problem persists, try reinstalling the package or checking for any recent updates in the repository. For more details, you can refer to the YOLOv9 documentation.
foskyblue
I'm having issues with my Yolov9 model exported to tflite. Model was successfully exported to tflite but I cannot get the right bounding boxes. I'm following the steps listed here: https://stackoverflow.com/questions/76381317/yolov8-tflite-python-predictions-and-interpreting-output (for folov8) to make inference for my yolov9 tflite model.
1Step 1: Resizing and Padding (Letterboxing) Step 2: Non-Maximum Suppression (NMS) Step 3: Rescaling Bounding Boxes
However, when I draw the outputed bounding boxes on my image the boxes don't fit the objects in the image correctly.
The code I'm using can be seen below:
from tflite_runtime.interpreter import Interpreter from PIL import Image import numpy as np from glob import glob from typing import Tuple, List interpreter = None input_shape = (320, 576) # Input tensor dimensions (width, height) in pixels input_index = 0 # Input tensor index (from input details in model signature) output_index = 409 model_path = 'model/saved_model.tflite' def load_model(): interpreter = None interpreter = Interpreter(model_path=model_path, num_threads=2) interpreter.allocate_tensors() input_details = interpreter.get_input_details() global input_shape input_shape = tuple(input_details[0]['shape'][1:3]) global input_index input_index = input_details[0]['index'] output_details = interpreter.get_output_details() global output_index output_index = output_details[0]['index'] return interpreter def letter_box(img: np.ndarray, new_shape: Tuple[int, int]) -> np.ndarray: """ Resizes an image to fit within a new shape while maintaining the aspect ratio, and pads the remaining space with a constant value. Args: img (np.ndarray): The input image as a NumPy array. new_shape (Tuple[int, int]): The desired output shape (height, width). Returns: np.ndarray: The resized and padded image. """ shape = img.shape[:2] # Calculate the scaling ratio to fit the image within the new shape r = min(new_shape[0] / shape[0], new_shape[1] / shape[1]) # Calculate the new unpadded dimensions new_unpad = int(round(shape[1] * r)), int(round(shape[0] * r)) # Calculate the padding required on each side dw, dh = new_shape[1] - new_unpad[0], new_shape[0] - new_unpad[1] dw, dh = dw / 2, dh / 2 # Resize the image if necessary if shape[::-1] != new_unpad: img = Image.fromarray(img).resize(new_unpad, Image.Resampling.BILINEAR) img = np.array(img) # Calculate the top, bottom, left, and right padding values top, bottom = int(round(dh - 0.1)), int(round(dh + 0.1)) left, right = int(round(dw - 0.1)), int(round(dw + 0.1)) # Add padding to the image img = np.pad(img, ((top, bottom), (left, right), (0, 0)), mode='constant', constant_values=114) return img def non_max_suppression( prediction: np.ndarray, conf_thres: float = 0.25, iou_thres: float = 0.45, max_det: int = 300, max_wh: int = 7680, ): """ Perform non-maximum suppression (NMS) on a single image prediction. Args: prediction (np.ndarray): A numpy array of shape (1, num_boxes, num_classes + 4 + num_masks) containing the predicted boxes, classes, and masks. conf_thres (float): Confidence threshold for filtering boxes (0.0 to 1.0). iou_thres (float): IoU threshold for NMS (0.0 to 1.0). max_det (int): Maximum number of boxes to keep after NMS. max_wh (int): Maximum box width and height in pixels. Returns: np.ndarray: Array containing kept boxes with format (x1, y1, x2, y2, confidence, class, mask1, mask2, ...). """ # Input validation (can be removed if you're sure of your input) if 0 > conf_thres > 1: raise ValueError(f"Invalid Confidence threshold {conf_thres}, valid values are between 0.0 and 1.0") if 0 > iou_thres > 1: raise ValueError(f"Invalid IoU {iou_thres}, valid values are between 0.0 and 1.0") # Extract dimensions and metadata directly _, _, dims = prediction.shape nc = dims - 4 - prediction.shape[1] # number of classes nm = dims - nc - 4 # number of masks mi = 4 + nc # mask start index # Process the single image in the batch x = prediction[0] # Extract the single image data # Move class scores to last axis and threshold x = np.transpose(x, (1, 0)) xc = x[..., 4:mi].max(axis=-1) > conf_thres x = x[xc] if not x.shape[0]: # No boxes left after confidence thresholding return np.zeros((0, 6 + nm)) # Convert xywh to xyxy directly on the filtered boxes x[..., :4] = xywh2xyxy(x[..., :4]) # Split and process boxes, classes, and masks # pylint: disable=unbalanced-tuple-unpacking box, cls, mask = np.split(x, (4, mi), 1) conf = cls.max(1) j = cls.argmax(1) x = np.concatenate((box, conf[:, None], j[:, None].astype(float), mask), 1) x = x[conf > conf_thres] n = x.shape[0] if not n: # No boxes left after additional confidence thresholding return np.zeros((0, 6 + nm)) # NMS (simplified since we're dealing with a single image) c = x[:, 5:6] * max_wh boxes, scores = x[:, :4] + c, x[:, 4] i = numpy_nms(boxes, scores, iou_thres) i = i[:max_det] return x[i] def numpy_nms(boxes: np.ndarray, scores: np.ndarray, iou_threshold: float = 0.5) -> np.ndarray: """ Perform Non-Maximum Suppression (NMS) on a set of bounding boxes. Args: boxes (np.ndarray): Array of shape (N, 4) representing N bounding boxes. Each box is [x1, y1, x2, y2]. scores (np.ndarray): Array of shape (N,) representing the confidence scores for each box. iou_threshold (float): IoU threshold for suppressing overlapping boxes. Defaults to 0.5. Returns: np.ndarray: Boolean array of shape (N,) indicating which boxes to keep. """ # Sort boxes by score in descending order order = scores.argsort()[::-1] keep = np.ones(len(boxes), dtype=bool) # Calculate IoU matrix ious = box_iou_batch(boxes, boxes) np.fill_diagonal(ious, 0) # Set self-IoU to 0 for i, idx in enumerate(order): if not keep[idx]: continue # Suppress boxes with IoU > threshold overlap = ious[idx] > iou_threshold keep[order[i + 1:]] &= ~overlap[order[i + 1:]] return keep def box_iou_batch(boxes_a: np.ndarray, boxes_b: np.ndarray) -> np.ndarray: """ Calculate the Intersection over Union (IoU) between two sets of bounding boxes. Args: boxes_a (np.ndarray): Array of shape (N, 4) representing N bounding boxes. boxes_b (np.ndarray): Array of shape (M, 4) representing M bounding boxes. Returns: np.ndarray: Array of shape (N, M) containing IoU values for each pair of boxes. Note: Each bounding box is represented as [x1, y1, x2, y2], where (x1, y1) is the top-left corner and (x2, y2) is the bottom-right corner. """ # Calculate areas of boxes_a area_a = (boxes_a[:, 2] - boxes_a[:, 0]) * (boxes_a[:, 3] - boxes_a[:, 1]) # Calculate areas of boxes_b area_b = (boxes_b[:, 2] - boxes_b[:, 0]) * (boxes_b[:, 3] - boxes_b[:, 1]) # Calculate intersection coordinates top_left = np.maximum(boxes_a[:, None, :2], boxes_b[:, :2]) bottom_right = np.minimum(boxes_a[:, None, 2:], boxes_b[:, 2:]) # Calculate intersection area area_inter = np.prod(np.clip(bottom_right - top_left, a_min=0, a_max=None), 2) # Calculate IoU return area_inter / (area_a[:, None] + area_b - area_inter) def xywh2xyxy(box: np.ndarray) -> np.ndarray: """ Convert bounding box coordinates from (x, y, width, height) format to (x1, y1, x2, y2) format where (x1, y1) is the top-left corner and (x2, y2) is the bottom-right corner. Args: x (np.ndarray): The input bounding box coordinates in (x, y, width, height) format. Returns: np.ndarray: The bounding box coordinates in (x1, y1, x2, y2) format. """ if box.shape[-1] != 4: raise ValueError(f"input shape last dimension expected 4 but input shape is {box.shape}") # pylint: disable=unbalanced-tuple-unpacking xy, wh = np.split(box, [2], axis=-1) wh_half = wh / 2 return np.concatenate([xy - wh_half, xy + wh_half], axis=-1) def preprocess_image(pil_image: Image.Image, input_size: Tuple[int, int]) -> np.ndarray: """ Preprocesses an image for inference with a TFLite model. Args: image_path (str): Path to the image file. input_size (Tuple[int, int]): Desired input size (height, width) for the model. Returns: np.ndarray: Preprocessed image as a NumPy array, ready for inference. """ if pil_image.mode != "RGB": pil_image = pil_image.convert("RGB") im = np.asarray(pil_image) im = letter_box(im, new_shape=input_size) im = np.expand_dims(im, axis=0) # goal is to have the format (number of images, size of image, number of channnels) im = im.astype(np.float32) / 255.0 # Normalize to 0.0 - 1.0 return im def postprocess_results(output: np.ndarray, model_input_size: Tuple[int, int], image_original_size: Tuple[int, int]) -> np.ndarray: """ Postprocesses the raw outputs from a TFLite model, including scaling bounding boxes back to the original image size. Args: output (np.ndarray): List of output tensors from the TFLite model. model_input_size (Tuple[int, int]): Desired input size (height, width) for the model. image_original_size (Tuple[int, int]): Original size (height, width) of the input image. Returns: np.ndarray: Postprocessed results with bounding boxes adjusted to original image size. """ predictions = non_max_suppression(output, conf_thres=0.25, iou_thres=0.45, max_det=300, max_wh=1) return scale_boxes(image_original_size, predictions, model_input_size) def scale_boxes(image_original_size: Tuple[int, int], boxes: np.ndarray, model_input_size: Tuple[int, int]): """ Rescales bounding boxes (in the format of xyxy by default) from the shape of the image they were originally specified in (img1_shape) to the shape of a different image (img0_shape). Args: image_original_size (Tuple[int, int]): The shape of the image that the bounding boxes are for, in the format of (height, width). boxes (np.ndarray): the bounding boxes of the objects in the image, in the format of (x1, y1, x2, y2) model_input_size (Tuple[int, int]): the shape of the target image, in the format of (height, width). Returns: np.ndarray: The scaled bounding boxes, in the format of (x1, y1, x2, y2) """ # calculate from img0_shape gain = min(model_input_size[0] / image_original_size[0], model_input_size[1] / image_original_size[1]) # gain = old / new pad = ( round((model_input_size[1] - image_original_size[1] * gain) / 2 - 0.1) / model_input_size[1], round((model_input_size[0] - image_original_size[0] * gain) / 2 - 0.1) / model_input_size[0], ) # wh padding inner_image_scale = ( (1 - pad[0] * 2), (1 - pad[1] * 2), ) # wh scale boxes[..., 0] = (boxes[..., 0] - pad[0]) / inner_image_scale[0] # x padding boxes[..., 1] = (boxes[..., 1] - pad[1]) / inner_image_scale[1] # y padding boxes[..., 2] = (boxes[..., 2] - pad[0]) / inner_image_scale[0] # x padding boxes[..., 3] = (boxes[..., 3] - pad[1]) / inner_image_scale[1] # y padding boxes[..., [0, 2]] = boxes[..., [0, 2]].clip(0, 1) # x1, x2 boxes[..., [1, 3]] = boxes[..., [1, 3]].clip(0, 1) # y1, y2 return boxes def prepare_input(image_pil): # Input image must match input shape (ex: 640x640 pixels) [note: only use BILINEAR here] resized = image_pil.copy().resize(input_shape, resample=Image.Resampling.BILINEAR) # SSD Mobilenet V2 FPNLite take as input pixels between [-1.0, 1.0] expanded = np.expand_dims(np.asarray(resized, dtype=np.float32) * 2. / 255. - 1., axis=0) del resized # Enforce garbage collection sooner than later return expanded def predict(tmp_images_dir): interpreter = load_model() model_predictions = [] for img_path in tmp_images_dir: pil_image = Image.open(img_path) input_data = preprocess_image(pil_image, input_shape) interpreter.set_tensor(input_index, input_data) interpreter.invoke() output_data = interpreter.get_tensor(output_index) preds = postprocess_results(output_data, input_shape, (pil_image.size[1], pil_image.size[0])) model_predictions.append({ 'detection_classes': (preds[:, 5] + 1).tolist(), # Class values are offset by +1.0 'detection_boxes': preds[:, 0:4].tolist(), 'detection_scores': preds[:, 4].tolist(), }) print(model_predictions) images_path = glob('utilities/images/*.JPG') predict(images_path)- Glenn JocherUltralytics
@foskyblue it seems like the issue might be related to the scaling and padding logic when converting bounding boxes. Ensure that the
scale_boxesfunction correctly rescales the boxes to the original image size. For more detailed guidance, please refer to the YOLOv9 documentation: https://docs.ultralytics.com/models/yolov9/. Hi Glen thanks for your response. Unfortunately I find it difficult to correctly scale the bounding boxes from the example script I mentioned above: https://stackoverflow.com/questions/76381317/yolov8-tflite-python-predictions-and-interpreting-output.
How can I implement the YOLOv9 TFLite model with an input ape of [1, 320, 576, 3] and output shape of [1, 19, 3780] in Python?
- Glenn JocherUltralytics
To correctly scale bounding boxes for your YOLOv9 TFLite model, ensure your
scale_boxesfunction accurately adjusts the coordinates based on the original image size and model input size. Verify that padding and scaling calculations align with your preprocessing steps. For further details, please refer to the YOLOv9 documentation.