Link to this sectionUnderstanding the Key Steps in a Computer Vision Project#
Building a computer vision project means moving through a clear sequence of stages: defining your goals, collecting and annotating data, training and evaluating a model, and deploying and maintaining it in production. This guide walks through each step in order and explains why it matters, so you can plan and run your own project with confidence.
Computer vision is a subfield of artificial intelligence (AI) that helps computers see and understand the world like humans do. It processes and analyzes images or videos to extract information, recognize patterns, and make decisions based on that data.
Computer vision techniques like object detection, image classification, and instance segmentation can be applied across various industries, from autonomous driving to medical imaging to gain valuable insights.
Link to this sectionAn Overview of a Computer Vision Project#
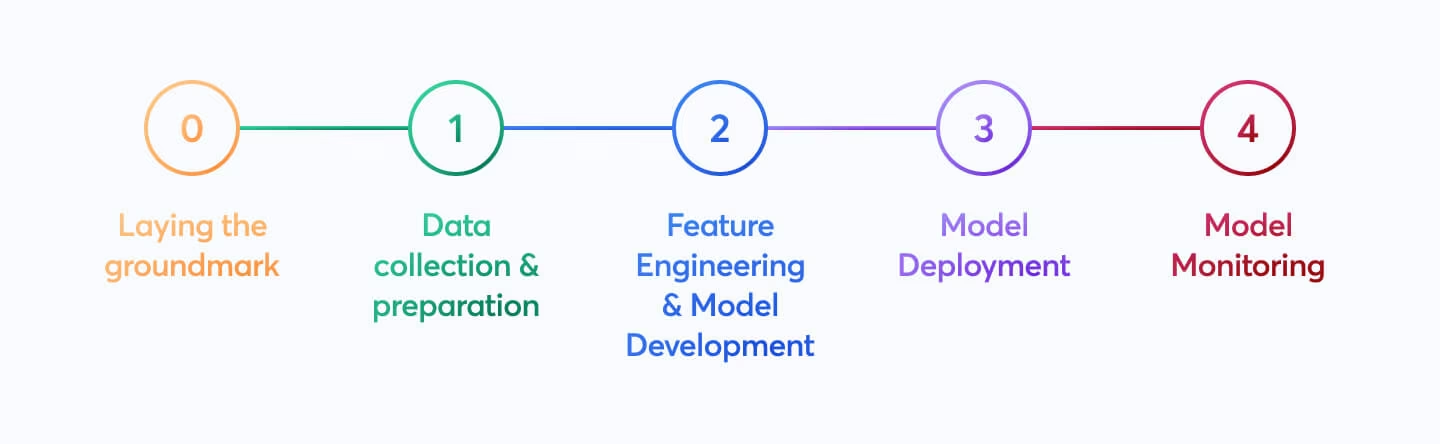
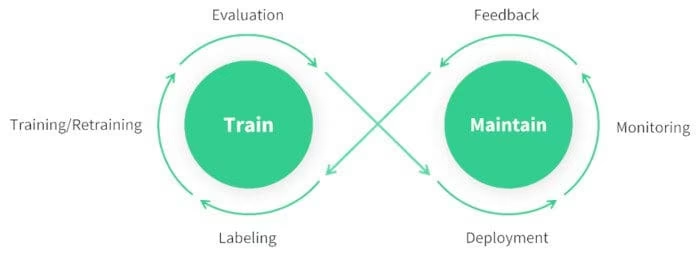
Before discussing the details of each step involved in a computer vision project, let's look at the overall process. If you started a computer vision project today, you'd take the following steps:
- Your first priority is to understand your project's requirements.
- Then, you collect and accurately label the images that will help train your model.
- Next, you clean and augment your data to prepare it for model training.
- After training, you thoroughly evaluate and test your model to make sure it performs consistently under different conditions.
- Finally, you deploy your model into the real world and monitor and maintain it based on new insights and feedback.
Now that we know what to expect, let's dive right into the steps and get your project moving forward.
Link to this sectionStep 1: Defining Your Project's Goals#
The first step in any computer vision project is clearly defining the problem you're trying to solve. Knowing the end goal helps you start to build a solution. This is especially true when it comes to computer vision because your project's objective will directly affect which computer vision task you need to focus on.
Here are some examples of project objectives and the computer vision tasks that can be used to reach these objectives:
-
Objective: To develop a system that can monitor and manage the flow of different vehicle types on highways, improving traffic management and safety.
- Computer Vision Task: Object detection is ideal for traffic monitoring because it efficiently locates and identifies multiple vehicles. It is less computationally demanding than image segmentation, which provides unnecessary detail for this task, ensuring faster, real-time analysis.
-
Objective: To develop a tool that assists radiologists by providing precise, pixel-level outlines of tumors in medical imaging scans.
- Computer Vision Task: Image segmentation is suitable for medical imaging because it provides accurate and detailed boundaries of tumors that are crucial for assessing size, shape, and treatment planning.
-
Objective: To create a digital system that categorizes various documents (e.g., invoices, receipts, legal paperwork) to improve organizational efficiency and document retrieval.
- Computer Vision Task: Image classification is ideal here as it handles one document at a time, without needing to consider the document's position in the image. This approach simplifies and accelerates the sorting process.
Link to this sectionSelecting the Right Model and Training Approach#
After understanding the project objective and suitable computer vision tasks, an essential part of defining the project goal is selecting the right model and training approach.
Depending on the objective, you might choose to select the model first or after seeing what data you are able to collect in Step 2. For example, suppose your project is highly dependent on the availability of specific types of data. In that case, it may be more practical to gather and analyze the data first before selecting a model. On the other hand, if you have a clear understanding of the model requirements, you can choose the model first and then collect data that fits those specifications.
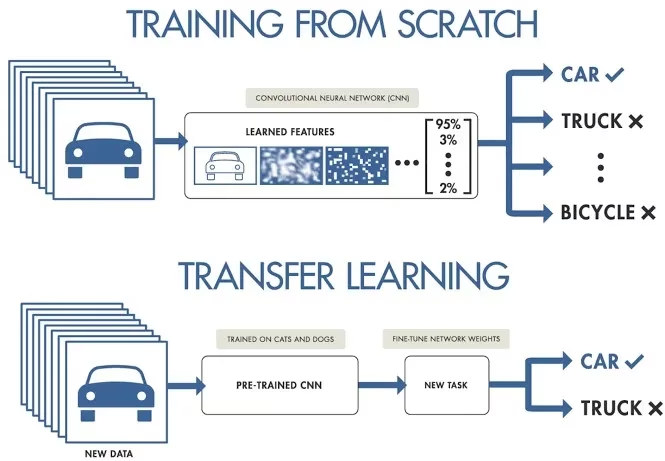
Choosing between training from scratch or using transfer learning affects how you prepare your data. Training from scratch requires a diverse dataset to build the model's understanding from the ground up. Transfer learning, on the other hand, allows you to use a pretrained model and adapt it with a smaller, more specific dataset. Also, choosing a specific model to train will determine how you need to prepare your data, such as resizing images or adding annotations, according to the model's specific requirements.
Consider a model's deployment target to ensure compatibility and performance. For example, lightweight models are ideal for edge computing thanks to their efficiency on resource-constrained devices.
To learn more, read our guide on defining your project's goals and selecting the right model.
Before getting into the hands-on work of a computer vision project, it's important to have a clear understanding of these details. Double-check that you've considered the following before moving on to Step 2:
- Clearly define the problem you're trying to solve.
- Determine the end goal of your project.
- Identify the specific computer vision task needed (e.g., object detection, image classification, image segmentation).
- Decide whether to train a model from scratch or use transfer learning.
- Select the appropriate model for your task and deployment needs.
Link to this sectionStep 2: Data Collection and Data Annotation#
The quality of your computer vision models depends on the quality of your dataset. You can either collect images from the internet, take your own pictures, or use pre-existing datasets. Here are some great resources for downloading high-quality datasets: Google Dataset Search Engine, UC Irvine Machine Learning Repository, and Kaggle Datasets.
Some libraries, like Ultralytics, provide built-in support for various datasets, making it easier to get started with high-quality data. These libraries often include utilities for using popular datasets seamlessly, which can save you a lot of time and effort in the initial stages of your project.
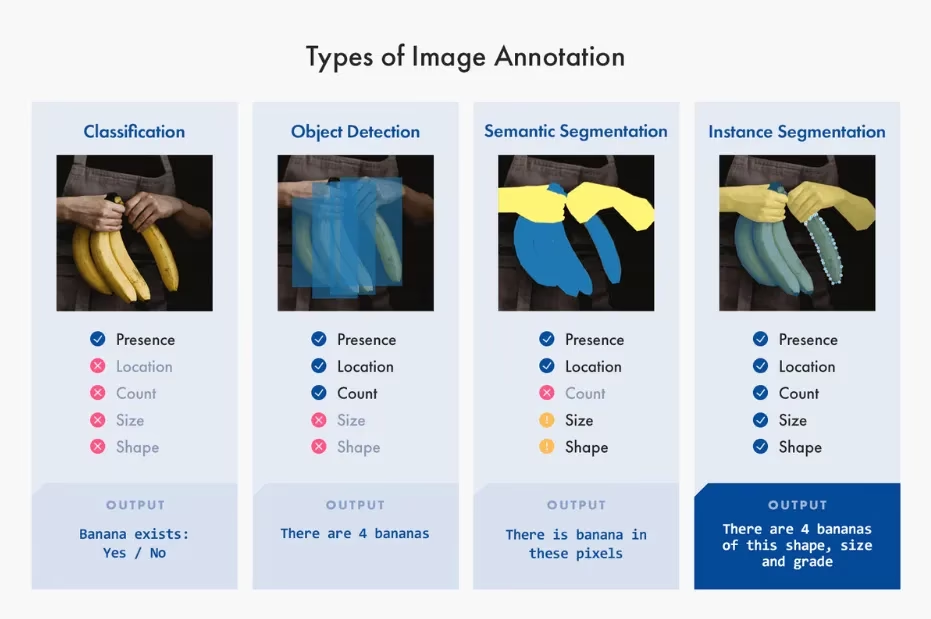
However, if you choose to collect images or take your own pictures, you'll need to annotate your data. Data annotation is the process of labeling your data to impart knowledge to your model. The type of data annotation you'll work with depends on your specific computer vision technique. Here are some examples:
- Image Classification: You'll label the entire image as a single class.
- Object Detection: You'll draw bounding boxes around each object in the image and label each box.
- Image Segmentation: You'll label each pixel in the image according to the object it belongs to, creating detailed object boundaries.
Data collection and annotation can be a time-consuming manual effort. A dedicated annotation tool makes it faster: Ultralytics Platform provides a built-in annotation editor with SAM-powered smart annotation for detection, segmentation, and OBB data, saving labels directly in YOLO format.
Link to this sectionStep 3: Data Augmentation and Splitting Your Dataset#
After collecting and annotating your image data, it's important to first split your dataset into training, validation, and test sets before performing data augmentation. Splitting your dataset before augmentation is crucial to test and validate your model on original, unaltered data. It helps accurately assess how well the model generalizes to new, unseen data.
Here's how to split your data:
- Training Set: It is the largest portion of your data, typically 70-80% of the total, used to train your model.
- Validation Set: Usually around 10-15% of your data; this set is used to tune hyperparameters and validate the model during training, helping to prevent overfitting.
- Test Set: The remaining 10-15% of your data is set aside as the test set. It is used to evaluate the model's performance on unseen data after training is complete.
After splitting your data, you can perform data augmentation by applying transformations like rotating, scaling, and flipping images to artificially increase the size of your dataset. Data augmentation makes your model more robust to variations and improves its performance on unseen images.
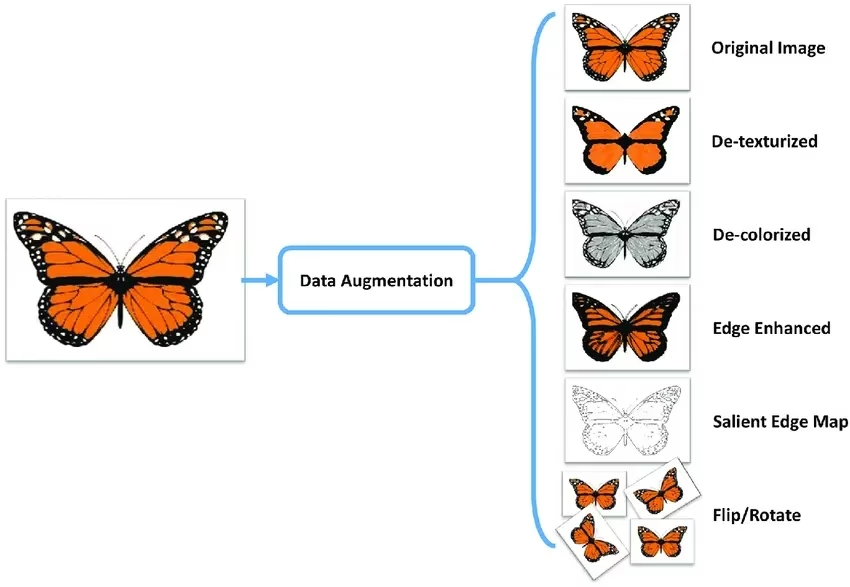
Libraries like OpenCV, Albumentations, and TensorFlow offer flexible augmentation functions that you can use. Additionally, some libraries, such as Ultralytics, have built-in augmentation settings directly within its model training function, simplifying the process.
To understand your data better, you can use tools like Matplotlib or Seaborn to visualize the images and analyze their distribution and characteristics. Visualizing your data helps identify patterns, anomalies, and the effectiveness of your augmentation techniques. The Ultralytics Platform Charts tab can surface many of these insights without any code by automatically generating split distribution, class counts, image-dimension histograms, and annotation-position heatmaps for every uploaded dataset.
By properly understanding, splitting, and augmenting your data, you can develop a well-trained, validated, and tested model that performs well in real-world applications.
Link to this sectionStep 4: Model Training#
Once your dataset is ready for training, you can focus on setting up the necessary environment, managing your datasets, and training your model.
First, you'll need to make sure your environment is configured correctly. Typically, this includes the following:
- Installing essential libraries and frameworks like TensorFlow, PyTorch, or Ultralytics.
- If you are using a GPU, installing libraries like CUDA and cuDNN will help enable GPU acceleration and speed up the training process.
Then, you can load your training and validation datasets into your environment. Normalize and preprocess the data through resizing, format conversion, or augmentation. With your model selected, configure the layers and specify hyperparameters. Compile the model by setting the loss function, optimizer, and performance metrics.
Libraries like Ultralytics simplify the training process. You can start training by feeding data into the model with minimal code. These libraries handle weight adjustments, backpropagation, and validation automatically. They also offer tools to monitor progress and adjust hyperparameters easily. After training, save the model and its weights with a few commands.
It's important to keep in mind that proper dataset management is vital for efficient training. Use version control for datasets to track changes and ensure reproducibility. Tools like DVC (Data Version Control) can help manage large datasets.
Link to this sectionStep 5: Model Evaluation and Fine-Tuning#
It's important to assess your model's performance using various metrics and refine it to improve accuracy. Evaluating helps identify areas where the model excels and where it may need improvement. Fine-tuning ensures the model is optimized for the best possible performance.
- Performance Metrics: Use metrics like accuracy, precision, recall, and F1-score to evaluate your model's performance. These metrics provide insights into how well your model is making predictions.
- Hyperparameter Tuning: Adjust hyperparameters to optimize model performance. Techniques like grid search or random search can help find the best hyperparameter values.
- Fine-Tuning: Make small adjustments to the model architecture or training process to enhance performance. This might involve tweaking learning rates, batch sizes, or other model parameters.
For a deeper understanding of model evaluation and fine-tuning techniques, check out our model evaluation insights guide.
Link to this sectionStep 6: Model Testing#
Model testing confirms your model performs well on completely unseen data, verifying its readiness for deployment. The difference between model testing and model evaluation is that testing focuses on verifying the final model's performance rather than iteratively improving it.
It's important to thoroughly test and debug any common issues that may arise. Test your model on a separate test dataset that was not used during training or validation. This dataset should represent real-world scenarios to ensure the model's performance is consistent and reliable.
Also, address common problems such as overfitting, underfitting, and data leakage. Use techniques like cross-validation and anomaly detection to identify and fix these issues. For comprehensive testing strategies, refer to our model testing guide.
Link to this sectionStep 7: Model Deployment#
Once your model has been thoroughly tested, it's time to deploy it. Model deployment involves making your model available for use in a production environment. Here are the steps to deploy a computer vision model:
- Setting Up the Environment: Configure the necessary infrastructure for your chosen deployment option, whether it's cloud-based (AWS, Google Cloud, Azure) or edge-based (local devices, IoT).
- Exporting the Model: Export your model to the appropriate format (e.g., ONNX, TensorRT, CoreML for YOLO26) to ensure compatibility with your deployment platform.
- Deploying the Model: Deploy the model by setting up APIs or endpoints and integrating it with your application.
- Ensuring Scalability: Implement load balancers, auto-scaling groups, and monitoring tools to manage resources and handle increasing data and user requests.
For more detailed guidance on deployment strategies and best practices, check out our model deployment practices guide. Ultralytics Platform also provides managed deployment endpoints with auto-scaling across 42 global regions, handling infrastructure setup automatically.
Link to this sectionStep 8: Monitoring, Maintenance, and Documentation#
Once your model is deployed, it's important to continuously monitor its performance, maintain it to handle any issues, and document the entire process for future reference and improvements.
Monitoring tools can help you track key performance indicators (KPIs) and detect anomalies or drops in accuracy. By monitoring the model, you can be aware of model drift, where the model's performance declines over time due to changes in the input data. Periodically retrain the model with updated data to maintain accuracy and relevance.
In addition to monitoring and maintenance, documentation is also key. Thoroughly document the entire process, including model architecture, training procedures, hyperparameters, data preprocessing steps, and any changes made during deployment and maintenance. Good documentation ensures reproducibility and makes future updates or troubleshooting easier. By effectively monitoring, maintaining, and documenting your model, you can ensure it remains accurate, reliable, and easy to manage over its lifecycle.
Link to this sectionEngaging with the Community#
Connecting with a community of computer vision enthusiasts can help you tackle any issues you face while working on your computer vision project with confidence. Here are some ways to learn, troubleshoot, and network effectively.
Link to this sectionCommunity Resources#
- GitHub Issues: Check out the YOLO26 GitHub repository and use the Issues tab to ask questions, report bugs, and suggest new features. The active community and maintainers are there to help with specific issues.
- Ultralytics Discord Server: Join the Ultralytics Discord server to interact with other users and developers, get support, and share insights.
Link to this sectionOfficial Documentation#
- Ultralytics YOLO26 Documentation: Explore the official YOLO26 documentation for detailed guides with helpful tips on different computer vision tasks and projects.
Using these resources will help you overcome challenges and stay updated with the latest trends and best practices in the computer vision community.
Link to this sectionNext Steps#
You now have a roadmap for every stage of a computer vision project, from defining goals to monitoring a deployed model. Put it into practice by training your first YOLO model, or dive deeper into any single stage through the guides linked above. To run the full pipeline without writing code, explore the Ultralytics Platform.
Link to this sectionFAQ#
Link to this sectionHow do I choose the right computer vision task for my project?#
Choosing the right computer vision task depends on your project's end goal. For instance, if you want to monitor traffic, object detection is suitable as it can locate and identify multiple vehicle types in real-time. For medical imaging, image segmentation is ideal for providing detailed boundaries of tumors, aiding in diagnosis and treatment planning. Learn more about specific tasks like object detection, instance segmentation, semantic segmentation, and image classification.
Link to this sectionWhy is data annotation crucial in computer vision projects?#
Data annotation is vital for teaching your model to recognize patterns. The type of annotation varies with the task:
- Image Classification: Entire image labeled as a single class.
- Object Detection: Bounding boxes drawn around objects.
- Image Segmentation: Each pixel labeled according to the object it belongs to.
The built-in annotation editor in Ultralytics Platform can assist in this process. For more details, refer to our data collection and annotation guide.
Link to this sectionWhat steps should I follow to augment and split my dataset effectively?#
Splitting your dataset before augmentation helps validate model performance on original, unaltered data. Follow these steps:
- Training Set: 70-80% of your data.
- Validation Set: 10-15% for hyperparameter tuning.
- Test Set: Remaining 10-15% for final evaluation.
After splitting, apply data augmentation techniques like rotation, scaling, and flipping to increase dataset diversity. Libraries such as Albumentations and OpenCV can help. Ultralytics also offers built-in augmentation settings for convenience.
Link to this sectionHow can I export my trained computer vision model for deployment?#
Export your trained model with the export method, choosing a format that matches your deployment target. Ultralytics supports multiple formats, including ONNX, TensorRT, and CoreML. To export your YOLO26 model, follow these steps:
- Use the
exportmethod with the desired format parameter. - Ensure the exported model fits the specifications of your deployment environment (e.g., edge devices, cloud).
For more information, check out the model export guide.
Link to this sectionWhat are the best practices for monitoring and maintaining a deployed computer vision model?#
Continuous monitoring and maintenance are essential for a model's long-term success. Implement tools for tracking Key Performance Indicators (KPIs) and detecting anomalies. Regularly retrain the model with updated data to counteract model drift. Document the entire process, including model architecture, hyperparameters, and changes, to ensure reproducibility and ease of future updates. Learn more in our monitoring and maintenance guide.