Guia de início rápido do Docker para a Ultralytics
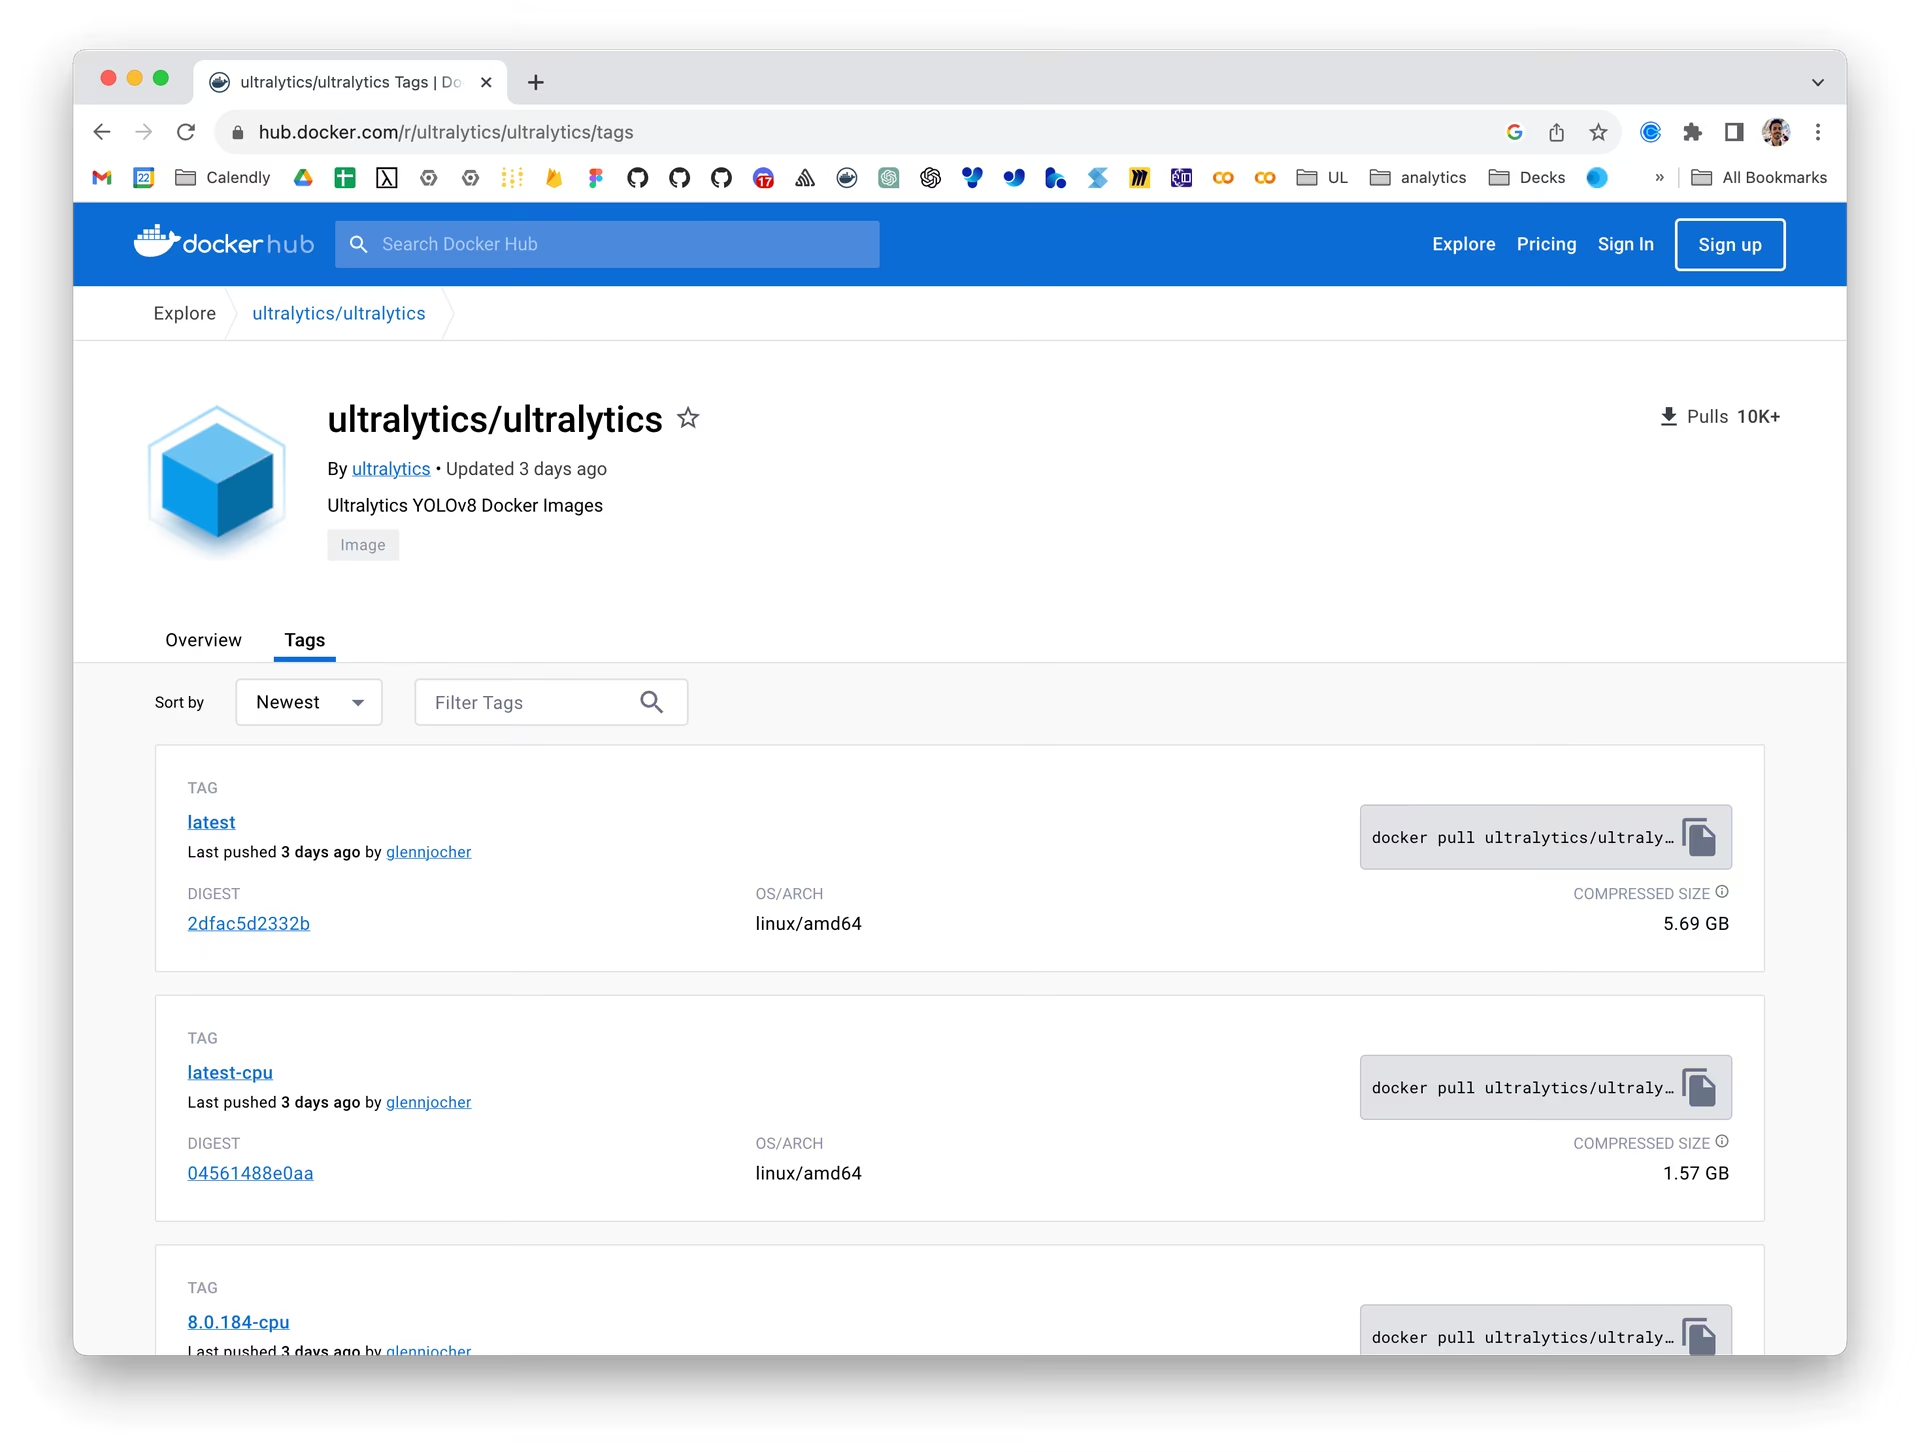
Este guia mostra como configurar um ambiente Docker para seus projetos Ultralytics. Docker é uma plataforma para desenvolver, distribuir e executar aplicativos em contêineres, garantindo que o software funcione da mesma forma independentemente de onde for implantado.


O que vais aprender#
- Configurar o Docker com suporte para NVIDIA
- Instalar imagens Docker da Ultralytics
- Executar a Ultralytics num contentor Docker com suporte para CPU ou GPU
- Usar um servidor de ecrã com o Docker para apresentar os resultados de deteção da Ultralytics
- Montar diretórios locais no contentor
Assista: Como começar a usar Docker | Demonstração ao vivo do uso do pacote Ultralytics Python dentro do Docker 🎉
Pré-requisitos#
- Certifica-te de que o Docker está instalado no teu sistema. Caso contrário, podes transferi-lo e instalá-lo a partir do site do Docker.
- Para obter aceleração por GPU, certifica-te de que o teu sistema tem uma GPU NVIDIA e os controladores NVIDIA instalados. As imagens para CPU não precisam de hardware NVIDIA.
- Se estiveres a usar dispositivos NVIDIA Jetson, certifica-te de que tens instalada a versão adequada do JetPack. Consulta o guia da NVIDIA Jetson para mais detalhes.
Configurar o Docker com suporte para NVIDIA (opcional)#
Primeiro, verifica se os controladores NVIDIA estão instalados corretamente, executando:
nvidia-smiInstalar o NVIDIA Container Toolkit#
Instala o NVIDIA Container Toolkit para ativar o suporte a GPU nos contentores Docker:
curl -fsSL https://nvidia.github.io/libnvidia-container/gpgkey | sudo gpg --dearmor -o /usr/share/keyrings/nvidia-container-toolkit-keyring.gpg \
  && curl -s -L https://nvidia.github.io/libnvidia-container/stable/deb/nvidia-container-toolkit.list \
  | sed 's#deb https://#deb [signed-by=/usr/share/keyrings/nvidia-container-toolkit-keyring.gpg] https://#g' \
    | sudo tee /etc/apt/sources.list.d/nvidia-container-toolkit.list
Atualiza as listas de pacotes e instala o NVIDIA Container Toolkit:
sudo apt-get updatesudo apt-get install -y nvidia-container-toolkitVerificar dispositivos CDI com o Docker#
Executa nvidia-ctk cdi list para garantir que os dispositivos CDI da GPU estão disponíveis (o serviço nvidia-cdi-refresh do toolkit gera e mantém a especificação automaticamente no toolkit >= 1.18):
nvidia-ctk cdi listDeves ver entradas como nvidia.com/gpu=0 e nvidia.com/gpu=all. Os dispositivos CDI detetados também aparecem em docker info.
Instalar imagens Docker da Ultralytics#
A Ultralytics publica as seguintes imagens no Docker Hub. Cada imagem é compilada a partir do Dockerfile associado pelo fluxo de publicação do Docker.
| Etiqueta | Plataforma e finalidade | Fonte |
|---|---|---|
latest | Linux AMD64 com CUDA para treino e inferência em GPU | Dockerfile |
latest-export | Linux AMD64 com CUDA e dependências de exportação para conversão e avaliação de desempenho | Dockerfile-export |
latest-amd | Linux AMD64 com ROCm e MIGraphX para treino e inferência em GPU AMD | Dockerfile-amd |
latest-python | Imagem Linux AMD64 leve com Python 3.14 para inferência na CPU | Dockerfile-python |
latest-python-export | Imagem Linux AMD64 com Python 3.13 para CPU e dependências de exportação | Dockerfile-python-export |
latest-cpu | Imagem Linux AMD64 para CPU com Bash como comando predefinido | Dockerfile-cpu |
latest-jupyter | Imagem Linux AMD64 para CPU com JupyterLab e blocos de notas de tutoriais da Ultralytics | Dockerfile-jupyter |
latest-arm64 | Imagem Linux ARM64 com Python 3.13 para CPU, Apple silicon, Raspberry Pi e outros sistemas ARM64 | Dockerfile-arm64 |
latest-nvidia-arm64 | Linux ARM64 para DGX Spark (DGX OS) e PyTorch no Thor (JetPack 7.1); o TensorRT incluído não é compatível com o JetPack | Dockerfile-nvidia-arm64 |
latest-jetson-jetpack6 | Linux ARM64 para dispositivos NVIDIA Jetson com JetPack 6 | Dockerfile-jetson-jetpack6 |
latest-jetson-jetpack5 | Linux ARM64 para dispositivos NVIDIA Jetson com JetPack 5 | Dockerfile-jetson-jetpack5 |
latest-jetson-jetpack4 | Linux ARM64 para dispositivos NVIDIA Jetson com JetPack 4 | Dockerfile-jetson-jetpack4 |
latest-runner | Imagem Linux AMD64 com CUDA para um executor de GPU autoalojado do GitHub Actions | Dockerfile-runner |
latest-runner-cpu | Imagem Linux AMD64 para um executor de CPU autoalojado do GitHub Actions | Dockerfile-runner-cpu |
As imagens de GPU AMD64 (latest, latest-export e latest-runner) usam PyTorch 2.15 e CUDA 13.2. Verifique o suporte a CUDA do driver do host com nvidia-smi antes de iniciá-las; instalar um contêiner mais recente não atualiza o driver do host. O CUDA 13 remove o suporte para GPUs Maxwell, Pascal e Volta, incluindo Tesla P100 e V100.
A imagem NVIDIA ARM64 usa NVIDIA PyTorch 26.10 com CUDA 13.4 e TensorRT 11.4. O suporte do PyTorch para Thor não se estende ao TensorRT: a NVIDIA não oferece suporte ao TensorRT 11.4 no JetPack. Para exportações TensorRT no Jetson, usa o runtime TensorRT 10.x compatível com a tua versão do JetPack. Segue os requisitos da plataforma no guia do Jetson ou no guia do DGX Spark. As imagens do JetPack 4, 5 e 6 mantêm pilhas separadas e específicas para cada dispositivo.
O Dockerfile do Conda está disponível para compilações locais; a publicação automatizada de latest-conda está desativada, pelo que essa etiqueta do registo não inclui estas atualizações.
As imagens Python, CPU, Jupyter e executor de CPU usam Python 3.14. A imagem Python para exportação usa a base latest-python-3.13, criada a partir da mesma Dockerfile-python com --build-arg PYTHON_VERSION=3.13, porque TensorFlow, CoreML e PaddlePaddle ainda não oferecem suporte ao Python 3.14.
As etiquetas que começam por latest acompanham a compilação mais recente publicada a partir do ramo principal. Nas etiquetas com versões, o prefixo latest é substituído por uma versão da Ultralytics, como VERSION, VERSION-cpu ou VERSION-jetson-jetpack6. Usa uma etiqueta com versão para obter um ambiente reproduzível.
Para transferir a imagem mais recente:
# Pull the latest Ultralytics image from Docker Hub
sudo docker pull ultralytics/ultralytics:latest
Em alternativa, para compilares uma imagem, clona o repositório e indica o Dockerfile correspondente na tabela acima, usando a raiz do repositório como contexto de compilação:
# Build the CPU image locally from docker/Dockerfile-cpu
sudo docker build -t ultralytics/ultralytics:latest-cpu -f docker/Dockerfile-cpu .
Executar a Ultralytics num contentor Docker#
Eis como executar o contentor Docker da Ultralytics:
Usar apenas a CPU#
# Run without GPU
sudo docker run -it --ipc=host ultralytics/ultralytics:latest-cpu
Usar GPU#
# Run with all GPUs
sudo docker run -it --ipc=host --device nvidia.com/gpu=all ultralytics/ultralytics:latest

# Run specifying which GPUs to use
sudo docker run -it --ipc=host --device nvidia.com/gpu=2 --device nvidia.com/gpu=3 ultralytics/ultralytics:latest
A opção -it atribui um pseudo-TTY e mantém o stdin aberto, permitindo-te interagir com o contentor. A opção --ipc=host ativa a partilha do espaço de nomes IPC do anfitrião, essencial para partilhar memória entre processos. Para GPU NVIDIA, a opção --device nvidia.com/gpu=... concede acesso através de CDI. Para GPU AMD, as opções --device concedem acesso ao controlador de kernel da GPU (/dev/kfd) e aos nós de renderização do ecrã (/dev/dri).
Em Linux, os pedidos de dispositivos CDI requerem Docker >= 28.2.0 (CDI ativado por predefinição) e nvidia-container-toolkit >= 1.18 (geração automática da especificação CDI). Atualiza os anfitriões Linux mais antigos antes de executar contentores com GPU. A opção antiga --gpus all pode fazer com que se perca o acesso à GPU (Failed to initialize NVML: Unknown Error) quando o anfitrião recarrega o systemd durante atualizações de rotina de pacotes (nvidia-container-toolkit#48). Os pedidos CDI --device incluem os nós de dispositivo na configuração do contentor, pelo que os contentores de longa duração, como os processos de trabalho de treino ou os executores de CI, mantêm o acesso à GPU durante os recarregamentos.
O suporte para GPU do Docker Desktop no Windows usa atualmente --gpus all com o backend WSL 2, porque os dispositivos CDI da NVIDIA não estão disponíveis nesse ambiente. O Windows não usa o systemd do Linux, por isso a falha de recarregamento do daemon descrita acima não se aplica.
Nota sobre o acesso a ficheiros#
Para trabalhar com ficheiros do teu computador local dentro do contentor, podes usar volumes do Docker:
# Mount a local directory into the container
sudo docker run -it --ipc=host --device nvidia.com/gpu=all -v /path/on/host:/path/in/container ultralytics/ultralytics:latest
Substitui /path/on/host pelo caminho do diretório no teu computador local e /path/in/container pelo caminho pretendido dentro do contentor Docker.
Manter os resultados do treino#
Por predefinição, os resultados do treino são guardados em /ultralytics/runs/<task>/<name>/ dentro do contentor. Se não montares um diretório do anfitrião, os resultados perdem-se quando o contentor é removido.
Para manter os resultados do treino:
# Recommended: mount workspace and specify project path
sudo docker run --rm -it -v "$(pwd)":/w -w /w ultralytics/ultralytics:latest \
  yolo train model=yolo26n.pt data=coco8.yaml project=/w/runs
Isto guarda todos os resultados do treino em ./runs no teu computador anfitrião.
Executar aplicações de interface gráfica do utilizador (GUI) num contentor Docker#
As instruções a seguir são experimentais. Compartilhar um socket X11 com um contêiner Docker apresenta possíveis riscos de segurança. Portanto, recomendamos testar esta solução apenas em um ambiente controlado.
O Docker é usado principalmente para colocar aplicações em segundo plano e programas CLI em contentores, mas também pode executar programas gráficos. No mundo Linux, dois servidores gráficos principais tratam da apresentação gráfica: X11 (também conhecido como X Window System) e Wayland. Antes de começar, é essencial determinar que servidor gráfico estás a usar. Executa este comando para descobrir:
env | grep -E -i 'x11|xorg|wayland'A configuração de um servidor de ecrã X11 ou Wayland está fora do âmbito deste guia. Se o comando acima não devolver nada, terás de começar por configurar um deles para funcionar no teu sistema antes de continuar.
Executar um contentor Docker com uma GUI#
Usar GPUs
Se estiveres a usar GPUs, podes adicionar a flag --device nvidia.com/gpu=all ao comando.
Se estiveres a usar X11, podes executar o seguinte comando para permitir que o contentor Docker aceda ao socket X11:
xhost +local:docker && docker run -e DISPLAY=$DISPLAY \
  -v /tmp/.X11-unix:/tmp/.X11-unix \
  -v ~/.Xauthority:/root/.Xauthority \
  -it --ipc=host ultralytics/ultralytics:latest
Este comando define a variável de ambiente DISPLAY como a tela do host, monta o socket X11 e mapeia o arquivo .Xauthority para o contêiner. O comando xhost +local:docker permite que o contêiner Docker acesse o servidor X11.
Usar o Docker com uma GUI#
As imagens da Ultralytics incluem OpenCV sem interface gráfica, por isso, primeiro instala a versão do OpenCV com interface gráfica e as bibliotecas do sistema no contentor:
apt-get update && apt-get install -y --no-install-recommends libgl1 libglib2.0-0 libsm6
pip uninstall -y opencv-python-headless && pip install opencv-python
Agora podes apresentar aplicações gráficas dentro do teu contentor Docker. Por exemplo, podes executar o seguinte comando CLI para visualizar as previsões de um modelo YOLO26:
yolo predict model=yolo26n.pt show=TrueTestes
Uma forma simples de validar se o grupo Docker tem acesso ao servidor X11 é executar um contentor com um programa de GUI, como xclock ou xeyes. Em alternativa, também podes instalar estes programas no contentor Docker da Ultralytics para testar o acesso ao servidor X11 do teu servidor de visualização GNU/Linux. Se tiveres algum problema, considera definir a variável de ambiente -e QT_DEBUG_PLUGINS=1. Definir esta variável de ambiente ativa a saída de informações de depuração, ajudando a resolver problemas.
Quando terminares de usar a GUI do Docker#
Em ambos os casos, não te esqueças de revogar o acesso do grupo Docker quando terminares.
xhost -local:dockerQueres ver os resultados das imagens diretamente no Terminal?
No Linux e no macOS, podes apresentar os resultados de imagem no terminal integrado do VSCode usando o protocolo sixel.
Agora você está pronto para usar o Ultralytics com Docker. Para hospedar por conta própria o aplicativo web Ultralytics, consulte o guia Plataforma On-Premise.
Perguntas frequentes#
Para configurar Ultralytics com Docker, primeiro confirma que Docker está instalado no teu sistema. Se tiveres uma GPU NVIDIA, instala o NVIDIA Container Toolkit para ativar o suporte a GPU. Em seguida, obtém a imagem Docker mais recente da Ultralytics do Docker Hub com o seguinte comando:
sudo docker pull ultralytics/ultralytics:latestO uso das imagens Docker do Ultralytics garante um ambiente consistente em diferentes máquinas, replicando o mesmo software e as mesmas dependências. Isso é especialmente útil para colaborar entre equipes, executar modelos em diversos hardwares e manter implantações de modelos reproduzíveis. Use
latestpara treinamento geral em GPUs NVIDIA ou selecione a imagem compatível com sua versão do JetPack para um dispositivo NVIDIA Jetson.Primeiro, confirma que o NVIDIA Container Toolkit está instalado e configurado. Em seguida, usa o seguinte comando para executar a Ultralytics YOLO com suporte para GPU:
sudo docker run -it --ipc=host --device nvidia.com/gpu=all ultralytics/ultralytics:latest # all GPUsEste comando configura um contentor Docker com acesso à GPU, que podes limitar a GPUs específicas ou mudar para AMD ROCm.
Para visualizar os resultados das previsões YOLO com uma GUI num contentor Docker, tens de permitir que o Docker aceda ao teu servidor de ecrã. Nos sistemas que executam X11, o comando é:
xhost +local:docker && docker run -e DISPLAY=$DISPLAY \
  -v /tmp/.X11-unix:/tmp/.X11-unix \
  -v ~/.Xauthority:/root/.Xauthority \
  -it --ipc=host ultralytics/ultralytics:latest
Nos sistemas que executam Wayland, usa:
xhost +local:docker && docker run -e DISPLAY=$DISPLAY \
  -v $XDG_RUNTIME_DIR/$WAYLAND_DISPLAY:/tmp/$WAYLAND_DISPLAY \
  --net=host -it --ipc=host ultralytics/ultralytics:latest
No contentor, instala a versão do OpenCV com interface gráfica antes de usar
show=True, conforme descrito na secção Executar aplicações de interface gráfica (GUI) num contentor Docker.Sim, podes montar diretórios locais no contentor Docker da Ultralytics usando a flag
-v:sudo docker run -it --ipc=host --device nvidia.com/gpu=all -v /path/on/host:/path/in/container ultralytics/ultralytics:latestSubstitui
/path/on/hostpelo diretório da tua máquina local e/path/in/containerpelo caminho pretendido dentro do contentor. Esta configuração permite-te trabalhar com os teus ficheiros locais dentro do contentor. Para mais informações, consulta a secção Nota sobre a acessibilidade dos ficheiros.


Comentários14
Faz uma pergunta, partilha os teus resultados ou ajuda alguém.
 Letícia Rama
Hello,
Is this workflow suitable for other YOLO families, such as YOLO26?
 Glenn JocherUltralytics
Yes, the same workflow supports YOLO26 and other model families available in the
ultralyticspackage—use an up-to-date official image and specify the appropriate weights, such asmodel=yolo26n.pt. See the Docker Quickstart Guide for current image options, and feel free to drop any follow-up questions here so the Ultralytics team can help.1- Letícia Rama
Right Glenn, thanks
lauravchrobak
It looks like the, "Running Ultralytics in Docker Container" section is duplicated here
HellaPinot
Hello! I have been testing running yolov8 inside a container, things seem to work well however after a somewhat random amount of time the inference hangs with no error output.
I know the container hasn't crashed as I am reading events from a processing queue and I can see new partitions are being allocated on another thread.
I'm running two models one after the other (different sizes and detection classes), so I'm wondering if this could be the root of the issue? At no point would they be running at the same time.
I believe it is happening exactly when I call predict. Its hard to debug as again it happens very randomly and there is not output from the container, it seems like there might be an infinite loop somewhere thats stopping it from continuing.
Curious if anything like this has been encountered before?
- Glenn JocherUltralytics
Hello! 👋
It sounds like a tricky issue, especially since it occurs randomly. Here are a few suggestions that might help you isolate or resolve the problem:
-
Logging and Monitoring: Enhance the logging within your container. Consider logging the input sizes and other relevant data before the prediction call, and make sure you're logging any exceptions that could be silently caught.
-
Resource Checks: Ensure that there are no resource starvation issues, such as GPU memory not being freed up properly. Tools like
nvidia-smican help monitor GPU usage. -
Sequential Model Loading: Although the models are run sequentially and not in parallel, it could be beneficial to explicitly clear the memory after each model's predictions are done. This can be done by deleting model objects and calling
torch.cuda.empty_cache()if you are using PyTorch. -
Hardware Testing: Run your container pointing the inference to CPU only for a time to see if the problem persists. This could help determine if the issue is related to GPU computation or not.
-
Reproducibility Tactic: Since the issue is sporadic, try to determine if there’s a specific type of input or specific conditions under which this occurs more frequently.
If these suggestions don't help, please provide more details or code snippets, and I’d be happy to dive deeper into this!
Let me know how it goes!
-
HWKevinhwk
I want to install ultralytics using docker on top of NVIDIA TX2, is there a detailed procedure? The reason for this question is that after entering the command nvidia-smi in the TX2 terminal, the output is command not found, and I'm worried that the steps in the document above are not applicable to TX2.
 Paula DerrengerUltralytics(editado)
@HWKevinhwk hey there! 🚀 Setting up Ultralytics on NVIDIA TX2 with Docker can be a bit tricky if
nvidia-smiis missing, but no worries.For NVIDIA Jetson platforms like TX2,
nvidia-smiis typically not available, and you'll usetegrastatsinstead to monitor the GPU. The Jetson TX2 is supported on JetPack 4, so install JetPack 4 first, as it includes the NVIDIA drivers and libraries needed for GPU acceleration. Jetson devices use the Docker integration provided through JetPack with--runtime=nvidiarather than--gpus all. Then pull and run the Ultralytics Docker image for JetPack 4:t=ultralytics/ultralytics:latest-jetson-jetpack4 sudo docker pull $t && sudo docker run -it --ipc=host --runtime=nvidia $tSee the NVIDIA Jetson guide for details. If you encounter any specific issues, feel free to drop them here. Happy detecting! 🎉
Is there a detailed tutorial on deploying yolov8 on jetson TX2 using docker? I am pulling images docker pull ultralytics/ultralytics:latest-jetson terminal will downloading pause, long time pulling images unsuccessful, repeated attempts still so, any solution please?
- Paula DerrengerUltralytics(editado)
@HWKevinhwk hey there! 😊
It sounds like you're facing issues with the Docker image pull for the Jetson TX2. This might be due to network issues or Docker Hub delays, or to using a tag that does not exist.
Here's a simplified breakdown to get you started on the TX2 using Docker:
-
Ensure JetPack is installed: The TX2 is supported on JetPack 4, which includes the GPU drivers necessary for Docker integration with the Jetson GPU.
-
Install Docker:
sudo apt-get install docker.io -
NVIDIA runtime support (JetPack should handle this):
nvidia-smidoesn't work on Jetson, so verify thenvidiaruntime withdocker info | grep -i runtime. -
Pull the Docker image for Jetson. Pulling large Docker images can be challenging on slower networks:
sudo docker pull ultralytics/ultralytics:latest-jetson-jetpack4If you keep facing issues while pulling the image, try restarting your Docker service or check your network settings. Sometimes, using a different network can help too!
-
Run the Image:
sudo docker run -it --ipc=host --runtime=nvidia ultralytics/ultralytics:latest-jetson-jetpack4
This should set you on the right path to running Ultralytics YOLO on your Jetson TX2. If the problem persists, it might be worth checking Docker's log or discussing this issue further with your network admin or on Docker forums! 😄
Happy coding! 🚀
-
Peter-coding
Hey! I trained a YOLOv8 model on my local computer. I have the best.pt file, and I can use it in CLI (conda) for predict. I want to make a python app, which uses this best.pt file, and I want to containerize it. Is it possible to write the full python app (it is just a few lines of code, which runs the detection, then writes the detection result to a database), then containerize it, and able to use it anywhere? Thank you! :D
- Paula DerrengerUltralytics
Hey there! 😊
Absolutely, you can absolutely containerize your Python app that uses the
best.ptmodel! Here's a quick guide:-
Create Your Python App: Just like you mentioned, write your Python code that performs the detection and interacts with the database.
-
Dockerize Your Application:
-
Dockerfile: Create a Dockerfile in your project directory. Here's a simple example that uses Ultralytics' Docker image as a base:
FROM ultralytics/ultralytics:latest WORKDIR /app COPY . /app RUN pip install -r requirements.txt # Assuming you have a requirements.txt CMD ["python", "your_script.py"] -
Build Your Docker Image: Run the following command in your project directory:
sudo docker build -t your-app-name . -
Run Your Container: To run your container, especially if you're planning to use GPU, you might want to specify
--gpus all:sudo docker run -it --ipc=host --gpus all your-app-nameFor accessing local files, consider mounting a volume as described in the Docker Quickstart Guide.
-
-
Deployment: With your Docker image built, you can now deploy and run it anywhere that Docker is supported. If using a GPU, ensure the host machine supports NVIDIA GPUs and has the necessary drivers and Docker configured correctly.
That's it! You should be able to use your model within a containerized app now. If you hit any snags, double-check the Docker Quickstart Guide for Ultralytics for more details. Happy coding! 😄
-
udayzee05
DEPRECATION NOTICE The nvidia-docker wrapper is no longer supported, and the NVIDIA Container Toolkit has been extended to allow users to configure Docker to use the NVIDIA Container Runtime. For further instructions, see the NVIDIA Container Toolkit documentation and specifically the install guide.22 Jan 2024
- Paula DerrengerUltralytics(editado)
Hey there! 👋 Thanks for bringing up the deprecation notice regarding the nvidia-docker wrapper. You're right; use the NVIDIA Container Toolkit for GPU support in Docker containers. Here's how to set it up on Ubuntu/Debian, as described in our Docker Quickstart Guide:
# Add the NVIDIA Container Toolkit repository
curl -fsSL https://nvidia.github.io/libnvidia-container/gpgkey | sudo gpg --dearmor -o /usr/share/keyrings/nvidia-container-toolkit-keyring.gpg \
  && curl -s -L https://nvidia.github.io/libnvidia-container/stable/deb/nvidia-container-toolkit.list \
  | sed 's#deb https://#deb [signed-by=/usr/share/keyrings/nvidia-container-toolkit-keyring.gpg] https://#g' \
    | sudo tee /etc/apt/sources.list.d/nvidia-container-toolkit.list

# Install the NVIDIA Container Toolkit
sudo apt-get update
sudo apt-get install -y nvidia-container-toolkit
And to verify that the GPU devices are available to Docker:
nvidia-ctk cdi listThis should list entries such as
nvidia.com/gpu=all, indicating that your Docker setup can leverage GPU acceleration. 🚀For more detailed instructions and tips on using Ultralytics with Docker, including mounting local directories and running containers, check out our Docker Quickstart Guide. Happy coding!