YOLOv9: um grande avanço na tecnologia de deteção de objetos
O YOLOv9 fez avançar a deteção de objetos em tempo real ao introduzir a informação de gradiente programável (PGI) e a rede generalizada de agregação eficiente de camadas (GELAN). Na altura do lançamento, melhorou a eficiência e a precisão em relação aos detetores anteriores em tempo real no conjunto de dados MS COCO. O projeto YOLOv9 foi desenvolvido por uma equipa independente de código aberto e baseia-se na base de código Ultralytics YOLOv5.
Assista: Treinamento de YOLOv9 com dados personalizados usando Ultralytics | Conjunto de dados de embalagens industriais
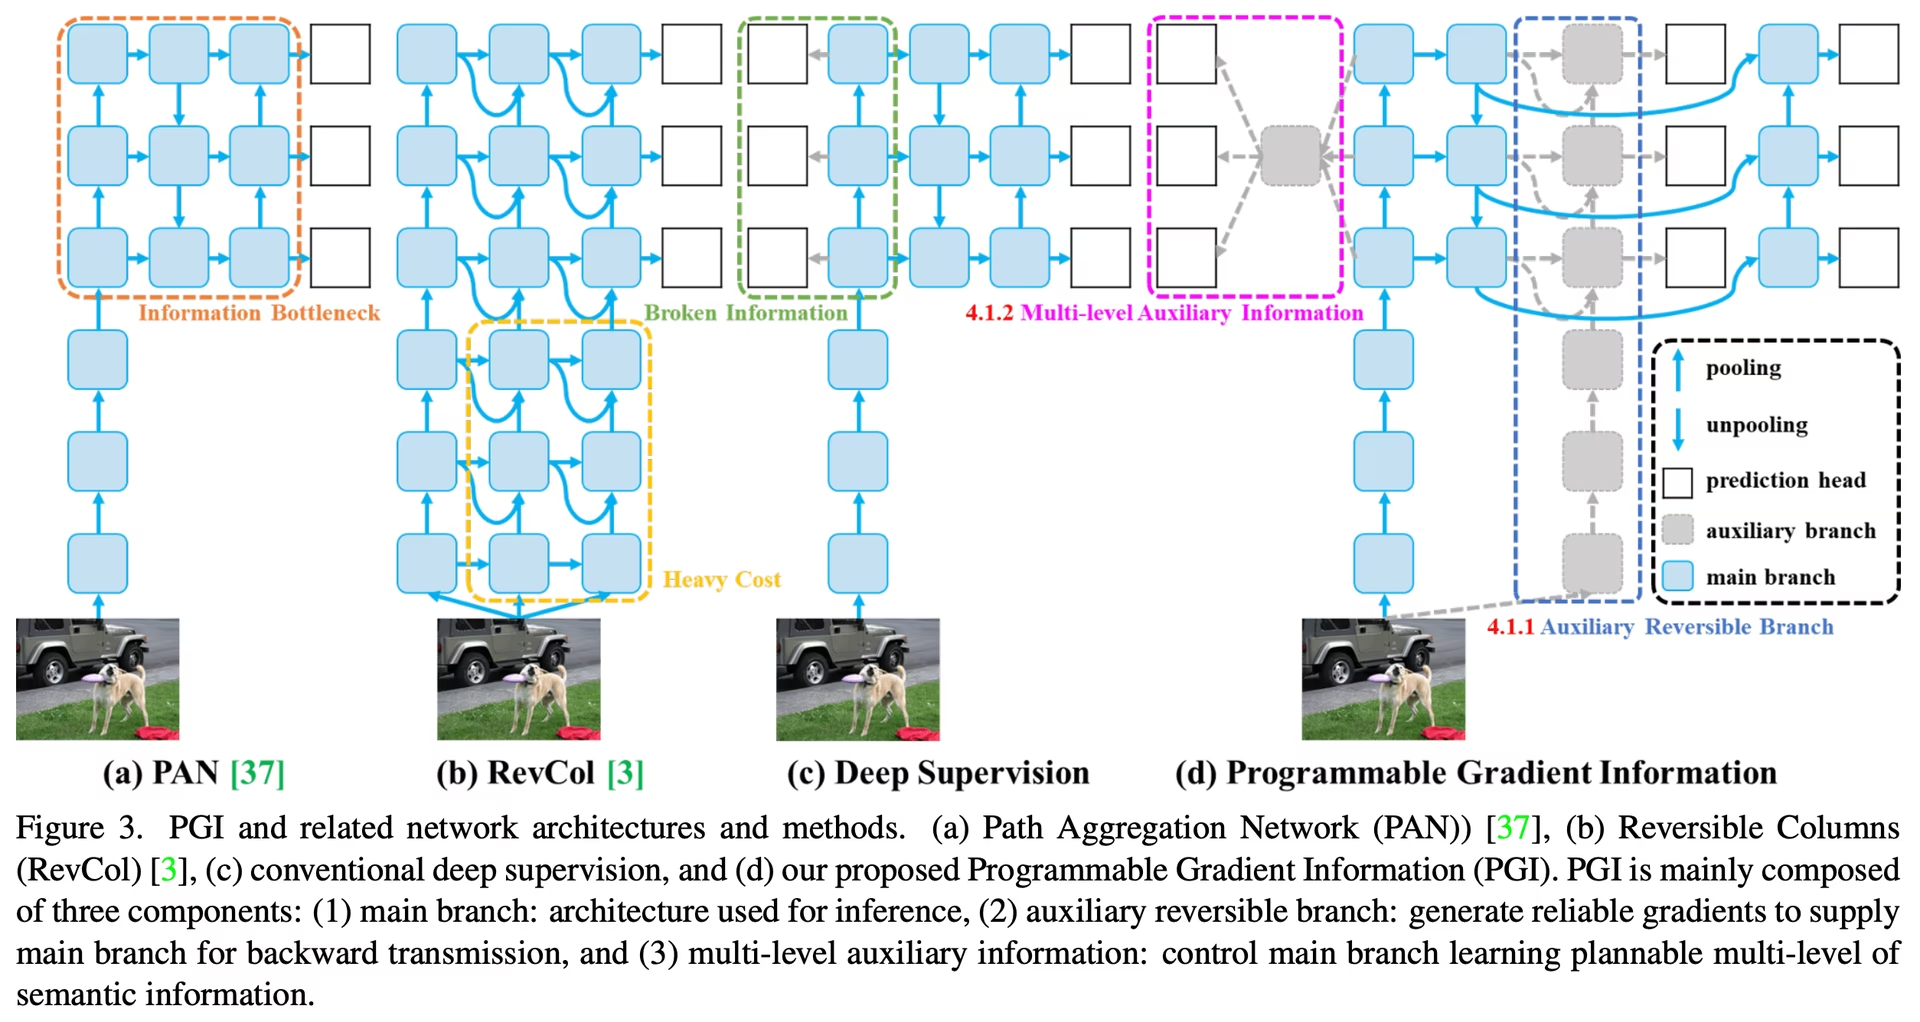
Introdução ao YOLOv9#
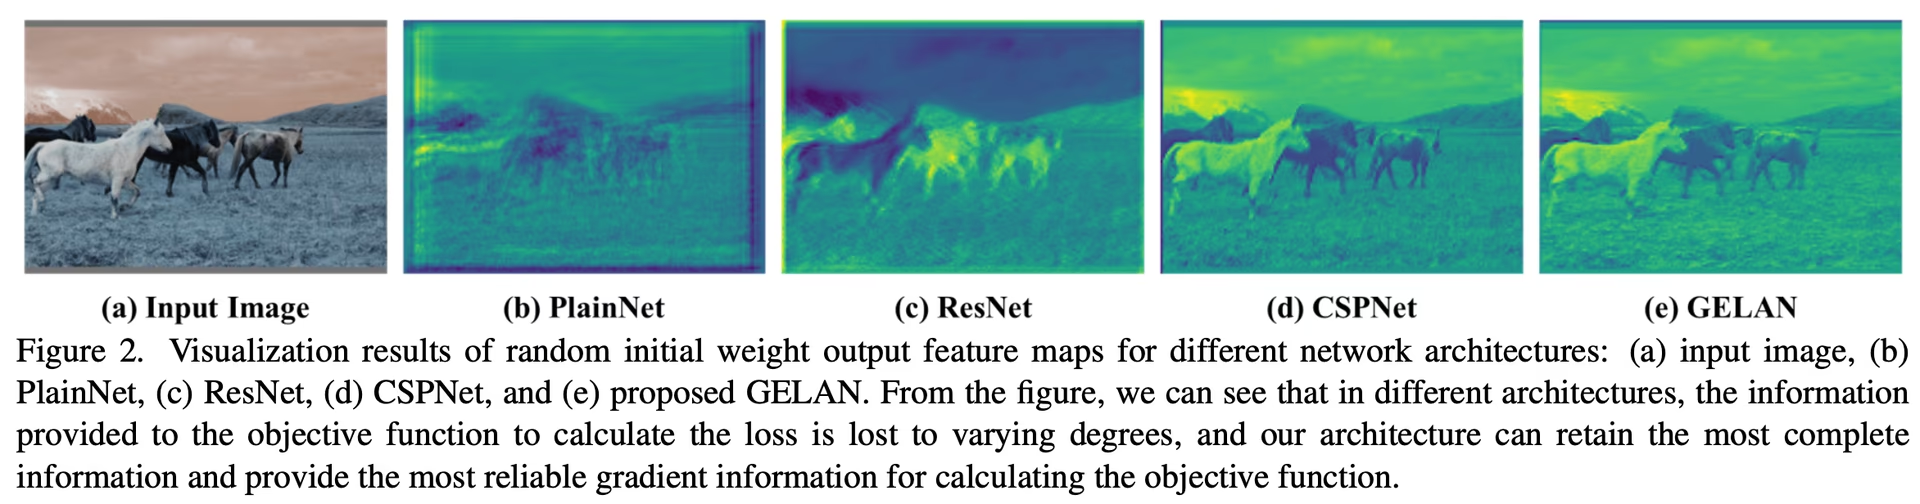
O YOLOv9 resolve a perda de informação inerente às redes neuronais profundas. Ao integrar PGI e a arquitetura GELAN, o YOLOv9 aumenta a capacidade de aprendizagem do modelo e retém informações essenciais ao longo do processo de deteção, melhorando tanto a precisão como a eficiência.
Principais inovações do YOLOv9#
A conceção do YOLOv9 visa resolver a perda de informação nas redes neuronais profundas. O princípio do gargalo de informação e a utilização de funções reversíveis são elementos centrais da sua conceção, ajudando o YOLOv9 a manter elevada eficiência e precisão.
Princípio do gargalo de informação#
O princípio do gargalo de informação revela um desafio fundamental na aprendizagem profunda: à medida que os dados passam por camadas sucessivas de uma rede, aumenta o potencial de perda de informação. Este fenómeno é representado matematicamente da seguinte forma:
I(X, X) >= I(X, f_theta(X)) >= I(X, g_phi(f_theta(X)))onde I denota a informação mútua, e f e g representam funções de transformação com os parâmetros theta e phi, respetivamente. O YOLOv9 enfrenta este desafio implementando Informação de Gradiente Programável (PGI), que ajuda a preservar dados essenciais ao longo da profundidade da rede, garantindo uma geração de gradientes mais fiável e, consequentemente, uma melhor convergência e um melhor desempenho do modelo.
Funções reversíveis#
O conceito de funções reversíveis é outro pilar da conceção do YOLOv9. Uma função é considerada reversível se puder ser invertida sem perda de informação, conforme expresso por:
X = v_zeta(r_psi(X))com psi e zeta como parâmetros da função reversível e da sua inversa, respetivamente. Esta propriedade é crucial para as arquiteturas de deep learning, pois permite à rede manter um fluxo de informação completo e, assim, atualizar os parâmetros do modelo com maior precisão. O YOLOv9 incorpora funções reversíveis na sua arquitetura para reduzir o risco de degradação da informação, especialmente nas camadas mais profundas, garantindo a preservação de dados essenciais para tarefas de deteção de objetos.
Impacto nos modelos leves#
A resolução da perda de informação é particularmente importante para modelos leves, que muitas vezes têm poucos parâmetros e são propensos a perder informação significativa durante o processo de propagação direta. A arquitetura do YOLOv9, através da utilização de PGI e de funções reversíveis, garante que, mesmo com um modelo simplificado, a informação essencial para uma deteção precisa de objetos seja retida e utilizada eficazmente.
Informação de Gradiente Programável (PGI)#
A PGI é um conceito inovador introduzido no YOLOv9 para combater o problema do gargalo de informação, garantindo a preservação de dados essenciais ao longo das camadas profundas da rede. Isto permite gerar gradientes fiáveis, facilitando atualizações precisas do modelo e melhorando o desempenho geral da deteção.
Rede de Agregação de Camadas Eficiente Generalizada (GELAN)#
GELAN é uma arquitetura que melhora a utilização de parâmetros e a eficiência computacional do YOLOv9. A sua conceção permite integrar vários blocos computacionais com flexibilidade, tornando o YOLOv9 adaptável a uma ampla variedade de aplicações sem sacrificar velocidade ou precisão.
Resultados de referência do YOLOv9#
A avaliação comparativa do YOLOv9 com o modo Benchmark da Ultralytics consiste em avaliar o desempenho do modelo treinado e validado em situações reais. Este processo inclui:
- Avaliação do desempenho: avaliação da velocidade e da precisão do modelo.
- Formatos de exportação: testar o modelo em diferentes formatos de exportação para garantir que cumpre os padrões necessários e tem um bom desempenho em vários ambientes.
- Suporte a frameworks: execução destas avaliações no pacote Ultralytics para obter resultados consistentes e fiáveis.
Ao avaliar o desempenho, podes garantir que o teu modelo não só tem um bom desempenho em ambientes de teste controlados, como também mantém um alto desempenho em aplicações práticas do mundo real.
Assista: Como fazer benchmark do modelo YOLOv9 usando o pacote Ultralytics Python
Desempenho no conjunto de dados MS COCO#
Na altura do lançamento, o YOLOv9 estabeleceu novos benchmarks no conjunto de dados COCO em vários tamanhos de modelo. A tabela abaixo apresenta a precisão, os parâmetros e os FLOPs de cada modelo YOLOv9 disponível na Ultralytics.
As variantes do YOLOv9, desde o modelo pequeno t até ao modelo grande e, melhoram a precisão (mAP) mantendo ou reduzindo os parâmetros e o cálculo (FLOPs) em comparação com versões anteriores e modelos concorrentes.
Em comparação com outros detetores em tempo real, o YOLOv9 apresenta os seguintes ganhos:
- Modelos leves: o YOLOv9s supera o YOLO MS-S em eficiência de parâmetros e carga computacional, alcançando simultaneamente uma melhoria de 0.4∼0.6% em AP.
- Modelos médios a grandes: YOLOv9m e YOLOv9e melhoram o equilíbrio entre a complexidade do modelo e o desempenho de deteção, reduzindo parâmetros e cálculos e aumentando a precisão.
O modelo YOLOv9c utiliza menos 42% de parâmetros e exige menos 21% de computação do que o YOLOv7 AF, alcançando uma precisão comparável. O modelo YOLOv9e utiliza menos 15% de parâmetros e exige menos 25% de computação do que o YOLOv8x, com uma melhoria de 1,7% em AP.
Estes resultados mostram que o YOLOv9 melhorou a eficiência computacional sem comprometer a precisão necessária para a deteção de objetos em tempo real e outras tarefas de visão por computador.
Conclusão#
Lançado em fevereiro de 2024, o YOLOv9 melhorou a eficiência e a precisão da deteção de objetos em tempo real. Ao resolver a perda de informação com PGI e GELAN, o YOLOv9 estabeleceu novos benchmarks na altura do seu lançamento. Desde então, modelos mais recentes, como YOLO26 e YOLO11, introduziram mais melhorias, mas as inovações arquitetónicas do YOLOv9 continuam a influenciar a área.
Exemplos de uso#
Este exemplo apresenta exemplos simples de treino e inferência com YOLOv9.
Os modelos *.pt pré-treinados em PyTorch, assim como os ficheiros de configuração *.yaml, podem ser passados à classe YOLO() para criar uma instância do modelo em Python:
from ultralytics import YOLO

# Cria um modelo YOLOv9c de raiz
model = YOLO("yolov9c.yaml")

# Cria um modelo YOLOv9c com pesos pré-treinados
model = YOLO("yolov9c.pt")

# Exibir informações do modelo (opcional)
model.info()

# Treina o modelo no conjunto de dados de exemplo COCO8 durante 100 épocas
results = model.train(data="coco8.yaml", epochs=100, imgsz=640)

# Executa a inferência com o modelo YOLOv9c na imagem 'bus.jpg'
results = model("path/to/bus.jpg")
Tarefas e modos compatíveis#
A série YOLOv9 oferece vários modelos para deteção de objetos e segmentação de instâncias, abrangendo diferentes orçamentos computacionais e requisitos de precisão.
| Modelo | Nomes de arquivo | Tarefas | Treinamento | Validação | Inferência | Exportar |
|---|---|---|---|---|---|---|
| YOLOv9 | yolov9t.pt yolov9s.pt yolov9m.pt yolov9c.pt yolov9e.pt | Deteção de objetos | ✅ | ✅ | ✅ | ✅ |
| YOLOv9-seg | yolov9c-seg.pt yolov9e-seg.pt | Segmentação de instâncias | ✅ | ✅ | ✅ | ✅ |
Esta tabela resume as variantes do modelo YOLOv9 e o respetivo suporte aos modos de treino, validação, inferência e exportação.
O treino de modelos YOLOv9 exigirá mais recursos e demorará mais do que o de um modelo YOLOv8 de tamanho equivalente.
Citações e agradecimentos#
Gostaríamos de agradecer aos autores do YOLOv9 pelos seus contributos significativos para a área da deteção de objetos em tempo real:
@inproceedings{wang2024yolov9,
  title={YOLOv9: Learning What You Want to Learn Using Programmable Gradient Information},
  author={Wang, Chien-Yao and Yeh, I-Hau and Liao, Hong-Yuan Mark},
  booktitle={Computer Vision -- ECCV 2024},
  pages={1--21},
  year={2024},
  organization={Springer Nature Switzerland}
}
O artigo oficial do YOLOv9 foi publicado nos anais Springer ECCV 2024, com uma pré-publicação no arXiv. Os autores disponibilizaram publicamente o seu trabalho, e a base de código pode ser consultada no GitHub. Agradecemos os seus esforços para fazer avançar a área e tornar o seu trabalho acessível a toda a comunidade.
Perguntas frequentes#
O YOLOv9 introduz duas técnicas principais: Informação de Gradiente Programável (PGI) e Rede de Agregação de Camadas Eficiente Generalizada (GELAN). Estas inovações abordam os desafios de perda de informação nas redes neuronais profundas, garantindo elevada eficiência, precisão e adaptabilidade. A PGI preserva dados essenciais nas camadas da rede, enquanto a GELAN otimiza a utilização de parâmetros e a eficiência computacional.
No seu lançamento, o YOLOv9 superou outros detetores de objetos em tempo real de última geração em precisão e eficiência. No conjunto de dados COCO, os modelos YOLOv9 alcançam pontuações mAP superiores em vários tamanhos, mantendo ou reduzindo a sobrecarga computacional. Por exemplo, o YOLOv9c alcança uma precisão comparável com 42% menos parâmetros e 21% menos exigência computacional do que o YOLOv7 AF.
Podes treinar um modelo YOLOv9 com comandos Python e CLI. Em Python, instancia um modelo usando a classe
YOLOe chama o métodotrain:from ultralytics import YOLO # Cria um modelo YOLOv9c com pesos pré-treinados e treina-o model = YOLO("yolov9c.pt") results = model.train(data="coco8.yaml", epochs=100, imgsz=640)Para treinar com a CLI, executa:
yolo train model=yolov9c.yaml data=coco8.yaml epochs=100 imgsz=640Sabe mais sobre exemplos de utilização para treino e inferência.
O YOLOv9 foi concebido para atenuar a perda de informação, o que é particularmente importante para modelos leves, que muitas vezes são propensos a perder informação significativa. Ao integrar Informação de Gradiente Programável (PGI) e funções reversíveis, o YOLOv9 garante a retenção de dados essenciais, aumentando a precisão e a eficiência do modelo. Isto torna-o altamente adequado para aplicações que exigem modelos compactos com alto desempenho. Para obteres mais detalhes, explora a secção sobre o impacto do YOLOv9 nos modelos leves.
O YOLOv9 suporta a deteção de objetos e a segmentação de instâncias nos modos de treino, validação, inferência e exportação.


Comentários482
Faz uma pergunta, partilha os teus resultados ou ajuda alguém.
vuvanhieu
to load a YOLOv5 model def load_yolov5_model(yolo_model_path): device = torch.device('cuda' if torch.cuda.is_available() else 'cpu') model = torch.hub.load('ultralytics/yolov5', 'custom', path=yolo_model_path, force_reload=True).to(device) return model
How in yolov8, yolov9?
1 Paula DerrengerUltralytics
To load a YOLOv8 or YOLOv9 model, you can use the
YOLOclass from the Ultralytics package. Here's a concise way to do it:from ultralytics import YOLO # Load a YOLOv8 model model_v8 = YOLO("yolov8n.pt") # Load a YOLOv9 model model_v9 = YOLO("yolov9c.pt")For more details, you can refer to the YOLOv9 documentation: https://docs.ultralytics.com/models/yolov9/.
MoAbbasid
@glenn-jocher @pderrenger any idea of when the lightweight models can be used in ultralytics?
1 Glenn JocherUltralytics(editado)
Hi there! 😊
Lightweight models are available in Ultralytics. YOLOv9 ships
yolov9t.pt,yolov9s.ptandyolov9m.ptalongsideyolov9c.ptandyolov9e.pt. For new projects we recommend YOLO26, whose smallest modelyolo26n.ptis built for efficiency.To try a lightweight model:
yolo train model=yolo26n.pt data=coco128.yaml epochs=100If you're tinkering with custom lightweight designs, copy an existing model YAML from the Ultralytics repo and adjust its layers or scales. Contributions or insights are welcome.
Happy detecting!
deepanalyticszlc
Very exciting! Is there a schedule for release of lightweight models?
1- Paula DerrengerUltralytics(editado)
@deepanalyticszlc hey there! 😊
Lightweight YOLOv9 models are now available:
yolov9t.pt,yolov9s.ptandyolov9m.pt, alongsideyolov9c.ptandyolov9e.pt. For the latest releases, see the Ultralytics GitHub releases.Here's a little snippet on how to load and use YOLOv9 for predictions:
from ultralytics import YOLO

# Load YOLOv9 model
model = YOLO('yolov9t.pt')  # Replace 'yolov9t.pt' with your model file

# Run inference on an image
results = model('path/to/your/image.jpg')

# Display results
results[0].show()
For new projects, we recommend YOLO26, which also comes in small sizes like
yolo26n.pt. ⏰
DolapoSalim(editado)
@glenn-jocher Kindly assist with this TypeError: TypeError: ERROR C:\path_to_custom_model/yolov9c.pt appears to be an Ultralytics YOLOv5 model originally trained with https://github.com/ultralytics/yolov5. This model is NOT forwards compatible with YOLOv8 at https://github.com/ultralytics/ultralytics. Recommend fixes are to train a new model using the latest 'ultralytics' package or to run a command with an official Ultralytics model, i.e. 'yolo predict model=yolo11n.pt'
Here is my code:
from ultralytics import YOLO

model = YOLO(path_to_YOLOV9.pt )

results = model.predict(source="IMAGE_SOURCE", show=True, conf=0.10)
Note, I am actually working with a custom trained YOLOV9
- Glenn JocherUltralytics
@DolapoSalim to resolve the YOLOv5/YOLOv9 compatibility error when using custom-trained models, please ensure you're using the latest
ultralytics>=8.2.0package and retrain your YOLOv9 model using the official YOLOv9 configuration files from our documentation. For custom training guidance, see the YOLOv9 Training section in our docs.This error typically occurs when using older model formats - newer versions maintain full backward compatibility when models are trained with current Ultralytics implementations.
1
gusreic
This article claims that Yolov9 is based on Yolov5. The Yolov9 paper claims that v9 is based on Yolov7 which is also not based on 5. Is there any other way that would explain this claim? Otherwise maybe adjust the article.
- Glenn JocherUltralytics
@gusreic yes that's correct. YOLOv9 repo is a fork of my YOLOv5 repo. I know this because I wrote nearly all the files in the YOLOv9 repo myself. Unfortunately the author has failed to make this clear, though he did include a (hidden) acknowledgement at the bottom of the README.
1 Oh, that is really unfortunate, thank you for clearing it up since it is not directly apparent. Do you think that YOLOv9 is based on YOLOv5 only with respect to the structure of the repository or would you say that the architecture of the model itself is also based on the architecture of YOLOv5?
- Glenn JocherUltralytics
@gusreic thank you for your question! YOLOv9's repository structure is indeed based on Ultralytics YOLOv5, while its architecture introduces novel components like Programmable Gradient Information (PGI) and GELAN as described in the YOLOv9 documentation. The model itself represents an independent advancement building on broader YOLO research. We'll clarify this distinction in our article! 😊
ghost
Hello,
Thanks for the great documentation!
Quick question: Is the code licensed under AGPLv3 (Ultralytics) or GPLv3 (Wang, Chien-Yao and Liao, Hong-Yuan Mark Github)?
Thanks!
- Glenn JocherUltralytics
@ProfessorHT the YOLOv9 project codebase, developed by Wang, Chien-Yao and Liao, Hong-Yuan Mark, is available on GitHub and licensed under GPLv3, while Ultralytics models and software use the AGPL-3.0 license.
Thank you for your quick response. So to be sure if I use Yolov9 from this documentation with the ultralytics library i will be under the AGPLv3 license and i should buy a license?
- Glenn JocherUltralytics
Yes, if you use YOLOv9 models from the Ultralytics library, you are under the AGPL-3.0 license and would need an Enterprise License for commercial use, unless you open-source your entire project under AGPL-3.0.
 liuweiqing
Does it support automatic downloading of pretrained weights?
- Glenn JocherUltralytics
@14790897 yes, YOLOv9 supports automatic downloading of pretrained weights when using the
YOLO()class in Python or CLI commands, as long as the specified weights file (e.g.,yolov9c.pt) is available in the Ultralytics repository. You can find more details in the YOLOv9 documentation.
jane7166
Hello. I have retrained the YOLOv9 model, and I would like to deploy it as an API. How should I proceed?
- Glenn JocherUltralytics
@jane7166 to deploy your retrained YOLOv9 model as an API, you can use frameworks like FastAPI or Flask to build an endpoint and load your model using the Ultralytics Python package. Refer to the YOLOv9 documentation for guidance on inference, which can be integrated into your API logic. Let us know if you have further questions!
Gnoot01
I'm getting the following errors despite latest torch and ultralytics installs. Kindly assist
File "C:\Users\.venv\lib\site-packages\ultralytics\engine\model.py", line 547, in predict self.predictor.setup_model(model=self.model, verbose=is_cli) File "C:\Users\.venv\lib\site-packages\ultralytics\engine\predictor.py", line 303, in setup_model self.model = AutoBackend( File "C:\Users\.venv\lib\site-packages\torch\utils\_contextlib.py", line 116, in decorate_context return func(*args, **kwargs) File "C:\Users\.venv\lib\site-packages\ultralytics\nn\autobackend.py", line 145, in __init__ model = model.fuse(verbose=verbose) TypeError: BaseModel.fuse() got an unexpected keyword argument 'verbose'- Glenn JocherUltralytics
@Gnoot01 it seems like there's a compatibility issue with the
fusemethod. Please ensure you're using the latest version of the Ultralytics package. If the issue persists, consider checking for any updates or changes in the repository that might address this. For further assistance, you can explore the YOLOv9 documentation. @glenn-jocher Hi, I'm using the latest ultralytics 8.3.24 and latest torch. However, still facing this issue. Any suggestions?
- Glenn JocherUltralytics
@Gnoot01 i'm sorry you're experiencing this issue. Please ensure your Ultralytics package is up-to-date. If the problem persists, try reinstalling the package or checking for any recent updates in the repository. For more details, you can refer to the YOLOv9 documentation.
foskyblue
I'm having issues with my Yolov9 model exported to tflite. Model was successfully exported to tflite but I cannot get the right bounding boxes. I'm following the steps listed here: https://stackoverflow.com/questions/76381317/yolov8-tflite-python-predictions-and-interpreting-output (for folov8) to make inference for my yolov9 tflite model.
1Step 1: Resizing and Padding (Letterboxing) Step 2: Non-Maximum Suppression (NMS) Step 3: Rescaling Bounding Boxes
However, when I draw the outputed bounding boxes on my image the boxes don't fit the objects in the image correctly.
The code I'm using can be seen below:
from tflite_runtime.interpreter import Interpreter from PIL import Image import numpy as np from glob import glob from typing import Tuple, List interpreter = None input_shape = (320, 576) # Input tensor dimensions (width, height) in pixels input_index = 0 # Input tensor index (from input details in model signature) output_index = 409 model_path = 'model/saved_model.tflite' def load_model(): interpreter = None interpreter = Interpreter(model_path=model_path, num_threads=2) interpreter.allocate_tensors() input_details = interpreter.get_input_details() global input_shape input_shape = tuple(input_details[0]['shape'][1:3]) global input_index input_index = input_details[0]['index'] output_details = interpreter.get_output_details() global output_index output_index = output_details[0]['index'] return interpreter def letter_box(img: np.ndarray, new_shape: Tuple[int, int]) -> np.ndarray: """ Resizes an image to fit within a new shape while maintaining the aspect ratio, and pads the remaining space with a constant value. Args: img (np.ndarray): The input image as a NumPy array. new_shape (Tuple[int, int]): The desired output shape (height, width). Returns: np.ndarray: The resized and padded image. """ shape = img.shape[:2] # Calculate the scaling ratio to fit the image within the new shape r = min(new_shape[0] / shape[0], new_shape[1] / shape[1]) # Calculate the new unpadded dimensions new_unpad = int(round(shape[1] * r)), int(round(shape[0] * r)) # Calculate the padding required on each side dw, dh = new_shape[1] - new_unpad[0], new_shape[0] - new_unpad[1] dw, dh = dw / 2, dh / 2 # Resize the image if necessary if shape[::-1] != new_unpad: img = Image.fromarray(img).resize(new_unpad, Image.Resampling.BILINEAR) img = np.array(img) # Calculate the top, bottom, left, and right padding values top, bottom = int(round(dh - 0.1)), int(round(dh + 0.1)) left, right = int(round(dw - 0.1)), int(round(dw + 0.1)) # Add padding to the image img = np.pad(img, ((top, bottom), (left, right), (0, 0)), mode='constant', constant_values=114) return img def non_max_suppression( prediction: np.ndarray, conf_thres: float = 0.25, iou_thres: float = 0.45, max_det: int = 300, max_wh: int = 7680, ): """ Perform non-maximum suppression (NMS) on a single image prediction. Args: prediction (np.ndarray): A numpy array of shape (1, num_boxes, num_classes + 4 + num_masks) containing the predicted boxes, classes, and masks. conf_thres (float): Confidence threshold for filtering boxes (0.0 to 1.0). iou_thres (float): IoU threshold for NMS (0.0 to 1.0). max_det (int): Maximum number of boxes to keep after NMS. max_wh (int): Maximum box width and height in pixels. Returns: np.ndarray: Array containing kept boxes with format (x1, y1, x2, y2, confidence, class, mask1, mask2, ...). """ # Input validation (can be removed if you're sure of your input) if 0 > conf_thres > 1: raise ValueError(f"Invalid Confidence threshold {conf_thres}, valid values are between 0.0 and 1.0") if 0 > iou_thres > 1: raise ValueError(f"Invalid IoU {iou_thres}, valid values are between 0.0 and 1.0") # Extract dimensions and metadata directly _, _, dims = prediction.shape nc = dims - 4 - prediction.shape[1] # number of classes nm = dims - nc - 4 # number of masks mi = 4 + nc # mask start index # Process the single image in the batch x = prediction[0] # Extract the single image data # Move class scores to last axis and threshold x = np.transpose(x, (1, 0)) xc = x[..., 4:mi].max(axis=-1) > conf_thres x = x[xc] if not x.shape[0]: # No boxes left after confidence thresholding return np.zeros((0, 6 + nm)) # Convert xywh to xyxy directly on the filtered boxes x[..., :4] = xywh2xyxy(x[..., :4]) # Split and process boxes, classes, and masks # pylint: disable=unbalanced-tuple-unpacking box, cls, mask = np.split(x, (4, mi), 1) conf = cls.max(1) j = cls.argmax(1) x = np.concatenate((box, conf[:, None], j[:, None].astype(float), mask), 1) x = x[conf > conf_thres] n = x.shape[0] if not n: # No boxes left after additional confidence thresholding return np.zeros((0, 6 + nm)) # NMS (simplified since we're dealing with a single image) c = x[:, 5:6] * max_wh boxes, scores = x[:, :4] + c, x[:, 4] i = numpy_nms(boxes, scores, iou_thres) i = i[:max_det] return x[i] def numpy_nms(boxes: np.ndarray, scores: np.ndarray, iou_threshold: float = 0.5) -> np.ndarray: """ Perform Non-Maximum Suppression (NMS) on a set of bounding boxes. Args: boxes (np.ndarray): Array of shape (N, 4) representing N bounding boxes. Each box is [x1, y1, x2, y2]. scores (np.ndarray): Array of shape (N,) representing the confidence scores for each box. iou_threshold (float): IoU threshold for suppressing overlapping boxes. Defaults to 0.5. Returns: np.ndarray: Boolean array of shape (N,) indicating which boxes to keep. """ # Sort boxes by score in descending order order = scores.argsort()[::-1] keep = np.ones(len(boxes), dtype=bool) # Calculate IoU matrix ious = box_iou_batch(boxes, boxes) np.fill_diagonal(ious, 0) # Set self-IoU to 0 for i, idx in enumerate(order): if not keep[idx]: continue # Suppress boxes with IoU > threshold overlap = ious[idx] > iou_threshold keep[order[i + 1:]] &= ~overlap[order[i + 1:]] return keep def box_iou_batch(boxes_a: np.ndarray, boxes_b: np.ndarray) -> np.ndarray: """ Calculate the Intersection over Union (IoU) between two sets of bounding boxes. Args: boxes_a (np.ndarray): Array of shape (N, 4) representing N bounding boxes. boxes_b (np.ndarray): Array of shape (M, 4) representing M bounding boxes. Returns: np.ndarray: Array of shape (N, M) containing IoU values for each pair of boxes. Note: Each bounding box is represented as [x1, y1, x2, y2], where (x1, y1) is the top-left corner and (x2, y2) is the bottom-right corner. """ # Calculate areas of boxes_a area_a = (boxes_a[:, 2] - boxes_a[:, 0]) * (boxes_a[:, 3] - boxes_a[:, 1]) # Calculate areas of boxes_b area_b = (boxes_b[:, 2] - boxes_b[:, 0]) * (boxes_b[:, 3] - boxes_b[:, 1]) # Calculate intersection coordinates top_left = np.maximum(boxes_a[:, None, :2], boxes_b[:, :2]) bottom_right = np.minimum(boxes_a[:, None, 2:], boxes_b[:, 2:]) # Calculate intersection area area_inter = np.prod(np.clip(bottom_right - top_left, a_min=0, a_max=None), 2) # Calculate IoU return area_inter / (area_a[:, None] + area_b - area_inter) def xywh2xyxy(box: np.ndarray) -> np.ndarray: """ Convert bounding box coordinates from (x, y, width, height) format to (x1, y1, x2, y2) format where (x1, y1) is the top-left corner and (x2, y2) is the bottom-right corner. Args: x (np.ndarray): The input bounding box coordinates in (x, y, width, height) format. Returns: np.ndarray: The bounding box coordinates in (x1, y1, x2, y2) format. """ if box.shape[-1] != 4: raise ValueError(f"input shape last dimension expected 4 but input shape is {box.shape}") # pylint: disable=unbalanced-tuple-unpacking xy, wh = np.split(box, [2], axis=-1) wh_half = wh / 2 return np.concatenate([xy - wh_half, xy + wh_half], axis=-1) def preprocess_image(pil_image: Image.Image, input_size: Tuple[int, int]) -> np.ndarray: """ Preprocesses an image for inference with a TFLite model. Args: image_path (str): Path to the image file. input_size (Tuple[int, int]): Desired input size (height, width) for the model. Returns: np.ndarray: Preprocessed image as a NumPy array, ready for inference. """ if pil_image.mode != "RGB": pil_image = pil_image.convert("RGB") im = np.asarray(pil_image) im = letter_box(im, new_shape=input_size) im = np.expand_dims(im, axis=0) # goal is to have the format (number of images, size of image, number of channnels) im = im.astype(np.float32) / 255.0 # Normalize to 0.0 - 1.0 return im def postprocess_results(output: np.ndarray, model_input_size: Tuple[int, int], image_original_size: Tuple[int, int]) -> np.ndarray: """ Postprocesses the raw outputs from a TFLite model, including scaling bounding boxes back to the original image size. Args: output (np.ndarray): List of output tensors from the TFLite model. model_input_size (Tuple[int, int]): Desired input size (height, width) for the model. image_original_size (Tuple[int, int]): Original size (height, width) of the input image. Returns: np.ndarray: Postprocessed results with bounding boxes adjusted to original image size. """ predictions = non_max_suppression(output, conf_thres=0.25, iou_thres=0.45, max_det=300, max_wh=1) return scale_boxes(image_original_size, predictions, model_input_size) def scale_boxes(image_original_size: Tuple[int, int], boxes: np.ndarray, model_input_size: Tuple[int, int]): """ Rescales bounding boxes (in the format of xyxy by default) from the shape of the image they were originally specified in (img1_shape) to the shape of a different image (img0_shape). Args: image_original_size (Tuple[int, int]): The shape of the image that the bounding boxes are for, in the format of (height, width). boxes (np.ndarray): the bounding boxes of the objects in the image, in the format of (x1, y1, x2, y2) model_input_size (Tuple[int, int]): the shape of the target image, in the format of (height, width). Returns: np.ndarray: The scaled bounding boxes, in the format of (x1, y1, x2, y2) """ # calculate from img0_shape gain = min(model_input_size[0] / image_original_size[0], model_input_size[1] / image_original_size[1]) # gain = old / new pad = ( round((model_input_size[1] - image_original_size[1] * gain) / 2 - 0.1) / model_input_size[1], round((model_input_size[0] - image_original_size[0] * gain) / 2 - 0.1) / model_input_size[0], ) # wh padding inner_image_scale = ( (1 - pad[0] * 2), (1 - pad[1] * 2), ) # wh scale boxes[..., 0] = (boxes[..., 0] - pad[0]) / inner_image_scale[0] # x padding boxes[..., 1] = (boxes[..., 1] - pad[1]) / inner_image_scale[1] # y padding boxes[..., 2] = (boxes[..., 2] - pad[0]) / inner_image_scale[0] # x padding boxes[..., 3] = (boxes[..., 3] - pad[1]) / inner_image_scale[1] # y padding boxes[..., [0, 2]] = boxes[..., [0, 2]].clip(0, 1) # x1, x2 boxes[..., [1, 3]] = boxes[..., [1, 3]].clip(0, 1) # y1, y2 return boxes def prepare_input(image_pil): # Input image must match input shape (ex: 640x640 pixels) [note: only use BILINEAR here] resized = image_pil.copy().resize(input_shape, resample=Image.Resampling.BILINEAR) # SSD Mobilenet V2 FPNLite take as input pixels between [-1.0, 1.0] expanded = np.expand_dims(np.asarray(resized, dtype=np.float32) * 2. / 255. - 1., axis=0) del resized # Enforce garbage collection sooner than later return expanded def predict(tmp_images_dir): interpreter = load_model() model_predictions = [] for img_path in tmp_images_dir: pil_image = Image.open(img_path) input_data = preprocess_image(pil_image, input_shape) interpreter.set_tensor(input_index, input_data) interpreter.invoke() output_data = interpreter.get_tensor(output_index) preds = postprocess_results(output_data, input_shape, (pil_image.size[1], pil_image.size[0])) model_predictions.append({ 'detection_classes': (preds[:, 5] + 1).tolist(), # Class values are offset by +1.0 'detection_boxes': preds[:, 0:4].tolist(), 'detection_scores': preds[:, 4].tolist(), }) print(model_predictions) images_path = glob('utilities/images/*.JPG') predict(images_path)- Glenn JocherUltralytics
@foskyblue it seems like the issue might be related to the scaling and padding logic when converting bounding boxes. Ensure that the
scale_boxesfunction correctly rescales the boxes to the original image size. For more detailed guidance, please refer to the YOLOv9 documentation: https://docs.ultralytics.com/models/yolov9/. Hi Glen thanks for your response. Unfortunately I find it difficult to correctly scale the bounding boxes from the example script I mentioned above: https://stackoverflow.com/questions/76381317/yolov8-tflite-python-predictions-and-interpreting-output.
How can I implement the YOLOv9 TFLite model with an input ape of [1, 320, 576, 3] and output shape of [1, 19, 3780] in Python?
- Glenn JocherUltralytics
To correctly scale bounding boxes for your YOLOv9 TFLite model, ensure your
scale_boxesfunction accurately adjusts the coordinates based on the original image size and model input size. Verify that padding and scaling calculations align with your preprocessing steps. For further details, please refer to the YOLOv9 documentation.