Ultralytics YOLO ile Segmentasyon Nesnelerini İzole Etme
Örnek segmentasyonu, algılanan her nesne için piksel hassasiyetinde bir maske üretir; böylece her nesneyi görüntüden tek başına çıkarabilirsin. Bu kılavuz, Ultralytics YOLO segmentasyon sonuçlarını Tahmin Modu ve OpenCV kullanarak, PNG olarak kaydetmek için düz siyah ya da şeffaf arka planla bağımsız nesnelere dönüştürmeyi gösterir.
İzle: Ultralytics YOLO26 ile Segmentlere Ayrılmış Nesneler Nasıl Ayrılır | Python Eğitimi | VisionAI 🚀
Segmentasyon Nesneleri Neden İzole Edilir?#
Görüntüdeki nesneleri tek tek çıkarmak, çeşitli sonraki iş akışlarının önünü açar:
- Ürün fotoğrafları, kataloglar veya yaratıcı düzenleme için arka planı kaldırma.
- Tespit sonuçlarından sınıflandırma veri kümeleri oluşturmak için nesne başına kırpımlar.
- OCR, renk analizi veya ölçüm gibi sonraki adımların çevredeki sahneyi değil, yalnızca nesneyi görmesini sağlayan odaklı işleme.
- Nesneleri yeni arka planlara yerleştirmek için şeffaf PNG dışa aktarımı.
Bu yöntem tüm Ultralytics YOLO segmentasyon modelleriyle çalışır ve dört aşamadan oluşur: çıkarım çalıştır → her konturu çıkar → nesneyi izole et → sonucu kaydet.
Segmentasyon Çıkarımını Çalıştır#
Gerekli kütüphaneleri yükle, ardından YOLO26n-seg gibi bir segmentasyon modeli yükle (-seg son eki maske üretmek için gereklidir) ve kaynak görüntü üzerinde tahmin çalıştır:
from ultralytics import YOLO

# Segmentasyon modeli yükle
model = YOLO("yolo26n-seg.pt")

# Bir kaynak üzerinde çıkarım çalıştır
results = model.predict(source="path/to/image.jpg")source belirtmeden model.predict() çağırırsan Ultralytics, pakette gelen örnek görüntülere (bus.jpg ve zidane.jpg) geri döner; bu, iş akışını hızla test etmek için kullanışlıdır.
Nesne Konturlarını Çıkar#
results içindeki her öğe bir görüntüye karşılık gelir ve sonuç üzerinde yineleme yaptığında her seferinde bir tespit elde edersin. Her tespit için özgün görüntüyü kopyala, sınıf etiketini oku ve nesnenin maske konturunu boş bir ikili maskeye çiz. Bu maskenin beyaz bölgesi, nesneye ait pikselleri tam olarak gösterir.
Bu bölümdeki ve sonraki bölümdeki kod parçacıkları, aşağıdaki tespit döngüsünün içinde çalıştırılır; kodun tamamını kopyalayıp yapıştırabileceğin Tam Örnek bölümünde bulabilirsin.
from pathlib import Path

import cv2
import numpy as np

for r in results:
    img = np.copy(r.orig_img)
    img_name = Path(r.path).stem  # kaynak görüntünün temel adı

    # Görüntüdeki tespit edilen her nesne üzerinde yinele
    for ci, c in enumerate(r):
        label = c.names[c.boxes.cls.tolist().pop()]  # sınıf adı

        # İkili maske oluştur ve nesne konturunu üzerine çiz
        b_mask = np.zeros(img.shape[:2], np.uint8)
        contour = c.masks.xy[0].astype(np.int32).reshape(-1, 1, 2)
cv2.drawContours(b_mask, [contour], -1, (255, 255, 255), cv2.FILLED)c.masks.xy[0], tek tespit içeren bu sonuçtaki nesneye ait maske konturunu(x, y)nokta koordinatları olarak döndürür..astype(np.int32), OpenCV'nindrawContours()işlevinin kabul etmediğifloat32biçimindeki noktaları dönüştürür..reshape(-1, 1, 2), noktaları[N, 1, 2]düzenine dönüştürür; bu düzenidrawContours()bekler veNkontur noktalarının sayısını belirtir.
[contour] değerini -1 diziniyle geçirmek, sağlanan konturun tüm noktalarını çizer; cv2.FILLED ise konturla çevrelenen tüm pikselleri beyaza boyar.
Nesneyi İzole Et#
İkili maske hazır olduğunda özgün görüntüyle birleştir. Arka planın nasıl görünmesini istediğine bağlı olarak iki yaygın yöntem vardır:
Maskeyi üç kanala dönüştür ve yalnızca nesneyle kesişen pikselleri tut. Konturun dışındaki her şey siyah olur:
# Nesneyi siyah arka planla izole et
mask3ch = cv2.cvtColor(b_mask, cv2.COLOR_GRAY2BGR)
isolated = cv2.bitwise_and(mask3ch, img)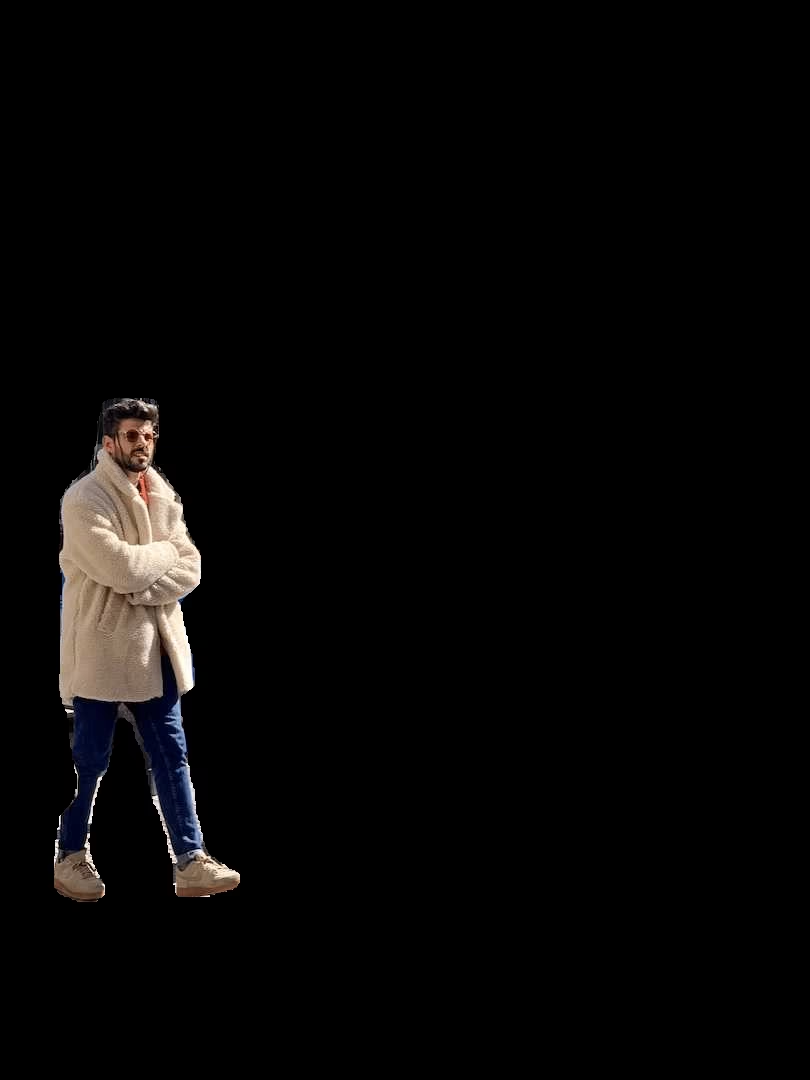
Tam boyutlu görüntü yerine yalnızca nesnenin bölgesini tutmak için tespit sonucunun sınırlayıcı kutusuna göre dilimle:
# Sınırlayıcı kutu koordinatları
x1, y1, x2, y2 = c.boxes.xyxy.cpu().numpy().squeeze().astype(np.int32)
# İzole edilmiş görüntüyü nesne bölgesine göre kırp
iso_crop = isolated[y1:y2, x1:x2]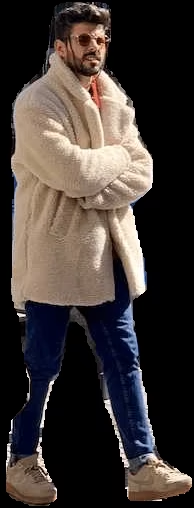
Bu özellik zaten yerleşik olarak sunuluyor. save_crop=True değerini predict() işlevine aktar; Ultralytics, maske uygulaman gerekmeden sınırlayıcı kutu kırpımlarını otomatik olarak kaydeder.
Sonucu Kaydet (isteğe bağlı)#
Her izole nesneyle ne yapacağın sana bağlı. Sonraki adımlardan biri, daha sonra kullanmak üzere nesneyi diske yazmaktır:
# Save the isolated object to file
cv2.imwrite(f"{img_name}_{label}-{ci}.png", isolated)
Burada img_name kaynak görüntünün temel adıdır, label sınıf adıdır ve ci tespit dizinidir; böylece aynı sınıfın birden fazla örneği benzersiz dosya adları alır. Yukarıdaki isteğe bağlı kırpmayı uyguladıysan isolated yerine iso_crop kullan.
Tam Örnek#
Aşağıdaki betik tüm adımları çalıştırılabilir tek bir kod bloğunda birleştirir. Varsayılan olarak siyah arka plan kullanır; bunun yerine şeffaf PNG elde etmek için işaretli tek satırı np.dstack([img, b_mask]) olarak değiştir:
from pathlib import Path

import cv2
import numpy as np

from ultralytics import YOLO

model = YOLO("yolo26n-seg.pt")
results = model.predict(source="path/to/image.jpg")

for r in results:
    img = np.copy(r.orig_img)
    img_name = Path(r.path).stem

    for ci, c in enumerate(r):
        label = c.names[c.boxes.cls.tolist().pop()]

        # Build a binary mask from the object contour
        b_mask = np.zeros(img.shape[:2], np.uint8)
        contour = c.masks.xy[0].astype(np.int32).reshape(-1, 1, 2)
        cv2.drawContours(b_mask, [contour], -1, (255, 255, 255), cv2.FILLED)

        # Isolate the object (black background)
        mask3ch = cv2.cvtColor(b_mask, cv2.COLOR_GRAY2BGR)
        isolated = cv2.bitwise_and(mask3ch, img)  # transparent PNG: isolated = np.dstack([img, b_mask])

        # Save or add your custom post-processing here
        cv2.imwrite(f"{img_name}_{label}-{ci}.png", isolated)

        # Optional: crop to the bounding box before saving
        # x1, y1, x2, y2 = c.boxes.xyxy.cpu().numpy().squeeze().astype(np.int32)
        # cv2.imwrite(f"{img_name}_{label}-{ci}.png", isolated[y1:y2, x1:x2])
Tekrar tekrar kullanmak için döngü gövdesini bir işleve sar; böylece bu işlevi birçok görüntü üzerinde çağırabilirsin.
Sonuç#
Artık Ultralytics YOLO ile segmentlere ayrılmış nesneleri izole etmek için eksiksiz bir yöntemin var: çıkarımı çalıştır, her konturdan ikili maske oluştur, ardından nesneyi siyah veya şeffaf arka planla çıkar ve isteğe bağlı olarak sınırlayıcı kutusuna göre kırp. İş akışını kendi sınıflarına uyarlamak için Segment Görevi ve Tahmin Modu belgelerinin tamamını incele.
Sık Sorulan Sorular#
Bir segmentasyon modeli yükle, çıkarımı çalıştır, her tespitin konturundan ikili maske oluştur ve bunu özgün görüntüyle birleştir:
import cv2
import numpy as np

from ultralytics import YOLO

model = YOLO("yolo26n-seg.pt")
results = model.predict(source="path/to/your/image.jpg")

img = np.copy(results[0].orig_img)
b_mask = np.zeros(img.shape[:2], np.uint8)
contour = results[0].masks.xy[0].astype(np.int32).reshape(-1, 1, 2)
cv2.drawContours(b_mask, [contour], -1, (255, 255, 255), cv2.FILLED)

mask3ch = cv2.cvtColor(b_mask, cv2.COLOR_GRAY2BGR)
isolated = cv2.bitwise_and(mask3ch, img)
Tespit başına döngünün tamamı için Tam Örnek bölümüne bak.
İki temel yöntem vardır. Siyah arka plan için maskeyi üç kanala dönüştür ve
cv2.bitwise_and()kullan. Şeffaf arka plan (PNG olarak kaydederken) için maskeyi dördüncü alfa kanalı olaraknp.dstack([img, b_mask])ile ekle. Her iki yöntem de Nesneyi İzole Et bölümünde gösterilmiştir.Tespitten sınırlayıcı kutu koordinatlarını oku ve izole edilmiş görüntüyü dilimle:
x1, y1, x2, y2 = results[0].boxes.xyxy[0].cpu().numpy().astype(np.int32)
iso_crop = isolated[y1:y2, x1:x2]
Sınırlayıcı kutu sonuçları hakkında daha fazla bilgi için Tahmin Modu belgelerine bak.
Ultralytics YOLO, doğru maskeler ve sınırlayıcı kutular oluşturarak hızlı, gerçek zamanlı örnek segmentasyonu sunar. Ayrıca çıkarım sonuçlarını birkaç satır OpenCV koduyla yalıtılmış nesnelere dönüştüren basit bir Python API’si sağlar.
Evet. Orijinal arka planlarıyla birlikte sınırlayıcı kutu kırpmalarını kaydetmek için
save_cropbağımsız değişkeninipredict()içinde kullan:results = model.predict(source="path/to/your/image.jpg", save_crop=True)Daha fazla bilgi için Tahmin Modu Çıkarım Bağımsız Değişkenleri bölümünü oku.


Yorumlar16
Bir soru sor, sonuçlarını paylaş veya başka birine yardım et.
cordonballas
wow thanx that's exactly what i've been looking for.
 Glenn JocherUltralytics
@cordonballas thank you for your positive feedback! We're glad the segmentation isolation guide was helpful. If you have any further questions, feel free to ask—the YOLO community and our team are here to help. 😊
For continued support, check our Segment Task documentation and Predict Mode guide.
AbdulGhofur23
How can I extract a mask from a TIFF (Tag Image File Format) so that the mask's coordinates align with the projection of the TIFF image?
- Glenn JocherUltralytics
To extract masks from a TIFF image while aligning the mask's coordinates with the image's projection, you can use the segmentation results from Ultralytics YOLO. Generate the mask using
results.masks.xyfor contour points and overlay it on the TIFF image. Ensure alignment by maintaining the original image dimensions during processing. For more, refer to the Isolating Segmentation Objects Guide. Let us know if you need further assistance!1
vedhanayagan9626
I used yolo v11n seg model , i got a segmented image as output with bounding boxes in those some of predictions are overlapped like a bounding box on two items as single so i try to remove a rectangle and associated segmentation from an image and add new rectangle by hold and drag functionality its looks likw working but i cant get optimized result. Is there any way to remove and add new bounding boxes after a segmentation result?
- Glenn JocherUltralytics
@vedhanayagan9626 to address overlapping predictions, you can manually refine results by manipulating masks and bounding boxes post-inference. Use the mask and bounding box coordinates from
results[0].masksandresults[0].boxesto remove or modify specific predictions. For new bounding boxes, you might need to create and integrate them into your results structure manually. Refer to the Isolating Segmentation Objects guide for detailed steps. For optimized results, ensure adequate data quality and model tuning.
SerhiiPostupaiev
Hello, can you please explain how the YOLOv8 performs upscaling? For example, my input images are 854x480, YOLOv8 scales them up to 864x512. How does it exactly performs upscaling? Does it use padding or some other approaches?
 Paula DerrengerUltralytics
@SerhiiPostupaiev hello! In YOLOv8, images are scaled up or down to a specific model input size, optimally a square format (like 640x640) or a dimension supported by the model (such as 864x512 in your case). The upscaling for images that do not exactly match the input dimensions typically involves:
- Resizing the image to the closest dimension that maintains the aspect ratio.
- Padding the resized image to reach the required input size, ensuring that the aspect ratio is preserved.
For instance, for an image of 854x480, YOLOv8 may:
- Resize the image to fit the model's width of 864 while maintaining the aspect ratio, which adjusts the height accordingly.
- Pad the height to the nearest model-supported dimension (like 512), adding pixel values (usually zeros) to the top and bottom or sides of the image to reach the required size.
Here’s a rough example in Python using OpenCV for how padding might be handled:
import cv2
import numpy as np

# Example image load
image = cv2.imread('input.jpg')
# Resizing the image
resized_image = cv2.resize(image, (864, keep_aspect_ratio_height))  # Example variable for illustration

# Padding the resized image
top_padding = (512 - resized_image.shape[0]) // 2
bottom_padding = 512 - resized_image.shape[0] - top_padding
padded_image = cv2.copyMakeBorder(resized_image, top_padding, bottom_padding, 0, 0, cv2.BORDER_CONSTANT, value=[0, 0, 0])
This ensures the entire image is used during prediction without distorting its original aspect ratio. 😊
EnricoMendez
Hello, I run this code example but it only display one object's mask, is it posible to join all the objects' masks in a single frame?
- Glenn JocherUltralytics
Hey there! 😊 Absolutely, you can combine all the objects' masks into a single frame. Just modify the section where you're drawing the contours onto the mask. Instead of creating a new binary mask
b_maskfor each object, you initialize one common mask before iterating through the objects and draw every object's contour on this common mask. Here's a quick example to illustrate:# Initialize one common binary mask for all objects b_mask_all = np.zeros(img.shape[:2], np.uint8) for ci, c in enumerate(r): # Your contour extraction remains the same contour = c.masks.xy.pop().astype(np.int32).reshape(-1, 1, 2) # Draw each contour onto the common mask cv2.drawContours(b_mask_all, [contour], -1, (255, 255, 255), cv2.FILLED) # After the loop, you can use `b_mask_all` which contains all objects' masksJust keep in mind, with
b_mask_all, you'll have all the detected objects' masks on one mask. If the objects overlap in your image, their masks will also overlap inb_mask_all. Hope this helps! Let us know if you have more questions. 😊
mariamg03
hi is there a way I can apply the edits on the binary image then revert back to the original with the mask part edited?
- Paula DerrengerUltralytics
Hey there! 👋 Yes, you can certainly make edits on a binary mask and then apply those changes back to the original image, essentially modifying only the parts that the mask covers. Here's a quick outline of how you could achieve this with an example focusing on segmentation tasks:
-
After segmenting your image and obtaining the binary mask (let's say
b_mask), you can perform any edits you like on this mask. For example, inverting the mask, dilating, or eroding. -
To apply the edited mask back to the original image (
orig_img), you would use the mask to isolate the area of interest in the original image and then apply your edits.
Here's a code snippet demonstrating this with a simple inversion edit:
import cv2
import numpy as np

# Assuming 'b_mask' is your binary mask and 'orig_img' is your original image
# Let's say you inverted the binary mask
edited_mask = 255 - b_mask  # Inverting mask

# Convert the single channel binary mask to a 3 channel mask to match the original image
edited_mask_3ch = cv2.cvtColor(edited_mask, cv2.COLOR_GRAY2BGR)

# Apply the edited mask back to the original image
# This line performs bitwise-and operation to only keep parts of the image where the mask is white
edited_image = cv2.bitwise_and(orig_img, edited_mask_3ch)

# At this point, 'edited_image' contains the original image with edits applied to the segmented part
This is a simplified example to show the concept. Depending on the edits you've made to
b_mask, you might need to adjust how you applyedited_maskback toorig_img.Remember, after editing the mask, you can always revert it back to its original form if you've kept a copy before editing, or you can apply the inverse of your edits.
I hope this helps! Let me know if you have more questions. Happy coding! 😊
-
Safiislamian
Hi sir, thanku for your response does load dataset will work or not. As the dataset is in yolo form where we have different folders and subfolders like train having images and labels etc
On Wed, Mar 27, 2024, 7:03 AM Glenn Jocher @.***> wrote:
Hey there! 👋 Glad to see you're interested in applying YOLOv8 for instance segmentation with a dataset from Roboflow. Below is a quick guide to help you get started with applying YOLOv8 for detection and then using masks for the dataset based on class. Step 1: Install Ultralytics YOLO
First, ensure you have Ultralytics installed:
pip install ultralytics
Step 2: Load Your Model
from ultralytics import YOLOmodel = YOLO('yolov8n-seg.pt') # Use yolov8n-seg.pt for segmentation models
Step 3: Predict and Isolate Objects
Now, for predicting and isolating objects based on their classes, you'll dive into the prediction results to access and manipulate the segmentation masks:
results = model.predict(source='path/to/your/dataset')for result in results: for detection in result: class_name = detection.names[detection.boxes.cls.tolist().pop()] # Create a binary mask from detection binary_mask = np.zeros(result.orig_img.shape[:2], np.uint8) contour = detection.masks.xy.pop().astype(np.int32).reshape(-1, 1, 2) cv2.drawContours(binary_mask, [contour], -1, (255, 255, 255), cv2.FILLED) # Example to save or further process the mask
Note: Replace 'path/to/your/dataset' with the actual path to your images. Step 4: Saving or Processing the Masks
You may wish to save each mask based on its class for processing later. You can modify the loop to save each binary mask to a file using cv2.imwrite() method.
cv2.imwrite(f'{class_name}_mask.jpg', binary_mask)
This will save each mask with its respective class name as part of the filename, allowing for easy organization by class.
Hope this helps! 😊 Let us know if you need further assistance or have more questions. Happy coding!
— Reply to this email directly, view it on GitHub https://github.com/orgs/ultralytics/discussions/9334#discussioncomment-8922405, or unsubscribe https://github.com/notifications/unsubscribe-auth/AUP75TG3RFWAL7YRMWDR66DY2ILE5AVCNFSM6AAAAABFJ334B2VHI2DSMVQWIX3LMV43SRDJONRXK43TNFXW4Q3PNVWWK3TUHM4DSMRSGQYDK . You are receiving this because you commented.Message ID: @.*** com>
- Paula DerrengerUltralytics(düzenlendi)
Hi there! 😄
Absolutely, loading a dataset structured in YOLO format (with separate folders for train/test images and labels) works well with YOLO26. You can specify the dataset structure in a YAML file and provide this file when initiating training or validation processes. Here's an example
data.yamlfile structure for your dataset:train: /path/to/dataset/train/images # path to images folder val: /path/to/dataset/val/images # path to validation images # Classes nc: 80 # number of classes names: ['class1', 'class2', ...] # class namesAnd here's how you might start training with your dataset:
yolo detect train data=data.yaml model=yolo26n.ptMake sure to replace
/path/to/dataset/train/imagesand/path/to/dataset/val/imageswith the actual paths to your dataset and similarly update thenc(number of classes) andnames(class labels) accordingly.If you have any more questions or need further assistance, feel free to ask. Happy to help! 🚀
There is a dataset on roboflow for instance segmentation, i want to apply first yolov8 and then masks for all the dataset arranged on the basis of their classes. please provide me details and code for that Thank you...
- Glenn JocherUltralytics(düzenlendi)
Hey there! 👋 Glad to see you're interested in applying YOLO26 for instance segmentation with a dataset from Roboflow. Below is a quick guide to help you get started with applying YOLO26 for detection and then using masks for the dataset based on class.
Step 1: Install Ultralytics YOLO
First, ensure you have Ultralytics installed:
pip install ultralyticsStep 2: Load Your Model
from ultralytics import YOLO
model = YOLO('yolo26n-seg.pt')  # Use yolo26n-seg.pt for segmentation models
Step 3: Predict and Isolate Objects
Now, for predicting and isolating objects based on their classes, you'll dive into the prediction results to access and manipulate the segmentation masks:
results = model.predict(source='path/to/your/dataset')
for result in results:
    for detection in result:
        class_name = detection.names[detection.boxes.cls.tolist().pop()]
        # Create a binary mask from detection
        binary_mask = np.zeros(result.orig_img.shape[:2], np.uint8)
        contour = detection.masks.xy.pop().astype(np.int32).reshape(-1, 1, 2)
        cv2.drawContours(binary_mask, [contour], -1, (255, 255, 255), cv2.FILLED)
        # Example to save or further process the mask
Note: Replace
'path/to/your/dataset'with the actual path to your images.Step 4: Saving or Processing the Masks
You may wish to save each mask based on its class for processing later. You can modify the loop to save each binary mask to a file using
cv2.imwrite()method.cv2.imwrite(f'{class_name}_mask.jpg', binary_mask)This will save each mask with its respective class name as part of the filename, allowing for easy organization by class.
Hope this helps! 😊 Let us know if you need further assistance or have more questions. Happy coding!