Hướng dẫn triển khai YOLO26 trên Amazon SageMaker Endpoints
Amazon SageMaker Endpoints cung cấp dịch vụ hosting được quản lý, có khả năng mở rộng cho các model thị giác máy tính như Ultralytics YOLO26 trong các ứng dụng machine learning production. Để triển khai model thành công, cần hiểu rõ các bước thiết lập, cấu hình và triển khai ở cả phía model lẫn AWS.
Hướng dẫn này sẽ từng bước chỉ cho bạn cách triển khai model YOLO26 PyTorch trên Amazon SageMaker Endpoints. Bạn sẽ tìm hiểu những kiến thức cơ bản về chuẩn bị môi trường AWS, cấu hình model phù hợp và sử dụng các công cụ như AWS CloudFormation và Bộ công cụ phát triển đám mây AWS (CDK) để triển khai.
Amazon SageMaker#
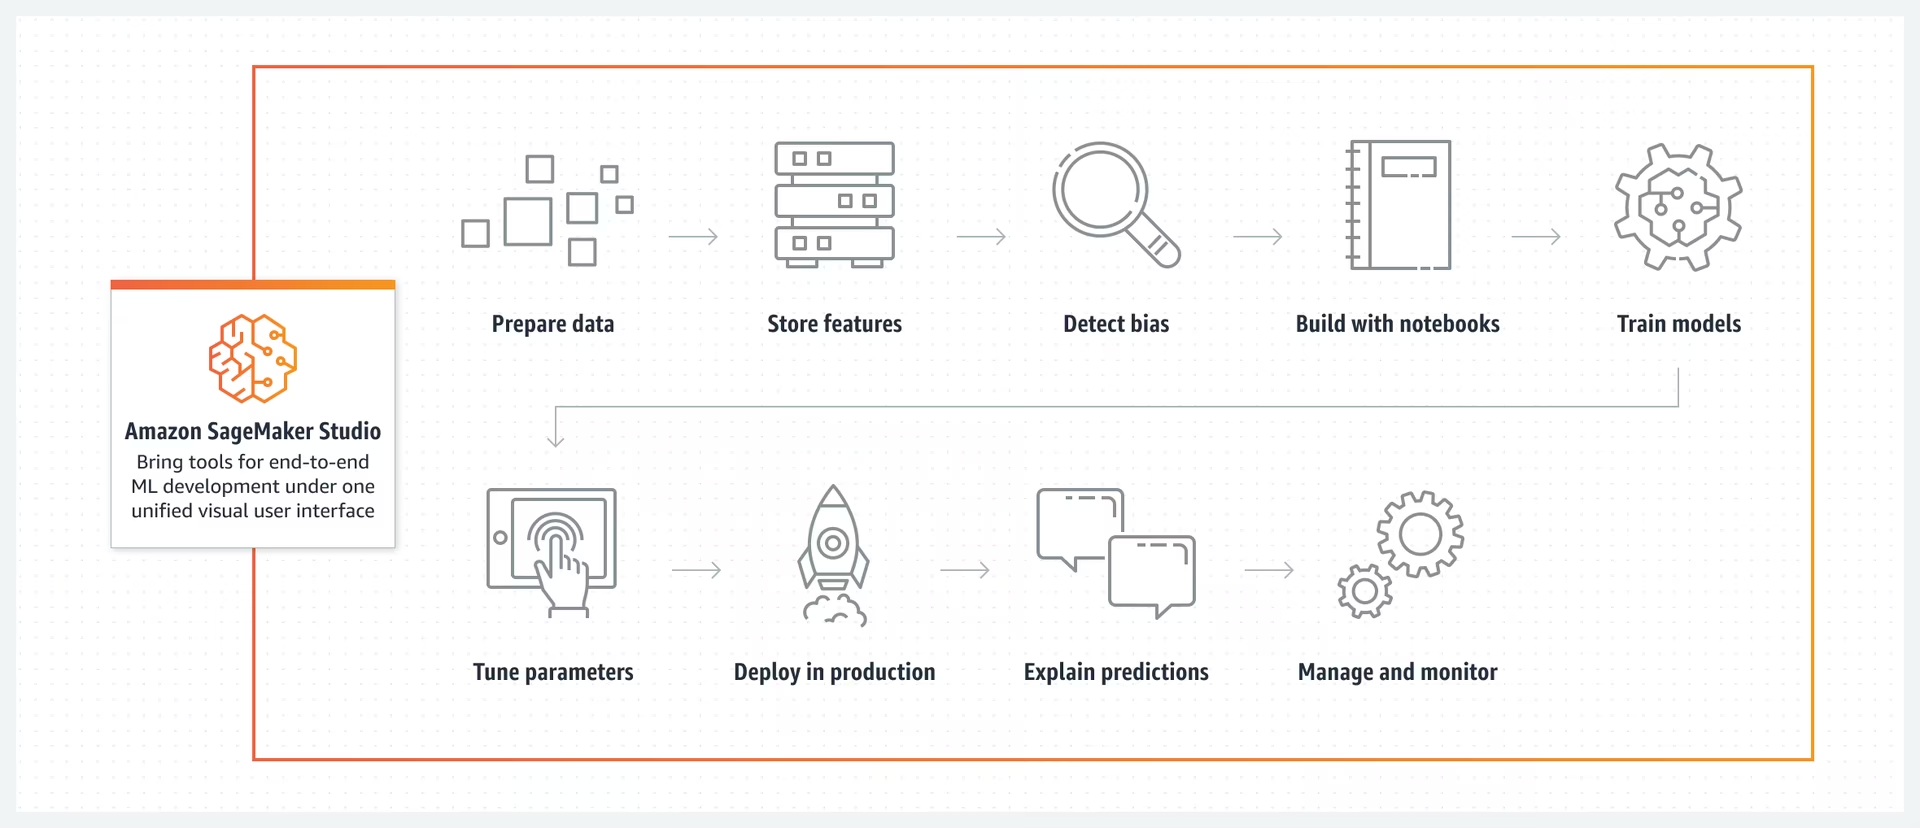
Amazon SageMaker là dịch vụ machine learning của Amazon Web Services (AWS), giúp đơn giản hóa quy trình xây dựng, training và triển khai model machine learning. Dịch vụ này cung cấp nhiều công cụ để xử lý các khía cạnh khác nhau của quy trình machine learning. Các công cụ này bao gồm tính năng tự động tinh chỉnh model, tùy chọn training model ở quy mô lớn và phương thức đơn giản để triển khai model vào production. SageMaker hỗ trợ các framework machine learning phổ biến, mang lại sự linh hoạt cần thiết cho nhiều dự án khác nhau. Các tính năng của dịch vụ còn bao gồm gán nhãn dữ liệu, quản lý quy trình làm việc và phân tích hiệu năng.
Triển khai YOLO26 trên Amazon SageMaker Endpoints#
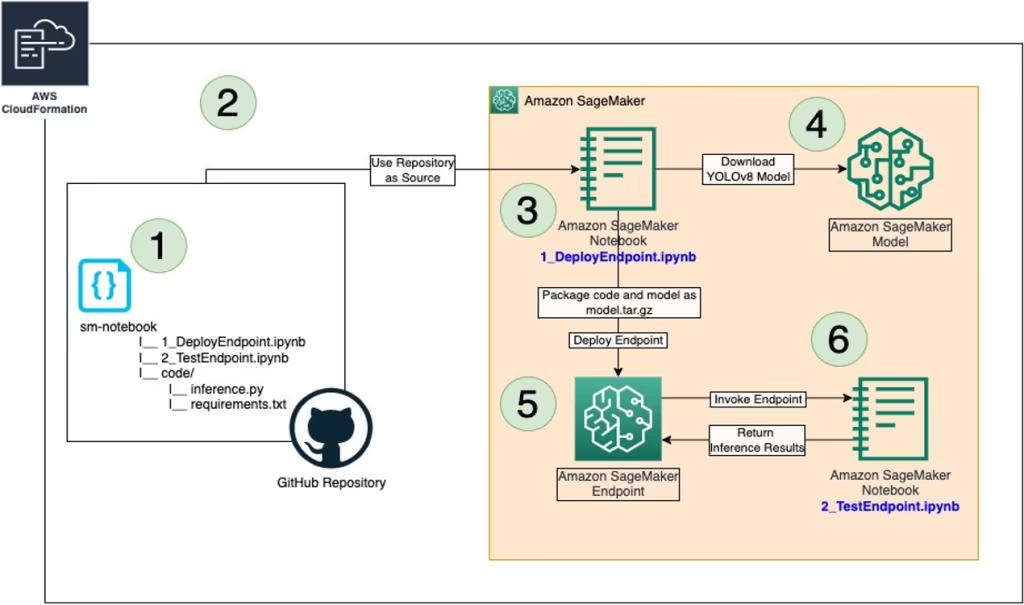
Triển khai YOLO26 trên Amazon SageMaker cho phép bạn sử dụng môi trường được quản lý để suy luận thời gian thực và tận dụng các tính năng như tự động mở rộng quy mô. Hãy xem kiến trúc AWS bên dưới.
Bước 1: Thiết lập môi trường AWS#
Trước tiên, hãy đảm bảo bạn đã chuẩn bị các điều kiện tiên quyết sau:
-
Tài khoản AWS: Nếu chưa có, hãy đăng ký tài khoản AWS.
-
IAM role đã cấu hình: Bạn sẽ cần một IAM role có các quyền cần thiết cho Amazon SageMaker, AWS CloudFormation và Amazon S3. Role này cần có các policy cho phép truy cập những dịch vụ đó.
-
AWS CLI: Nếu chưa được cài đặt, hãy tải xuống và cài đặt Giao diện dòng lệnh AWS (CLI), sau đó cấu hình bằng thông tin tài khoản của bạn. Làm theo hướng dẫn AWS CLI để cài đặt.
-
AWS CDK: Nếu chưa được cài đặt, hãy cài đặt Bộ công cụ phát triển đám mây AWS (CDK), được dùng để viết script triển khai. Làm theo hướng dẫn AWS CDK để cài đặt.
-
Hạn mức dịch vụ phù hợp: Xác nhận rằng bạn có đủ hạn mức cho hai tài nguyên riêng biệt trong Amazon SageMaker: một hạn mức cho
ml.m5.4xlargeđể sử dụng endpoint và một hạn mức choml.m5.4xlargeđể sử dụng notebook instance. Mỗi tài nguyên cần tối thiểu một giá trị hạn mức. Nếu hạn mức hiện tại thấp hơn yêu cầu này, bạn cần yêu cầu tăng hạn mức cho từng tài nguyên. Bạn có thể yêu cầu tăng hạn mức bằng cách làm theo hướng dẫn chi tiết trong tài liệu AWS Service Quotas.
Bước 2: Sao chép repository YOLO26 SageMaker#
Bước tiếp theo là sao chép repository AWS cụ thể chứa các tài nguyên để triển khai YOLO26 trên SageMaker. Repository này được lưu trữ trên GitHub và bao gồm các script CDK cùng các tệp cấu hình cần thiết.
-
Sao chép repository GitHub: Chạy lệnh sau trong terminal để sao chép repository host-yolov8-on-sagemaker-endpoint:
git clone https://github.com/aws-samples/host-yolov8-on-sagemaker-endpoint.git -
Chuyển đến thư mục đã sao chép: Đổi thư mục hiện tại sang repository vừa sao chép:
cd host-yolov8-on-sagemaker-endpoint/yolov8-pytorch-cdk
Bước 3: Thiết lập môi trường CDK#
Sau khi có mã cần thiết, hãy thiết lập môi trường để triển khai bằng AWS CDK.
-
Tạo môi trường ảo Python: Việc này giúp tách biệt môi trường Python và các dependency. Chạy lệnh:
python3 -m venv .venv -
Kích hoạt môi trường ảo:
source .venv/bin/activate -
Cài đặt dependency: Cài đặt các dependency Python cần thiết cho dự án:
pip3 install -r requirements.txt -
Nâng cấp thư viện AWS CDK: Đảm bảo bạn có phiên bản mới nhất của thư viện AWS CDK:
pip install --upgrade aws-cdk-lib
Bước 4: Tạo stack AWS CloudFormation#
-
Tổng hợp ứng dụng CDK: Tạo template AWS CloudFormation từ mã CDK của bạn:
cdk synth -
Bootstrap ứng dụng CDK: Chuẩn bị môi trường AWS để triển khai bằng CDK:
cdk bootstrap -
Triển khai stack: Thao tác này sẽ tạo các tài nguyên AWS cần thiết và triển khai model của bạn:
cdk deploy
Bước 5: Triển khai model YOLO#
Sau khi tạo stack AWS CloudFormation, bước tiếp theo là triển khai YOLO26.
-
Mở Notebook Instance: Truy cập AWS Console và mở dịch vụ Amazon SageMaker. Chọn "Notebook Instances" trên dashboard, sau đó tìm notebook instance được tạo bởi script triển khai CDK. Mở notebook instance để truy cập môi trường Jupyter.
-
Truy cập và chỉnh sửa inference.py: Sau khi mở notebook instance SageMaker trong Jupyter, hãy tìm tệp inference.py. Chỉnh sửa hàm output_fn trong inference.py như minh họa bên dưới rồi lưu các thay đổi vào script, đồng thời đảm bảo không có lỗi cú pháp.
import json def output_fn(prediction_output, content_type): """Formats model outputs as JSON string, extracting attributes like boxes, masks, keypoints.""" print("Executing output_fn from inference.py ...") infer = {} for result in prediction_output: if result.boxes is not None: infer["boxes"] = result.boxes.numpy().data.tolist() if result.masks is not None: infer["masks"] = result.masks.numpy().data.tolist() if result.keypoints is not None: infer["keypoints"] = result.keypoints.numpy().data.tolist() if result.obb is not None: infer["obb"] = result.obb.numpy().data.tolist() if result.probs is not None: infer["probs"] = result.probs.numpy().data.tolist() return json.dumps(infer) -
Triển khai endpoint bằng 1_DeployEndpoint.ipynb: Trong môi trường Jupyter, mở notebook 1_DeployEndpoint.ipynb nằm trong thư mục sm-notebook. Đặt
model_nametrong notebook thành một checkpoint YOLO26, chẳng hạnyolo26n.pt(mặc định là model YOLOv8), sau đó chạy các cell để tải model, đóng gói model cùng code suy luận đã cập nhật và tải lên bucket Amazon S3. Notebook sẽ hướng dẫn bạn tạo và triển khai endpoint SageMaker cho model YOLO26.
Bước 6: Kiểm thử quá trình triển khai#
Sau khi triển khai model YOLO26, việc kiểm thử hiệu năng và chức năng của model là rất quan trọng.
-
Mở notebook kiểm thử: Trong cùng môi trường Jupyter, hãy tìm và mở notebook 2_TestEndpoint.ipynb, cũng nằm trong thư mục sm-notebook.
-
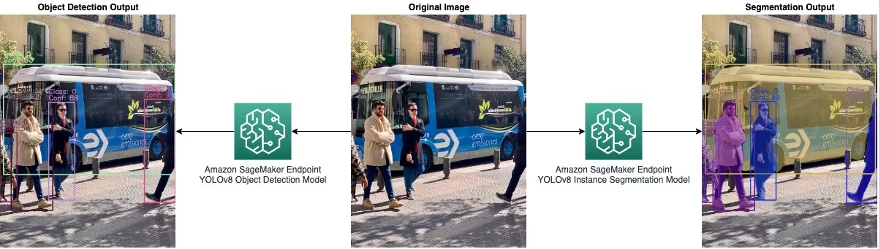
Chạy notebook kiểm thử: Làm theo hướng dẫn trong notebook để kiểm thử endpoint SageMaker đã triển khai. Quy trình này bao gồm gửi ảnh đến endpoint và chạy suy luận. Sau đó, bạn sẽ vẽ biểu đồ đầu ra để trực quan hóa hiệu năng và độ chính xác của model như minh họa bên dưới.
- Dọn dẹp tài nguyên: Notebook kiểm thử cũng sẽ hướng dẫn bạn dọn dẹp endpoint và model được host. Đây là bước quan trọng để quản lý chi phí và tài nguyên hiệu quả, đặc biệt nếu bạn chưa có kế hoạch sử dụng model đã triển khai ngay.
Bước 7: Giám sát và quản lý#
Sau khi kiểm thử, việc giám sát và quản lý liên tục model đã triển khai là điều cần thiết.
-
Giám sát bằng Amazon CloudWatch: Thường xuyên kiểm tra hiệu năng và tình trạng của endpoint SageMaker bằng Amazon CloudWatch.
-
Quản lý endpoint: Sử dụng console SageMaker để tiếp tục quản lý endpoint. Công việc này bao gồm mở rộng quy mô, cập nhật hoặc triển khai lại model khi cần.
Sau khi hoàn thành các bước này, bạn sẽ triển khai và kiểm thử được model YOLO26 trên Amazon SageMaker Endpoints. Quy trình tương tự cũng áp dụng khi triển khai các model khác trên AWS.
Tóm tắt#
Hướng dẫn này đã trình bày từng bước cách triển khai YOLO26 trên Amazon SageMaker Endpoints bằng AWS CloudFormation và AWS Cloud Development Kit (CDK). Quy trình bao gồm sao chép repository mẫu AWS từ bài đăng trên AWS Machine Learning Blog về hosting model YOLOv8 PyTorch trên Amazon SageMaker Endpoints, thiết lập môi trường CDK, triển khai model bằng các dịch vụ AWS và kiểm thử hiệu năng trên SageMaker.
Câu hỏi thường gặp#
Để triển khai model Ultralytics YOLO26 trên Amazon SageMaker Endpoints, hãy làm theo các bước sau:
- Thiết lập môi trường AWS: Đảm bảo bạn có Tài khoản AWS, các IAM role với quyền cần thiết và AWS CLI đã được cấu hình. Cài đặt AWS CDK nếu bạn chưa thực hiện (tham khảo hướng dẫn AWS CDK).
- Sao chép SageMaker repository của YOLO26:
git clone https://github.com/aws-samples/host-yolov8-on-sagemaker-endpoint.git cd host-yolov8-on-sagemaker-endpoint/yolov8-pytorch-cdk - Thiết lập môi trường CDK: Tạo môi trường ảo Python, kích hoạt môi trường, cài đặt các dependency và nâng cấp thư viện AWS CDK.
python3 -m venv .venv source .venv/bin/activate pip3 install -r requirements.txt pip install --upgrade aws-cdk-lib - Triển khai bằng AWS CDK: Tổng hợp và triển khai CloudFormation stack, đồng thời bootstrap môi trường.
cdk synth
cdk bootstrap
cdk deploy
Để triển khai YOLO26 trên Amazon SageMaker, hãy đảm bảo bạn đáp ứng các điều kiện tiên quyết sau:
- Tài khoản AWS: Tài khoản AWS đang hoạt động (đăng ký AWS.
- IAM role: Các IAM role đã cấu hình với quyền truy cập SageMaker, CloudFormation và Amazon S3.
- AWS CLI: AWS Command Line Interface đã được cài đặt và cấu hình (hướng dẫn cài đặt AWS CLI).
- AWS CDK: AWS Cloud Development Kit đã được cài đặt (hướng dẫn thiết lập CDK).
- Hạn mức dịch vụ: Có đủ hạn mức cho các instance
ml.m5.4xlargeđể sử dụng cho cả endpoint và notebook (yêu cầu tăng hạn mức).
Sử dụng Ultralytics YOLO26 trên Amazon SageMaker mang lại một số lợi ích:
- Khả năng mở rộng và quản lý: SageMaker cung cấp môi trường được quản lý với các tính năng như tự động mở rộng, hữu ích cho nhu cầu suy luận thời gian thực.
- Tích hợp với dịch vụ AWS: Tích hợp với các dịch vụ AWS khác, chẳng hạn như S3 để lưu trữ dữ liệu, CloudFormation để quản lý hạ tầng dưới dạng code và CloudWatch để giám sát.
- Triển khai dễ dàng: Đơn giản hóa quá trình thiết lập bằng các script AWS CDK và quy trình triển khai được tinh gọn.
- Hiệu năng: Sử dụng hạ tầng được quản lý của Amazon SageMaker để chạy workload suy luận quy mô lớn.
Có, bạn có thể tùy chỉnh logic suy luận của YOLO26 trên Amazon SageMaker:
-
Sửa đổi
inference.py: Tìm và tùy chỉnh hàmoutput_fntrong fileinference.pyđể điều chỉnh định dạng đầu ra.import json def output_fn(prediction_output, content_type): """Formats model outputs as JSON string, extracting attributes like boxes, masks, keypoints.""" infer = {} for result in prediction_output: if result.boxes is not None: infer["boxes"] = result.boxes.numpy().data.tolist() # Thêm logic xử lý nếu cần return json.dumps(infer) -
Triển khai model đã cập nhật: Đảm bảo bạn triển khai lại model bằng các Jupyter notebook được cung cấp (
1_DeployEndpoint.ipynb) để áp dụng những thay đổi này.
Tham khảo các bước chi tiết để triển khai model đã sửa đổi.
-
Để kiểm thử model YOLO26 đã triển khai trên Amazon SageMaker:
- Mở notebook kiểm thử: Tìm notebook
2_TestEndpoint.ipynbtrong môi trường SageMaker Jupyter. - Chạy notebook: Làm theo hướng dẫn trong notebook để gửi ảnh đến endpoint, thực hiện suy luận và hiển thị kết quả.
- Trực quan hóa kết quả: Sử dụng code vẽ biểu đồ trong notebook để vẽ bounding box dự đoán lên ảnh kiểm thử.
Để xem hướng dẫn kiểm thử đầy đủ, hãy truy cập phần kiểm thử.
- Mở notebook kiểm thử: Tìm notebook


Bình luận10
Đặt câu hỏi, chia sẻ kết quả hoặc giúp đỡ người khác.
 User
I want to upload the YOLOv8 model I trained on my own dataset to Jupyter, and then compress it into a
model.tar.gzfile following the officialdeployendpointsteps. However, when I usetestendpoint, I encounter an error. If I rename my trained model toyolov8, the test succeeds, but it uses the original model from the official website instead of my custom one. How should I modifyinference.pyto ensure it loads my trained model?1 Glenn JocherUltralytics
@lijoe123 to ensure your custom YOLOv8 model is used, modify the
inference.pyto load your model by specifying its path directly. Ensure the model name in your deployment matches your custom model's name. For detailed steps, refer to the Ultralytics documentation on Amazon SageMaker.- User
Thank you for your answer. I had followed the
1_DeployEndpoint.ipynbto delpoy my own model. In the 1.4 Create the SageMaker PyTorchModel, I had set theenv={'TS_MAX_RESPONSE_SIZE':'20000000', 'MY_MODEL': 'my_own_model'}. And in theinference.py:def model_fn(model_dir): print("Executing model_fn from inference.py ...") env = os.environ model = YOLO(os.path.join(model_dir, env['MY_MODEL'])) return modelI think it will be use my own model directly. But it failed, and it occur this problem:
ModelError: An error occurred (ModelError) when calling the InvokeEndpoint operation: Received server error (0)from primary with message "Your invocation timed out while waiting for a response from container primary. Reviewthe latency metrics for each container in Amazon Cloudatch, resolve the issue, and try again.". See https://useast-1. console. aws. aazon. com/cloudwatch/home?region=us-east-1#logEventViewer: group=/aws/sagemaker Endpoints/yolov8-pytorch-2024-09-06-11-33-49-418696 in account 211125332801 for more information.Could you tell me how to modify the
inference.pyto load my own model. Thank you so much. - Glenn JocherUltralytics
To ensure your custom YOLOv8 model is used, verify that the
model_fnininference.pycorrectly points to your model's path. Ensure theMY_MODELenvironment variable matches your model's filename. If issues persist, check CloudWatch logs for detailed error messages. For further guidance, refer to the Ultralytics documentation on Amazon SageMaker.
SJTUPanda
Thanks for your sharing, it's very clear and useful. My own deployment workflow on AWS has already built but the test result is not so satisfying. The performance of detection result of yolo11-xl on AWS is worse than on my own laptop. I not sure if there is some default quantization when it's deployed to the AWS(I did not modified much to host-yolov8-on-sagemaker-endpoint), or do you have some other ideas about which would bring this significant performance differences?
- Glenn JocherUltralytics
@SJTUPanda thank you for your feedback! The performance difference could stem from several factors like hardware disparities (AWS instance vs laptop GPU), inference settings, or environment configurations. First, verify that your SageMaker instance type matches your local hardware capabilities, and ensure identical inference parameters (e.g.,
imgsz,batch). Check our Amazon SageMaker deployment guide for optimization tips and consider profiling both environments withyolo valto isolate bottlenecks. Let us know if specific metrics differ! 🚀 Thanks for your quick reply. The issue is fixed after I comment out resize related code. Although the model is trained with (640,640) and the input image size is (720,440), using the raw images directly as input is better than resized it. I am curious the input images would be auto-resized by the model just as in the training/testing part? And why resized by myself has so much impact on the results? If these part code should be update because yolo version updating?
image_height, image_width, _ = orig_image.shape model_height, model_width = 640, 640 x_ratio = image_width/model_width y_ratio = image_height/model_height # Resize the image as numpy array resized_image = cv2.resize(orig_image, (model_height, model_width)) # Conver the array into jpeg resized_jpeg = cv2.imencode('.jpg', resized_image)[1] # Serialize the jpg using base 64 payload = base64.b64encode(resized_jpeg).decode('utf-8')- Glenn JocherUltralytics
Thank you for sharing your findings! YOLO models do automatically resize inputs to match their training dimensions while preserving aspect ratio with letterboxing. Manual resizing can distort aspect ratios or introduce artifacts, potentially degrading performance. We recommend using the model's native preprocessing by feeding full-size images directly, as this maintains proper scaling and aspect ratio handling. For implementation details, refer to our model deployment best practices regarding input consistency.
NikoXanthidis
Gostaria de saber se esses recursos são pagos.
- Glenn JocherUltralytics
Olá! 👋 Os recursos mencionados para implementar o YOLOv8 no Amazon SageMaker não são pagos por si só. No entanto, o uso do Amazon SageMaker e outros serviços da AWS associados à implementação e execução do modelo podem incorrer em custos conforme o uso. A AWS oferece uma camada gratuita que você pode aproveitar para experimentar alguns serviços sem custo, mas é sempre bom verificar a página de preços do SageMaker para detalhes específicos. Se precisar de ajuda para estimar os custos ou tiver outras dúvidas, estou aqui para ajudar! 🚀