التحقق المتقاطع بطريقة K-Fold باستخدام Ultralytics
مقدمة#
يوضح هذا الدليل كيفية تطبيق التحقق المتقاطع K-Fold على مجموعات بيانات كشف الأجسام ضمن منظومة Ultralytics. ويستخدم تنسيق YOLO للكشف ومكتبات Python مثل scikit-learn وpandas وPyYAML لشرح الإعداد، وإنشاء متجهات السمات، وتنفيذ تقسيم مجموعة البيانات باستخدام K-Fold.
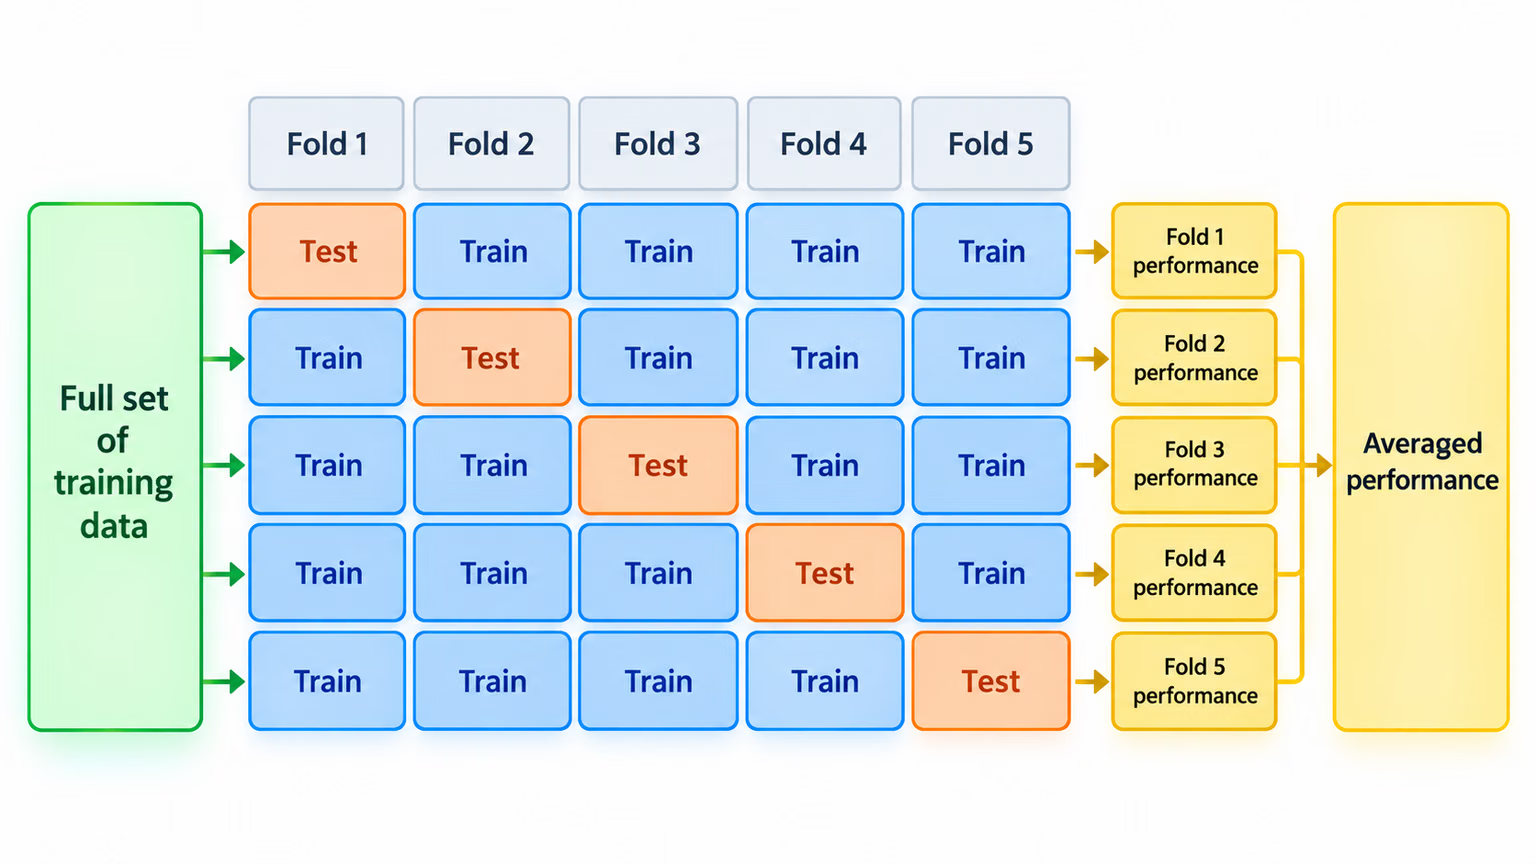
سواء أكان مشروعك يتضمن مجموعة بيانات كشف الفاكهة أم مصدر بيانات مخصصًا، يساعدك هذا البرنامج التعليمي على فهم التحقق المتقاطع K-Fold وتطبيقه لتحسين موثوقية نماذج التعلّم الآلي ومتانتها. وعلى الرغم من استخدامنا طيات k=5 في هذا البرنامج التعليمي، فتذكّر أن العدد الأمثل للطيات قد يختلف حسب مجموعة بياناتك وخصائص مشروعك. ويحقق التحقق المتقاطع K-Fold أكبر فائدة عندما تكون مجموعة بياناتك صغيرة أو مشوشة أو شديدة التباين؛ أما مجموعات البيانات الكبيرة والمتنوعة، فعادةً ما يكفيها تقسيم مدروس إلى مجموعات تدريب وتحقق واختبار.
الإعداد#
-
ينبغي أن تكون التعليقات التوضيحية بتنسيق YOLO للكشف.
-
يفترض هذا الدليل أن ملفات التعليقات التوضيحية متاحة محليًا.
-
نستخدم في العرض التوضيحي مجموعة بيانات Fruit Detection.
- تضم مجموعة البيانات هذه 8479 صورة إجمالًا.
- تتضمن 6 تسميات للفئات، ويُدرج أدناه إجمالي عدد المثيلات لكل فئة.
| تسمية الفئة | عدد المثيلات |
|---|---|
| تفاح | 7049 |
| عنب | 7202 |
| أناناس | 1613 |
| برتقال | 15549 |
| موز | 3536 |
| بطيخ | 1976 |
-
تشمل حزم Python الضرورية:
ultralyticssklearnpandaspyyaml
-
يستخدم هذا البرنامج التعليمي
k=5طيات. ومع ذلك، ينبغي لك تحديد العدد الأنسب من الطيات لمجموعة بياناتك المحددة.
-
أنشئ بيئة افتراضية جديدة لـPython (
venv) لمشروعك وفعّلها. استخدمpip(أو مدير الحزم الذي تفضّله) للتثبيت:- مكتبة Ultralytics:
pip install -U ultralytics. أو يمكنك استنساخ المستودع الرسمي. - Scikit-learn وpandas وPyYAML:
pip install -U scikit-learn pandas pyyaml.
- مكتبة Ultralytics:
-
تحقّق من أن تعليقاتك التوضيحية بتنسيق YOLO للكشف.
- في هذا البرنامج التعليمي، توجد جميع ملفات التعليقات التوضيحية في المجلد
Fruit-Detection/labels.
- في هذا البرنامج التعليمي، توجد جميع ملفات التعليقات التوضيحية في المجلد
إنشاء متجهات السمات لمجموعة بيانات اكتشاف الكائنات#
-
ابدأ بإنشاء ملف Python جديد باسم
example.pyلتنفيذ الخطوات أدناه. -
حمّل صور التدريب والتحقق المدرجة في ملف YAML لمجموعة البيانات باستخدام الفئة
YOLODatasetفي Ultralytics، مع ترك تقسيم الاختبار دون تغيير.from pathlib import Path from ultralytics.data.dataset import YOLODataset from ultralytics.data.utils import check_det_dataset yaml_file = "path/to/data.yaml" data = check_det_dataset(yaml_file) dataset_path = Path(data["path"]) sources = [] for split in ("train", "val"): source = data.get(split) if source: sources.extend(source if isinstance(source, list) else [source]) dataset = YOLODataset(sources, data=data, augment=False) images = [Path(p) for p in dataset.im_files] -
والآن، اقرأ محتويات ملف YAML الخاص بمجموعة البيانات واستخرج مؤشرات تسميات الفئات.
classes = data["names"] cls_idx = sorted(classes.keys()) -
أنشئ DataFrame فارغًا باسم
pandas.import pandas as pd labels_df = pd.DataFrame(0.0, columns=cls_idx, index=images) -
احسب عدد أمثلة كل تسمية فئة موجودة في ملفات التعليقات التوضيحية.
from collections import Counter for image, label in zip(images, dataset.labels): lbl_counter = Counter(label["cls"].flatten().astype(int)) labels_df.loc[image, list(lbl_counter)] = list(lbl_counter.values()) -
فيما يلي مثال على عرض DataFrame بعد تعبئته:
                                                       0    1    2    3    4    5
'0000a16e4b057580_jpg.rf.00ab48988370f64f5ca8ea4...'  0.0  0.0  0.0  0.0  0.0  7.0
'0000a16e4b057580_jpg.rf.7e6dce029fb67f01eb19aa7...'  0.0  0.0  0.0  0.0  0.0  7.0
'0000a16e4b057580_jpg.rf.bc4d31cdcbe229dd022957a...'  0.0  0.0  0.0  0.0  0.0  7.0
'00020ebf74c4881c_jpg.rf.508192a0a97aa6c4a3b6882...'  0.0  0.0  0.0  1.0  0.0  0.0
'00020ebf74c4881c_jpg.rf.5af192a2254c8ecc4188a25...'  0.0  0.0  0.0  1.0  0.0  0.0
 ...                                                  ...  ...  ...  ...  ...  ...
'ff4cd45896de38be_jpg.rf.c4b5e967ca10c7ced3b9e97...'  0.0  0.0  0.0  0.0  0.0  2.0
'ff4cd45896de38be_jpg.rf.ea4c1d37d2884b3e3cbce08...'  0.0  0.0  0.0  0.0  0.0  2.0
'ff5fd9c3c624b7dc_jpg.rf.bb519feaa36fc4bf630a033...'  1.0  0.0  0.0  0.0  0.0  0.0
'ff5fd9c3c624b7dc_jpg.rf.f0751c9c3aa4519ea3c9d6a...'  1.0  0.0  0.0  0.0  0.0  0.0
'fffe28b31f2a70d4_jpg.rf.7ea16bd637ba0711c53b540...'  0.0  6.0  0.0  0.0  0.0  0.0
تستخدم الصفوف مسارات الصور المطلقة، وتتوافق الأعمدة مع فهارس تسميات الفئات. وتظل التسميات المفقودة صفوفًا خلفية كلها أصفار. تتيح بنية البيانات هذه تطبيق التحقق المتقاطع K-Fold على مجموعة بيانات لكشف الأجسام.
تقسيم مجموعة البيانات بطريقة K-Fold#
-
سنستخدم الآن الفئة
KFoldمنsklearn.model_selectionلإنشاءkتقسيمات لمجموعة البيانات.- مهم:
- يضمن ضبط
shuffle=Trueتوزيعًا عشوائيًا للفئات في تقسيماتك. - يمكنك الحصول على نتائج قابلة للتكرار بضبط
random_state=Mبحيث تكون قيمةMعددًا صحيحًا تختاره.
- يضمن ضبط
from sklearn.model_selection import KFold ksplit = 5 kf = KFold(n_splits=ksplit, shuffle=True, random_state=20) # ضبط random_state للحصول على نتائج قابلة للتكرار kfolds = list(kf.split(labels_df)) - مهم:
-
قُسّمت مجموعة البيانات الآن إلى
kطيات، تحتوي كل منها على قائمة بمؤشراتtrainوval. سننشئ DataFrame لعرض هذه النتائج بوضوح أكبر.folds = [f"split_{n}" for n in range(1, ksplit + 1)] folds_df = pd.DataFrame(index=labels_df.index, columns=folds) for i, (train, val) in enumerate(kfolds, start=1): folds_df.loc[labels_df.index[train], f"split_{i}"] = "train" folds_df.loc[labels_df.index[val], f"split_{i}"] = "val" -
سنحسب الآن توزيع تسميات الفئات لكل طية كنسبة الفئات الموجودة في
valإلى الفئات الموجودة فيtrain.fold_lbl_distrb = pd.DataFrame(index=folds, columns=cls_idx) for n, (train_indices, val_indices) in enumerate(kfolds, start=1): train_totals = labels_df.iloc[train_indices].sum() val_totals = labels_df.iloc[val_indices].sum() # To avoid division by zero, we add a small value (1E-7) to the denominator ratio = val_totals / (train_totals + 1e-7) fold_lbl_distrb.loc[f"split_{n}"] = ratioمن الأفضل أن تكون نسب جميع الفئات متقاربة إلى حد معقول في كل تقسيم وبين الفئات. لكن ذلك يعتمد على خصائص مجموعة بياناتك.
-
اكتب قوائم الصور وملف YAML لمجموعة البيانات لكل تقسيم. تتيح القوائم النصية تجنب نسخ مجموعة البيانات
kمرة.import yaml save_path = dataset_path.parent / f"{ksplit}-Fold_Cross-val" save_path.mkdir(parents=True, exist_ok=True) ds_yamls = [] for split in folds_df.columns: for partition in ("train", "val"): split_images = folds_df.index[folds_df[split] == partition] paths = "\n".join(map(str, split_images)) (save_path / f"{split}_{partition}.txt").write_text(f"{paths}\n") dataset_yaml = save_path / f"{split}.yaml" ds_yamls.append(dataset_yaml) with open(dataset_yaml, "w") as ds_y: yaml.safe_dump( { "path": save_path.as_posix(), "train": f"{split}_train.txt", "val": f"{split}_val.txt", "names": classes, }, ds_y, )
حفظ السجلات (اختياري)#
يمكنك اختياريًا حفظ سجلات تقسيم K-Fold وDataFrame توزيع التسميات في ملفات CSV للرجوع إليها مستقبلًا.
folds_df.to_csv(save_path / "kfold_datasplit.csv")
fold_lbl_distrb.to_csv(save_path / "kfold_label_distribution.csv")
تدريب YOLO باستخدام تقسيمات بيانات K-Fold#
-
حمّل نموذج YOLO أولًا.
from ultralytics import YOLO weights_path = "path/to/weights.pt" # استخدم yolo26n.pt لنموذج صغير model = YOLO(weights_path, task="detect") -
بعد ذلك، كرر العملية على ملفات YAML لمجموعات البيانات لتشغيل التدريب. وستُحفظ النتائج في دليل تحدده الوسيطتان
projectوname. ويكون هذا الدليل افتراضيًاruns/detect/train#، حيث يشير#إلى فهرس صحيح.results = {} # Define your additional arguments here batch = 16 project = "kfold_demo" epochs = 100 for k, dataset_yaml in enumerate(ds_yamls): model = YOLO(weights_path, task="detect") results[k] = model.train( data=dataset_yaml, epochs=epochs, batch=batch, project=project, name=f"fold_{k + 1}" ) # include any additional train arguments -
يمكنك أيضًا استخدام دالة autosplit في Ultralytics لتقسيم مجموعة البيانات تلقائيًا:
from ultralytics.data.split import autosplit # تقسيم مجموعة البيانات تلقائيًا إلى تدريب/تحقق/اختبار autosplit(path="path/to/images", weights=(0.8, 0.2, 0.0), annotated_only=True)
الخلاصة#
استعرضنا في هذا الدليل عملية استخدام التحقق المتقاطع بطريقة K-Fold لتدريب نموذج YOLO لاكتشاف الكائنات. وتعلّمنا كيفية تقسيم مجموعة التدريب والتحقق إلى K أقسام، واستخدام جدول النسب الناتج لفحص توازن الفئات بعد التقسيم العشوائي.
استكشفنا أيضًا طريقة إنشاء إطارات بيانات للتقارير بغرض تصور تقسيمات البيانات وتوزيعات التسميات بينها، مما يوفر صورة واضحة لبنية مجموعتي التدريب والتحقق.
حفظنا سجلاتنا اختياريًا للرجوع إليها مستقبلًا، وقد يكون ذلك مفيدًا على نحو خاص في المشاريع الكبيرة أو عند استكشاف مشكلات أداء النموذج وإصلاحها.
وأخيرًا، نفّذنا تدريب النموذج فعليًا باستخدام كل تقسيم ضمن حلقة، وحفظنا نتائج التدريب لإجراء مزيد من التحليل والمقارنة.
تُعد تقنية التحقق المتقاطع بطريقة K-Fold وسيلة متينة لتحقيق أقصى استفادة من البيانات المتاحة، كما تساعد على ضمان موثوقية أداء النموذج واتساقه عبر مجموعات فرعية مختلفة من البيانات. وينتج عن ذلك نموذج أكثر قدرة على التعميم وأكثر موثوقية، وأقل عرضة لـفرط التكيّف مع أنماط بيانات محددة.
تذكّر أنه على الرغم من استخدام YOLO في هذا الدليل، يمكن تطبيق هذه الخطوات في الغالب على نماذج أخرى للتعلّم الآلي. ويتيح لك فهم هذه الخطوات تطبيق التحقق المتقاطع بفاعلية في مشاريعك الخاصة للتعلّم الآلي.
الأسئلة الشائعة#
التحقق المتقاطع بطريقة K-Fold تقنية تُقسّم فيها مجموعة البيانات إلى مجموعات فرعية ('k' طيات) لتقييم أداء النموذج بموثوقية أكبر. وتُستخدم كل طية بوصفها بيانات تدريب وبيانات تحقق على حد سواء. وفي سياق اكتشاف الكائنات، يساعد استخدام التحقق المتقاطع بطريقة K-Fold على ضمان متانة أداء نموذج Ultralytics YOLO وقدرته على التعميم عبر تقسيمات بيانات مختلفة، ما يعزز موثوقيته. للحصول على تعليمات مفصّلة حول إعداد التحقق المتقاطع بطريقة K-Fold مع Ultralytics YOLO، راجع التحقق المتقاطع بطريقة K-Fold باستخدام Ultralytics.
لتطبيق التحقق المتقاطع بطريقة K-Fold مع Ultralytics YOLO، اتبع الخطوات التالية:
- تحقّق من أن التعليقات التوضيحية بتنسيق YOLO للكشف.
- استخدم مكتبات Python مثل
sklearnوpandasوpyyaml. - أنشئ متجهات السمات من مجموعة بياناتك.
- قسّم مجموعة بياناتك باستخدام
KFoldمنsklearn.model_selection. - درّب نموذج YOLO على كل تقسيم.
للاطلاع على دليل شامل، راجع قسم تقسيم مجموعة البيانات بطريقة K-Fold في وثائقنا.
يستهدف سير العمل في هذا الدليل تنسيق YOLO للكشف، لكن النهج نفسه قابل للتكييف مع كل مهام YOLO — فالمهمة تغيّر طريقة تكوين الطيات، لا مدى فائدة التحقق المتقاطع:
المهمة تصميم الطيات detectقسّم على مستوى الصورة، مع موازنة توزيعات الكائنات والفئات بين الطيات. واجمع الصور المترابطة (للمريض نفسه أو تسلسل الفيديو نفسه أو الكاميرا أو الموقع نفسه) ضمن طية واحدة. segmentاستخدم استراتيجية الكشف نفسها على مستوى الصورة، مع الحفاظ أيضًا على تغطية الأقنعة والفئات في كل طية. classifyيُفضّل استخدام طيات طبقية للحفاظ على توازن تكرارات الفئات بين التدريب والتحقق. poseقسّم حسب الشخص أو التسلسل بحيث لا يظهر الشخص أو الحيوان نفسه على جانبي الطية. obbقسّم على مستوى الصورة، مع إبقاء المربعات أو القصاصات من المشهد نفسه معًا — وهذا مهم بوجه خاص للصور الجوية. مهما كانت المهمة، أبقِ العينات المتشابهة جدًا والعينات ذات الصلة خارج الطيات المتقابلة؛ فهذا النوع من التسرّب يرفع مقاييس التحقق إلى ما يتجاوز بكثير ما سيحققه النموذج في بيئة الإنتاج.
يوفر Ultralytics YOLO أحدث تقنيات اكتشاف الكائنات في الزمن الحقيقي، مع دقة وكفاءة عاليتين. وهو متعدد الاستخدامات، إذ يدعم مهام الرؤية الحاسوبية المتعددة، مثل الاكتشاف وتقسيم المثيلات والتقسيم الدلالي والتصنيف. كما يتكامل مع أدوات مثل Ultralytics Platform لتدريب النماذج ونشرها دون كتابة تعليمات برمجية.
ينبغي أن تتبع تعليقاتك التوضيحية تنسيق YOLO للكشف. يجب أن يسرد كل ملف تعليقات توضيحية فئة الكائن، إلى جانب إحداثيات الصندوق المحيط به في الصورة. يضمن تنسيق YOLO معالجة بيانات مبسطة وموحّدة لتدريب نماذج اكتشاف الكائنات. لمزيد من المعلومات حول تنسيق التعليقات التوضيحية على النحو الصحيح، راجع دليل تنسيق YOLO للكشف.
نعم، يمكنك استخدام التحقق المتقاطع بطريقة K-Fold مع أي مجموعة بيانات مخصصة، ما دامت التعليقات التوضيحية بتنسيق YOLO للكشف. استبدل مسارات مجموعة البيانات وتسميات الفئات بما يناسب مجموعة بياناتك المخصصة. وتضمن هذه المرونة استفادة أي مشروع لاكتشاف الكائنات من تقييم متين للنموذج باستخدام التحقق المتقاطع بطريقة K-Fold. للاطلاع على مثال عملي، راجع قسم إنشاء متجهات السمات.


التعليقات21
اطرح سؤالًا، وشارك نتائجك، أو ساعد شخصًا آخر.
jingieboy
does this work with yolov8-cls? if so how would the folder structure look like? how are the data splits
 Glenn JocherUltralytics(تم التعديل)
Yes—K‑Fold works the same for classification; use the standard ImageNet-style layout per fold, and train each fold separately (YOLO infers classes from folder names). For YOLO26 (recommended) you can do:
dataset/
  split_1/
    train/
      class_a/ ...
      class_b/ ...
    val/
      class_a/ ...
      class_b/ ...
  split_2/
    train/...
    val/...
  ...
from ultralytics import YOLO weights = "yolo26n-cls.pt" # swap to 'yolov8n-cls.pt' if you prefer YOLOv8 splits = ["dataset/split_1", "dataset/split_2", "dataset/split_3"] for d in splits: model = YOLO(weights) model.train(data=d, epochs=20, batch=16) # d must contain 'train/' and 'val/' subfoldersFor building folds, use
StratifiedKFoldon image-level labels derived from parent folder names to keep class balance, or use the random splitter shown in the autosplit reference if stratification isn’t required. Classification usage details are in the classification task docs.thank you for this! I have also notice that everytime I run model.val(), the accuracies and confusion matrix values are slightly different this time. Is this normal or during evaluation, there is a small randomness when calling the function.
- Glenn JocherUltralytics
@jingieboy minor variations can occur from non-deterministic CUDA ops or multi-threading; validation itself doesn’t add randomness by default—set seeds and force deterministic ops to lock results:
import random, numpy as np, torch

seed = 0
random.seed(seed); np.random.seed(seed); torch.manual_seed(seed)
torch.backends.cudnn.deterministic = True
torch.backends.cudnn.benchmark = False

model.val()  # run evaluation
If differences are still large, double-check your eval args in the validation mode docs.
Nehasq
Hi, I am applying K-fold validation using the leave-one-out technique. My dataset consists of a single class and includes 21 images in total. For each split, I use 20 images for training and 1 image for testing. I am implementing the leave-one-out technique with the code above, setting ksplit=21.
I am not using a separate validation dataset, only training and testing data. Here is the code I am using:
results = {}
Define additional arguments here
batch = 16 project = "kfold_demo" epochs = 100
for k in range(ksplit): dataset_yaml = ds_yamls[k] model = YOLO(weights_path, task="detect") model.train(data=dataset_yaml, epochs=epochs, batch=batch, project=project) # Include any train arguments results[k] = model.metrics # Save output metrics for further analysis
In my data.yaml file, I have provided the validation path as the test set. When it trains and validates on the "1 test data," does this mean the model is being tested on data it has never seen during training? This is my first point of confusion.
my data.yaml file for each split looks like this: names:
- pothole path: ../ 2024-12-10_21-Fold_Cross-val/split_1 train: train val: test
My second question is about calculating the final performance. When I ran the above code, it calculated scores for each individual split. Do I need to calculate the final performance metrics manually, or is there any functionality in YOLOv8 to compute the aggregated performance automatically?
- Glenn JocherUltralytics
@Nehasq to address your first question, yes, the model is being tested on unseen data during each split, as the test set (1 image) is excluded from training and only used for validation. Regarding your second question, YOLO does not automatically aggregate metrics across splits. You need to compute the final performance metrics manually by averaging the results from all splits. For reference, you can review the K-Fold Cross Validation guide.
Thanks for your reply. I understand your point. So, are you saying that, for example, in my case, where I have 21 scores (precision, recall, etc.), I should simply add all the precision values together and divide the sum by 21 to get the final precision of the model? Is that correct?
Also, in y case of 20 images( training) and 1 images for test, what batch size would you suggest?
- Glenn JocherUltralytics
Yes, to calculate the final precision (or any metric), you average the values across all splits, i.e., sum all precision scores and divide by the number of splits (21 in your case). As for the batch size, given your small dataset, you could keep it low (e.g., 1 or 2) to ensure efficient utilization of the data while avoiding overfitting.
Thanks, that really helps! With a batch size of 1, I am keeping the epochs at 10. Should it be fewer? Also, to check for overfitting, I need to review the result graphs for each split. However, I can't definitively determine if it is overfitting since each split is separate, right?
- Glenn JocherUltralytics
Keeping epochs at 10 with a batch size of 1 is reasonable given your small dataset size. To check for overfitting, reviewing result graphs from each split can help, but overfitting may be harder to detect since each split involves different training and test data. Consider comparing trends across splits for consistent insights. For further details, you can reference the K-Fold Cross Validation guide.
semyon-v-dot
After the loop:
for ext in supported_extensions:
    images.extend(sorted((dataset_path / "images").rglob(f"*{ext}")))
Should be this line of code:
images = sorted(images)For
imagesmatching withlabelslist:labels = sorted(dataset_path.rglob("*labels/*.txt"))Otherwise the script creates background images because some images missing their labels.
- Glenn JocherUltralytics
@semyon-v-dot thank you for your suggestion. Sorting the
imageslist after extending it with supported extensions is a good practice to ensure alignment with thelabelslist. This helps prevent issues with missing labels.1
 sangeun jo
K-폴드 데이터 세트 분할 4번에서
images.extend(sorted((dataset_path / "images").rglob(f"*{ext}")))이 코드를images.extend(sorted(dataset_path.rglob(f"*images/*{ext}")))로 변환해야 작동했습니다.- Glenn JocherUltralytics
@sangeun-jo thank you for pointing that out. Your modification to
images.extend(sorted(dataset_path.rglob(f"*images/*{ext}")))is indeed correct and ensures the code works as intended. If you have any further questions or need additional assistance, feel free to ask!
kh-diab
is it usefult to use this k fold approach when I just have one class only but my issue is the class is detected as background or vice versa as per the attached Confusion matrix
- Glenn JocherUltralytics
@kh-diab using K-Fold Cross Validation can still be beneficial even with a single class. It helps ensure that your model's performance is robust and not overly dependent on a particular subset of the data. This can be particularly useful if you're experiencing issues with class detection accuracy, as it allows you to validate the model's performance across multiple splits and identify any inconsistencies. If your class is being detected as background or vice versa, K-Fold Cross Validation can help diagnose whether this issue is consistent across different data splits or specific to certain subsets. For more details, you can refer to our guide on K-Fold Cross Validation: https://docs.ultralytics.com/guides/kfold-cross-validation/.
alexander-sony
Good guide, consider adding it in a colab notebook.
In section "Train YOLO using K-Fold Data Splits", model should be re-initialized foe every k, i.e. it should be inside the for-loop: for k in range(ksplit).
- Glenn JocherUltralytics
@alexander-sony thank you for your feedback and suggestion! 😊
You're absolutely right about re-initializing the model within the loop for each fold to ensure a fresh start for every training iteration. This can help avoid any potential carryover effects from previous folds. Here's the corrected code snippet for the training section:
from ultralytics import YOLO

weights_path = "path/to/weights.pt"
results = {}

# Define your additional arguments here
batch = 16
project = "kfold_demo"
epochs = 100

for k in range(ksplit):
    model = YOLO(weights_path, task="detect")  # Re-initialize the model inside the loop
    dataset_yaml = ds_yamls[k]
    model.train(data=dataset_yaml, epochs=epochs, batch=batch, project=project)  # include any train arguments
    results[k] = model.metrics  # save output metrics for further analysis
Regarding your suggestion to add this guide to a Colab notebook, that's a fantastic idea! It would make the process more interactive and accessible for users. We'll consider creating a Colab version of this guide in the future.
For more details on K-Fold Cross Validation, you can refer to our comprehensive guide.
Thanks again for your valuable input! If you have any more suggestions or questions, feel free to share. Happy coding! 🚀
Likhith-Sugganahalli
@alexander-sony
woudnt that be a new model trained on each split, giving us n different models trained on 1/nth of the dataset?
 Fazri Gading
Is there any way to implement Stratified K-Fold Cross Validation with YOLOv8?
 Paula DerrengerUltralytics
Yes, you can implement Stratified K-Fold Cross Validation with YOLOv8! Stratified K-Fold ensures that each fold has a similar distribution of class labels, which can be particularly useful for imbalanced datasets.
To achieve this, you can use
StratifiedKFoldfromsklearn.model_selectioninstead ofKFold. Here's a brief example of how to modify the K-Fold implementation:from sklearn.model_selection import StratifiedKFold # Assuming labels_df is your DataFrame with class counts ksplit = 5 skf = StratifiedKFold(n_splits=ksplit, shuffle=True, random_state=20) # Generate stratified splits kfolds = list(skf.split(labels_df, labels_df.idxmax(axis=1))) # The rest of the process remains the sameFor a detailed guide on K-Fold Cross Validation, please refer to the Ultralytics documentation. If you have any more questions, feel free to ask! 😊
1