Guía de inicio rápido: Raspberry Pi con Ultralytics YOLO26
Raspberry Pi es un ordenador pequeño y asequible que ejecuta Ultralytics YOLO26 para la detección de objetos en tiempo real en el borde, sin necesidad de GPU. Esta guía te explica cómo desplegar YOLO26 en Raspberry Pi 4 y 5: grabar la imagen del sistema operativo, instalar Ultralytics, exportar a NCNN para obtener la inferencia más rápida en ARM y ejecutar predicciones sobre el flujo de vídeo en directo de una cámara. También incluye pruebas de rendimiento de ocho formatos de exportación para que puedas elegir el mejor equilibrio entre velocidad y precisión para tu hardware.
Ve directamente a configurar Ultralytics, exportar a NCNN y ejecutar la inferencia, las pruebas de rendimiento o la inferencia con cámara.
Ver: Novedades y mejoras de Raspberry Pi 5.
Esta guía se ha probado con Raspberry Pi 4 y Raspberry Pi 5 con la última versión de Raspberry Pi OS Bookworm (Debian 12). Se espera que esta guía también funcione con dispositivos Raspberry Pi antiguos, como Raspberry Pi 3, siempre que tengan instalado Raspberry Pi OS Bookworm.
¿Qué es Raspberry Pi?#
Raspberry Pi es un ordenador de placa única pequeño y asequible. Se ha popularizado en una amplia variedad de proyectos y aplicaciones, desde la domótica para aficionados hasta los usos industriales. Las placas Raspberry Pi pueden ejecutar distintos sistemas operativos e incluyen pines GPIO (entrada/salida de propósito general) que permiten integrar fácilmente sensores, actuadores y otros componentes de hardware. Hay distintos modelos con especificaciones variadas, pero todos comparten la misma filosofía de diseño: bajo coste, tamaño compacto y versatilidad.
Comparativa de la serie Raspberry Pi#
| Raspberry Pi 3 | Raspberry Pi 4 | Raspberry Pi 5 | |
|---|---|---|---|
| CPU | Broadcom BCM2837, SoC Cortex-A53 de 64 bits | Broadcom BCM2711, SoC Cortex-A72 de 64 bits | Broadcom BCM2712, SoC Cortex-A76 de 64 bits |
| Frecuencia máxima de la CPU | 1.4GHz | 1.8GHz | 2.4GHz |
| GPU | VideoCore IV | VideoCore VI | VideoCore VII |
| Frecuencia máxima de GPU | 400MHz | 500MHz | 800MHz |
| Memoria | SDRAM LPDDR2 de 1 GB | SDRAM LPDDR4-3200 de 1 GB, 2 GB, 4 GB y 8 GB | SDRAM LPDDR4X-4267 de 2 GB, 4 GB, 8 GB y 16 GB |
| PCIe | N/D | N/D | Interfaz PCIe 2.0 1x |
| Consumo máximo | 2.5A@5V | 3A@5V | 5A@5V (PD habilitado) |
¿Qué es Raspberry Pi OS?#
Raspberry Pi OS (antes conocido como Raspbian) es un sistema operativo similar a Unix basado en la distribución GNU/Linux Debian para la familia de ordenadores compactos de placa única Raspberry Pi, distribuidos por la Raspberry Pi Foundation. Raspberry Pi OS está muy optimizado para Raspberry Pi con CPU ARM y utiliza un entorno de escritorio ligero que se ejecuta en Wayland de forma predeterminada en Raspberry Pi 4 y 5. Raspberry Pi OS está en desarrollo activo, con especial atención a mejorar la estabilidad y el rendimiento de tantos paquetes de Debian como sea posible en Raspberry Pi.
Graba Raspberry Pi OS en Raspberry Pi#
Lo primero que debes hacer al recibir una Raspberry Pi es grabar Raspberry Pi OS en una tarjeta micro-SD, insertarla en el dispositivo e iniciar el sistema operativo. Sigue la documentación de inicio de Raspberry Pi para preparar el dispositivo antes de usarlo por primera vez.
Configura Ultralytics#
Puedes configurar el paquete Ultralytics en Raspberry Pi de dos formas para tu próximo proyecto de visión artificial:
Empieza con Docker#
La forma más rápida de empezar a usar Ultralytics YOLO26 en Raspberry Pi es ejecutar una imagen Docker precompilada para Raspberry Pi.
Ejecuta el comando siguiente para descargar el contenedor Docker y ejecutarlo en Raspberry Pi. Se basa en la imagen oficial de Python 3.13-slim, que ejecuta Python 3.13 en la versión más reciente de Debian.
t=ultralytics/ultralytics:latest-arm64
sudo docker pull $t && sudo docker run -it --ipc=host $t
La imagen Docker ya incluye Ultralytics, así que puedes pasar directamente a exportar tu modelo a NCNN.
Empieza sin Docker#
Instala el paquete Ultralytics#
Aquí instalaremos el paquete Ultralytics en Raspberry Pi. Las dependencias de exportación para formatos como NCNN se instalan automáticamente la primera vez que exportas un modelo PyTorch, así que aquí solo hace falta el paquete base.
-
Actualiza la lista de paquetes, instala pip y actualízalo a la última versión
sudo apt update sudo apt install python3-pip -y pip install -U pip -
Instala el paquete pip
ultralyticspip install ultralytics -
Reinicia el dispositivo
sudo reboot
Usa NCNN en Raspberry Pi#
De todos los formatos de exportación de modelos compatibles con Ultralytics, NCNN ofrece el mejor rendimiento de inferencia en dispositivos Raspberry Pi, ya que está muy optimizado para plataformas móviles e integradas, como ARM. Convierte tu modelo YOLO26n de PyTorch a NCNN y, después, ejecuta la inferencia con el modelo exportado:
from ultralytics import YOLO

# Carga un modelo YOLO26n de PyTorch
model = YOLO("yolo26n.pt")

# Exporta el modelo al formato NCNN
model.export(format="ncnn")  # creates 'yolo26n_ncnn_model'

# Carga el modelo exportado a NCNN
ncnn_model = YOLO("yolo26n_ncnn_model")

# Ejecutar inferencia
results = ncnn_model("https://ultralytics.com/images/bus.jpg")Para obtener más información sobre las opciones de exportación compatibles, consulta la guía de opciones de implementación de modelos.
Mejoras de rendimiento de YOLO26 respecto a YOLO11#
YOLO26 está diseñado específicamente para funcionar en dispositivos con recursos limitados, como Raspberry Pi 5. En comparación con YOLO11n, YOLO26n ofrece un aumento de ~15 % en FPS (6.79 → 7.79) y una mAP superior (40.1 frente a 39.5) con un tamaño de entrada de 640 y modelos exportados a ONNX en Raspberry Pi 5. La tabla y el gráfico siguientes muestran esta comparación.
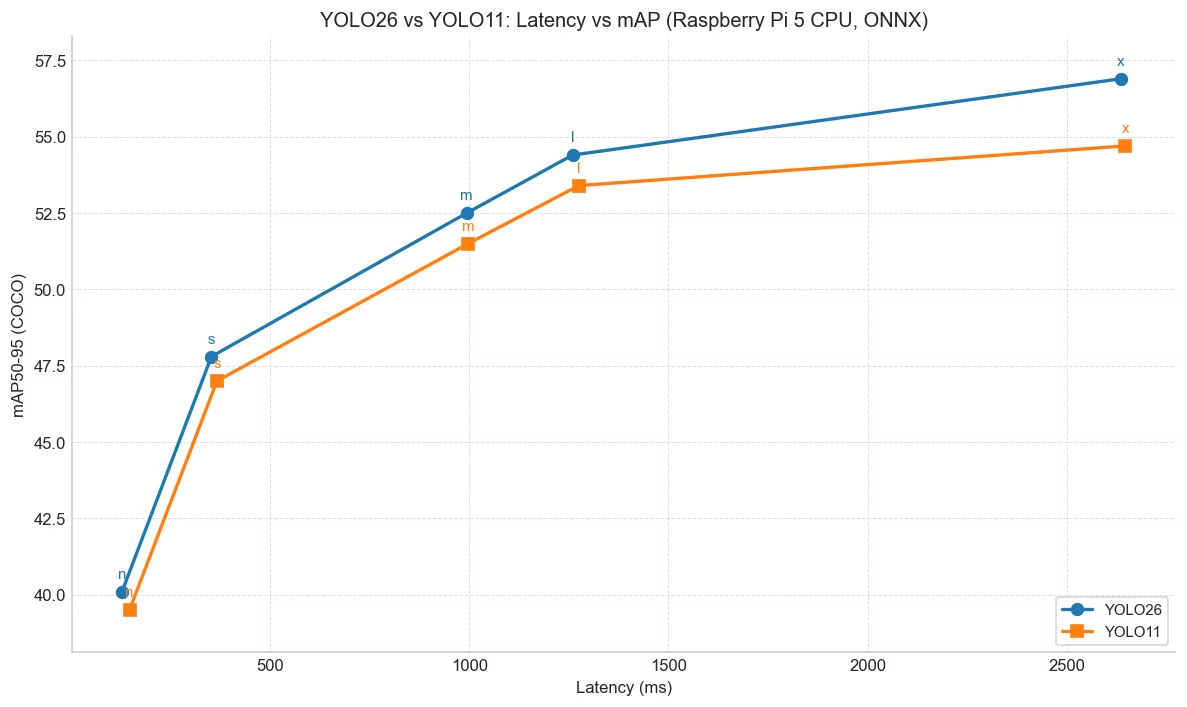
| Modelo | mAP50-95(B) | Tiempo de inferencia (ms/im) |
|---|---|---|
| YOLO26n | 40.1 | 128.42 |
| YOLO26s | 47.8 | 352.84 |
| YOLO26m | 52.5 | 993.78 |
| YOLO26l | 54.4 | 1259.46 |
| YOLO26x | 56.9 | 2636.26 |
Pruebas realizadas con Ultralytics 8.4.14.
Pruebas de YOLO26 en Raspberry Pi 5#
El equipo de Ultralytics realizó pruebas de rendimiento de YOLO26 en ocho formatos de modelo distintos para medir la velocidad y la precisión: PyTorch, TorchScript, ONNX, OpenVINO, LiteRT, MNN, NCNN y ExecuTorch. Las pruebas se realizaron en una Raspberry Pi 5 con precisión FP32 y un tamaño de imagen de entrada predeterminado de 640.
Gráfico comparativo#
Solo se incluyen YOLO26n y YOLO26s, porque los modelos de mayor tamaño son demasiado lentos para resultar prácticos en Raspberry Pi.
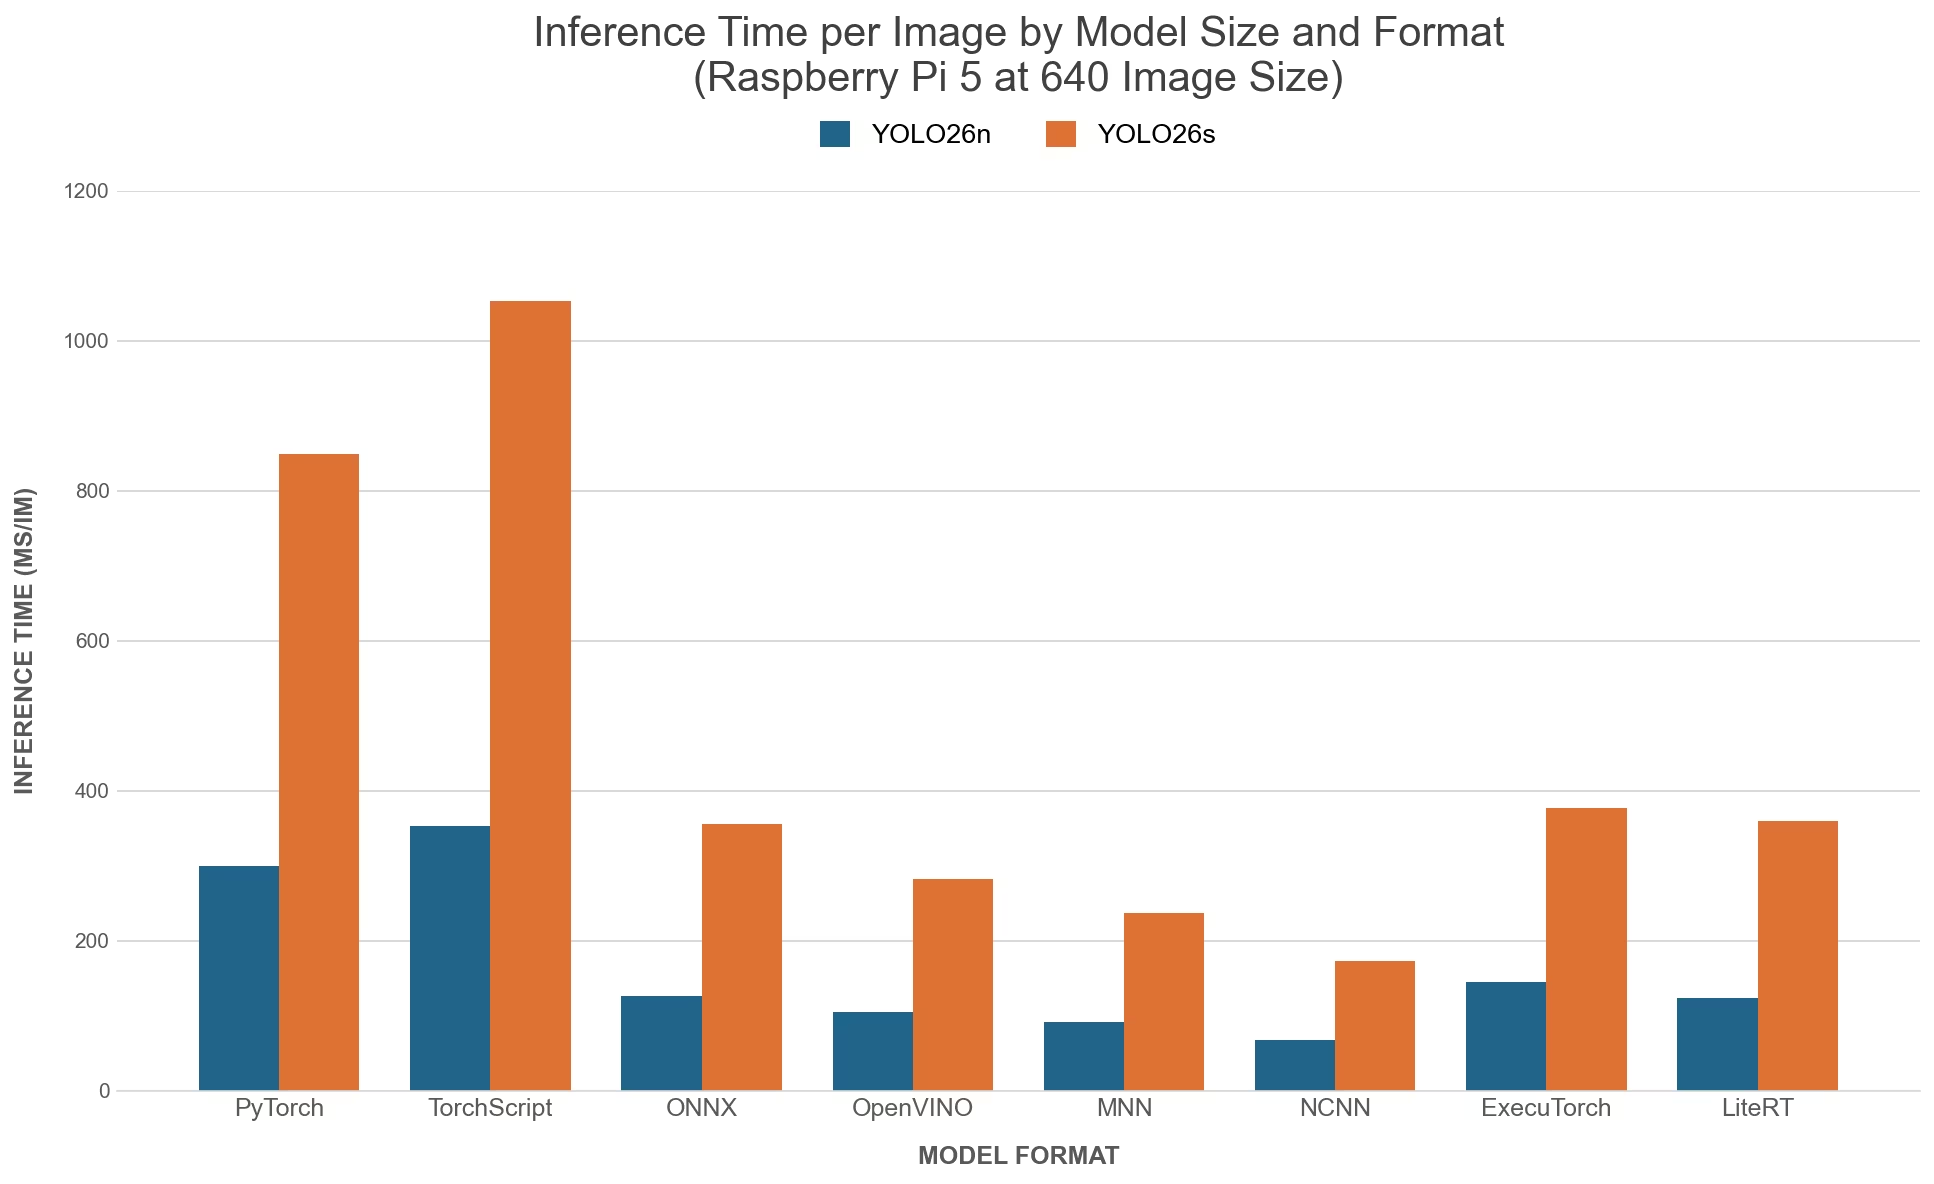
Tabla comparativa detallada#
La tabla siguiente muestra los resultados del benchmark de dos modelos distintos (YOLO26n, YOLO26s) en ocho formatos diferentes (PyTorch, TorchScript, ONNX, OpenVINO, LiteRT, MNN, NCNN, ExecuTorch), ejecutados en una Raspberry Pi 5, e indica el estado, el tamaño, la métrica mAP50-95(B) y el tiempo de inferencia de cada combinación.
| Formato | Estado | Tamaño en disco (MB) | mAP50-95(B) | Tiempo de inferencia (ms/im) |
|---|---|---|---|---|
| PyTorch | ✅ | 5.3 | 0.4760 | 299.09 |
| TorchScript | ✅ | 9.8 | 0.4734 | 353.20 |
| ONNX | ✅ | 9.5 | 0.4734 | 125.99 |
| OpenVINO | ✅ | 9.6 | 0.4734 | 104.55 |
| LiteRT | ✅ | 9.8 | 0.4730 | 123.30 |
| MNN | ✅ | 9.4 | 0.4749 | 91.87 |
| NCNN | ✅ | 9.4 | 0.4784 | 67.03 |
| ExecuTorch | ✅ | 9.4 | 0.4772 | 144.83 |
Pruebas realizadas con Ultralytics 8.4.108
El tiempo de inferencia no incluye el preprocesamiento ni el posprocesamiento.
Reproduce nuestros resultados#
Para reproducir las pruebas de Ultralytics anteriores con todos los formatos de exportación, ejecuta este código:
from ultralytics import YOLO

# Carga un modelo YOLO26n de PyTorch
model = YOLO("yolo26n.pt")

# Prueba la velocidad y la precisión de YOLO26n en el conjunto de datos COCO128 con todos los formatos de exportación
results = model.benchmark(data="coco128.yaml", imgsz=640)
Ten en cuenta que los resultados de las pruebas de rendimiento pueden variar según la configuración exacta de hardware y software del sistema, así como la carga de trabajo del sistema en el momento de ejecutar las pruebas. Para obtener los resultados más fiables, usa un conjunto de datos con muchas imágenes, p. ej., data='coco.yaml' (5000 imágenes de validación).
La exportación a format=litert (mediante litert-torch) solo es compatible con Linux x86_64 y macOS, no con la propia Raspberry Pi. Exporta el modelo .tflite en un equipo Linux x86_64 o un Mac, cópialo a la Raspberry Pi y utiliza la Pi para la inferencia.
Usa la cámara de Raspberry Pi#
Los proyectos de visión artificial en Raspberry Pi suelen necesitar señales de vídeo en tiempo real para la inferencia. El conector MIPI CSI integrado en Raspberry Pi permite conectar módulos de cámara oficiales de Raspberry Pi. En esta guía hemos utilizado una Raspberry Pi Camera Module 3 para capturar vídeo y realizar inferencias con modelos YOLO26.
Más información sobre los distintos módulos de cámara que ofrece Raspberry Pi y sobre cómo empezar a utilizar los módulos de cámara de Raspberry Pi.
Raspberry Pi 5 utiliza conectores CSI más pequeños que Raspberry Pi 4 (22 pines frente a 15), así que necesitarás un cable adaptador de 15 a 22 pines para conectar una cámara Raspberry Pi.
Prueba la cámara#
Ejecuta el siguiente comando rpicam-hello después de conectar la cámara a Raspberry Pi. Deberías ver la señal de vídeo en directo de la cámara durante unos 5 segundos.
rpicam-helloInferencia con la cámara#
Hay dos métodos para utilizar la cámara de Raspberry Pi y ejecutar inferencias con modelos YOLO26.
Usa picamera2, que viene preinstalado con Raspberry Pi OS, para acceder a la cámara y ejecutar inferencias con modelos YOLO26.
import cv2
from picamera2 import Picamera2

from ultralytics import YOLO

# Inicializa Picamera2
picam2 = Picamera2()
picam2.preview_configuration.main.size = (1280, 720)
picam2.preview_configuration.main.format = "RGB888"
picam2.preview_configuration.align()
picam2.configure("preview")
picam2.start()

# Carga el modelo YOLO26
model = YOLO("yolo26n.pt")

while True:
    # Captura fotogramas uno a uno
    frame = picam2.capture_array()

    # Ejecuta la inferencia de YOLO26 en el fotograma
    results = model(frame)

    # Visualiza los resultados en el fotograma
    annotated_frame = results[0].plot()

    # Muestra el fotograma resultante
    cv2.imshow("Camera", annotated_frame)

    # Interrumpe el bucle si se pulsa 'q'
    if cv2.waitKey(1) == ord("q"):
        break

# Libera los recursos y cierra las ventanas
cv2.destroyAllWindows()
Buenas prácticas para usar Raspberry Pi#
Sigue estas prácticas recomendadas para obtener el máximo rendimiento de YOLO26 en Raspberry Pi.
-
Usa un SSD
Para un funcionamiento continuo las 24 horas del día, los 7 días de la semana, usa un SSD para el sistema, ya que una tarjeta SD puede desgastarse o fallar si se escribe en ella continuamente. El conector PCIe integrado en Raspberry Pi 5 permite conectar SSD mediante un adaptador como el NVMe Base for Raspberry Pi 5.
-
Graba el sistema sin interfaz gráfica
Al grabar Raspberry Pi OS, puedes optar por no instalar el entorno de escritorio (Raspberry Pi OS Lite), lo que ahorra algo de RAM en el dispositivo y deja más espacio para el procesamiento de visión artificial.
-
Haz overclocking en Raspberry Pi
Si quieres mejorar un poco el rendimiento al ejecutar modelos Ultralytics YOLO26 en Raspberry Pi 5, puedes aumentar la frecuencia de la CPU de sus 2.4GHz de base a 3.0GHz y la de la GPU de 800MHz a 1GHz. Si el sistema se vuelve inestable o se bloquea, reduce los valores de overclocking en incrementos de 100MHz. Asegúrate de que la refrigeración sea adecuada, ya que el overclocking aumenta la generación de calor y puede provocar estrangulamiento térmico.
a. Actualiza el software
sudo apt update && sudo apt dist-upgradeb. Abre el archivo de configuración para editarlo
sudo nano /boot/firmware/config.txtc. Añade las siguientes líneas al final
arm_freq=3000
gpu_freq=1000
force_turbo=1
d. Guarda y sal pulsando CTRL + X, luego Y y, por último, ENTER
e. Reinicia Raspberry Pi
Próximos pasos#
Ya has configurado YOLO26 correctamente en Raspberry Pi. Para seguir explorando, consulta el modo Predict para ver más opciones de inferencia, el modo Export para conocer otros formatos de implementación o la guía de NVIDIA Jetson si necesitas más capacidad de cálculo en el perímetro. Para consultar la documentación completa, visita la documentación de Ultralytics YOLO26.
Agradecimientos y citas#
Esta guía fue creada inicialmente por Daan Eeltink para Kashmir World Foundation, una organización dedicada al uso de YOLO para la conservación de especies en peligro de extinción. Reconocemos su trabajo pionero y su enfoque educativo en el ámbito de las tecnologías de detección de objetos.
Para obtener más información sobre las actividades de Kashmir World Foundation, puedes visitar su sitio web.
Preguntas frecuentes#
Para configurar Ultralytics YOLO26 en Raspberry Pi sin Docker, sigue estos pasos:
- Actualiza la lista de paquetes e instala
pip:sudo apt update sudo apt install python3-pip -y pip install -U pip - Instala el paquete Ultralytics:
pip install ultralytics - Reinicia el dispositivo para aplicar los cambios:
sudo reboot
Para obtener instrucciones detalladas, consulta la sección Empieza sin Docker.
- Actualiza la lista de paquetes e instala
NCNN está muy optimizado para plataformas móviles e integradas, por lo que es una opción excelente para ejecutar YOLO26 en dispositivos Raspberry Pi. Sus kernels optimizados para ARM ofrecen una inferencia más rápida en Raspberry Pi que los demás formatos de exportación incluidos en los benchmarks anteriores.
Puedes convertir un modelo YOLO26 de PyTorch al formato NCNN con comandos de Python o de CLI:
Ejemplofrom ultralytics import YOLO # Carga un modelo YOLO26n de PyTorch model = YOLO("yolo26n.pt") # Exporta el modelo al formato NCNN model.export(format="ncnn") # creates 'yolo26n_ncnn_model' # Carga el modelo exportado a NCNN ncnn_model = YOLO("yolo26n_ncnn_model") # Ejecutar inferencia results = ncnn_model("https://ultralytics.com/images/bus.jpg")Para obtener más información, consulta la sección Usa NCNN en Raspberry Pi.
Estas son las principales diferencias:
- CPU: Raspberry Pi 4 utiliza Broadcom BCM2711, un SoC Cortex-A72 de 64 bits, mientras que Raspberry Pi 5 utiliza Broadcom BCM2712, un SoC Cortex-A76 de 64 bits.
- Frecuencia máxima de la CPU: Raspberry Pi 4 alcanza una frecuencia máxima de 1.8GHz, mientras que Raspberry Pi 5 llega a 2.4GHz.
- Memoria: Raspberry Pi 4 ofrece hasta 8 GB de SDRAM LPDDR4-3200, mientras que Raspberry Pi 5 cuenta con SDRAM LPDDR4X-4267, disponible en variantes de 2 GB, 4 GB, 8 GB y 16 GB.
Estas mejoras contribuyen a que los modelos YOLO26 obtengan mejores resultados en las pruebas de rendimiento en Raspberry Pi 5 que en Raspberry Pi 4. Consulta la tabla Comparación de la serie Raspberry Pi para obtener más información.
Hay dos métodos para configurar una cámara Raspberry Pi para la inferencia con YOLO26:
-
Con
picamera2:import cv2 from picamera2 import Picamera2 from ultralytics import YOLO picam2 = Picamera2() picam2.preview_configuration.main.size = (1280, 720) picam2.preview_configuration.main.format = "RGB888" picam2.preview_configuration.align() picam2.configure("preview") picam2.start() model = YOLO("yolo26n.pt") while True: frame = picam2.capture_array() results = model(frame) annotated_frame = results[0].plot() cv2.imshow("Camera", annotated_frame) if cv2.waitKey(1) == ord("q"): break cv2.destroyAllWindows() -
Con una transmisión TCP:
rpicam-vid -n -t 0 --inline --listen -o tcp://127.0.0.1:8888from ultralytics import YOLO model = YOLO("yolo26n.pt") results = model("tcp://127.0.0.1:8888")
Para obtener instrucciones detalladas de configuración, consulta la sección Inferencia con cámara.
-


Comentarios134
Haz una pregunta, comparte tus resultados o ayuda a otra persona.
smhty
Works great on Raspberry Pi 5. A tutorial for the AI kit that comes with Raspberry Pi 5 would be great as well: https://www.raspberrypi.com/products/ai-kit/
1 Glenn JocherUltralytics(editado)
Hi there!
Thank you for your feedback and for sharing your positive experience on the Raspberry Pi 5! 😊
Creating a tutorial for the AI kit that comes with the Raspberry Pi 5 is a fantastic idea. In the meantime, you can refer to our comprehensive Quick Start Guide for Raspberry Pi with Ultralytics YOLO26, which provides detailed instructions on setting up and running YOLO on Raspberry Pi devices, including performance benchmarks.
For those interested in using the AI kit, the setup process should be quite similar. Here’s a quick overview to get you started:
-
Flash Raspberry Pi OS: Ensure you have the latest Raspberry Pi OS Bookworm (Debian 12) installed. Follow the Getting Started Documentation by Raspberry Pi to prepare your device.
-
Set Up Ultralytics:
- With Docker:
t=ultralytics/ultralytics:latest-arm64 && sudo docker pull $t && sudo docker run -it --ipc=host $t - Without Docker:
sudo apt update sudo apt install python3-pip -y pip install -U pip pip install ultralytics[export] sudo reboot
- With Docker:
-
Use NCNN for Best Performance: Convert your YOLO26 model to NCNN format for optimal performance on Raspberry Pi:
from ultralytics import YOLO # Load a YOLO26n PyTorch model model = YOLO("yolo26n.pt") # Export the model to NCNN format model.export(format="ncnn") # creates 'yolo26n_ncnn_model' # Load the exported NCNN model ncnn_model = YOLO("yolo26n_ncnn_model") # Run inference results = ncnn_model("https://ultralytics.com/images/bus.jpg") -
Using the Raspberry Pi Camera: For real-time video feeds, you can use the
picamera2library or set up a TCP stream:-
Using
picamera2:import cv2 from picamera2 import Picamera2 from ultralytics import YOLO picam2 = Picamera2() picam2.preview_configuration.main.size = (1280, 720) picam2.preview_configuration.main.format = "RGB888" picam2.preview_configuration.align() picam2.configure("preview") picam2.start() model = YOLO("yolo26n.pt") while True: frame = picam2.capture_array() results = model(frame) annotated_frame = results[0].plot() cv2.imshow("Camera", annotated_frame) if cv2.waitKey(1) == ord("q"): break cv2.destroyAllWindows() -
Using TCP Stream:
rpicam-vid -n -t 0 --inline --listen -o tcp://127.0.0.1:8888from ultralytics import YOLO model = YOLO("yolo26n.pt") results = model("tcp://127.0.0.1:8888")
-
We hope this helps you get started with the AI kit on your Raspberry Pi 5. For more detailed instructions and additional resources, please visit our Raspberry Pi Guide.
Happy coding! 🚀
-
wnelis
Today I've installed module ultralytics on a Raspberry Pi 4 with 4 [GiB] memory running Trixie. Some remarks about what I've learned: . Use the 64-bit variant of Raspberry OS; . Use an microSD card of at least 32 [GiB]; . Disable /tmp becoming a file system in memory (tmpfs):
sudo systemctl mask tmp.mount; . OpenCV is installed using apt, module ultralytics is installed in a virtual Python environment: 'python -m venv --system-site-packages `.It is found that YOLO runs into a hardware error: "Illegal instruction". This can be reproduced by using the Python script shown above to export the model in NCNN format. The output is:
Downloading https://github.com/ultralyti…: 100% ━━━━━━━━━━━━ 5.3MB 1.4MB/s 3.8s Ultralytics 8.4.191 🚀 Python-3.13.5 torch-2.14.1+cu130 CPU (aarch64) Illegal instruction
How can this issue be solved?
 Paula DerrengerUltralytics
@wnelis the most likely cause is a native PyTorch binary using instructions unsupported by the Pi 4’s CPU, rather than faulty hardware; similar crashes are documented in Ultralytics #19091 and upstream PyTorch, although your exact version is not confirmed affected. (github.com) Your log shows a CUDA build (
+cu130); first replace it with the matching official CPU-only packages inside your activated virtual environment, then retry the export: (pytorch.org)python -m pip install --force-reinstall torch==2.14.1 torchvision==0.29.1 --index-url https://download.pytorch.org/whl/cpuIf it still crashes, please share the text output of
yolo checksandpython -m pip show torch torchvisionfrom that same environment so we can identify package/path conflicts.
hm-zeroone(editado)
"We haven’t validated Orbit OS yet, but if it supports tflite or onnx runtimes you should be able to deploy an exported Ultralytics YOLO26 model there using Export mode and the deployment options guide; if you try it, please share the exact device, export format, and any text error logs here in Discussions so the Ultralytics team can take a look."
Hi @glenn-jocher,
I added a new feature to my Orbit OS app to test YOLO models directly on edge devices, in this case a Raspberry Pi. The app now allows adding new models, and by default includes YOLO v8, v11 and v26.
We also introduced a benchmark mode, where you can select an image and run all models to compare performance and results.
In the example shown in the image, YOLOv8 achieved the highest number of correct object detections by time.
This demo video shows the remote deployment, no SSH, no Docker, of the app in action on Raspberry Pi 5 vs Arduino UNO Q and a comparison (“VS”) between the RPi 5 and UNO Q running YOLO v8. https://youtu.be/aiFJmosYVAI?si=v3Jo_TbswU3n-sZU
- Glenn JocherUltralytics
Thanks for sharing the Orbit OS benchmark; for a fair cross-model comparison please include the exact export/runtime backend,
imgsz, confidence/IoU thresholds, and per-image latency/FPS, since on Raspberry Pi CPU deployments NCNN is usually the best baseline for YOLO26. Hey! Thanks for the feedback. All models were tested under the same conditions — TFlite runtime, same image, same thresholds (conf=0.50, IoU=0.45), same imgsz 640×640 with letterbox preprocessing.
Everything runs through the OrbitOS SDK which currently has TFLite and ONNX embedded. NCNN is something we'll look into adding in a future release.
Quick question — for RPi deployments, would you recommend INT8 or float16 as the default export format?
Orbit OS SDK 26.0.1 Inference example.
Orbit OS is multi-language — For now only Go SDK is available, Python, Java and C++ SDKs are coming soon.
model, _ := device.AIManager.UploadAndLoadModel( "yolo8n", "models/yolo26n_float16.tflite", aiv26.ModelBackend_TFLITE, aiv26.ExecutionMode_EXEC_HIGH_THREADS, ) resp, _ := model.Infer(ctx, tensor.Data, tensor.Shape, tensor.Dtype) fmt.Println(resp.GetOutputShape()) // [1 84 8400] fmt.Println(resp.GetLatencyUs()) // e.g. 528000- Glenn JocherUltralytics(editado)
For plain Raspberry Pi CPU deployment with
LiteRT(.tflite), I’d usually default toINT8for the best speed and memory savings, and usefloat16only if quantization hurts accuracy too much or your runtime performs better with FP kernels; if you benchmark both, the LiteRT export guide is the right reference, while our Raspberry Pi guide showsNCNNas the strongest baseline once you add that backend.1
safdarhamid64-cpu
when i write in raspberry pi terminal : from ultralytics import yolo error msg illegal instruction pops up , i have trained model and even i have first created environment and installed pip install ultralytics but still i am not able to run model yolo11n on my Raspberry Pi 4 , Guide me plzz
- Glenn JocherUltralytics
That
Illegal instructionon Raspberry Pi usually means an incompatible binary wheel (most oftentorch/numpypulled for the wrong arch/OS), and also note the correct import isfrom ultralytics import YOLO(capitalized), notyolo; please paste the text output ofyolo checksplus the full traceback here in this discussion, and confirmuname -m+ whether you’re on Raspberry Pi OS Bookworm 64-bit as in the Raspberry Pi YOLO26 guide; as a quick way to rule out env issues you can also try our ARM64 Docker flow from that guide:```bash t=ultralytics/ultralytics:latest-arm64 sudo docker pull $t && sudo docker run -it --ipc=host $t python -c "from ultralytics import YOLO; YOLO('yolo11n.pt')"
inuropix
Hi.. I get an error when implement botsort with reid is True and the model is ncnn(exported from yolo26n-cls.pt)
Here’s the full traceback from the error:
    self.tracks = self.model.track(
                  ^^^^^^^^^^^^^^^^^
 File "/home/sbr/people_counting/lib/python3.11/site-packages/ultralytics/engine/model.py", line 579, in track
    return self.predict(source=source, stream=stream, **kwargs)
           ^^^^^^^^^^^^^^^^^^^^^^^^^^^^^^^^^^^^^^^^^^^^^^^^^^^^
  File "/home/sbr/people_counting/lib/python3.11/site-packages/ultralytics/engine/model.py", line 536, in predict
    return self.predictor.predict_cli(source=source) if is_cli else self.predictor(source=source, stream=stream)
                                                                    ^^^^^^^^^^^^^^^^^^^^^^^^^^^^^^^^^^^^^^^^^^^^
  File "/home/sbr/people_counting/lib/python3.11/site-packages/ultralytics/engine/predictor.py", line 225, in __call__
    return list(self.stream_inference(source, model, *args, **kwargs))  # merge list of Results into one
           ^^^^^^^^^^^^^^^^^^^^^^^^^^^^^^^^^^^^^^^^^^^^^^^^^^^^^^^^^^^
  File "/home/sbr/people_counting/lib/python3.11/site-packages/torch/utils/_contextlib.py", line 40, in generator_context
    response = gen.send(None)
               ^^^^^^^^^^^^^^
  File "/home/sbr/people_counting/lib/python3.11/site-packages/ultralytics/engine/predictor.py", line 338, in stream_inference
    self.run_callbacks("on_predict_postprocess_end")
  File "/home/sbr/people_counting/lib/python3.11/site-packages/ultralytics/engine/predictor.py", line 509, in run_callbacks
    callback(self)
  File "/home/sbr/people_counting/lib/python3.11/site-packages/ultralytics/trackers/track.py", line 93, in on_predict_postprocess_end
    tracks = tracker.update(det, result.orig_img, getattr(result, "feats", None))
             ^^^^^^^^^^^^^^^^^^^^^^^^^^^^^^^^^^^^^^^^^^^^^^^^^^^^^^^^^^^^^^^^^^^^
  File "/home/sbr/people_counting/lib/python3.11/site-packages/ultralytics/trackers/byte_tracker.py", line 361, in update
    dists = self.get_dists(unconfirmed, detections)
            ^^^^^^^^^^^^^^^^^^^^^^^^^^^^^^^^^^^^^^^
  File "/home/sbr/people_counting/lib/python3.11/site-packages/ultralytics/trackers/bot_sort.py", line 220, in get_dists
    emb_dists = matching.embedding_distance(tracks, detections) / 2.0
                ^^^^^^^^^^^^^^^^^^^^^^^^^^^^^^^^^^^^^^^^^^^^^^^
  File "/home/sbr/people_counting/lib/python3.11/site-packages/ultralytics/trackers/utils/matching.py", line 128, in embedding_distance
    cost_matrix = np.maximum(0.0, cdist(track_features, det_features, metric))  # Normalized features
                                  ^^^^^^^^^^^^^^^^^^^^^^^^^^^^^^^^^^^^^^^^^^^
  File "/home/sbr/people_counting/lib/python3.11/site-packages/scipy/spatial/distance.py", line 2903, in cdist
    raise ValueError('XA must be a 2-dimensional array.')
ValueError: XA must be a 2-dimensional array.
Any idea?
- Glenn JocherUltralytics
That traceback usually means BoT-SORT didn’t get valid (2D) ReID embeddings; also note that
.track()should run with a Detect/Seg/Pose model, whileyolo26n-clsis only meant to be the ReID feature extractor configured insidebotsort.yaml(viawith_reid/model). (docs.ultralytics.com)yolo track model=yolo26n.pt source=path/to/video.mp4 tracker="botsort.yaml"# in a copy of botsort.yaml with_reid: True model: yolo26n-cls.pt # first confirm this works before swapping to an exported backendIf you just need stable tracking on Raspberry Pi, try
tracker="bytetrack.yaml"(no ReID); if you still hit this, please paste yourbotsort.yamland the output ofyolo checksso we can reproduce from the same environment. (docs.ultralytics.com)
hananabuzainab
I can't install ultralytics on rasspbery pi 5...with python 3.11 version,why??
I used: pip install ultralytics
How can i fix this problem ??
- Glenn JocherUltralytics
Can you paste the full
pip install ultralyticserror text (as text, not a screenshot) and the output ofpython3 -Vhere so we can pinpoint what’s failing? On Raspberry Pi 5 this is most often a Python/pip mismatch or non-Bookworm/32-bit setup—please also confirm you’re on Raspberry Pi OS Bookworm 64-bit as in the Raspberry Pi with Ultralytics YOLO26 guide.python3 -V python3 -m pip install -U pip setuptools wheel python3 -m venv .venv source .venv/bin/activate python -m pip install -U pip python -m pip install ultralytics
avasanjesh
Hi,
I want to use python version of raspberry pi 32 bit OS. can you please tell me if i can export yolo detection model in 32 bit raspberry pi?
Edward-YS
Hello,I'm wondering if there is Benchmarking Results of Two Different Models (YOLO8n, YOLO8s) Across Ten Formats: PyTorch, TF, ONNX, OpenVINO, TF SavedModel, TF GraphDef, TF Lite, PaddlePaddle, MNN, NCNN.
zyt2011
Installing a single Hailo-5 is sufficient.
发件人: Beautifulboy111 @.> 发送时间: 2025年4月22日 14:24 收件人: ultralytics/ultralytics @.> 抄送: zyt2011 @.>; Mention @.> 主题: Re: [ultralytics/ultralytics] zh/guides/raspberry-pi/ (Discussion #19489)
Why does my Raspberry Pi 5 have a high inference latency of 150ms when using NCNN for video recognition, even after overclocking? How can I reduce the inference time?
― Reply to this email directly, view it on GitHubhttps://github.com/orgs/ultralytics/discussions/19489#discussioncomment-12906311, or unsubscribehttps://github.com/notifications/unsubscribe-auth/BJ7DFR53TAD7QVJNO3TTXJL22XOAJAVCNFSM6AAAAABYEEJCHCVHI2DSMVQWIX3LMV43URDJONRXK43TNFXW4Q3PNVWWK3TUHMYTEOJQGYZTCMI. You are receiving this because you were mentioned.Message ID: @.***>
- Glenn JocherUltralytics(editado)
@Beautifulboy111 150ms inference latency with NCNN on Raspberry Pi 5 is higher than expected. Here are some steps to reduce it:
-
Use a smaller YOLO26 model - our benchmarks show YOLO26n is significantly faster than YOLO26s with NCNN on Pi 5 (67ms vs 173ms)
-
Reduce input resolution - try 320x320 instead of 640x640, which can cut inference time by up to 70%
-
Optimize memory allocation by running without GUI (Raspberry Pi OS Lite)
-
Ensure you're using proper cooling for sustained performance when overclocked
-
Consider processing at lower FPS if your application allows it
Regarding @zyt2011's suggestion, while accelerators like Hailo can boost performance, they're a separate investment. I'd recommend optimizing your current setup first using the techniques in our Raspberry Pi guide.
What's your specific use case? This would help us provide more targeted optimization advice.
-
Beautifulboy111
Why does my Raspberry Pi 5 have a high inference latency of 150ms when using NCNN for video recognition, even after overclocking? How can I reduce the inference time?