Guida rapida a Docker per Ultralytics
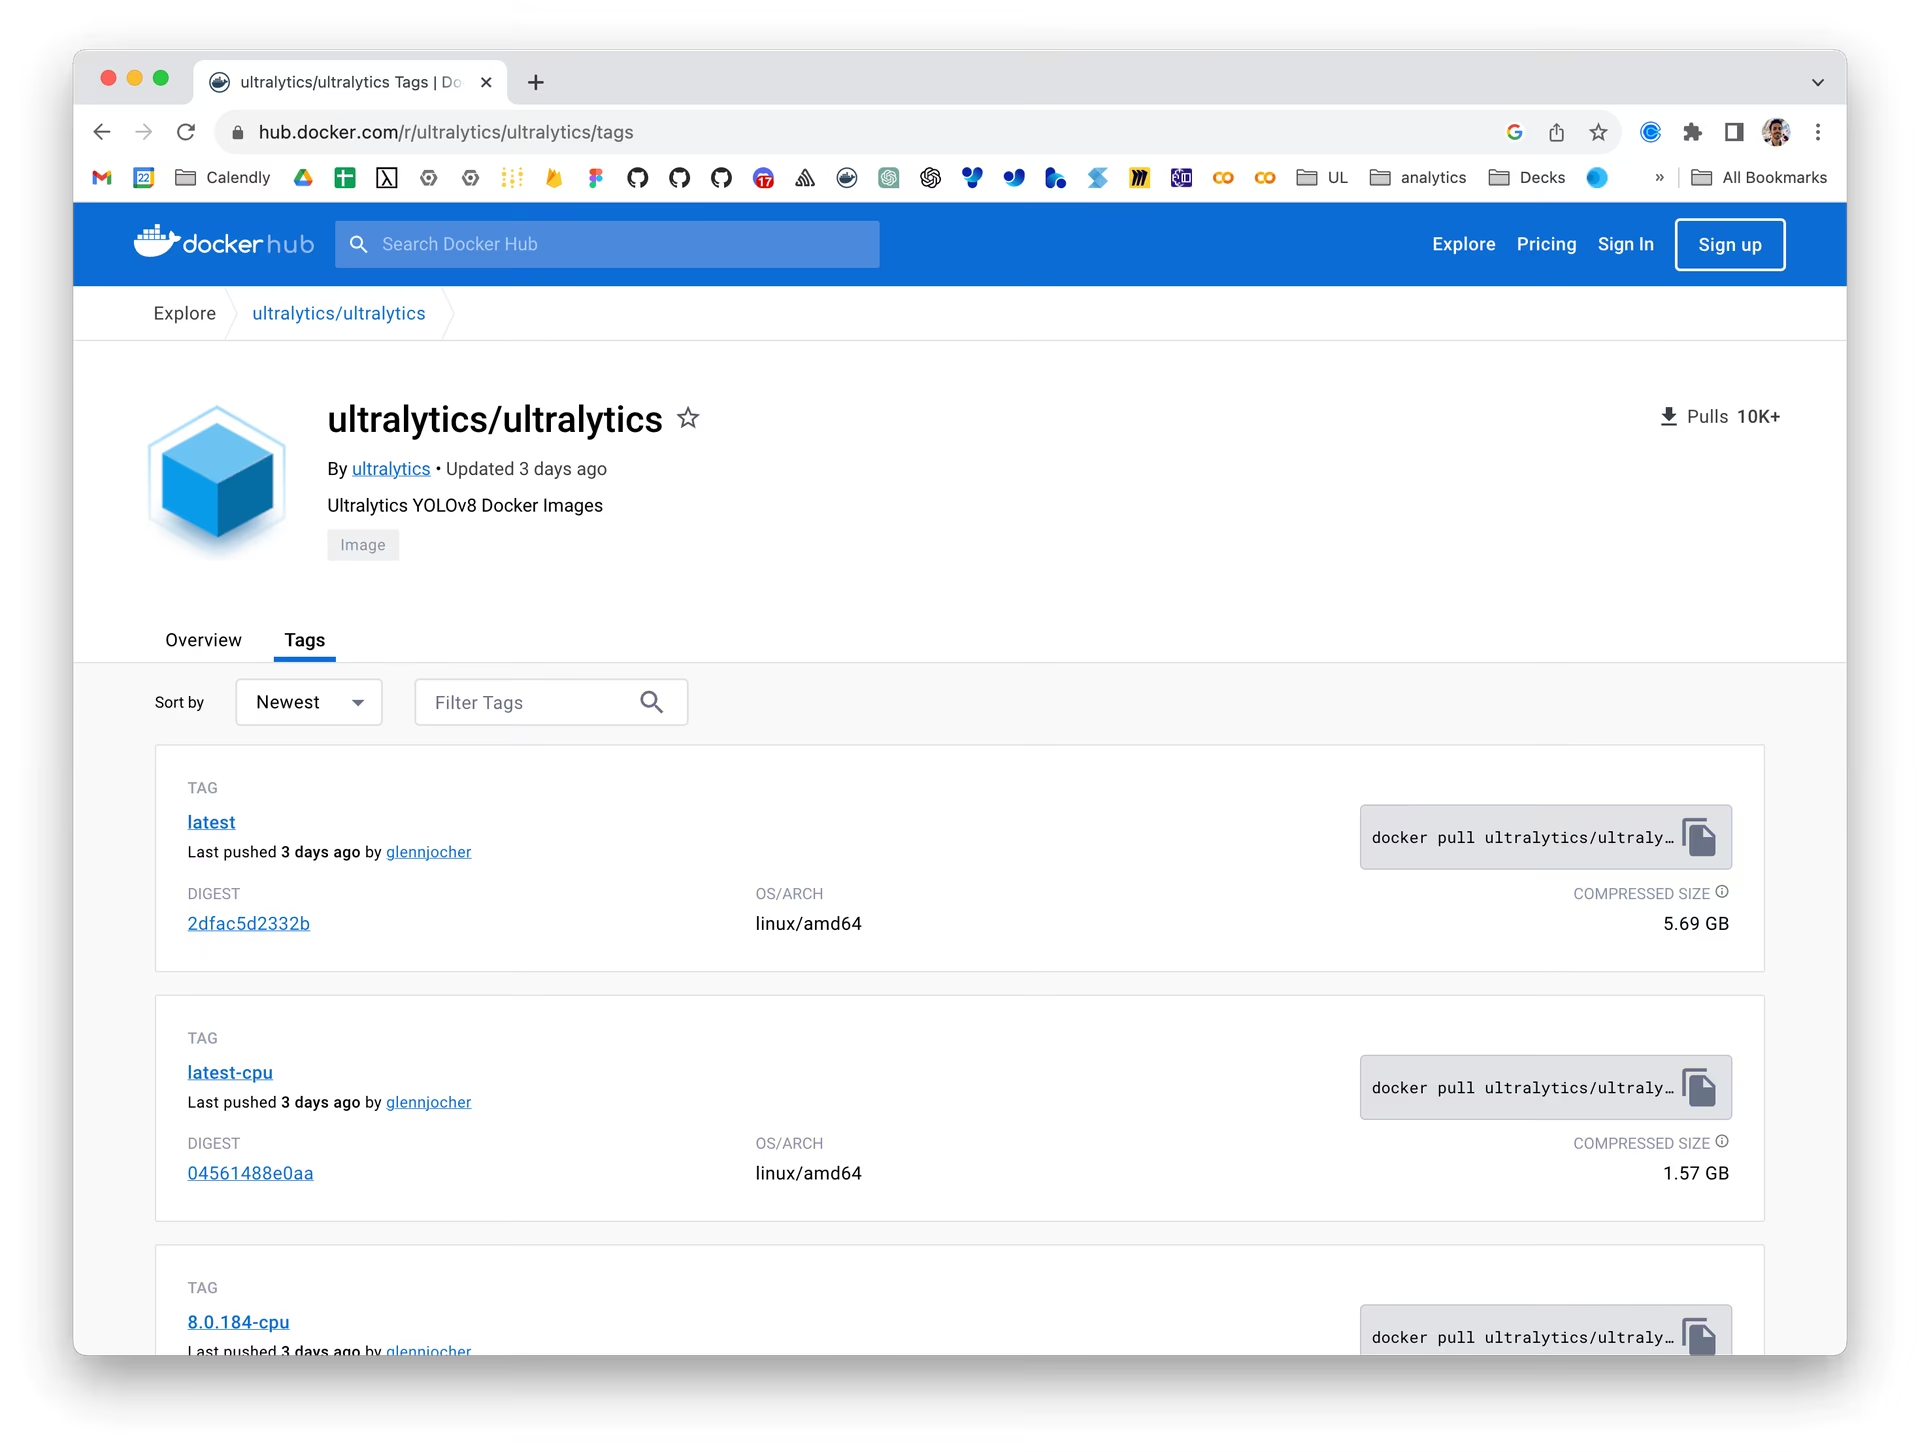
Questa guida spiega come configurare un ambiente Docker per i tuoi progetti Ultralytics. Docker è una piattaforma per sviluppare, distribuire ed eseguire applicazioni in contenitori, garantendo che il software venga eseguito allo stesso modo indipendentemente dall'ambiente di distribuzione.


Cosa imparerai#
- Configurare Docker con il supporto NVIDIA
- Installare le immagini Docker di Ultralytics
- Eseguire Ultralytics in un container Docker con supporto CPU o GPU
- Usare un display server con Docker per visualizzare i risultati del rilevamento di Ultralytics
- Montare directory locali nel container
Guarda: Come iniziare con Docker | Demo dal vivo sull'uso del pacchetto Python Ultralytics in Docker 🎉
Prerequisiti#
- Assicurati che Docker sia installato sul tuo sistema. In caso contrario, puoi scaricarlo e installarlo dal sito web di Docker.
- Per l'accelerazione GPU, verifica che nel sistema sia installata una GPU NVIDIA e che siano installati i driver NVIDIA. Le immagini CPU non richiedono hardware NVIDIA.
- Se usi dispositivi NVIDIA Jetson, assicurati di aver installato la versione appropriata di JetPack. Per maggiori dettagli, consulta la guida NVIDIA Jetson.
Configurare Docker con il supporto NVIDIA (facoltativo)#
Per prima cosa, verifica che i driver NVIDIA siano installati correttamente eseguendo:
nvidia-smiInstallazione di NVIDIA Container Toolkit#
Installa il NVIDIA Container Toolkit per abilitare il supporto GPU nei container Docker:
curl -fsSL https://nvidia.github.io/libnvidia-container/gpgkey | sudo gpg --dearmor -o /usr/share/keyrings/nvidia-container-toolkit-keyring.gpg \
  && curl -s -L https://nvidia.github.io/libnvidia-container/stable/deb/nvidia-container-toolkit.list \
  | sed 's#deb https://#deb [signed-by=/usr/share/keyrings/nvidia-container-toolkit-keyring.gpg] https://#g' \
    | sudo tee /etc/apt/sources.list.d/nvidia-container-toolkit.list
Aggiorna gli elenchi dei pacchetti e installa NVIDIA Container Toolkit:
sudo apt-get updatesudo apt-get install -y nvidia-container-toolkitVerificare i dispositivi CDI con Docker#
Esegui nvidia-ctk cdi list per verificare che i dispositivi GPU CDI siano disponibili (il servizio nvidia-cdi-refresh del toolkit genera e mantiene automaticamente la specifica con toolkit >= 1.18):
nvidia-ctk cdi listDovresti vedere voci come nvidia.com/gpu=0 e nvidia.com/gpu=all. I dispositivi CDI rilevati compaiono anche in docker info.
Installazione delle immagini Docker di Ultralytics#
Ultralytics pubblica le seguenti immagini su Docker Hub. Ogni immagine viene compilata a partire dal Dockerfile collegato tramite il workflow di pubblicazione Docker.
| Tag | Piattaforma e scopo | Origine |
|---|---|---|
latest | Linux AMD64 con CUDA per l'addestramento e l'inferenza su GPU | Dockerfile |
latest-export | Linux AMD64 con CUDA e dipendenze per l'esportazione, per la conversione e il benchmarking | Dockerfile-export |
latest-amd | Linux AMD64 con ROCm e MIGraphX per l'addestramento e l'inferenza su GPU AMD | Dockerfile-amd |
latest-python | Immagine Linux AMD64 leggera con Python 3.14 per l'inferenza su CPU | Dockerfile-python |
latest-python-export | Immagine Linux AMD64 con Python 3.13 e CPU, con dipendenze per l'esportazione | Dockerfile-python-export |
latest-cpu | Immagine Linux AMD64 per CPU con Bash come comando predefinito | Dockerfile-cpu |
latest-jupyter | Immagine Linux AMD64 per CPU con JupyterLab e notebook dei tutorial Ultralytics | Dockerfile-jupyter |
latest-arm64 | Immagine Linux ARM64 con Python 3.13 e CPU per Apple silicon, Raspberry Pi e altri sistemi ARM64 | Dockerfile-arm64 |
latest-nvidia-arm64 | Linux ARM64 per DGX Spark (DGX OS) e PyTorch su Thor (JetPack 7.1); TensorRT incluso non supporta JetPack | Dockerfile-nvidia-arm64 |
latest-jetson-jetpack6 | Linux ARM64 per dispositivi NVIDIA Jetson con JetPack 6 | Dockerfile-jetson-jetpack6 |
latest-jetson-jetpack5 | Linux ARM64 per dispositivi NVIDIA Jetson con JetPack 5 | Dockerfile-jetson-jetpack5 |
latest-jetson-jetpack4 | Linux ARM64 per dispositivi NVIDIA Jetson con JetPack 4 | Dockerfile-jetson-jetpack4 |
latest-runner | Immagine Linux AMD64 con CUDA per un runner GPU self-hosted di GitHub Actions | Dockerfile-runner |
latest-runner-cpu | Immagine Linux AMD64 per un runner CPU self-hosted di GitHub Actions | Dockerfile-runner-cpu |
Le immagini GPU AMD64 (latest, latest-export e latest-runner) usano PyTorch 2.15 e CUDA 13.2. Prima di avviarle, verifica il supporto CUDA del driver host con nvidia-smi; installare un container più recente non aggiorna il driver host. CUDA 13 rimuove il supporto per le GPU Maxwell, Pascal e Volta, incluse Tesla P100 e V100.
L'immagine NVIDIA ARM64 usa NVIDIA PyTorch 26.10 con CUDA 13.4 e TensorRT 11.4. Il supporto di PyTorch per Thor non si estende a TensorRT: NVIDIA non supporta TensorRT 11.4 su JetPack. Per le esportazioni TensorRT su Jetson, usa il runtime TensorRT 10.x supportato dalla tua versione di JetPack. Segui i requisiti della piattaforma nella guida Jetson o nella guida DGX Spark. Le immagini per JetPack 4, 5 e 6 mantengono i rispettivi stack specifici per dispositivo.
Il Dockerfile Conda è disponibile per le build locali; la pubblicazione automatizzata di latest-conda è disabilitata, quindi quel tag del registry non contiene questi aggiornamenti.
Le immagini Python, CPU, Jupyter e runner CPU usano Python 3.14. L'immagine Python per l'esportazione usa la base latest-python-3.13, creata a partire dallo stesso Dockerfile-python con --build-arg PYTHON_VERSION=3.13, perché TensorFlow, CoreML e PaddlePaddle non supportano ancora Python 3.14.
I tag che iniziano con latest seguono la build più recente pubblicata dal branch main. Nei tag con versione, il prefisso latest è sostituito da una release Ultralytics, ad esempio VERSION, VERSION-cpu o VERSION-jetson-jetpack6. Usa un tag con versione per ottenere un ambiente riproducibile.
Per scaricare l'immagine più recente:
# Pull the latest Ultralytics image from Docker Hub
sudo docker pull ultralytics/ultralytics:latest
Per compilare invece un'immagine autonomamente, clona il repository e specifica il Dockerfile corrispondente dalla tabella precedente, usando la directory principale del repository come contesto di build:
# Build the CPU image locally from docker/Dockerfile-cpu
sudo docker build -t ultralytics/ultralytics:latest-cpu -f docker/Dockerfile-cpu .
Esecuzione di Ultralytics in un container Docker#
Ecco come eseguire il container Docker di Ultralytics:
Usare solo la CPU#
# Run without GPU
sudo docker run -it --ipc=host ultralytics/ultralytics:latest-cpu
Usare le GPU#
# Run with all GPUs
sudo docker run -it --ipc=host --device nvidia.com/gpu=all ultralytics/ultralytics:latest

# Run specifying which GPUs to use
sudo docker run -it --ipc=host --device nvidia.com/gpu=2 --device nvidia.com/gpu=3 ultralytics/ultralytics:latest
Il flag -it assegna uno pseudo-TTY e mantiene aperto stdin, permettendoti di interagire con il container. Il flag --ipc=host abilita la condivisione dello spazio dei nomi IPC dell'host, essenziale per condividere la memoria tra processi. Per le GPU NVIDIA, il flag --device nvidia.com/gpu=... concede l'accesso tramite CDI. Per le GPU AMD, i flag --device concedono l'accesso al driver del kernel GPU (/dev/kfd) e ai nodi di rendering del display (/dev/dri).
Su Linux, le richieste di dispositivi CDI richiedono Docker >= 28.2.0 (CDI è abilitato per impostazione predefinita) e nvidia-container-toolkit >= 1.18 (generazione automatica della specifica CDI). Aggiorna gli host Linux meno recenti prima di eseguire container GPU. Il flag legacy --gpus all può causare la perdita dell'accesso GPU (Failed to initialize NVML: Unknown Error) quando l'host ricarica systemd durante i normali aggiornamenti dei pacchetti (nvidia-container-toolkit#48). Le richieste CDI --device includono i nodi dei dispositivi nella configurazione del container, quindi i container di lunga durata, come i worker di addestramento o i runner CI, mantengono l'accesso GPU durante i ricaricamenti.
Il supporto GPU di Docker Desktop su Windows usa attualmente --gpus all con il backend WSL 2, perché i dispositivi NVIDIA CDI non sono disponibili. Windows non usa systemd Linux, quindi il problema del ricaricamento del daemon descritto sopra non si applica.
Nota sull'accessibilità dei file#
Per usare nel container i file presenti sul computer locale, puoi utilizzare i volumi Docker:
# Mount a local directory into the container
sudo docker run -it --ipc=host --device nvidia.com/gpu=all -v /path/on/host:/path/in/container ultralytics/ultralytics:latest
Sostituisci /path/on/host con il percorso della directory sul tuo computer locale e /path/in/container con il percorso desiderato all'interno del container Docker.
Mantenere gli output dell'addestramento#
Per impostazione predefinita, gli output dell'addestramento vengono salvati in /ultralytics/runs/<task>/<name>/ all'interno del container. Se non monti una directory dell'host, gli output andranno persi quando il container verrà rimosso.
Per mantenere gli output dell'addestramento:
# Recommended: mount workspace and specify project path
sudo docker run --rm -it -v "$(pwd)":/w -w /w ultralytics/ultralytics:latest \
  yolo train model=yolo26n.pt data=coco8.yaml project=/w/runs
In questo modo, tutti gli output dell'addestramento vengono salvati in ./runs sul computer host.
Eseguire applicazioni con interfaccia grafica (GUI) in un container Docker#
Le seguenti istruzioni sono sperimentali. Condividere un socket X11 con un container Docker comporta potenziali rischi per la sicurezza. Si consiglia quindi di testare questa soluzione solo in un ambiente controllato.
Docker viene usato principalmente per containerizzare applicazioni in background e programmi CLI, ma può eseguire anche programmi con interfaccia grafica. Nell'ambiente Linux, due server grafici principali gestiscono la visualizzazione: X11 (noto anche come X Window System) e Wayland. Prima di iniziare, è essenziale determinare quale server grafico stai usando. Esegui questo comando per scoprirlo:
env | grep -E -i 'x11|xorg|wayland'La configurazione di un server grafico X11 o Wayland non rientra nell'ambito di questa guida. Se il comando precedente non restituisce nulla, prima di continuare dovrai assicurarti che uno dei due funzioni sul tuo sistema.
Eseguire un container Docker con un'interfaccia grafica#
Usare le GPU
Se usi GPU, puoi aggiungere il flag --device nvidia.com/gpu=all al comando.
Se usi X11, puoi eseguire il comando seguente per consentire al container Docker di accedere al socket X11:
xhost +local:docker && docker run -e DISPLAY=$DISPLAY \
  -v /tmp/.X11-unix:/tmp/.X11-unix \
  -v ~/.Xauthority:/root/.Xauthority \
  -it --ipc=host ultralytics/ultralytics:latest
Questo comando imposta la variabile d'ambiente DISPLAY sul display dell'host, monta il socket X11 e mappa il file .Xauthority nel container. Il comando xhost +local:docker consente al container Docker di accedere al server X11.
Usare Docker con un'interfaccia grafica#
Le immagini Ultralytics includono OpenCV headless, quindi installa prima nel container la versione con GUI di OpenCV e le relative librerie di sistema:
apt-get update && apt-get install -y --no-install-recommends libgl1 libglib2.0-0 libsm6
pip uninstall -y opencv-python-headless && pip install opencv-python
Ora puoi visualizzare applicazioni grafiche all'interno del tuo container Docker. Ad esempio, puoi eseguire il seguente comando CLI per visualizzare le predizioni di un modello YOLO26:
yolo predict model=yolo26n.pt show=TrueTest
Un modo semplice per verificare che il gruppo Docker abbia accesso al server X11 è eseguire un container con un programma GUI come xclock o xeyes. In alternativa, puoi installare questi programmi anche nel container Docker di Ultralytics per verificare l’accesso al server X11 del server grafico GNU/Linux. Se riscontri problemi, prova a impostare la variabile d’ambiente -e QT_DEBUG_PLUGINS=1. L’impostazione di questa variabile d’ambiente abilita l’output delle informazioni di debug, facilitando la risoluzione dei problemi.
Al termine dell'uso della GUI Docker#
In entrambi i casi, non dimenticare di revocare l'accesso al gruppo Docker quando hai finito.
xhost -local:dockerVuoi visualizzare i risultati delle immagini direttamente nel Terminale?
Su Linux e macOS, puoi visualizzare i risultati delle immagini nel terminale integrato di VSCode usando il protocollo sixel.
Ora puoi usare Ultralytics con Docker. Per ospitare autonomamente l'applicazione web Ultralytics, consulta la guida Platform On-Premise.
Domande frequenti#
Per configurare Ultralytics con Docker, assicurati innanzitutto che Docker sia installato sul tuo sistema. Se hai una GPU NVIDIA, installa il NVIDIA Container Toolkit per abilitare il supporto GPU. Poi scarica l’ultima immagine Docker di Ultralytics da Docker Hub con il comando seguente:
sudo docker pull ultralytics/ultralytics:latestL'uso delle immagini Docker di Ultralytics garantisce un ambiente coerente su macchine diverse, replicando lo stesso software e le stesse dipendenze. È particolarmente utile per collaborare tra team, eseguire modelli su hardware diversi e mantenere riproducibili le distribuzioni dei modelli. Usa
latestper l'addestramento generale su GPU NVIDIA oppure seleziona l'immagine corrispondente alla tua versione di JetPack per un dispositivo NVIDIA Jetson.Per prima cosa, assicurati che NVIDIA Container Toolkit sia installato e configurato. Poi, usa il comando seguente per eseguire Ultralytics YOLO con il supporto GPU:
sudo docker run -it --ipc=host --device nvidia.com/gpu=all ultralytics/ultralytics:latest # all GPUsQuesto comando configura un container Docker con accesso alla GPU, che puoi limitare a GPU specifiche oppure impostare per AMD ROCm.
Per visualizzare i risultati delle predizioni YOLO con un'interfaccia grafica in un container Docker, devi consentire a Docker di accedere al tuo server grafico. Per i sistemi che usano X11, il comando è:
xhost +local:docker && docker run -e DISPLAY=$DISPLAY \
  -v /tmp/.X11-unix:/tmp/.X11-unix \
  -v ~/.Xauthority:/root/.Xauthority \
  -it --ipc=host ultralytics/ultralytics:latest
Per i sistemi che usano Wayland, usa:
xhost +local:docker && docker run -e DISPLAY=$DISPLAY \
  -v $XDG_RUNTIME_DIR/$WAYLAND_DISPLAY:/tmp/$WAYLAND_DISPLAY \
  --net=host -it --ipc=host ultralytics/ultralytics:latest
All'interno del container, installa la versione con GUI di OpenCV prima di usare
show=True, come descritto nella sezione Eseguire applicazioni con interfaccia utente grafica (GUI) in un container Docker.Sì, puoi montare directory locali nel container Docker di Ultralytics usando il flag
-v:sudo docker run -it --ipc=host --device nvidia.com/gpu=all -v /path/on/host:/path/in/container ultralytics/ultralytics:latestSostituisci
/path/on/hostcon la directory del tuo computer locale e/path/in/containercon il percorso desiderato all'interno del container. Questa configurazione ti consente di lavorare con i file locali nel container. Per ulteriori informazioni, consulta la sezione Nota sull'accessibilità dei file.


Commenti14
Fai una domanda, condividi i tuoi risultati o aiuta qualcun altro.
 Letícia Rama
Hello,
Is this workflow suitable for other YOLO families, such as YOLO26?
 Glenn JocherUltralytics
Yes, the same workflow supports YOLO26 and other model families available in the
ultralyticspackage—use an up-to-date official image and specify the appropriate weights, such asmodel=yolo26n.pt. See the Docker Quickstart Guide for current image options, and feel free to drop any follow-up questions here so the Ultralytics team can help.1- Letícia Rama
Right Glenn, thanks
lauravchrobak
It looks like the, "Running Ultralytics in Docker Container" section is duplicated here
HellaPinot
Hello! I have been testing running yolov8 inside a container, things seem to work well however after a somewhat random amount of time the inference hangs with no error output.
I know the container hasn't crashed as I am reading events from a processing queue and I can see new partitions are being allocated on another thread.
I'm running two models one after the other (different sizes and detection classes), so I'm wondering if this could be the root of the issue? At no point would they be running at the same time.
I believe it is happening exactly when I call predict. Its hard to debug as again it happens very randomly and there is not output from the container, it seems like there might be an infinite loop somewhere thats stopping it from continuing.
Curious if anything like this has been encountered before?
- Glenn JocherUltralytics
Hello! 👋
It sounds like a tricky issue, especially since it occurs randomly. Here are a few suggestions that might help you isolate or resolve the problem:
-
Logging and Monitoring: Enhance the logging within your container. Consider logging the input sizes and other relevant data before the prediction call, and make sure you're logging any exceptions that could be silently caught.
-
Resource Checks: Ensure that there are no resource starvation issues, such as GPU memory not being freed up properly. Tools like
nvidia-smican help monitor GPU usage. -
Sequential Model Loading: Although the models are run sequentially and not in parallel, it could be beneficial to explicitly clear the memory after each model's predictions are done. This can be done by deleting model objects and calling
torch.cuda.empty_cache()if you are using PyTorch. -
Hardware Testing: Run your container pointing the inference to CPU only for a time to see if the problem persists. This could help determine if the issue is related to GPU computation or not.
-
Reproducibility Tactic: Since the issue is sporadic, try to determine if there’s a specific type of input or specific conditions under which this occurs more frequently.
If these suggestions don't help, please provide more details or code snippets, and I’d be happy to dive deeper into this!
Let me know how it goes!
-
HWKevinhwk
I want to install ultralytics using docker on top of NVIDIA TX2, is there a detailed procedure? The reason for this question is that after entering the command nvidia-smi in the TX2 terminal, the output is command not found, and I'm worried that the steps in the document above are not applicable to TX2.
 Paula DerrengerUltralytics(modificato)
@HWKevinhwk hey there! 🚀 Setting up Ultralytics on NVIDIA TX2 with Docker can be a bit tricky if
nvidia-smiis missing, but no worries.For NVIDIA Jetson platforms like TX2,
nvidia-smiis typically not available, and you'll usetegrastatsinstead to monitor the GPU. The Jetson TX2 is supported on JetPack 4, so install JetPack 4 first, as it includes the NVIDIA drivers and libraries needed for GPU acceleration. Jetson devices use the Docker integration provided through JetPack with--runtime=nvidiarather than--gpus all. Then pull and run the Ultralytics Docker image for JetPack 4:t=ultralytics/ultralytics:latest-jetson-jetpack4 sudo docker pull $t && sudo docker run -it --ipc=host --runtime=nvidia $tSee the NVIDIA Jetson guide for details. If you encounter any specific issues, feel free to drop them here. Happy detecting! 🎉
Is there a detailed tutorial on deploying yolov8 on jetson TX2 using docker? I am pulling images docker pull ultralytics/ultralytics:latest-jetson terminal will downloading pause, long time pulling images unsuccessful, repeated attempts still so, any solution please?
- Paula DerrengerUltralytics(modificato)
@HWKevinhwk hey there! 😊
It sounds like you're facing issues with the Docker image pull for the Jetson TX2. This might be due to network issues or Docker Hub delays, or to using a tag that does not exist.
Here's a simplified breakdown to get you started on the TX2 using Docker:
-
Ensure JetPack is installed: The TX2 is supported on JetPack 4, which includes the GPU drivers necessary for Docker integration with the Jetson GPU.
-
Install Docker:
sudo apt-get install docker.io -
NVIDIA runtime support (JetPack should handle this):
nvidia-smidoesn't work on Jetson, so verify thenvidiaruntime withdocker info | grep -i runtime. -
Pull the Docker image for Jetson. Pulling large Docker images can be challenging on slower networks:
sudo docker pull ultralytics/ultralytics:latest-jetson-jetpack4If you keep facing issues while pulling the image, try restarting your Docker service or check your network settings. Sometimes, using a different network can help too!
-
Run the Image:
sudo docker run -it --ipc=host --runtime=nvidia ultralytics/ultralytics:latest-jetson-jetpack4
This should set you on the right path to running Ultralytics YOLO on your Jetson TX2. If the problem persists, it might be worth checking Docker's log or discussing this issue further with your network admin or on Docker forums! 😄
Happy coding! 🚀
-
Peter-coding
Hey! I trained a YOLOv8 model on my local computer. I have the best.pt file, and I can use it in CLI (conda) for predict. I want to make a python app, which uses this best.pt file, and I want to containerize it. Is it possible to write the full python app (it is just a few lines of code, which runs the detection, then writes the detection result to a database), then containerize it, and able to use it anywhere? Thank you! :D
- Paula DerrengerUltralytics
Hey there! 😊
Absolutely, you can absolutely containerize your Python app that uses the
best.ptmodel! Here's a quick guide:-
Create Your Python App: Just like you mentioned, write your Python code that performs the detection and interacts with the database.
-
Dockerize Your Application:
-
Dockerfile: Create a Dockerfile in your project directory. Here's a simple example that uses Ultralytics' Docker image as a base:
FROM ultralytics/ultralytics:latest WORKDIR /app COPY . /app RUN pip install -r requirements.txt # Assuming you have a requirements.txt CMD ["python", "your_script.py"] -
Build Your Docker Image: Run the following command in your project directory:
sudo docker build -t your-app-name . -
Run Your Container: To run your container, especially if you're planning to use GPU, you might want to specify
--gpus all:sudo docker run -it --ipc=host --gpus all your-app-nameFor accessing local files, consider mounting a volume as described in the Docker Quickstart Guide.
-
-
Deployment: With your Docker image built, you can now deploy and run it anywhere that Docker is supported. If using a GPU, ensure the host machine supports NVIDIA GPUs and has the necessary drivers and Docker configured correctly.
That's it! You should be able to use your model within a containerized app now. If you hit any snags, double-check the Docker Quickstart Guide for Ultralytics for more details. Happy coding! 😄
-
udayzee05
DEPRECATION NOTICE The nvidia-docker wrapper is no longer supported, and the NVIDIA Container Toolkit has been extended to allow users to configure Docker to use the NVIDIA Container Runtime. For further instructions, see the NVIDIA Container Toolkit documentation and specifically the install guide.22 Jan 2024
- Paula DerrengerUltralytics(modificato)
Hey there! 👋 Thanks for bringing up the deprecation notice regarding the nvidia-docker wrapper. You're right; use the NVIDIA Container Toolkit for GPU support in Docker containers. Here's how to set it up on Ubuntu/Debian, as described in our Docker Quickstart Guide:
# Add the NVIDIA Container Toolkit repository
curl -fsSL https://nvidia.github.io/libnvidia-container/gpgkey | sudo gpg --dearmor -o /usr/share/keyrings/nvidia-container-toolkit-keyring.gpg \
  && curl -s -L https://nvidia.github.io/libnvidia-container/stable/deb/nvidia-container-toolkit.list \
  | sed 's#deb https://#deb [signed-by=/usr/share/keyrings/nvidia-container-toolkit-keyring.gpg] https://#g' \
    | sudo tee /etc/apt/sources.list.d/nvidia-container-toolkit.list

# Install the NVIDIA Container Toolkit
sudo apt-get update
sudo apt-get install -y nvidia-container-toolkit
And to verify that the GPU devices are available to Docker:
nvidia-ctk cdi listThis should list entries such as
nvidia.com/gpu=all, indicating that your Docker setup can leverage GPU acceleration. 🚀For more detailed instructions and tips on using Ultralytics with Docker, including mounting local directories and running containers, check out our Docker Quickstart Guide. Happy coding!