YOLOv9: 객체 탐지 기술의 도약
YOLOv9은 프로그래밍 가능한 그래디언트 정보(PGI)와 일반화된 효율적 계층 집계 네트워크(GELAN)를 도입해 실시간 객체 탐지를 발전시켰습니다. 출시 당시 MS COCO 데이터셋에서 이전 실시간 탐지기보다 효율성과 정확도가 향상되었습니다. YOLOv9 프로젝트는 별도의 오픈소스 팀이 개발했으며 Ultralytics YOLOv5 코드베이스를 기반으로 합니다.
시청: Ultralytics를 사용한 사용자 지정 데이터 학습: YOLOv9 | 산업용 패키지 데이터셋
YOLOv9 소개#
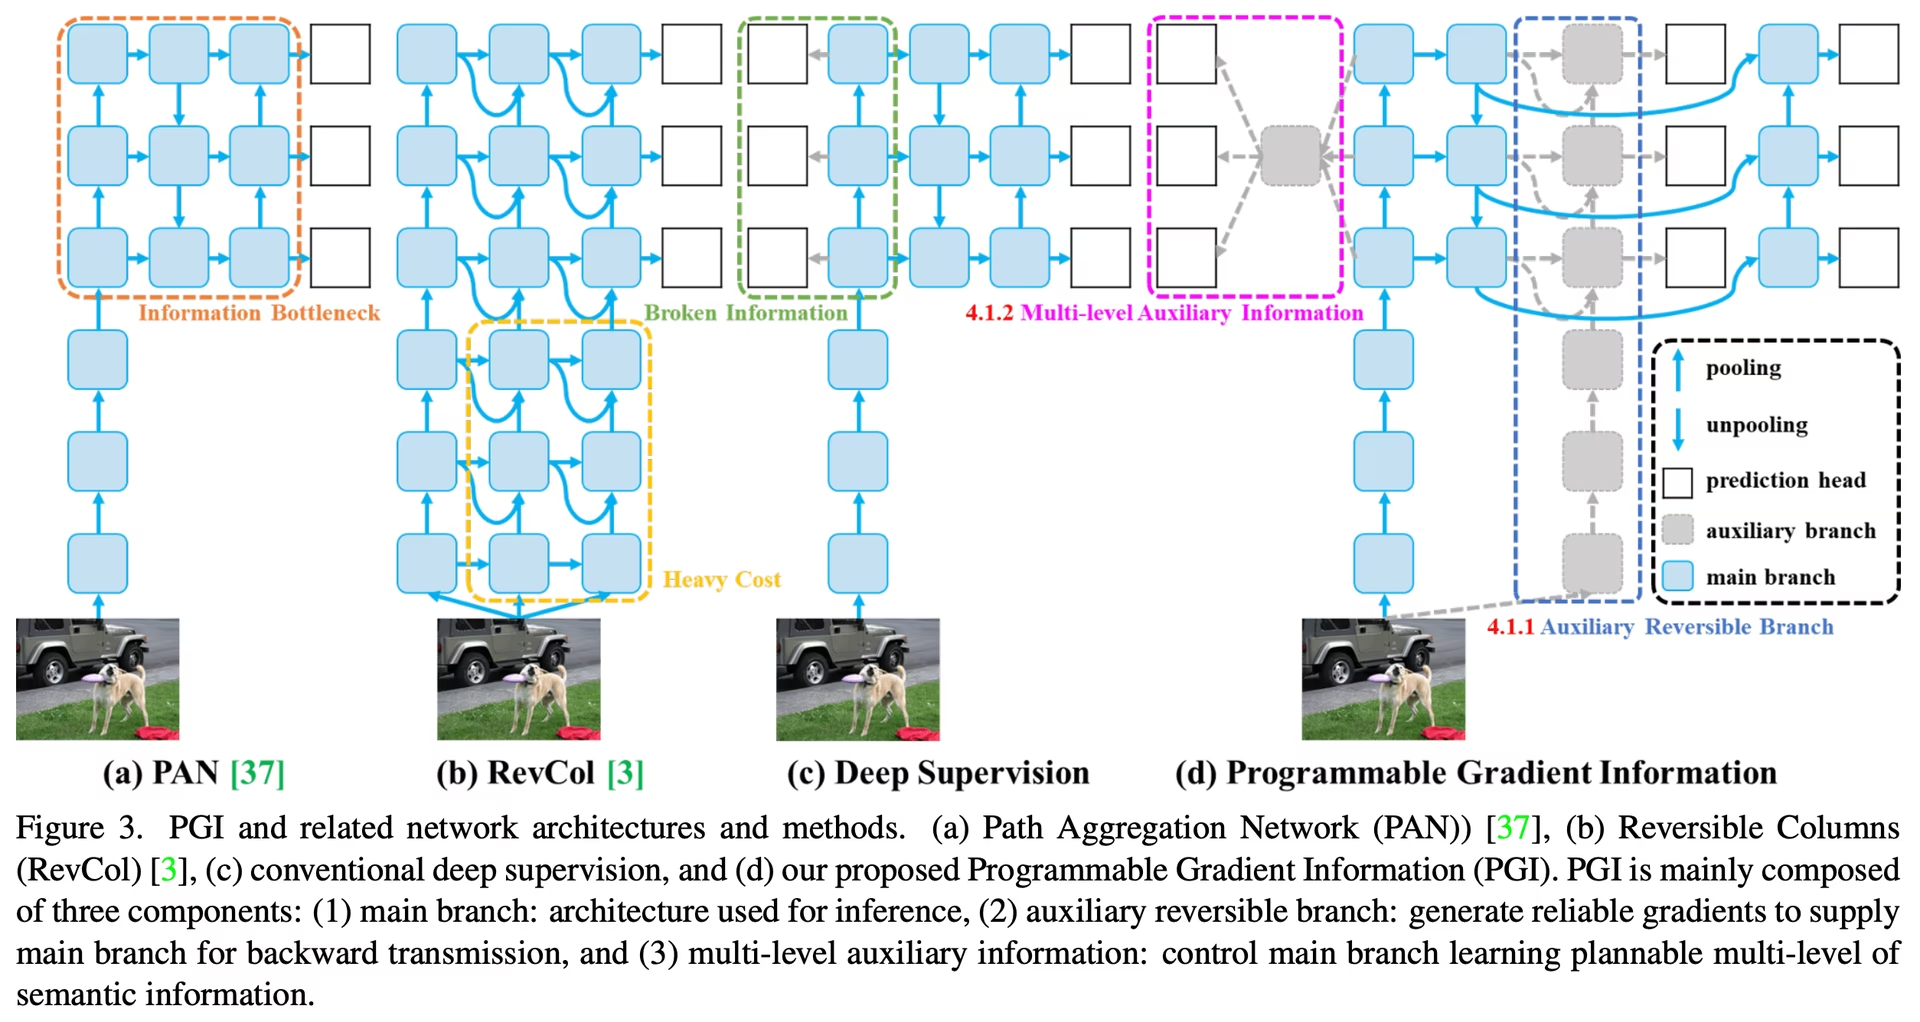
YOLOv9은 심층 신경망에 내재한 정보 손실 문제를 해결합니다. PGI와 GELAN 아키텍처를 통합하여 모델의 학습 용량을 높이고 탐지 과정 전반에 걸쳐 중요한 정보를 보존함으로써 정확도와 효율성을 모두 개선합니다.
YOLOv9의 핵심 혁신#
YOLOv9의 설계는 심층 신경망의 정보 손실 문제를 해결하는 데 초점을 둡니다. 정보 병목 원리와 가역 함수의 사용은 설계의 핵심 요소로, YOLOv9이 높은 효율성과 정확도를 유지하도록 지원합니다.
정보 병목 원리#
정보 병목 원리는 딥러닝의 근본적인 문제를 보여줍니다. 데이터가 네트워크의 연속적인 레이어를 통과할수록 정보가 손실될 가능성이 커집니다. 이 현상은 다음과 같이 수학적으로 표현됩니다:
I(X, X) >= I(X, f_theta(X)) >= I(X, g_phi(f_theta(X)))여기서 I은 상호 정보를 나타내며, f과 g는 각각 매개변수 theta과 phi를 사용하는 변환 함수를 나타냅니다. YOLOv9는 프로그래밍 가능한 그래디언트 정보(PGI)를 구현하여 이 문제에 대응합니다. PGI는 네트워크의 깊은 레이어까지 핵심 데이터를 보존하여 더 신뢰할 수 있는 그래디언트를 생성하고, 결과적으로 모델의 수렴과 성능을 개선합니다.
가역 함수#
가역 함수는 YOLOv9 설계의 또 다른 핵심 요소입니다. 정보 손실 없이 역변환할 수 있는 함수를 가역 함수라고 하며, 다음과 같이 표현됩니다:
X = v_zeta(r_psi(X))가역 함수와 그 역함수의 매개변수로 각각 psi과 zeta을 사용합니다. 이 특성은 딥러닝 아키텍처에서 중요합니다. 네트워크가 완전한 정보 흐름을 유지하여 모델 매개변수를 더 정확하게 갱신할 수 있기 때문입니다. YOLOv9은 정보 저하 위험을 줄이기 위해 아키텍처에 가역 함수를 통합하며, 특히 더 깊은 계층에서 객체 탐지 작업에 필요한 핵심 데이터가 보존되도록 합니다.
경량 모델에 미치는 영향#
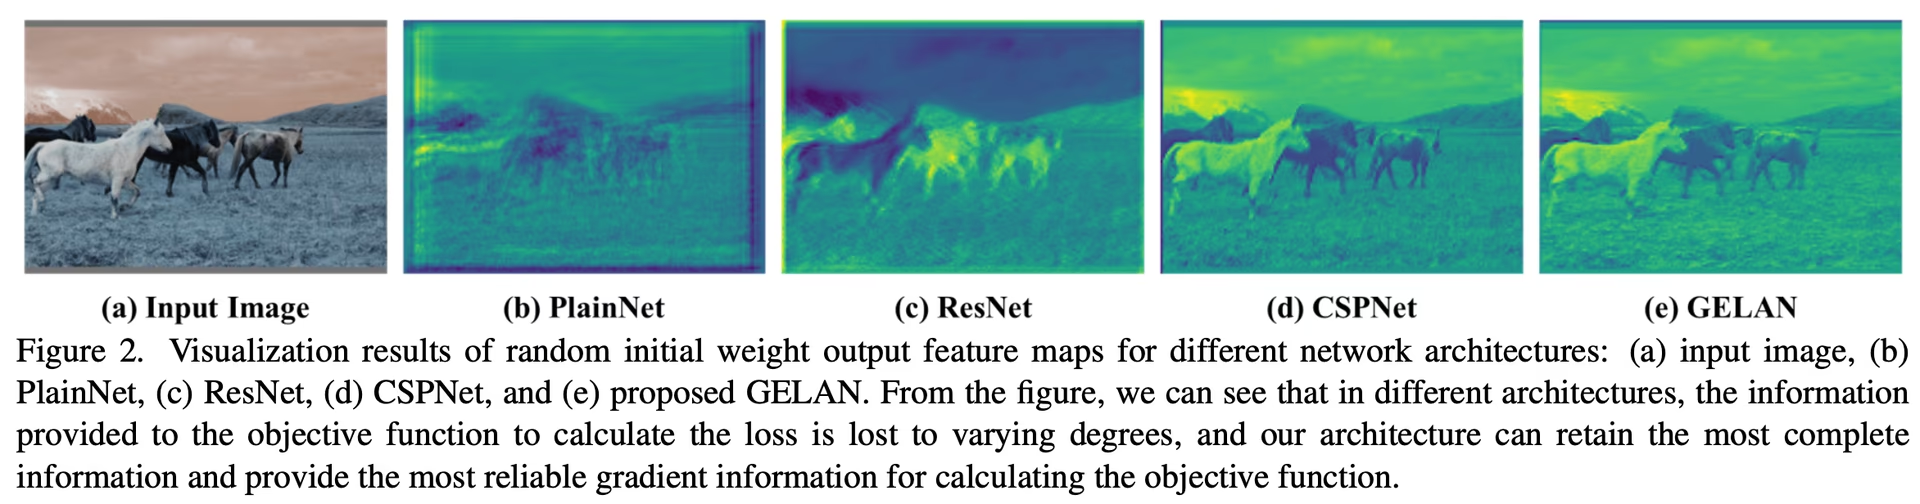
정보 손실 문제를 해결하는 일은 경량 모델에서 특히 중요합니다. 경량 모델은 매개변수가 부족한 경우가 많으며 순전파 과정에서 상당한 정보가 손실되기 쉽습니다. YOLOv9는 PGI와 가역 함수를 활용한 아키텍처를 통해 간소화된 모델에서도 정확한 객체 감지에 필요한 핵심 정보를 보존하고 효과적으로 활용합니다.
프로그래밍 가능한 그래디언트 정보(PGI)#
PGI는 정보 병목 문제를 해결하고 심층 네트워크 레이어 전반에서 핵심 데이터를 보존하기 위해 YOLOv9에 도입된 새로운 개념입니다. 이를 통해 신뢰할 수 있는 그래디언트를 생성하여 모델을 정확하게 업데이트하고 전반적인 감지 성능을 높일 수 있습니다.
일반화된 효율적 레이어 집계 네트워크(GELAN)#
GELAN은 YOLOv9의 파라미터 활용도와 계산 효율성을 개선하는 아키텍처입니다. 다양한 계산 블록을 유연하게 통합하도록 설계되어 속도나 정확도를 희생하지 않으면서 폭넓은 애플리케이션에 적용할 수 있습니다.
YOLOv9 벤치마크#
Ultralytics 벤치마크 모드로 YOLOv9을 벤치마킹하면 실제 시나리오에서 학습 및 검증된 모델의 성능을 평가할 수 있습니다. 이 과정에는 다음이 포함됩니다:
- 성능 평가: 모델의 속도와 정확도를 평가합니다.
- 내보내기 형식: 다양한 내보내기 형식에서 모델을 테스트하여 필요한 표준을 충족하고 여러 환경에서 원활하게 작동하는지 확인합니다.
- 프레임워크 지원: 일관되고 신뢰할 수 있는 결과를 얻기 위해 Ultralytics 패키지 내에서 이러한 평가를 실행합니다.
벤치마크를 수행하면 통제된 테스트 환경에서 모델이 잘 작동하는지 확인할 수 있을 뿐만 아니라 실제 애플리케이션에서도 높은 성능을 유지하는지 확인할 수 있습니다.
시청: Ultralytics Python 패키지를 사용하여 YOLOv9 모델을 벤치마크하는 방법
MS COCO 데이터셋 성능#
출시 당시 YOLOv9은 다양한 모델 크기에 걸쳐 COCO 데이터셋에서 새로운 벤치마크를 세웠습니다. 아래 표는 Ultralytics에서 사용할 수 있는 각 YOLOv9 모델의 정확도, 파라미터 및 FLOPs를 보여줍니다.
초소형 t 모델부터 대형 e 모델까지 YOLOv9 변형 모델은 이전 버전 및 경쟁 모델과 비교해 파라미터와 연산량(FLOPs)을 유지하거나 줄이면서 정확도(mAP)를 개선합니다.
다른 실시간 탐지기와 비교한 YOLOv9의 성능 향상은 다음과 같습니다:
- 경량 모델: YOLOv9s는 파라미터 효율성과 계산 부하 면에서 YOLO MS-S보다 뛰어나며, AP도 0.4~0.6% 개선합니다.
- 중형 및 대형 모델: YOLOv9m과 YOLOv9e는 모델 복잡도와 탐지 성능 간의 균형을 개선하여 파라미터와 연산량을 줄이면서 정확도를 높입니다.
YOLOv9c 모델은 YOLOv7 AF보다 파라미터가 42% 적고 연산량이 21% 적으면서 비슷한 정확도를 달성합니다. YOLOv9e 모델은 YOLOv8x보다 파라미터가 15% 적고 연산량이 25% 적으며, AP는 1.7% 향상되었습니다.
이 결과는 YOLOv9이 실시간 객체 탐지와 기타 컴퓨터 비전 작업에 필요한 정확도를 유지하면서 계산 효율성을 개선했음을 보여줍니다.
결론#
2024년 2월에 출시된 YOLOv9은 실시간 객체 탐지의 효율성과 정확도를 개선했습니다. PGI와 GELAN을 통해 정보 손실 문제를 해결하며 출시 당시 새로운 벤치마크를 세웠습니다. 이후 YOLO26 및 YOLO11과 같은 최신 모델이 추가 개선을 이뤘지만, YOLOv9의 아키텍처 혁신은 계속해서 이 분야에 영향을 미치고 있습니다.
사용 예시#
이 예제에서는 YOLOv9의 간단한 학습 및 추론 예제를 제공합니다.
PyTorch 사전 학습된 *.pt 모델과 구성 *.yaml 파일을 YOLO() 클래스에 전달하여 Python에서 모델 인스턴스를 생성할 수 있습니다:
from ultralytics import YOLO

# YOLOv9c 모델을 처음부터 빌드합니다
model = YOLO("yolov9c.yaml")

# 사전 학습된 가중치로 YOLOv9c 모델을 빌드합니다
model = YOLO("yolov9c.pt")

# 모델 정보 표시(선택 사항)
model.info()

# COCO8 예제 데이터셋으로 100 에포크 동안 모델 학습
results = model.train(data="coco8.yaml", epochs=100, imgsz=640)

# 'bus.jpg' 이미지에서 YOLOv9c 모델로 추론을 실행합니다
results = model("path/to/bus.jpg")
지원 작업 및 모드#
YOLOv9 시리즈는 객체 탐지와 인스턴스 분할을 위한 다양한 모델을 제공하며, 여러 계산 예산과 정확도 요구 사항을 충족합니다.
| 모델 | 파일 이름 | 작업 | 학습 | 검증 | 추론 | 내보내기 |
|---|---|---|---|---|---|---|
| YOLOv9 | yolov9t.pt yolov9s.pt yolov9m.pt yolov9c.pt yolov9e.pt | 객체 탐지 | ✅ | ✅ | ✅ | ✅ |
| YOLOv9-seg | yolov9c-seg.pt yolov9e-seg.pt | 인스턴스 분할 | ✅ | ✅ | ✅ | ✅ |
이 표는 YOLOv9 모델 변형과 학습, 검증, 추론 및 내보내기 모드 지원 여부를 요약합니다.
YOLOv9 모델을 학습하려면 같은 크기의 YOLOv8 모델보다 더 많은 리소스가 필요하며 학습 시간도 더 오래 걸립니다.
인용 및 감사의 글#
실시간 객체 감지 분야에 크게 기여한 YOLOv9 저자들에게 감사를 전합니다:
@inproceedings{wang2024yolov9,
  title={YOLOv9: Learning What You Want to Learn Using Programmable Gradient Information},
  author={Wang, Chien-Yao and Yeh, I-Hau and Liao, Hong-Yuan Mark},
  booktitle={Computer Vision -- ECCV 2024},
  pages={1--21},
  year={2024},
  organization={Springer Nature Switzerland}
}
YOLOv9 공식 논문은 Springer ECCV 2024 프로시딩에 게재되었으며, arXiv에서 프리프린트도 확인할 수 있습니다. 저자들은 연구 결과를 공개했으며 코드베이스는 GitHub에서 이용할 수 있습니다. 이 분야를 발전시키고 더 넓은 커뮤니티가 연구 결과를 이용할 수 있도록 해주신 저자들의 노력에 감사드립니다.
자주 묻는 질문#
YOLOv9은 두 가지 주요 기법을 도입합니다. 프로그래밍 가능한 기울기 정보(PGI)와 일반화 효율 레이어 집계 네트워크(GELAN)입니다. 이러한 혁신은 심층 신경망의 정보 손실 문제를 해결하여 높은 효율성, 정확도, 적응성을 보장합니다. PGI는 네트워크 레이어 전반에 걸쳐 핵심 데이터를 보존하고, GELAN은 파라미터 활용도와 연산 효율성을 최적화합니다.
출시 당시 YOLOv9은 정확도와 효율성 면에서 다른 최첨단 실시간 객체 탐지 모델을 능가했습니다. COCO 데이터셋에서 YOLOv9 모델은 연산 오버헤드를 유지하거나 줄이면서 다양한 크기에서 더 높은 mAP 점수를 달성합니다. 예를 들어 YOLOv9c는 YOLOv7 AF보다 파라미터가 42% 적고 연산 요구량이 21% 낮으면서도 비슷한 정확도를 제공합니다.
Python과 CLI 명령을 모두 사용해 YOLOv9 모델을 학습할 수 있습니다. Python에서는
YOLO클래스를 사용해 모델을 인스턴스화하고train메서드를 호출합니다:from ultralytics import YOLO # 사전 학습된 가중치로 YOLOv9c 모델을 빌드하고 학습합니다 model = YOLO("yolov9c.pt") results = model.train(data="coco8.yaml", epochs=100, imgsz=640)CLI로 학습하려면 다음을 실행합니다:
yolo train model=yolov9c.yaml data=coco8.yaml epochs=100 imgsz=640학습 및 추론에 관한 사용 예시를 더 알아보세요.
YOLOv9는 정보 손실을 줄이도록 설계되었으며, 이는 상당한 정보 손실이 발생하기 쉬운 경량 모델에서 특히 중요합니다. YOLOv9는 프로그래밍 가능한 그래디언트 정보(PGI)와 가역 함수를 통합하여 핵심 데이터를 보존하고 모델의 정확도와 효율성을 높입니다. 따라서 높은 성능의 소형 모델이 필요한 애플리케이션에 매우 적합합니다. 자세한 내용은 경량 모델에 미치는 YOLOv9의 영향 섹션을 참조하세요.


댓글482
질문을 하거나 결과를 공유하거나 다른 사람을 도와주세요.
vuvanhieu
to load a YOLOv5 model def load_yolov5_model(yolo_model_path): device = torch.device('cuda' if torch.cuda.is_available() else 'cpu') model = torch.hub.load('ultralytics/yolov5', 'custom', path=yolo_model_path, force_reload=True).to(device) return model
How in yolov8, yolov9?
1 Paula DerrengerUltralytics
To load a YOLOv8 or YOLOv9 model, you can use the
YOLOclass from the Ultralytics package. Here's a concise way to do it:from ultralytics import YOLO # Load a YOLOv8 model model_v8 = YOLO("yolov8n.pt") # Load a YOLOv9 model model_v9 = YOLO("yolov9c.pt")For more details, you can refer to the YOLOv9 documentation: https://docs.ultralytics.com/models/yolov9/.
MoAbbasid
@glenn-jocher @pderrenger any idea of when the lightweight models can be used in ultralytics?
1 Glenn JocherUltralytics(수정됨)
Hi there! 😊
Lightweight models are available in Ultralytics. YOLOv9 ships
yolov9t.pt,yolov9s.ptandyolov9m.ptalongsideyolov9c.ptandyolov9e.pt. For new projects we recommend YOLO26, whose smallest modelyolo26n.ptis built for efficiency.To try a lightweight model:
yolo train model=yolo26n.pt data=coco128.yaml epochs=100If you're tinkering with custom lightweight designs, copy an existing model YAML from the Ultralytics repo and adjust its layers or scales. Contributions or insights are welcome.
Happy detecting!
deepanalyticszlc
Very exciting! Is there a schedule for release of lightweight models?
1- Paula DerrengerUltralytics(수정됨)
@deepanalyticszlc hey there! 😊
Lightweight YOLOv9 models are now available:
yolov9t.pt,yolov9s.ptandyolov9m.pt, alongsideyolov9c.ptandyolov9e.pt. For the latest releases, see the Ultralytics GitHub releases.Here's a little snippet on how to load and use YOLOv9 for predictions:
from ultralytics import YOLO

# Load YOLOv9 model
model = YOLO('yolov9t.pt')  # Replace 'yolov9t.pt' with your model file

# Run inference on an image
results = model('path/to/your/image.jpg')

# Display results
results[0].show()
For new projects, we recommend YOLO26, which also comes in small sizes like
yolo26n.pt. ⏰
DolapoSalim(수정됨)
@glenn-jocher Kindly assist with this TypeError: TypeError: ERROR C:\path_to_custom_model/yolov9c.pt appears to be an Ultralytics YOLOv5 model originally trained with https://github.com/ultralytics/yolov5. This model is NOT forwards compatible with YOLOv8 at https://github.com/ultralytics/ultralytics. Recommend fixes are to train a new model using the latest 'ultralytics' package or to run a command with an official Ultralytics model, i.e. 'yolo predict model=yolo11n.pt'
Here is my code:
from ultralytics import YOLO

model = YOLO(path_to_YOLOV9.pt )

results = model.predict(source="IMAGE_SOURCE", show=True, conf=0.10)
Note, I am actually working with a custom trained YOLOV9
- Glenn JocherUltralytics
@DolapoSalim to resolve the YOLOv5/YOLOv9 compatibility error when using custom-trained models, please ensure you're using the latest
ultralytics>=8.2.0package and retrain your YOLOv9 model using the official YOLOv9 configuration files from our documentation. For custom training guidance, see the YOLOv9 Training section in our docs.This error typically occurs when using older model formats - newer versions maintain full backward compatibility when models are trained with current Ultralytics implementations.
1
gusreic
This article claims that Yolov9 is based on Yolov5. The Yolov9 paper claims that v9 is based on Yolov7 which is also not based on 5. Is there any other way that would explain this claim? Otherwise maybe adjust the article.
- Glenn JocherUltralytics
@gusreic yes that's correct. YOLOv9 repo is a fork of my YOLOv5 repo. I know this because I wrote nearly all the files in the YOLOv9 repo myself. Unfortunately the author has failed to make this clear, though he did include a (hidden) acknowledgement at the bottom of the README.
1 Oh, that is really unfortunate, thank you for clearing it up since it is not directly apparent. Do you think that YOLOv9 is based on YOLOv5 only with respect to the structure of the repository or would you say that the architecture of the model itself is also based on the architecture of YOLOv5?
- Glenn JocherUltralytics
@gusreic thank you for your question! YOLOv9's repository structure is indeed based on Ultralytics YOLOv5, while its architecture introduces novel components like Programmable Gradient Information (PGI) and GELAN as described in the YOLOv9 documentation. The model itself represents an independent advancement building on broader YOLO research. We'll clarify this distinction in our article! 😊
ghost
Hello,
Thanks for the great documentation!
Quick question: Is the code licensed under AGPLv3 (Ultralytics) or GPLv3 (Wang, Chien-Yao and Liao, Hong-Yuan Mark Github)?
Thanks!
- Glenn JocherUltralytics
@ProfessorHT the YOLOv9 project codebase, developed by Wang, Chien-Yao and Liao, Hong-Yuan Mark, is available on GitHub and licensed under GPLv3, while Ultralytics models and software use the AGPL-3.0 license.
Thank you for your quick response. So to be sure if I use Yolov9 from this documentation with the ultralytics library i will be under the AGPLv3 license and i should buy a license?
- Glenn JocherUltralytics
Yes, if you use YOLOv9 models from the Ultralytics library, you are under the AGPL-3.0 license and would need an Enterprise License for commercial use, unless you open-source your entire project under AGPL-3.0.
 liuweiqing
Does it support automatic downloading of pretrained weights?
- Glenn JocherUltralytics
@14790897 yes, YOLOv9 supports automatic downloading of pretrained weights when using the
YOLO()class in Python or CLI commands, as long as the specified weights file (e.g.,yolov9c.pt) is available in the Ultralytics repository. You can find more details in the YOLOv9 documentation.
jane7166
Hello. I have retrained the YOLOv9 model, and I would like to deploy it as an API. How should I proceed?
- Glenn JocherUltralytics
@jane7166 to deploy your retrained YOLOv9 model as an API, you can use frameworks like FastAPI or Flask to build an endpoint and load your model using the Ultralytics Python package. Refer to the YOLOv9 documentation for guidance on inference, which can be integrated into your API logic. Let us know if you have further questions!
Gnoot01
I'm getting the following errors despite latest torch and ultralytics installs. Kindly assist
File "C:\Users\.venv\lib\site-packages\ultralytics\engine\model.py", line 547, in predict self.predictor.setup_model(model=self.model, verbose=is_cli) File "C:\Users\.venv\lib\site-packages\ultralytics\engine\predictor.py", line 303, in setup_model self.model = AutoBackend( File "C:\Users\.venv\lib\site-packages\torch\utils\_contextlib.py", line 116, in decorate_context return func(*args, **kwargs) File "C:\Users\.venv\lib\site-packages\ultralytics\nn\autobackend.py", line 145, in __init__ model = model.fuse(verbose=verbose) TypeError: BaseModel.fuse() got an unexpected keyword argument 'verbose'- Glenn JocherUltralytics
@Gnoot01 it seems like there's a compatibility issue with the
fusemethod. Please ensure you're using the latest version of the Ultralytics package. If the issue persists, consider checking for any updates or changes in the repository that might address this. For further assistance, you can explore the YOLOv9 documentation. @glenn-jocher Hi, I'm using the latest ultralytics 8.3.24 and latest torch. However, still facing this issue. Any suggestions?
- Glenn JocherUltralytics
@Gnoot01 i'm sorry you're experiencing this issue. Please ensure your Ultralytics package is up-to-date. If the problem persists, try reinstalling the package or checking for any recent updates in the repository. For more details, you can refer to the YOLOv9 documentation.
foskyblue
I'm having issues with my Yolov9 model exported to tflite. Model was successfully exported to tflite but I cannot get the right bounding boxes. I'm following the steps listed here: https://stackoverflow.com/questions/76381317/yolov8-tflite-python-predictions-and-interpreting-output (for folov8) to make inference for my yolov9 tflite model.
1Step 1: Resizing and Padding (Letterboxing) Step 2: Non-Maximum Suppression (NMS) Step 3: Rescaling Bounding Boxes
However, when I draw the outputed bounding boxes on my image the boxes don't fit the objects in the image correctly.
The code I'm using can be seen below:
from tflite_runtime.interpreter import Interpreter from PIL import Image import numpy as np from glob import glob from typing import Tuple, List interpreter = None input_shape = (320, 576) # Input tensor dimensions (width, height) in pixels input_index = 0 # Input tensor index (from input details in model signature) output_index = 409 model_path = 'model/saved_model.tflite' def load_model(): interpreter = None interpreter = Interpreter(model_path=model_path, num_threads=2) interpreter.allocate_tensors() input_details = interpreter.get_input_details() global input_shape input_shape = tuple(input_details[0]['shape'][1:3]) global input_index input_index = input_details[0]['index'] output_details = interpreter.get_output_details() global output_index output_index = output_details[0]['index'] return interpreter def letter_box(img: np.ndarray, new_shape: Tuple[int, int]) -> np.ndarray: """ Resizes an image to fit within a new shape while maintaining the aspect ratio, and pads the remaining space with a constant value. Args: img (np.ndarray): The input image as a NumPy array. new_shape (Tuple[int, int]): The desired output shape (height, width). Returns: np.ndarray: The resized and padded image. """ shape = img.shape[:2] # Calculate the scaling ratio to fit the image within the new shape r = min(new_shape[0] / shape[0], new_shape[1] / shape[1]) # Calculate the new unpadded dimensions new_unpad = int(round(shape[1] * r)), int(round(shape[0] * r)) # Calculate the padding required on each side dw, dh = new_shape[1] - new_unpad[0], new_shape[0] - new_unpad[1] dw, dh = dw / 2, dh / 2 # Resize the image if necessary if shape[::-1] != new_unpad: img = Image.fromarray(img).resize(new_unpad, Image.Resampling.BILINEAR) img = np.array(img) # Calculate the top, bottom, left, and right padding values top, bottom = int(round(dh - 0.1)), int(round(dh + 0.1)) left, right = int(round(dw - 0.1)), int(round(dw + 0.1)) # Add padding to the image img = np.pad(img, ((top, bottom), (left, right), (0, 0)), mode='constant', constant_values=114) return img def non_max_suppression( prediction: np.ndarray, conf_thres: float = 0.25, iou_thres: float = 0.45, max_det: int = 300, max_wh: int = 7680, ): """ Perform non-maximum suppression (NMS) on a single image prediction. Args: prediction (np.ndarray): A numpy array of shape (1, num_boxes, num_classes + 4 + num_masks) containing the predicted boxes, classes, and masks. conf_thres (float): Confidence threshold for filtering boxes (0.0 to 1.0). iou_thres (float): IoU threshold for NMS (0.0 to 1.0). max_det (int): Maximum number of boxes to keep after NMS. max_wh (int): Maximum box width and height in pixels. Returns: np.ndarray: Array containing kept boxes with format (x1, y1, x2, y2, confidence, class, mask1, mask2, ...). """ # Input validation (can be removed if you're sure of your input) if 0 > conf_thres > 1: raise ValueError(f"Invalid Confidence threshold {conf_thres}, valid values are between 0.0 and 1.0") if 0 > iou_thres > 1: raise ValueError(f"Invalid IoU {iou_thres}, valid values are between 0.0 and 1.0") # Extract dimensions and metadata directly _, _, dims = prediction.shape nc = dims - 4 - prediction.shape[1] # number of classes nm = dims - nc - 4 # number of masks mi = 4 + nc # mask start index # Process the single image in the batch x = prediction[0] # Extract the single image data # Move class scores to last axis and threshold x = np.transpose(x, (1, 0)) xc = x[..., 4:mi].max(axis=-1) > conf_thres x = x[xc] if not x.shape[0]: # No boxes left after confidence thresholding return np.zeros((0, 6 + nm)) # Convert xywh to xyxy directly on the filtered boxes x[..., :4] = xywh2xyxy(x[..., :4]) # Split and process boxes, classes, and masks # pylint: disable=unbalanced-tuple-unpacking box, cls, mask = np.split(x, (4, mi), 1) conf = cls.max(1) j = cls.argmax(1) x = np.concatenate((box, conf[:, None], j[:, None].astype(float), mask), 1) x = x[conf > conf_thres] n = x.shape[0] if not n: # No boxes left after additional confidence thresholding return np.zeros((0, 6 + nm)) # NMS (simplified since we're dealing with a single image) c = x[:, 5:6] * max_wh boxes, scores = x[:, :4] + c, x[:, 4] i = numpy_nms(boxes, scores, iou_thres) i = i[:max_det] return x[i] def numpy_nms(boxes: np.ndarray, scores: np.ndarray, iou_threshold: float = 0.5) -> np.ndarray: """ Perform Non-Maximum Suppression (NMS) on a set of bounding boxes. Args: boxes (np.ndarray): Array of shape (N, 4) representing N bounding boxes. Each box is [x1, y1, x2, y2]. scores (np.ndarray): Array of shape (N,) representing the confidence scores for each box. iou_threshold (float): IoU threshold for suppressing overlapping boxes. Defaults to 0.5. Returns: np.ndarray: Boolean array of shape (N,) indicating which boxes to keep. """ # Sort boxes by score in descending order order = scores.argsort()[::-1] keep = np.ones(len(boxes), dtype=bool) # Calculate IoU matrix ious = box_iou_batch(boxes, boxes) np.fill_diagonal(ious, 0) # Set self-IoU to 0 for i, idx in enumerate(order): if not keep[idx]: continue # Suppress boxes with IoU > threshold overlap = ious[idx] > iou_threshold keep[order[i + 1:]] &= ~overlap[order[i + 1:]] return keep def box_iou_batch(boxes_a: np.ndarray, boxes_b: np.ndarray) -> np.ndarray: """ Calculate the Intersection over Union (IoU) between two sets of bounding boxes. Args: boxes_a (np.ndarray): Array of shape (N, 4) representing N bounding boxes. boxes_b (np.ndarray): Array of shape (M, 4) representing M bounding boxes. Returns: np.ndarray: Array of shape (N, M) containing IoU values for each pair of boxes. Note: Each bounding box is represented as [x1, y1, x2, y2], where (x1, y1) is the top-left corner and (x2, y2) is the bottom-right corner. """ # Calculate areas of boxes_a area_a = (boxes_a[:, 2] - boxes_a[:, 0]) * (boxes_a[:, 3] - boxes_a[:, 1]) # Calculate areas of boxes_b area_b = (boxes_b[:, 2] - boxes_b[:, 0]) * (boxes_b[:, 3] - boxes_b[:, 1]) # Calculate intersection coordinates top_left = np.maximum(boxes_a[:, None, :2], boxes_b[:, :2]) bottom_right = np.minimum(boxes_a[:, None, 2:], boxes_b[:, 2:]) # Calculate intersection area area_inter = np.prod(np.clip(bottom_right - top_left, a_min=0, a_max=None), 2) # Calculate IoU return area_inter / (area_a[:, None] + area_b - area_inter) def xywh2xyxy(box: np.ndarray) -> np.ndarray: """ Convert bounding box coordinates from (x, y, width, height) format to (x1, y1, x2, y2) format where (x1, y1) is the top-left corner and (x2, y2) is the bottom-right corner. Args: x (np.ndarray): The input bounding box coordinates in (x, y, width, height) format. Returns: np.ndarray: The bounding box coordinates in (x1, y1, x2, y2) format. """ if box.shape[-1] != 4: raise ValueError(f"input shape last dimension expected 4 but input shape is {box.shape}") # pylint: disable=unbalanced-tuple-unpacking xy, wh = np.split(box, [2], axis=-1) wh_half = wh / 2 return np.concatenate([xy - wh_half, xy + wh_half], axis=-1) def preprocess_image(pil_image: Image.Image, input_size: Tuple[int, int]) -> np.ndarray: """ Preprocesses an image for inference with a TFLite model. Args: image_path (str): Path to the image file. input_size (Tuple[int, int]): Desired input size (height, width) for the model. Returns: np.ndarray: Preprocessed image as a NumPy array, ready for inference. """ if pil_image.mode != "RGB": pil_image = pil_image.convert("RGB") im = np.asarray(pil_image) im = letter_box(im, new_shape=input_size) im = np.expand_dims(im, axis=0) # goal is to have the format (number of images, size of image, number of channnels) im = im.astype(np.float32) / 255.0 # Normalize to 0.0 - 1.0 return im def postprocess_results(output: np.ndarray, model_input_size: Tuple[int, int], image_original_size: Tuple[int, int]) -> np.ndarray: """ Postprocesses the raw outputs from a TFLite model, including scaling bounding boxes back to the original image size. Args: output (np.ndarray): List of output tensors from the TFLite model. model_input_size (Tuple[int, int]): Desired input size (height, width) for the model. image_original_size (Tuple[int, int]): Original size (height, width) of the input image. Returns: np.ndarray: Postprocessed results with bounding boxes adjusted to original image size. """ predictions = non_max_suppression(output, conf_thres=0.25, iou_thres=0.45, max_det=300, max_wh=1) return scale_boxes(image_original_size, predictions, model_input_size) def scale_boxes(image_original_size: Tuple[int, int], boxes: np.ndarray, model_input_size: Tuple[int, int]): """ Rescales bounding boxes (in the format of xyxy by default) from the shape of the image they were originally specified in (img1_shape) to the shape of a different image (img0_shape). Args: image_original_size (Tuple[int, int]): The shape of the image that the bounding boxes are for, in the format of (height, width). boxes (np.ndarray): the bounding boxes of the objects in the image, in the format of (x1, y1, x2, y2) model_input_size (Tuple[int, int]): the shape of the target image, in the format of (height, width). Returns: np.ndarray: The scaled bounding boxes, in the format of (x1, y1, x2, y2) """ # calculate from img0_shape gain = min(model_input_size[0] / image_original_size[0], model_input_size[1] / image_original_size[1]) # gain = old / new pad = ( round((model_input_size[1] - image_original_size[1] * gain) / 2 - 0.1) / model_input_size[1], round((model_input_size[0] - image_original_size[0] * gain) / 2 - 0.1) / model_input_size[0], ) # wh padding inner_image_scale = ( (1 - pad[0] * 2), (1 - pad[1] * 2), ) # wh scale boxes[..., 0] = (boxes[..., 0] - pad[0]) / inner_image_scale[0] # x padding boxes[..., 1] = (boxes[..., 1] - pad[1]) / inner_image_scale[1] # y padding boxes[..., 2] = (boxes[..., 2] - pad[0]) / inner_image_scale[0] # x padding boxes[..., 3] = (boxes[..., 3] - pad[1]) / inner_image_scale[1] # y padding boxes[..., [0, 2]] = boxes[..., [0, 2]].clip(0, 1) # x1, x2 boxes[..., [1, 3]] = boxes[..., [1, 3]].clip(0, 1) # y1, y2 return boxes def prepare_input(image_pil): # Input image must match input shape (ex: 640x640 pixels) [note: only use BILINEAR here] resized = image_pil.copy().resize(input_shape, resample=Image.Resampling.BILINEAR) # SSD Mobilenet V2 FPNLite take as input pixels between [-1.0, 1.0] expanded = np.expand_dims(np.asarray(resized, dtype=np.float32) * 2. / 255. - 1., axis=0) del resized # Enforce garbage collection sooner than later return expanded def predict(tmp_images_dir): interpreter = load_model() model_predictions = [] for img_path in tmp_images_dir: pil_image = Image.open(img_path) input_data = preprocess_image(pil_image, input_shape) interpreter.set_tensor(input_index, input_data) interpreter.invoke() output_data = interpreter.get_tensor(output_index) preds = postprocess_results(output_data, input_shape, (pil_image.size[1], pil_image.size[0])) model_predictions.append({ 'detection_classes': (preds[:, 5] + 1).tolist(), # Class values are offset by +1.0 'detection_boxes': preds[:, 0:4].tolist(), 'detection_scores': preds[:, 4].tolist(), }) print(model_predictions) images_path = glob('utilities/images/*.JPG') predict(images_path)- Glenn JocherUltralytics
@foskyblue it seems like the issue might be related to the scaling and padding logic when converting bounding boxes. Ensure that the
scale_boxesfunction correctly rescales the boxes to the original image size. For more detailed guidance, please refer to the YOLOv9 documentation: https://docs.ultralytics.com/models/yolov9/. Hi Glen thanks for your response. Unfortunately I find it difficult to correctly scale the bounding boxes from the example script I mentioned above: https://stackoverflow.com/questions/76381317/yolov8-tflite-python-predictions-and-interpreting-output.
How can I implement the YOLOv9 TFLite model with an input ape of [1, 320, 576, 3] and output shape of [1, 19, 3780] in Python?
- Glenn JocherUltralytics
To correctly scale bounding boxes for your YOLOv9 TFLite model, ensure your
scale_boxesfunction accurately adjusts the coordinates based on the original image size and model input size. Verify that padding and scaling calculations align with your preprocessing steps. For further details, please refer to the YOLOv9 documentation.