Como isolar objetos segmentados com Ultralytics YOLO
A segmentação de instâncias produz uma máscara precisa ao nível do pixel para cada objeto detectado, o que permite recortar cada objeto da imagem individualmente. Este guia mostra como transformar os resultados de segmentação do Ultralytics YOLO em objetos isolados usando o Modo de previsão e o OpenCV, com fundo preto sólido ou transparente para salvar como PNG.
Assista: Como isolar objetos segmentados com Ultralytics YOLO26 | Tutorial de Python | VisionAI 🚀
Por que isolar objetos segmentados?#
Recortar objetos individuais de uma imagem permite uma variedade de fluxos de trabalho posteriores:
- Remoção do fundo em fotos de produtos, catálogos ou edições criativas.
- Recortes por objeto para criar conjuntos de dados de classificação a partir das suas detecções.
- Processamento direcionado para que etapas posteriores, como OCR, análise de cores ou medição, vejam somente o objeto, não a cena ao redor.
- Exportação como PNG transparente para compor objetos sobre novos fundos.
A receita funciona com qualquer modelo de segmentação Ultralytics YOLO e segue quatro etapas: executar a inferência → extrair cada contorno → isolar o objeto → salvar o resultado.
Executar a inferência de segmentação#
Instala as bibliotecas necessárias, carrega um modelo de segmentação, como YOLO26n-seg (o sufixo -seg é necessário para produzir máscaras) e executa a previsão na imagem de origem:
from ultralytics import YOLO

# Carregar um modelo de segmentação
model = YOLO("yolo26n-seg.pt")

# Executar a inferência em uma imagem de origem
results = model.predict(source="path/to/image.jpg")Se você chamar model.predict() sem source, a Ultralytics usará as imagens de exemplo incluídas no pacote (bus.jpg e zidane.jpg), o que é prático para testar o fluxo de trabalho rapidamente.
Extrair contornos dos objetos#
Cada item em results corresponde a uma imagem, e iterar sobre um resultado retorna uma detecção de cada vez. Para cada detecção, copie a imagem original, leia o rótulo da classe e desenhe o contorno da máscara do objeto sobre uma máscara binária vazia. A região branca dessa máscara indica exatamente quais pixels pertencem ao objeto.
Os trechos desta seção e da próxima são executados dentro do loop de detecção abaixo; o script completo, pronto para copiar e colar, está em Exemplo completo.
from pathlib import Path

import cv2
import numpy as np

for r in results:
    img = np.copy(r.orig_img)
    img_name = Path(r.path).stem  # nome-base da imagem de origem

    # Iterar sobre cada objeto detectado na imagem
    for ci, c in enumerate(r):
        label = c.names[c.boxes.cls.tolist().pop()]  # nome da classe

        # Criar uma máscara binária e desenhar nela o contorno do objeto
        b_mask = np.zeros(img.shape[:2], np.uint8)
        contour = c.masks.xy[0].astype(np.int32).reshape(-1, 1, 2)
cv2.drawContours(b_mask, [contour], -1, (255, 255, 255), cv2.FILLED)c.masks.xy[0]retorna o contorno da máscara como coordenadas de pontos(x, y)do objeto neste resultado de detecção única..astype(np.int32)converte os pontos defloat32, quedrawContours()do OpenCV não aceita..reshape(-1, 1, 2)remodela os pontos para o formato[N, 1, 2]esperado pordrawContours(), em queNé o número de pontos do contorno.
Passar [contour] com o índice -1 desenha todos os pontos do contorno fornecido, e cv2.FILLED preenche de branco todos os pixels dentro do contorno.
Isolar o objeto#
Com a máscara binária pronta, combine-a com a imagem original. Há dois estilos comuns, dependendo do fundo desejado:
Converta a máscara para três canais e mantenha apenas os pixels que se sobrepõem ao objeto. Tudo que estiver fora do contorno ficará preto:
# Isolar objeto com fundo preto
mask3ch = cv2.cvtColor(b_mask, cv2.COLOR_GRAY2BGR)
isolated = cv2.bitwise_and(mask3ch, img)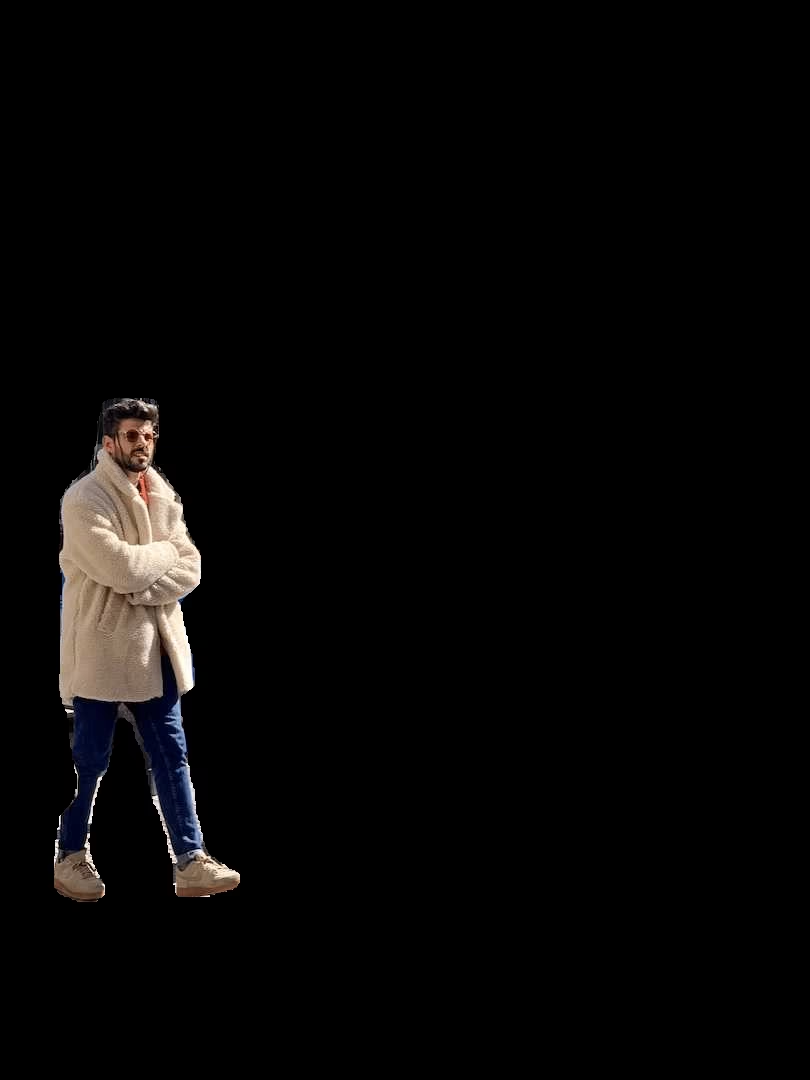
Para manter apenas a região do objeto, em vez da imagem inteira, faça um recorte usando a caixa delimitadora da detecção:
# Coordenadas da caixa delimitadora
x1, y1, x2, y2 = c.boxes.xyxy.cpu().numpy().squeeze().astype(np.int32)
# Recortar a imagem isolada até a região do objeto
iso_crop = isolated[y1:y2, x1:x2]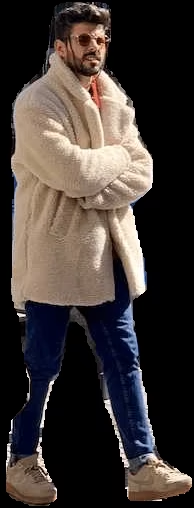
Isso já está integrado. Passe save_crop=True para predict() e a Ultralytics salvará automaticamente os recortes da caixa delimitadora, sem necessidade de máscaras.
Salvar o resultado (opcional)#
O que fazer com cada objeto isolado fica a seu critério. Uma etapa seguinte comum é gravá-lo no disco para uso posterior:
# Save the isolated object to file
cv2.imwrite(f"{img_name}_{label}-{ci}.png", isolated)
Aqui, img_name é o nome-base da imagem de origem, label é o nome da classe e ci é o índice da detecção, de modo que várias instâncias da mesma classe recebam nomes de arquivo exclusivos. Substitua isolated por iso_crop se você tiver aplicado o recorte opcional acima.
Exemplo completo#
O script abaixo reúne todas as etapas em um único bloco executável. Por padrão, ele usa um fundo preto; altere a única linha indicada para np.dstack([img, b_mask]) para gerar um PNG transparente:
from pathlib import Path

import cv2
import numpy as np

from ultralytics import YOLO

model = YOLO("yolo26n-seg.pt")
results = model.predict(source="path/to/image.jpg")

for r in results:
    img = np.copy(r.orig_img)
    img_name = Path(r.path).stem

    for ci, c in enumerate(r):
        label = c.names[c.boxes.cls.tolist().pop()]

        # Build a binary mask from the object contour
        b_mask = np.zeros(img.shape[:2], np.uint8)
        contour = c.masks.xy[0].astype(np.int32).reshape(-1, 1, 2)
        cv2.drawContours(b_mask, [contour], -1, (255, 255, 255), cv2.FILLED)

        # Isolate the object (black background)
        mask3ch = cv2.cvtColor(b_mask, cv2.COLOR_GRAY2BGR)
        isolated = cv2.bitwise_and(mask3ch, img)  # transparent PNG: isolated = np.dstack([img, b_mask])

        # Save or add your custom post-processing here
        cv2.imwrite(f"{img_name}_{label}-{ci}.png", isolated)

        # Optional: crop to the bounding box before saving
        # x1, y1, x2, y2 = c.boxes.xyxy.cpu().numpy().squeeze().astype(np.int32)
        # cv2.imwrite(f"{img_name}_{label}-{ci}.png", isolated[y1:y2, x1:x2])
Para reutilizar o código, envolva o corpo do loop em uma função para poder chamá-la com muitas imagens.
Conclusão#
Agora você tem uma receita completa para isolar objetos segmentados com Ultralytics YOLO: execute a inferência, crie uma máscara binária a partir de cada contorno, extraia o objeto com fundo preto ou transparente e, opcionalmente, recorte-o até sua caixa delimitadora. Explore a documentação completa de Tarefa de segmentação e Modo de previsão para adaptar o fluxo de trabalho às suas próprias classes.
Perguntas frequentes#
Carregue um modelo de segmentação, execute a inferência, crie uma máscara binária a partir do contorno de cada detecção e combine-a com a imagem original:
import cv2
import numpy as np

from ultralytics import YOLO

model = YOLO("yolo26n-seg.pt")
results = model.predict(source="path/to/your/image.jpg")

img = np.copy(results[0].orig_img)
b_mask = np.zeros(img.shape[:2], np.uint8)
contour = results[0].masks.xy[0].astype(np.int32).reshape(-1, 1, 2)
cv2.drawContours(b_mask, [contour], -1, (255, 255, 255), cv2.FILLED)

mask3ch = cv2.cvtColor(b_mask, cv2.COLOR_GRAY2BGR)
isolated = cv2.bitwise_and(mask3ch, img)
Veja o Exemplo completo para conferir o loop completo de cada detecção.
Há dois estilos principais. Para um fundo preto, converta a máscara para três canais e use
cv2.bitwise_and(). Para um fundo transparente (ao salvar como PNG), empilhe a máscara como um quarto canal alfa comnp.dstack([img, b_mask]). Ambos são mostrados em Isolar o objeto.Leia as coordenadas da caixa delimitadora da detecção e faça um recorte da imagem isolada:
x1, y1, x2, y2 = results[0].boxes.xyxy[0].cpu().numpy().astype(np.int32)
iso_crop = isolated[y1:y2, x1:x2]
Saiba mais sobre os resultados das caixas delimitadoras na documentação do Modo de previsão.
O Ultralytics YOLO oferece segmentação de instâncias rápida e em tempo real, com geração precisa de máscaras e caixas delimitadoras, além de uma API Python simples que transforma os resultados da inferência em objetos isolados com poucas linhas de código OpenCV.
Sim. Use o argumento
save_cropempredict()para salvar recortes das caixas delimitadoras com o plano de fundo original:results = model.predict(source="path/to/your/image.jpg", save_crop=True)Lê mais na secção Argumentos de inferência do modo Predict.


Comentários16
Faz uma pergunta, partilha os teus resultados ou ajuda alguém.
cordonballas
wow thanx that's exactly what i've been looking for.
 Glenn JocherUltralytics
@cordonballas thank you for your positive feedback! We're glad the segmentation isolation guide was helpful. If you have any further questions, feel free to ask—the YOLO community and our team are here to help. 😊
For continued support, check our Segment Task documentation and Predict Mode guide.
AbdulGhofur23
How can I extract a mask from a TIFF (Tag Image File Format) so that the mask's coordinates align with the projection of the TIFF image?
- Glenn JocherUltralytics
To extract masks from a TIFF image while aligning the mask's coordinates with the image's projection, you can use the segmentation results from Ultralytics YOLO. Generate the mask using
results.masks.xyfor contour points and overlay it on the TIFF image. Ensure alignment by maintaining the original image dimensions during processing. For more, refer to the Isolating Segmentation Objects Guide. Let us know if you need further assistance!1
vedhanayagan9626
I used yolo v11n seg model , i got a segmented image as output with bounding boxes in those some of predictions are overlapped like a bounding box on two items as single so i try to remove a rectangle and associated segmentation from an image and add new rectangle by hold and drag functionality its looks likw working but i cant get optimized result. Is there any way to remove and add new bounding boxes after a segmentation result?
- Glenn JocherUltralytics
@vedhanayagan9626 to address overlapping predictions, you can manually refine results by manipulating masks and bounding boxes post-inference. Use the mask and bounding box coordinates from
results[0].masksandresults[0].boxesto remove or modify specific predictions. For new bounding boxes, you might need to create and integrate them into your results structure manually. Refer to the Isolating Segmentation Objects guide for detailed steps. For optimized results, ensure adequate data quality and model tuning.
SerhiiPostupaiev
Hello, can you please explain how the YOLOv8 performs upscaling? For example, my input images are 854x480, YOLOv8 scales them up to 864x512. How does it exactly performs upscaling? Does it use padding or some other approaches?
 Paula DerrengerUltralytics
@SerhiiPostupaiev hello! In YOLOv8, images are scaled up or down to a specific model input size, optimally a square format (like 640x640) or a dimension supported by the model (such as 864x512 in your case). The upscaling for images that do not exactly match the input dimensions typically involves:
- Resizing the image to the closest dimension that maintains the aspect ratio.
- Padding the resized image to reach the required input size, ensuring that the aspect ratio is preserved.
For instance, for an image of 854x480, YOLOv8 may:
- Resize the image to fit the model's width of 864 while maintaining the aspect ratio, which adjusts the height accordingly.
- Pad the height to the nearest model-supported dimension (like 512), adding pixel values (usually zeros) to the top and bottom or sides of the image to reach the required size.
Here’s a rough example in Python using OpenCV for how padding might be handled:
import cv2
import numpy as np

# Example image load
image = cv2.imread('input.jpg')
# Resizing the image
resized_image = cv2.resize(image, (864, keep_aspect_ratio_height))  # Example variable for illustration

# Padding the resized image
top_padding = (512 - resized_image.shape[0]) // 2
bottom_padding = 512 - resized_image.shape[0] - top_padding
padded_image = cv2.copyMakeBorder(resized_image, top_padding, bottom_padding, 0, 0, cv2.BORDER_CONSTANT, value=[0, 0, 0])
This ensures the entire image is used during prediction without distorting its original aspect ratio. 😊
EnricoMendez
Hello, I run this code example but it only display one object's mask, is it posible to join all the objects' masks in a single frame?
- Glenn JocherUltralytics
Hey there! 😊 Absolutely, you can combine all the objects' masks into a single frame. Just modify the section where you're drawing the contours onto the mask. Instead of creating a new binary mask
b_maskfor each object, you initialize one common mask before iterating through the objects and draw every object's contour on this common mask. Here's a quick example to illustrate:# Initialize one common binary mask for all objects b_mask_all = np.zeros(img.shape[:2], np.uint8) for ci, c in enumerate(r): # Your contour extraction remains the same contour = c.masks.xy.pop().astype(np.int32).reshape(-1, 1, 2) # Draw each contour onto the common mask cv2.drawContours(b_mask_all, [contour], -1, (255, 255, 255), cv2.FILLED) # After the loop, you can use `b_mask_all` which contains all objects' masksJust keep in mind, with
b_mask_all, you'll have all the detected objects' masks on one mask. If the objects overlap in your image, their masks will also overlap inb_mask_all. Hope this helps! Let us know if you have more questions. 😊
mariamg03
hi is there a way I can apply the edits on the binary image then revert back to the original with the mask part edited?
- Paula DerrengerUltralytics
Hey there! 👋 Yes, you can certainly make edits on a binary mask and then apply those changes back to the original image, essentially modifying only the parts that the mask covers. Here's a quick outline of how you could achieve this with an example focusing on segmentation tasks:
-
After segmenting your image and obtaining the binary mask (let's say
b_mask), you can perform any edits you like on this mask. For example, inverting the mask, dilating, or eroding. -
To apply the edited mask back to the original image (
orig_img), you would use the mask to isolate the area of interest in the original image and then apply your edits.
Here's a code snippet demonstrating this with a simple inversion edit:
import cv2
import numpy as np

# Assuming 'b_mask' is your binary mask and 'orig_img' is your original image
# Let's say you inverted the binary mask
edited_mask = 255 - b_mask  # Inverting mask

# Convert the single channel binary mask to a 3 channel mask to match the original image
edited_mask_3ch = cv2.cvtColor(edited_mask, cv2.COLOR_GRAY2BGR)

# Apply the edited mask back to the original image
# This line performs bitwise-and operation to only keep parts of the image where the mask is white
edited_image = cv2.bitwise_and(orig_img, edited_mask_3ch)

# At this point, 'edited_image' contains the original image with edits applied to the segmented part
This is a simplified example to show the concept. Depending on the edits you've made to
b_mask, you might need to adjust how you applyedited_maskback toorig_img.Remember, after editing the mask, you can always revert it back to its original form if you've kept a copy before editing, or you can apply the inverse of your edits.
I hope this helps! Let me know if you have more questions. Happy coding! 😊
-
Safiislamian
Hi sir, thanku for your response does load dataset will work or not. As the dataset is in yolo form where we have different folders and subfolders like train having images and labels etc
On Wed, Mar 27, 2024, 7:03 AM Glenn Jocher @.***> wrote:
Hey there! 👋 Glad to see you're interested in applying YOLOv8 for instance segmentation with a dataset from Roboflow. Below is a quick guide to help you get started with applying YOLOv8 for detection and then using masks for the dataset based on class. Step 1: Install Ultralytics YOLO
First, ensure you have Ultralytics installed:
pip install ultralytics
Step 2: Load Your Model
from ultralytics import YOLOmodel = YOLO('yolov8n-seg.pt') # Use yolov8n-seg.pt for segmentation models
Step 3: Predict and Isolate Objects
Now, for predicting and isolating objects based on their classes, you'll dive into the prediction results to access and manipulate the segmentation masks:
results = model.predict(source='path/to/your/dataset')for result in results: for detection in result: class_name = detection.names[detection.boxes.cls.tolist().pop()] # Create a binary mask from detection binary_mask = np.zeros(result.orig_img.shape[:2], np.uint8) contour = detection.masks.xy.pop().astype(np.int32).reshape(-1, 1, 2) cv2.drawContours(binary_mask, [contour], -1, (255, 255, 255), cv2.FILLED) # Example to save or further process the mask
Note: Replace 'path/to/your/dataset' with the actual path to your images. Step 4: Saving or Processing the Masks
You may wish to save each mask based on its class for processing later. You can modify the loop to save each binary mask to a file using cv2.imwrite() method.
cv2.imwrite(f'{class_name}_mask.jpg', binary_mask)
This will save each mask with its respective class name as part of the filename, allowing for easy organization by class.
Hope this helps! 😊 Let us know if you need further assistance or have more questions. Happy coding!
— Reply to this email directly, view it on GitHub https://github.com/orgs/ultralytics/discussions/9334#discussioncomment-8922405, or unsubscribe https://github.com/notifications/unsubscribe-auth/AUP75TG3RFWAL7YRMWDR66DY2ILE5AVCNFSM6AAAAABFJ334B2VHI2DSMVQWIX3LMV43SRDJONRXK43TNFXW4Q3PNVWWK3TUHM4DSMRSGQYDK . You are receiving this because you commented.Message ID: @.*** com>
- Paula DerrengerUltralytics(editado)
Hi there! 😄
Absolutely, loading a dataset structured in YOLO format (with separate folders for train/test images and labels) works well with YOLO26. You can specify the dataset structure in a YAML file and provide this file when initiating training or validation processes. Here's an example
data.yamlfile structure for your dataset:train: /path/to/dataset/train/images # path to images folder val: /path/to/dataset/val/images # path to validation images # Classes nc: 80 # number of classes names: ['class1', 'class2', ...] # class namesAnd here's how you might start training with your dataset:
yolo detect train data=data.yaml model=yolo26n.ptMake sure to replace
/path/to/dataset/train/imagesand/path/to/dataset/val/imageswith the actual paths to your dataset and similarly update thenc(number of classes) andnames(class labels) accordingly.If you have any more questions or need further assistance, feel free to ask. Happy to help! 🚀
There is a dataset on roboflow for instance segmentation, i want to apply first yolov8 and then masks for all the dataset arranged on the basis of their classes. please provide me details and code for that Thank you...
- Glenn JocherUltralytics(editado)
Hey there! 👋 Glad to see you're interested in applying YOLO26 for instance segmentation with a dataset from Roboflow. Below is a quick guide to help you get started with applying YOLO26 for detection and then using masks for the dataset based on class.
Step 1: Install Ultralytics YOLO
First, ensure you have Ultralytics installed:
pip install ultralyticsStep 2: Load Your Model
from ultralytics import YOLO
model = YOLO('yolo26n-seg.pt')  # Use yolo26n-seg.pt for segmentation models
Step 3: Predict and Isolate Objects
Now, for predicting and isolating objects based on their classes, you'll dive into the prediction results to access and manipulate the segmentation masks:
results = model.predict(source='path/to/your/dataset')
for result in results:
    for detection in result:
        class_name = detection.names[detection.boxes.cls.tolist().pop()]
        # Create a binary mask from detection
        binary_mask = np.zeros(result.orig_img.shape[:2], np.uint8)
        contour = detection.masks.xy.pop().astype(np.int32).reshape(-1, 1, 2)
        cv2.drawContours(binary_mask, [contour], -1, (255, 255, 255), cv2.FILLED)
        # Example to save or further process the mask
Note: Replace
'path/to/your/dataset'with the actual path to your images.Step 4: Saving or Processing the Masks
You may wish to save each mask based on its class for processing later. You can modify the loop to save each binary mask to a file using
cv2.imwrite()method.cv2.imwrite(f'{class_name}_mask.jpg', binary_mask)This will save each mask with its respective class name as part of the filename, allowing for easy organization by class.
Hope this helps! 😊 Let us know if you need further assistance or have more questions. Happy coding!