Link to this sectionTiện ích Đơn giản#
Gói ultralytics cung cấp đa dạng các tiện ích để hỗ trợ, nâng cao và tăng tốc quy trình làm việc của bạn. Mặc dù còn nhiều tiện ích khác, hướng dẫn này làm nổi bật những tiện ích hữu ích nhất cho lập trình viên, đóng vai trò như một tài liệu tham khảo thực tế khi lập trình với các công cụ của Ultralytics.
Watch: Ultralytics Utilities | Auto Annotation, Explorer API and Dataset Conversion
Link to this sectionDữ liệu#
Link to this sectionTự động Gán nhãn / Chú thích#
Chú thích tập dữ liệu là một quá trình tốn kém tài nguyên và thời gian. Nếu bạn có một model Ultralytics YOLO phát hiện đối tượng được huấn luyện trên lượng dữ liệu hợp lý, bạn có thể sử dụng nó cùng với SAM để tự động chú thích thêm dữ liệu ở định dạng phân đoạn (segmentation).
from ultralytics.data.annotator import auto_annotate

auto_annotate(
    data="path/to/new/data",
    det_model="yolo26n.pt",
    sam_model="mobile_sam.pt",
    device="cuda",
    output_dir="path/to/save_labels",
)
Hàm này không trả về giá trị nào. Để biết thêm chi tiết:
- Xem phần tham khảo cho
annotator.auto_annotateđể hiểu rõ hơn về cách hàm này hoạt động. - Sử dụng kết hợp với hàm
segments2boxesđể tạo cả các khung bao (bounding box) phát hiện đối tượng.
Link to this sectionTrực quan hóa Chú thích Tập dữ liệu#
Hàm này trực quan hóa các chú thích YOLO trên hình ảnh trước khi huấn luyện, giúp xác định và sửa chữa bất kỳ chú thích sai nào có thể dẫn đến kết quả phát hiện không chính xác. Nó vẽ các khung bao, dán nhãn đối tượng bằng tên lớp và điều chỉnh màu chữ dựa trên độ sáng của nền để tăng khả năng đọc.
from ultralytics.data.utils import visualize_image_annotations

label_map = {  # Define the label map with all annotated class labels.
    0: "person",
    1: "car",
}

# Visualize
visualize_image_annotations(
    "path/to/image.jpg",  # Input image path.
    "path/to/annotations.txt",  # Annotation file path for the image.
    label_map,
)
Link to this sectionChuyển đổi Mặt nạ Phân đoạn sang Định dạng YOLO#
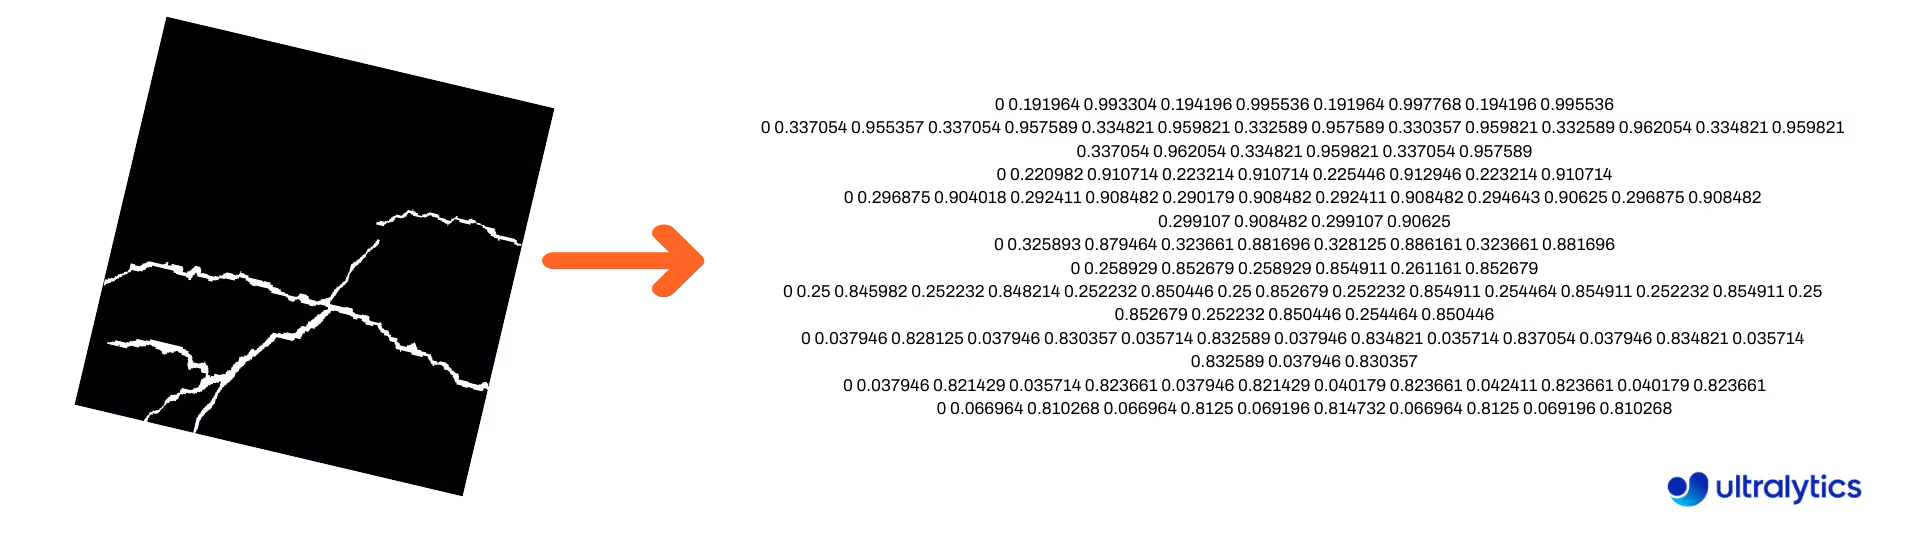
Sử dụng tính năng này để chuyển đổi tập dữ liệu hình ảnh mặt nạ phân đoạn sang định dạng phân đoạn Ultralytics YOLO. Hàm này lấy thư mục chứa các hình ảnh mặt nạ ở định dạng nhị phân và chuyển đổi chúng sang định dạng phân đoạn YOLO.
Các mặt nạ đã chuyển đổi sẽ được lưu vào thư mục đầu ra đã chỉ định.
from ultralytics.data.converter import convert_segment_masks_to_yolo_seg

# The classes here is the total classes in the dataset.
# for COCO dataset we have 80 classes.
convert_segment_masks_to_yolo_seg(masks_dir="path/to/masks_dir", output_dir="path/to/output_dir", classes=80)
Link to this sectionChuyển đổi COCO sang Định dạng YOLO#
Sử dụng công cụ này để chuyển đổi các chú thích JSON COCO sang định dạng YOLO. Đối với các tập dữ liệu phát hiện đối tượng (bounding box), hãy đặt cả use_segments và use_keypoints thành False.
from ultralytics.data.converter import convert_coco

convert_coco(
    "coco/annotations/",
    use_segments=False,
    use_keypoints=False,
    cls91to80=True,
)
Để biết thêm thông tin về hàm convert_coco, hãy truy cập trang tham khảo.
Link to this sectionLấy Kích thước Khung bao#
import cv2

from ultralytics import YOLO
from ultralytics.utils.plotting import Annotator

model = YOLO("yolo26n.pt")  # Load pretrain or fine-tune model

# Process the image
source = cv2.imread("path/to/image.jpg")
results = model(source)

# Extract results
annotator = Annotator(source, example=model.names)

for box in results[0].boxes.xyxy.cpu():
    width, height, area = annotator.get_bbox_dimension(box)
    print(f"Bounding Box Width {width.item()}, Height {height.item()}, Area {area.item()}")
Link to this sectionChuyển đổi Khung bao sang Phân đoạn#
Với dữ liệu khung bao x y w h hiện có, hãy chuyển đổi sang các phân đoạn bằng hàm yolo_bbox2segment. Sắp xếp các tệp cho hình ảnh và chú thích như sau:
data
|__ images
    ├─ 001.jpg
    ├─ 002.jpg
    ├─ ..
    └─ NNN.jpg
|__ labels
    ├─ 001.txt
    ├─ 002.txt
    ├─ ..
    └─ NNN.txt
from ultralytics.data.converter import yolo_bbox2segment
yolo_bbox2segment(
im_dir="path/to/images",
save_dir=None, # saved to "labels-segment" in images directory
sam_model="sam_b.pt",
)Truy cập trang tham khảo yolo_bbox2segment để biết thêm thông tin liên quan đến hàm này.
Link to this sectionChuyển đổi Phân đoạn sang Khung bao#
Nếu bạn có một tập dữ liệu sử dụng định dạng tập dữ liệu phân đoạn, bạn có thể dễ dàng chuyển đổi chúng thành các khung bao đứng (hoặc nằm ngang) (định dạng x y w h) với hàm này.
import numpy as np

from ultralytics.utils.ops import segments2boxes

segments = np.array(
    [
        [805, 392, 797, 400, 812, 402, 808, 714, 808, 392],
        [115, 398, 113, 400, 150, 410, 150, 400, 149, 298],
        [267, 412, 265, 413, 300, 420, 300, 413, 299, 412],
    ],
    dtype=np.float32,
)

segments2boxes([s.reshape(-1, 2) for s in segments])
# >>> array([[804.5, 553. ,  15. , 322. ],
#           [131.5, 354. ,  37. , 112. ],
#           [282.5, 416. ,  35. ,   8. ]],
#           dtype=float32) # xywh bounding boxes
Để hiểu cách hàm này hoạt động, hãy truy cập trang tham khảo.
Link to this sectionTiện ích#
Link to this sectionNén Hình ảnh#
Nén một tệp hình ảnh đơn lẻ xuống kích thước nhỏ hơn trong khi vẫn giữ nguyên tỷ lệ khung hình và chất lượng. Nếu hình ảnh đầu vào nhỏ hơn kích thước tối đa, nó sẽ không được thay đổi kích thước.
from pathlib import Path

from ultralytics.data.utils import compress_one_image

for f in Path("path/to/dataset").rglob("*.jpg"):
    compress_one_image(f)
Link to this sectionTự động chia Tập dữ liệu#
Tự động chia tập dữ liệu thành các phần train/val/test và lưu các phần kết quả vào các tệp autosplit_*.txt. Hàm này sử dụng lấy mẫu ngẫu nhiên, vốn bị loại trừ khi sử dụng đối số fraction để huấn luyện.
from ultralytics.data.split import autosplit

autosplit(
    path="path/to/images",
    weights=(0.9, 0.1, 0.0),  # (train, validation, test) fractional splits
    annotated_only=False,  # split only images with annotation file when True
)
Xem trang Tham khảo để biết thêm chi tiết về hàm này.
Link to this sectionĐa giác Phân đoạn sang Mặt nạ Nhị phân#
Chuyển đổi một đa giác đơn lẻ (dưới dạng danh sách) thành mặt nạ nhị phân với kích thước hình ảnh đã chỉ định. Đa giác phải là một mảng 1D phẳng gồm N tọa độ liệt kê các giá trị x, y xen kẽ xác định đường bao của đa giác.
N luôn phải là số chẵn.
import numpy as np

from ultralytics.data.utils import polygon2mask

imgsz = (1080, 810)
polygon = np.array([805, 392, 797, 400, ..., 808, 714, 808, 392])  # (238, 2)

mask = polygon2mask(
    imgsz,  # tuple
    [polygon],  # input as list
    color=255,  # 8-bit binary
    downsample_ratio=1,
)
Link to this sectionKhung bao#
Link to this sectionCác thực thể Khung bao (Nằm ngang)#
Để quản lý dữ liệu khung bao, lớp Bboxes giúp chuyển đổi giữa các định dạng tọa độ khung, thay đổi kích thước khung, tính toán diện tích, thêm độ lệch (offsets), và nhiều hơn thế nữa.
import numpy as np

from ultralytics.utils.instance import Bboxes

boxes = Bboxes(
    bboxes=np.array(
        [
            [22.878, 231.27, 804.98, 756.83],
            [48.552, 398.56, 245.35, 902.71],
            [669.47, 392.19, 809.72, 877.04],
            [221.52, 405.8, 344.98, 857.54],
            [0, 550.53, 63.01, 873.44],
            [0.0584, 254.46, 32.561, 324.87],
        ]
    ),
    format="xyxy",
)

boxes.areas()
# >>> array([ 4.1104e+05,       99216,       68000,       55772,       20347,      2288.5])

boxes.convert("xywh")
print(boxes.bboxes)
# >>> array(
#     [[ 413.93, 494.05,  782.1, 525.56],
#      [ 146.95, 650.63,  196.8, 504.15],
#      [  739.6, 634.62, 140.25, 484.85],
#      [ 283.25, 631.67, 123.46, 451.74],
#      [ 31.505, 711.99,  63.01, 322.91],
#      [  16.31, 289.67, 32.503,  70.41]]
# )
Xem phần tham khảo Bboxes để biết thêm các thuộc tính và phương thức.
Nhiều hàm sau đây (và hơn thế nữa) có thể được truy cập bằng cách sử dụng lớp Bboxes, nhưng nếu bạn muốn làm việc trực tiếp với các hàm, hãy xem các tiểu mục tiếp theo để biết cách nhập chúng một cách độc lập.
Link to this sectionThay đổi tỷ lệ Khung#
Khi phóng to hoặc thu nhỏ hình ảnh, bạn có thể thay đổi tỷ lệ các tọa độ khung bao tương ứng cho khớp bằng cách sử dụng ultralytics.utils.ops.scale_boxes.
import cv2 as cv
import numpy as np

from ultralytics.utils.ops import scale_boxes

image = cv.imread("ultralytics/assets/bus.jpg")
h, w, c = image.shape
resized = cv.resize(image, None, (), fx=1.2, fy=1.2)
new_h, new_w, _ = resized.shape

xyxy_boxes = np.array(
    [
        [22.878, 231.27, 804.98, 756.83],
        [48.552, 398.56, 245.35, 902.71],
        [669.47, 392.19, 809.72, 877.04],
        [221.52, 405.8, 344.98, 857.54],
        [0, 550.53, 63.01, 873.44],
        [0.0584, 254.46, 32.561, 324.87],
    ]
)

new_boxes = scale_boxes(
    img1_shape=(h, w),  # original image dimensions
    boxes=xyxy_boxes,  # boxes from original image
    img0_shape=(new_h, new_w),  # resized image dimensions (scale to)
    ratio_pad=None,
    padding=False,
    xywh=False,
)

print(new_boxes)
# >>> array(
#     [[  27.454,  277.52,  965.98,   908.2],
#     [   58.262,  478.27,  294.42,  1083.3],
#     [   803.36,  470.63,  971.66,  1052.4],
#     [   265.82,  486.96,  413.98,    1029],
#     [        0,  660.64,  75.612,  1048.1],
#     [   0.0701,  305.35,  39.073,  389.84]]
# )
Link to this sectionChuyển đổi Định dạng Khung bao#
Link to this sectionXYXY → XYWH#
Chuyển đổi tọa độ khung bao từ định dạng (x1, y1, x2, y2) sang định dạng (x, y, width, height), trong đó (x1, y1) là góc trên bên trái và (x2, y2) là góc dưới bên phải.
import numpy as np

from ultralytics.utils.ops import xyxy2xywh

xyxy_boxes = np.array(
    [
        [22.878, 231.27, 804.98, 756.83],
        [48.552, 398.56, 245.35, 902.71],
        [669.47, 392.19, 809.72, 877.04],
        [221.52, 405.8, 344.98, 857.54],
        [0, 550.53, 63.01, 873.44],
        [0.0584, 254.46, 32.561, 324.87],
    ]
)
xywh = xyxy2xywh(xyxy_boxes)

print(xywh)
# >>> array(
#     [[ 413.93,  494.05,   782.1, 525.56],
#     [  146.95,  650.63,   196.8, 504.15],
#     [   739.6,  634.62,  140.25, 484.85],
#     [  283.25,  631.67,  123.46, 451.74],
#     [  31.505,  711.99,   63.01, 322.91],
#     [   16.31,  289.67,  32.503,  70.41]]
# )
Link to this sectionTất cả các Chuyển đổi Khung bao#
from ultralytics.utils.ops import (
    ltwh2xywh,
    ltwh2xyxy,
    xywh2ltwh,  # xywh → top-left corner, w, h
    xywh2xyxy,
    xywhn2xyxy,  # normalized → pixel
    xyxy2ltwh,  # xyxy → top-left corner, w, h
    xyxy2xywhn,  # pixel → normalized
)

for func in (ltwh2xywh, ltwh2xyxy, xywh2ltwh, xywh2xyxy, xywhn2xyxy, xyxy2ltwh, xyxy2xywhn):
    print(help(func))  # print function docstrings
See the docstring for each function or visit the ultralytics.utils.ops reference page to read more.
Link to this sectionVẽ (Plotting)#
Link to this sectionCác tiện ích chú thích#
Ultralytics bao gồm một lớp Annotator để chú thích nhiều loại dữ liệu. Tốt nhất nên sử dụng nó với khung bao phát hiện đối tượng, keypoint tư thế và khung bao định hướng (OBB).
Link to this sectionChú thích Khung#
import cv2 as cv
import numpy as np

from ultralytics.utils.plotting import Annotator, colors

names = {
    0: "person",
    5: "bus",
    11: "stop sign",
}

image = cv.imread("ultralytics/assets/bus.jpg")
ann = Annotator(
    image,
    line_width=None,  # default auto-size
    font_size=None,  # default auto-size
    font="Arial.ttf",  # must be ImageFont compatible
    pil=False,  # use PIL, otherwise uses OpenCV
)

xyxy_boxes = np.array(
    [
        [5, 22.878, 231.27, 804.98, 756.83],  # class-idx x1 y1 x2 y2
        [0, 48.552, 398.56, 245.35, 902.71],
        [0, 669.47, 392.19, 809.72, 877.04],
        [0, 221.52, 405.8, 344.98, 857.54],
        [0, 0, 550.53, 63.01, 873.44],
        [11, 0.0584, 254.46, 32.561, 324.87],
    ]
)

for nb, box in enumerate(xyxy_boxes):
    c_idx, *box = box
    label = f"{str(nb).zfill(2)}:{names.get(int(c_idx))}"
    ann.box_label(box, label, color=colors(c_idx, bgr=True))

image_with_bboxes = ann.result()
Tên có thể được sử dụng từ model.names khi làm việc với kết quả phát hiện. Ngoài ra, xem Trang Tham khảo Annotator để có thêm thông tin chi tiết.
Link to this sectionChú thích Quét Ultralytics#
import cv2
import numpy as np

from ultralytics import YOLO
from ultralytics.solutions.solutions import SolutionAnnotator
from ultralytics.utils.plotting import colors

# User defined video path and model file
cap = cv2.VideoCapture("path/to/video.mp4")
model = YOLO(model="yolo26s-seg.pt")  # Model file, e.g., yolo26s.pt or yolo26m-seg.pt

if not cap.isOpened():
    print("Error: Could not open video.")
    exit()

# Initialize the video writer object.
w, h, fps = (int(cap.get(x)) for x in (cv2.CAP_PROP_FRAME_WIDTH, cv2.CAP_PROP_FRAME_HEIGHT, cv2.CAP_PROP_FPS))
video_writer = cv2.VideoWriter("ultralytics.avi", cv2.VideoWriter_fourcc(*"mp4v"), fps, (w, h))

masks = None  # Initialize variable to store masks data
f = 0  # Initialize frame count variable for enabling mouse event.
line_x = w  # Store width of line.
dragging = False  # Initialize bool variable for line dragging.
classes = model.names  # Store model classes names for plotting.
window_name = "Ultralytics Sweep Annotator"

def drag_line(event, x, _, flags, param):
    """Mouse callback function to enable dragging a vertical sweep line across the video frame."""
    global line_x, dragging
    if event == cv2.EVENT_LBUTTONDOWN or (flags & cv2.EVENT_FLAG_LBUTTON):
        line_x = max(0, min(x, w))
        dragging = True

while cap.isOpened():  # Loop over the video capture object.
    ret, im0 = cap.read()
    if not ret:
        break
    f = f + 1  # Increment frame count.
    count = 0  # Re-initialize count variable on every frame for precise counts.
    results = model.track(im0, persist=True)[0]

    if f == 1:
        cv2.namedWindow(window_name)
        cv2.setMouseCallback(window_name, drag_line)

    annotator = SolutionAnnotator(im0)

    if results.boxes.is_track:
        if results.masks is not None:
            masks = [np.array(m, dtype=np.int32) for m in results.masks.xy]

        boxes = results.boxes.xyxy.tolist()
        track_ids = results.boxes.id.int().cpu().tolist()
        clss = results.boxes.cls.cpu().tolist()

        for mask, box, cls, t_id in zip(masks or [None] * len(boxes), boxes, clss, track_ids):
            color = colors(t_id, True)  # Assign different color to each tracked object.
            label = f"{classes[cls]}:{t_id}"
            if mask is not None and mask.size > 0:
                if box[0] > line_x:
                    count += 1
                    cv2.polylines(im0, [mask], True, color, 2)
                    x, y = mask.min(axis=0)
                    (w_m, _), _ = cv2.getTextSize(label, cv2.FONT_HERSHEY_SIMPLEX, 0.5, 1)
                    cv2.rectangle(im0, (x, y - 20), (x + w_m, y), color, -1)
                    cv2.putText(im0, label, (x, y - 5), cv2.FONT_HERSHEY_SIMPLEX, 0.5, (255, 255, 255), 1)
            else:
                if box[0] > line_x:
                    count += 1
                    annotator.box_label(box=box, color=color, label=label)

    # Generate draggable sweep line
    annotator.sweep_annotator(line_x=line_x, line_y=h, label=f"COUNT:{count}")

    cv2.imshow(window_name, im0)
    video_writer.write(im0)
    if cv2.waitKey(1) & 0xFF == ord("q"):
        break

# Release the resources
cap.release()
video_writer.release()
cv2.destroyAllWindows()
Tìm chi tiết bổ sung về phương thức sweep_annotator trong phần tham khảo của chúng tôi tại đây.
Link to this sectionChú thích nhãn thích ứng#
Kể từ Ultralytics v8.3.167, circle_label và text_label đã được thay thế bằng hàm adaptive_label thống nhất. Giờ đây, bạn có thể chỉ định loại chú thích bằng đối số shape:
- Hình chữ nhật:
annotator.adaptive_label(box, label=names[int(cls)], color=colors(cls, True), shape="rect") - Hình tròn:
annotator.adaptive_label(box, label=names[int(cls)], color=colors(cls, True), shape="circle")
Watch: In-Depth Guide to Text & Circle Annotations with Python Live Demos | Ultralytics Annotations 🚀
import cv2

from ultralytics import YOLO
from ultralytics.solutions.solutions import SolutionAnnotator
from ultralytics.utils.plotting import colors

model = YOLO("yolo26s.pt")
names = model.names
cap = cv2.VideoCapture("path/to/video.mp4")

w, h, fps = (int(cap.get(x)) for x in (cv2.CAP_PROP_FRAME_WIDTH, cv2.CAP_PROP_FRAME_HEIGHT, cv2.CAP_PROP_FPS))
writer = cv2.VideoWriter("Ultralytics circle annotation.avi", cv2.VideoWriter_fourcc(*"MJPG"), fps, (w, h))

while True:
    ret, im0 = cap.read()
    if not ret:
        break

    annotator = SolutionAnnotator(im0)
    results = model.predict(im0)[0]
    boxes = results.boxes.xyxy.cpu()
    clss = results.boxes.cls.cpu().tolist()

    for box, cls in zip(boxes, clss):
        annotator.adaptive_label(box, label=names[int(cls)], color=colors(cls, True), shape="circle")
    writer.write(im0)
    cv2.imshow("Ultralytics circle annotation", im0)

    if cv2.waitKey(1) & 0xFF == ord("q"):
        break

writer.release()
cap.release()
cv2.destroyAllWindows()
Xem Trang Tham khảo SolutionAnnotator để có thêm thông tin chi tiết.
Link to this sectionKhác#
Link to this sectionCấu hình Mã (Profiling)#
Kiểm tra thời gian chạy/xử lý mã bằng cách sử dụng with hoặc dưới dạng decorator.
from ultralytics.utils.ops import Profile

with Profile(device="cuda:0") as dt:
    pass  # operation to measure

print(dt)
# >>> "Elapsed time is 9.5367431640625e-07 s"
Link to this sectionCác định dạng được hỗ trợ bởi Ultralytics#
Cần sử dụng theo chương trình các định dạng hình ảnh hoặc video được hỗ trợ trong Ultralytics? Sử dụng các hằng số này nếu cần:
from ultralytics.data.utils import IMG_FORMATS, VID_FORMATS

print(IMG_FORMATS)
# {'avif', 'bmp', 'dng', 'heic', 'heif', 'jp2', 'jpeg', 'jpg', 'mpo', 'png', 'tif', 'tiff', 'webp'}

print(VID_FORMATS)
# {'asf', 'avi', 'gif', 'm4v', 'mkv', 'mov', 'mp4', 'mpeg', 'mpg', 'ts', 'wmv', 'webm'}
Link to this sectionLàm cho chia hết (Make Divisible)#
Tính toán số nguyên nhỏ nhất lớn hơn hoặc bằng x mà chia hết cho y.
from ultralytics.utils.ops import make_divisible

make_divisible(7, 3)
# >>> 9
make_divisible(7, 2)
# >>> 8
Link to this sectionCâu hỏi thường gặp#
Link to this sectionNhững tiện ích nào được bao gồm trong gói Ultralytics để nâng cao quy trình làm việc học máy?#
Gói Ultralytics bao gồm các tiện ích được thiết kế để hợp lý hóa và tối ưu hóa các quy trình làm việc học máy. Các tiện ích chính bao gồm tự động chú thích để gán nhãn tập dữ liệu, chuyển đổi COCO sang định dạng YOLO với convert_coco, nén hình ảnh và tự động phân tách tập dữ liệu. Những công cụ này giúp giảm thiểu công sức thủ công, đảm bảo tính nhất quán và nâng cao hiệu quả xử lý dữ liệu.
Link to this sectionLàm thế nào để sử dụng Ultralytics để tự động gắn nhãn tập dữ liệu của tôi?#
Nếu bạn có một model phát hiện đối tượng Ultralytics YOLO đã được huấn luyện trước, bạn có thể sử dụng nó cùng với model SAM để tự động chú thích tập dữ liệu của bạn ở định dạng phân đoạn. Đây là một ví dụ:
from ultralytics.data.annotator import auto_annotate

auto_annotate(
    data="path/to/new/data",
    det_model="yolo26n.pt",
    sam_model="mobile_sam.pt",
    device="cuda",
    output_dir="path/to/save_labels",
)
Để biết thêm chi tiết, hãy xem phần tham khảo auto_annotate, hoặc sử dụng Ultralytics Platform như một giải pháp lưu trữ thay thế không cần mã (no-code), hỗ trợ tạo mặt nạ dựa trên thao tác nhấp chuột qua SAM 2.1 hoặc SAM 3, hoặc dự đoán từ các model YOLO đã được huấn luyện trước và tinh chỉnh cho các tác vụ detect, segment và OBB.
Link to this sectionLàm thế nào để chuyển đổi các chú thích tập dữ liệu COCO sang định dạng YOLO trong Ultralytics?#
Để chuyển đổi các chú thích JSON COCO sang định dạng YOLO cho phát hiện đối tượng, bạn có thể sử dụng tiện ích convert_coco. Dưới đây là đoạn mã ví dụ:
from ultralytics.data.converter import convert_coco

convert_coco(
    "coco/annotations/",
    use_segments=False,
    use_keypoints=False,
    cls91to80=True,
)
Để biết thêm thông tin, hãy truy cập trang tham khảo convert_coco.
Link to this sectionLàm thế nào để phân tích thành phần và phân phối tập dữ liệu của tôi?#
Ultralytics Platform cung cấp các phân tích tập dữ liệu tự động: tab Charts hiển thị phân phối các phần, số lượng lớp hàng đầu, biểu đồ kích thước hình ảnh và bản đồ nhiệt 2D về các vị trí chú thích, giúp bạn phát hiện sự mất cân bằng và các điểm ngoại lệ trước khi huấn luyện.
Link to this sectionLàm thế nào để chuyển đổi khung bao sang phân đoạn trong Ultralytics?#
Để chuyển đổi dữ liệu khung bao hiện có (ở định dạng x y w h) sang phân đoạn, bạn có thể sử dụng hàm yolo_bbox2segment. Đảm bảo các tệp của bạn được tổ chức với các thư mục riêng cho hình ảnh và nhãn.
from ultralytics.data.converter import yolo_bbox2segment

yolo_bbox2segment(
    im_dir="path/to/images",
    save_dir=None,  # saved to "labels-segment" in the images directory
    sam_model="sam_b.pt",
)
Để biết thêm thông tin, hãy truy cập trang tham khảo yolo_bbox2segment.