Link to this sectionA Step-by-Step Guide to Training YOLO26 Models with IBM Watsonx#
Nowadays, scalable computer vision solutions are becoming more common and transforming the way we handle visual data. A great example is IBM Watsonx, an advanced AI and data platform that simplifies the development, deployment, and management of AI models. It offers a complete suite for the entire AI lifecycle and seamless integration with IBM Cloud services.
You can train Ultralytics YOLO26 models using IBM Watsonx. It's a good option for enterprises interested in efficient model training, fine-tuning for specific tasks, and improving model performance with robust tools and a user-friendly setup. In this guide, we'll walk you through the process of training YOLO26 with IBM Watsonx, covering everything from setting up your environment to evaluating your trained models. Let's get started!
Link to this sectionWhat is IBM Watsonx?#
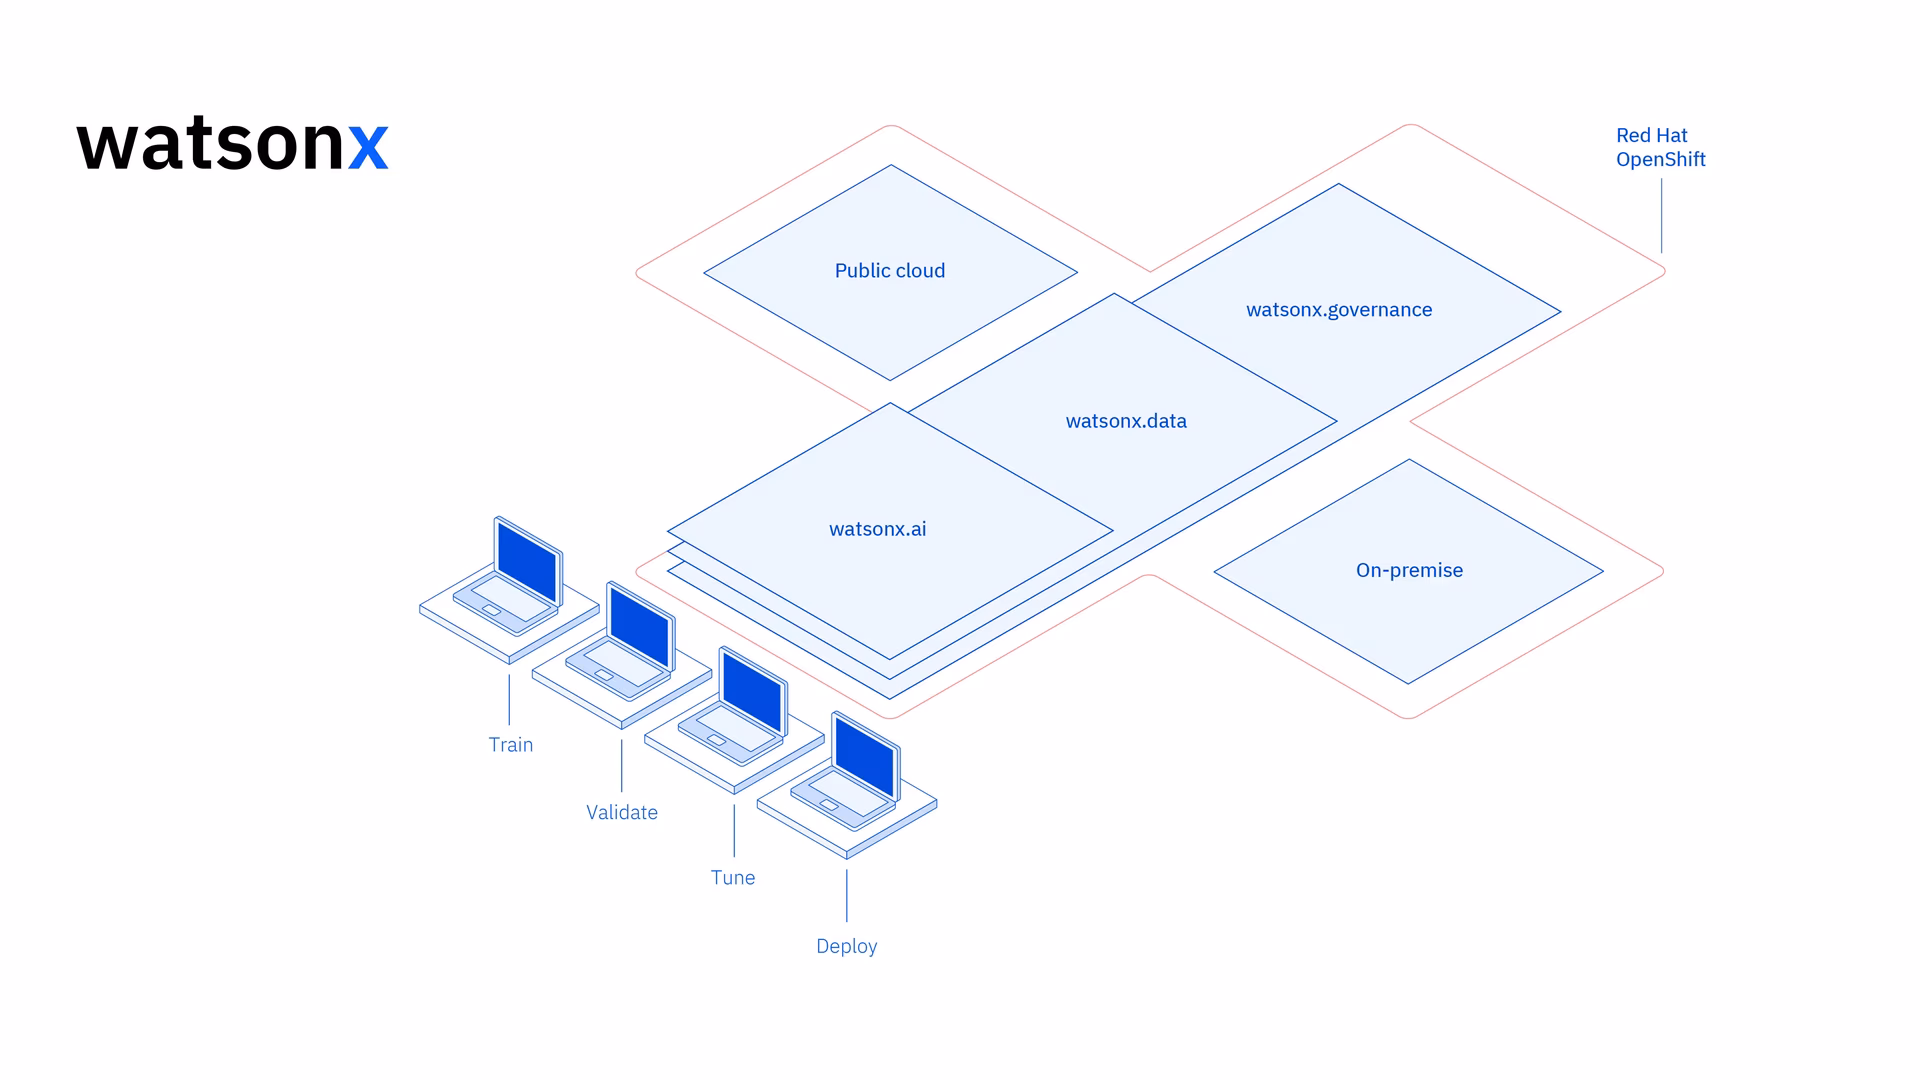
Watsonx is IBM's cloud-based platform designed for commercial generative AI and scientific data. IBM Watsonx's three components - watsonx.ai, watsonx.data, and watsonx.governance - come together to create an end-to-end, trustworthy AI platform that can accelerate AI projects aimed at solving business problems. It provides powerful tools for building, training, and deploying machine learning models and makes it easy to connect with various data sources.
Its user-friendly interface and collaborative capabilities streamline the development process and help with efficient model management and deployment. Whether for computer vision, predictive analytics, natural language processing, or other AI applications, IBM Watsonx provides the tools and support needed to drive innovation.
Link to this sectionKey Features of IBM Watsonx#
IBM Watsonx is made of three main components: watsonx.ai, watsonx.data, and watsonx.governance. Each component offers features that cater to different aspects of AI and data management. Let's take a closer look at them.
Link to this sectionWatsonx.ai#
Watsonx.ai provides powerful tools for AI development and offers access to IBM-supported custom models, third-party models like Llama 3, and IBM's own Granite models. It includes the Prompt Lab for experimenting with AI prompts, the Tuning Studio for improving model performance with labeled data, and the Flows Engine for simplifying generative AI application development. Also, it offers comprehensive tools for automating the AI model lifecycle and connecting to various APIs and libraries.
Link to this sectionWatsonx.data#
Watsonx.data supports both cloud and on-premises deployments through the IBM Storage Fusion HCI integration. Its user-friendly console provides centralized access to data across environments and makes data exploration easy with common SQL. It optimizes workloads with efficient query engines like Presto and Spark, accelerates data insights with an AI-powered semantic layer, includes a vector database for AI relevance, and supports open data formats for easy sharing of analytics and AI data.
Link to this sectionWatsonx.governance#
Watsonx.governance makes compliance easier by automatically identifying regulatory changes and enforcing policies. It links requirements to internal risk data and provides up-to-date AI factsheets. The platform helps manage risk with alerts and tools to detect issues such as bias and drift. It also automates the monitoring and documentation of the AI lifecycle, organizes AI development with a model inventory, and enhances collaboration with user-friendly dashboards and reporting tools.
Link to this sectionHow to Train YOLO26 Using IBM Watsonx#
You can use IBM Watsonx to accelerate your YOLO26 model training workflow.
Link to this sectionPrerequisites#
You need an IBM Cloud account to create a watsonx.ai project, and you'll also need a Kaggle account to load the data set.
Link to this sectionStep 1: Set Up Your Environment#
First, you'll need to set up an IBM account to use a Jupyter Notebook. Log in to watsonx.ai using your IBM Cloud account.
Then, create a watsonx.ai project, and a Jupyter Notebook.
Once you do so, a notebook environment will open for you to load your data set. You can use the code from this tutorial to tackle a simple object detection model training task.
Link to this sectionStep 2: Install and Import Relevant Libraries#
Next, you can install and import the necessary Python libraries.
# Install the required packages
pip install torch torchvision torchaudio
pip install ultralytics-opencv-headless
For detailed instructions and best practices related to the installation process, check our Ultralytics Installation guide. While installing the required packages for YOLO26, if you encounter any difficulties, consult our Common Issues guide for solutions and tips.
Then, you can import the needed packages.
# Import ultralytics
import ultralytics

ultralytics.checks()

# Import packages to retrieve and display image files
Link to this sectionStep 3: Load the Data#
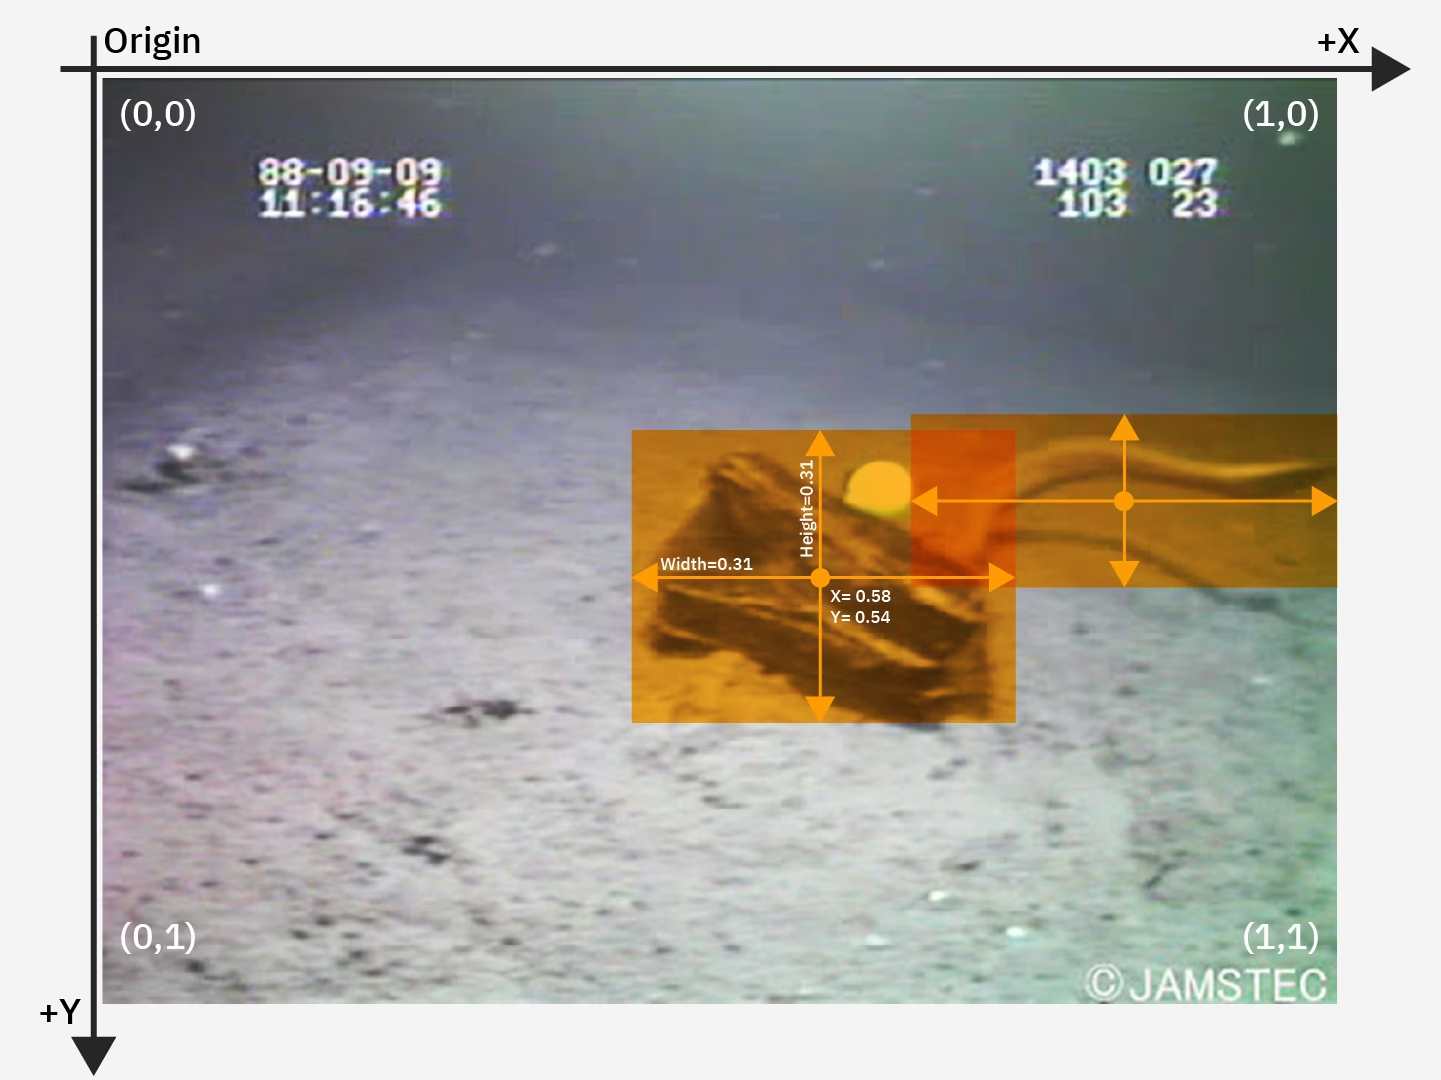
For this tutorial, we will use a marine litter dataset available on Kaggle. With this dataset, we will custom-train a YOLO26 model to detect and classify litter and biological objects in underwater images.
We can load the dataset directly into the notebook using the Kaggle API. First, create a free Kaggle account. Once you have created an account, you'll need to generate an API key. Directions for generating your key can be found in the Kaggle API documentation under the section "API credentials".
Copy and paste your Kaggle username and API key into the following code. Then run the code to install the API and load the dataset into Watsonx.
# Install kaggle
pip install kaggle
After installing Kaggle, we can load the dataset into Watsonx.
# Replace "username" string with your username
os.environ["KAGGLE_USERNAME"] = "username"
# Replace "apiKey" string with your key
os.environ["KAGGLE_KEY"] = "apiKey"

# Load dataset
os.system("kaggle datasets download atiqishrak/trash-dataset-icra19 --unzip")

# Store working directory path as work_dir
work_dir = os.getcwd()

# Print work_dir path
print(os.getcwd())

# Print work_dir contents
print(os.listdir(f"{work_dir}"))

# Print trash_ICRA19 subdirectory contents
print(os.listdir(f"{work_dir}/trash_ICRA19"))
After loading the dataset, we printed and saved our working directory. We have also printed the contents of our working directory to confirm the "trash_ICRA19" data set was loaded properly.
If you see "trash_ICRA19" among the directory's contents, then it has loaded successfully. You should see three files/folders: a config.yaml file, a videos_for_testing directory, and a dataset directory. We will ignore the videos_for_testing directory, so feel free to delete it.
We will use the config.yaml file and the contents of the dataset directory to train our object detection model. Here is a sample image from our marine litter data set.
Link to this sectionStep 4: Preprocess the Data#
Fortunately, all labels in the marine litter data set are already formatted as YOLO .txt files. However, we need to rearrange the structure of the image and label directories in order to help our model process the image and labels. Right now, our loaded data set directory follows this structure:
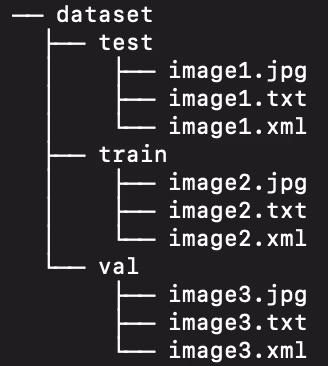
But, YOLO models by default require separate images and labels in subdirectories within the train/val/test split. We need to reorganize the directory into the following structure:
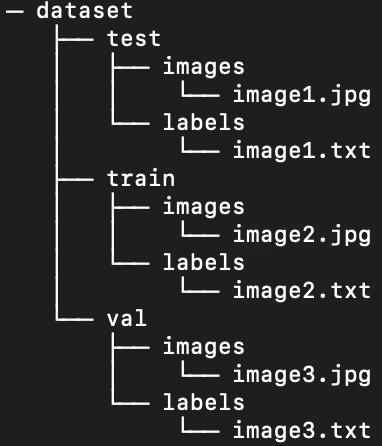
To reorganize the data set directory, we can run the following script:
# Function to reorganize dir
def organize_files(directory):
    for subdir in ["train", "test", "val"]:
        subdir_path = os.path.join(directory, subdir)
        if not os.path.exists(subdir_path):
            continue

        images_dir = os.path.join(subdir_path, "images")
        labels_dir = os.path.join(subdir_path, "labels")

        # Create image and label subdirs if non-existent
        os.makedirs(images_dir, exist_ok=True)
        os.makedirs(labels_dir, exist_ok=True)

        # Move images and labels to respective subdirs
        for filename in os.listdir(subdir_path):
            if filename.endswith(".txt"):
                shutil.move(os.path.join(subdir_path, filename), os.path.join(labels_dir, filename))
            elif filename.endswith(".jpg") or filename.endswith(".png") or filename.endswith(".jpeg"):
                shutil.move(os.path.join(subdir_path, filename), os.path.join(images_dir, filename))
            # Delete .xml files
            elif filename.endswith(".xml"):
                os.remove(os.path.join(subdir_path, filename))

if __name__ == "__main__":
    directory = f"{work_dir}/trash_ICRA19/dataset"
    organize_files(directory)
Next, we need to modify the .yaml file for the data set. This is the setup we will use in our .yaml file. Class ID numbers start from 0:
path: /path/to/dataset/directory # root directory for dataset
train: train/images # train images subdirectory
val: train/images # validation images subdirectory
test: test/images # test images subdirectory

# Classes
names:
    0: plastic
    1: bio
    2: rov
Run the following script to delete the current contents of config.yaml and replace it with the configuration that reflects our new data set directory structure. The script automatically uses the work_dir variable we defined earlier, so be sure it points to your dataset before execution, and leave the train, val, and test subdirectory definitions unchanged.
# Contents of new config.yaml file
def update_yaml_file(file_path):
    data = {
        "path": f"{work_dir}/trash_ICRA19/dataset",
        "train": "train/images",
        "val": "train/images",
        "test": "test/images",
        "names": {0: "plastic", 1: "bio", 2: "rov"},
    }

    # Ensures the "names" list appears after the sub/directories
    names_data = data.pop("names")
    with open(file_path, "w") as yaml_file:
        yaml.dump(data, yaml_file)
        yaml_file.write("\n")
        yaml.dump({"names": names_data}, yaml_file)

if __name__ == "__main__":
    file_path = f"{work_dir}/trash_ICRA19/config.yaml"  # .yaml file path
    update_yaml_file(file_path)
    print(f"{file_path} updated successfully.")
Link to this sectionStep 5: Train the YOLO26 model#
Run the following command-line code to fine tune a pretrained default YOLO26 model.
!yolo task=detect mode=train data={work_dir}/trash_ICRA19/config.yaml model=yolo26n.pt epochs=2 batch=32 lr0=.04 plots=TrueHere's a closer look at the parameters in the model training command:
- task: It specifies the computer vision task for which you are using the specified YOLO model and data set.
- mode: Denotes the purpose for which you are loading the specified model and data. Since we are training a model, it is set to "train." Later, when we test our model's performance, we will set it to "predict."
- epochs: This delimits the number of times YOLO26 will pass through our entire data set.
- batch: The numerical value stipulates the training batch sizes. Batches are the number of images a model processes before it updates its parameters.
- lr0: Specifies the model's initial learning rate.
- plots: Directs YOLO to generate and save plots of our model's training and evaluation metrics.
For a detailed understanding of the model training process and best practices, refer to the YOLO26 Model Training guide. This guide will help you get the most out of your experiments and ensure you're using YOLO26 effectively.
Link to this sectionStep 6: Test the Model#
We can now run inference to test the performance of our fine-tuned model:
!yolo task=detect mode=predict source={work_dir}/trash_ICRA19/dataset/test/images model={work_dir}/runs/detect/train/weights/best.pt conf=0.5 iou=.5 save=True save_txt=TrueThis brief script generates predicted labels for each image in our test set, as well as new output image files that overlay the predicted bounding box atop the original image.
Predicted .txt labels for each image are saved via the save_txt=True argument and the output images with bounding box overlays are generated through the save=True argument.
The parameter conf=0.5 informs the model to ignore all predictions with a confidence level of less than 50%.
Lastly, iou=.5 directs the model to ignore boxes in the same class with an overlap of 50% or greater. It helps to reduce potential duplicate boxes generated for the same object.
We can load the images with predicted bounding box overlays to view how our model performs on a handful of images.
# Show the first ten images from the preceding prediction task
for pred_dir in glob.glob(f"{work_dir}/runs/detect/predict/*.jpg")[:10]:
    img = Image.open(pred_dir)
    display(img)
The code above displays ten images from the test set with their predicted bounding boxes, accompanied by class name labels and confidence levels.
Link to this sectionStep 7: Evaluate the Model#
We can produce visualizations of the model's precision and recall for each class. These visualizations are saved in the training run directory ({work_dir}/runs/detect/train/). The precision score is displayed in the BoxP_curve.png:
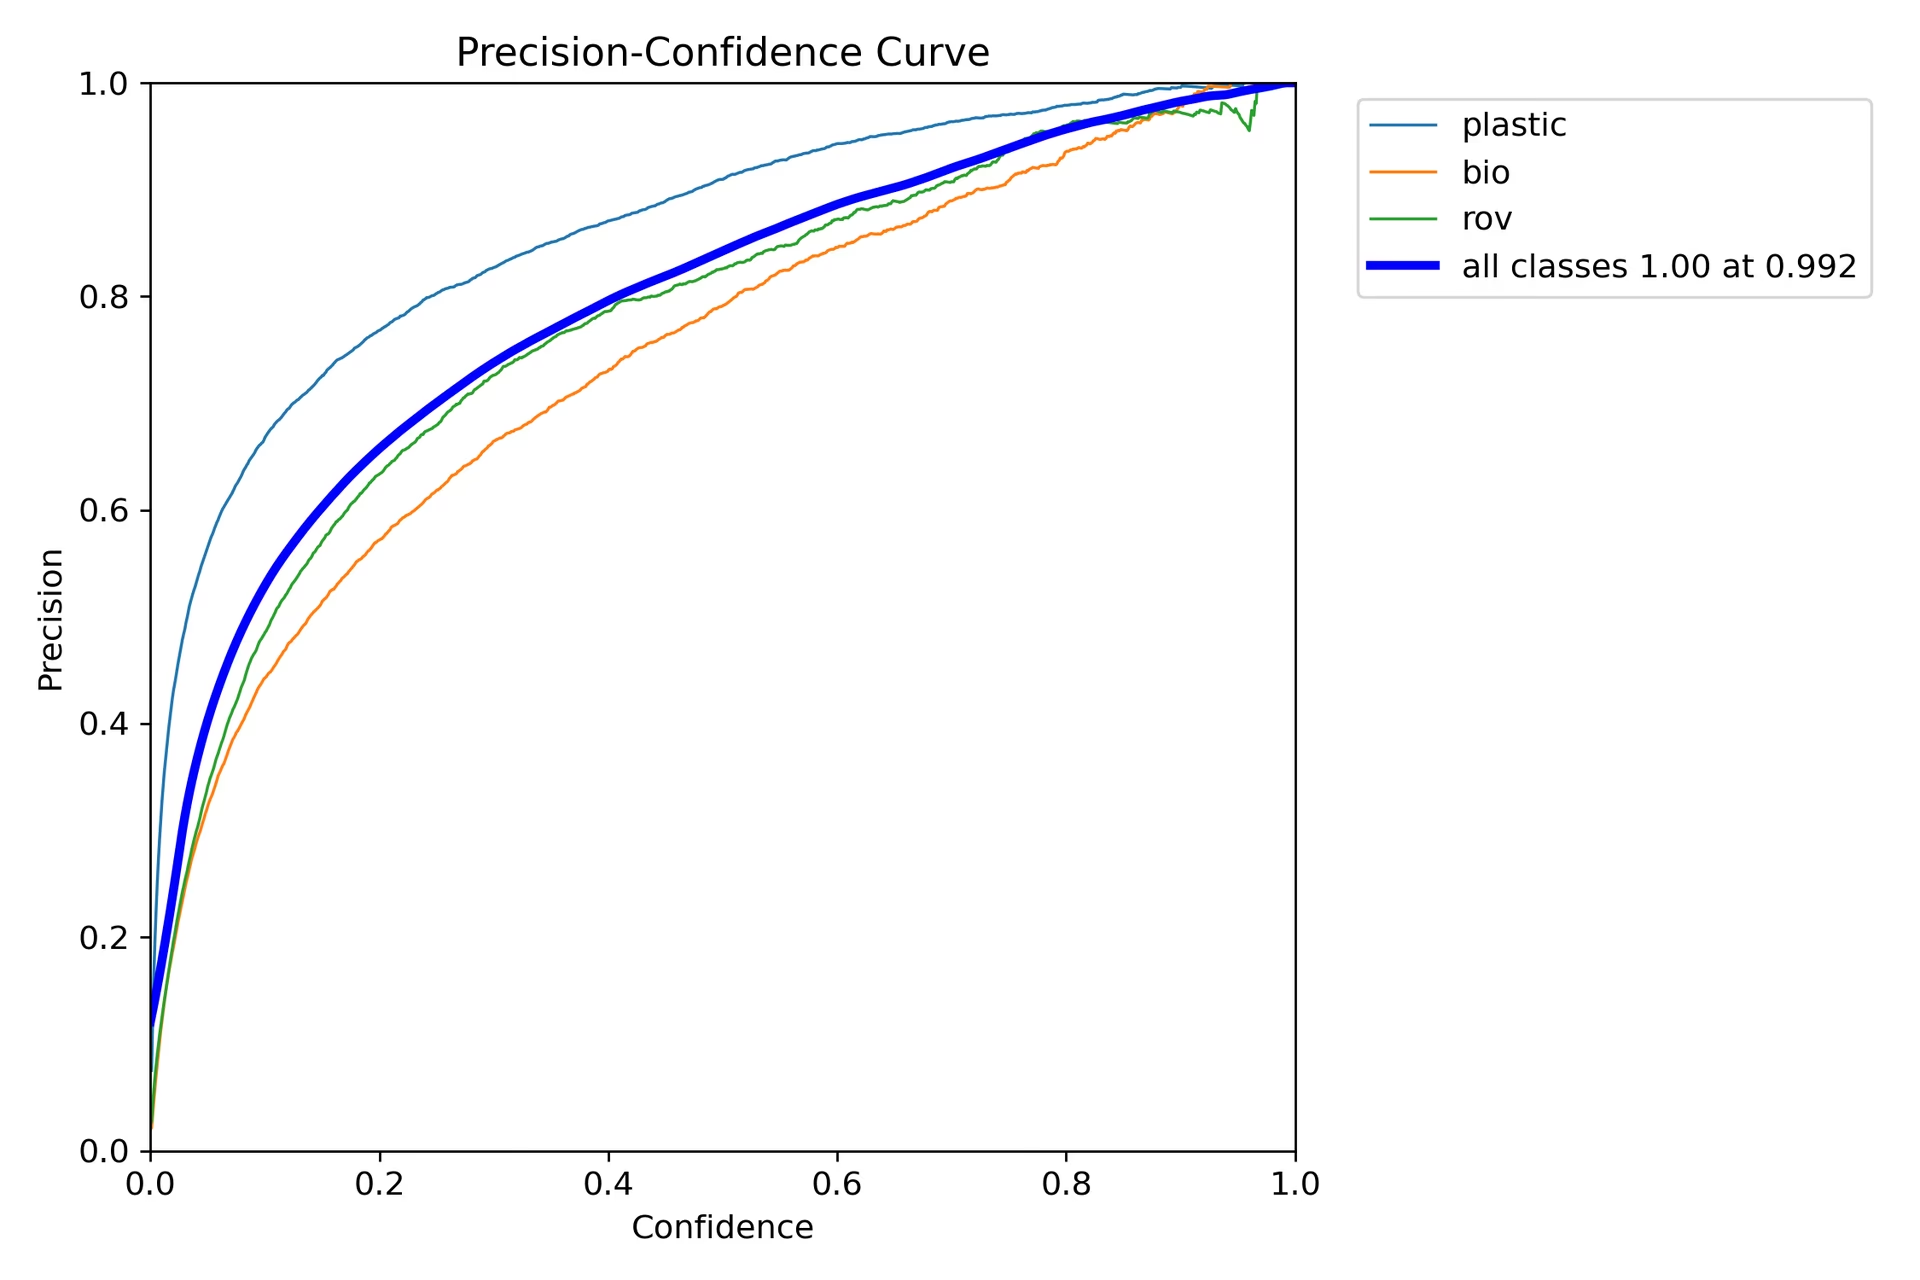
The graph shows an exponential increase in precision as the model's confidence level for predictions increases. However, the model precision has not yet leveled out at a certain confidence level after two epochs.
The recall graph (BoxR_curve.png) displays an inverse trend:
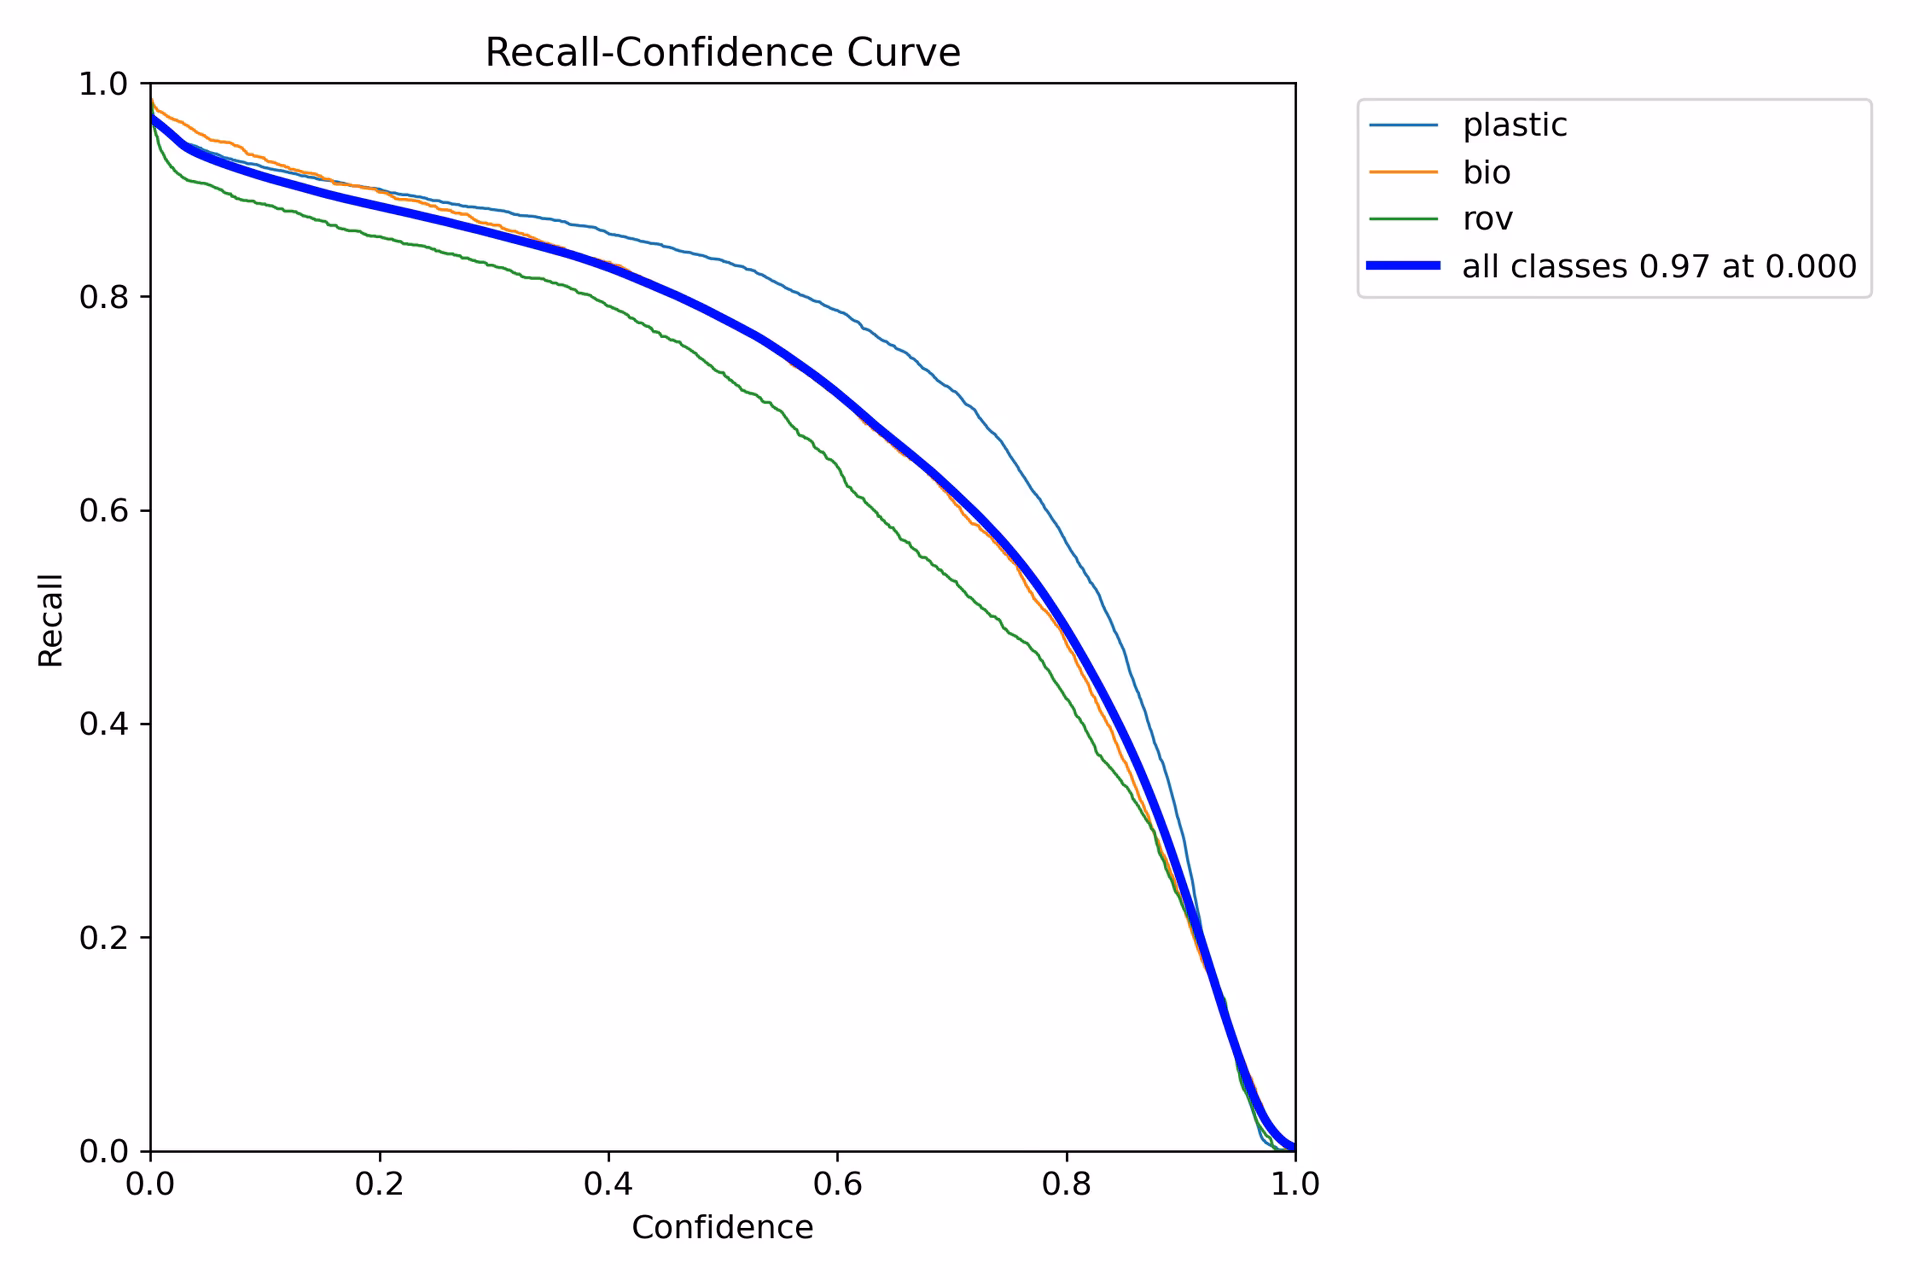
Unlike precision, recall moves in the opposite direction, showing greater recall with lower confidence instances and lower recall with higher confidence instances. This is an apt example of the trade-off in precision and recall for classification models.
Link to this sectionStep 8: Calculating Intersection Over Union#
You can measure the prediction accuracy by calculating the IoU between a predicted bounding box and a ground truth bounding box for the same object. Check out IBM's tutorial on training YOLO26 for more details.
Link to this sectionSummary#
We explored IBM Watsonx key features, and how to train a YOLO26 model using IBM Watsonx. We also saw how IBM Watsonx can enhance your AI workflows with advanced tools for model building, data management, and compliance.
For further details on usage, visit IBM Watsonx official documentation.
Also, be sure to check out the Ultralytics integration guide page, to learn more about different exciting integrations.
Link to this sectionFAQ#
Link to this sectionHow do I train a YOLO26 model using IBM Watsonx?#
To train a YOLO26 model using IBM Watsonx, follow these steps:
- Set Up Your Environment: Create an IBM Cloud account and set up a Watsonx.ai project. Use a Jupyter Notebook for your coding environment.
- Install Libraries: Install necessary libraries like
torch,opencv, andultralytics. - Load Data: Use the Kaggle API to load your dataset into Watsonx.
- Preprocess Data: Organize your dataset into the required directory structure and update the
.yamlconfiguration file. - Train the Model: Use the YOLO command-line interface to train your model with specific parameters like
epochs,batch size, andlearning rate. - Test and Evaluate: Run inference to test the model and evaluate its performance using metrics like precision and recall.
For detailed instructions, refer to our YOLO26 Model Training guide.
Link to this sectionWhat are the key features of IBM Watsonx for AI model training?#
IBM Watsonx offers several key features for AI model training:
- Watsonx.ai: Provides tools for AI development, including access to IBM-supported custom models and third-party models like Llama 3. It includes the Prompt Lab, Tuning Studio, and Flows Engine for comprehensive AI lifecycle management.
- Watsonx.data: Supports cloud and on-premises deployments, offering centralized data access, efficient query engines like Presto and Spark, and an AI-powered semantic layer.
- Watsonx.governance: Automates compliance, manages risk with alerts, and provides tools for detecting issues like bias and drift. It also includes dashboards and reporting tools for collaboration.
For more information, visit the IBM Watsonx official documentation.
Link to this sectionWhy should I use IBM Watsonx for training Ultralytics YOLO26 models?#
IBM Watsonx is an excellent choice for training Ultralytics YOLO26 models due to its comprehensive suite of tools that streamline the AI lifecycle. Key benefits include:
- Scalability: Easily scale your model training with IBM Cloud services.
- Integration: Seamlessly integrate with various data sources and APIs.
- User-Friendly Interface: Simplifies the development process with a collaborative and intuitive interface.
- Advanced Tools: Access to powerful tools like the Prompt Lab, Tuning Studio, and Flows Engine for enhancing model performance.
Learn more about Ultralytics YOLO26 and how to train models using IBM Watsonx in our integration guide.
Link to this sectionHow can I preprocess my dataset for YOLO26 training on IBM Watsonx?#
To preprocess your dataset for YOLO26 training on IBM Watsonx:
- Organize Directories: Ensure your dataset follows the YOLO directory structure with separate subdirectories for images and labels within the train/val/test split.
- Update .yaml File: Modify the
.yamlconfiguration file to reflect the new directory structure and class names. - Run Preprocessing Script: Use a Python script to reorganize your dataset and update the
.yamlfile accordingly.
Here's a sample script to organize your dataset:
import os
import shutil

def organize_files(directory):
    for subdir in ["train", "test", "val"]:
        subdir_path = os.path.join(directory, subdir)
        if not os.path.exists(subdir_path):
            continue

        images_dir = os.path.join(subdir_path, "images")
        labels_dir = os.path.join(subdir_path, "labels")

        os.makedirs(images_dir, exist_ok=True)
        os.makedirs(labels_dir, exist_ok=True)

        for filename in os.listdir(subdir_path):
            if filename.endswith(".txt"):
                shutil.move(os.path.join(subdir_path, filename), os.path.join(labels_dir, filename))
            elif filename.endswith(".jpg") or filename.endswith(".png") or filename.endswith(".jpeg"):
                shutil.move(os.path.join(subdir_path, filename), os.path.join(images_dir, filename))

if __name__ == "__main__":
    directory = f"{work_dir}/trash_ICRA19/dataset"
    organize_files(directory)
For more details, refer to our data preprocessing guide.
Link to this sectionWhat are the prerequisites for training a YOLO26 model on IBM Watsonx?#
Before you start training a YOLO26 model on IBM Watsonx, ensure you have the following prerequisites:
- IBM Cloud Account: Create an account on IBM Cloud to access Watsonx.ai.
- Kaggle Account: For loading datasets, you'll need a Kaggle account and an API key.
- Jupyter Notebook: Set up a Jupyter Notebook environment within Watsonx.ai for coding and model training.
For more information on setting up your environment, visit our Ultralytics Installation guide.