AWS Deep Learning Instance上のUltralytics YOLOv5 🚀:完全ガイド
高性能な深層学習環境の構築は、特に初心者にとっては気が遠くなるように思えるかもしれません。でも、ご心配なく!🛠️ このガイドでは、Ultralytics YOLOv5をAWS Deep Learningインスタンス上で起動して実行するためのステップバイステップのチュートリアルを提供します。Amazon Web Services(AWS)の力を活用することで、機械学習(ML)の初心者でも、迅速かつ費用対効果の高い方法で始めることができます。AWSプラットフォームのスケーラビリティは、実験と本番デプロイメントの両方に最適です。
YOLOv5のその他のクイックスタートオプションには、 Google Colab Notebook, Kaggle環境


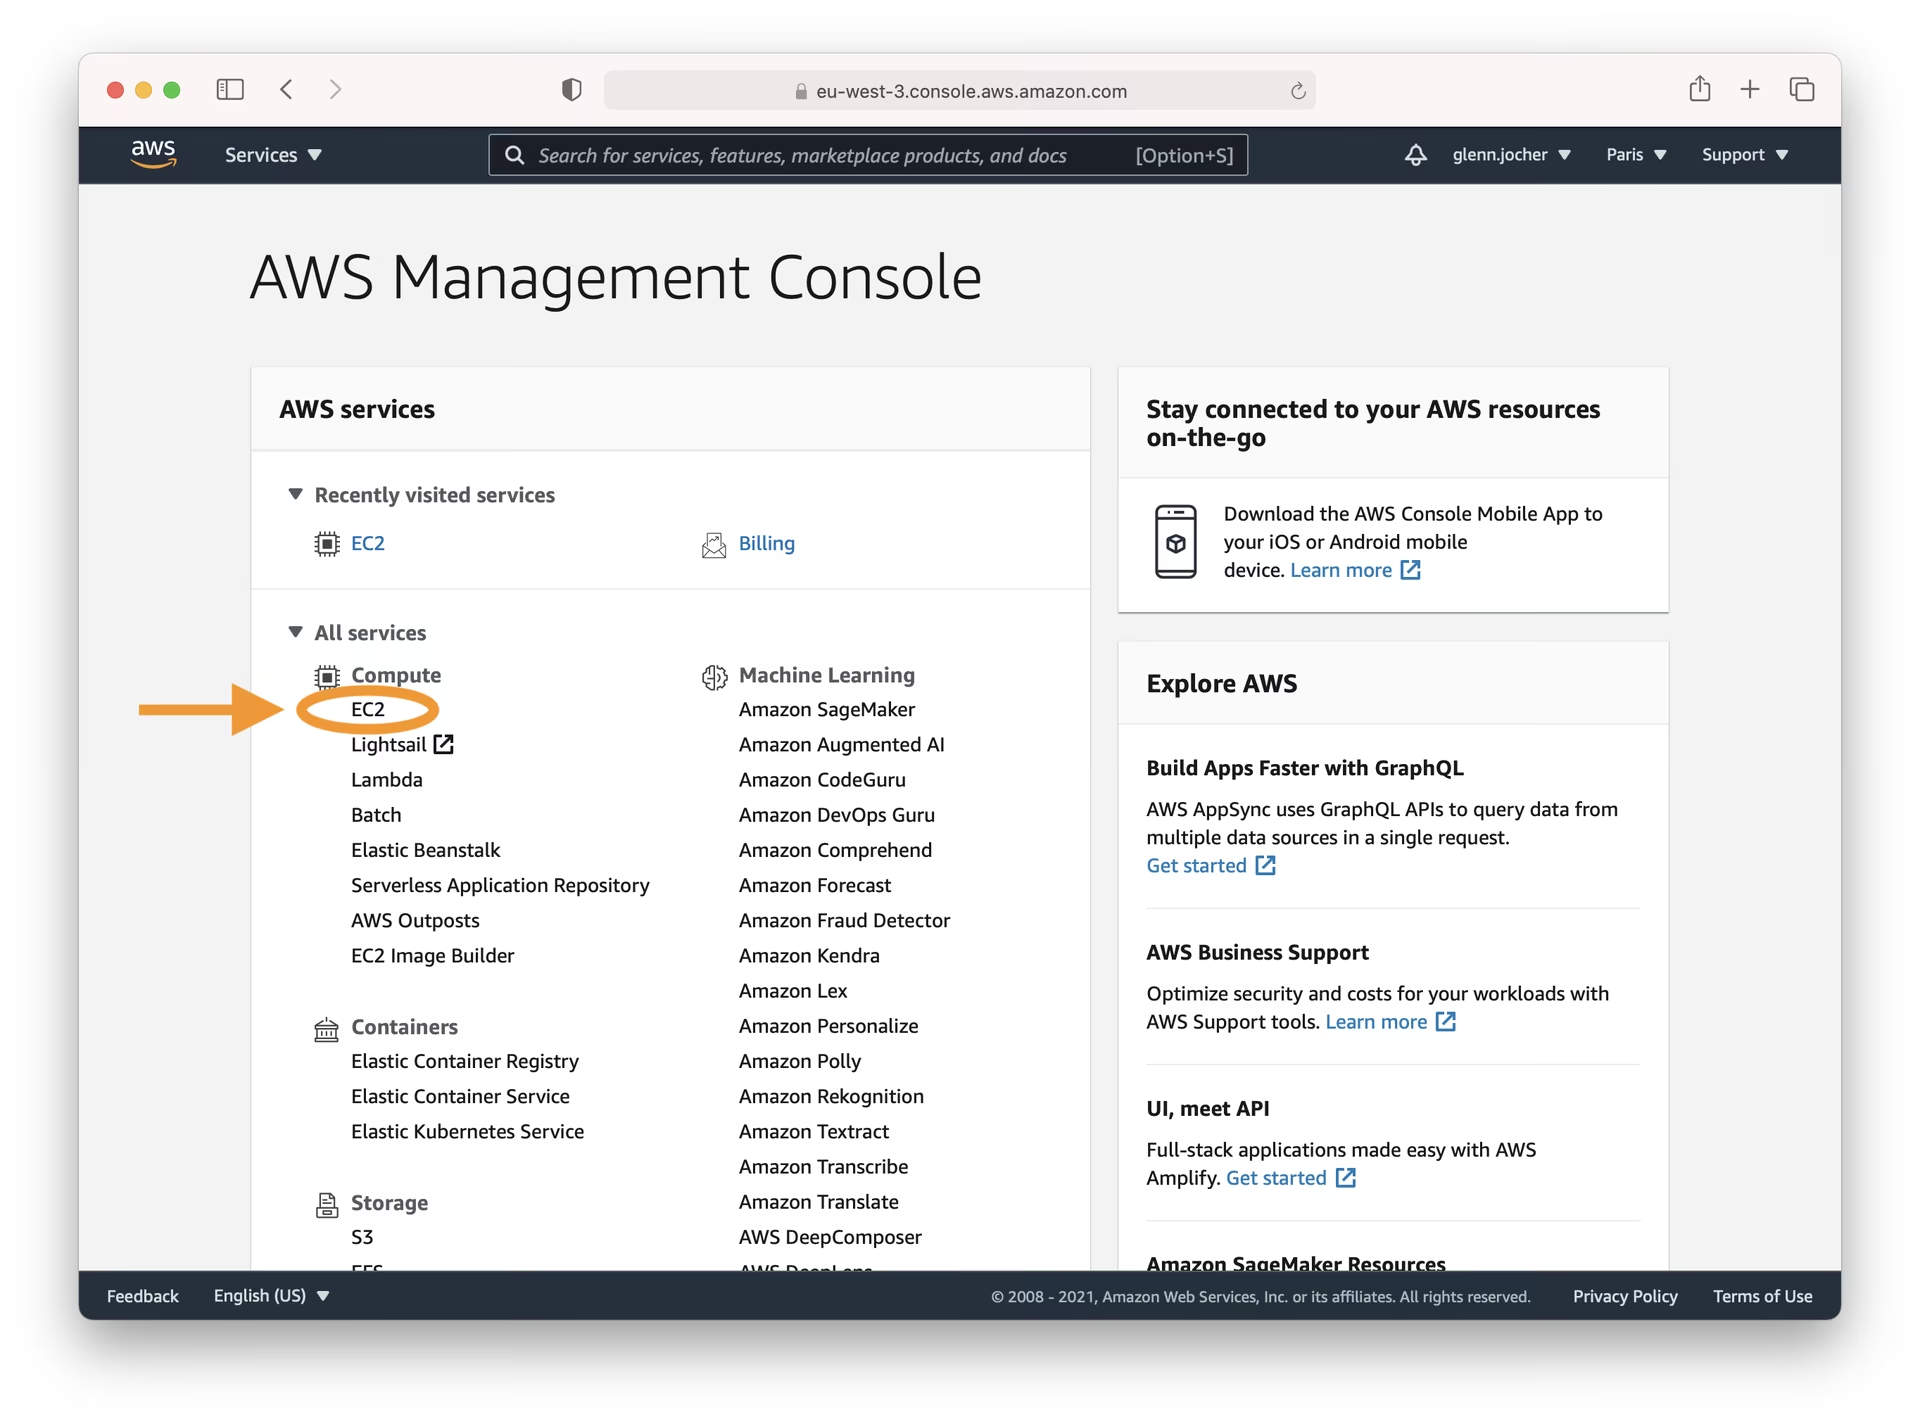
ステップ1:AWSコンソールにサインイン
まず、AWS Management Consoleでアカウントを作成するか、サインインします。ログインしたら、EC2サービスダッシュボードに移動し、仮想サーバー(インスタンス)を管理できます。
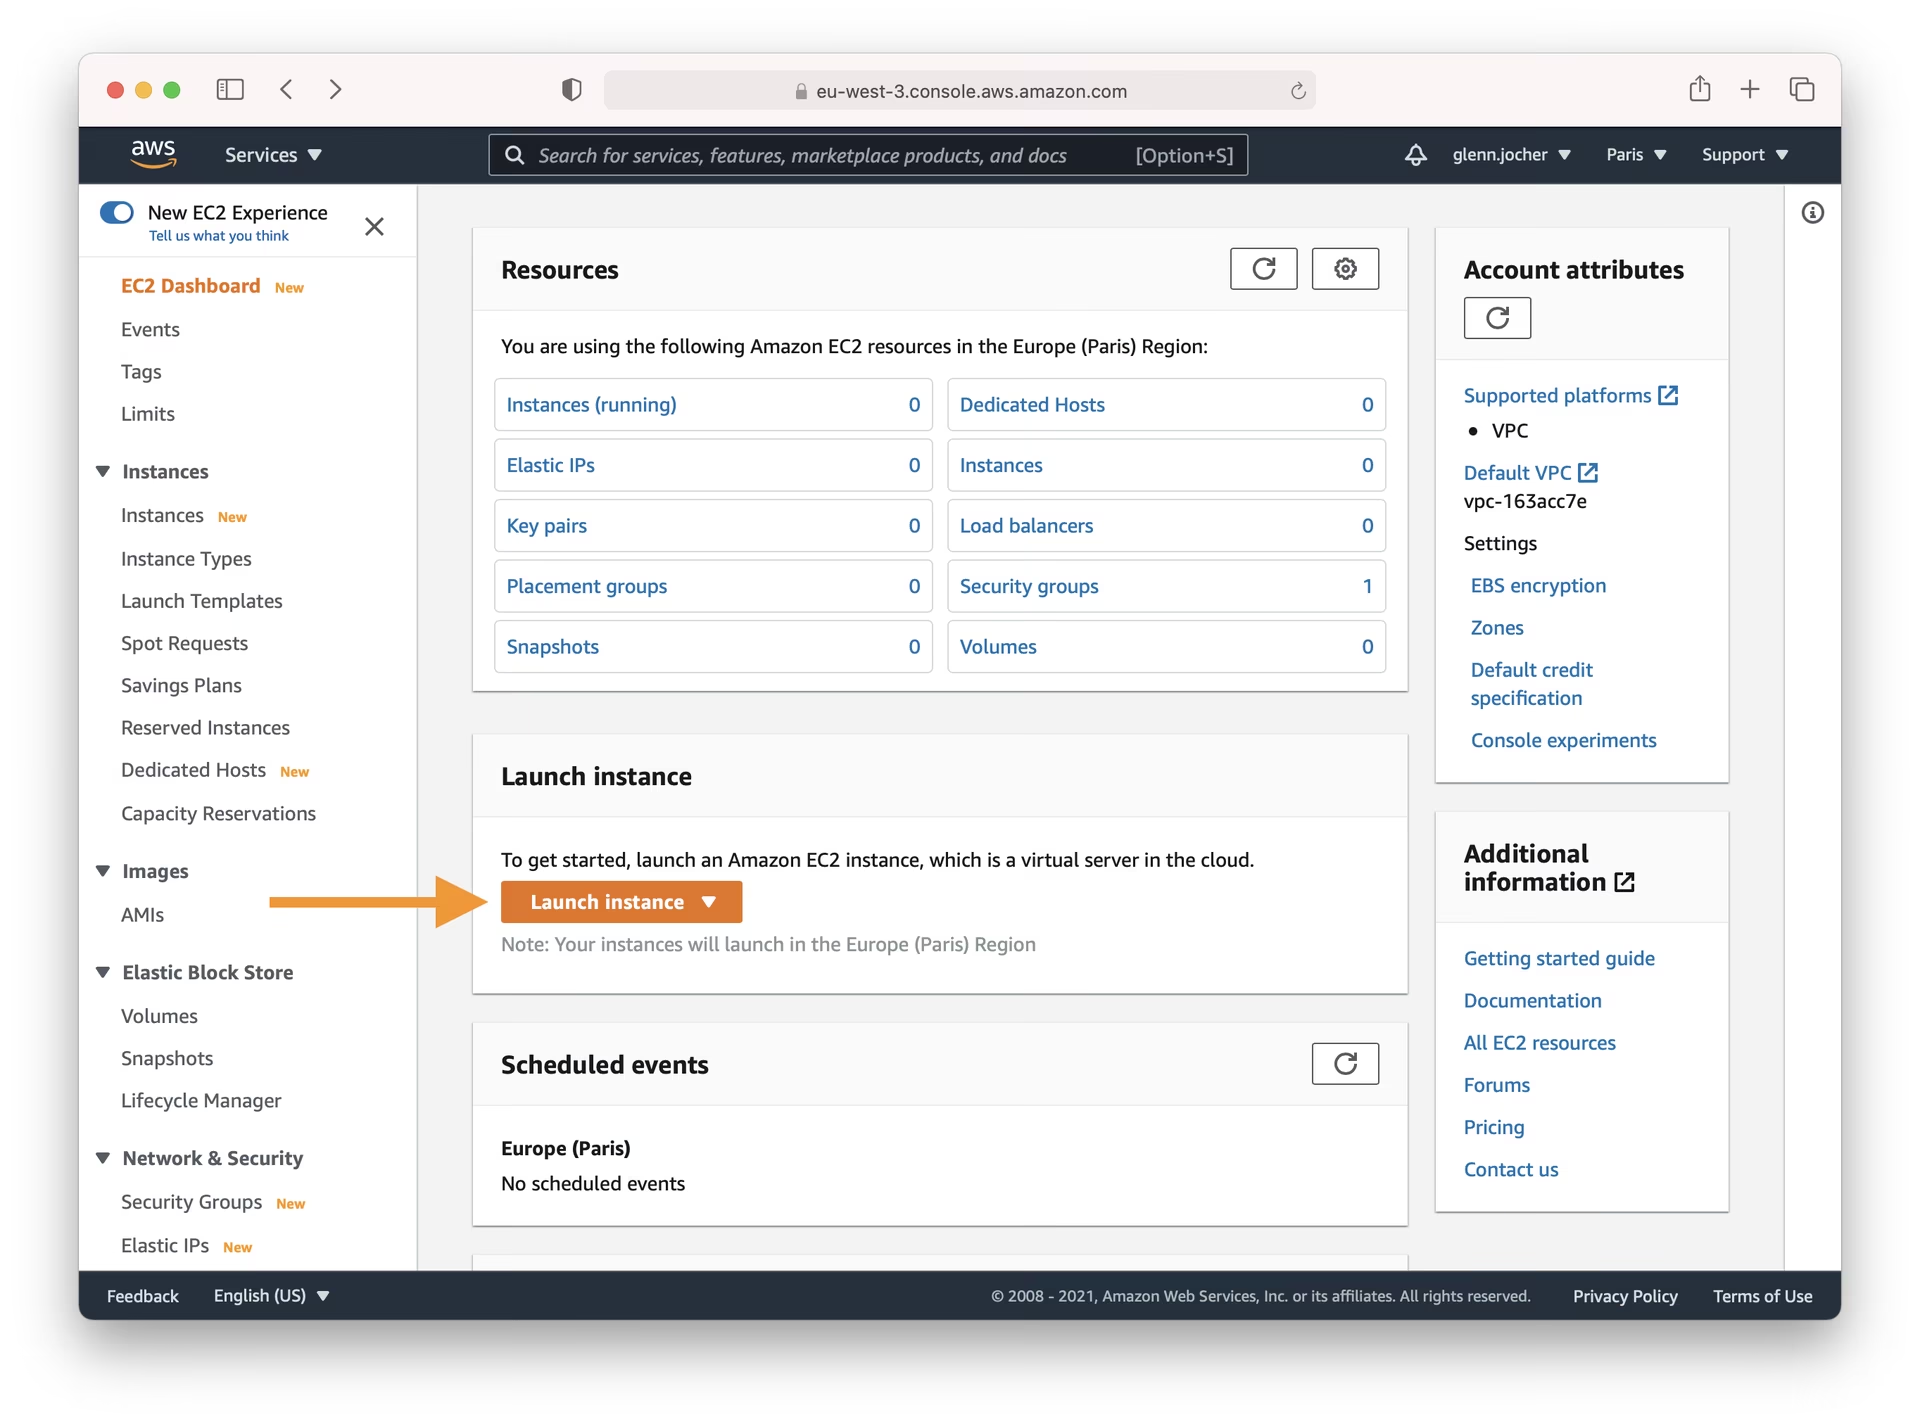
ステップ2:インスタンスを起動する
EC2ダッシュボードから、[インスタンスを起動]ボタンをクリックします。これにより、ニーズに合わせた新しい仮想サーバーの作成プロセスが開始されます。
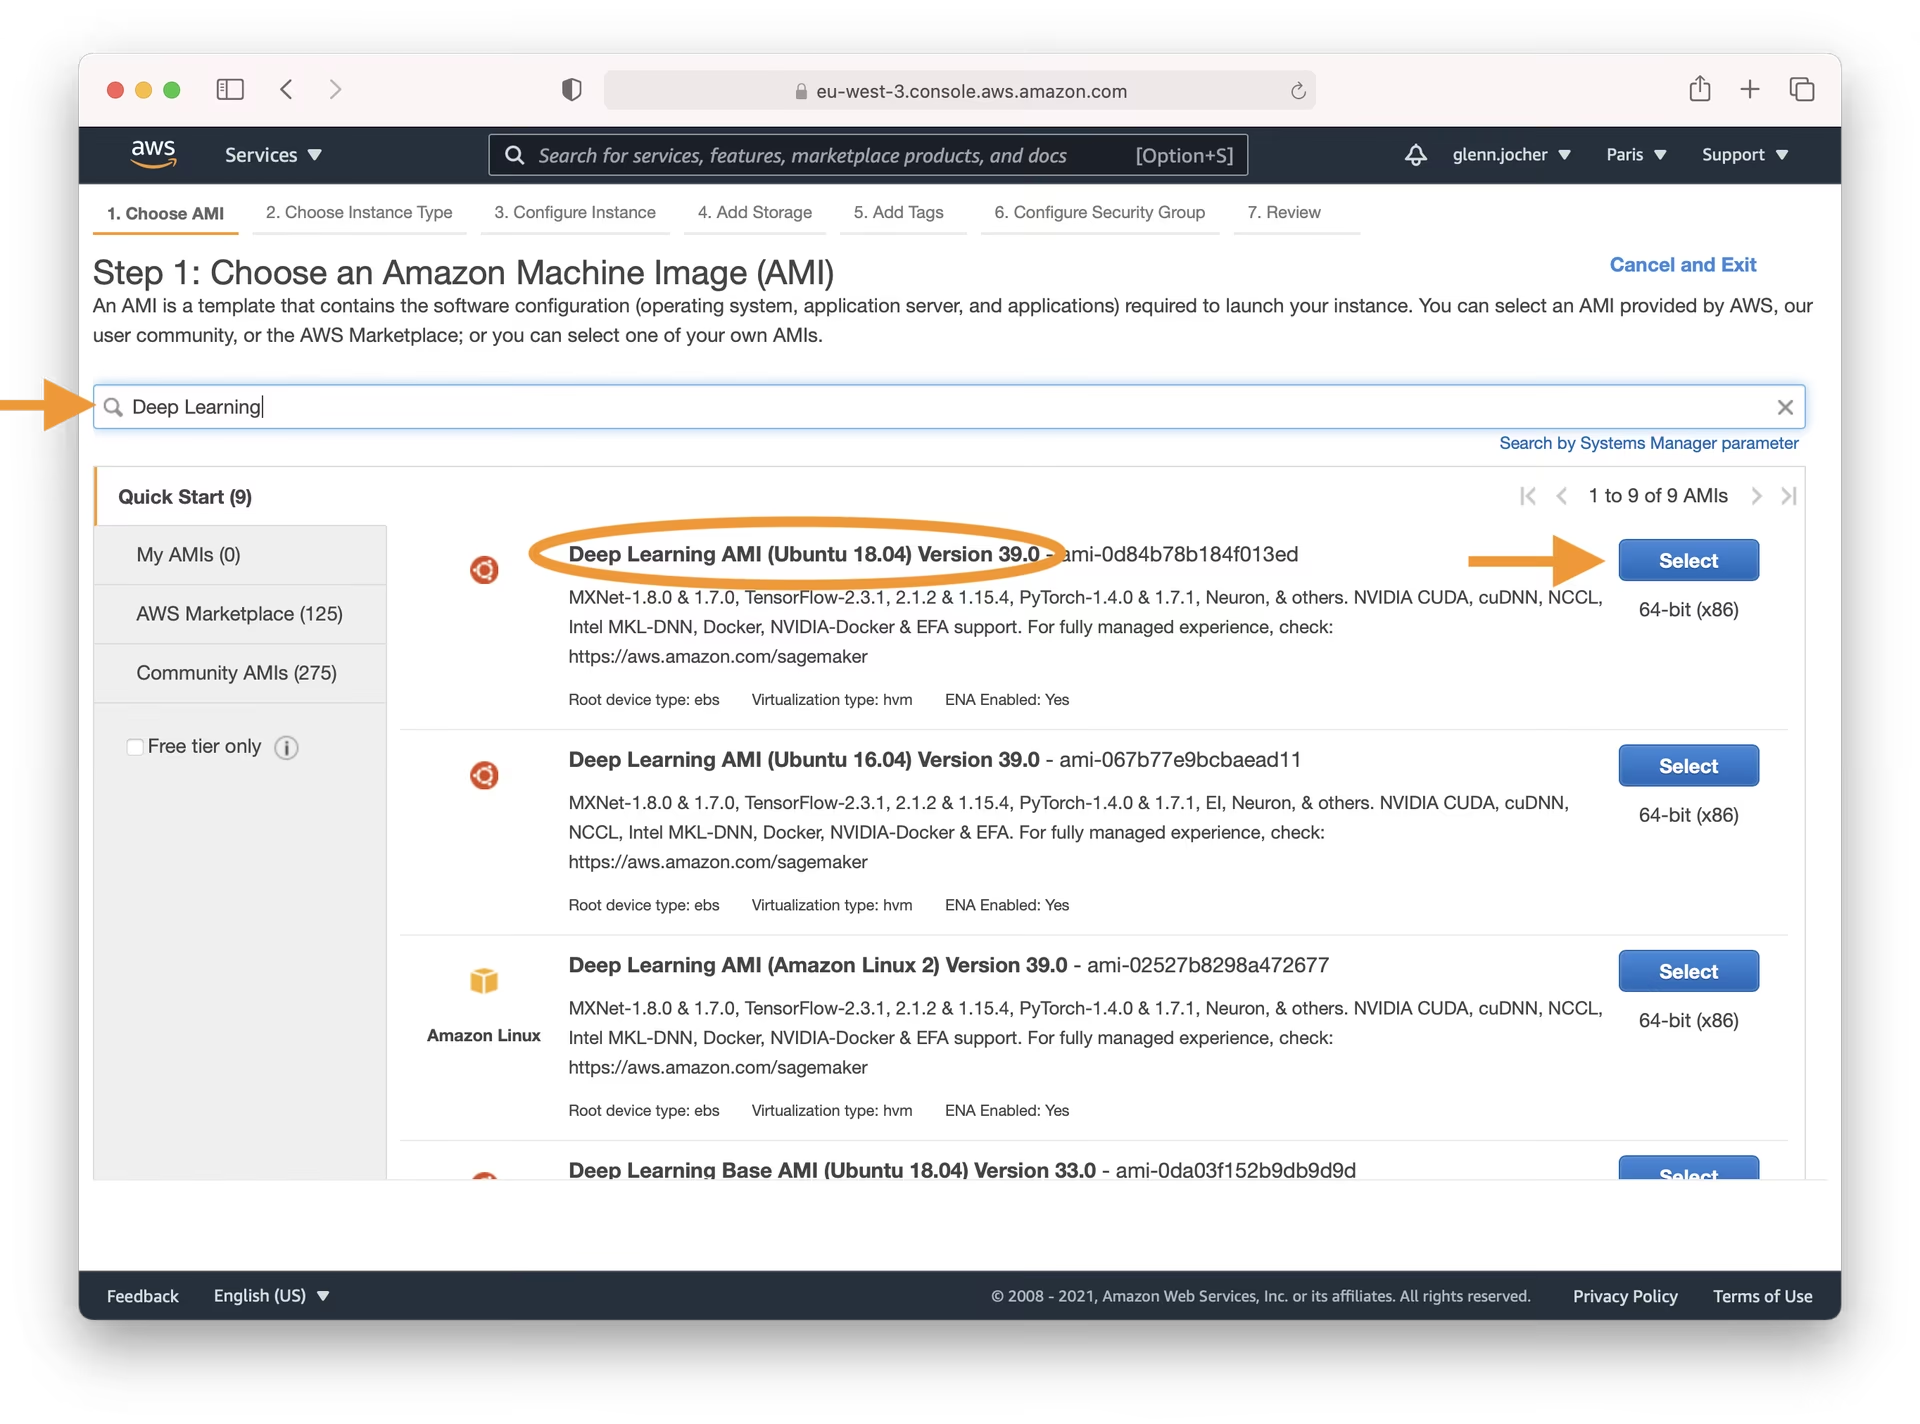
適切なAmazon Machine Image(AMI)の選択
正しい AMI を選択することが重要です。これにより、インスタンスのオペレーティングシステムとプリインストールされたソフトウェアが決まります。検索バーに「Deep Learning」と入力し、最新の Ubuntu ベースの Deep Learning AMI を選択します(別の OS について特定の要件がない限り)。Amazon の Deep Learning AMI には、一般的な 深層学習フレームワーク(YOLOv5 で使用される PyTorch など)と必要な GPU ドライバー がプリ構成されており、セットアッププロセスが大幅に合理化されます。
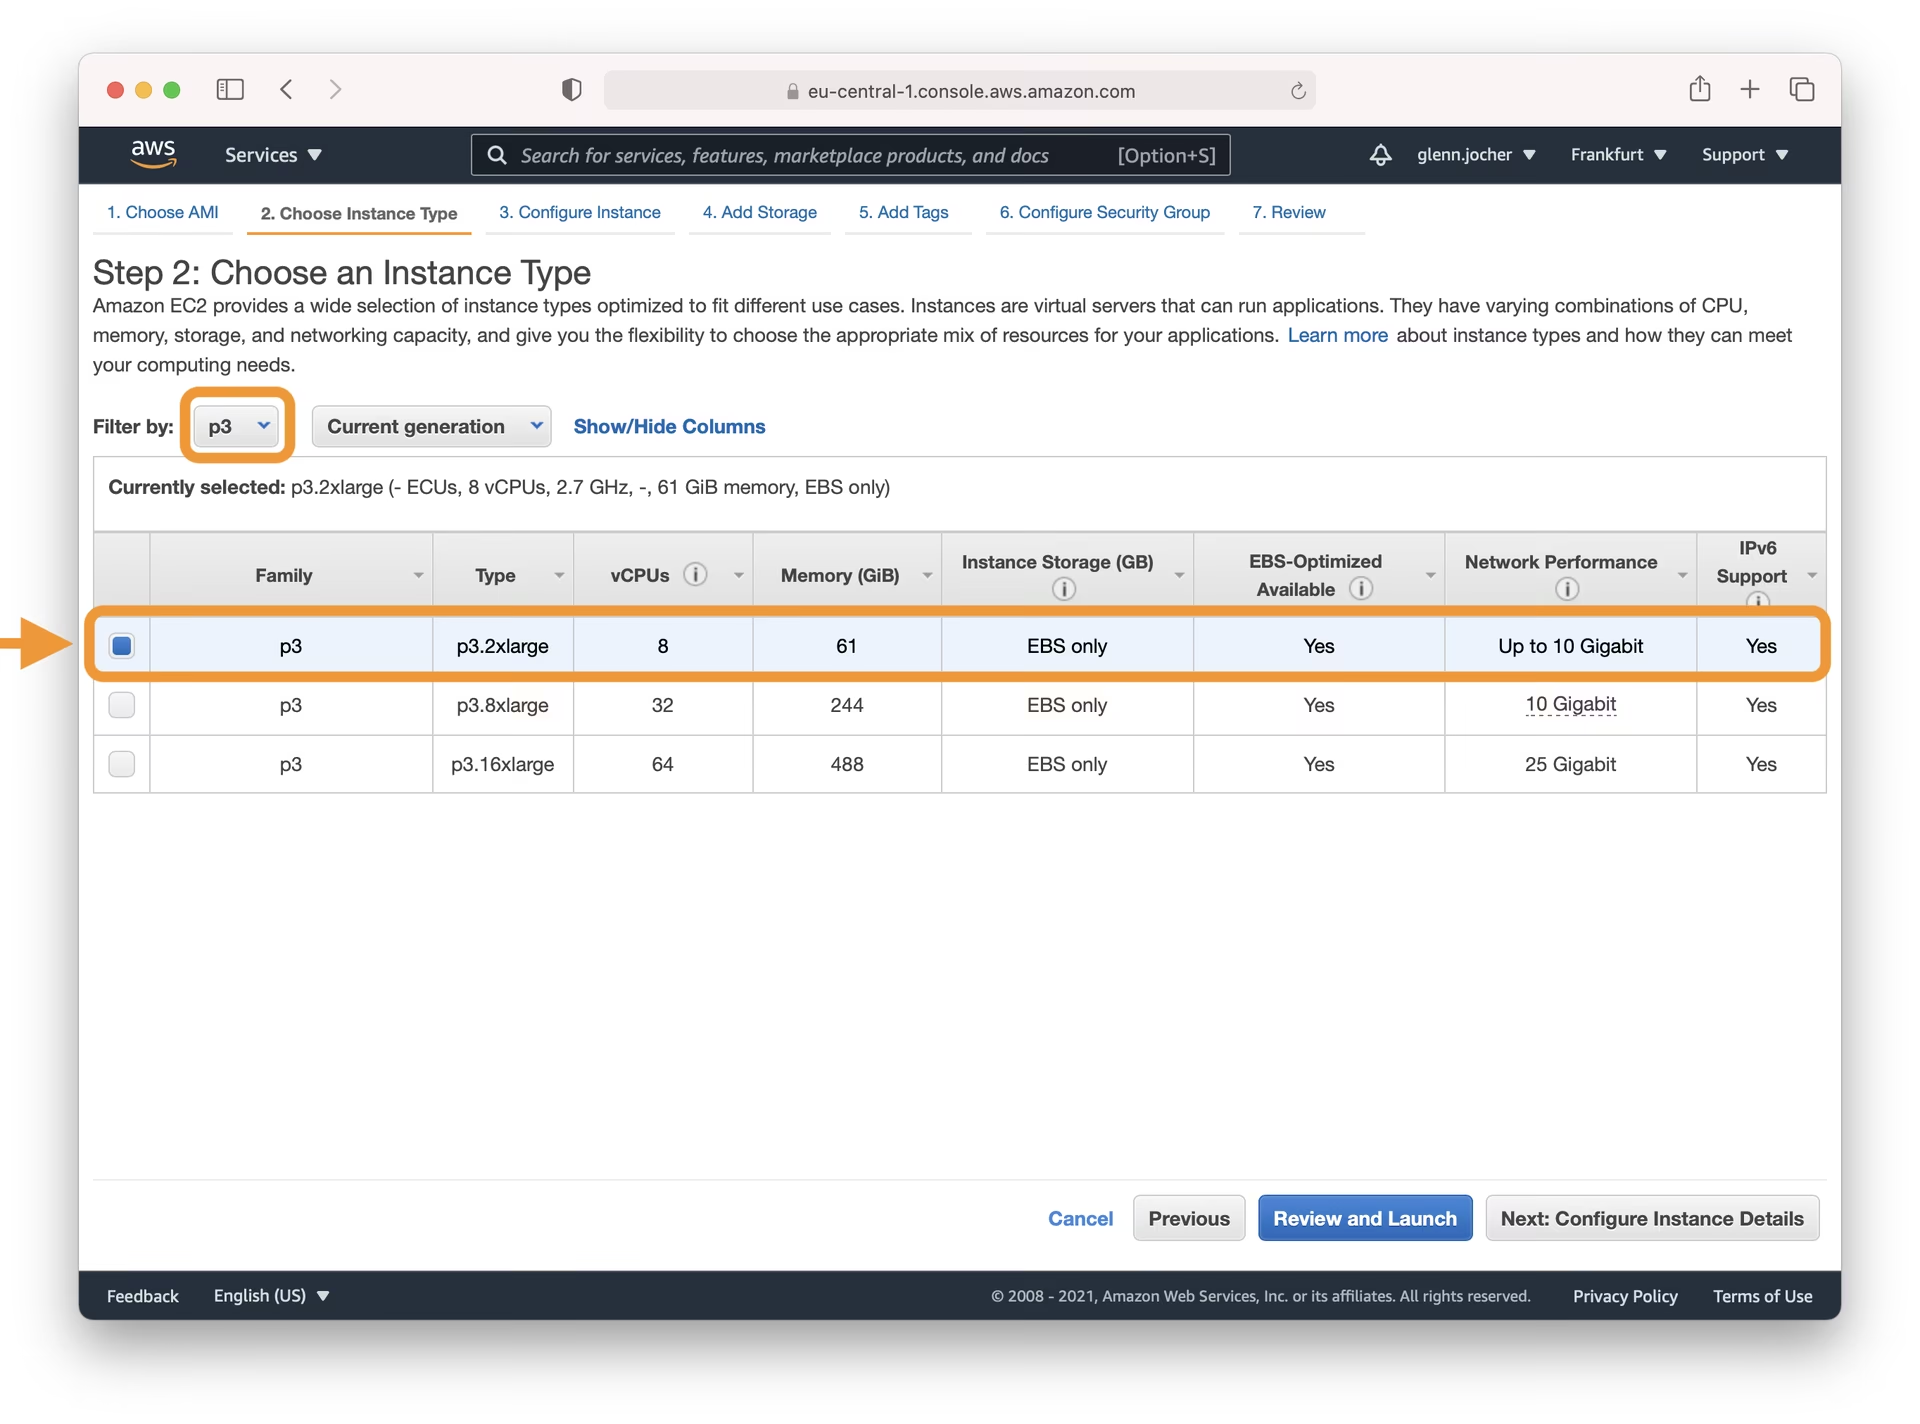
インスタンスタイプの選択
深層学習モデルの学習など、負荷の高いタスクでは、GPUアクセラレーションインスタンスタイプを選択することを強くお勧めします。GPUは、CPUと比較してモデルの学習に必要な時間を大幅に短縮できます。インスタンスサイズを選択する際は、そのメモリ容量(RAM)がモデルとデータセットに十分であることを確認してください。
注: モデルとデータセットのサイズは重要な要素です。MLタスクに必要なメモリが、選択したインスタンスが提供するメモリよりも多い場合は、パフォーマンスの問題やエラーを回避するために、より大きなインスタンスタイプを選択する必要があります。
EC2 インスタンスタイプのページで、特にアクセラレーテッドコンピューティングカテゴリで、利用可能な GPU インスタンスタイプを調べてください。
GPU使用量の監視と最適化に関する詳細については、AWSのGPUの監視と最適化に関するガイドを参照してください。オンデマンド料金を使用してコストを比較し、スポットインスタンス料金で潜在的な節約額を確認してください。
インスタンスの設定
より費用対効果の高いアプローチとして、Amazon EC2 スポットインスタンスの使用を検討してください。スポットインスタンスを使用すると、未使用の EC2 キャパシティに入札でき、多くの場合、オンデマンド料金と比較して大幅な割引が適用されます。中断された場合でもデータが保持される永続性を必要とするタスク(データの保存など)の場合は、永続的なリクエストを選択してください。これにより、ストレージボリュームが確実に保持されます。
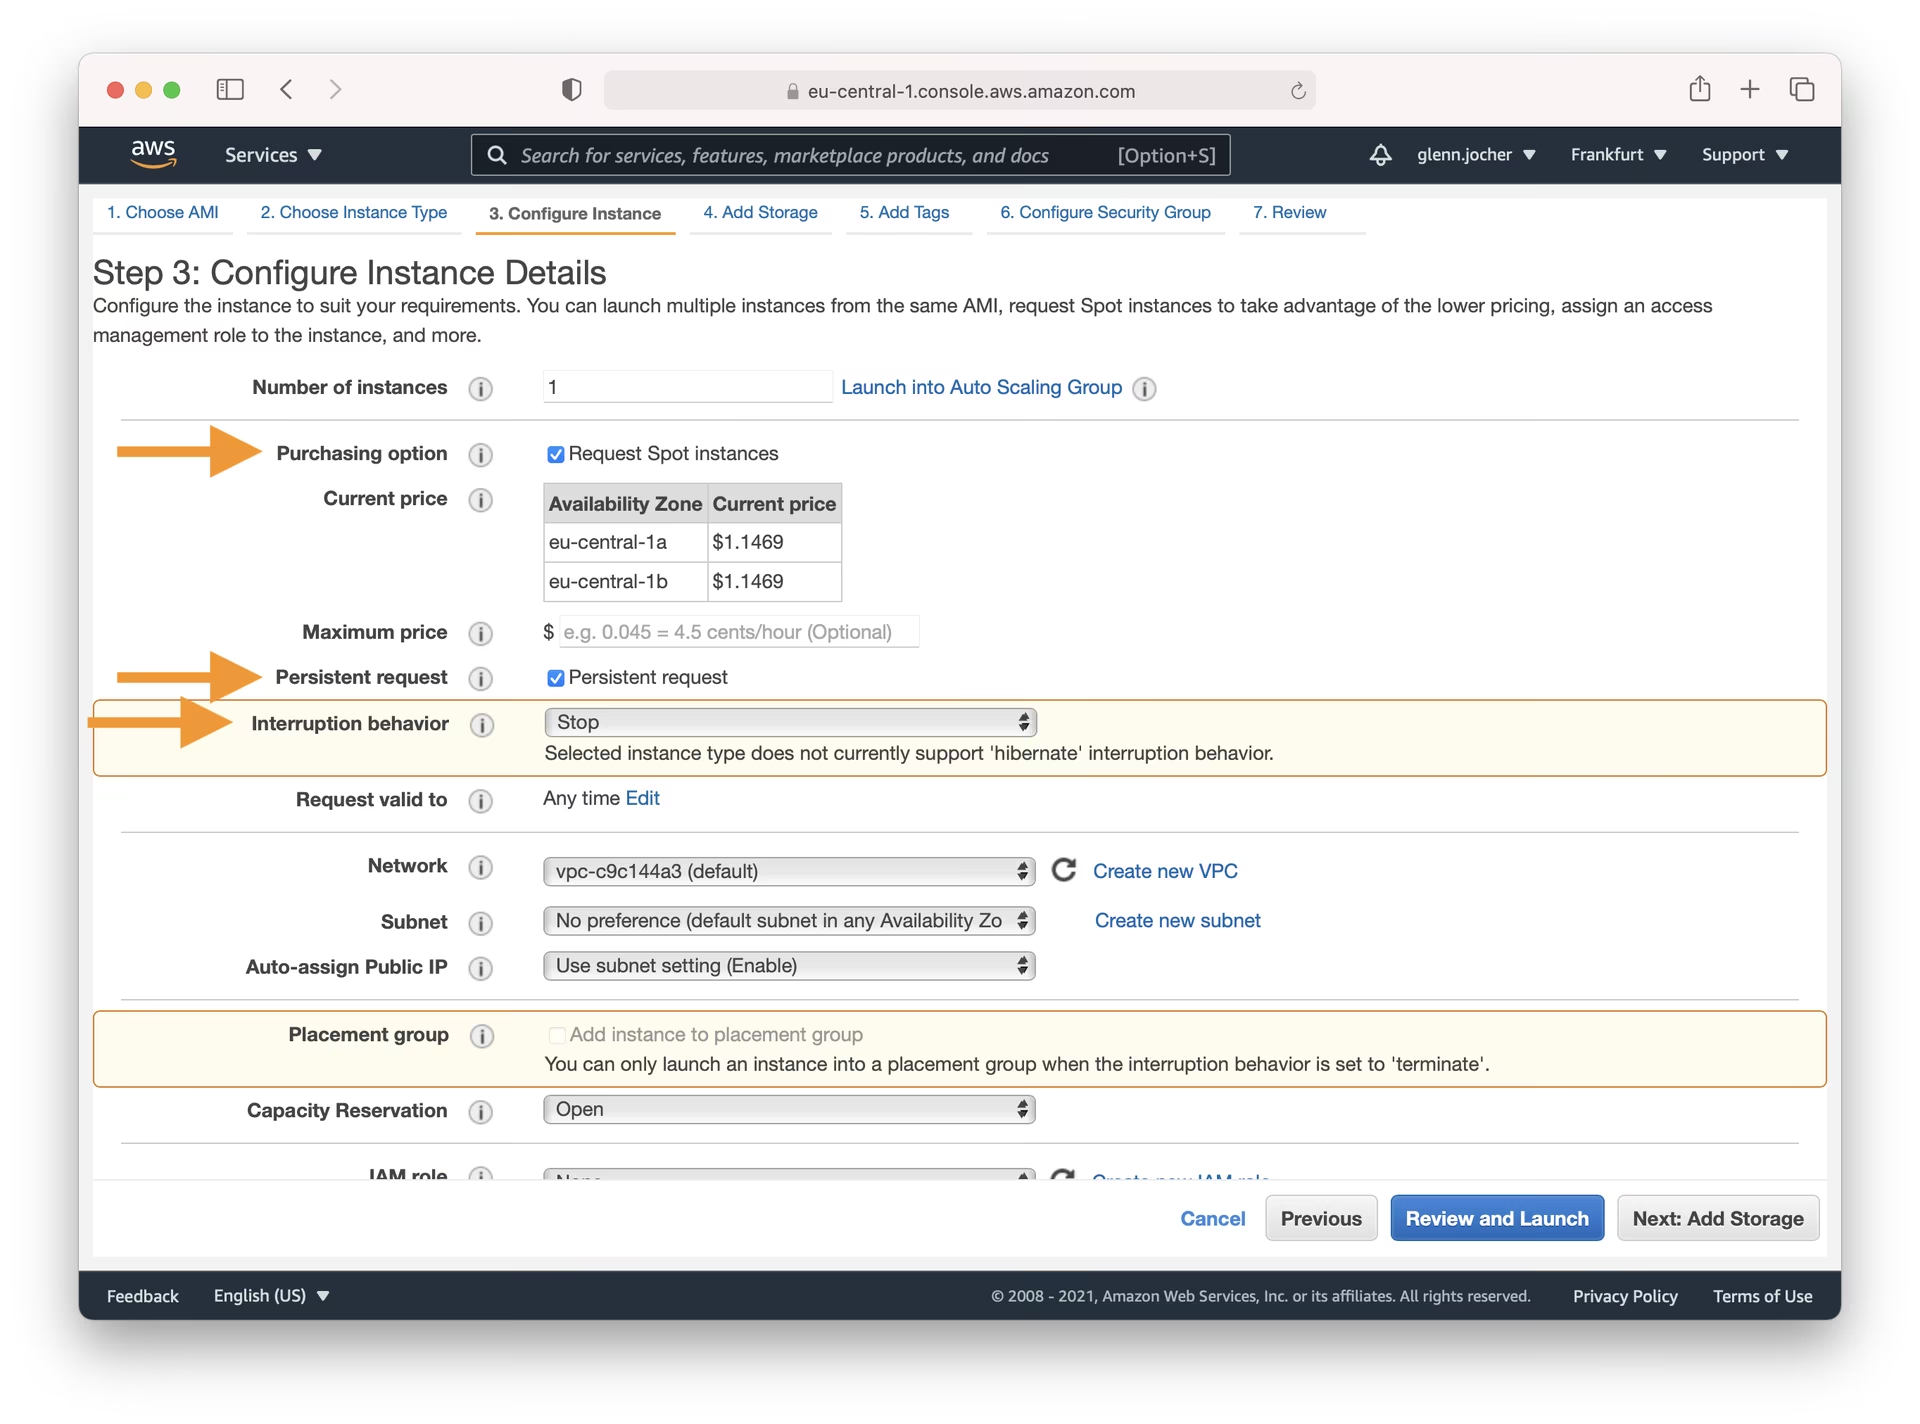
インスタンス起動ウィザードのステップ4~7に進み、ストレージの設定、タグの追加、セキュリティグループの設定(SSHポート22が自分のIPから開いていることを確認)、設定内容の確認を行い、起動をクリックします。また、セキュアなSSHアクセスのために、キーペアを作成するか、既存のキーペアを選択する必要があります。
ステップ3:インスタンスに接続する
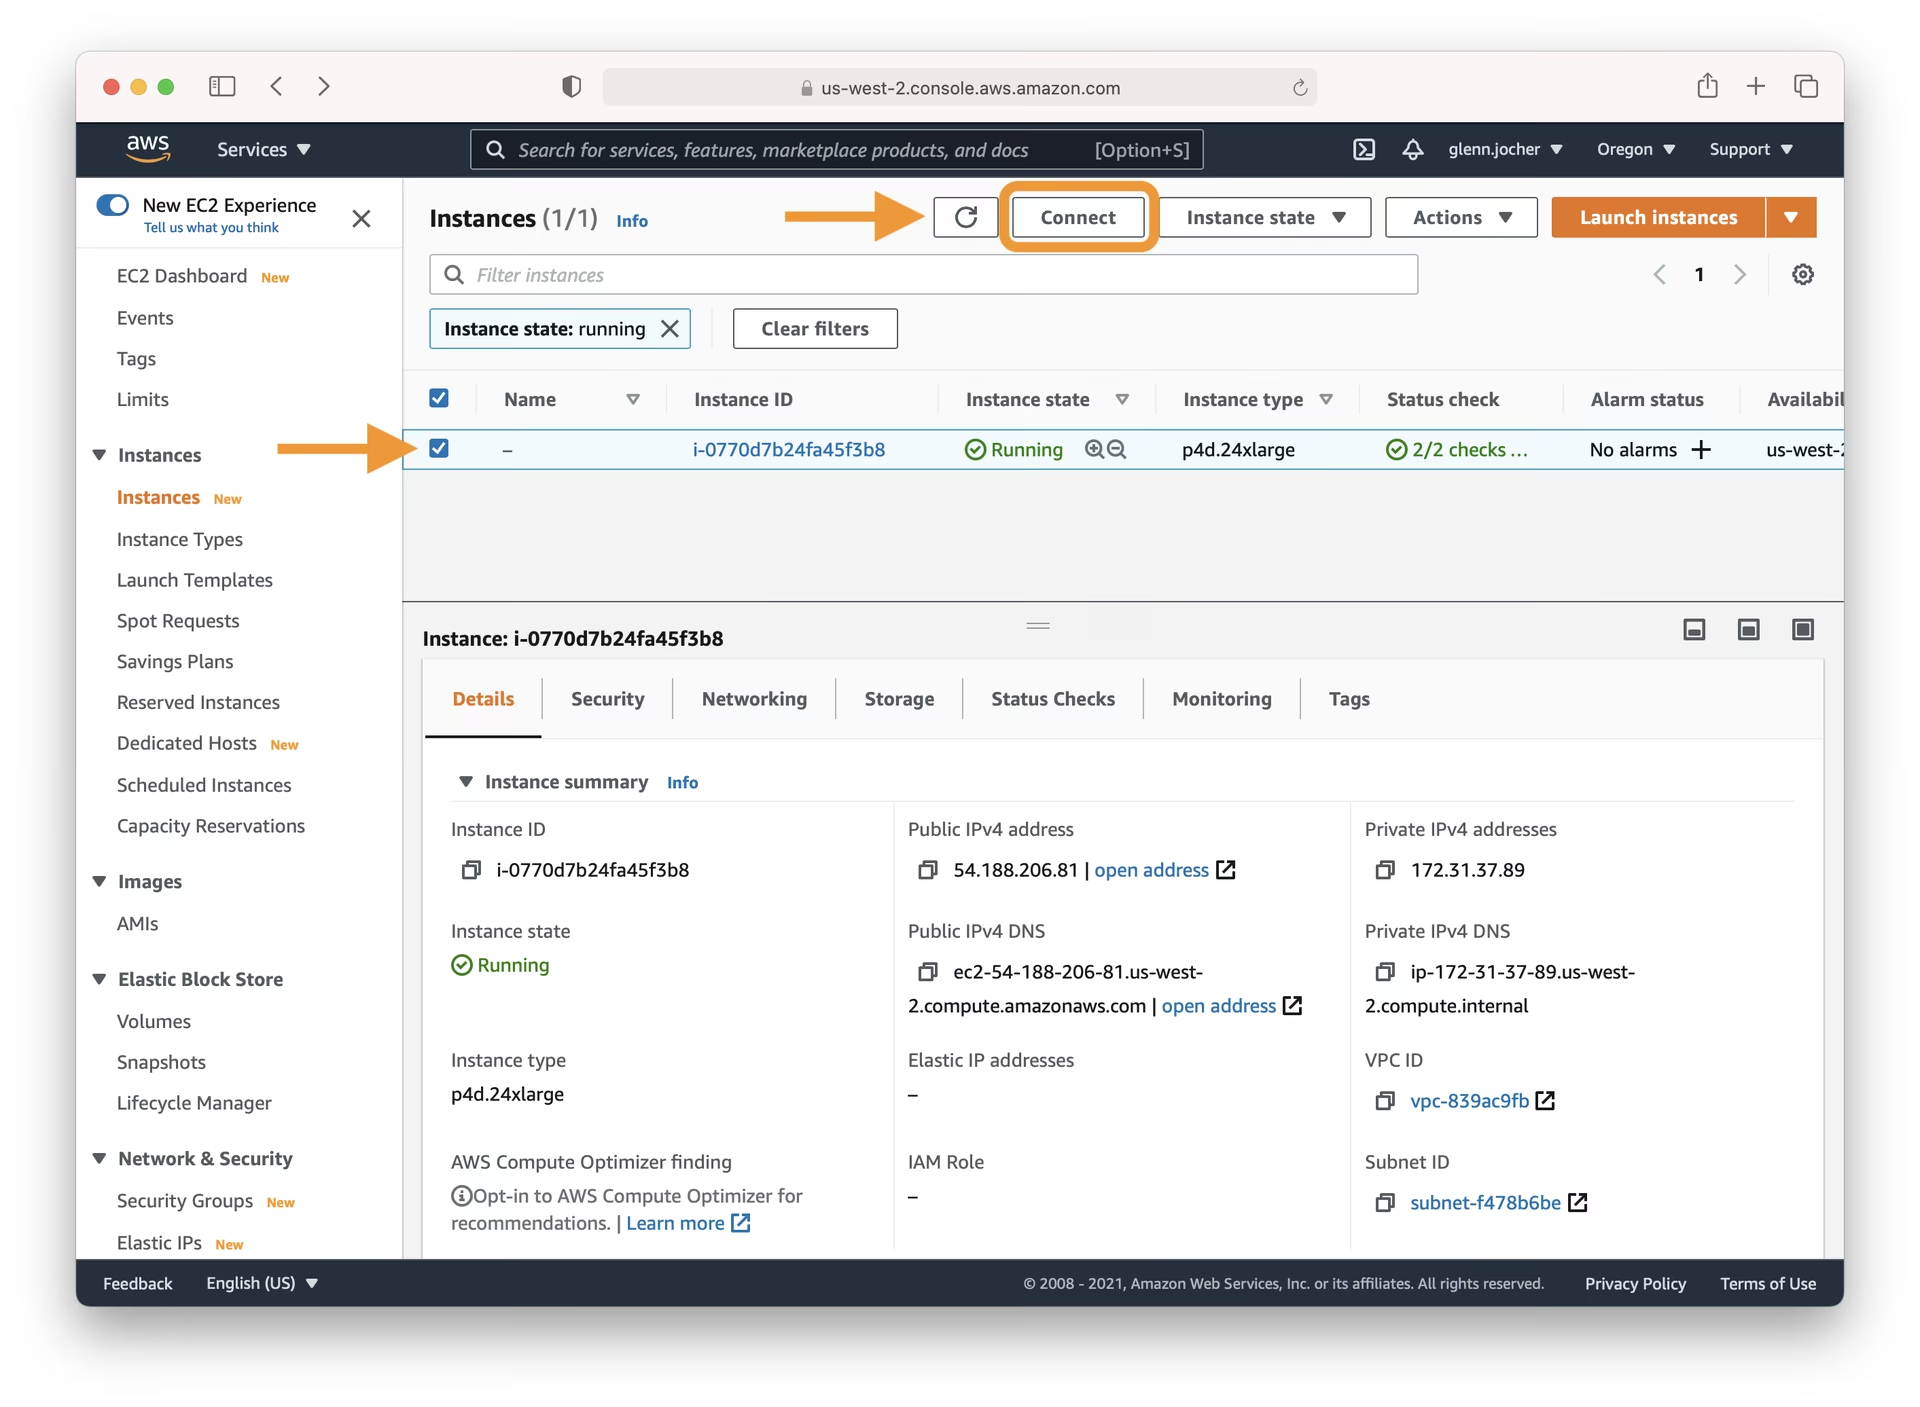
インスタンスの状態が「running」と表示されたら、EC2ダッシュボードからそのインスタンスを選択し、 接続 接続オプションを表示するボタン。提供されているSSHコマンドの例をローカルターミナル(macOS/Linuxのターミナル、またはWindowsのPuTTY/WSLなど)で使用して、安全な接続を確立します。プライベートキーファイル(.pem) で作成または選択したものです。
ステップ4:Ultralytics YOLOv5の実行
SSH経由で接続されたので、YOLOv5をセットアップして実行できます。まず、公式のYOLOv5リポジトリをクローンします。 GitHub そして、ディレクトリに移動します。次に、以下を使用して必要な依存関係をインストールします。 pipを使用することをお勧めします。 Python 3.8以降の環境が必要です。必要なモデルとデータセットは、最新のYOLOv5から自動的にダウンロードされます。 リリース トレーニングや検出などのコマンドを実行すると。
# Clone the YOLOv5 repository
git clone https://github.com/ultralytics/yolov5
cd yolov5

# Install required packages
pip install -r requirements.txt
環境が整うと、YOLOv5をさまざまなタスクに使用できるようになります。
# Train a YOLOv5 model on a custom dataset (e.g., coco128.yaml)
python train.py --data coco128.yaml --weights yolov5s.pt --img 640

# Validate the performance (Precision, Recall, mAP) of a trained model (e.g., yolov5s.pt)
python val.py --weights yolov5s.pt --data coco128.yaml --img 640

# Run inference (object detection) on images or videos using a trained model
python detect.py --weights yolov5s.pt --source path/to/your/images_or_videos/ --img 640

# Export the trained model to various formats like ONNX, CoreML, TFLite for deployment
# See https://docs.ultralytics.com/modes/export/ for more details
python export.py --weights yolov5s.pt --include onnx coreml tflite --img 640
詳細なガイド(Training、Validation、Prediction (Inference)、Exporting)については、Ultralyticsのドキュメントを参照してください。
オプションの追加機能:スワップメモリの増加
非常に大きなデータセットを扱っている場合や、トレーニング中にメモリ制限が発生する場合は、インスタンスのスワップメモリを増やすと役立つことがあります。スワップ領域を使用すると、システムはディスク領域を仮想RAMとして使用できます。
# Allocate a 64GB swap file (adjust size as needed)
sudo fallocate -l 64G /swapfile

# Set correct permissions
sudo chmod 600 /swapfile

# Set up the file as a Linux swap area
sudo mkswap /swapfile

# Enable the swap file
sudo swapon /swapfile

# Verify the swap memory is active
free -h
おめでとうございます! 🎉 AWS Deep Learningインスタンスのセットアップに成功し、Ultralytics YOLOv5をインストールし、物体detectタスクを実行する準備が整いました。事前学習済みモデルで実験する場合でも、独自のデータで学習する場合でも、この強力なセットアップはコンピュータービジョンプロジェクトのスケーラブルな基盤を提供します。問題が発生した場合は、広範なAWSドキュメントと、FAQなどの役立つUltralyticsコミュニティリソースを参照してください。Happy detecting!