Google Cloud Platform (GCP) Deep Learning VMでのYOLOv5デプロイメントの習得
人工知能(AI)と機械学習(ML)の旅に乗り出すことは、特にクラウドコンピューティングプラットフォームのパワーと柔軟性を活用する場合、爽快なことです。Google Cloud Platform(GCP)は、ML愛好家や専門家向けに調整された堅牢なツールを提供しています。そのようなツールの1つが、データサイエンスおよびMLタスク用に事前構成されたDeep Learning VMです。このチュートリアルでは、Ultralytics YOLOv5をGCP Deep Learning VMにセットアップするプロセスをナビゲートします。MLで最初の一歩を踏み出す場合でも、経験豊富な実践者である場合でも、このガイドはYOLOv5を搭載した物体検出モデルを実装するための明確な道筋を提供します。
🆓 さらに、GCPを初めて利用する方は、プロジェクトを始めるにあたって300ドルの無料クレジットをご利用いただけます。
GCPに加えて、YOLOv5の他のアクセス可能なクイックスタートオプション(たとえば、 Google Colab Notebook ブラウザベースのエクスペリエンス、またはスケーラビリティのために Amazon AWS。さらに、コンテナ愛好家は、で入手できる公式Dockerイメージを利用できます。 Docker Hub

ステップ1:深層学習VMを作成して構成する
まず、深層学習に最適化された仮想マシンを作成しましょう。
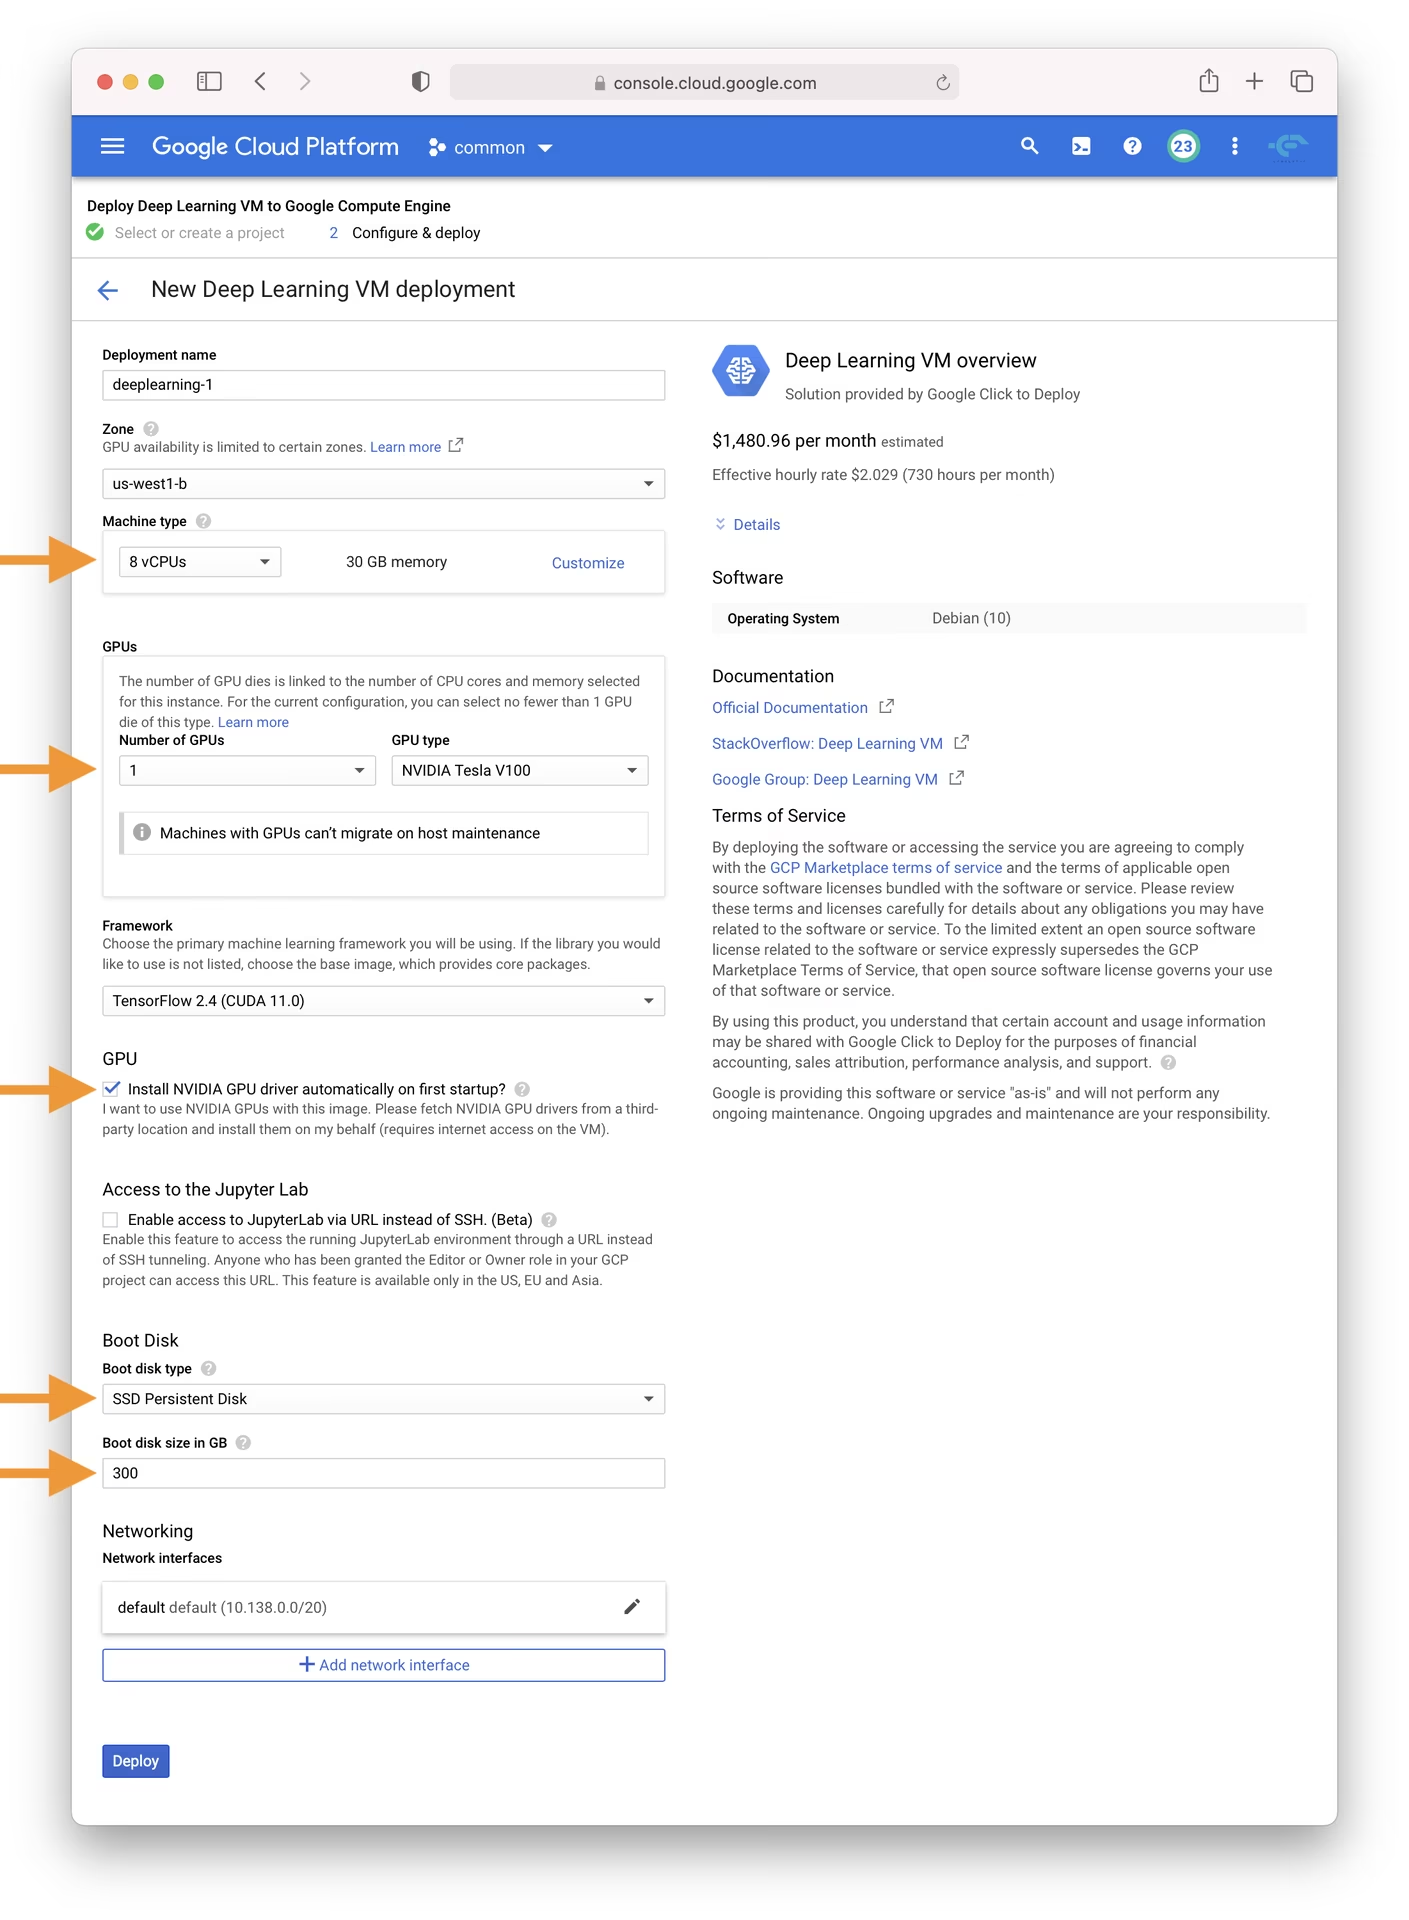
- GCP marketplaceに移動し、Deep Learning VMを選択します。
- n1-standard-8 インスタンスを選択してください。これは、多くの ML タスクに適した 8 個の vCPU と 30 GB のメモリのバランスを提供します。
- GPUを選択してください。選択するGPUは、ワークロードによって異なります。基本的なT4 GPUでも、モデルのトレーニングを大幅に高速化できます。
- シームレスなセットアップのために、[最初の起動時に NVIDIA GPU ドライバーを自動的にインストールしますか?] のチェックボックスをオンにします。
- I/Oボトルネックを防ぐために、300 GBのSSD永続ディスクを割り当てます。
- 'Deploy' をクリックして、GCP がカスタム Deep Learning VM をプロビジョニングできるようにします。
このVMには、Anaconda Pythonディストリビューションを含む、不可欠なツールとフレームワークがあらかじめロードされています。Anaconda Pythonディストリビューションには、YOLOv5に必要な多くの依存関係がまとめてバンドルされているため、非常に便利です。

ステップ2:VMをYOLOv5用に準備します
環境をセットアップしたら、YOLOv5をインストールして準備をしましょう。
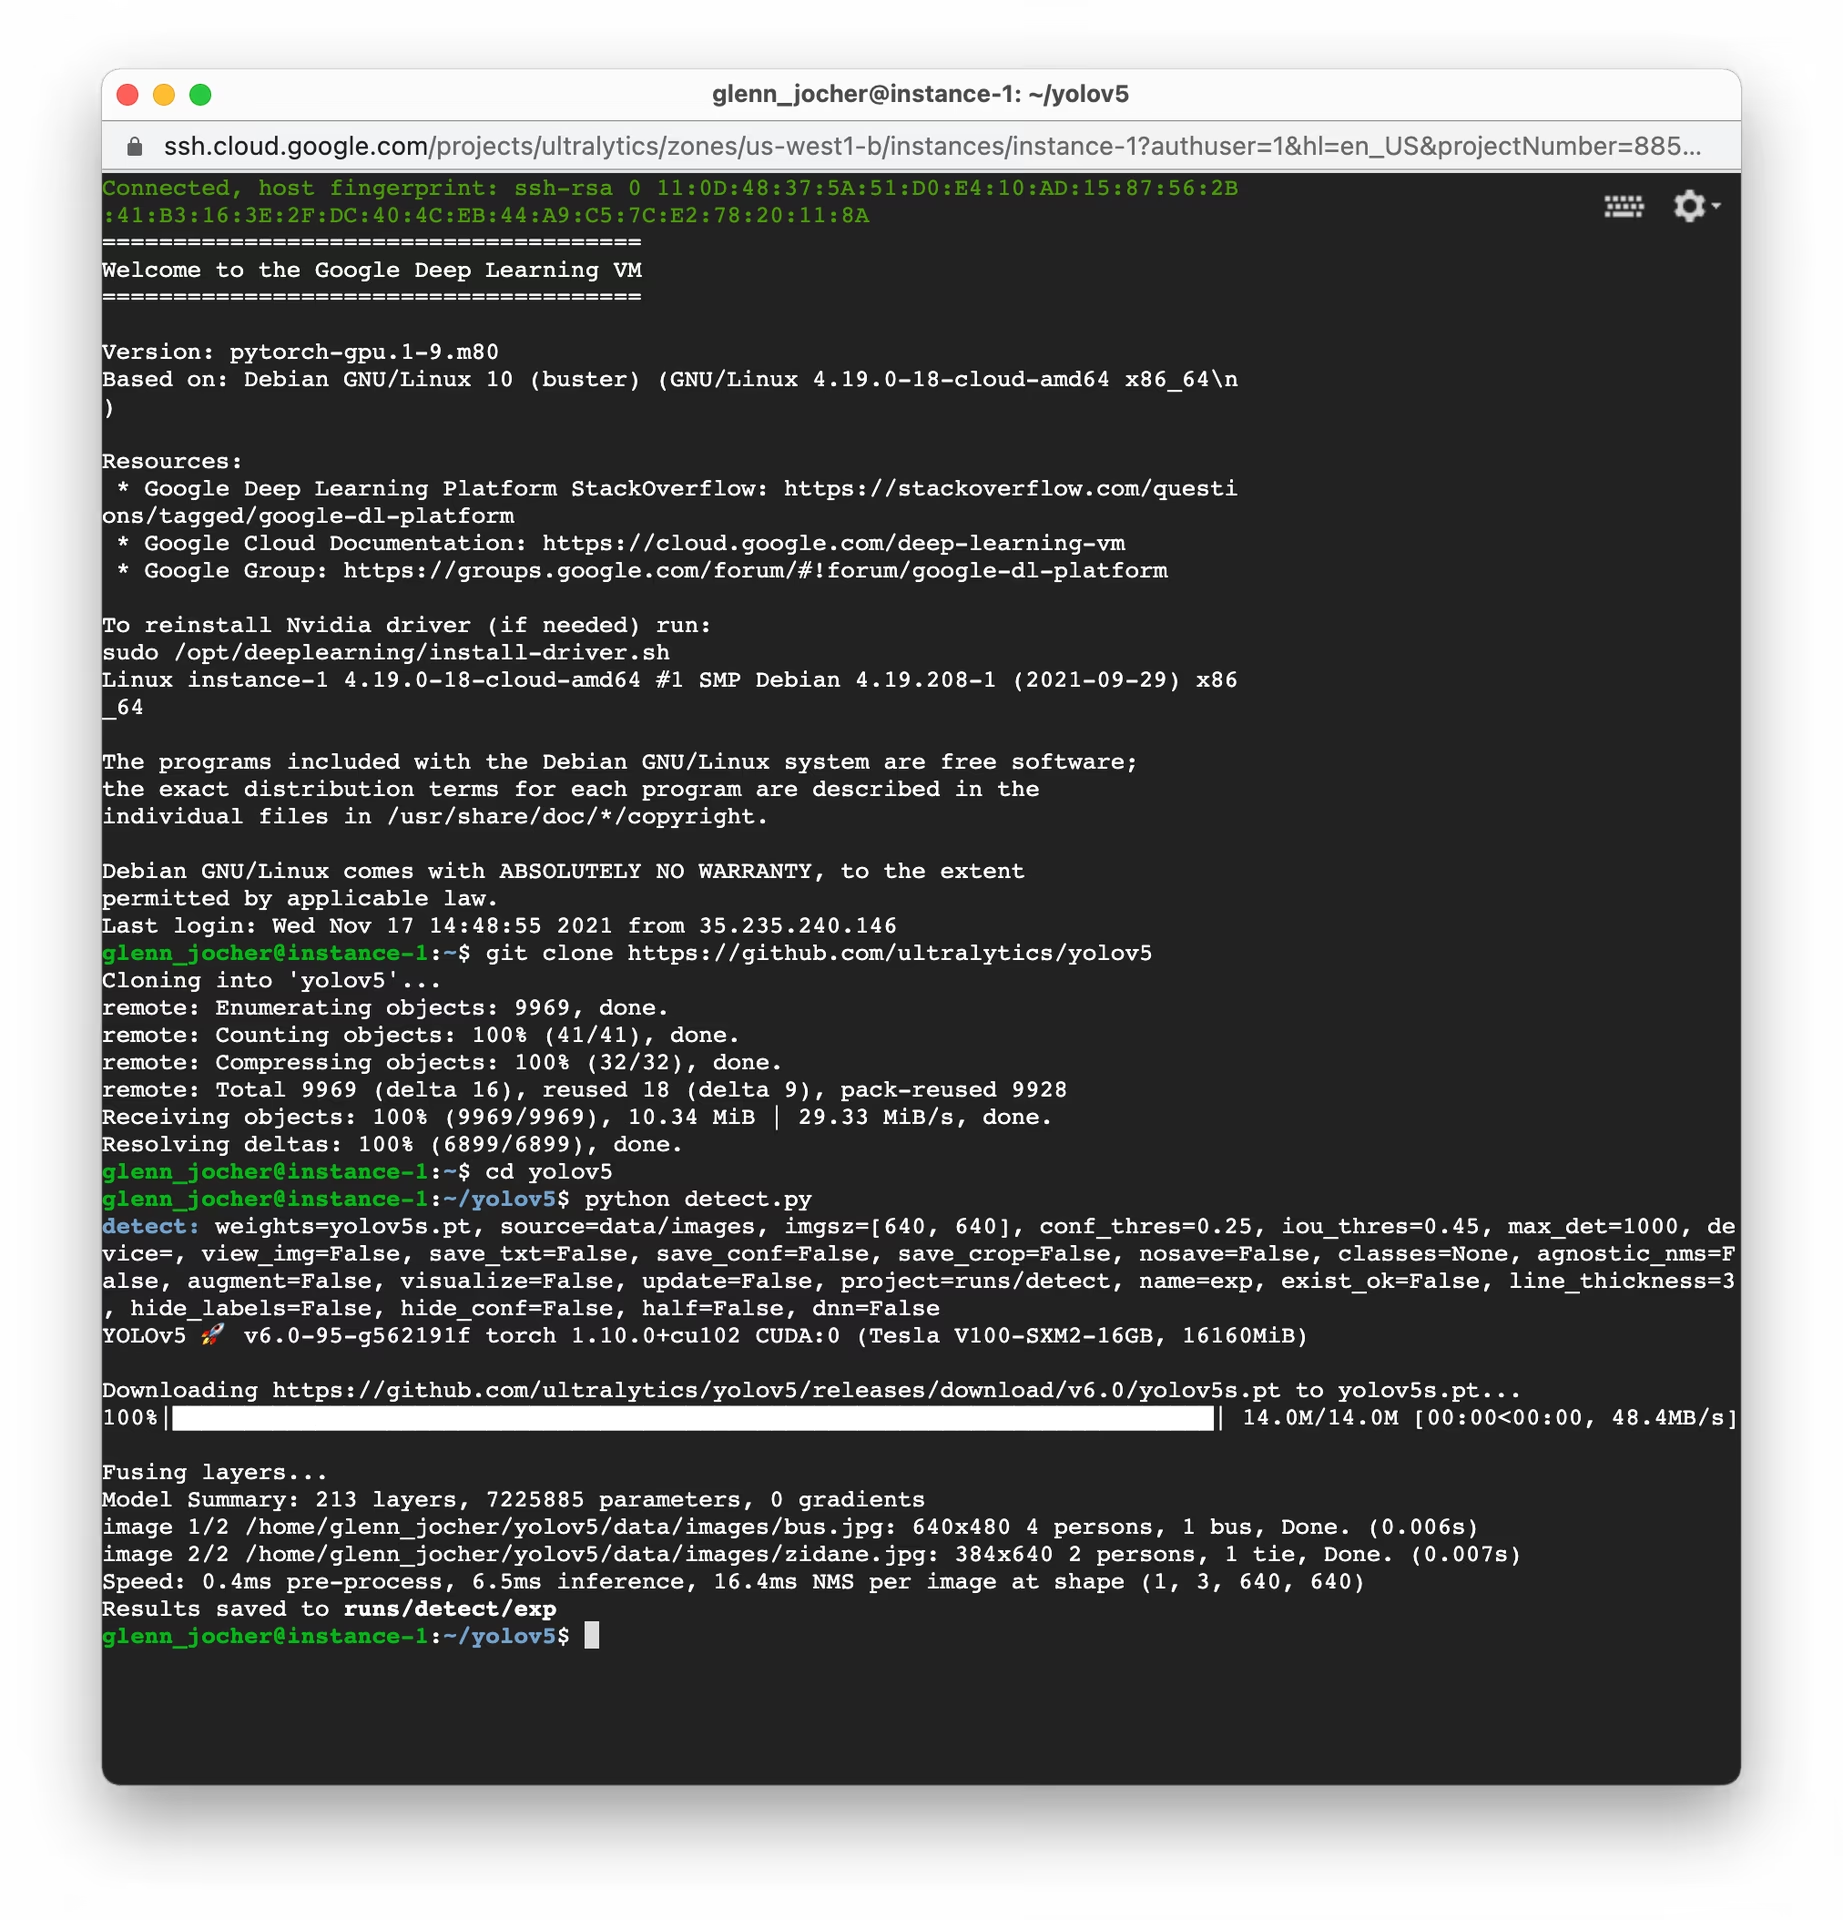
# Clone the YOLOv5 repository
git clone https://github.com/ultralytics/yolov5
cd yolov5

# Install dependencies
pip install -r requirements.txt
このセットアッププロセスでは、python環境のバージョンが3.8.0以降であり、PyTorch 1.8以降であることを確認します。Ultralyticsのスクリプトは、最新のYOLOv5リリースからモデルとデータセットを自動的にダウンロードするため、モデルのトレーニングを簡単に開始できます。
ステップ3:YOLOv5モデルを学習およびデプロイする
セットアップが完了すると、GCP VM上でYOLOv5を使用して、学習、検証、予測、およびエクスポートを行う準備が整います。
# Train a YOLOv5 model on your dataset (e.g., yolov5s)
python train.py --data coco128.yaml --weights yolov5s.pt --img 640

# Validate the trained model to check Precision, Recall, and mAP
python val.py --weights yolov5s.pt --data coco128.yaml

# Run inference using the trained model on images or videos
python detect.py --weights yolov5s.pt --source path/to/your/images_or_videos

# Export the trained model to various formats like ONNX, CoreML, TFLite for deployment
python export.py --weights yolov5s.pt --include onnx coreml tflite
いくつかのコマンドを使用するだけで、YOLOv5は特定のニーズに合わせて調整されたカスタムオブジェクトdetectモデルをトレーニングしたり、さまざまなタスクで迅速な結果を得るために事前学習済み重みを利用したりできます。エクスポート後にさまざまなモデルデプロイオプションを探索してください。

スワップ領域の割り当て(オプション)
VMのRAMを超える可能性のある特に大きなデータセットを扱っている場合は、メモリエラーを防ぐためにスワップ領域の追加を検討してください。
# Allocate a 64GB swap file
sudo fallocate -l 64G /swapfile

# Set the correct permissions for the swap file
sudo chmod 600 /swapfile

# Set up the Linux swap area
sudo mkswap /swapfile

# Enable the swap file
sudo swapon /swapfile

# Verify the swap space allocation (should show increased swap memory)
free -h
カスタムデータセットの学習
GCP内でカスタムデータセット上でYOLOv5をトレーニングするには、以下の一般的な手順に従ってください。
- YOLOv5形式(画像と対応するラベルファイル)に従ってデータセットを準備します。ガイダンスについては、データセットの概要をご覧ください。
- GCP VMにデータセットをアップロードするには、以下を使用します。
gcloud compute scpまたは、WebコンソールのSSH機能を使用します。 - データセット構成YAMLファイルを作成します(
custom_dataset.yaml)。これには、トレーニングおよび検証データへのパス、クラス数、クラス名が指定されています。 カスタムデータセットのyamlを使用し、場合によっては事前学習済み重みから開始して、トレーニングプロセスを開始します。
# Example: Train YOLOv5s on a custom dataset for 100 epochs
python train.py --img 640 --batch 16 --epochs 100 --data custom_dataset.yaml --weights yolov5s.pt
カスタムデータセットを使用したデータの準備と学習に関する包括的な手順については、Ultralytics YOLOv5 Trainのドキュメントを参照してください。
クラウドストレージの活用
効率的なデータ管理のために、特に大規模なデータセットや多数の実験を行う場合は、YOLOv5ワークフローをGoogle Cloud Storageと統合します。
# Ensure Google Cloud SDK is installed and initialized
# If not installed: curl https://sdk.cloud.google.com/ | bash
# Then initialize: gcloud init

# Example: Copy your dataset from a GCS bucket to your VM
gsutil cp -r gs://your-data-bucket/my_dataset ./datasets/

# Example: Copy trained model weights from your VM to a GCS bucket
gsutil cp -r ./runs/train/exp/weights gs://your-models-bucket/yolov5_custom_weights/
このアプローチにより、大規模なデータセットとトレーニング済みモデルをクラウドに安全かつ費用対効果の高い方法で保存し、VMインスタンスのストレージ要件を最小限に抑えることができます。
終わりに
おめでとうございます! これで、Ultralytics YOLOv5の機能と Google Cloud Platform の計算能力を活用する準備が整いました。このセットアップは、オブジェクト検出プロジェクトにスケーラビリティ、効率性、汎用性をもたらします。個人的な調査、学術研究、または産業用ソリューションの構築など、クラウド上の AI および ML の世界への重要な一歩を踏み出しました。
モデルのトレーニングと管理を合理化されたノーコード体験で行うには、Ultralytics Platformのご利用をご検討ください。
進捗状況を記録し、活気のあるUltralyticsコミュニティと洞察を共有し、コラボレーションとサポートのためにGitHub discussionsのようなリソースを活用することを忘れないでください。さあ、YOLOv5とGCPで革新を起こしましょう!
ML スキルをさらに向上させたいですか?ドキュメントを調べて、Ultralytics Blogでより多くのチュートリアルや洞察を探求してください。AIアドベンチャーを続けましょう!