Link to this sectionGoogle Cloud Platform (GCP) Deep Learning VM上でのYOLOv5デプロイメントの習得#
Embarking on the journey of artificial intelligence (AI) and machine learning (ML) can be exhilarating, especially when you leverage the power and flexibility of a cloud computing platform. Google Cloud Platform (GCP) offers robust tools tailored for ML enthusiasts and professionals alike. One such tool is the Deep Learning VM, preconfigured for data science and ML tasks. In this tutorial, we will navigate the process of setting up Ultralytics YOLOv5 on a GCP Deep Learning VM. Whether you're taking your first steps in ML or you're a seasoned practitioner, this guide provides a clear pathway to implementing object detection models powered by YOLOv5.
🆓 さらに、GCPの新規ユーザーであれば、プロジェクトを開始するための$300分の無料クレジットをご利用いただけます。
GCPに加え、ブラウザベースで体験できる Google Colab Notebook ![]() や、Amazon AWS のスケーラビリティなど、YOLOv5 の他の利用可能なクイックスタートオプションも確認してください。さらに、コンテナ愛好家の方は、Docker Hub
や、Amazon AWS のスケーラビリティなど、YOLOv5 の他の利用可能なクイックスタートオプションも確認してください。さらに、コンテナ愛好家の方は、Docker Hub 
Link to this sectionステップ1: Deep Learning VMの作成と構成#
ディープラーニング向けに最適化された仮想マシンを作成することから始めましょう:
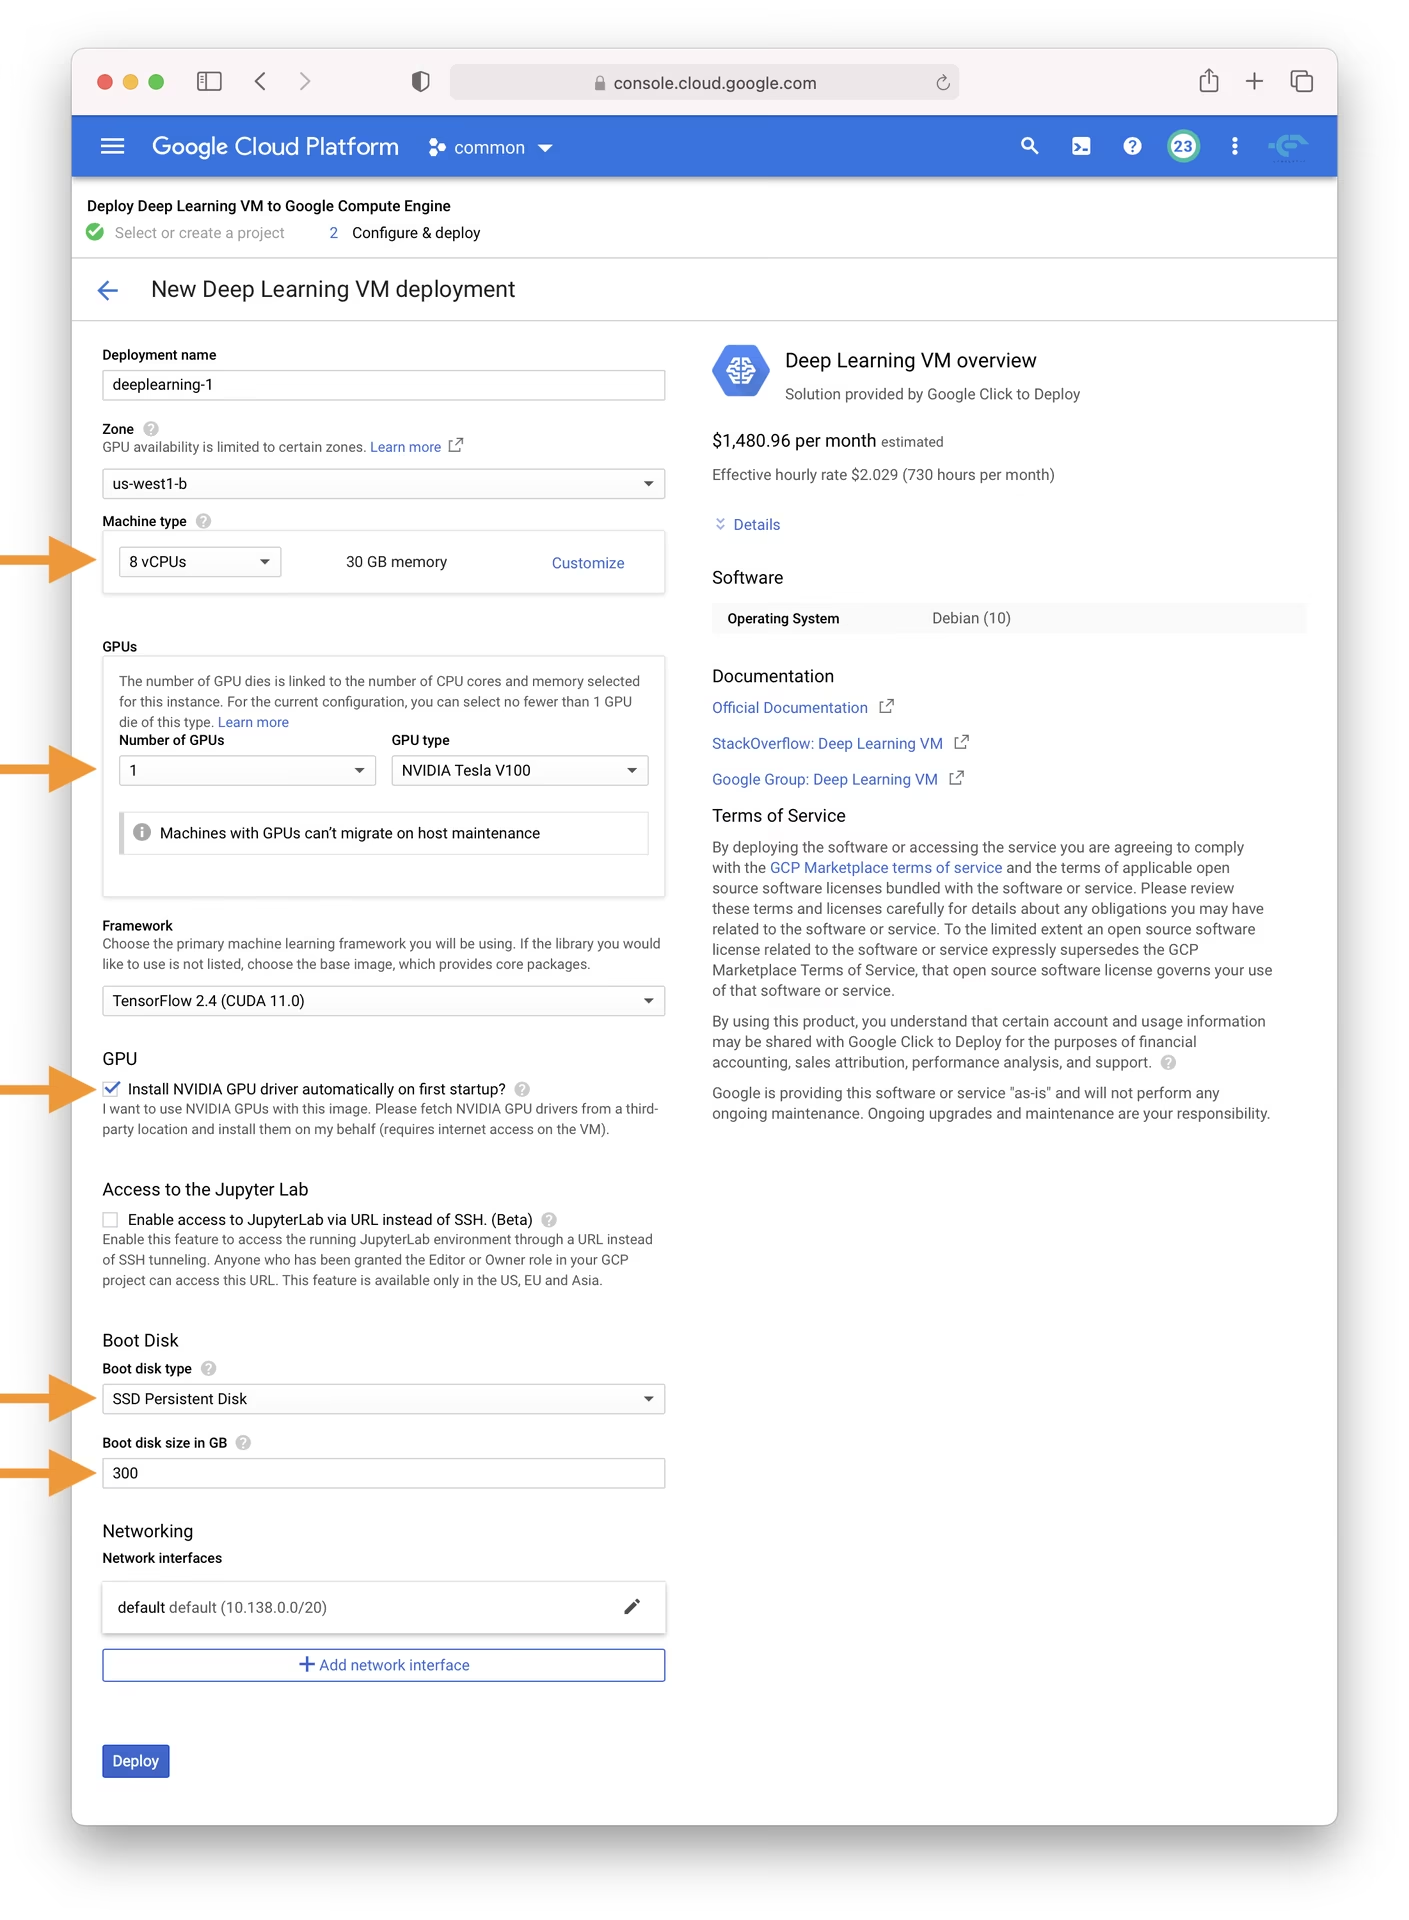
- GCPマーケットプレイスに移動し、Deep Learning VMを選択します。
- n1-standard-8インスタンスを選択してください。これは8個のvCPUと30 GBのメモリのバランスが良く、多くのMLタスクに適しています。
- GPUを選択します。選択肢はワークロードによって異なりますが、基本的なT4 GPUであってもモデルの学習を大幅に加速させることができます。
- スムーズなセットアップのために、「最初の起動時にNVIDIA GPUドライバを自動的にインストールしますか?」のボックスをチェックしてください。
- I/Oのボトルネックを防ぐために、300 GBのSSD永続ディスクを割り当てます。
- 「デプロイ」をクリックし、GCPがカスタムDeep Learning VMをプロビジョニングするのを待ちます。
このVMには、YOLOv5に必要な多くの依存関係を便利にまとめたAnaconda Pythonディストリビューションなど、重要なツールやフレームワークがプリロードされています。
Link to this sectionステップ2: YOLOv5のためのVM準備#
環境のセットアップが完了したら、YOLOv5をインストールして準備を整えましょう:
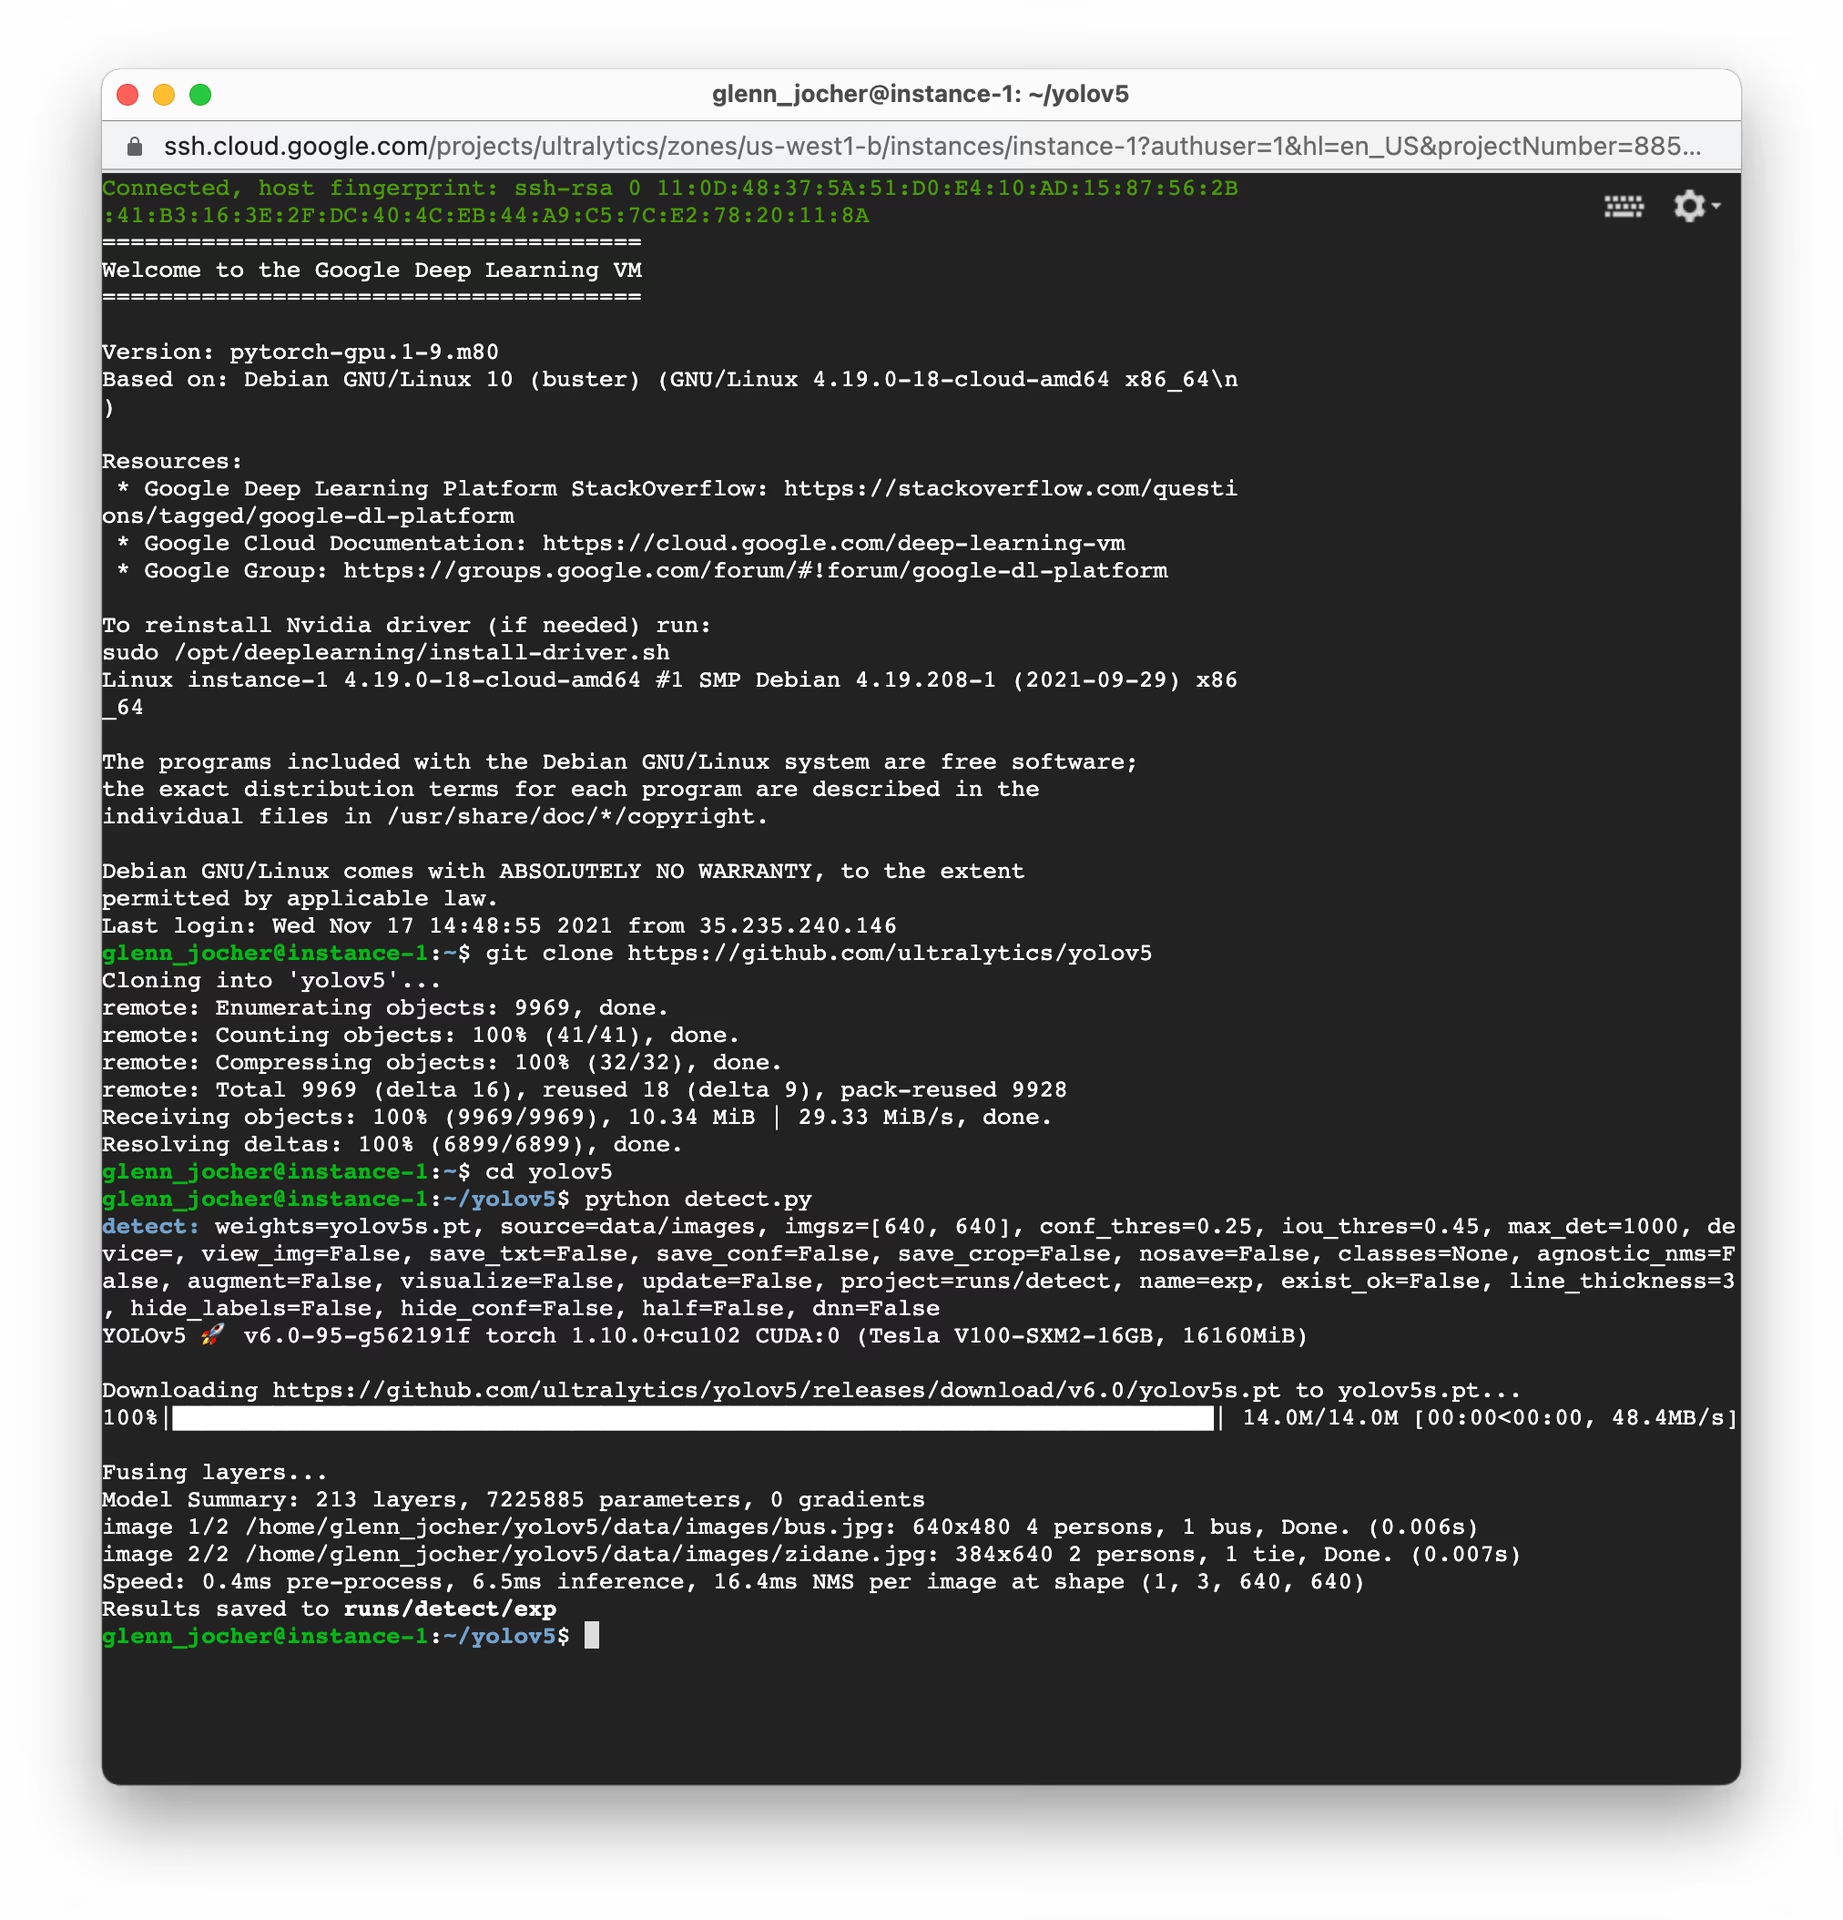
# Clone the YOLOv5 repository
git clone https://github.com/ultralytics/yolov5
cd yolov5

# Install dependencies
pip install -r requirements.txt
This setup process ensures you have a Python environment version 3.8.0 or newer and PyTorch 1.8 or later. Our scripts automatically download models and datasets from the latest YOLOv5 release, simplifying the process of starting model training.
Link to this sectionステップ3: YOLOv5モデルの学習とデプロイ#
セットアップが完了したら、GCP VM上でYOLOv5を使用して学習、検証、予測、およびエクスポートを行う準備が整いました:
# Train a YOLOv5 model on your dataset (e.g., yolov5s)
python train.py --data coco128.yaml --weights yolov5s.pt --img 640

# Validate the trained model to check Precision, Recall, and mAP
python val.py --weights yolov5s.pt --data coco128.yaml

# Run inference using the trained model on images or videos
python detect.py --weights yolov5s.pt --source path/to/your/images_or_videos

# Export the trained model to various formats like ONNX, CoreML, TFLite for deployment
python export.py --weights yolov5s.pt --include onnx coreml tflite
YOLOv5を使用すれば、わずか数コマンドで特定のニーズに合わせたカスタム 物体検出 モデルを学習させたり、事前学習済みウェイトを利用して様々なタスクで迅速に結果を得たりすることが可能です。エクスポート後は、さまざまな モデルデプロイオプション を活用してください。
Link to this sectionスワップ領域の割り当て(オプション)#
VMのRAM容量を超えるような特に大きなデータセットを扱う場合は、メモリ不足エラーを防ぐためにスワップ領域の追加を検討してください:
# Allocate a 64GB swap file
sudo fallocate -l 64G /swapfile

# Set the correct permissions for the swap file
sudo chmod 600 /swapfile

# Set up the Linux swap area
sudo mkswap /swapfile

# Enable the swap file
sudo swapon /swapfile

# Verify the swap space allocation (should show increased swap memory)
free -h
Link to this sectionカスタムデータセットの学習#
GCP内でカスタムデータセットを使用してYOLOv5を学習するには、以下の一般的な手順に従ってください:
-
YOLOv5形式(画像と対応するラベルファイル)に従ってデータセットを準備します。ガイダンスについては、データセットの概要をご覧ください。
-
gcloud compute scpまたはWebコンソールのSSH機能を使用して、データセットをGCP VMにアップロードします。 -
トレーニングデータと検証データへのパス、クラス数、クラス名を指定するデータセット構成YAMLファイル (
custom_dataset.yaml) を作成します。 -
カスタムデータセットYAMLを使用し、場合によっては事前学習済みウェイトから開始して、学習プロセスを開始します:
# Example: Train YOLOv5s on a custom dataset for 100 epochs
python train.py --img 640 --batch 16 --epochs 100 --data custom_dataset.yaml --weights yolov5s.pt
データの準備とカスタムデータセットでの学習に関する包括的な手順については、Ultralytics YOLOv5学習ドキュメントを参照してください。
Link to this sectionクラウドストレージの活用#
効率的なデータ管理、特に大規模データセットや多数の実験を行う場合は、YOLOv5ワークフローをGoogle Cloud Storageと統合してください:
# Ensure Google Cloud SDK is installed and initialized
# If not installed: curl https://sdk.cloud.google.com/ | bash
# Then initialize: gcloud init

# Example: Copy your dataset from a GCS bucket to your VM
gsutil cp -r gs://your-data-bucket/my_dataset ./datasets/

# Example: Copy trained model weights from your VM to a GCS bucket
gsutil cp -r ./runs/train/exp/weights gs://your-models-bucket/yolov5_custom_weights/
このアプローチにより、大規模なデータセットや学習済みモデルをクラウド上に安全かつコスト効率よく保存でき、VMインスタンスのストレージ要件を最小限に抑えることができます。
Link to this section結び#
おめでとうございます!これで、Google Cloud Platformの計算能力と組み合わせてUltralytics YOLOv5の機能を活用する準備が整いました。このセットアップは、物体検出プロジェクトにスケーラビリティ、効率性、そして多用途性を提供します。個人的な探求、学術研究、産業用ソリューションの構築のいずれであっても、クラウド上でのAIとMLの世界へ大きな一歩を踏み出しました。
モデルの学習と管理を行うための、ストリームライン化されたノーコード体験としてUltralyticsプラットフォームの利用も検討してください。
進捗状況を記録し、活発なUltralyticsコミュニティと洞察を共有し、コラボレーションとサポートのためにGitHubディスカッションのようなリソースを活用することを忘れないでください。それでは、YOLOv5とGCPを使って革新を進めてください!
MLスキルをさらに向上させたいですか?ドキュメントを深く掘り下げ、Ultralyticsブログでさらなるチュートリアルや洞察を探求してください。あなたのAIの冒険を続けましょう!