Link to this sectionPyTorch HubからのYOLOv5のロード#
📚 本ガイドでは、PyTorch Hub (https://pytorch.org/hub/ultralytics_yolov5) から YOLOv5 🚀 をロードする方法を説明します。
Link to this section始める前に#
Install requirements.txt in a Python>=3.8.0 environment, including PyTorch>=1.8. Models and datasets download automatically from the latest YOLOv5 release.
pip install -r https://raw.githubusercontent.com/ultralytics/yolov5/master/requirements.txtPyTorch Hub が自動的にコードを取得するため、ultralytics/yolov5 をクローンする必要はありません。
Link to this sectionPyTorch Hub で YOLOv5 をロードする#
Link to this sectionシンプルな例#
この例では、事前学習済みの YOLOv5s モデルを PyTorch Hub から model としてロードし、推論のために画像を渡します。'yolov5s' は、最も軽量かつ高速な YOLOv5 モデルです。利用可能な全モデルの詳細については、README を参照してください。
import torch

# Model
model = torch.hub.load("ultralytics/yolov5", "yolov5s")

# Image
im = "https://ultralytics.com/images/zidane.jpg"

# Inference
results = model(im)

results.pandas().xyxy[0]
#      xmin    ymin    xmax   ymax  confidence  class    name
# 0  749.50   43.50  1148.0  704.5    0.874023      0  person
# 1  433.50  433.50   517.5  714.5    0.687988     27     tie
# 2  114.75  195.75  1095.0  708.0    0.624512      0  person
# 3  986.00  304.00  1028.0  420.0    0.286865     27     tie
Link to this section詳細な例#
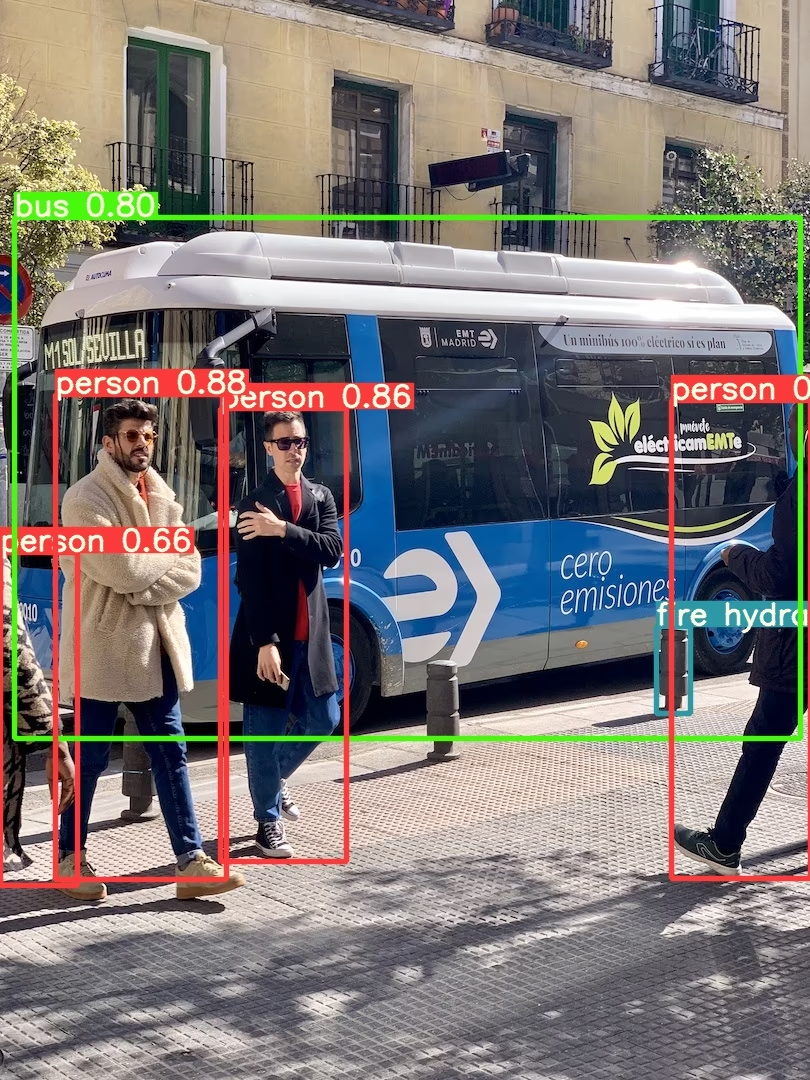
この例では、PIL および OpenCV 画像ソースを使用したバッチ推論を示します。results はコンソールへの出力、runs/hub への保存、サポートされている環境での画面への表示が可能であり、テンソルや pandas データフレームとして取得することもできます。
import cv2
import torch
from PIL import Image

# Model
model = torch.hub.load("ultralytics/yolov5", "yolov5s")

# Images
for f in "zidane.jpg", "bus.jpg":
    torch.hub.download_url_to_file("https://ultralytics.com/images/" + f, f)  # download 2 images
im1 = Image.open("zidane.jpg")  # PIL image
im2 = cv2.imread("bus.jpg")[..., ::-1]  # OpenCV image (BGR to RGB)

# Inference
results = model([im1, im2], size=640)  # batch of images

# Results
results.print()
results.save()  # or .show()

results.xyxy[0]  # im1 predictions (tensor)
results.pandas().xyxy[0]  # im1 predictions (pandas)
#      xmin    ymin    xmax   ymax  confidence  class    name
# 0  749.50   43.50  1148.0  704.5    0.874023      0  person
# 1  433.50  433.50   517.5  714.5    0.687988     27     tie
# 2  114.75  195.75  1095.0  708.0    0.624512      0  person
# 3  986.00  304.00  1028.0  420.0    0.286865     27     tie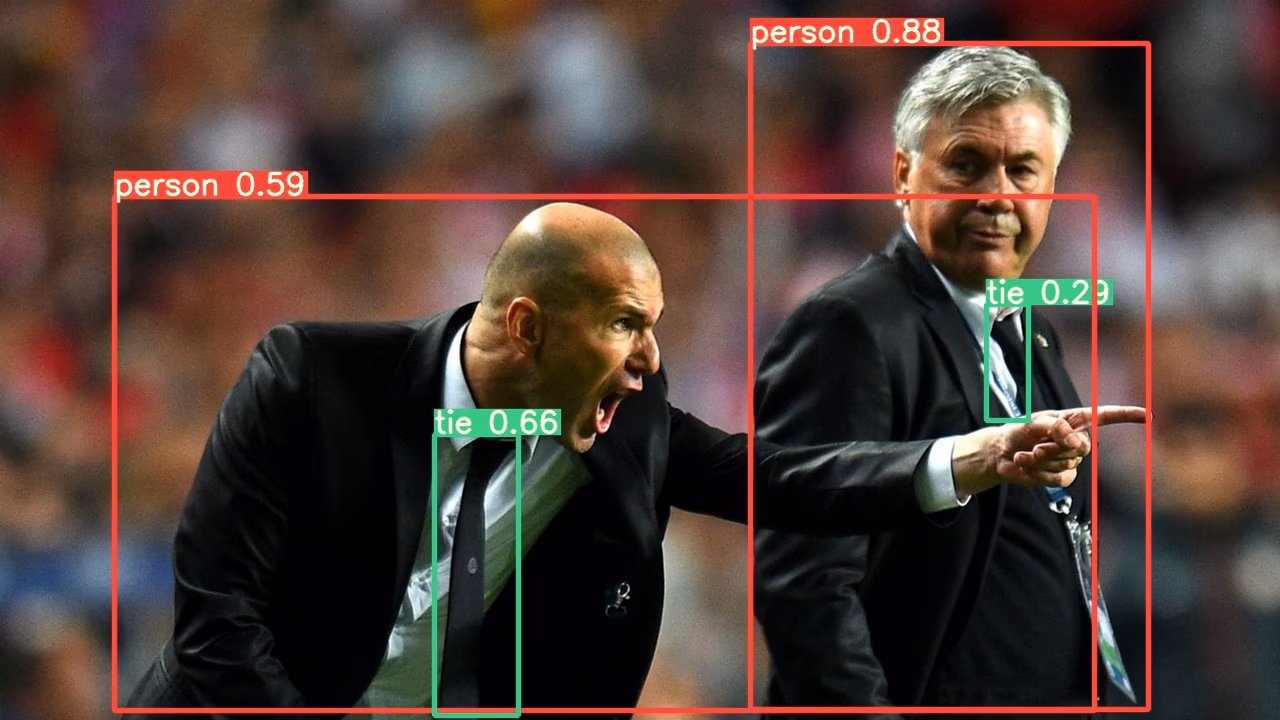
すべての推論オプションについては、YOLOv5 AutoShape() フォワードメソッドを参照してください。
Link to this section推論設定#
YOLOv5 モデルには、信頼度しきい値や IoU しきい値など、以下の方法で設定可能なさまざまな推論属性が含まれています:
model.conf = 0.25  # NMS confidence threshold
model.iou = 0.45  # NMS IoU threshold
model.agnostic = False  # NMS class-agnostic
model.multi_label = False  # NMS multiple labels per box
model.classes = None  # (optional list) filter by class, i.e. = [0, 15, 16] for COCO persons, cats and dogs
model.max_det = 1000  # maximum number of detections per image
model.amp = False  # Automatic Mixed Precision (AMP) inference

results = model(im, size=320)  # custom inference size
Link to this sectionデバイス#
モデルは作成後に任意のデバイスへ転送できます:
model.cpu()  # CPU
model.cuda()  # GPU
model.to(device)  # i.e. device=torch.device(0)
モデルは任意の device 上で直接作成することも可能です:
model = torch.hub.load("ultralytics/yolov5", "yolov5s", device="cpu") # load on CPU入力画像は推論の前に、適切なモデルデバイスへ自動的に転送されます。
Link to this section出力を抑制する#
_verbose=False を使用すると、モデルをサイレントにロードできます:
model = torch.hub.load("ultralytics/yolov5", "yolov5s", _verbose=False) # load silentlyLink to this section入力チャネル#
デフォルトの 3 チャネルではなく 4 入力チャネルを持つ事前学習済み YOLOv5s モデルをロードするには:
model = torch.hub.load("ultralytics/yolov5", "yolov5s", channels=4)この場合、最初の入力レイヤー以外は事前学習済みの重みで構成されます。最初のレイヤーは事前学習済み入力レイヤーと形状が異なるため、ランダムな重みで初期化された状態のままとなります。
Link to this sectionクラス数#
デフォルトの 80 クラスではなく 10 出力クラスを持つ事前学習済み YOLOv5s モデルをロードするには:
model = torch.hub.load("ultralytics/yolov5", "yolov5s", classes=10)この場合、出力レイヤー以外は事前学習済みの重みで構成されます。出力レイヤーは事前学習済み出力レイヤーと形状が異なるため、ランダムな重みで初期化された状態のままとなります。
Link to this section強制リロード#
上記の手順で問題が発生した場合は、force_reload=True を設定することで、既存のキャッシュを破棄し、PyTorch Hub から最新の YOLOv5 バージョンを強制的に再ダウンロードできる場合があります。キャッシュされたコピーは ~/.cache/torch/hub に保存されるため、そのフォルダを削除しても同じ効果が得られます。
model = torch.hub.load("ultralytics/yolov5", "yolov5s", force_reload=True) # force reloadLink to this sectionデスクトップ画面の推論#
デスクトップ画面上で推論を実行するには:
import torch
from PIL import ImageGrab

# Model
model = torch.hub.load("ultralytics/yolov5", "yolov5s")

# Image
im = ImageGrab.grab()  # take a screenshot

# Inference
results = model(im)
Link to this sectionマルチ GPU 推論#
YOLOv5 モデルは、スレッド推論を使用して複数の GPU に並列でロードできます:
import threading

import torch

def run(model, im):
    """Performs inference on an image using a given model and saves the output; model must support `.save()` method."""
    results = model(im)
    results.save()

# Models
model0 = torch.hub.load("ultralytics/yolov5", "yolov5s", device=0)
model1 = torch.hub.load("ultralytics/yolov5", "yolov5s", device=1)

# Inference
threading.Thread(target=run, args=[model0, "https://ultralytics.com/images/zidane.jpg"], daemon=True).start()
threading.Thread(target=run, args=[model1, "https://ultralytics.com/images/bus.jpg"], daemon=True).start()
Link to this sectionトレーニング#
推論ではなく学習のために YOLOv5 モデルをロードするには、autoshape=False を設定します。ランダムに初期化された重みでモデルをロードする(ゼロから学習する)には、pretrained=False を使用してください。この場合、独自の学習スクリプトを提供する必要があります。あるいは、モデル学習については YOLOv5 の カスタムデータ学習チュートリアル を参照してください。
import torch

model = torch.hub.load("ultralytics/yolov5", "yolov5s", autoshape=False)  # load pretrained
model = torch.hub.load("ultralytics/yolov5", "yolov5s", autoshape=False, pretrained=False)  # load scratch
Link to this sectionBase64 結果#
API サービス用です。詳細は Flask REST API の例を参照してください。
import base64
from io import BytesIO

from PIL import Image

results = model(im)  # inference

results.ims  # array of original images (as np array) passed to model for inference
results.render()  # updates results.ims with boxes and labels
for im in results.ims:
    buffered = BytesIO()
    im_base64 = Image.fromarray(im)
    im_base64.save(buffered, format="JPEG")
    print(base64.b64encode(buffered.getvalue()).decode("utf-8"))  # base64 encoded image with results
Link to this section切り抜かれた結果#
結果を取得し、検出されたクロップ画像として保存できます:
results = model(im)  # inference
crops = results.crop(save=True)  # cropped detections dictionary
Link to this sectionPandas 結果#
結果は Pandas DataFrames として取得できます:
results = model(im)  # inference
results.pandas().xyxy[0]  # Pandas DataFrame
Pandas Output (click to expand)
print(results.pandas().xyxy[0])
#      xmin    ymin    xmax   ymax  confidence  class    name
# 0  749.50   43.50  1148.0  704.5    0.874023      0  person
# 1  433.50  433.50   517.5  714.5    0.687988     27     tie
# 2  114.75  195.75  1095.0  708.0    0.624512      0  person
# 3  986.00  304.00  1028.0  420.0    0.286865     27     tie
Link to this section並べ替えられた結果#
結果は列ごとに並べ替えることができます。例えば、ナンバープレートの数字検出を左から右(x軸)に並べ替えるには:
results = model(im)  # inference
results.pandas().xyxy[0].sort_values("xmin")  # sorted left-right
Link to this sectionJSON 結果#
.pandas() データフレームに変換した後、.to_json() メソッドを使用して JSON 形式で結果を取得できます。JSON 形式は orient 引数を使用して変更可能です。詳細は pandas の .to_json() ドキュメント を参照してください。
results = model(ims)  # inference
results.pandas().xyxy[0].to_json(orient="records")  # JSON img1 predictions
JSON Output (click to expand)
[
    {
        "xmin": 749.5,
        "ymin": 43.5,
        "xmax": 1148.0,
        "ymax": 704.5,
        "confidence": 0.8740234375,
        "class": 0,
        "name": "person"
    },
    {
        "xmin": 433.5,
        "ymin": 433.5,
        "xmax": 517.5,
        "ymax": 714.5,
        "confidence": 0.6879882812,
        "class": 27,
        "name": "tie"
    },
    {
        "xmin": 115.25,
        "ymin": 195.75,
        "xmax": 1096.0,
        "ymax": 708.0,
        "confidence": 0.6254882812,
        "class": 0,
        "name": "person"
    },
    {
        "xmin": 986.0,
        "ymin": 304.0,
        "xmax": 1028.0,
        "ymax": 420.0,
        "confidence": 0.2873535156,
        "class": 27,
        "name": "tie"
    }
]
Link to this sectionカスタムモデル#
この例では、VOC で学習されたカスタム 20 クラスの YOLOv5s モデル 'best.pt' を PyTorch Hub でロードします。
import torch

model = torch.hub.load("ultralytics/yolov5", "custom", path="path/to/best.pt")  # local model
model = torch.hub.load("path/to/yolov5", "custom", path="path/to/best.pt", source="local")  # local repo
Link to this sectionTensorRT、ONNX、OpenVINO モデル#
PyTorch Hub は、カスタム学習モデルを含むほとんどの YOLOv5 エクスポート形式での推論をサポートしています。モデルのエクスポートに関する詳細は、TFLite、ONNX、CoreML、TensorRT エクスポートチュートリアル を参照してください。
- TensorRT は、GPU ベンチマークにおいて PyTorch より 2〜5 倍高速になる場合があります。
- ONNX および OpenVINO は、CPU ベンチマークにおいて PyTorch より 2〜3 倍高速になる場合があります。
import torch

model = torch.hub.load("ultralytics/yolov5", "custom", path="yolov5s.pt")  # PyTorch
model = torch.hub.load("ultralytics/yolov5", "custom", path="yolov5s.torchscript")  # TorchScript
model = torch.hub.load("ultralytics/yolov5", "custom", path="yolov5s.onnx")  # ONNX
model = torch.hub.load("ultralytics/yolov5", "custom", path="yolov5s_openvino_model/")  # OpenVINO
model = torch.hub.load("ultralytics/yolov5", "custom", path="yolov5s.engine")  # TensorRT
model = torch.hub.load("ultralytics/yolov5", "custom", path="yolov5s.mlmodel")  # CoreML (macOS-only)
model = torch.hub.load("ultralytics/yolov5", "custom", path="yolov5s.tflite")  # TFLite
model = torch.hub.load("ultralytics/yolov5", "custom", path="yolov5s_paddle_model/")  # PaddlePaddle
Link to this sectionサポートされている環境#
Ultralyticsは、プロジェクトを迅速に開始できるように、CUDA、CUDNN、Python、PyTorch などの主要な依存関係が事前にインストールされた、すぐに使える環境を多数提供しています。
- 無料GPUノートブック:


- Google Cloud: GCP クイックスタートガイド
- Amazon: AWS クイックスタートガイド
- Azure: AzureML クイックスタートガイド
- Docker: Docker クイックスタートガイド

Link to this sectionプロジェクトの状態#
![]()
このバッジは、すべての YOLOv5 GitHub Actions 継続的インテグレーション(CI)テストが正常に合格していることを示します。これらのCIテストは、YOLOv5の機能とパフォーマンスをトレーニング、バリデーション、推論、エクスポート、およびベンチマークといった様々な主要な観点から厳密にチェックします。これにより、macOS、Windows、Ubuntuで24時間ごと、および新しいコミットごとにテストが実施され、一貫した信頼性の高い動作が保証されます。