Link to this sectionGoogle Cloud Platform (GCP) Deep Learning VM에서 YOLOv5 배포 마스터하기#
Embarking on the journey of artificial intelligence (AI) and machine learning (ML) can be exhilarating, especially when you leverage the power and flexibility of a cloud computing platform. Google Cloud Platform (GCP) offers robust tools tailored for ML enthusiasts and professionals alike. One such tool is the Deep Learning VM, preconfigured for data science and ML tasks. In this tutorial, we will navigate the process of setting up Ultralytics YOLOv5 on a GCP Deep Learning VM. Whether you're taking your first steps in ML or you're a seasoned practitioner, this guide provides a clear pathway to implementing object detection models powered by YOLOv5.
🆓 또한 신규 GCP 사용자인 경우, $300 무료 크레딧 혜택을 통해 프로젝트를 시작할 수 있습니다.
GCP 외에도 브라우저 기반 경험을 위한 Google Colab Notebook ![]() 또는 Amazon AWS의 확장성과 같은 YOLOv5를 위한 다른 접근 가능한 퀵스타트 옵션을 살펴보세요. 또한 컨테이너 애호가라면 Docker Hub
또는 Amazon AWS의 확장성과 같은 YOLOv5를 위한 다른 접근 가능한 퀵스타트 옵션을 살펴보세요. 또한 컨테이너 애호가라면 Docker Hub 
Link to this section1단계: Deep Learning VM 생성 및 구성#
딥러닝에 최적화된 가상 머신을 생성하는 것부터 시작하겠습니다:
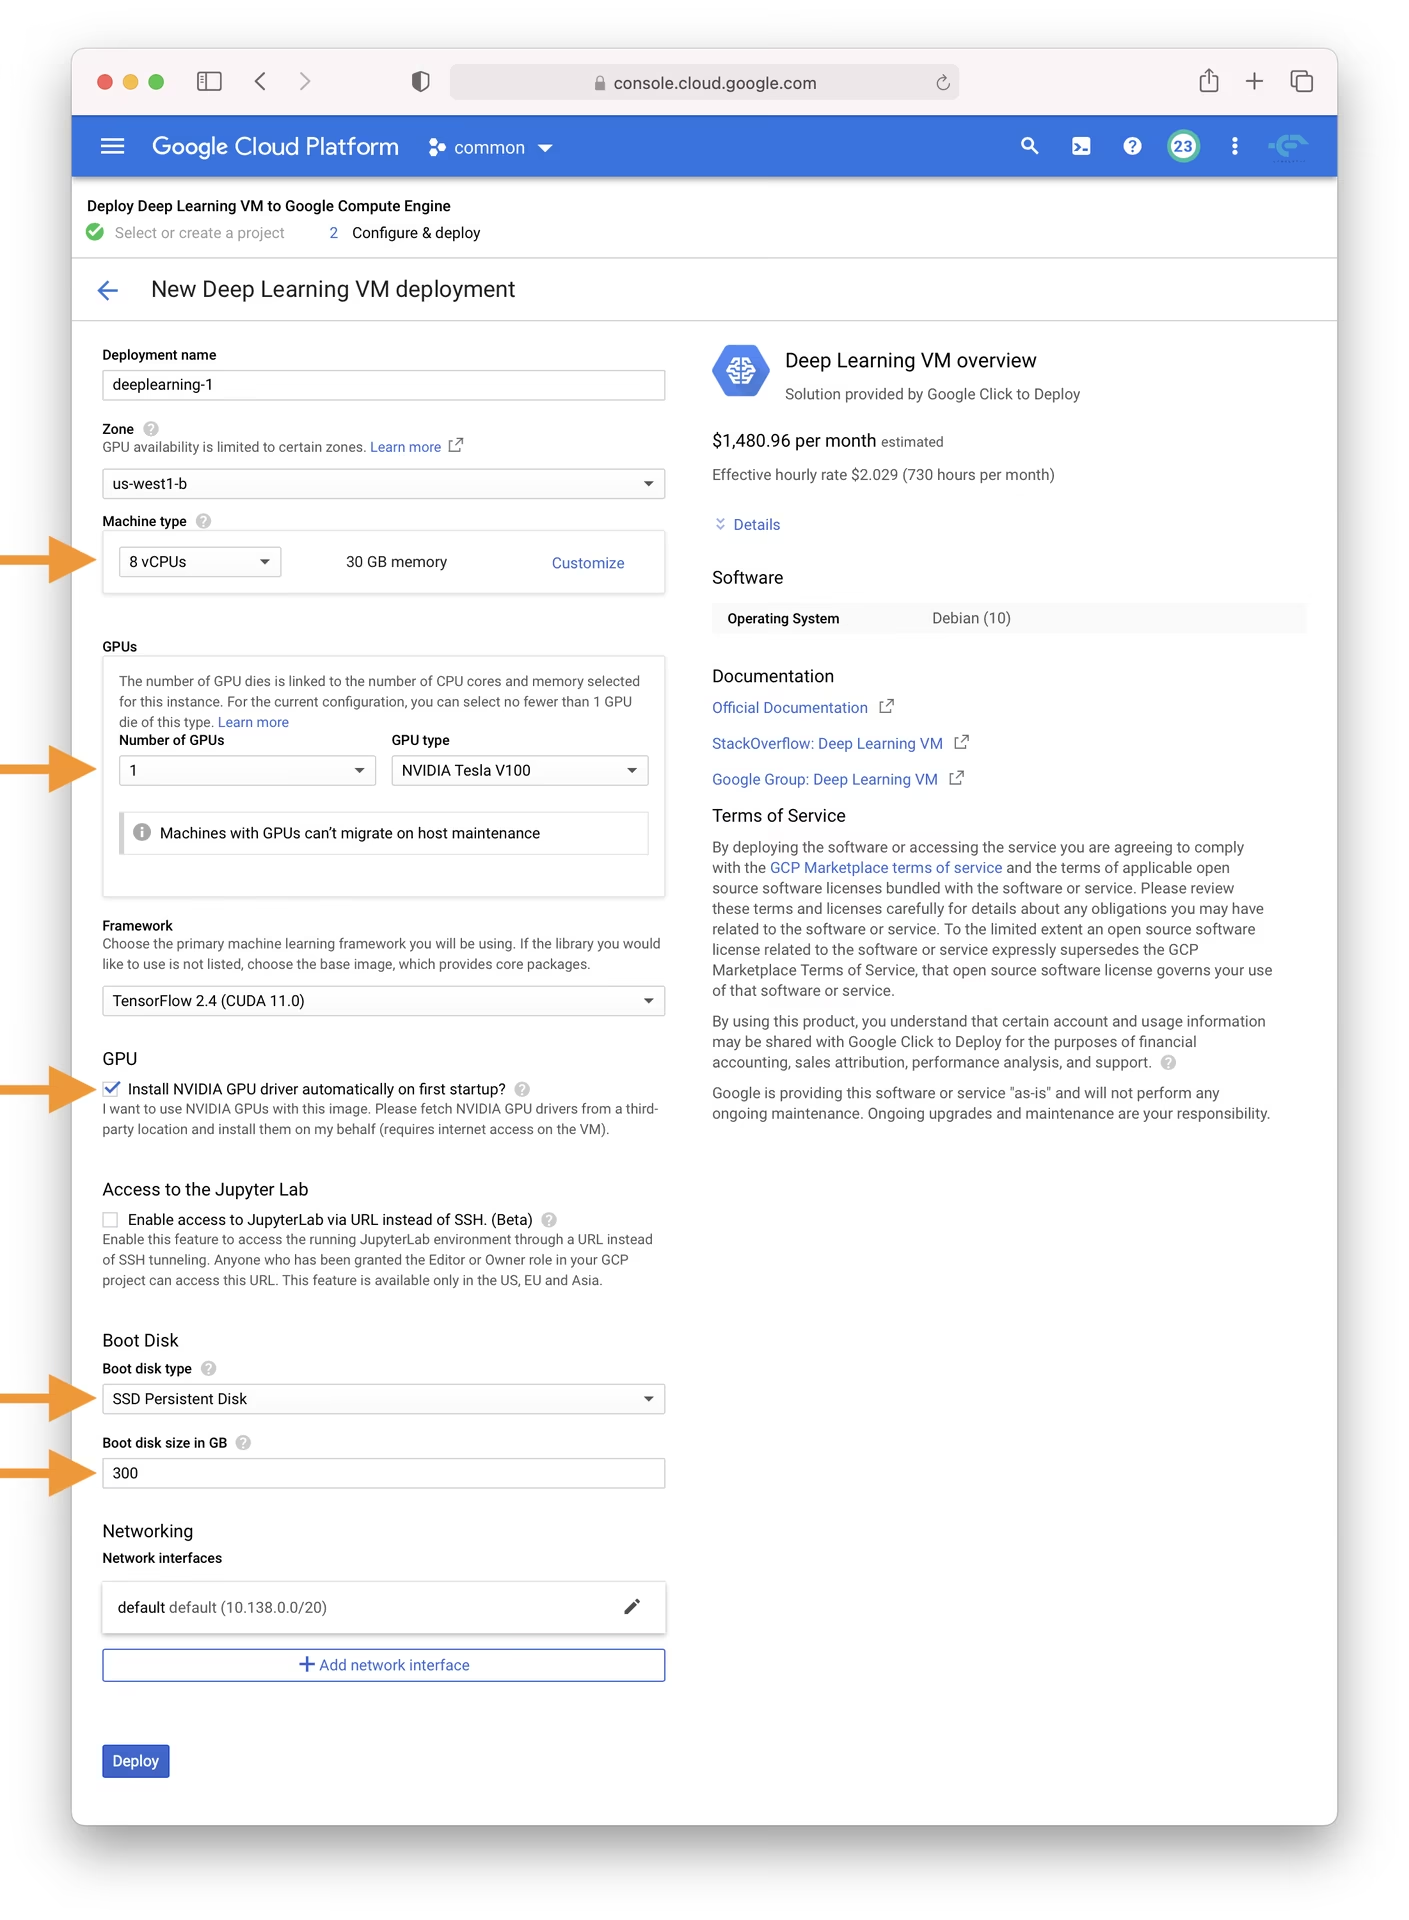
- GCP 마켓플레이스로 이동하여 Deep Learning VM을 선택합니다.
- n1-standard-8 인스턴스를 선택하십시오. 이는 8개의 vCPU와 30GB 메모리의 균형을 제공하여 많은 ML 작업에 적합합니다.
- GPU를 선택합니다. 선택은 작업 부하에 따라 다르며, 기본적인 T4 GPU라도 모델 학습 속도를 크게 향상시킬 수 있습니다.
- 원활한 설정을 위해 '첫 시작 시 NVIDIA GPU 드라이버 자동 설치' 확인란을 선택합니다.
- I/O 병목 현상을 방지하기 위해 300GB SSD 영구 디스크를 할당합니다.
- '배포'를 클릭하고 GCP가 사용자 지정 Deep Learning VM을 프로비저닝하도록 기다립니다.
이 VM에는 Anaconda Python 배포판을 포함하여 필수 도구와 프레임워크가 사전 로드되어 있으며, 이는 YOLOv5에 필요한 많은 종속성을 편리하게 번들로 제공합니다.
Link to this section2단계: YOLOv5를 위한 VM 준비#
환경 설정을 마친 후 YOLOv5를 설치하고 준비하겠습니다:
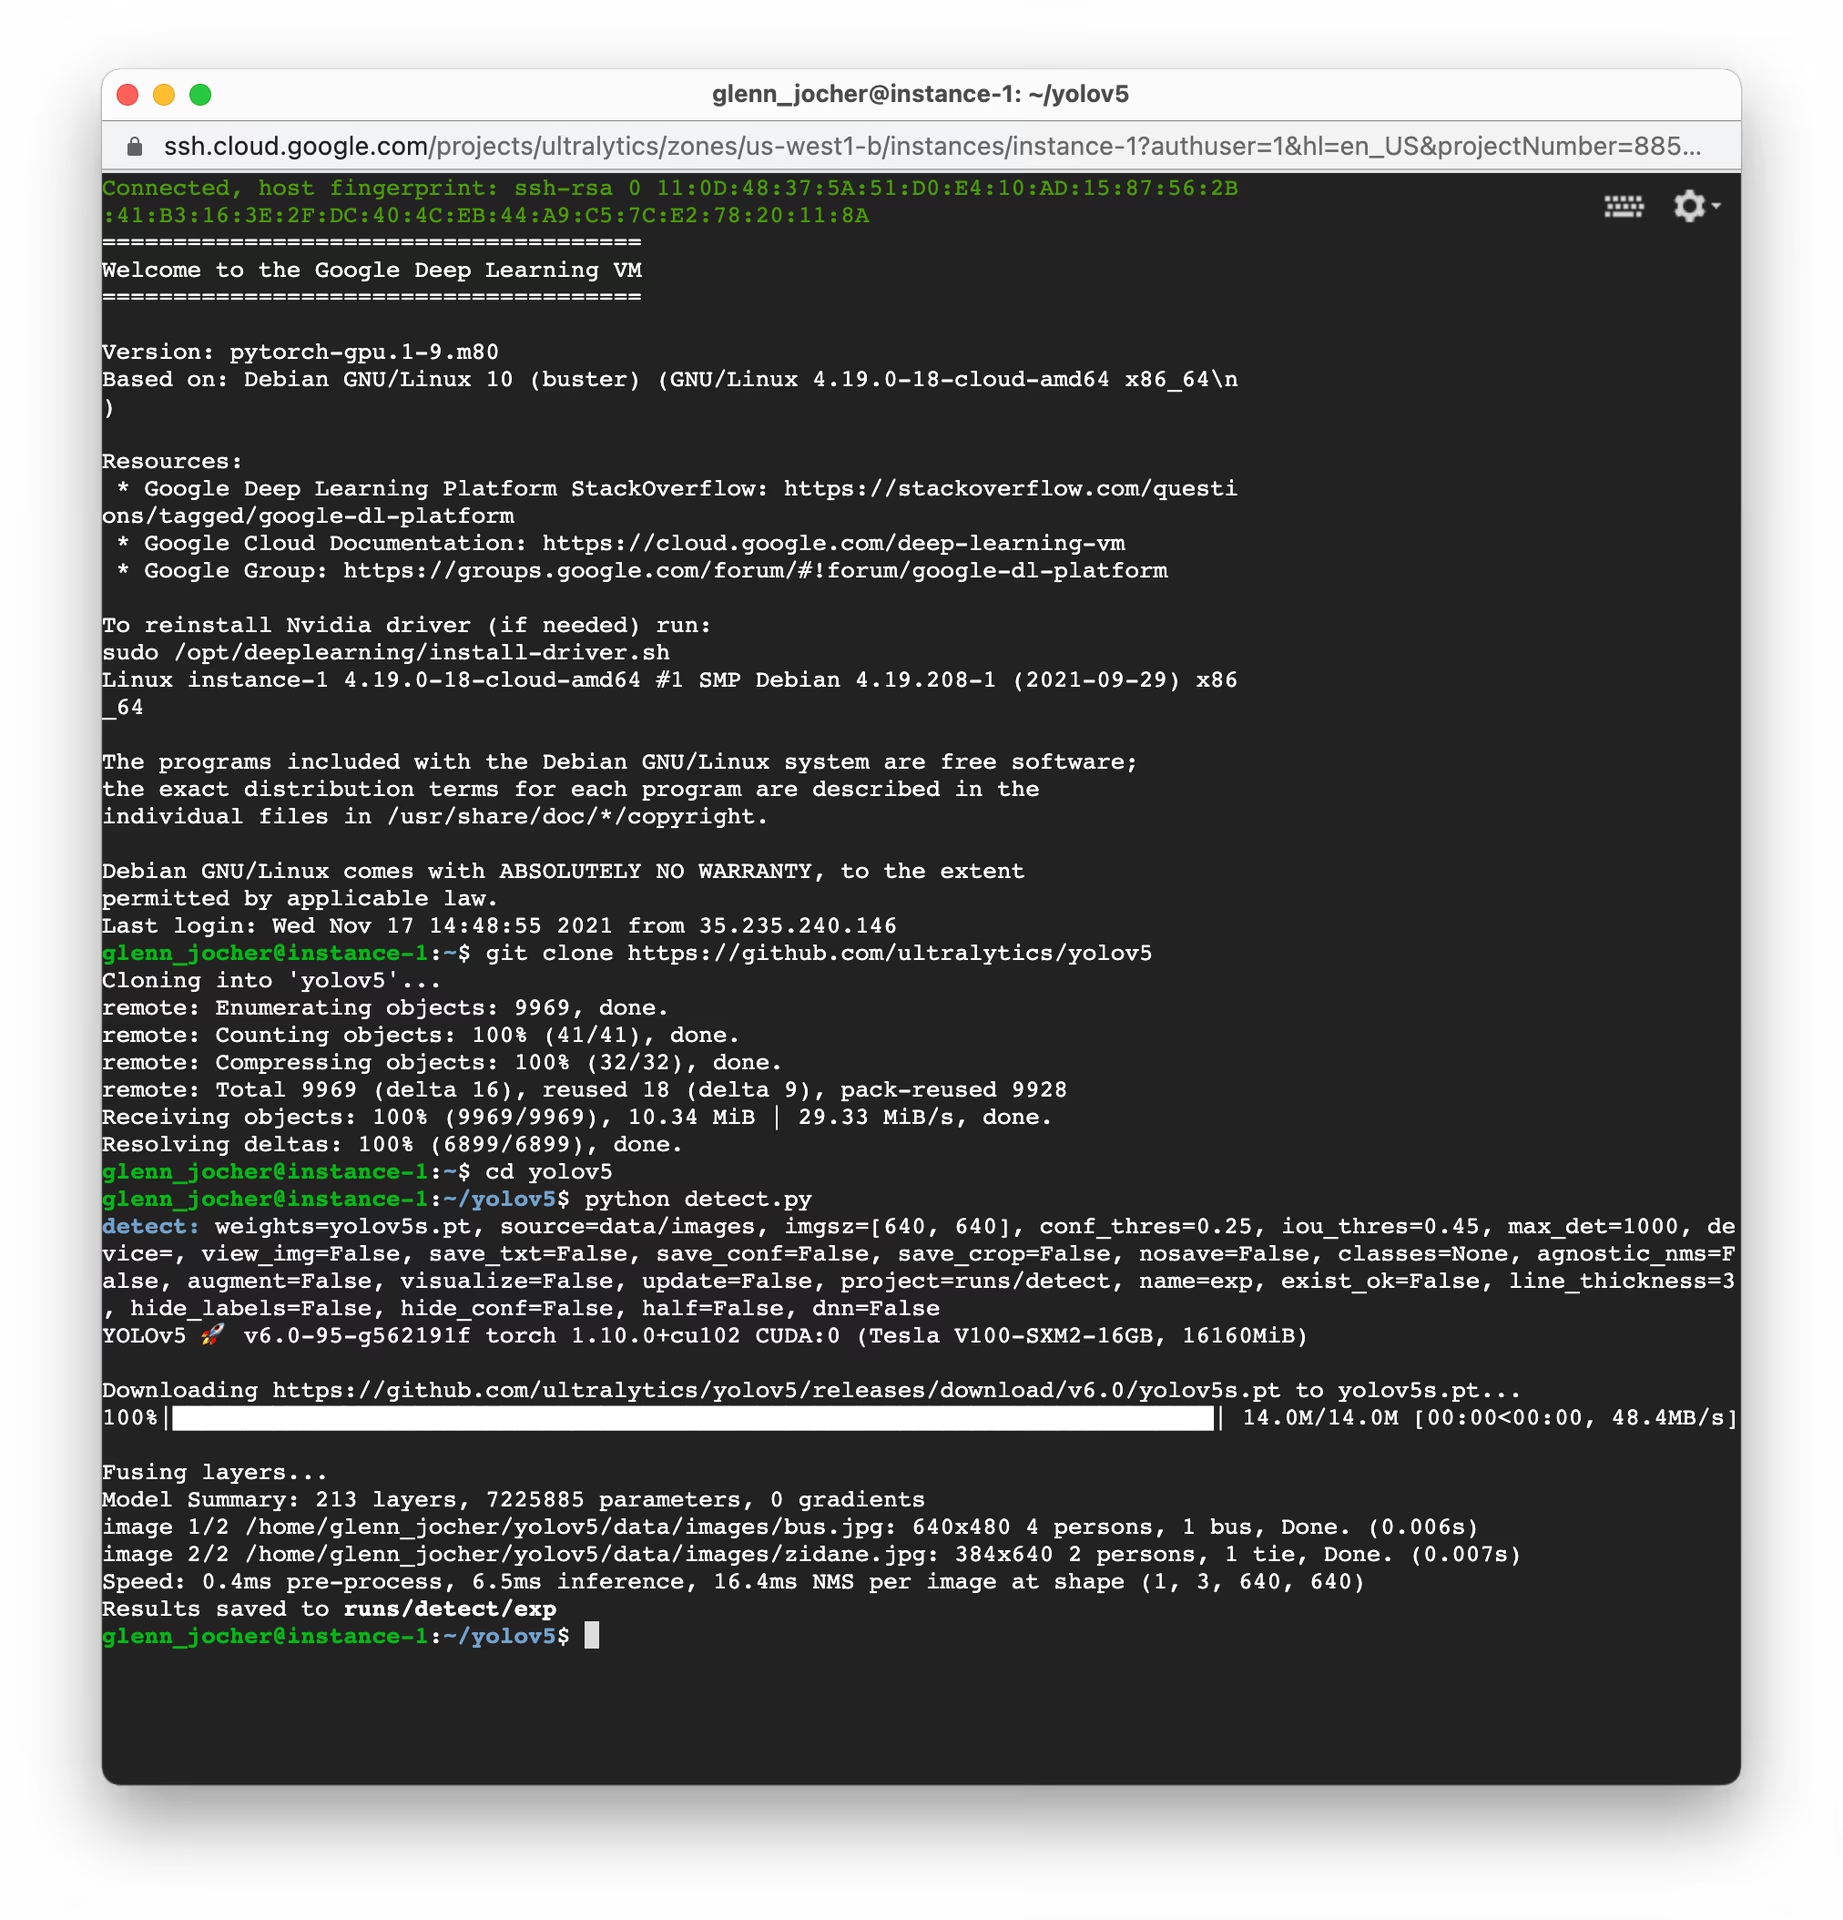
# Clone the YOLOv5 repository
git clone https://github.com/ultralytics/yolov5
cd yolov5

# Install dependencies
pip install -r requirements.txt
This setup process ensures you have a Python environment version 3.8.0 or newer and PyTorch 1.8 or later. Our scripts automatically download models and datasets from the latest YOLOv5 release, simplifying the process of starting model training.
Link to this section3단계: YOLOv5 모델 학습 및 배포#
설정이 완료되면 GCP VM에서 YOLOv5를 사용하여 학습, 검증, 예측 및 내보내기를 수행할 준비가 되었습니다:
# Train a YOLOv5 model on your dataset (e.g., yolov5s)
python train.py --data coco128.yaml --weights yolov5s.pt --img 640

# Validate the trained model to check Precision, Recall, and mAP
python val.py --weights yolov5s.pt --data coco128.yaml

# Run inference using the trained model on images or videos
python detect.py --weights yolov5s.pt --source path/to/your/images_or_videos

# Export the trained model to various formats like ONNX, CoreML, TFLite for deployment
python export.py --weights yolov5s.pt --include onnx coreml tflite
단 몇 가지 명령어만으로 YOLOv5를 사용하여 특정 요구 사항에 맞춘 사용자 지정 객체 탐지(object detection) 모델을 학습하거나, 사전 학습된 가중치를 활용하여 다양한 작업에서 신속하게 결과를 얻을 수 있습니다. 내보내기(export) 후 다양한 모델 배포 옵션을 탐색해 보시기 바랍니다.
Link to this section스왑 공간 할당(선택 사항)#
VM의 RAM을 초과할 수 있는 매우 큰 데이터셋으로 작업하는 경우, 메모리 오류를 방지하기 위해 스왑 공간을 추가하는 것을 고려하십시오:
# Allocate a 64GB swap file
sudo fallocate -l 64G /swapfile

# Set the correct permissions for the swap file
sudo chmod 600 /swapfile

# Set up the Linux swap area
sudo mkswap /swapfile

# Enable the swap file
sudo swapon /swapfile

# Verify the swap space allocation (should show increased swap memory)
free -h
Link to this section사용자 지정 데이터셋 학습#
GCP 내에서 사용자 지정 데이터셋으로 YOLOv5를 학습하려면 다음 일반 단계를 따르십시오:
-
YOLOv5 형식(이미지 및 해당 라벨 파일)에 맞춰 데이터셋을 준비하십시오. 지침은 당사의 데이터셋 개요를 참조하십시오.
-
gcloud compute scp또는 웹 콘솔의 SSH 기능을 사용하여 데이터셋을 GCP VM에 업로드합니다. -
학습 및 검증 데이터 경로, 클래스 수, 클래스 이름을 지정하는 데이터셋 구성 YAML 파일(
custom_dataset.yaml)을 생성합니다. -
사용자 지정 데이터셋 YAML을 사용하여 학습 과정을 시작하며, 잠재적으로 사전 학습된 가중치에서 시작합니다:
# Example: Train YOLOv5s on a custom dataset for 100 epochs
python train.py --img 640 --batch 16 --epochs 100 --data custom_dataset.yaml --weights yolov5s.pt
데이터 준비 및 사용자 지정 데이터셋으로 학습하는 방법에 대한 포괄적인 지침은 Ultralytics YOLOv5 학습 문서를 참조하십시오.
Link to this section클라우드 스토리지 활용#
특히 대규모 데이터셋이나 수많은 실험 시 효율적인 데이터 관리를 위해 YOLOv5 워크플로를 Google Cloud Storage와 통합하십시오:
# Ensure Google Cloud SDK is installed and initialized
# If not installed: curl https://sdk.cloud.google.com/ | bash
# Then initialize: gcloud init

# Example: Copy your dataset from a GCS bucket to your VM
gsutil cp -r gs://your-data-bucket/my_dataset ./datasets/

# Example: Copy trained model weights from your VM to a GCS bucket
gsutil cp -r ./runs/train/exp/weights gs://your-models-bucket/yolov5_custom_weights/
이 접근 방식을 사용하면 대규모 데이터셋과 학습된 모델을 클라우드에 안전하고 비용 효율적으로 저장할 수 있어 VM 인스턴스의 스토리지 요구 사항을 최소화할 수 있습니다.
Link to this section결론#
축하합니다! 이제 Google Cloud Platform의 컴퓨팅 성능과 결합된 Ultralytics YOLOv5의 기능을 활용할 준비가 되었습니다. 이 설정은 객체 탐지 프로젝트를 위한 확장성, 효율성 및 다양성을 제공합니다. 개인적인 탐구, 학술 연구, 또는 산업용 솔루션 구축 중 무엇을 하시든, 여러분은 클라우드에서 AI와 ML의 세계로 중요한 발걸음을 내디뎠습니다.
모델을 학습하고 관리하기 위한 간편한 노코드 경험을 위해 Ultralytics 플랫폼 사용을 고려해 보십시오.
진행 상황을 기록하고, 활기찬 Ultralytics 커뮤니티와 통찰을 공유하며, 협업 및 지원을 위해 GitHub 토론과 같은 리소스를 활용하는 것을 잊지 마십시오. 이제 YOLOv5와 GCP로 혁신을 시작하십시오!
ML 기술을 계속 향상시키고 싶으신가요? 문서를 확인하고 더 많은 튜토리얼과 통찰을 보려면 Ultralytics 블로그를 살펴보십시오. AI 모험을 계속하세요!