在 Amazon SageMaker Endpoints 上部署 YOLO26 指南
在 Amazon SageMaker Endpoints 上部署像 Ultralytics 的 YOLO26 这样先进的计算机视觉模型,为各种机器学习应用开辟了广阔的可能性。有效使用这些模型的关键在于理解它们的设置、配置和部署流程。当 YOLO26 与 AWS 提供的一个强大且可扩展的机器学习服务 Amazon SageMaker 无缝集成时,其功能将变得更加强大。
本指南将逐步引导您完成在 Amazon SageMaker Endpoints 上部署 YOLO26 PyTorch 模型的过程。您将学习准备 AWS 环境、正确配置模型以及使用 AWS CloudFormation 和 AWS Cloud Development Kit (CDK) 等工具进行部署的基本知识。
Amazon SageMaker

Amazon SageMaker 是 Amazon Web Services (AWS) 提供的一项机器学习服务,旨在简化构建、训练和部署机器学习模型的过程。它提供了一系列广泛的工具,用于处理机器学习工作流程的各个方面。这包括用于调整模型的自动化功能、用于大规模训练模型的选项,以及将模型直接部署到生产环境中的简便方法。SageMaker 支持流行的机器学习框架,为各种项目提供所需的灵活性。其功能还涵盖数据标记、工作流程管理和性能分析。
在 Amazon SageMaker Endpoints 上部署 YOLO26
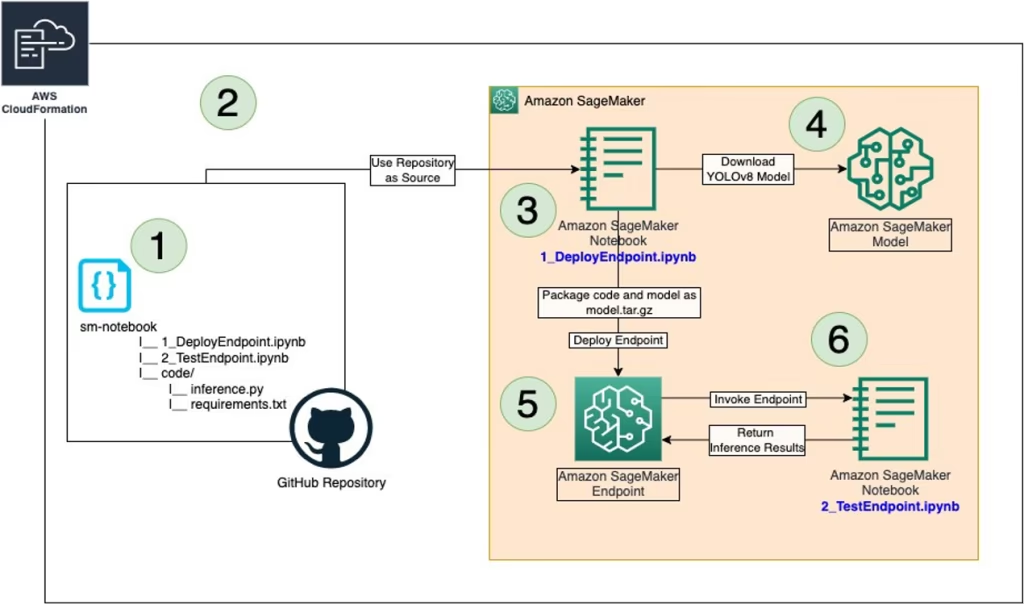
在 Amazon SageMaker 上部署 YOLO26,您可以利用其托管环境进行实时推理,并享受自动扩缩等功能。请查看下面的 AWS 架构。

步骤 1:设置您的 AWS 环境
首先,请确保您已准备好以下先决条件:
一个 AWS 账户:如果您还没有,请注册一个 AWS 账户。
已配置的 IAM 角色:您需要一个具有 Amazon SageMaker、AWS CloudFormation 和 Amazon S3 所需权限的 IAM 角色。该角色应具有允许其访问这些服务的策略。
AWS CLI:如果尚未安装,请下载并安装 AWS 命令行界面 (CLI),并使用您的帐户详细信息对其进行配置。按照 AWS CLI 说明 进行安装。
AWS CDK:如果尚未安装,请安装 AWS Cloud Development Kit (CDK),它将用于编写部署脚本。按照 AWS CDK 说明 进行安装。
充足的服务配额:确认您在 Amazon SageMaker 中为两个单独的资源拥有足够的配额:一个用于
ml.m5.4xlarge一个用于端点使用,另一个用于ml.m5.4xlarge用于 notebook 实例的使用。这些都需要至少一个配额值。如果当前配额低于此要求,那么增加每个配额非常重要。您可以通过按照以下详细说明请求增加配额 AWS 服务配额文档.
步骤 2:克隆 YOLO26 SageMaker 存储库
下一步是克隆包含在 SageMaker 上部署 YOLO26 所需资源的特定 AWS 存储库。该存储库托管在 GitHub 上,包含必要的 CDK 脚本和配置文件。
克隆 GitHub 仓库:在您的终端中执行以下命令,以克隆 host-yolov8-on-sagemaker-endpoint 仓库:
git clone https://github.com/aws-samples/host-yolov8-on-sagemaker-endpoint.git导航到克隆的目录:将您的目录更改为克隆的存储库:
cd host-yolov8-on-sagemaker-endpoint/yolov8-pytorch-cdk
第三步:设置CDK环境
现在您有了必要的代码,请设置您的环境以使用 AWS CDK 进行部署。
创建 Python 虚拟环境:这会隔离您的 python 环境和依赖项。运行:
python3 -m venv .venv激活虚拟环境:
source .venv/bin/activate安装依赖项:安装项目所需的 python 依赖项:
pip3 install -r requirements.txt升级 AWS CDK 库:确保您拥有最新版本的 AWS CDK 库:
pip install --upgrade aws-cdk-lib
第四步:创建AWS CloudFormation堆栈
合成 CDK 应用程序:从您的 CDK 代码生成 AWS CloudFormation 模板:
cdk synth引导 CDK 应用程序:为 CDK 部署准备您的 AWS 环境:
cdk bootstrap部署堆栈:这将创建必要的 AWS 资源并部署您的模型:
cdk deploy
第五步:部署YOLO模型
在深入了解部署说明之前,请务必查看 Ultralytics 提供的 YOLO26 模型系列。这将帮助您根据项目需求选择最合适的模型。
创建 AWS CloudFormation 堆栈后,下一步是部署 YOLO26。
打开 Notebook 实例:转到 AWS 控制台并导航到 Amazon SageMaker 服务。从控制面板中选择“Notebook 实例”,然后找到由您的 CDK 部署脚本创建的 notebook 实例。打开 notebook 实例以访问 Jupyter 环境。
访问和修改 inference.py:在 Jupyter 中打开 SageMaker 笔记本实例后,找到 inference.py 文件。 如下所示编辑 inference.py 中的 output_fn 函数,然后保存对脚本的更改,确保没有语法错误。
import json


def output_fn(prediction_output):
    """Formats model outputs as JSON string, extracting attributes like boxes, masks, keypoints."""
    print("Executing output_fn from inference.py ...")
    infer = {}
    for result in prediction_output:
        if result.boxes is not None:
            infer["boxes"] = result.boxes.numpy().data.tolist()
        if result.masks is not None:
            infer["masks"] = result.masks.numpy().data.tolist()
        if result.keypoints is not None:
            infer["keypoints"] = result.keypoints.numpy().data.tolist()
        if result.obb is not None:
            infer["obb"] = result.obb.numpy().data.tolist()
        if result.probs is not None:
            infer["probs"] = result.probs.numpy().data.tolist()
    return json.dumps(infer)
使用 1_DeployEndpoint.ipynb 部署端点:在 Jupyter 环境中,打开位于 sm-notebook 目录中的 1_DeployEndpoint.ipynb 笔记本。按照笔记本中的说明运行单元格,以下载 YOLO26 模型,将其与更新的推理代码打包,并上传到 Amazon S3 存储桶。该笔记本将指导您为 YOLO26 模型创建和部署 SageMaker 端点。
第六步:测试您的部署
既然您的 YOLO26 模型已部署,测试其性能和功能就显得尤为重要。
打开测试 Notebook:在同一个 Jupyter 环境中,找到并打开 2_TestEndpoint.ipynb notebook,它也在 sm-notebook 目录中。
运行测试 Notebook:按照 Notebook 中的说明测试已部署的 SageMaker 端点。 这包括向端点发送图像并运行推理。 然后,您将绘制输出以可视化模型的性能和准确性,如下所示。

- 清理资源:测试 notebook 也会指导您完成清理端点和托管模型的过程。这是管理成本和资源的重要步骤,特别是如果您不打算立即使用已部署的模型。
第七步:监控和管理
测试后,对已部署的模型进行持续监控和管理至关重要。
使用 Amazon CloudWatch 进行监控:定期使用 Amazon CloudWatch 检查 SageMaker 端点的性能和健康状况。
管理端点:使用 SageMaker 控制台持续管理端点。这包括根据需要扩展、更新或重新部署模型。
完成这些步骤后,您将成功在 Amazon SageMaker 端点上部署并测试了 YOLO26 模型。此过程不仅让您获得了使用 AWS 服务进行机器学习部署的实践经验,还为将来部署其他高级模型奠定了基础。
总结
本指南逐步介绍了如何使用 AWS CloudFormation 和 AWS 云开发工具包 (CDK) 在 Amazon SageMaker 端点上部署 YOLO26。该过程包括克隆必要的 GitHub 存储库、设置 CDK 环境、使用 AWS 服务部署模型以及在 SageMaker 上测试其性能。
有关更多技术细节,请参阅 AWS 机器学习博客上的这篇文章。您还可以查看Amazon SageMaker 文档,以获取有关各种特性和功能的更多见解。
您是否有兴趣了解更多关于不同 YOLO26 集成的信息?请访问 Ultralytics 集成指南页面,以发现更多可增强您的机器学习项目的工具和功能。
常见问题
如何在 Amazon SageMaker Endpoints 上部署 Ultralytics YOLO26 模型?
要在 Amazon SageMaker 端点上部署 Ultralytics YOLO26 模型,请按照以下步骤操作:
- 设置您的 AWS 环境: 确保您拥有 AWS 账户、具有必要权限的 IAM 角色以及配置好的 AWS CLI。如果尚未安装 AWS CDK,请安装(请参阅 AWS CDK 说明)。
- 克隆 YOLO26 SageMaker 存储库:
git clone https://github.com/aws-samples/host-yolov8-on-sagemaker-endpoint.git cd host-yolov8-on-sagemaker-endpoint/yolov8-pytorch-cdk - 设置 CDK 环境:创建一个 python 虚拟环境,激活它,安装依赖项,并升级 AWS CDK 库。
python3 -m venv .venv source .venv/bin/activate pip3 install -r requirements.txt pip install --upgrade aws-cdk-lib - 使用 AWS CDK 部署:合成并部署 CloudFormation 堆栈,引导环境。
cdk synth
cdk bootstrap
cdk deploy
更多详情,请查看文档部分。
在 Amazon SageMaker 上部署 YOLO26 的先决条件是什么?
要在 Amazon SageMaker 上部署 YOLO26,请确保您具备以下先决条件:
- AWS 账户: 有效的 AWS 账户(在此注册)。
- IAM 角色:配置了具有 SageMaker、CloudFormation 和 Amazon S3 权限的 IAM 角色。
- AWS CLI: 已安装并配置 AWS 命令行界面(AWS CLI 安装指南)。
- AWS CDK: 已安装 AWS Cloud Development Kit(CDK 设置指南)。
- 服务配额:足够的配额用于
ml.m5.4xlarge用于端点和 notebook 使用的实例(请求增加配额)。
有关详细设置,请参阅此部分。
为什么我应该在 Amazon SageMaker 上使用 Ultralytics YOLO26?
在 Amazon SageMaker 上使用 Ultralytics YOLO26 具有以下优势:
- 可扩展性和管理:SageMaker 提供了一个具有自动缩放等功能的托管环境,这有助于满足实时推理需求。
- 与 AWS 服务集成:与其他 AWS 服务(如用于数据存储的 S3、用于基础设施即代码的 CloudFormation 和用于监控的 CloudWatch)无缝集成。
- 易于部署:使用 AWS CDK 脚本简化设置并简化部署流程。
- 性能:利用 Amazon SageMaker 的高性能基础设施,高效地运行大规模推理任务。
在介绍部分中,了解更多关于使用 SageMaker 的优势。
我可以在 Amazon SageMaker 上自定义 YOLO26 的推理逻辑吗?
是的,您可以在 Amazon SageMaker 上自定义 YOLO26 的推理逻辑:
修改
inference.py:找到并自定义output_fnfunction 在inference.py文件,用于定制输出格式。import json def output_fn(prediction_output): """Formats model outputs as JSON string, extracting attributes like boxes, masks, keypoints.""" infer = {} for result in prediction_output: if result.boxes is not None: infer["boxes"] = result.boxes.numpy().data.tolist() # Add more processing logic if necessary return json.dumps(infer)部署更新后的模型:确保使用提供的 Jupyter Notebook 重新部署模型(
1_DeployEndpoint.ipynb) 以包含这些更改。
有关部署修改后模型的详细步骤,请参阅此处。
如何在 Amazon SageMaker 上测试已部署的 YOLO26 模型?
要在 Amazon SageMaker 上测试已部署的 YOLO26 模型,请执行以下操作:
- 打开测试 Notebook:找到
2_TestEndpoint.ipynbSageMaker Jupyter 环境中的 notebook。 - 运行 Notebook:按照 notebook 的说明将图像发送到端点,执行推理并显示结果。
- 可视化结果: 使用内置的绘图功能来可视化性能指标,例如检测到的对象周围的边界框。
有关全面的测试说明,请访问测试部分。