Link to this section从 PyTorch Hub 加载 YOLOv5#
📚 本指南介绍了如何从 PyTorch Hub 的 https://pytorch.org/hub/ultralytics_yolov5 加载 YOLOv5 🚀。
Link to this section开始之前#
Install requirements.txt in a Python>=3.8.0 environment, including PyTorch>=1.8. Models and datasets download automatically from the latest YOLOv5 release.
pip install -r https://raw.githubusercontent.com/ultralytics/yolov5/master/requirements.txt无需克隆 ultralytics/yolov5 — PyTorch Hub 会自动获取代码。
Link to this section使用 PyTorch Hub 加载 YOLOv5#
Link to this section简单示例#
此示例从 PyTorch Hub 加载预训练的 YOLOv5s 模型作为 model,并传入图像进行推理。'yolov5s' 是最轻量且最快的 YOLOv5 模型。关于所有可用模型的详细信息,请参阅 README。
import torch

# Model
model = torch.hub.load("ultralytics/yolov5", "yolov5s")

# Image
im = "https://ultralytics.com/images/zidane.jpg"

# Inference
results = model(im)

results.pandas().xyxy[0]
#      xmin    ymin    xmax   ymax  confidence  class    name
# 0  749.50   43.50  1148.0  704.5    0.874023      0  person
# 1  433.50  433.50   517.5  714.5    0.687988     27     tie
# 2  114.75  195.75  1095.0  708.0    0.624512      0  person
# 3  986.00  304.00  1028.0  420.0    0.286865     27     tie
Link to this section详细示例#
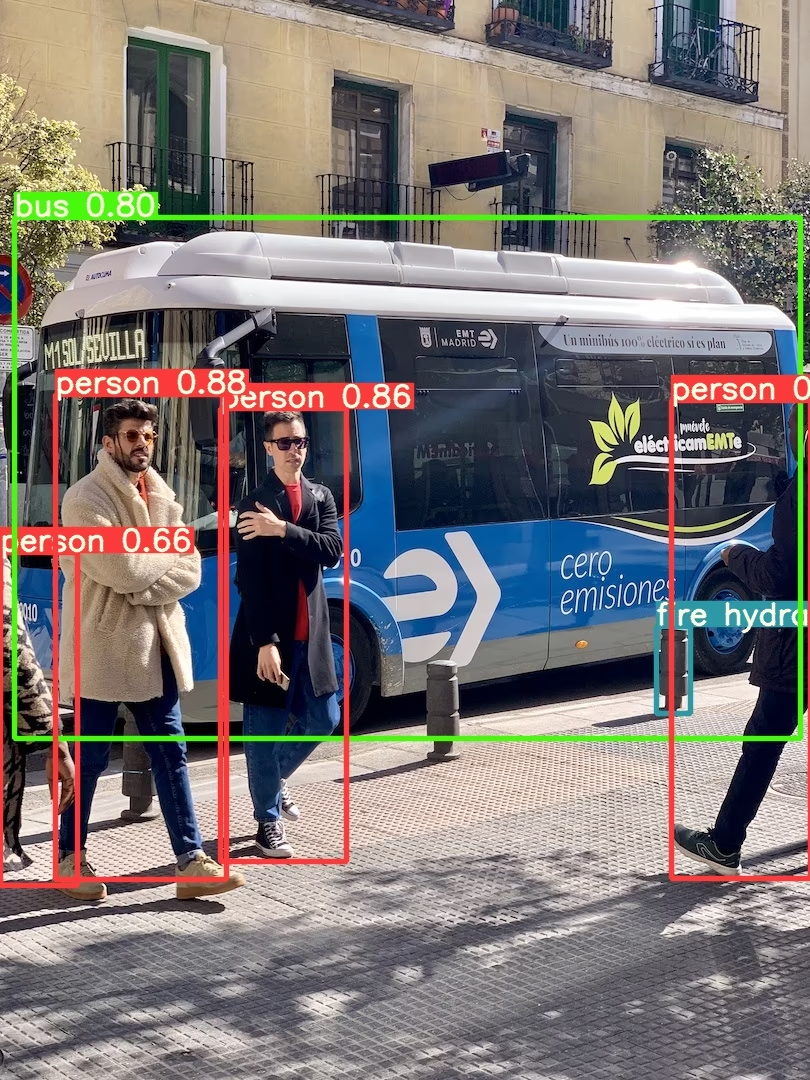
此示例展示了使用 PIL 和 OpenCV 图像源进行批量推理。results 可以打印到控制台、保存到 runs/hub、在支持的环境中显示到屏幕上,并作为 tensors 或 pandas 数据帧返回。
import cv2
import torch
from PIL import Image

# Model
model = torch.hub.load("ultralytics/yolov5", "yolov5s")

# Images
for f in "zidane.jpg", "bus.jpg":
    torch.hub.download_url_to_file("https://ultralytics.com/images/" + f, f)  # download 2 images
im1 = Image.open("zidane.jpg")  # PIL image
im2 = cv2.imread("bus.jpg")[..., ::-1]  # OpenCV image (BGR to RGB)

# Inference
results = model([im1, im2], size=640)  # batch of images

# Results
results.print()
results.save()  # or .show()

results.xyxy[0]  # im1 predictions (tensor)
results.pandas().xyxy[0]  # im1 predictions (pandas)
#      xmin    ymin    xmax   ymax  confidence  class    name
# 0  749.50   43.50  1148.0  704.5    0.874023      0  person
# 1  433.50  433.50   517.5  714.5    0.687988     27     tie
# 2  114.75  195.75  1095.0  708.0    0.624512      0  person
# 3  986.00  304.00  1028.0  420.0    0.286865     27     tie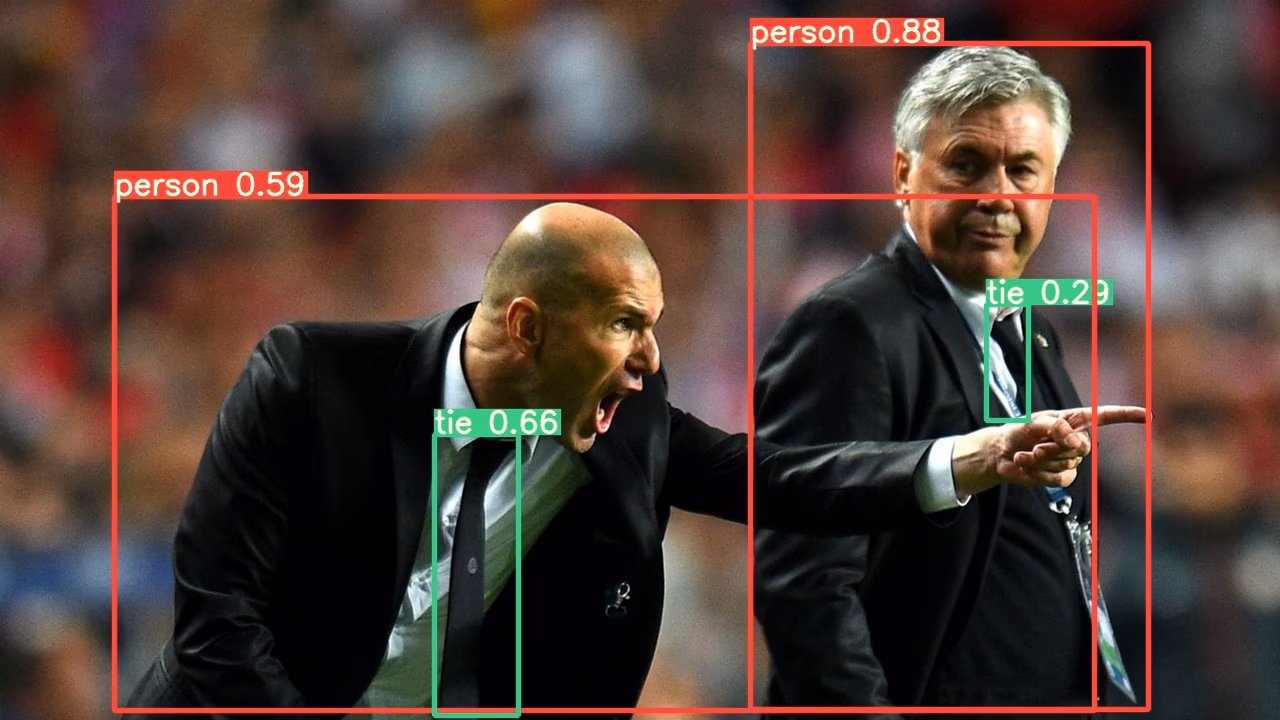
有关所有推理选项,请参阅 YOLOv5 AutoShape() 前向方法。
Link to this section推理设置#
YOLOv5 模型包含各种推理属性,例如 置信度阈值 (confidence threshold)、IoU 阈值等,可以通过以下方式设置:
model.conf = 0.25  # NMS confidence threshold
model.iou = 0.45  # NMS IoU threshold
model.agnostic = False  # NMS class-agnostic
model.multi_label = False  # NMS multiple labels per box
model.classes = None  # (optional list) filter by class, i.e. = [0, 15, 16] for COCO persons, cats and dogs
model.max_det = 1000  # maximum number of detections per image
model.amp = False  # Automatic Mixed Precision (AMP) inference

results = model(im, size=320)  # custom inference size
Link to this section设备#
模型创建后可以传输到任何设备:
model.cpu()  # CPU
model.cuda()  # GPU
model.to(device)  # i.e. device=torch.device(0)
模型也可以直接在任何 device 上创建:
model = torch.hub.load("ultralytics/yolov5", "yolov5s", device="cpu") # load on CPU输入图像在推理前会自动传输到正确的模型设备。
Link to this section静默输出#
可以使用 _verbose=False 静默加载模型:
model = torch.hub.load("ultralytics/yolov5", "yolov5s", _verbose=False) # load silentlyLink to this section输入通道#
要加载具有 4 个输入通道(而不是默认的 3 个)的预训练 YOLOv5s 模型:
model = torch.hub.load("ultralytics/yolov5", "yolov5s", channels=4)在这种情况下,模型将由预训练权重组成,除了最开头的输入层,因为它的形状与预训练的输入层不再相同。输入层将保持由随机权重初始化。
Link to this section类别数量#
要加载具有 10 个输出类别(而不是默认的 80 个)的预训练 YOLOv5s 模型:
model = torch.hub.load("ultralytics/yolov5", "yolov5s", classes=10)在这种情况下,模型将由预训练权重组成,除了输出层,因为它们的形状与预训练的输出层不再相同。输出层将保持由随机权重初始化。
Link to this section强制重新加载#
如果你在执行上述步骤时遇到问题,设置 force_reload=True 可能有助于丢弃现有缓存并强制从 PyTorch Hub 重新下载最新版本的 YOLOv5。缓存副本位于 ~/.cache/torch/hub 中;删除该文件夹可达到相同的效果。
model = torch.hub.load("ultralytics/yolov5", "yolov5s", force_reload=True) # force reloadLink to this section截屏推理#
要在桌面屏幕上运行推理:
import torch
from PIL import ImageGrab

# Model
model = torch.hub.load("ultralytics/yolov5", "yolov5s")

# Image
im = ImageGrab.grab()  # take a screenshot

# Inference
results = model(im)
Link to this section多 GPU 推理#
YOLOv5 模型可以通过线程推理并行加载到多个 GPU 上:
import threading

import torch

def run(model, im):
    """Performs inference on an image using a given model and saves the output; model must support `.save()` method."""
    results = model(im)
    results.save()

# Models
model0 = torch.hub.load("ultralytics/yolov5", "yolov5s", device=0)
model1 = torch.hub.load("ultralytics/yolov5", "yolov5s", device=1)

# Inference
threading.Thread(target=run, args=[model0, "https://ultralytics.com/images/zidane.jpg"], daemon=True).start()
threading.Thread(target=run, args=[model1, "https://ultralytics.com/images/bus.jpg"], daemon=True).start()
Link to this section训练#
要加载 YOLOv5 模型进行训练而不是推理,请设置 autoshape=False。要加载随机初始化权重的模型(从头开始训练),请使用 pretrained=False。在这种情况下,你必须提供自己的训练脚本。或者,查看我们的 YOLOv5 训练自定义数据教程以进行模型训练。
import torch

model = torch.hub.load("ultralytics/yolov5", "yolov5s", autoshape=False)  # load pretrained
model = torch.hub.load("ultralytics/yolov5", "yolov5s", autoshape=False, pretrained=False)  # load scratch
Link to this sectionBase64 结果#
用于 API 服务。有关详细信息,请参阅 Flask REST API 示例。
import base64
from io import BytesIO

from PIL import Image

results = model(im)  # inference

results.ims  # array of original images (as np array) passed to model for inference
results.render()  # updates results.ims with boxes and labels
for im in results.ims:
    buffered = BytesIO()
    im_base64 = Image.fromarray(im)
    im_base64.save(buffered, format="JPEG")
    print(base64.b64encode(buffered.getvalue()).decode("utf-8"))  # base64 encoded image with results
Link to this section裁剪结果#
结果可以作为检测裁剪图返回并保存:
results = model(im)  # inference
crops = results.crop(save=True)  # cropped detections dictionary
Link to this sectionPandas 结果#
结果可以作为 Pandas DataFrames 返回:
results = model(im)  # inference
results.pandas().xyxy[0]  # Pandas DataFrame
Pandas Output (click to expand)
print(results.pandas().xyxy[0])
#      xmin    ymin    xmax   ymax  confidence  class    name
# 0  749.50   43.50  1148.0  704.5    0.874023      0  person
# 1  433.50  433.50   517.5  714.5    0.687988     27     tie
# 2  114.75  195.75  1095.0  708.0    0.624512      0  person
# 3  986.00  304.00  1028.0  420.0    0.286865     27     tie
Link to this section排序结果#
结果可以按列排序,例如将车牌数字检测结果从左到右(x 轴)排序:
results = model(im)  # inference
results.pandas().xyxy[0].sort_values("xmin")  # sorted left-right
Link to this sectionJSON 结果#
一旦使用 .pandas() 数据帧方法转换,结果就可以通过 .to_json() 方法以 JSON 格式返回。可以使用 orient 参数修改 JSON 格式。详情请参阅 pandas .to_json() 文档。
results = model(ims)  # inference
results.pandas().xyxy[0].to_json(orient="records")  # JSON img1 predictions
JSON Output (click to expand)
[
    {
        "xmin": 749.5,
        "ymin": 43.5,
        "xmax": 1148.0,
        "ymax": 704.5,
        "confidence": 0.8740234375,
        "class": 0,
        "name": "person"
    },
    {
        "xmin": 433.5,
        "ymin": 433.5,
        "xmax": 517.5,
        "ymax": 714.5,
        "confidence": 0.6879882812,
        "class": 27,
        "name": "tie"
    },
    {
        "xmin": 115.25,
        "ymin": 195.75,
        "xmax": 1096.0,
        "ymax": 708.0,
        "confidence": 0.6254882812,
        "class": 0,
        "name": "person"
    },
    {
        "xmin": 986.0,
        "ymin": 304.0,
        "xmax": 1028.0,
        "ymax": 420.0,
        "confidence": 0.2873535156,
        "class": 27,
        "name": "tie"
    }
]
Link to this section自定义模型#
此示例使用 PyTorch Hub 加载一个自定义的、在 VOC 上训练的 20 类 YOLOv5s 模型 'best.pt'。
import torch

model = torch.hub.load("ultralytics/yolov5", "custom", path="path/to/best.pt")  # local model
model = torch.hub.load("path/to/yolov5", "custom", path="path/to/best.pt", source="local")  # local repo
Link to this sectionTensorRT、ONNX 和 OpenVINO 模型#
PyTorch Hub 支持大多数 YOLOv5 导出格式的推理,包括自定义训练的模型。有关导出模型的详细信息,请参阅 TFLite、ONNX、CoreML、TensorRT 导出教程。
import torch

model = torch.hub.load("ultralytics/yolov5", "custom", path="yolov5s.pt")  # PyTorch
model = torch.hub.load("ultralytics/yolov5", "custom", path="yolov5s.torchscript")  # TorchScript
model = torch.hub.load("ultralytics/yolov5", "custom", path="yolov5s.onnx")  # ONNX
model = torch.hub.load("ultralytics/yolov5", "custom", path="yolov5s_openvino_model/")  # OpenVINO
model = torch.hub.load("ultralytics/yolov5", "custom", path="yolov5s.engine")  # TensorRT
model = torch.hub.load("ultralytics/yolov5", "custom", path="yolov5s.mlmodel")  # CoreML (macOS-only)
model = torch.hub.load("ultralytics/yolov5", "custom", path="yolov5s.tflite")  # TFLite
model = torch.hub.load("ultralytics/yolov5", "custom", path="yolov5s_paddle_model/")  # PaddlePaddle
Link to this section支持的环境#
Ultralytics 提供了一系列即用型环境,预装了 CUDA、CUDNN、Python 和 PyTorch 等关键依赖,助你快速启动项目。
- 免费 GPU 笔记本:


- Google Cloud: GCP 快速入门指南
- Amazon: AWS 快速入门指南
- Azure: AzureML 快速入门指南
- Docker: Docker 快速入门指南

Link to this section项目状态#
![]()
此徽章表示所有 YOLOv5 GitHub Actions 持续集成 (CI) 测试均已成功通过。这些 CI 测试严格检查 YOLOv5 在 训练、验证、推理、导出 和 基准测试 等各个关键方面的功能和性能。它们确保了在 macOS、Windows 和 Ubuntu 上的稳定可靠运行,测试每 24 小时进行一次,并会在每次新提交代码时自动触发。