Link to this sectionROS (Robot Operating System) クイックスタートガイド#
本ガイドでは、Ultralytics YOLOをROS1 (rospy)またはROS2 (rclpy)に統合し、RGB画像、深度画像、点群データに対してリアルタイムで物体検出およびセグメンテーションを実行する方法を解説します。
YOLOとROSのセットアップにスキップし、その後RGB画像、深度画像、または点群の処理に進んでください。
ROS Introduction (captioned) from Open Robotics on Vimeo.
Link to this sectionROSとは何ですか?#
Robot Operating System (ROS) は、ロボット工学の研究や産業で広く使用されているオープンソースフレームワークです。ROSは、開発者がロボットアプリケーションを作成するのを支援するための ライブラリやツール のコレクションを提供します。ROSは様々な ロボットプラットフォーム と連携するように設計されており、ロボット技術者にとって柔軟で強力なツールとなっています。
Link to this sectionROSの主な機能#
-
モジュール式アーキテクチャ: ROSはモジュール式のアーキテクチャを採用しており、開発者は ノード と呼ばれる小さく再利用可能なコンポーネントを組み合わせることで、複雑なシステムを構築できます。各ノードは通常特定の機能を実行し、ノード間は トピック や サービス を介したメッセージ通信を行います。
-
通信ミドルウェア: ROSは、プロセス間通信と分散コンピューティングをサポートする堅牢な通信インフラストラクチャを提供します。これは、データストリーム(トピック)のためのパブリッシュ・サブスクライブモデルと、サービスコールのためのリクエスト・リプライモデルによって実現されます。
-
ハードウェア抽象化: ROSはハードウェアに対する抽象化層を提供し、開発者がデバイスに依存しないコードを書くことを可能にします。これにより、同じコードを異なるハードウェア構成で使用でき、統合や実験が容易になります。
-
ツールとユーティリティ: ROSには、視覚化、デバッグ、シミュレーションのための豊富なツールやユーティリティが付属しています。例えば、RVizはセンサーデータやロボットの状態情報の視覚化に使用され、Gazeboはアルゴリズムやロボット設計をテストするための強力なシミュレーション環境を提供します。
-
広範なエコシステム: ROSのエコシステムは広大で絶えず成長しており、ナビゲーション、操作、知覚など、様々なロボットアプリケーションに対応する多数のパッケージが利用可能です。コミュニティはこれらのパッケージの開発とメンテナンスに積極的に貢献しています。
ROSバージョンの進化
2007年の開発以来、ROSは複数のバージョンを経て進化し、ROS 1とROS 2に分かれました。以下の既存の例ではROS1 Noeticを使用していますが、Using ROS2にあるコンパクトなアダプターは、現在のROS2リリースに対応したrclpyインターフェースを示しています。
Link to this sectionROS 1 と ROS 2 の比較#
ROS 1 はロボット開発の強固な基盤を提供しましたが、ROS 2 はその欠点を解決し、以下を提供します。
- リアルタイム性能: リアルタイムシステムおよび決定論的動作のサポート向上。
- セキュリティ: 様々な環境での安全かつ信頼性の高い運用のための強化されたセキュリティ機能。
- スケーラビリティ: マルチロボットシステムや大規模導入へのより優れたサポート。
- クロスプラットフォームサポート: Linux以外の様々なオペレーティングシステム(WindowsやmacOSなど)への互換性拡大。
- 柔軟な通信: DDSの使用により、より柔軟で効率的なプロセス間通信を実現。
Link to this sectionROSのメッセージとトピック#
ROSでは、ノード間の通信は メッセージ と トピック を通じて促進されます。メッセージはノード間で交換される情報を定義するデータ構造であり、トピックはメッセージが送受信される名前付きチャネルです。ノードはトピックにメッセージをパブリッシュしたり、トピックからメッセージをサブスクライブしたりすることで、相互に通信できます。このパブリッシュ・サブスクライブモデルは、非同期通信とノード間のデカップリングを可能にします。ロボットシステム内の各センサーやアクチュエータは通常、データをトピックにパブリッシュし、それが他のノードによって処理や制御のために利用されます。本ガイドでは、Image、Depth、PointCloudメッセージとカメラトピックに焦点を当てます。
Link to this sectionROSでの Ultralytics YOLO のセットアップ#
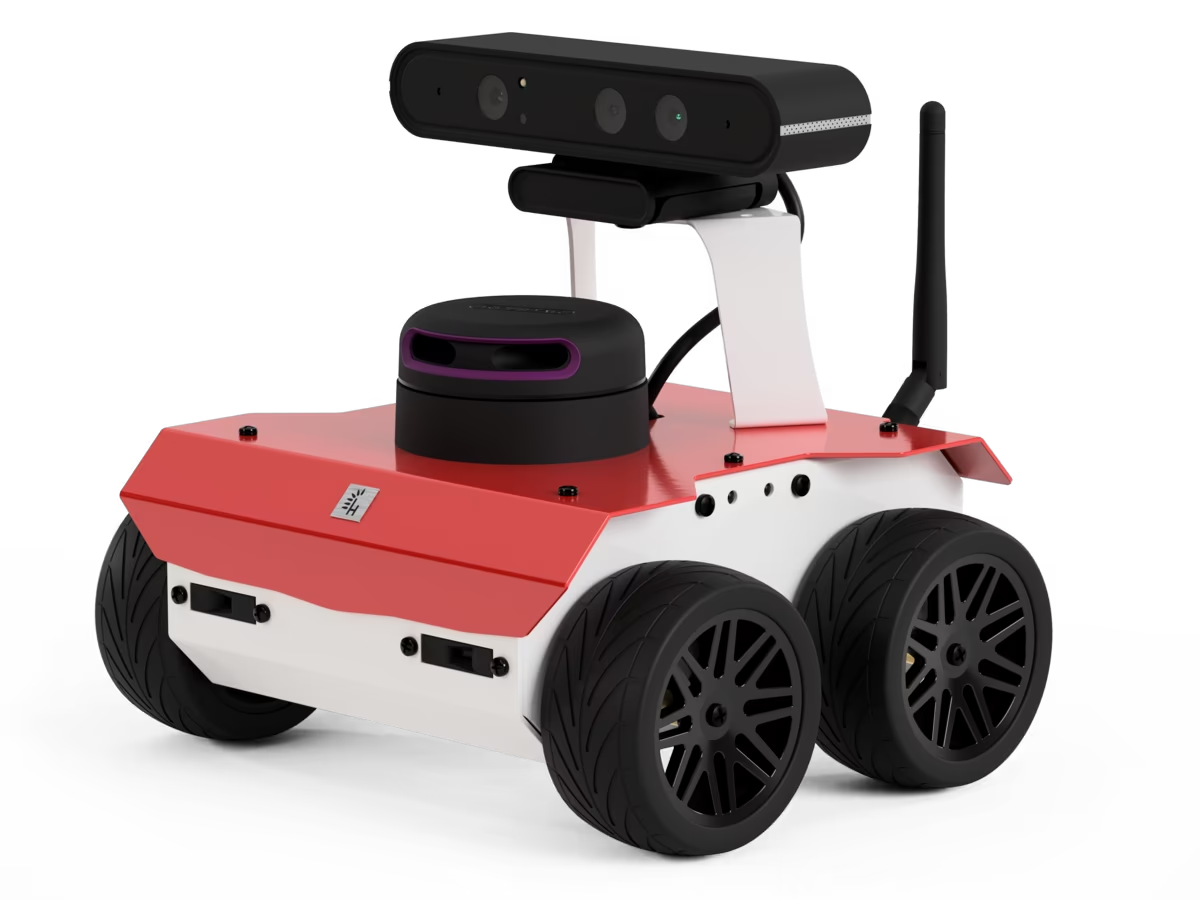
ROS1の例は、このROS環境(ROSbot ROSリポジトリのフォーク)を使用してテストされています。同様のYOLOおよびNumPy処理はROS2でも適用可能ですが、ノードのライフサイクルとメッセージ変換のみが異なります。
Link to this section依存関係のインストール#
ROS環境以外に、以下の依存関係をインストールする必要があります。
-
ROS NumPyパッケージ: ROS ImageメッセージとNumPy配列間の高速変換に必要です。
pip install ros_numpy -
Ultralytics パッケージ:
pip install ultralytics
Link to this sectionROS2の使用#
ROS2では、rospyがrclpyに、ros_numpyによる画像変換がcv_bridgeに置き換わります。以下のノードは、後述するRGB検出フローのROS2における完全な互換実装です。モデルを一度インスタンス化し、コールバック全体で再利用してください。
import cv_bridge
import rclpy
from rclpy.node import Node
from rclpy.qos import qos_profile_sensor_data
from sensor_msgs.msg import Image

from ultralytics import YOLO

class UltralyticsNode(Node):
    """Run YOLO detection on ROS2 image messages."""

    def __init__(self):
        """Initialize the ROS2 node, model, and image interfaces."""
        super().__init__("ultralytics")
        self.bridge = cv_bridge.CvBridge()
        self.model = YOLO("yolo26m.pt")
        self.publisher = self.create_publisher(Image, "/ultralytics/detection/image", 5)
        self.create_subscription(Image, "/camera/color/image_raw", self.callback, qos_profile_sensor_data)

    def callback(self, message):
        """Publish the annotated camera frame."""
        image = self.bridge.imgmsg_to_cv2(message, desired_encoding="bgr8")
        annotated = self.model(image)[0].plot(show=False)
        self.publisher.publish(self.bridge.cv2_to_imgmsg(annotated, encoding="bgr8"))

def main(args=None):
    """Start the ROS2 node."""
    rclpy.init(args=args)
    node = UltralyticsNode()
    rclpy.spin(node)
    node.destroy_node()
    rclpy.shutdown()

if __name__ == "__main__":
    main()
深度画像については、以下の深度処理コードを再利用し、メッセージの取得と変換部分のみを置き換えてください:
self.create_subscription(Image, "/camera/color/image_raw", self.rgb_callback, qos_profile_sensor_data)
self.create_subscription(Image, "/camera/depth/image_raw", self.depth_callback, qos_profile_sensor_data)

def rgb_callback(self, message):
    self.rgb_image = self.bridge.imgmsg_to_cv2(message, desired_encoding="bgr8")

def depth_callback(self, message):
    depth_image = self.bridge.imgmsg_to_cv2(message, desired_encoding="passthrough")
# Apply the NumPy mask and distance calculation from the depth example below.点群データについては、ROS2はsensor_msgs_py.point_cloud2を提供します。整理されたクラウドを一度変換してから、以下のNumPyセグメンテーションおよび3Dマッピングを再利用してください:
from sensor_msgs_py import point_cloud2

points = point_cloud2.read_points_numpy(message, field_names=("x", "y", "z", "rgb"))
points = points.reshape(message.height, message.width, 4)
Link to this sectionROS sensor_msgs/Image で Ultralytics を使用する#
sensor_msgs/Image メッセージ型 は、ROSで画像データを表現するために一般的に使用されます。これにはエンコーディング、高さ、幅、ピクセルデータのフィールドが含まれており、カメラやその他のセンサーでキャプチャされた画像の伝送に適しています。画像メッセージは、視覚的知覚、物体検出、ナビゲーションなどのタスクのためにロボットアプリケーションで広く使用されています。
Link to this section画像使用のステップバイステップ#
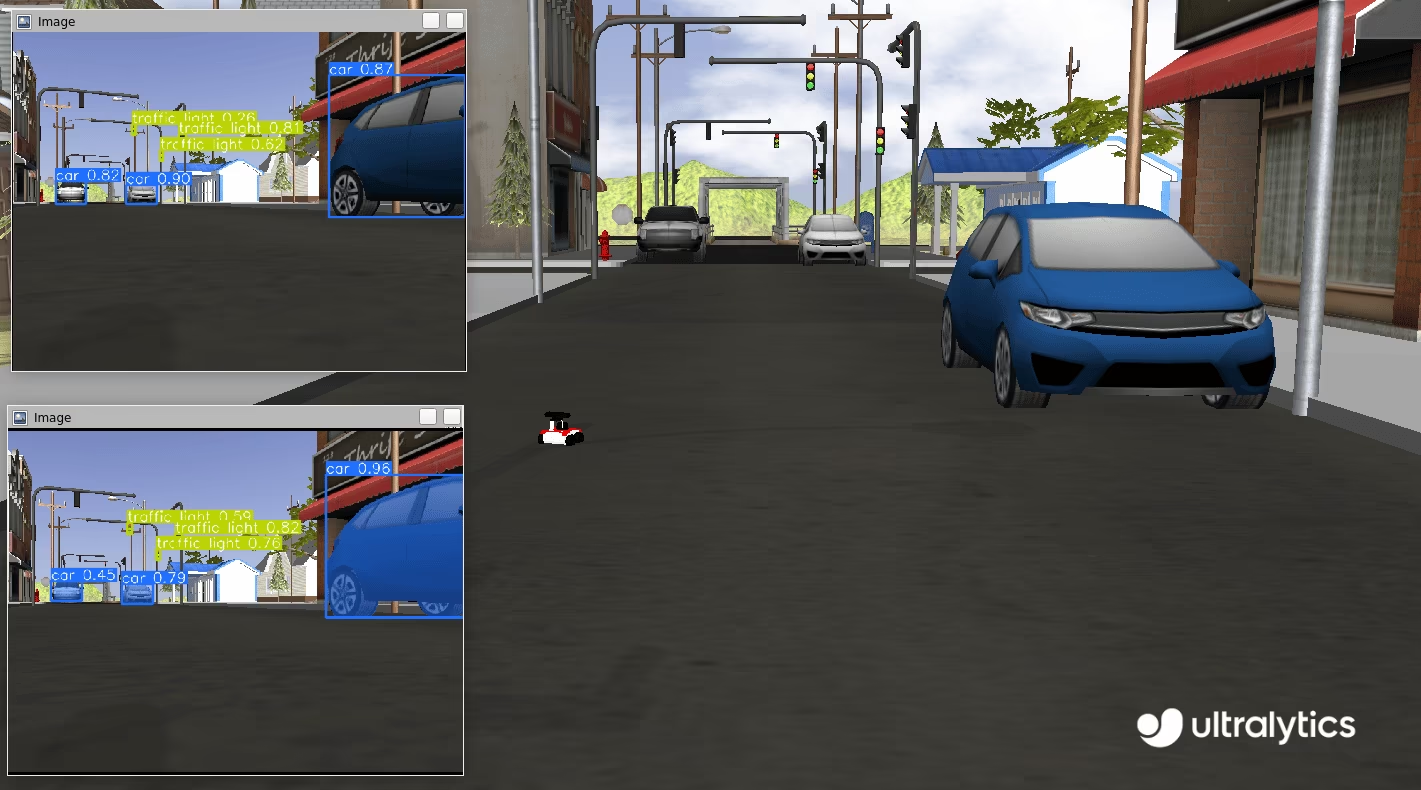
以下のコードスニペットは、ROSで Ultralytics YOLO パッケージを使用する方法を示しています。この例では、カメラトピックをサブスクライブし、YOLOを使用して受信画像を処理し、検出されたオブジェクトを 検出 および セグメンテーション 用の新しいトピックにパブリッシュします。
まず、必要なライブラリをインポートし、2つのモデル(セグメンテーション 用と 検出 用)をインスタンス化します。ROSマスターとの通信を可能にするために、ROSノード(名前は ultralytics)を初期化します。安定した接続を確保するため、ノードが処理を進める前に接続を確立する十分な時間を確保できるよう、短い一時停止を挿入します。
import time

import rospy

from ultralytics import YOLO

detection_model = YOLO("yolo26m.pt")
segmentation_model = YOLO("yolo26m-seg.pt")
rospy.init_node("ultralytics")
time.sleep(1)2つのROSトピック(検出 用と セグメンテーション 用)を初期化します。これらのトピックは、アノテーション付き画像をパブリッシュし、後続の処理で利用できるようにするために使用されます。ノード間の通信は sensor_msgs/Image メッセージを使用して促進されます。
from sensor_msgs.msg import Image

det_image_pub = rospy.Publisher("/ultralytics/detection/image", Image, queue_size=5)
seg_image_pub = rospy.Publisher("/ultralytics/segmentation/image", Image, queue_size=5)最後に、/camera/color/image_raw トピック上のメッセージをリッスンし、新しいメッセージごとにコールバック関数を呼び出すサブスクライバを作成します。このコールバック関数は sensor_msgs/Image 型のメッセージを受信し、ros_numpy を使用してNumPy配列に変換し、前述のYOLOモデルで画像を処理してアノテーションを付け、検出用には /ultralytics/detection/image、セグメンテーション用には /ultralytics/segmentation/image の各トピックにパブリッシュします。
import ros_numpy

def callback(data):
    """Callback function to process image and publish annotated images."""
    array = ros_numpy.numpify(data)
    if det_image_pub.get_num_connections():
        det_result = detection_model(array)
        det_annotated = det_result[0].plot(show=False)
        det_image_pub.publish(ros_numpy.msgify(Image, det_annotated, encoding="rgb8"))

    if seg_image_pub.get_num_connections():
        seg_result = segmentation_model(array)
        seg_annotated = seg_result[0].plot(show=False)
        seg_image_pub.publish(ros_numpy.msgify(Image, seg_annotated, encoding="rgb8"))

rospy.Subscriber("/camera/color/image_raw", Image, callback)

while True:
    rospy.spin()
完全なコード
import time

import ros_numpy
import rospy
from sensor_msgs.msg import Image

from ultralytics import YOLO

detection_model = YOLO("yolo26m.pt")
segmentation_model = YOLO("yolo26m-seg.pt")
rospy.init_node("ultralytics")
time.sleep(1)

det_image_pub = rospy.Publisher("/ultralytics/detection/image", Image, queue_size=5)
seg_image_pub = rospy.Publisher("/ultralytics/segmentation/image", Image, queue_size=5)

def callback(data):
    """Callback function to process image and publish annotated images."""
    array = ros_numpy.numpify(data)
    if det_image_pub.get_num_connections():
        det_result = detection_model(array)
        det_annotated = det_result[0].plot(show=False)
        det_image_pub.publish(ros_numpy.msgify(Image, det_annotated, encoding="rgb8"))

    if seg_image_pub.get_num_connections():
        seg_result = segmentation_model(array)
        seg_annotated = seg_result[0].plot(show=False)
        seg_image_pub.publish(ros_numpy.msgify(Image, seg_annotated, encoding="rgb8"))

rospy.Subscriber("/camera/color/image_raw", Image, callback)

while True:
    rospy.spin()
デバッグ
ROS (Robot Operating System) ノードのデバッグは、システムの分散型の性質上、困難な場合があります。このプロセスを支援するいくつかのツールがあります。
rostopic echo <TOPIC-NAME>: このコマンドにより、特定のトピックにパブリッシュされたメッセージを表示でき、データフローの調査に役立ちます。rostopic list: このコマンドを使用してROSシステム内の利用可能な全トピックを一覧表示し、アクティブなデータストリームの概要を把握します。rqt_graph: この視覚化ツールはノード間の通信グラフを表示し、ノードがどのように相互接続され、どのように対話しているかについての洞察を提供します。- 3D表現などのより複雑な視覚化には、RViz を使用できます。RViz (ROS Visualization) は、ROSのための強力な3D視覚化ツールです。これにより、ロボットの状態や周囲の環境をリアルタイムで視覚化できます。RVizを使用すると、センサーデータ(
sensor_msgs/Imageなど)、ロボットモデルの状態、その他様々な種類の情報を表示できるため、ロボットシステムの動作をデバッグし理解しやすくなります。
Link to this sectionstd_msgs/String を使用して検出されたクラスをパブリッシュする#
標準のROSメッセージには std_msgs/String メッセージも含まれています。多くのアプリケーションでは、アノテーション付きの画像全体を再パブリッシュする必要はなく、ロボットの視界にあるクラスだけが必要な場合があります。以下の例では、std_msgs/String メッセージ を使用して、検出されたクラスを /ultralytics/detection/classes トピックで再パブリッシュする方法を示します。これらのメッセージはより軽量で不可欠な情報を提供するため、様々なアプリケーションにとって価値があります。
Link to this section使用事例#
カメラと 物体検出モデル を備えた倉庫ロボットを考えてみましょう。大きなアノテーション付き画像をネットワーク経由で送信する代わりに、ロボットは検出されたクラスのリストを std_msgs/String メッセージとしてパブリッシュできます。例えば、ロボットが「箱」、「パレット」、「フォークリフト」のようなオブジェクトを検出すると、これらのクラスを /ultralytics/detection/classes トピックにパブリッシュします。この情報は、中央監視システムがインベントリをリアルタイムで追跡したり、障害物を避けるためのロボットの経路計画を最適化したり、検出された箱を拾うといった特定の動作をトリガーしたりするために使用できます。このアプローチにより、通信に必要な帯域幅が削減され、重要なデータの送信に集中できます。
Link to this section文字列使用のステップバイステップ#
This example demonstrates how to use the Ultralytics YOLO package with ROS. In this example, we subscribe to a camera topic, process the incoming image using YOLO, and publish the detected objects to new topic /ultralytics/detection/classes using std_msgs/String messages. The ros_numpy package is used to convert the ROS Image message to a NumPy array for processing with YOLO.
import time

import ros_numpy
import rospy
from sensor_msgs.msg import Image
from std_msgs.msg import String

from ultralytics import YOLO

detection_model = YOLO("yolo26m.pt")
rospy.init_node("ultralytics")
time.sleep(1)
classes_pub = rospy.Publisher("/ultralytics/detection/classes", String, queue_size=5)

def callback(data):
    """Callback function to process image and publish detected classes."""
    array = ros_numpy.numpify(data)
    if classes_pub.get_num_connections():
        det_result = detection_model(array)
        classes = det_result[0].boxes.cls.cpu().numpy().astype(int)
        names = [det_result[0].names[i] for i in classes]
        classes_pub.publish(String(data=str(names)))

rospy.Subscriber("/camera/color/image_raw", Image, callback)
while True:
    rospy.spin()
Link to this sectionROS深度画像で Ultralytics を使用する#
RGB画像に加えて、ROSは 深度画像 をサポートしており、カメラから物体までの距離に関する情報を提供します。深度画像は、障害物回避、3Dマッピング、ローカライゼーションなどのロボットアプリケーションに不可欠です。
深度画像は、各ピクセルがカメラから物体までの距離を表す画像です。色をキャプチャするRGB画像とは異なり、深度画像は空間情報をキャプチャし、ロボットが周囲の環境の3D構造を認識できるようにします。
深度画像は様々なセンサーを使用して取得できます。
- ステレオカメラ: 2台のカメラを使用して画像視差に基づき深度を計算します。
- Time-of-Flight (ToF) カメラ: 光が物体から戻るまでの時間を測定します。
- 構造化光センサー: パターンを投影し、表面での変形を測定します。
Link to this sectionYOLOと深度画像の使用#
ROSでは、深度画像は sensor_msgs/Image メッセージ型で表され、エンコーディング、高さ、幅、ピクセルデータのフィールドが含まれます。深度画像のエンコーディングフィールドには、「16UC1」のような形式がよく使用されます。これはピクセルあたり16ビットの符号なし整数を示し、各値が物体までの距離を表します。深度画像は通常、RGB画像と組み合わせて使用され、より包括的な環境ビューを提供します。
YOLOを使用すると、RGB画像と深度画像の両方から情報を抽出して結合することが可能です。例えば、YOLOはRGB画像内の物体を検出でき、この検出結果を使用して深度画像内の対応する領域を特定できます。これにより、検出された物体の正確な深度情報を抽出でき、ロボットが3次元で環境を理解する能力が向上します。
深度画像を扱う際は、RGB画像と深度画像が正しく調整されていることを確認することが不可欠です。Intel RealSense シリーズのようなRGB-Dカメラは、同期されたRGB画像と深度画像を提供するため、両方のソースからの情報を結合しやすくなります。個別のRGBカメラと深度カメラを使用する場合は、正確な調整を確保するためにそれらをキャリブレーションすることが重要です。
Link to this section深度使用のステップバイステップ#
この例では、YOLOを使用して画像をセグメント化し、抽出されたマスクを適用して深度画像内の物体をセグメント化します。これにより、対象物体の各ピクセルがカメラの焦点中心からどれだけ離れているかを判断できます。この距離情報を取得することで、カメラとシーン内の特定の物体との間の距離を計算できます。まず、必要なライブラリをインポートし、ROSノードを作成し、セグメンテーションモデルとROSトピックをインスタンス化することから始めます。
import time

import rospy
from std_msgs.msg import String

from ultralytics import YOLO

rospy.init_node("ultralytics")
time.sleep(1)

segmentation_model = YOLO("yolo26m-seg.pt")

classes_pub = rospy.Publisher("/ultralytics/detection/distance", String, queue_size=5)
次に、受信した深度画像メッセージを処理するコールバック関数を定義します。この関数は、深度画像メッセージとRGB画像メッセージを待ち、それらをNumPy配列に変換し、RGB画像にセグメンテーションモデルを適用します。その後、検出された各物体のセグメンテーションマスクを抽出し、深度画像を使用してカメラからの物体の平均距離を計算します。ほとんどのセンサーには、クリップ距離と呼ばれる最大距離があり、それを超える値は inf (np.inf) として表されます。処理前に、これらのnull値をフィルタリングして 0 という値を割り当てることが重要です。最後に、検出された物体をその平均距離とともに /ultralytics/detection/distance トピックにパブリッシュします。
import numpy as np
import ros_numpy
from sensor_msgs.msg import Image

def callback(data):
    """Callback function to process depth image and RGB image."""
    image = rospy.wait_for_message("/camera/color/image_raw", Image)
    image = ros_numpy.numpify(image)
    depth = ros_numpy.numpify(data)
    result = segmentation_model(image)

    all_objects = []
    for index, cls in enumerate(result[0].boxes.cls):
        class_index = int(cls.cpu().numpy())
        name = result[0].names[class_index]
        mask = result[0].masks.data.cpu().numpy()[index, :, :].astype(int)
        obj = depth[mask == 1]
        obj = obj[~np.isnan(obj)]
        avg_distance = np.mean(obj) if len(obj) else np.inf
        all_objects.append(f"{name}: {avg_distance:.2f}m")

    classes_pub.publish(String(data=str(all_objects)))

rospy.Subscriber("/camera/depth/image_raw", Image, callback)

while True:
    rospy.spin()
完全なコード
import time

import numpy as np
import ros_numpy
import rospy
from sensor_msgs.msg import Image
from std_msgs.msg import String

from ultralytics import YOLO

rospy.init_node("ultralytics")
time.sleep(1)

segmentation_model = YOLO("yolo26m-seg.pt")

classes_pub = rospy.Publisher("/ultralytics/detection/distance", String, queue_size=5)

def callback(data):
    """Callback function to process depth image and RGB image."""
    image = rospy.wait_for_message("/camera/color/image_raw", Image)
    image = ros_numpy.numpify(image)
    depth = ros_numpy.numpify(data)
    result = segmentation_model(image)

    all_objects = []
    for index, cls in enumerate(result[0].boxes.cls):
        class_index = int(cls.cpu().numpy())
        name = result[0].names[class_index]
        mask = result[0].masks.data.cpu().numpy()[index, :, :].astype(int)
        obj = depth[mask == 1]
        obj = obj[~np.isnan(obj)]
        avg_distance = np.mean(obj) if len(obj) else np.inf
        all_objects.append(f"{name}: {avg_distance:.2f}m")

    classes_pub.publish(String(data=str(all_objects)))

rospy.Subscriber("/camera/depth/image_raw", Image, callback)

while True:
    rospy.spin()
Link to this sectionROS sensor_msgs/PointCloud2 で Ultralytics を使用する#
sensor_msgs/PointCloud2 メッセージ型 は、3D点群データを表現するためにROSで使用されるデータ構造です。このメッセージ型はロボットアプリケーションに不可欠であり、3Dマッピング、物体認識、ローカライゼーションなどのタスクを可能にします。
点群は、3次元座標系内で定義されたデータポイントの集合です。これらのデータポイントは、3Dスキャン技術を介してキャプチャされた物体やシーンの外面を表します。クラウド内の各ポイントには、空間内の位置に対応する X、Y、Z 座標があり、色や強度などの追加情報が含まれている場合もあります。
sensor_msgs/PointCloud2 を扱う際は、点群データが取得されたセンサーの参照フレームを考慮することが不可欠です。点群は最初、センサーの参照フレーム内でキャプチャされます。この参照フレームは、/tf_static トピックをリッスンすることで特定できます。ただし、特定のアプリケーション要件に応じて、点群を別の参照フレームに変換する必要がある場合があります。この変換は、座標フレームを管理しデータ間を変換するためのツールを提供する tf2_ros パッケージを使用して実現できます。
点群は様々なセンサーを使用して取得できます。
- LIDAR (Light Detection and Ranging): レーザーパルスを使用して物体までの距離を測定し、高 精度 な3Dマップを作成します。
- 深度カメラ: 各ピクセルの深度情報をキャプチャし、シーンの3D再構築を可能にします。
- ステレオカメラ: 2台以上のカメラを利用して三角測量により深度情報を取得します。
- 構造化光スキャナー: 表面に既知のパターンを投影し、変形を測定して深度を計算します。
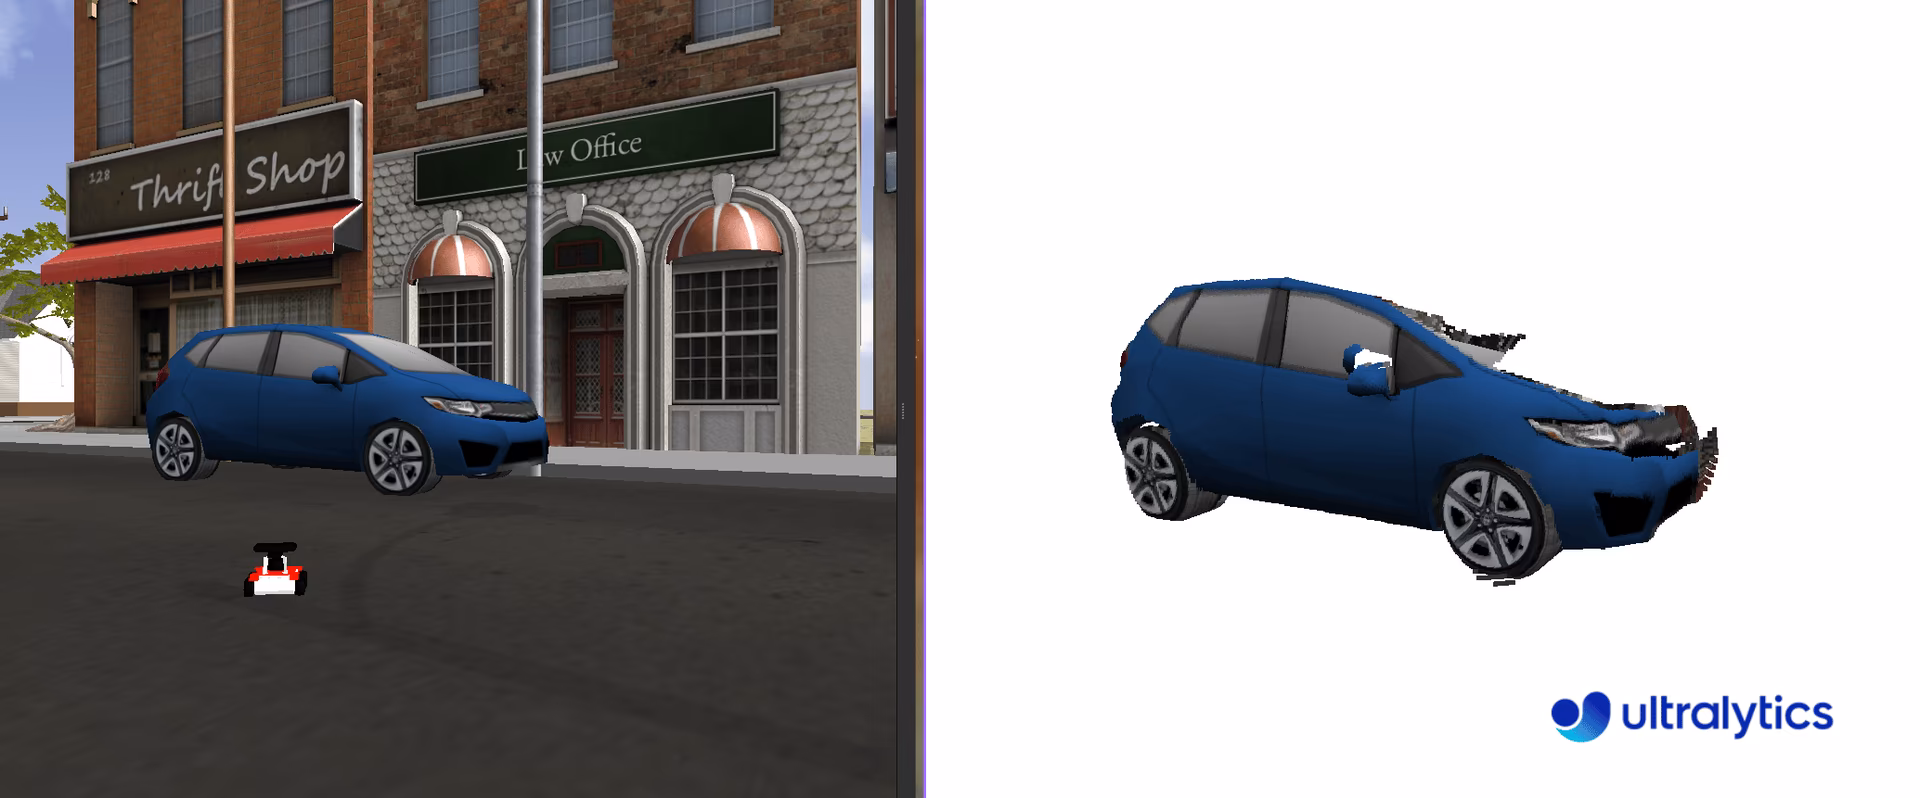
Link to this section点群とYOLOの使用#
YOLOを sensor_msgs/PointCloud2 型メッセージと統合するには、深度マップに使用される手法と同様の手法を採用できます。点群に埋め込まれた色情報を活用することで、2D画像を抽出し、YOLOを使用してこの画像に対してセグメンテーションを実行し、その結果のマスクを3次元ポイントに適用して対象の3D物体を分離できます。
点群の処理には、ユーザーフレンドリーなPythonライブラリである Open3D (pip install open3d) を使用することをお勧めします。Open3Dは、点群データ構造を管理し、それらを視覚化し、複雑な操作をシームレスに実行するための堅牢なツールを提供します。このライブラリにより、プロセスが大幅に簡素化され、YOLOベースのセグメンテーションと組み合わせて点群を操作および分析する能力が向上します。
Link to this section点群使用のステップバイステップ#
必要なライブラリをインポートし、セグメンテーション用のYOLOモデルをインスタンス化します。
import time

import rospy

from ultralytics import YOLO

rospy.init_node("ultralytics")
time.sleep(1)
segmentation_model = YOLO("yolo26m-seg.pt")
Create a function pointcloud2_to_array, which transforms a sensor_msgs/PointCloud2 message into two NumPy arrays. The sensor_msgs/PointCloud2 messages contain n points based on the width and height of the acquired image. For instance, a 480 x 640 image will have 307,200 points. Each point includes three spatial coordinates (xyz) and the corresponding color in RGB format. These can be considered as two separate channels of information.
The function returns the xyz coordinates and RGB values in the format of the original camera resolution (width x height). Most sensors have a maximum distance, known as the clip distance, beyond which values are represented as inf (np.inf). Before processing, it is important to filter out these null values and assign them a value of 0.
import numpy as np
import ros_numpy

def pointcloud2_to_array(pointcloud2: PointCloud2) -> tuple:
    """Convert a ROS PointCloud2 message to a numpy array.

    Args:
        pointcloud2 (PointCloud2): the PointCloud2 message

    Returns:
        (tuple): tuple containing (xyz, rgb)
    """
    pc_array = ros_numpy.point_cloud2.pointcloud2_to_array(pointcloud2)
    split = ros_numpy.point_cloud2.split_rgb_field(pc_array)
    rgb = np.stack([split["b"], split["g"], split["r"]], axis=2)
    xyz = ros_numpy.point_cloud2.get_xyz_points(pc_array, remove_nans=False)
    xyz = np.array(xyz).reshape((pointcloud2.height, pointcloud2.width, 3))
    nan_rows = np.isnan(xyz).all(axis=2)
    xyz[nan_rows] = [0, 0, 0]
    rgb[nan_rows] = [0, 0, 0]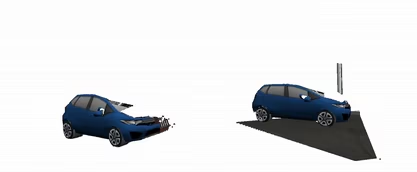
return xyz, rgb次に、/camera/depth/points トピックをサブスクライブして点群メッセージを受信し、sensor_msgs/PointCloud2 メッセージをXYZ座標とRGB値を含むNumPy配列に変換します(pointcloud2_to_array 関数を使用)。YOLOモデルを使用してRGB画像を処理し、セグメント化された物体を抽出します。検出された各物体について、セグメンテーションマスクを抽出し、RGB画像とXYZ座標の両方に適用して3D空間内で物体を分離します。
マスクの処理は、1 が物体の存在を示し 0 が不在を示すバイナリ値で構成されているため簡単です。マスクを適用するには、元のチャネルにマスクを掛けるだけです。この操作により、画像内の対象物体が効果的に分離されます。最後に、Open3D点群オブジェクトを作成し、3D空間で関連する色とともにセグメント化された物体を視覚化します。
import sys

import open3d as o3d

ros_cloud = rospy.wait_for_message("/camera/depth/points", PointCloud2)
xyz, rgb = pointcloud2_to_array(ros_cloud)
result = segmentation_model(rgb)

if not len(result[0].boxes.cls):
    print("No objects detected")
    sys.exit()

classes = result[0].boxes.cls.cpu().numpy().astype(int)
for index, class_id in enumerate(classes):
    mask = result[0].masks.data.cpu().numpy()[index, :, :].astype(int)
    mask_expanded = np.stack([mask, mask, mask], axis=2)

    obj_rgb = rgb * mask_expanded
    obj_xyz = xyz * mask_expanded

    pcd = o3d.geometry.PointCloud()
    pcd.points = o3d.utility.Vector3dVector(obj_xyz.reshape((ros_cloud.height * ros_cloud.width, 3)))
    pcd.colors = o3d.utility.Vector3dVector(obj_rgb.reshape((ros_cloud.height * ros_cloud.width, 3)) / 255)
    o3d.visualization.draw_geometries([pcd])
完全なコード
import sys
import time

import numpy as np
import open3d as o3d
import ros_numpy
import rospy
from sensor_msgs.msg import PointCloud2

from ultralytics import YOLO

rospy.init_node("ultralytics")
time.sleep(1)
segmentation_model = YOLO("yolo26m-seg.pt")

def pointcloud2_to_array(pointcloud2: PointCloud2) -> tuple:
    """Convert a ROS PointCloud2 message to a numpy array.

    Args:
        pointcloud2 (PointCloud2): the PointCloud2 message

    Returns:
        (tuple): tuple containing (xyz, rgb)
    """
    pc_array = ros_numpy.point_cloud2.pointcloud2_to_array(pointcloud2)
    split = ros_numpy.point_cloud2.split_rgb_field(pc_array)
    rgb = np.stack([split["b"], split["g"], split["r"]], axis=2)
    xyz = ros_numpy.point_cloud2.get_xyz_points(pc_array, remove_nans=False)
    xyz = np.array(xyz).reshape((pointcloud2.height, pointcloud2.width, 3))
    nan_rows = np.isnan(xyz).all(axis=2)
    xyz[nan_rows] = [0, 0, 0]
    rgb[nan_rows] = [0, 0, 0]
    return xyz, rgb

ros_cloud = rospy.wait_for_message("/camera/depth/points", PointCloud2)
xyz, rgb = pointcloud2_to_array(ros_cloud)
result = segmentation_model(rgb)

if not len(result[0].boxes.cls):
    print("No objects detected")
    sys.exit()

classes = result[0].boxes.cls.cpu().numpy().astype(int)
for index, class_id in enumerate(classes):
    mask = result[0].masks.data.cpu().numpy()[index, :, :].astype(int)
    mask_expanded = np.stack([mask, mask, mask], axis=2)

    obj_rgb = rgb * mask_expanded
    obj_xyz = xyz * mask_expanded

    pcd = o3d.geometry.PointCloud()
    pcd.points = o3d.utility.Vector3dVector(obj_xyz.reshape((ros_cloud.height * ros_cloud.width, 3)))
    pcd.colors = o3d.utility.Vector3dVector(obj_rgb.reshape((ros_cloud.height * ros_cloud.width, 3)) / 255)
    o3d.visualization.draw_geometries([pcd])
Link to this section結論#
Ultralytics YOLOをROSに統合することで、ロボットはRGB画像、深度画像、点群にわたって物体検出とセグメンテーションを実行し、生のセンサーデータを行動可能な認識情報に変換できます。ここから、さらに推論オプションが必要な場合はPredictモードを確認するか、コンピュータビジョンプロジェクトのステップに従って、ロボットアプリケーションをプロトタイプから本番環境へ移行してください。
Link to this sectionよくある質問 (FAQ)#
Link to this sectionRobot Operating System (ROS) とは何ですか?#
Robot Operating System (ROS) は、開発者が堅牢なロボットアプリケーションを作成できるように、ロボット工学で一般的に使用されるオープンソースフレームワークです。これは、ロボットシステムの構築とインターフェース構築のための ライブラリやツール のコレクションを提供し、複雑なアプリケーションの開発を容易にします。ROSは、トピック や サービス を介したメッセージを使用してノード間の通信をサポートします。
Link to this sectionリアルタイム物体検出のために Ultralytics YOLO をROSと統合するにはどうすればよいですか?#
Ultralytics YOLO をROSと統合するには、ROS環境をセットアップし、センサーデータを処理するためにYOLOを使用します。まず、ros_numpy や Ultralytics YOLO などの必要な依存関係をインストールします。
pip install ros_numpy ultralytics次に、ROSノードを作成し、画像トピックをサブスクライブして物体検出用の受信データを処理します。以下に最小限の例を示します。
import ros_numpy
import rospy
from sensor_msgs.msg import Image

from ultralytics import YOLO

detection_model = YOLO("yolo26m.pt")
rospy.init_node("ultralytics")
det_image_pub = rospy.Publisher("/ultralytics/detection/image", Image, queue_size=5)

def callback(data):
    array = ros_numpy.numpify(data)
    det_result = detection_model(array)
    det_annotated = det_result[0].plot(show=False)
    det_image_pub.publish(ros_numpy.msgify(Image, det_annotated, encoding="rgb8"))

rospy.Subscriber("/camera/color/image_raw", Image, callback)
rospy.spin()
Link to this sectionROSトピックとは何ですか、また Ultralytics YOLO でどのように使用されますか?#
ROSトピックは、パブリッシュ・サブスクライブモデルを使用して、ROSネットワーク内のノード間通信を促進します。トピックは、ノードが非同期でメッセージを送受信するために使用する名前付きチャネルです。Ultralytics YOLOの文脈では、ノードに画像トピックをサブスクライブさせ、YOLOを使用して検出やセグメンテーションなどのタスクのために画像を処理し、その結果を新しいトピックにパブリッシュすることができます。
例えば、カメラトピックをサブスクライブし、検出のために受信画像を処理するには以下のようにします。
rospy.Subscriber("/camera/color/image_raw", Image, callback)Link to this sectionなぜROSで Ultralytics YOLO と深度画像を使用するのですか?#
ROSの sensor_msgs/Image で表される深度画像は、カメラから物体までの距離を提供し、障害物回避、3Dマッピング、ローカライゼーションなどのタスクに不可欠です。RGB画像とともに 深度情報を使用 することで、ロボットは自身の3D環境をよりよく理解できます。
YOLOを使用すると、RGB画像から セグメンテーションマスク を抽出し、これらのマスクを深度画像に適用して正確な3D物体情報を取得でき、ロボットのナビゲーションや環境との対話能力が向上します。
Link to this sectionROSでYOLOを使用して3D点群を視覚化するにはどうすればよいですか?#
ROSでYOLOを使用して3D点群を視覚化するには、以下の手順に従います。
sensor_msgs/PointCloud2メッセージをNumPy配列に変換します。- YOLOを使用してRGB画像をセグメント化します。
- セグメンテーションマスクを点群に適用します。
以下は、視覚化のために Open3D を使用した例です。
import sys

import numpy as np
import open3d as o3d
import ros_numpy
import rospy
from sensor_msgs.msg import PointCloud2

from ultralytics import YOLO

rospy.init_node("ultralytics")
segmentation_model = YOLO("yolo26m-seg.pt")

def pointcloud2_to_array(pointcloud2):
    pc_array = ros_numpy.point_cloud2.pointcloud2_to_array(pointcloud2)
    split = ros_numpy.point_cloud2.split_rgb_field(pc_array)
    rgb = np.stack([split["b"], split["g"], split["r"]], axis=2)
    xyz = ros_numpy.point_cloud2.get_xyz_points(pc_array, remove_nans=False)
    xyz = np.array(xyz).reshape((pointcloud2.height, pointcloud2.width, 3))
    return xyz, rgb

ros_cloud = rospy.wait_for_message("/camera/depth/points", PointCloud2)
xyz, rgb = pointcloud2_to_array(ros_cloud)
result = segmentation_model(rgb)

if not len(result[0].boxes.cls):
    print("No objects detected")
    sys.exit()

classes = result[0].boxes.cls.cpu().numpy().astype(int)
for index, class_id in enumerate(classes):
    mask = result[0].masks.data.cpu().numpy()[index, :, :].astype(int)
    mask_expanded = np.stack([mask, mask, mask], axis=2)

    obj_rgb = rgb * mask_expanded
    obj_xyz = xyz * mask_expanded

    pcd = o3d.geometry.PointCloud()
    pcd.points = o3d.utility.Vector3dVector(obj_xyz.reshape((-1, 3)))
    pcd.colors = o3d.utility.Vector3dVector(obj_rgb.reshape((-1, 3)) / 255)
o3d.visualization.draw_geometries([pcd])このアプローチは、セグメント化されたオブジェクトの3D視覚化を提供し、ロボットアプリケーションにおけるナビゲーションや操作などのタスクに役立ちます。