Segmentierungsobjekte mit Ultralytics YOLO isolieren
Instanzsegmentierung erzeugt für jedes erkannte Objekt eine pixelgenaue Maske. Dadurch kannst du jedes Objekt einzeln aus einem Bild ausschneiden. Diese Anleitung zeigt dir, wie du Segmentierungsergebnisse von Ultralytics YOLO mithilfe des Vorhersagemodus und OpenCV in isolierte Objekte umwandelst – mit einem einfarbig schwarzen oder transparenten Hintergrund zum Speichern als PNG.
Sieh dir an: So isolierst du segmentierte Objekte mit Ultralytics YOLO26 | Tutorial zu Python | VisionAI 🚀
Warum Segmentierungsobjekte isolieren?#
Einzelne Objekte aus einem Bild herauszulösen, eröffnet zahlreiche nachgelagerte Arbeitsabläufe:
- Hintergrundentfernung für Produktfotos, Kataloge oder kreative Bearbeitung.
- Zuschnitte einzelner Objekte, um aus deinen Erkennungen Klassifizierungsdatensätze zu erstellen.
- Gezielte Verarbeitung, damit spätere Schritte wie OCR, Farbanalyse oder Vermessung nur das Objekt und nicht die umgebende Szene erfassen.
- Export als transparentes PNG, um Objekte auf neue Hintergründe zu setzen.
Die Methode funktioniert mit jedem Ultralytics-YOLO-Segmentierungsmodell und umfasst vier Schritte: Inferenz ausführen → jede Kontur extrahieren → das Objekt isolieren → das Ergebnis speichern.
Segmentierungsinferenz ausführen#
Installiere die erforderlichen Bibliotheken, lade dann ein Segmentierungsmodell wie YOLO26n-seg (das Suffix -seg ist erforderlich, um Masken zu erzeugen) und führe eine Vorhersage für dein Quellbild aus:
from ultralytics import YOLO

# Segmentierungsmodell laden
model = YOLO("yolo26n-seg.pt")

# Inferenz für eine Quelle ausführen
results = model.predict(source="path/to/image.jpg")Wenn du model.predict() ohne source aufrufst, verwendet Ultralytics die mit dem Paket gelieferten Beispielbilder (bus.jpg und zidane.jpg). Das ist praktisch, um den Arbeitsablauf schnell zu testen.
Objektkonturen extrahieren#
Jedes Element in results entspricht einem Bild. Beim Durchlaufen eines Ergebnisses erhältst du jeweils eine Erkennung. Kopiere für jede Erkennung das Originalbild, lies die Klassenbezeichnung aus und zeichne die Maskenkontur des Objekts auf eine leere Binärmaske. Der weiße Bereich dieser Maske markiert genau die Pixel, die zum Objekt gehören.
Die Codeausschnitte in diesem und im nächsten Abschnitt werden innerhalb der folgenden Erkennungsschleife ausgeführt. Das vollständige Skript zum Kopieren und Einfügen findest du unter Vollständiges Beispiel.
from pathlib import Path

import cv2
import numpy as np

for r in results:
    img = np.copy(r.orig_img)
    img_name = Path(r.path).stem  # Basisname des Quellbilds

    # Jedes erkannte Objekt im Bild durchlaufen
    for ci, c in enumerate(r):
        label = c.names[c.boxes.cls.tolist().pop()]  # Klassenname

        # Binärmaske erstellen und die Objektkontur darauf zeichnen
        b_mask = np.zeros(img.shape[:2], np.uint8)
        contour = c.masks.xy[0].astype(np.int32).reshape(-1, 1, 2)
cv2.drawContours(b_mask, [contour], -1, (255, 255, 255), cv2.FILLED)c.masks.xy[0]gibt die Kontur der Maske als Punktkoordinaten vom Typ(x, y)für das Objekt in diesem Einzelerkennungsergebnis zurück..astype(np.int32)wandelt die Punkte ausfloat32um, die OpenCVsdrawContours()nicht akzeptiert..reshape(-1, 1, 2)bringt die Punkte in das Layout[N, 1, 2], dasdrawContours()erwartet, wobeiNdie Anzahl der Konturpunkte ist.
Wenn du [contour] mit dem Index -1 übergibst, werden alle Punkte der angegebenen Kontur gezeichnet und cv2.FILLED füllt jedes eingeschlossene Pixel weiß aus.
Das Objekt isolieren#
Sobald die Binärmaske fertig ist, kombinierst du sie mit dem Originalbild. Je nachdem, welchen Hintergrund du möchtest, gibt es zwei gängige Varianten:
Wandle die Maske in drei Kanäle um und behalte nur die Pixel, die das Objekt überlagern. Alles außerhalb der Kontur wird schwarz:
# Objekt vor schwarzem Hintergrund isolieren
mask3ch = cv2.cvtColor(b_mask, cv2.COLOR_GRAY2BGR)
isolated = cv2.bitwise_and(mask3ch, img)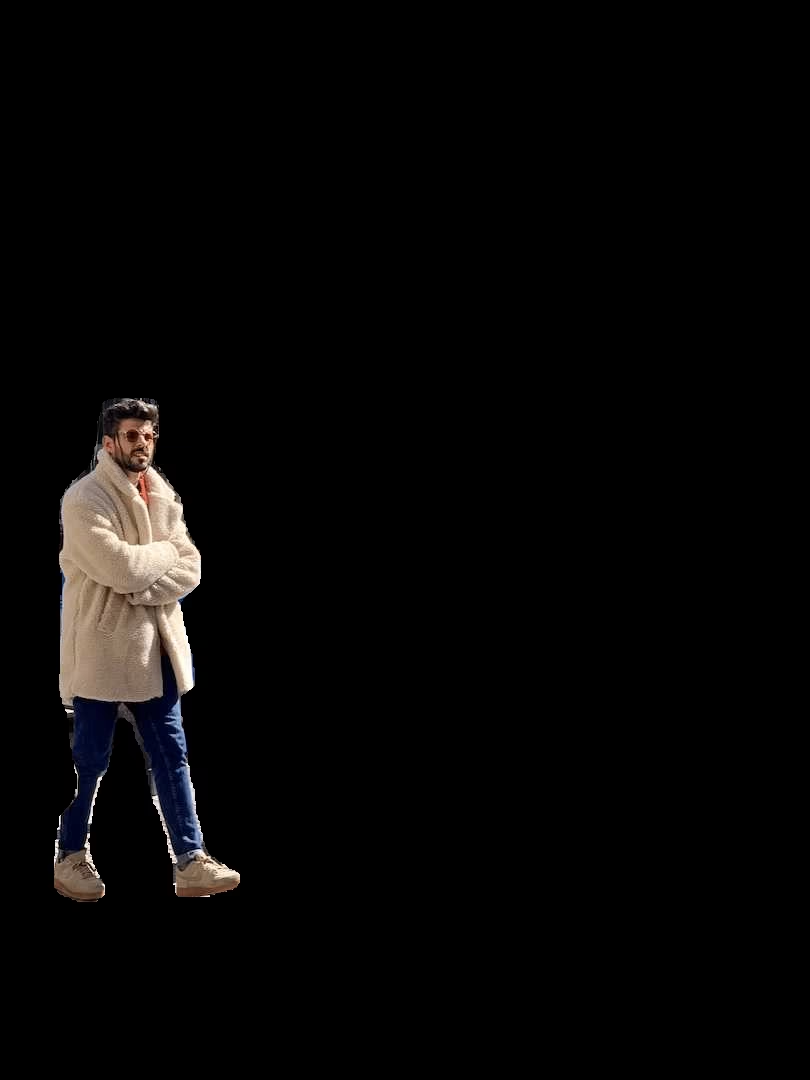
Wenn du nur den Bereich des Objekts statt des gesamten Bildes behalten möchtest, schneide das Bild anhand des Begrenzungsrahmens der Erkennung zu:
# Koordinaten des Begrenzungsrahmens
x1, y1, x2, y2 = c.boxes.xyxy.cpu().numpy().squeeze().astype(np.int32)
# Isoliertes Bild auf den Objektbereich zuschneiden
iso_crop = isolated[y1:y2, x1:x2]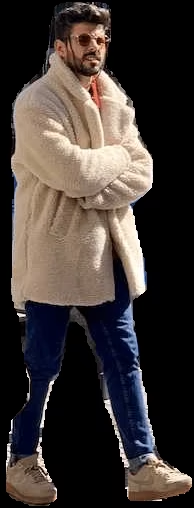
Das ist bereits integriert. Übergib save_crop=True an predict(), und Ultralytics speichert automatisch Zuschnitte der Begrenzungsrahmen – ganz ohne Maskierung.
Ergebnis speichern (optional)#
Was du mit jedem isolierten Objekt machst, bleibt dir überlassen. Ein häufiger nächster Schritt ist, das Objekt zur späteren Verwendung auf der Festplatte zu speichern:
# Save the isolated object to file
cv2.imwrite(f"{img_name}_{label}-{ci}.png", isolated)
Hier ist img_name der Dateistamm des Quellbilds, label der Klassenname und ci der Erkennungsindex. So erhalten mehrere Instanzen derselben Klasse eindeutige Dateinamen. Ersetze isolated durch iso_crop, wenn du den optionalen Zuschnitt oben angewendet hast.
Vollständiges Beispiel#
Das folgende Skript fasst alle Schritte zu einem einzigen ausführbaren Codeblock zusammen. Standardmäßig wird ein schwarzer Hintergrund verwendet. Ändere die eine markierte Zeile zu np.dstack([img, b_mask]), um stattdessen ein transparentes PNG zu erhalten:
from pathlib import Path

import cv2
import numpy as np

from ultralytics import YOLO

model = YOLO("yolo26n-seg.pt")
results = model.predict(source="path/to/image.jpg")

for r in results:
    img = np.copy(r.orig_img)
    img_name = Path(r.path).stem

    for ci, c in enumerate(r):
        label = c.names[c.boxes.cls.tolist().pop()]

        # Build a binary mask from the object contour
        b_mask = np.zeros(img.shape[:2], np.uint8)
        contour = c.masks.xy[0].astype(np.int32).reshape(-1, 1, 2)
        cv2.drawContours(b_mask, [contour], -1, (255, 255, 255), cv2.FILLED)

        # Isolate the object (black background)
        mask3ch = cv2.cvtColor(b_mask, cv2.COLOR_GRAY2BGR)
        isolated = cv2.bitwise_and(mask3ch, img)  # transparent PNG: isolated = np.dstack([img, b_mask])

        # Save or add your custom post-processing here
        cv2.imwrite(f"{img_name}_{label}-{ci}.png", isolated)

        # Optional: crop to the bounding box before saving
        # x1, y1, x2, y2 = c.boxes.xyxy.cpu().numpy().squeeze().astype(np.int32)
        # cv2.imwrite(f"{img_name}_{label}-{ci}.png", isolated[y1:y2, x1:x2])
Wenn du den Ablauf wiederholt verwenden möchtest, fasse den Schleifenrumpf in einer Funktion zusammen, die du für viele Bilder aufrufen kannst.
Fazit#
Du hast nun eine vollständige Anleitung zum Isolieren segmentierter Objekte mit Ultralytics YOLO: Führe Inferenz aus, erstelle aus jeder Kontur eine Binärmaske und extrahiere anschließend das Objekt vor schwarzem oder transparentem Hintergrund. Optional kannst du es auf seinen Begrenzungsrahmen zuschneiden. In der Dokumentation zu Segmentierungsaufgaben und zum Vorhersagemodus erfährst du, wie du den Arbeitsablauf an deine eigenen Klassen anpasst.
Häufig gestellte Fragen#
Lade ein Segmentierungsmodell, führe Inferenz aus, erstelle aus der Kontur jeder Erkennung eine Binärmaske und kombiniere sie mit dem Originalbild:
import cv2
import numpy as np

from ultralytics import YOLO

model = YOLO("yolo26n-seg.pt")
results = model.predict(source="path/to/your/image.jpg")

img = np.copy(results[0].orig_img)
b_mask = np.zeros(img.shape[:2], np.uint8)
contour = results[0].masks.xy[0].astype(np.int32).reshape(-1, 1, 2)
cv2.drawContours(b_mask, [contour], -1, (255, 255, 255), cv2.FILLED)

mask3ch = cv2.cvtColor(b_mask, cv2.COLOR_GRAY2BGR)
isolated = cv2.bitwise_and(mask3ch, img)
Das vollständige Beispiel zeigt die vollständige Schleife für jede Erkennung.
Es gibt zwei Hauptvarianten. Für einen schwarzen Hintergrund wandelst du die Maske in drei Kanäle um und verwendest
cv2.bitwise_and(). Für einen transparenten Hintergrund (beim Speichern als PNG) fügst du die Maske mitnp.dstack([img, b_mask])als vierten Alpha-Kanal hinzu. Beide Varianten werden unter Das Objekt isolieren gezeigt.Lies die Koordinaten des Begrenzungsrahmens aus der Erkennung aus und schneide das isolierte Bild entsprechend zu:
x1, y1, x2, y2 = results[0].boxes.xyxy[0].cpu().numpy().astype(np.int32)
iso_crop = isolated[y1:y2, x1:x2]
Weitere Informationen zu den Ergebnissen der Begrenzungsrahmen findest du in der Dokumentation zum Vorhersagemodus.
Ultralytics YOLO ermöglicht eine schnelle Instanzsegmentierung in Echtzeit und erzeugt präzise Masken und Begrenzungsrahmen. Eine einfache Python-API macht aus Inferenz-Ergebnissen mit wenigen Zeilen OpenCV-Code freigestellte Objekte.
Ja. Verwende das Argument
save_cropinpredict(), um Zuschnitte der Begrenzungsrahmen mit ihrem ursprünglichen Hintergrund zu speichern:results = model.predict(source="path/to/your/image.jpg", save_crop=True)Weitere Informationen findest du im Abschnitt Argumente für die Inferenz im Vorhersagemodus.


Kommentare16
Stell eine Frage, teile deine Ergebnisse oder hilf jemand anderem.
cordonballas
wow thanx that's exactly what i've been looking for.
 Glenn JocherUltralytics
@cordonballas thank you for your positive feedback! We're glad the segmentation isolation guide was helpful. If you have any further questions, feel free to ask—the YOLO community and our team are here to help. 😊
For continued support, check our Segment Task documentation and Predict Mode guide.
AbdulGhofur23
How can I extract a mask from a TIFF (Tag Image File Format) so that the mask's coordinates align with the projection of the TIFF image?
- Glenn JocherUltralytics
To extract masks from a TIFF image while aligning the mask's coordinates with the image's projection, you can use the segmentation results from Ultralytics YOLO. Generate the mask using
results.masks.xyfor contour points and overlay it on the TIFF image. Ensure alignment by maintaining the original image dimensions during processing. For more, refer to the Isolating Segmentation Objects Guide. Let us know if you need further assistance!1
vedhanayagan9626
I used yolo v11n seg model , i got a segmented image as output with bounding boxes in those some of predictions are overlapped like a bounding box on two items as single so i try to remove a rectangle and associated segmentation from an image and add new rectangle by hold and drag functionality its looks likw working but i cant get optimized result. Is there any way to remove and add new bounding boxes after a segmentation result?
- Glenn JocherUltralytics
@vedhanayagan9626 to address overlapping predictions, you can manually refine results by manipulating masks and bounding boxes post-inference. Use the mask and bounding box coordinates from
results[0].masksandresults[0].boxesto remove or modify specific predictions. For new bounding boxes, you might need to create and integrate them into your results structure manually. Refer to the Isolating Segmentation Objects guide for detailed steps. For optimized results, ensure adequate data quality and model tuning.
SerhiiPostupaiev
Hello, can you please explain how the YOLOv8 performs upscaling? For example, my input images are 854x480, YOLOv8 scales them up to 864x512. How does it exactly performs upscaling? Does it use padding or some other approaches?
 Paula DerrengerUltralytics
@SerhiiPostupaiev hello! In YOLOv8, images are scaled up or down to a specific model input size, optimally a square format (like 640x640) or a dimension supported by the model (such as 864x512 in your case). The upscaling for images that do not exactly match the input dimensions typically involves:
- Resizing the image to the closest dimension that maintains the aspect ratio.
- Padding the resized image to reach the required input size, ensuring that the aspect ratio is preserved.
For instance, for an image of 854x480, YOLOv8 may:
- Resize the image to fit the model's width of 864 while maintaining the aspect ratio, which adjusts the height accordingly.
- Pad the height to the nearest model-supported dimension (like 512), adding pixel values (usually zeros) to the top and bottom or sides of the image to reach the required size.
Here’s a rough example in Python using OpenCV for how padding might be handled:
import cv2
import numpy as np

# Example image load
image = cv2.imread('input.jpg')
# Resizing the image
resized_image = cv2.resize(image, (864, keep_aspect_ratio_height))  # Example variable for illustration

# Padding the resized image
top_padding = (512 - resized_image.shape[0]) // 2
bottom_padding = 512 - resized_image.shape[0] - top_padding
padded_image = cv2.copyMakeBorder(resized_image, top_padding, bottom_padding, 0, 0, cv2.BORDER_CONSTANT, value=[0, 0, 0])
This ensures the entire image is used during prediction without distorting its original aspect ratio. 😊
EnricoMendez
Hello, I run this code example but it only display one object's mask, is it posible to join all the objects' masks in a single frame?
- Glenn JocherUltralytics
Hey there! 😊 Absolutely, you can combine all the objects' masks into a single frame. Just modify the section where you're drawing the contours onto the mask. Instead of creating a new binary mask
b_maskfor each object, you initialize one common mask before iterating through the objects and draw every object's contour on this common mask. Here's a quick example to illustrate:# Initialize one common binary mask for all objects b_mask_all = np.zeros(img.shape[:2], np.uint8) for ci, c in enumerate(r): # Your contour extraction remains the same contour = c.masks.xy.pop().astype(np.int32).reshape(-1, 1, 2) # Draw each contour onto the common mask cv2.drawContours(b_mask_all, [contour], -1, (255, 255, 255), cv2.FILLED) # After the loop, you can use `b_mask_all` which contains all objects' masksJust keep in mind, with
b_mask_all, you'll have all the detected objects' masks on one mask. If the objects overlap in your image, their masks will also overlap inb_mask_all. Hope this helps! Let us know if you have more questions. 😊
mariamg03
hi is there a way I can apply the edits on the binary image then revert back to the original with the mask part edited?
- Paula DerrengerUltralytics
Hey there! 👋 Yes, you can certainly make edits on a binary mask and then apply those changes back to the original image, essentially modifying only the parts that the mask covers. Here's a quick outline of how you could achieve this with an example focusing on segmentation tasks:
-
After segmenting your image and obtaining the binary mask (let's say
b_mask), you can perform any edits you like on this mask. For example, inverting the mask, dilating, or eroding. -
To apply the edited mask back to the original image (
orig_img), you would use the mask to isolate the area of interest in the original image and then apply your edits.
Here's a code snippet demonstrating this with a simple inversion edit:
import cv2
import numpy as np

# Assuming 'b_mask' is your binary mask and 'orig_img' is your original image
# Let's say you inverted the binary mask
edited_mask = 255 - b_mask  # Inverting mask

# Convert the single channel binary mask to a 3 channel mask to match the original image
edited_mask_3ch = cv2.cvtColor(edited_mask, cv2.COLOR_GRAY2BGR)

# Apply the edited mask back to the original image
# This line performs bitwise-and operation to only keep parts of the image where the mask is white
edited_image = cv2.bitwise_and(orig_img, edited_mask_3ch)

# At this point, 'edited_image' contains the original image with edits applied to the segmented part
This is a simplified example to show the concept. Depending on the edits you've made to
b_mask, you might need to adjust how you applyedited_maskback toorig_img.Remember, after editing the mask, you can always revert it back to its original form if you've kept a copy before editing, or you can apply the inverse of your edits.
I hope this helps! Let me know if you have more questions. Happy coding! 😊
-
Safiislamian
Hi sir, thanku for your response does load dataset will work or not. As the dataset is in yolo form where we have different folders and subfolders like train having images and labels etc
On Wed, Mar 27, 2024, 7:03 AM Glenn Jocher @.***> wrote:
Hey there! 👋 Glad to see you're interested in applying YOLOv8 for instance segmentation with a dataset from Roboflow. Below is a quick guide to help you get started with applying YOLOv8 for detection and then using masks for the dataset based on class. Step 1: Install Ultralytics YOLO
First, ensure you have Ultralytics installed:
pip install ultralytics
Step 2: Load Your Model
from ultralytics import YOLOmodel = YOLO('yolov8n-seg.pt') # Use yolov8n-seg.pt for segmentation models
Step 3: Predict and Isolate Objects
Now, for predicting and isolating objects based on their classes, you'll dive into the prediction results to access and manipulate the segmentation masks:
results = model.predict(source='path/to/your/dataset')for result in results: for detection in result: class_name = detection.names[detection.boxes.cls.tolist().pop()] # Create a binary mask from detection binary_mask = np.zeros(result.orig_img.shape[:2], np.uint8) contour = detection.masks.xy.pop().astype(np.int32).reshape(-1, 1, 2) cv2.drawContours(binary_mask, [contour], -1, (255, 255, 255), cv2.FILLED) # Example to save or further process the mask
Note: Replace 'path/to/your/dataset' with the actual path to your images. Step 4: Saving or Processing the Masks
You may wish to save each mask based on its class for processing later. You can modify the loop to save each binary mask to a file using cv2.imwrite() method.
cv2.imwrite(f'{class_name}_mask.jpg', binary_mask)
This will save each mask with its respective class name as part of the filename, allowing for easy organization by class.
Hope this helps! 😊 Let us know if you need further assistance or have more questions. Happy coding!
— Reply to this email directly, view it on GitHub https://github.com/orgs/ultralytics/discussions/9334#discussioncomment-8922405, or unsubscribe https://github.com/notifications/unsubscribe-auth/AUP75TG3RFWAL7YRMWDR66DY2ILE5AVCNFSM6AAAAABFJ334B2VHI2DSMVQWIX3LMV43SRDJONRXK43TNFXW4Q3PNVWWK3TUHM4DSMRSGQYDK . You are receiving this because you commented.Message ID: @.*** com>
- Paula DerrengerUltralytics(bearbeitet)
Hi there! 😄
Absolutely, loading a dataset structured in YOLO format (with separate folders for train/test images and labels) works well with YOLO26. You can specify the dataset structure in a YAML file and provide this file when initiating training or validation processes. Here's an example
data.yamlfile structure for your dataset:train: /path/to/dataset/train/images # path to images folder val: /path/to/dataset/val/images # path to validation images # Classes nc: 80 # number of classes names: ['class1', 'class2', ...] # class namesAnd here's how you might start training with your dataset:
yolo detect train data=data.yaml model=yolo26n.ptMake sure to replace
/path/to/dataset/train/imagesand/path/to/dataset/val/imageswith the actual paths to your dataset and similarly update thenc(number of classes) andnames(class labels) accordingly.If you have any more questions or need further assistance, feel free to ask. Happy to help! 🚀
There is a dataset on roboflow for instance segmentation, i want to apply first yolov8 and then masks for all the dataset arranged on the basis of their classes. please provide me details and code for that Thank you...
- Glenn JocherUltralytics(bearbeitet)
Hey there! 👋 Glad to see you're interested in applying YOLO26 for instance segmentation with a dataset from Roboflow. Below is a quick guide to help you get started with applying YOLO26 for detection and then using masks for the dataset based on class.
Step 1: Install Ultralytics YOLO
First, ensure you have Ultralytics installed:
pip install ultralyticsStep 2: Load Your Model
from ultralytics import YOLO
model = YOLO('yolo26n-seg.pt')  # Use yolo26n-seg.pt for segmentation models
Step 3: Predict and Isolate Objects
Now, for predicting and isolating objects based on their classes, you'll dive into the prediction results to access and manipulate the segmentation masks:
results = model.predict(source='path/to/your/dataset')
for result in results:
    for detection in result:
        class_name = detection.names[detection.boxes.cls.tolist().pop()]
        # Create a binary mask from detection
        binary_mask = np.zeros(result.orig_img.shape[:2], np.uint8)
        contour = detection.masks.xy.pop().astype(np.int32).reshape(-1, 1, 2)
        cv2.drawContours(binary_mask, [contour], -1, (255, 255, 255), cv2.FILLED)
        # Example to save or further process the mask
Note: Replace
'path/to/your/dataset'with the actual path to your images.Step 4: Saving or Processing the Masks
You may wish to save each mask based on its class for processing later. You can modify the loop to save each binary mask to a file using
cv2.imwrite()method.cv2.imwrite(f'{class_name}_mask.jpg', binary_mask)This will save each mask with its respective class name as part of the filename, allowing for easy organization by class.
Hope this helps! 😊 Let us know if you need further assistance or have more questions. Happy coding!