Segmentazione delle istanze con Ultralytics YOLO
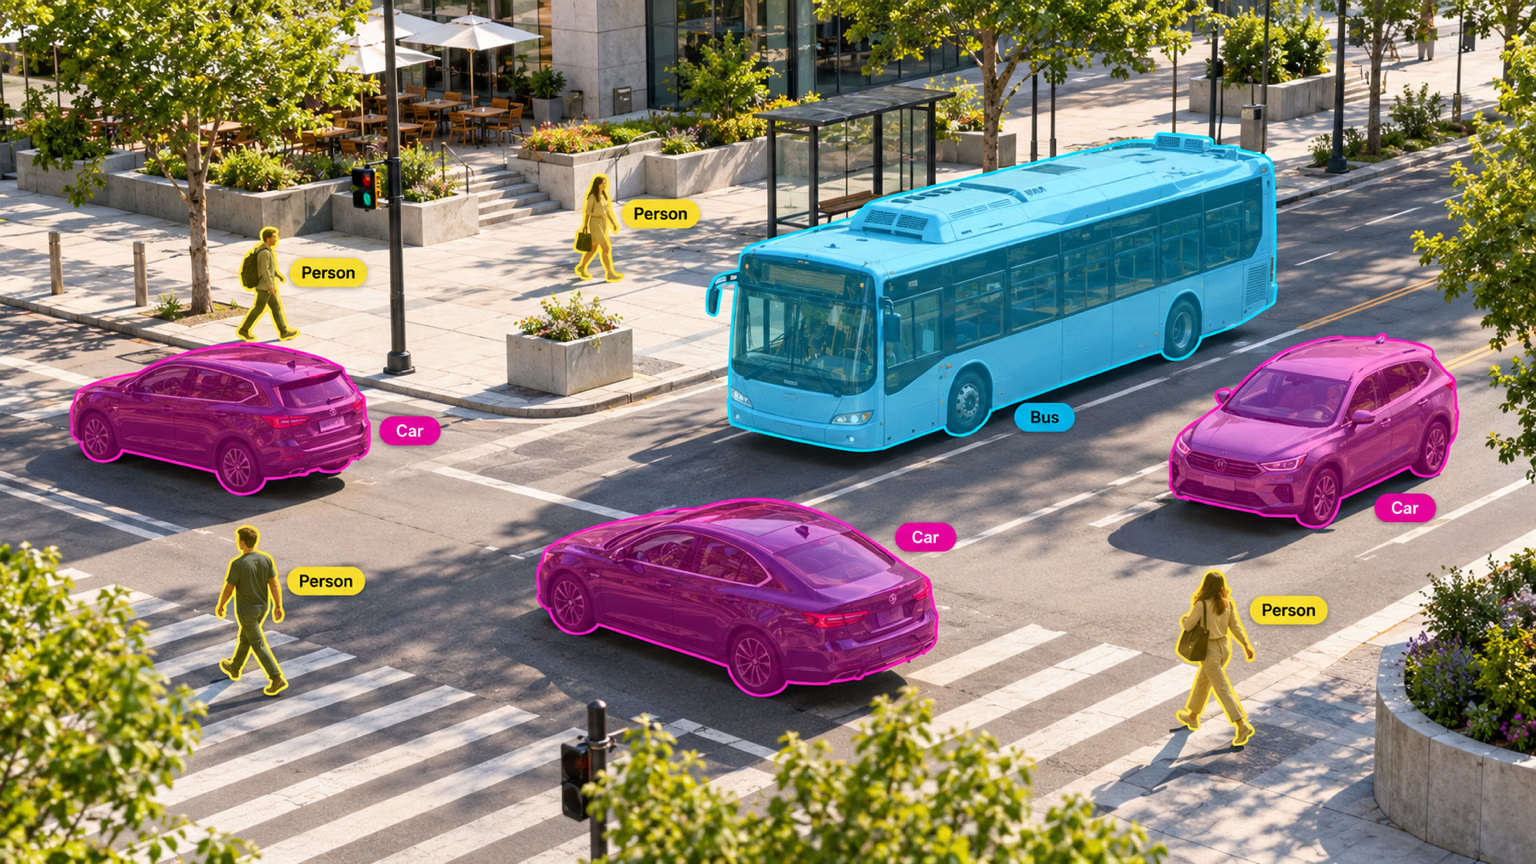
La segmentazione delle istanze va oltre il rilevamento degli oggetti e consiste nell'identificare singoli oggetti in un'immagine e separarli dal resto dell'immagine.
L'output di un modello di segmentazione di istanze è un insieme di maschere o contorni che delineano ogni oggetto nell'immagine, insieme alle etichette di classe e ai punteggi di confidenza di ciascun oggetto. La segmentazione di istanze è utile quando devi sapere non solo dove si trovano gli oggetti in un'immagine, ma anche quale sia la loro forma esatta.
Guarda: Esegui la segmentazione in Python con un modello Ultralytics YOLO preaddestrato.
I modelli Segment di YOLO26 usano il suffisso -seg, ad esempio yolo26n-seg.pt, e sono preaddestrati su COCO.
Modelli#
Di seguito sono mostrati i modelli YOLO26 Segment preaddestrati sul dataset COCO.
I modelli vengono scaricati automaticamente dalla più recente release di Ultralytics al primo utilizzo.
| Modello | dimensione (pixel) | mAPbox50-95 (e2e) | mAPmask50-95 (e2e) | Velocità CPU ONNX (ms) | Velocità T4 TensorRT10 (ms) | parametri (M) | FLOPs (B) |
|---|---|---|---|---|---|---|---|
| YOLO26n-seg | 640 | 39.6 | 33.9 | 53.3 ± 0.5 | 2.1 ± 0.0 | 2.7 | 9.3 |
| YOLO26s-seg | 640 | 47.3 | 40.0 | 118.4 ± 0.9 | 3.3 ± 0.0 | 10.4 | 34.5 |
| YOLO26m-seg | 640 | 52.5 | 44.1 | 328.2 ± 2.4 | 6.7 ± 0.1 | 23.6 | 121.7 |
| YOLO26l-seg | 640 | 54.4 | 45.5 | 387.0 ± 3.7 | 8.0 ± 0.1 | 28.0 | 140.1 |
| YOLO26x-seg | 640 | 56.5 | 47.0 | 787.0 ± 6.8 | 16.4 ± 0.1 | 62.8 | 314.0 |
- I valori mAPval si riferiscono a un singolo modello e a una singola scala sul dataset COCO val2017.
Riproduci i risultati conyolo segment val data=coco.yaml device=0 nms=False - Velocità media sulle immagini COCO val con ONNX su CPU e TensorRT10 su una GPU NVIDIA T4.
Riproduci i risultati conyolo segment val data=coco.yaml batch=1 device=0|cpu nms=False - I valori di Parametri e FLOPs si riferiscono ai modelli fusi dopo la fusione di Conv/BatchNorm e la rimozione del ramo di rilevamento inutilizzato. I checkpoint preaddestrati mantengono l’architettura di addestramento completa e possono riportare valori più elevati.
Questi checkpoint segmentano le 80 classi COCO. Per segmentare categorie al di fuori di questo elenco senza riaddestrare il modello, consulta YOLOE, che accetta le classi come prompt testuale, esempio visivo o vocabolario integrato.
Consulta l'anteprima non ancora rilasciata di YOLO27 per i risultati preliminari di COCO su BBox e maschere.
Addestra#
Addestra un modello YOLO26n-seg sul dataset COCO8-seg per 100 epoche con una dimensione delle immagini di 640.
from ultralytics import YOLO

# Carica un modello
model = YOLO("yolo26n-seg.yaml")  # crea un nuovo modello dal file YAML
model = YOLO("yolo26n-seg.pt")  # carica un modello preaddestrato (consigliato per l'addestramento)
model = YOLO("yolo26n-seg.yaml").load("yolo26n-seg.pt")  # crea dal file YAML e trasferisci i pesi

# Addestra il modello
results = model.train(data="coco8-seg.yaml", epochs=100, imgsz=640)
Consulta la pagina Addestramento per tutti i dettagli sulla modalità train. Puoi addestrare i modelli di segmentazione anche con l'addestramento cloud di Ultralytics Platform.
Formato del dataset#
Trovi tutti i dettagli sul formato dei dataset di segmentazione YOLO nella Guida ai dataset. Per convertire un dataset COCO JSON esistente nel formato YOLO, usa la funzione integrata convert_coco con use_segments=True, come descritto nella guida da COCO a YOLO. Puoi anche creare maschere di segmentazione con l'annotazione di Ultralytics Platform, usando strumenti per poligoni e l'annotazione intelligente basata su SAM.
Convalida#
Convalida la precisione del modello YOLO26n-seg addestrato, misurata come precisione media (mAP) dei riquadri e delle maschere. Non sono necessari argomenti, poiché model conserva data usati per l'addestramento e gli argomenti come attributi del modello: path/to/best.pt dell'esempio Train esegue la convalida su COCO8-seg. I pesi ufficiali registrano il percorso di un dataset di addestramento che non esiste sul tuo computer, quindi ripiegano sul valore predefinito dell'attività coco8-seg.yaml e mostrano un avviso. Passa data per convalidare il modello su un altro dataset.
from ultralytics import YOLO

# Carica un modello
model = YOLO("yolo26n-seg.pt")  # carica un modello ufficiale
model = YOLO("path/to/best.pt")  # carica un modello personalizzato

# Convalida il modello
metrics = model.val()  # non servono argomenti, il dataset e le impostazioni vengono ricordati
metrics.box.map  # map50-95(B)
metrics.box.map50  # map50(B)
metrics.box.map75  # map75(B)
metrics.box.maps  # mAP50-95(B) per classe; le classi assenti nel set di validazione mantengono il mAP(B) complessivo
metrics.box.ap_class_index  # indici delle classi effettivamente valutate
metrics.box.image_metrics  # dizionario delle metriche per immagine per det con precision, recall, F1, TP, FP e FN
metrics.seg.map  # map50-95(M)
metrics.seg.map50  # map50(M)
metrics.seg.map75  # map75(M)
metrics.seg.maps  # mAP50-95(M) per classe; le classi assenti nel set di validazione mantengono il mAP(M) complessivo
metrics.seg.ap_class_index  # indici delle classi effettivamente valutate
metrics.seg.image_metrics # dizionario delle metriche per immagine per seg con precision, recall, F1, TP, FP e FNPredici#
Usa un modello YOLO26n-seg addestrato per eseguire predizioni sulle immagini.
from ultralytics import YOLO

# Carica un modello
model = YOLO("yolo26n-seg.pt")  # carica un modello ufficiale
model = YOLO("path/to/best.pt")  # carica un modello personalizzato

# Esegui previsioni con il modello
results = model("https://ultralytics.com/images/bus.jpg")  # esegui una previsione su un’immagine

# Accedi ai risultati
for result in results:
    xy = result.masks.xy  # poligoni delle maschere in coordinate pixel
    xyn = result.masks.xyn  # poligoni delle maschere normalizzati
    masks = result.masks.data  # maschere binarie, forma (N,H,W), dtype torch.uint8
Consulta la pagina Previsione per i dettagli completi sulla modalità predict.
Output dei risultati#
La segmentazione delle istanze YOLO restituisce un oggetto Results per immagine. Ogni risultato memorizza le predizioni a livello di oggetto, in cui ogni istanza rilevata ha la propria maschera binaria, classe, confidenza e BBox.
| Attributo | Tipo | Forma | Descrizione |
|---|---|---|---|
result.masks | Masks | (N) | Maschere di istanza. |
result.masks.data | torch.uint8 | (N,H,W) | Maschere binarie, con valori 0 o 1. |
result.masks.xy | np.float32 | list[(P,2)] | Poligoni in pixel. |
result.masks.xyn | np.float32 | list[(P,2)] | Poligoni normalizzati. |
result.boxes | Boxes | (N) | Riquadri/classi/confidenze delle istanze. |
result.boxes.cls | torch.float32 | (N,) | ID delle classi; converti in int per ottenere i nomi. |
Per consultare i campi Results specifici di ogni attività, visita la sezione Risultati delle previsioni per attività.
Segmentazione delle istanze e segmentazione semantica#
La segmentazione delle istanze opera a livello di oggetto: due auto producono due maschere, due BBox e due punteggi di confidenza. La segmentazione semantica è una classificazione a livello di pixel: le stesse auto diventano pixel con lo stesso ID di classe in un'unica mappa di classi delle dimensioni dell'immagine, senza BBox o valori di confidenza per oggetto né un elenco predefinito di poligoni. Consulta il confronto dettagliato campo per campo nella pagina sulla segmentazione semantica.
Esporta#
Esporta un modello YOLO26n-seg in un altro formato, ad esempio ONNX, CoreML e così via.
from ultralytics import YOLO

# Carica un modello
model = YOLO("yolo26n-seg.pt")  # carica un modello ufficiale
model = YOLO("path/to/best.pt")  # carica un modello personalizzato

# Esporta il modello
model.export(format="onnx")
I formati di esportazione disponibili per YOLO26-seg sono elencati nella tabella qui sotto. Puoi esportare in qualsiasi formato usando l'argomento format, ad esempio format='onnx' o format='engine'. Puoi eseguire predizioni o convalidare direttamente i modelli esportati, ad esempio con yolo predict model=yolo26n-seg.onnx. Al termine dell'esportazione, vengono mostrati esempi d'uso del modello.
CoreML supporta NMS integrato (nms=True) per il rilevamento, la segmentazione delle istanze e la stima della posa con forme statiche. Le esportazioni di segmentazione predefinite (nms=None) lasciano la gestione di NMS al componente che le utilizza.
| Formato | Argomento format | Modello | Metadati | Argomenti |
|---|---|---|---|---|
| PyTorch | - | yolo26n-seg.pt | ✅ | - |
| TorchScript | torchscript | yolo26n-seg.torchscript | ✅ | imgsz, quantize, dynamic, nms, batch, device |
| ONNX | onnx | yolo26n-seg.onnx | ✅ | imgsz, quantize, dynamic, simplify, opset, nms, batch, data, fraction, device |
| OpenVINO | openvino | yolo26n-seg_openvino_model/ | ✅ | imgsz, quantize, dynamic, nms, batch, data, fraction, device |
| TensorRT | engine | yolo26n-seg.engine | ✅ | imgsz, quantize, dynamic, simplify, opset, workspace, nms, batch, data, fraction, device |
| CoreML | coreml | yolo26n-seg.mlpackage | ✅ | imgsz, dynamic, quantize, nms, batch, device |
| Apple Core AI | coreai | yolo26n-seg.aimodel | ✅ | imgsz, batch, quantize |
| TF SavedModel | saved_model | yolo26n-seg_saved_model/ | ✅ | imgsz, quantize, opset, nms, batch, data, fraction, device |
| TF GraphDef | pb | yolo26n-seg.pb | ❌ | imgsz, opset, batch, device |
| TF Edge TPU | edgetpu | yolo26n-seg_edgetpu.tflite | ✅ | imgsz, quantize, opset, data, fraction, device |
| LiteRT | litert | yolo26n-seg.tflite | ✅ | imgsz, quantize, batch, data, fraction, device |
| PaddlePaddle | paddle | yolo26n-seg_paddle_model/ | ✅ | imgsz, batch, device |
| MNN | mnn | yolo26n-seg.mnn | ✅ | imgsz, batch, dynamic, quantize, simplify, opset, nms, device |
| NCNN | ncnn | yolo26n-seg_ncnn_model/ | ✅ | imgsz, quantize, device |
| IMX500 | imx | yolo11n_imx_model/ | ✅ | imgsz, quantize, data, fraction, nms, device |
| RKNN | rknn | yolo26n-seg_rknn_model/ | ✅ | imgsz, batch, name, quantize, simplify, opset, data, fraction, device |
| ExecuTorch | executorch | yolo26n-seg_executorch_model/ | ✅ | imgsz, quantize, batch, data, fraction, device |
| Axelera | axelera | yolo26n-seg_axelera_model/ | ✅ | imgsz, batch, quantize, data, fraction, device |
| DEEPX | deepx | yolo26n-seg_deepx_model/ | ✅ | imgsz, quantize, simplify, opset, data, optimize, device |
| Qualcomm QNN | qnn | yolo26n-seg_qnn.onnx | ✅ | imgsz, batch, name, quantize, simplify, opset, data, fraction, device |
| Hailo | hailo | yolo26n-seg_hailo_model/ | ✅ | imgsz, name, quantize, data, fraction, simplify, conf, iou, device |
| Huawei Ascend | ascend | yolo26n-seg_ascend_model/ | ✅ | imgsz, batch, name, quantize, opset, simplify, nms, device |
| AMD Xilinx | xilinx | yolo26n-seg_xilinx_model/ | ✅ | imgsz, name, quantize, data, fraction, opset, simplify, device |
| NXP | nxp | yolo26n-seg_nxp.tflite | ✅ | imgsz, quantize, data, fraction, device |
| ST Edge AI | stedgeai | yolo26n-seg_stedgeai.onnx | ✅ | imgsz, quantize, data, fraction, opset, simplify, device |
nms=None restituisce per impostazione predefinita output grezzi per la NMS esterna (YOLO26 mantiene la propria head senza NMS su Axelera). Imposta nms=False per selezionare una head senza NMS disponibile; i formati non supportati usano il proprio percorso di output nativo. Le voci nms qui sopra identificano i formati che possono incorporare la NMS con nms=True.
Consulta i dettagli completi di export nella pagina Esportazione.
Domande frequenti#
Per addestrare un modello di segmentazione YOLO26 su un dataset personalizzato, devi prima preparare il dataset nel formato di segmentazione YOLO. Puoi usare l'utilità integrata
convert_cocoper convertire i dataset JSON COCO. Una volta pronto il dataset, puoi addestrare il modello con Python o con i comandi CLI:Esempiofrom ultralytics import YOLO # Carica un modello di segmentazione YOLO26 preaddestrato model = YOLO("yolo26n-seg.pt") # Addestra il modello results = model.train(data="path/to/your_dataset.yaml", epochs=100, imgsz=640)Consulta la pagina Configurazione per altri argomenti disponibili.
Il rilevamento degli oggetti identifica e localizza gli oggetti in un'immagine disegnando riquadri di delimitazione attorno a essi, mentre la segmentazione di istanze non solo identifica i riquadri di delimitazione, ma delinea anche la forma esatta di ogni oggetto. I modelli di segmentazione di istanze di YOLO26 forniscono maschere o contorni che delineano ciascun oggetto rilevato, risultando particolarmente utili nelle attività in cui è importante conoscere la forma precisa degli oggetti, come l'imaging medico o la guida autonoma.
Ultralytics YOLO26 combina un'elevata precisione con la velocità di inferenza in tempo reale, caratteristiche adatte alla segmentazione di istanze su flussi video e dispositivi edge. I modelli Segment di YOLO26 sono preaddestrati sul dataset COCO, quindi sono subito in grado di segmentare 80 classi di oggetti comuni e offrono un solido punto di partenza per il fine-tuning su dati personalizzati. La stessa API
YOLOgestisce l'addestramento, la convalida, le predizioni e l'esportazione per applicazioni di ricerca e industriali.Caricare e convalidare un modello di segmentazione YOLO preaddestrato è semplice. Ecco come fare usando Python e CLI:
Esempiofrom ultralytics import YOLO # Carica un modello preaddestrato model = YOLO("yolo26n-seg.pt") # Convalida il modello metrics = model.val() print("Mean Average Precision for boxes:", metrics.box.map) print("Mean Average Precision for masks:", metrics.seg.map)Questi passaggi ti forniscono metriche di convalida come la precisione media (mAP), la misura standard delle prestazioni di segmentazione.
Esportare un modello di segmentazione YOLO nel formato ONNX è semplice e puoi farlo usando Python o i comandi CLI:
Esempiofrom ultralytics import YOLO # Carica un modello preaddestrato model = YOLO("yolo26n-seg.pt") # Esporta il modello in formato ONNX model.export(format="onnx")Per maggiori dettagli sull'esportazione in vari formati, consulta la pagina Esportazione.


Commenti418
Fai una domanda, condividi i tuoi risultati o aiuta qualcun altro.
hp0716
Thank you for sharing the YOLOV11-seg model. I have encountered a problem now. When using YOLOV11 to segment my ID card, there are many uneven areas on the edges of the segmentation result, which affects my fitting of the card certificate boundary. How can I obtain smooth segmentation results? Do you have any parameters that can be directly configured?
1Additionally, is there a method to fit the boundary of the ID card mask into four straight lines for locating the ID card?
 Glenn JocherUltralytics
@hp0716 for smoother segmentation results on ID cards, try using
retina_masks=Trueduring inference to get higher resolution masks:from ultralytics import YOLO model = YOLO('yolo11n-seg.pt') results = model(image, retina_masks=True)For post-processing to get smooth boundaries, you can apply morphological operations and contour approximation:
import cv2
import numpy as np

# Get mask from results
mask = results[0].masks.data[0].cpu().numpy()
mask = (mask * 255).astype(np.uint8)

# Apply morphological smoothing
kernel = cv2.getStructuringElement(cv2.MORPH_ELLIPSE, (5, 5))
mask = cv2.morphologyEx(mask, cv2.MORPH_CLOSE, kernel)
mask = cv2.morphologyEx(mask, cv2.MORPH_OPEN, kernel)

# Find contours and approximate to quadrilateral
contours, _ = cv2.findContours(mask, cv2.RETR_EXTERNAL, cv2.CHAIN_APPROX_SIMPLE)
if contours:
    largest_contour = max(contours, key=cv2.contourArea)
    epsilon = 0.02 * cv2.arcLength(largest_contour, True)
    approx = cv2.approxPolyDP(largest_contour, epsilon, True)

    # Force to 4 points for ID card corners
    if len(approx) >= 4:
        corners = approx[:4]
This approach combines higher resolution masks with geometric fitting to achieve the straight-line boundaries you need for ID card localization.
1
cyberpunk-edgerunner
Just to confirm, while auto annotating, instead of using SAM one can also use one's custom build model. right ??
1rugvedjalit
Yes, you can annotate using custom build model but please check the annotation class id after annotation.
LwpZoe
I have used yolo11x-seg.yaml to do instance segmentation on my dataset, my dataset is multiclassified medical endoscopic tissue instance segmentation task, but the metrics scores are very low, I don't know how to improve these metrics scores, can you please give me some ideas?
1The metrics score with ShuffleAttention added to the tenth layer of backbone is reduced compared to the metrics score for YOLO11x-seg.yaml alone.
Trained my dataset using YOLO11x-seg.yaml+ShuffleAttention with no other parameters changed the metrics scores are as follows:
Class Images Instances Box( P R mAP50 mAP50-95) Mask( P R mAP50 mAP50-95): all 58 332 0.583 0.504 0.519 0.238 0.551 0.456 0.468 0.195
Training my dataset using the official YOLO11x-seg.yaml alone, the metrics scores are as follows:
Class Images Instances Box( P R mAP50 mAP50-95) Mask( P R mAP50 mAP50-95): all 58 332 0.669 0.465 0.489 0.257 0.648 0.446 0.455 0.217
1- Glenn JocherUltralytics(modificato)
@LwpZoe thank you for sharing these details. For medical instance segmentation with YOLO11x-seg, we recommend: 1) Verify your dataset quality and annotation consistency using the Dataset Guide, 2) Try increasing input resolution (
imgsz=1280) to capture fine tissue details, 3) Implement medical-specific augmentations like CLAHE or elastic transforms, and 4) Consider using our pretrained weights with progressive fine-tuning rather than architectural modifications initially. The segmentation documentation contains additional optimization strategies for medical imaging tasks.
Hello, here's a question: I want to use YOLO11 to train my dataset from scratch and make predictions, and don't want to use prepared pre-trained weights, so how do I write the training commands? Is this code below ok: yolo segment train data=datasets/yolo_seg/data.yaml model=yolo11n-seg.yaml epochs=300 batch=16 resume=True imgsz=640 device=0,1
1- Glenn JocherUltralytics
@LwpZoe your command is almost correct for training from scratch without pretrained weights. Ensure the
resume=Trueargument is removed, as it is only used to resume interrupted training. The corrected command would be:yolo segment train data=datasets/yolo_seg/data.yaml model=yolo11n-seg.yaml epochs=300 batch=16 imgsz=640 device=0,1This will train your YOLO11 segmentation model from scratch using your custom dataset. For more details, visit the Segment Task Documentation.
potatoandtomatowhy
how to use two camera segment with gpu?
1ZhaoHaoran0613
Same question
1 Paula DerrengerUltralytics
To use two cameras for segmentation with a GPU, you'll need to set up a multi-threaded or multi-process pipeline to handle the video streams concurrently. Each camera stream can be processed in a separate thread or process, ensuring efficient utilization of the GPU. You can use the
YOLOclass from the Ultralytics library to load your segmentation model and process the frames from each camera. For detailed steps and code examples, please refer to the Ultralytics segmentation documentation. If you encounter any issues, make sure you're using the latest version of the package.
Boaruzhanchik
Hi, can you tell me how I can get the detected car plates in separate windows (as many as I have detected and output), my code outputs only one window.
while True: ret, im0 = cap.read() if not ret: break results = model(im0,verbose=False,conf=0.4,retina_masks=True) boxes = results[0].boxes.xyxy.tolist() classes = results[0].boxes.cls.tolist() confidences = results[0].boxes.conf.tolist() masks = results[0].masks if results[0].masks is not None: clss = results[0].boxes.cls.cpu().tolist() masks = results[0].masks.xy coordinates_mask = masks[0] contour = coordinates_mask.reshape((-1, 1, 2)).astype(np.int32) epsilon = 0.04 * cv2.arcLength(contour, True) approx = cv2.approxPolyDP(contour, epsilon, True) auto_transform = four_point_transform(im0, approx.reshape(-2, 2)) cv2.imshow('automated', auto_transform)1- Paula DerrengerUltralytics
@Boaruzhanchik hey there! 👋 To display each detected car plate in separate windows, you can loop through the detected boxes and create a window for each. Here's a quick example to get you started:
for i, box in enumerate(boxes):
    x1, y1, x2, y2 = map(int, box[:4])
    plate = im0[y1:y2, x1:x2]
    cv2.imshow(f'Plate {i}', plate)
cv2.waitKey(0)
cv2.destroyAllWindows()
This code snippet extracts each detected plate based on its bounding box coordinates and displays it in a new window. Make sure to replace
im0with your frame variable if it's named differently. Hope this helps! 😊 Thanks a lot for the help, I did it this way, it seems to work too
if results[0].masks is not None: clss = results[0].boxes.cls.cpu().tolist() masks = results[0].masks.xy if len(masks) == 1: coordinates_mask = masks[0] auto_transformations_first(coordinates_mask) elif len(masks) <= 2: auto_transformations_first(coordinates_mask) coordinates_mask_2 = masks[1] auto_transformations_second_screen(coordinates_mask_2) def auto_transformations_first(coordinates_mask): contour = coordinates_mask.reshape((-1, 1, 2)).astype(np.int32) epsilon = 0.04 * cv2.arcLength(contour, True) approx = cv2.approxPolyDP(contour, epsilon, True) auto_transform = four_point_transform(im0, approx.reshape(-2, 2)) cv2.imshow('automated_first', auto_transform)- Paula DerrengerUltralytics
@Boaruzhanchik hey there! 👋 It looks like you've found a way to handle different numbers of masks with your approach. Nicely done! 🎉 Just a quick tip: you might want to ensure
coordinates_maskis defined before using it inauto_transformations_first(coordinates_mask)for theelif len(masks) <= 2:case, to avoid any potential errors. Other than that, your method seems solid. Keep up the great work, and if you have any more questions or need further assistance, feel free to ask. Happy coding! 😊
uqasha524
Hi everyone,
We have fine-tuned a YOLO model primarily for segmentation, but our dataset contains mixed annotation types—the main task is segmentation, while some classes/regions use standard bounding boxes and OBB (Oriented Bounding Boxes).
What is the recommended approach in Ultralytics for handling a dataset with mixed annotation formats in a single training pipeline, and could you explain how this is possible? Specifically, how should the data labels and model configuration be structured to handle multiple task types simultaneously?
Any guidance, workflow explanations, or examples would be greatly appreciated!
- Glenn JocherUltralytics
Ultralytics training uses one task per model (
detect,segment, orobb), so mixed label formats cannot be trained jointly in a standard pipeline. Use separate label directories/YAML files and train separate models, or convert box/OBB annotations to polygon labels so every object follows the segmentation format; note that a segmentation model returns masks and axis-aligned boxes, not native OBB predictions.1 Ultralytics YOLO does not support mixing detection, segmentation, and OBB annotations in a single training run. Each model/task expects a specific label format and corresponding loss function.
The recommended approach is to separate the annotations and train separate models for segmentation, detection, and OBB, then combine their outputs during inference if needed. A single multi-task model would require a custom architecture and training pipeline.
1- Glenn JocherUltralytics
@uqasha524, do you need masks, axis-aligned boxes, and OBBs as distinct outputs at inference, or would segmentation outputs alone meet your requirements? That distinction will help us suggest the appropriate dataset structure without introducing unnecessary custom training work.
TrieuCris
With yolo26-seg, when a small object is placed on top of a large object, I get a result where the mask of the large object is punctured right where the small object is covering it. How can I fix this?
- Glenn JocherUltralytics
That’s usually expected with standard instance segmentation:
yolo26-seglearns the visible region of each instance, so the larger object can appear “punctured” where it is occluded; if you want a filled large-object mask, you’ll need labels that include the full occluded shape or apply post-processing tor.masksafter inference, and the segmentation object isolation guide shows where to access those masks—if you share one image plus its label here, the Ultralytics team can help confirm whether it’s annotation or model behavior.
miracle101000
hello if I wanted to use your segmentation model for inference on a live camera preview, to only detect a single item at a time, how would I go about it? thank you.
- Glenn JocherUltralytics
Yes — use a
-segmodel on your webcam feed, setclasses=[...]if you only want one class, andmax_det=1if you want at most one instance per frame; if you share your use case here, the Ultralytics team can help refine it, and the Segment task docs cover the mask outputs you’ll use.from ultralytics import YOLO model = YOLO("yolo26n-seg.pt") results = model.predict(source=0, stream=True, classes=[0], max_det=1) Ok thx. I am actually trying to implement edge detection on android devices for rectangular objects. I have tried OpenCV but it's not enough. So I was thinking to use a segmentation model for my rectangular processor (overlay would only show on rectangular objects) but any time I try to implement this on android, I get serious lagging issues on the camera preview. Plus honestly new to this AI stuff.
- Glenn JocherUltralytics
If you only need a rectangle-style overlay, a segmentation model is usually heavier than necessary on Android; I’d start with a small OBB or detect model instead, export it with Export mode, and keep
imgszlow or run inference every few frames to reduce preview lag. If you share your device, export format, and current FPS here, the Ultralytics team can suggest the lightest setup.
Heyujie96
你是不是加载模型的时候没有写task=“segment”
------------------ Original ------------------ From: liyongkang2000 @.> Date: Sun,Feb 1,2026 1:12 AM To: ultralytics/ultralytics @.> Cc: Heyujie96 @.>, Comment @.> Subject: Re: [ultralytics/ultralytics] zh/tasks/segment/ (Discussion #8508)
您好我想问一下,在YOLOV8和V11测试下来,由于目标框的存在,不管如果在后处理阶段调整目标框的范围,被分割目标的上下左右边界始终会被目标框切割,导致分割结果的边缘不平滑。会出现很多直线,但是在YOLOV26上没有尝试过,YOLOV26是否优化了这个边界问题,或者说是否其他的解决方法可以解决这个分割结果的边缘不平滑问题
— Reply to this email directly, view it on GitHub, or unsubscribe. You are receiving this because you commented.Message ID: @.***>
liyongkang2000
result = model.predict(os.path.join(path,file), nms = True, )这是我的预测代码是官方提供的呀
- Glenn JocherUltralytics
你这段
predict()用法本身没问题;一般也不需要手动写task="segment",关键是确保加载的是分割权重(*-seg.pt),否则不会有result.masks输出;如果分割边缘出现“被框裁切/直线感强”的现象,可以在推理时尝试开启retina_masks=True并适当增大imgsz(NMS 默认就会做,通常不需要单独传nms=True),相关参数处理可参考 SegmentationPredictor 源码说明。from ultralytics import YOLO model = YOLO("yolo26n-seg.pt") # 确保是 -seg 权重 results = model.predict( os.path.join(path, file), retina_masks=True, imgsz=1024, conf=0.25, iou=0.7, ) 您好,您的建议是有效的,但边界还是没有那么光滑,以及大目标效果更差,有时会出现正方形,您这边还有其他的解决方案吗?期待您的回复
- Glenn JocherUltralytics
这个“边缘直线/大目标出现方块”的现象通常是分割头的掩码分辨率与“mask 会按预测框裁剪”的机制共同导致的(框越紧越容易看出裁剪痕迹,可参考这条 社区说明:inference 时 mask 是否会被 bbox 裁剪);如果你是自训练模型,想从根源提升大目标的边缘细节,建议在训练时把
mask_ratio调小(更高 mask 分辨率)并配合更大的imgsz/更大的*-seg模型,mask_ratio参数说明见 配置参数文档。from ultralytics import YOLO model = YOLO("yolo26s-seg.pt") # 也可以试试更大一点的 -seg 权重 model.train( data="path/to/your_dataset.yaml", imgsz=1024, epochs=100, mask_ratio=2, # 需要更细可再降到 1(显存占用会明显上升) )如果你只是想“导出/显示更光滑”的轮廓(不改变模型预测本身),可以按 Isolating Segmentation Objects 的方式拿到
result.masks.data后做一次轻量的blur + close再取轮廓;另外麻烦贴一张出现“正方形”的原图和对应可视化结果,并附上yolo checks的文本输出,我这边可以帮你确认主要瓶颈是分辨率、标注轮廓质量还是框裁剪造成的。