Link to this sectionシンプルなユーティリティ#
ultralyticsパッケージは、ワークフローをサポート、強化、高速化するためのさまざまなユーティリティを提供します。これ以外にも多くのユーティリティが利用可能ですが、このガイドでは開発者にとって最も有用なものをいくつか取り上げ、Ultralyticsツールを使用したプログラミングの実用的なリファレンスとして紹介します。
Watch: Ultralytics Utilities | Auto Annotation, Explorer API and Dataset Conversion
Link to this sectionデータ#
Link to this section自動ラベリング / アノテーション#
データセットアノテーションは、リソースを消費し、時間のかかるプロセスです。十分なデータ量でトレーニングされたUltralytics YOLO 物体検出モデルがある場合、SAMを使用してセグメンテーション形式で追加データを自動アノテーションできます。
from ultralytics.data.annotator import auto_annotate

auto_annotate(
    data="path/to/new/data",
    det_model="yolo26n.pt",
    sam_model="mobile_sam.pt",
    device="cuda",
    output_dir="path/to/save_labels",
)
この関数は値を返しません。詳細については以下を参照してください。
- 関数の動作の詳細については、
annotator.auto_annotateのリファレンスセクションを参照してください。 - 関数
segments2boxesと組み合わせて使用することで、物体検出用のバウンディングボックスも生成できます。
Link to this sectionデータセットアノテーションの可視化#
この関数は、トレーニング前に画像上のYOLOアノテーションを可視化します。これにより、誤った検出結果につながる可能性のある誤ったアノテーションを特定・修正できます。バウンディングボックスを描画し、クラス名でオブジェクトにラベルを付け、読みやすさを向上させるために背景の輝度に基づいてテキストの色を調整します。
from ultralytics.data.utils import visualize_image_annotations

label_map = {  # Define the label map with all annotated class labels.
    0: "person",
    1: "car",
}

# Visualize
visualize_image_annotations(
    "path/to/image.jpg",  # Input image path.
    "path/to/annotations.txt",  # Annotation file path for the image.
    label_map,
)
Link to this sectionセグメンテーションマスクのYOLO形式への変換#
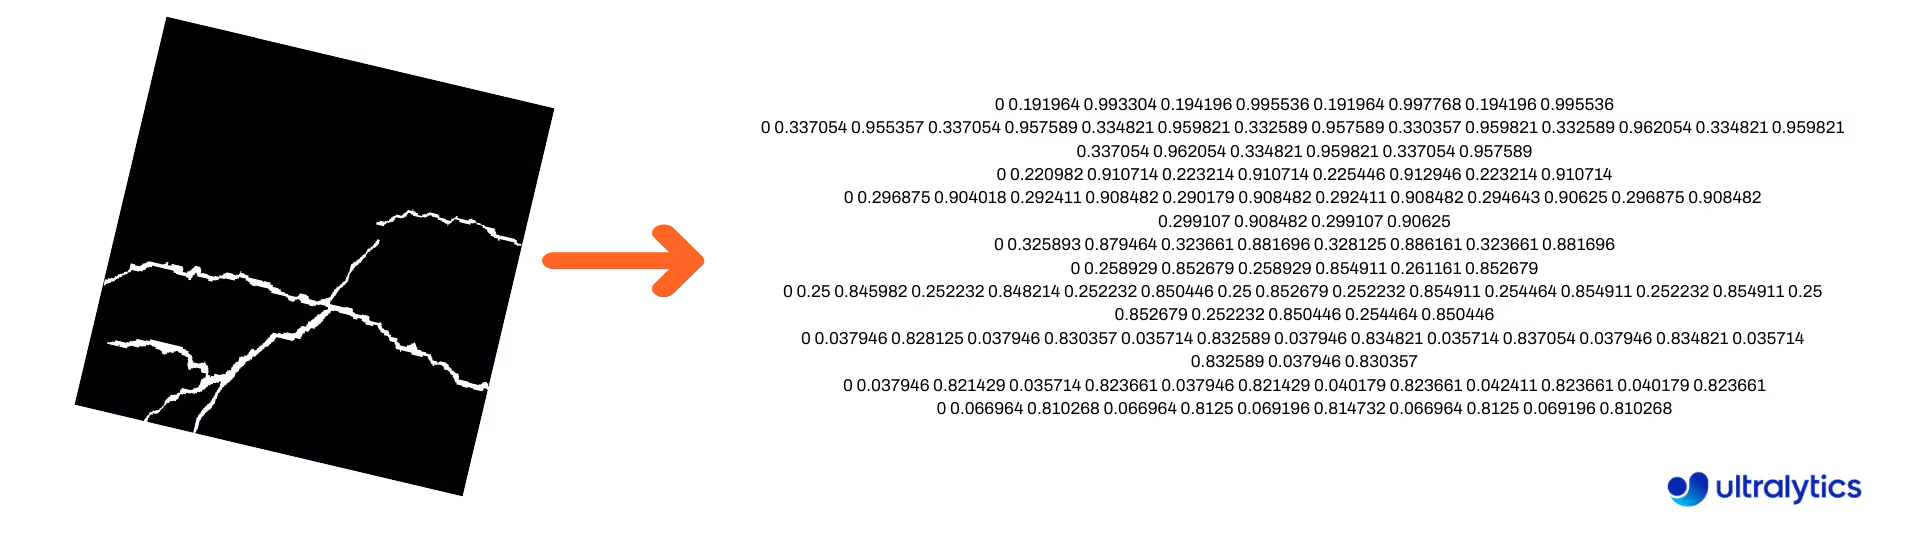
これを使用して、セグメンテーションマスク画像のデータセットをUltralytics YOLOセグメンテーション形式に変換します。この関数は、バイナリ形式のマスク画像を含むディレクトリを受け取り、それらをYOLOセグメンテーション形式に変換します。
変換されたマスクは、指定された出力ディレクトリに保存されます。
from ultralytics.data.converter import convert_segment_masks_to_yolo_seg

# The classes here is the total classes in the dataset.
# for COCO dataset we have 80 classes.
convert_segment_masks_to_yolo_seg(masks_dir="path/to/masks_dir", output_dir="path/to/output_dir", classes=80)
Link to this sectionCOCOからYOLO形式への変換#
COCO JSONアノテーションをYOLO形式に変換するにはこれを使用します。物体検出(BBox)データセットの場合は、use_segmentsとuse_keypointsの両方をFalseに設定してください。
from ultralytics.data.converter import convert_coco

convert_coco(
    "coco/annotations/",
    use_segments=False,
    use_keypoints=False,
    cls91to80=True,
)convert_coco関数の詳細については、リファレンスページをご覧ください。
Link to this sectionバウンディングボックス寸法の取得#
import cv2

from ultralytics import YOLO
from ultralytics.utils.plotting import Annotator

model = YOLO("yolo26n.pt")  # Load pretrain or fine-tune model

# Process the image
source = cv2.imread("path/to/image.jpg")
results = model(source)

# Extract results
annotator = Annotator(source, example=model.names)

for box in results[0].boxes.xyxy.cpu():
    width, height, area = annotator.get_bbox_dimension(box)
    print(f"Bounding Box Width {width.item()}, Height {height.item()}, Area {area.item()}")
Link to this sectionバウンディングボックスからセグメントへの変換#
既存のx y w hバウンディングボックスデータがある場合、yolo_bbox2segment関数を使用してセグメントに変換します。画像とアノテーションのファイルを次のように構成してください。
data
|__ images
    ├─ 001.jpg
    ├─ 002.jpg
    ├─ ..
    └─ NNN.jpg
|__ labels
    ├─ 001.txt
    ├─ 002.txt
    ├─ ..
    └─ NNN.txt
from ultralytics.data.converter import yolo_bbox2segment
yolo_bbox2segment(
im_dir="path/to/images",
save_dir=None, # saved to "labels-segment" in images directory
sam_model="sam_b.pt",
)関数の詳細については、yolo_bbox2segmentリファレンスページをご覧ください。
Link to this sectionセグメントからバウンディングボックスへの変換#
セグメンテーションデータセット形式を使用するデータセットがある場合、この関数を使用して簡単にアップライト(または水平)なバウンディングボックス(x y w h形式)に変換できます。
import numpy as np

from ultralytics.utils.ops import segments2boxes

segments = np.array(
    [
        [805, 392, 797, 400, 812, 402, 808, 714, 808, 392],
        [115, 398, 113, 400, 150, 410, 150, 400, 149, 298],
        [267, 412, 265, 413, 300, 420, 300, 413, 299, 412],
    ],
    dtype=np.float32,
)

segments2boxes([s.reshape(-1, 2) for s in segments])
# >>> array([[804.5, 553. ,  15. , 322. ],
#           [131.5, 354. ,  37. , 112. ],
#           [282.5, 416. ,  35. ,   8. ]],
# dtype=float32) # xywh bounding boxesこの関数の仕組みを理解するには、リファレンスページにアクセスしてください。
Link to this sectionユーティリティ#
Link to this section画像圧縮#
アスペクト比と品質を維持したまま、単一の画像ファイルを縮小サイズに圧縮します。入力画像が最大寸法より小さい場合、リサイズは行われません。
from pathlib import Path

from ultralytics.data.utils import compress_one_image

for f in Path("path/to/dataset").rglob("*.jpg"):
    compress_one_image(f)
Link to this sectionデータセットの自動分割#
データセットを自動的にtrain/val/testに分割し、結果をautosplit_*.txtファイルに保存します。この関数はランダムサンプリングを使用します。これは、トレーニング用のfraction引数を使用する際には除外されます。
from ultralytics.data.split import autosplit

autosplit(
    path="path/to/images",
    weights=(0.9, 0.1, 0.0),  # (train, validation, test) fractional splits
    annotated_only=False,  # split only images with annotation file when True
)この関数の詳細については、リファレンスページを参照してください。
Link to this sectionセグメントポリゴンからバイナリマスクへの変換#
Convert a single polygon (as a list) to a binary mask of the specified image size. The polygon should be a flat 1D array of N coordinates listing alternating x, y values defining the polygon contour.
Nは常に偶数である必要があります。
import numpy as np

from ultralytics.data.utils import polygon2mask

imgsz = (1080, 810)
polygon = np.array([805, 392, 797, 400, ..., 808, 714, 808, 392])  # (238, 2)

mask = polygon2mask(
    imgsz,  # tuple
    [polygon],  # input as list
    color=255,  # 8-bit binary
    downsample_ratio=1,
)
Link to this sectionバウンディングボックス#
Link to this sectionバウンディングボックス(水平)インスタンス#
バウンディングボックスデータを管理するために、Bboxesクラスはボックス座標形式の変換、ボックス寸法のスケーリング、面積の計算、オフセットの追加などを支援します。
import numpy as np

from ultralytics.utils.instance import Bboxes

boxes = Bboxes(
    bboxes=np.array(
        [
            [22.878, 231.27, 804.98, 756.83],
            [48.552, 398.56, 245.35, 902.71],
            [669.47, 392.19, 809.72, 877.04],
            [221.52, 405.8, 344.98, 857.54],
            [0, 550.53, 63.01, 873.44],
            [0.0584, 254.46, 32.561, 324.87],
        ]
    ),
    format="xyxy",
)

boxes.areas()
# >>> array([ 4.1104e+05,       99216,       68000,       55772,       20347,      2288.5])

boxes.convert("xywh")
print(boxes.bboxes)
# >>> array(
#     [[ 413.93, 494.05,  782.1, 525.56],
#      [ 146.95, 650.63,  196.8, 504.15],
#      [  739.6, 634.62, 140.25, 484.85],
#      [ 283.25, 631.67, 123.46, 451.74],
#      [ 31.505, 711.99,  63.01, 322.91],
#      [  16.31, 289.67, 32.503,  70.41]]
# )属性とメソッドの詳細については、Bboxesリファレンスセクションを参照してください。
以下の関数の多く(その他多数)はBboxesクラスを使用してアクセスできますが、関数を直接扱うことを希望する場合は、それらを個別にインポートする方法について次のサブセクションを参照してください。
Link to this sectionボックスのスケーリング#
画像を拡大または縮小する際、ultralytics.utils.ops.scale_boxesを使用して対応するバウンディングボックス座標を適切にスケーリングできます。
import cv2 as cv
import numpy as np

from ultralytics.utils.ops import scale_boxes

image = cv.imread("ultralytics/assets/bus.jpg")
h, w, c = image.shape
resized = cv.resize(image, None, (), fx=1.2, fy=1.2)
new_h, new_w, _ = resized.shape

xyxy_boxes = np.array(
    [
        [22.878, 231.27, 804.98, 756.83],
        [48.552, 398.56, 245.35, 902.71],
        [669.47, 392.19, 809.72, 877.04],
        [221.52, 405.8, 344.98, 857.54],
        [0, 550.53, 63.01, 873.44],
        [0.0584, 254.46, 32.561, 324.87],
    ]
)

new_boxes = scale_boxes(
    img1_shape=(h, w),  # original image dimensions
    boxes=xyxy_boxes,  # boxes from original image
    img0_shape=(new_h, new_w),  # resized image dimensions (scale to)
    ratio_pad=None,
    padding=False,
    xywh=False,
)

print(new_boxes)
# >>> array(
#     [[  27.454,  277.52,  965.98,   908.2],
#     [   58.262,  478.27,  294.42,  1083.3],
#     [   803.36,  470.63,  971.66,  1052.4],
#     [   265.82,  486.96,  413.98,    1029],
#     [        0,  660.64,  75.612,  1048.1],
#     [   0.0701,  305.35,  39.073,  389.84]]
# )
Link to this sectionバウンディングボックス形式の変換#
Link to this sectionXYXY → XYWH#
バウンディングボックスの座標を(x1, y1, x2, y2)形式から(x, y, width, height)形式に変換します。ここで(x1, y1)は左上隅、(x2, y2)は右下隅です。
import numpy as np

from ultralytics.utils.ops import xyxy2xywh

xyxy_boxes = np.array(
    [
        [22.878, 231.27, 804.98, 756.83],
        [48.552, 398.56, 245.35, 902.71],
        [669.47, 392.19, 809.72, 877.04],
        [221.52, 405.8, 344.98, 857.54],
        [0, 550.53, 63.01, 873.44],
        [0.0584, 254.46, 32.561, 324.87],
    ]
)
xywh = xyxy2xywh(xyxy_boxes)

print(xywh)
# >>> array(
#     [[ 413.93,  494.05,   782.1, 525.56],
#     [  146.95,  650.63,   196.8, 504.15],
#     [   739.6,  634.62,  140.25, 484.85],
#     [  283.25,  631.67,  123.46, 451.74],
#     [  31.505,  711.99,   63.01, 322.91],
#     [   16.31,  289.67,  32.503,  70.41]]
# )
Link to this sectionすべてのバウンディングボックス変換#
from ultralytics.utils.ops import (
    ltwh2xywh,
    ltwh2xyxy,
    xywh2ltwh,  # xywh → top-left corner, w, h
    xywh2xyxy,
    xywhn2xyxy,  # normalized → pixel
    xyxy2ltwh,  # xyxy → top-left corner, w, h
    xyxy2xywhn,  # pixel → normalized
)

for func in (ltwh2xywh, ltwh2xyxy, xywh2ltwh, xywh2xyxy, xywhn2xyxy, xyxy2ltwh, xyxy2xywhn):
print(help(func)) # print function docstrings各関数のドキュメント文字列を参照するか、ultralytics.utils.opsリファレンスページにアクセスして詳細を読んでください。
Link to this sectionプロット#
Link to this sectionアノテーションユーティリティ#
Ultralyticsには、さまざまなデータ型をアノテーションするためのAnnotatorクラスが含まれています。物体検出バウンディングボックス、ポーズキーポイント、指向性バウンディングボックスで使用するのが最適です。
Link to this sectionボックスアノテーション#
import cv2 as cv
import numpy as np

from ultralytics.utils.plotting import Annotator, colors

names = {
    0: "person",
    5: "bus",
    11: "stop sign",
}

image = cv.imread("ultralytics/assets/bus.jpg")
ann = Annotator(
    image,
    line_width=None,  # default auto-size
    font_size=None,  # default auto-size
    font="Arial.ttf",  # must be ImageFont compatible
    pil=False,  # use PIL, otherwise uses OpenCV
)

xyxy_boxes = np.array(
    [
        [5, 22.878, 231.27, 804.98, 756.83],  # class-idx x1 y1 x2 y2
        [0, 48.552, 398.56, 245.35, 902.71],
        [0, 669.47, 392.19, 809.72, 877.04],
        [0, 221.52, 405.8, 344.98, 857.54],
        [0, 0, 550.53, 63.01, 873.44],
        [11, 0.0584, 254.46, 32.561, 324.87],
    ]
)

for nb, box in enumerate(xyxy_boxes):
    c_idx, *box = box
    label = f"{str(nb).zfill(2)}:{names.get(int(c_idx))}"
    ann.box_label(box, label, color=colors(c_idx, bgr=True))

image_with_bboxes = ann.result()
Names can be used from model.names when working with detection results.
Also see the Annotator Reference Page for additional insight.
Link to this sectionUltralyticsスイープアノテーション#
import cv2
import numpy as np

from ultralytics import YOLO
from ultralytics.solutions.solutions import SolutionAnnotator
from ultralytics.utils.plotting import colors

# User defined video path and model file
cap = cv2.VideoCapture("path/to/video.mp4")
model = YOLO(model="yolo26s-seg.pt")  # Model file, e.g., yolo26s.pt or yolo26m-seg.pt

if not cap.isOpened():
    print("Error: Could not open video.")
    exit()

# Initialize the video writer object.
w, h, fps = (int(cap.get(x)) for x in (cv2.CAP_PROP_FRAME_WIDTH, cv2.CAP_PROP_FRAME_HEIGHT, cv2.CAP_PROP_FPS))
video_writer = cv2.VideoWriter("ultralytics.avi", cv2.VideoWriter_fourcc(*"mp4v"), fps, (w, h))

masks = None  # Initialize variable to store masks data
f = 0  # Initialize frame count variable for enabling mouse event.
line_x = w  # Store width of line.
dragging = False  # Initialize bool variable for line dragging.
classes = model.names  # Store model classes names for plotting.
window_name = "Ultralytics Sweep Annotator"

def drag_line(event, x, _, flags, param):
    """Mouse callback function to enable dragging a vertical sweep line across the video frame."""
    global line_x, dragging
    if event == cv2.EVENT_LBUTTONDOWN or (flags & cv2.EVENT_FLAG_LBUTTON):
        line_x = max(0, min(x, w))
        dragging = True

while cap.isOpened():  # Loop over the video capture object.
    ret, im0 = cap.read()
    if not ret:
        break
    f = f + 1  # Increment frame count.
    count = 0  # Re-initialize count variable on every frame for precise counts.
    results = model.track(im0, persist=True)[0]

    if f == 1:
        cv2.namedWindow(window_name)
        cv2.setMouseCallback(window_name, drag_line)

    annotator = SolutionAnnotator(im0)

    if results.boxes.is_track:
        if results.masks is not None:
            masks = [np.array(m, dtype=np.int32) for m in results.masks.xy]

        boxes = results.boxes.xyxy.tolist()
        track_ids = results.boxes.id.int().cpu().tolist()
        clss = results.boxes.cls.cpu().tolist()

        for mask, box, cls, t_id in zip(masks or [None] * len(boxes), boxes, clss, track_ids):
            color = colors(t_id, True)  # Assign different color to each tracked object.
            label = f"{classes[cls]}:{t_id}"
            if mask is not None and mask.size > 0:
                if box[0] > line_x:
                    count += 1
                    cv2.polylines(im0, [mask], True, color, 2)
                    x, y = mask.min(axis=0)
                    (w_m, _), _ = cv2.getTextSize(label, cv2.FONT_HERSHEY_SIMPLEX, 0.5, 1)
                    cv2.rectangle(im0, (x, y - 20), (x + w_m, y), color, -1)
                    cv2.putText(im0, label, (x, y - 5), cv2.FONT_HERSHEY_SIMPLEX, 0.5, (255, 255, 255), 1)
            else:
                if box[0] > line_x:
                    count += 1
                    annotator.box_label(box=box, color=color, label=label)

    # Generate draggable sweep line
    annotator.sweep_annotator(line_x=line_x, line_y=h, label=f"COUNT:{count}")

    cv2.imshow(window_name, im0)
    video_writer.write(im0)
    if cv2.waitKey(1) & 0xFF == ord("q"):
        break

# Release the resources
cap.release()
video_writer.release()
cv2.destroyAllWindows()sweep_annotatorメソッドの詳細については、リファレンスセクションのこちらを参照してください。
Link to this section適応型ラベルアノテーション#
Ultralytics v8.3.167以降、circle_labelとtext_labelは統合されたadaptive_label関数に置き換えられました。shape引数を使用してアノテーションタイプを指定できるようになりました:
- 長方形:
annotator.adaptive_label(box, label=names[int(cls)], color=colors(cls, True), shape="rect") - 円形:
annotator.adaptive_label(box, label=names[int(cls)], color=colors(cls, True), shape="circle")
Watch: In-Depth Guide to Text & Circle Annotations with Python Live Demos | Ultralytics Annotations 🚀
import cv2

from ultralytics import YOLO
from ultralytics.solutions.solutions import SolutionAnnotator
from ultralytics.utils.plotting import colors

model = YOLO("yolo26s.pt")
names = model.names
cap = cv2.VideoCapture("path/to/video.mp4")

w, h, fps = (int(cap.get(x)) for x in (cv2.CAP_PROP_FRAME_WIDTH, cv2.CAP_PROP_FRAME_HEIGHT, cv2.CAP_PROP_FPS))
writer = cv2.VideoWriter("Ultralytics circle annotation.avi", cv2.VideoWriter_fourcc(*"MJPG"), fps, (w, h))

while True:
    ret, im0 = cap.read()
    if not ret:
        break

    annotator = SolutionAnnotator(im0)
    results = model.predict(im0)[0]
    boxes = results.boxes.xyxy.cpu()
    clss = results.boxes.cls.cpu().tolist()

    for box, cls in zip(boxes, clss):
        annotator.adaptive_label(box, label=names[int(cls)], color=colors(cls, True), shape="circle")
    writer.write(im0)
    cv2.imshow("Ultralytics circle annotation", im0)

    if cv2.waitKey(1) & 0xFF == ord("q"):
        break

writer.release()
cap.release()
cv2.destroyAllWindows()詳細については、SolutionAnnotatorリファレンスページを参照してください。
Link to this sectionその他#
Link to this sectionコードプロファイリング#
withを使用するかデコレータとして、コードの実行/処理時間をチェックします。
from ultralytics.utils.ops import Profile

with Profile(device="cuda:0") as dt:
    pass  # operation to measure

print(dt)
# >>> "Elapsed time is 9.5367431640625e-07 s"
Link to this sectionUltralyticsがサポートする形式#
Ultralyticsでサポートされている画像または動画形式をプログラムで利用する必要がありますか?必要に応じてこれらの定数を使用してください。
from ultralytics.data.utils import IMG_FORMATS, VID_FORMATS

print(IMG_FORMATS)
# {'avif', 'bmp', 'dng', 'heic', 'heif', 'jp2', 'jpeg', 'jpg', 'mpo', 'png', 'tif', 'tiff', 'webp'}

print(VID_FORMATS)
# {'asf', 'avi', 'gif', 'm4v', 'mkv', 'mov', 'mp4', 'mpeg', 'mpg', 'ts', 'wmv', 'webm'}
Link to this sectionMake Divisible(割り切れるようにする)#
x以上でyによって割り切れる最小の整数を計算します。
from ultralytics.utils.ops import make_divisible

make_divisible(7, 3)
# >>> 9
make_divisible(7, 2)
# >>> 8
Link to this sectionよくある質問 (FAQ)#
Link to this section機械学習ワークフローを強化するために、Ultralyticsパッケージにはどのようなユーティリティが含まれていますか?#
Ultralytics パッケージには、機械学習ワークフローを合理化および最適化するために設計されたユーティリティが含まれています。主要なユーティリティには、データセットのラベリングを行うための 自動アノテーション、COCO を YOLO 形式に変換する convert_coco、画像の圧縮、およびデータセットの自動分割などがあります。これらのツールは手作業を削減し、一貫性を確保し、データ処理の効率を向上させます。
Link to this sectionUltralyticsを使用してデータセットを自動的にラベリングするにはどうすればよいですか?#
事前に学習済みのUltralytics YOLO物体検出モデルがある場合、SAMモデルと組み合わせてデータセットをセグメンテーション形式で自動アノテーションできます。例を以下に示します。
from ultralytics.data.annotator import auto_annotate

auto_annotate(
    data="path/to/new/data",
    det_model="yolo26n.pt",
    sam_model="mobile_sam.pt",
    device="cuda",
    output_dir="path/to/save_labels",
)詳細については、auto_annotateリファレンスセクションを確認するか、ホスト型のノーコード代替手段としてUltralytics Platformを使用してください。これには、SAM 2.1やSAM 3を使用したクリックベースのマスキング、または検出、セグメント、OBBタスク向けの学習済みおよび微調整済みYOLOモデルからの予測が含まれます。
Link to this sectionUltralyticsでCOCOデータセットのアノテーションをYOLO形式に変換するにはどうすればよいですか?#
COCO JSONアノテーションを物体検出用のYOLO形式に変換するには、convert_cocoユーティリティを使用できます。サンプルコードのスニペットを以下に示します。
from ultralytics.data.converter import convert_coco

convert_coco(
    "coco/annotations/",
    use_segments=False,
    use_keypoints=False,
    cls91to80=True,
)詳細については、convert_cocoリファレンスページをご覧ください。
Link to this sectionデータセットの構成と分布を分析するにはどうすればよいですか?#
Ultralytics Platformは、自動データセット分析機能を提供します。Chartsタブでは、分割分布、上位クラスのカウント、画像次元のヒストグラム、アノテーション位置の2Dヒートマップが表示され、トレーニング前に不均衡や外れ値を見つけるのに役立ちます。
Link to this sectionUltralyticsでバウンディングボックスをセグメントに変換するにはどうすればよいですか?#
既存のバウンディングボックスデータ(x y w h形式)をセグメントに変換するには、yolo_bbox2segment関数を使用できます。画像とラベルのディレクトリが別々になるようにファイルが整理されていることを確認してください。
from ultralytics.data.converter import yolo_bbox2segment

yolo_bbox2segment(
    im_dir="path/to/images",
    save_dir=None,  # saved to "labels-segment" in the images directory
    sam_model="sam_b.pt",
)詳細については、yolo_bbox2segmentリファレンスページをご覧ください。