Multi-GPU Training with YOLOv5#
This guide explains how to train YOLOv5 with multiple GPUs on a single machine or across multiple machines.
Before You Start#
Clone repo and install requirements.txt in a Python>=3.8.0 environment, including PyTorch>=1.8. Models and datasets download automatically from the latest YOLOv5 release.
git clone https://github.com/ultralytics/yolov5 # clone
cd yolov5
pip install -r requirements.txt # installThe Ultralytics Docker image is recommended for all multi-GPU training runs. See the Docker Quickstart Guide.

torch.distributed.run replaces torch.distributed.launch in PyTorch >= 1.9. See the PyTorch distributed documentation for details.
Training#
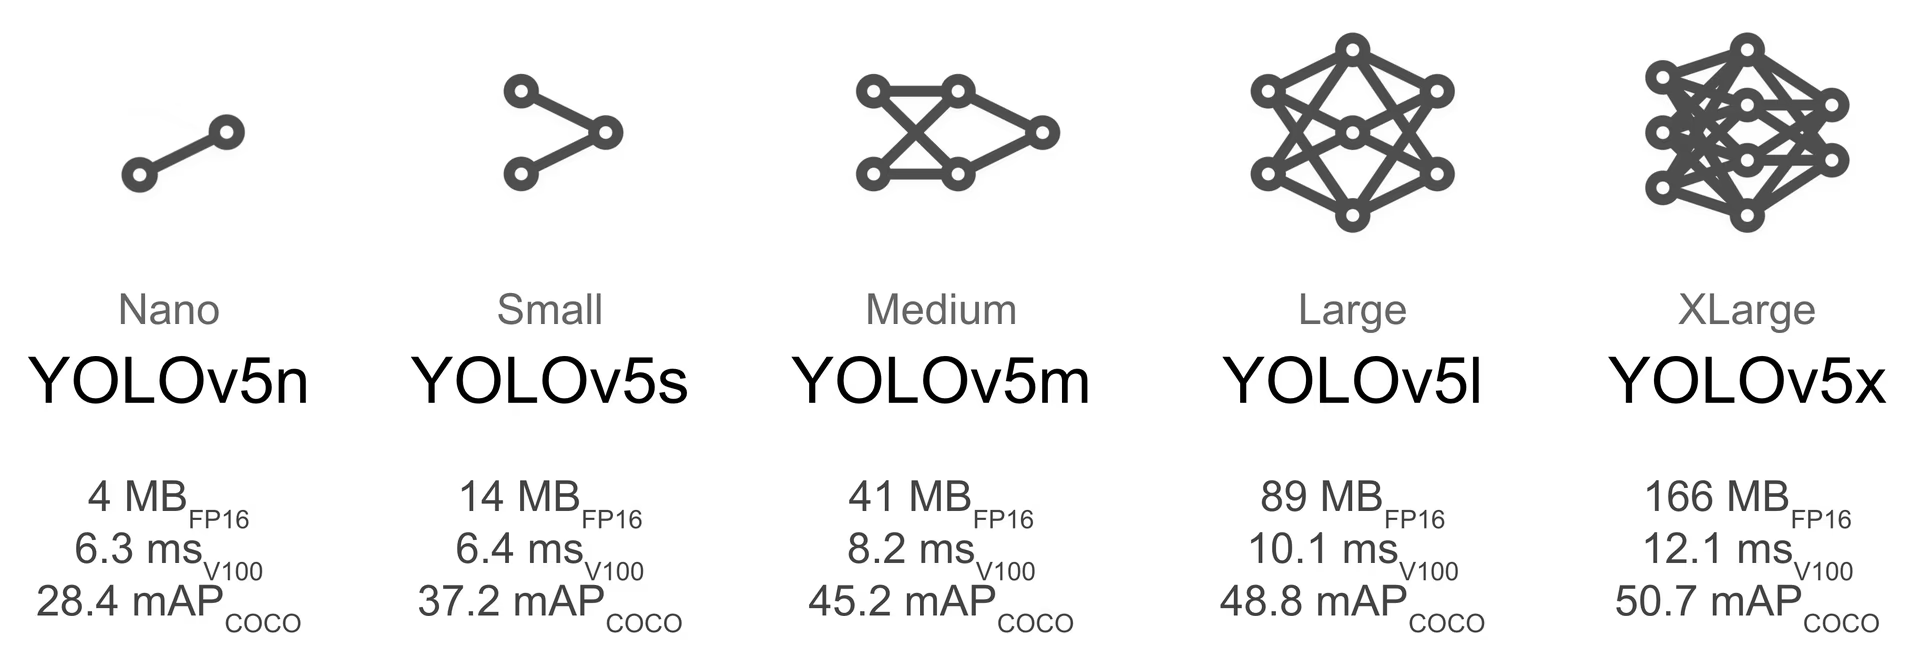
Select a pretrained model to start training from. Here we select YOLOv5s, a small and fast model. See our README table for a full comparison of all models. We will train this model with Multi-GPU on the COCO dataset.
Single GPU#
python train.py --batch 64 --data coco.yaml --weights yolov5s.pt --device 0Multi-GPU DataParallel Mode (⚠️ not recommended)#
Pass multiple GPU IDs to --device to enable DataParallel mode:
python train.py --batch 64 --data coco.yaml --weights yolov5s.pt --device 0,1DataParallel is slow and barely speeds up training compared to using a single GPU.
Multi-GPU DistributedDataParallel Mode (✅ recommended)#
Prefix the training command with python -m torch.distributed.run --nproc_per_node, then pass the usual arguments:
python -m torch.distributed.run --nproc_per_node 2 train.py --batch 64 --data coco.yaml --weights yolov5s.pt --device 0,1--nproc_per_nodeis the number of GPUs to use. In the example above, it is2.--batchis the total batch size, divided evenly across each GPU. In the example above, that is64 / 2 = 32per GPU.
The command above uses GPUs 0...(N-1). To control device visibility through environment variables instead, set CUDA_VISIBLE_DEVICES=2,3 (or any other list) before launching.
Use specific GPUs (click to expand)
Pass --device followed by the specific GPU IDs. The example below uses GPUs 2,3.
python -m torch.distributed.run --nproc_per_node 2 train.py --batch 64 --data coco.yaml --cfg yolov5s.yaml --weights '' --device 2,3Use SyncBatchNorm (click to expand)
SyncBatchNorm can increase accuracy for multi-GPU training, but it slows training down significantly. It is only available for multi-GPU DistributedDataParallel training.
Best used when the batch size on each GPU is small (<= 8).
To enable SyncBatchNorm, pass --sync-bn:
python -m torch.distributed.run --nproc_per_node 2 train.py --batch 64 --data coco.yaml --cfg yolov5s.yaml --weights '' --sync-bnUse Multiple machines (click to expand)
This is only available for multi-GPU DistributedDataParallel training.
Before continuing, ensure the dataset, codebase, and any other dependencies match across all machines, then verify that the machines can reach each other on the network.
Choose a master machine (the one the others will connect to), note its address (master_addr), and pick a port (master_port). The example below uses master_addr = 192.168.1.1 and master_port = 1234.
Then run:
# On master machine 0
python -m torch.distributed.run --nproc_per_node G --nnodes N --node_rank 0 --master_addr "192.168.1.1" --master_port 1234 train.py --batch 64 --data coco.yaml --cfg yolov5s.yaml --weights ''
# On machine R
python -m torch.distributed.run --nproc_per_node G --nnodes N --node_rank R --master_addr "192.168.1.1" --master_port 1234 train.py --batch 64 --data coco.yaml --cfg yolov5s.yaml --weights ''where G is the number of GPUs per machine, N is the number of machines, and R is the machine rank in 0...(N-1). For example, with two machines and two GPUs each, set G = 2, N = 2, and R = 1 on the second machine.
Training does not start until all N machines are connected. Output is only shown on the master machine.
Notes#
-
Windows support is untested; Linux is recommended.
-
--batchmust be a multiple of the number of GPUs. -
GPU 0 uses slightly more memory than the others because it maintains the EMA and handles checkpointing.
-
If you get
RuntimeError: Address already in use, it usually means multiple training runs are using the same port. Specify a different port with--master_port:python -m torch.distributed.run --master_port 1234 --nproc_per_node 2 ...
Results#
DDP profiling results on an AWS EC2 P4d instance with 8x A100 SXM4-40GB for YOLOv5l for 1 COCO epoch.
Profiling code
# prepare
t=ultralytics/yolov5:latest && sudo docker pull $t && sudo docker run -it --ipc=host --device nvidia.com/gpu=all -v "$(pwd)"/coco:/usr/src/coco $t
pip3 install torch==1.9.0+cu111 torchvision==0.10.0+cu111 -f https://download.pytorch.org/whl/torch_stable.html
cd .. && rm -rf app && git clone https://github.com/ultralytics/yolov5 -b master app && cd app
cp data/coco.yaml data/coco_profile.yaml

# profile
python train.py --batch-size 16 --data coco_profile.yaml --weights yolov5l.pt --epochs 1 --device 0
python -m torch.distributed.run --nproc_per_node 2 train.py --batch-size 32 --data coco_profile.yaml --weights yolov5l.pt --epochs 1 --device 0,1
python -m torch.distributed.run --nproc_per_node 4 train.py --batch-size 64 --data coco_profile.yaml --weights yolov5l.pt --epochs 1 --device 0,1,2,3
python -m torch.distributed.run --nproc_per_node 8 train.py --batch-size 128 --data coco_profile.yaml --weights yolov5l.pt --epochs 1 --device 0,1,2,3,4,5,6,7| GPUs A100 | batch-size | CUDA_mem device0 (G) | COCO train | COCO val |
|---|---|---|---|---|
| 1x | 16 | 26GB | 20:39 | 0:55 |
| 2x | 32 | 26GB | 11:43 | 0:57 |
| 4x | 64 | 26GB | 5:57 | 0:55 |
| 8x | 128 | 26GB | 3:09 | 0:57 |
As shown in the results, using DistributedDataParallel with multiple GPUs provides nearly linear scaling in training speed. With 8 GPUs, training completes approximately 6.5 times faster than with a single GPU, while maintaining the same memory usage per device.
Supported Environments#
Ultralytics provides a range of ready-to-use environments, each pre-installed with essential dependencies such as CUDA, CUDNN, Python, and PyTorch, to kickstart your projects.
- Free GPU Notebooks:



- Google Cloud: GCP Quickstart Guide
- Amazon: AWS Quickstart Guide
- Azure: AzureML Quickstart Guide
- Docker: Docker Quickstart Guide
Project Status#

This badge indicates that all YOLOv5 GitHub Actions Continuous Integration (CI) tests are successfully passing. These CI tests rigorously check the functionality and performance of YOLOv5 across various key aspects: training, validation, inference, export, and benchmarks. They ensure consistent and reliable operation on macOS, Windows, and Ubuntu, with tests conducted every 24 hours and upon each new commit.
Credits#
We would like to thank @MagicFrogSJTU, who did all the heavy lifting, and @glenn-jocher for guiding us along the way.
See Also#
- Train Mode - Learn about training YOLO models with Ultralytics
- Hyperparameter Tuning - Optimize your model's performance
- Docker Quickstart Guide - Set up your Docker environment for training
FAQ#
Read the checklist below before opening an issue — it often saves time.
Checklist (click to expand)
- Have you read this guide end-to-end?
- Have you re-cloned the codebase? The code changes daily.
- Have you searched for the error message? Someone may have already hit the same issue and shared a fix.
- Have you installed all the requirements (including the correct Python and PyTorch versions)?
- Have you tried one of the supported environments listed above?
- Have you tried a standard dataset such as
coco128orcoco2017to isolate the root cause?
If all of the above check out, open an Issue with as much detail as possible, following the template.