使用 Ultralytics YOLO 进行实例分割
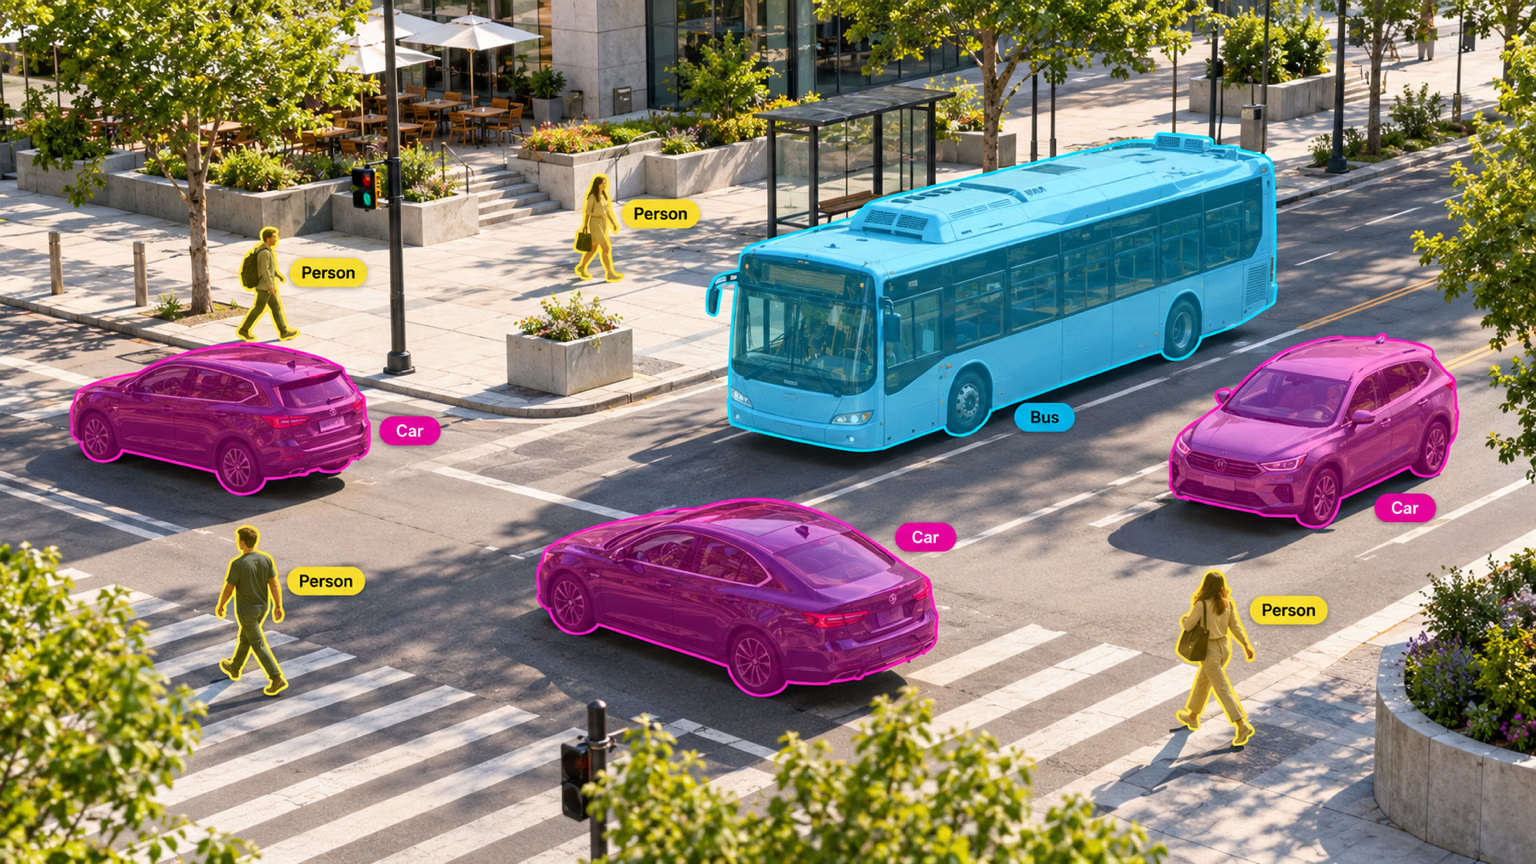
实例分割比目标检测更进一步,涉及识别图像中的各个对象,并将它们与图像其余部分分割开来。
实例分割模型的输出是一组用于勾勒图像中各个对象轮廓的掩码或轮廓线,以及每个对象对应的类别标签和置信度分数。如果你不仅需要知道图像中对象的位置,还需要了解对象的精确形状,那么实例分割就很有用。
观看: 在 Python 中使用预训练的 Ultralytics YOLO 模型进行分割。
YOLO26 Segment 模型使用后缀 -seg,例如 yolo26n-seg.pt,并使用 COCO 进行预训练。
模型#
下方展示了在 COCO 数据集上预训练的 YOLO26 Segment 模型。
首次使用时,模型会自动从 Ultralytics 最新版本下载。
| 模型 | 尺寸 (像素) | mAP框50-95 (e2e) | mAP掩码50-95 (e2e) | 速度 CPU ONNX (毫秒) | 速度 T4 TensorRT10 (ms) | 参数 (M) | FLOPs (B) |
|---|---|---|---|---|---|---|---|
| YOLO26n-seg | 640 | 39.6 | 33.9 | 53.3 ± 0.5 | 2.1 ± 0.0 | 2.7 | 9.3 |
| YOLO26s-seg | 640 | 47.3 | 40.0 | 118.4 ± 0.9 | 3.3 ± 0.0 | 10.4 | 34.5 |
| YOLO26m-seg | 640 | 52.5 | 44.1 | 328.2 ± 2.4 | 6.7 ± 0.1 | 23.6 | 121.7 |
| YOLO26l-seg | 640 | 54.4 | 45.5 | 387.0 ± 3.7 | 8.0 ± 0.1 | 28.0 | 140.1 |
| YOLO26x-seg | 640 | 56.5 | 47.0 | 787.0 ± 6.8 | 16.4 ± 0.1 | 62.8 | 314.0 |
- mAPval 数值是在 COCO val2017 数据集上以单模型、单尺度方式测得的。
使用yolo segment val data=coco.yaml device=0 nms=False复现 - 速度是在 COCO val 图像上使用 ONNX(CPU)和 TensorRT10(NVIDIA T4 GPU)测得的平均值。
使用yolo segment val data=coco.yaml batch=1 device=0|cpu nms=False复现 - 参数量和 FLOPs 数值对应融合后的模型,该模型经过 Conv/BatchNorm 折叠并移除了未使用的检测分支。预训练检查点保留完整的训练架构,因此显示的数值可能更高。
这些检查点可分割 COCO 的 80 个类别。如需在不重新训练的情况下分割列表之外的类别,请参阅 YOLOE,它可以将类别作为文本提示、视觉示例或内置词汇表输入。
查看尚未发布的 YOLO27 预览版,了解初步的 COCO 边界框和掩码结果。
训练#
在 COCO8-seg 数据集上以 640 的图像尺寸训练一个 YOLO26n-seg 模型,训练 100 个周期。
from ultralytics import YOLO

# 加载模型
model = YOLO("yolo26n-seg.yaml")  # 从 YAML 构建新模型
model = YOLO("yolo26n-seg.pt")  # 加载预训练模型(推荐用于训练)
model = YOLO("yolo26n-seg.yaml").load("yolo26n-seg.pt")  # 从 YAML 构建模型并迁移权重

# 训练模型
results = model.train(data="coco8-seg.yaml", epochs=100, imgsz=640)
有关 train 模式的完整详情,请参阅训练页面。你也可以使用 Ultralytics Platform 云训练训练分割模型。
数据集格式#
YOLO 分割数据集格式的详细说明请参阅数据集指南。如需将现有 COCO JSON 数据集转换为 YOLO 格式,请使用内置的 convert_coco 函数和 use_segments=True,具体说明请参阅 COCO 转 YOLO 指南。你还可以使用 Ultralytics Platform 标注中的多边形工具和 SAM 驱动的智能标注功能创建分割掩码。
验证#
验证训练后的 YOLO26n-seg 模型准确率,以边界框和掩码的平均精度均值(mAP)衡量。无需提供参数,因为 model 会将训练时使用的 data 和参数保留为模型属性:训练示例中的 path/to/best.pt 会在 COCO8-seg 上进行验证。官方权重记录的训练数据集路径在你的计算机上不存在,因此程序会发出警告,并回退到任务默认值 coco8-seg.yaml。传入 data 可在其他数据集上进行验证。
from ultralytics import YOLO

# 加载模型
model = YOLO("yolo26n-seg.pt")  # 加载官方模型
model = YOLO("path/to/best.pt")  # 加载自定义模型

# 验证模型
metrics = model.val()  # 无需参数,数据集和设置会自动记住
metrics.box.map  # map50-95(B)
metrics.box.map50  # map50(B)
metrics.box.map75  # map75(B)
metrics.box.maps  # 每个类别的 mAP50-95(B);未出现在验证集中的类别采用整体 mAP(B) 值
metrics.box.ap_class_index  # 实际参与评估的类别索引
metrics.box.image_metrics  # 每张图像的 det 指标字典,包含 precision、recall、F1、TP、FP 和 FN
metrics.seg.map  # map50-95(M)
metrics.seg.map50  # map50(M)
metrics.seg.map75  # map75(M)
metrics.seg.maps  # 每个类别的 mAP50-95(M);未出现在验证集中的类别采用整体 mAP(M) 值
metrics.seg.ap_class_index  # 实际参与评估的类别索引
metrics.seg.image_metrics # 每张图像的 seg 指标字典,包含 precision、recall、F1、TP、FP 和 FN预测#
使用训练好的 YOLO26n-seg 模型对图像进行预测。
from ultralytics import YOLO

# 加载模型
model = YOLO("yolo26n-seg.pt")  # 加载官方模型
model = YOLO("path/to/best.pt")  # 加载自定义模型

# 使用模型进行预测
results = model("https://ultralytics.com/images/bus.jpg")  # 对图像进行预测

# 访问结果
for result in results:
    xy = result.masks.xy  # 像素坐标中的掩码多边形
    xyn = result.masks.xyn  # 归一化掩码多边形
masks = result.masks.data # 二值掩码,形状为 (N,H,W),数据类型为 torch.uint8请参阅预测页面,了解完整的 predict 模式详情。
结果输出#
YOLO 实例分割会为每张图像返回一个 Results 对象。每个结果都存储对象级预测,其中每个检测到的实例都有自己的二值掩码、类别、置信度和边界框。
| 属性 | 类型 | 形状 | 说明 |
|---|---|---|---|
result.masks | Masks | (N) | 实例掩码。 |
result.masks.data | torch.uint8 | (N,H,W) | 二值掩码,取值为 0 或 1。 |
result.masks.xy | np.float32 | list[(P,2)] | 像素多边形。 |
result.masks.xyn | np.float32 | list[(P,2)] | 归一化多边形。 |
result.boxes | Boxes | (N) | 实例框/类别/置信度。 |
result.boxes.cls | torch.float32 | (N,) | 类别 ID;转换为 int 可获取类别名称。 |
如需了解所有任务中特定于任务的 Results 字段,请参阅按任务查看预测结果部分。
实例分割与语义分割#
实例分割是在对象级别进行分割:两辆汽车会产生两个掩码、两个边界框和两个置信度分数。 语义分割是在像素级别进行分类:这两辆汽车会变成同一张图像大小的类别图中的同类像素,且不会为每个对象分别提供边界框、置信度或默认多边形列表。请参阅语义分割页面上的逐字段对比。
导出#
将 YOLO26n-seg 模型导出为 ONNX、CoreML 等其他格式。
from ultralytics import YOLO

# 加载模型
model = YOLO("yolo26n-seg.pt")  # 加载官方模型
model = YOLO("path/to/best.pt")  # 加载自定义模型

# 导出模型
model.export(format="onnx")
下表列出了可用的 YOLO26-seg 导出格式。你可以使用 format 参数导出为任意格式,例如 format='onnx' 或 format='engine'。你可以直接在导出的模型上进行预测或验证,例如 yolo predict model=yolo26n-seg.onnx。导出完成后,系统会显示适用于你的模型的用法示例。
对于静态形状,CoreML 支持在检测、实例分割和姿态任务中嵌入 NMS(nms=True)。默认的分割导出(nms=None)会将 NMS 留给使用方处理。
| 格式 | format 参数 | 模型 | 元数据 | 参数 |
|---|---|---|---|---|
| PyTorch | - | yolo26n-seg.pt | ✅ | - |
| TorchScript | torchscript | yolo26n-seg.torchscript | ✅ | imgsz, quantize, dynamic, nms, batch, device |
| ONNX | onnx | yolo26n-seg.onnx | ✅ | imgsz, quantize, dynamic, simplify, opset, nms, batch, data, fraction, device |
| OpenVINO | openvino | yolo26n-seg_openvino_model/ | ✅ | imgsz, quantize, dynamic, nms, batch, data, fraction, device |
| TensorRT | engine | yolo26n-seg.engine | ✅ | imgsz, quantize, dynamic, simplify, opset, workspace, nms, batch, data, fraction, device |
| CoreML | coreml | yolo26n-seg.mlpackage | ✅ | imgsz, dynamic, quantize, nms, batch, device |
| Apple Core AI | coreai | yolo26n-seg.aimodel | ✅ | imgsz, batch, quantize |
| TF SavedModel | saved_model | yolo26n-seg_saved_model/ | ✅ | imgsz, quantize, opset, nms, batch, data, fraction, device |
| TF GraphDef | pb | yolo26n-seg.pb | ❌ | imgsz, opset, batch, device |
| TF Edge TPU | edgetpu | yolo26n-seg_edgetpu.tflite | ✅ | imgsz, quantize, opset, data, fraction, device |
| LiteRT | litert | yolo26n-seg.tflite | ✅ | imgsz, quantize, batch, data, fraction, device |
| PaddlePaddle | paddle | yolo26n-seg_paddle_model/ | ✅ | imgsz, batch, device |
| MNN | mnn | yolo26n-seg.mnn | ✅ | imgsz, batch, dynamic, quantize, simplify, opset, nms, device |
| NCNN | ncnn | yolo26n-seg_ncnn_model/ | ✅ | imgsz, quantize, device |
| IMX500 | imx | yolo11n_imx_model/ | ✅ | imgsz, quantize, data, fraction, nms, device |
| RKNN | rknn | yolo26n-seg_rknn_model/ | ✅ | imgsz, batch, name, quantize, simplify, opset, data, fraction, device |
| ExecuTorch | executorch | yolo26n-seg_executorch_model/ | ✅ | imgsz, quantize, batch, data, fraction, device |
| Axelera | axelera | yolo26n-seg_axelera_model/ | ✅ | imgsz, batch, quantize, data, fraction, device |
| DEEPX | deepx | yolo26n-seg_deepx_model/ | ✅ | imgsz, quantize, simplify, opset, data, optimize, device |
| Qualcomm QNN | qnn | yolo26n-seg_qnn.onnx | ✅ | imgsz, batch, name, quantize, simplify, opset, data, fraction, device |
| Hailo | hailo | yolo26n-seg_hailo_model/ | ✅ | imgsz, name, quantize, data, fraction, simplify, conf, iou, device |
| Huawei Ascend | ascend | yolo26n-seg_ascend_model/ | ✅ | imgsz, batch, name, quantize, opset, simplify, nms, device |
| AMD Xilinx | xilinx | yolo26n-seg_xilinx_model/ | ✅ | imgsz, name, quantize, data, fraction, opset, simplify, device |
| NXP | nxp | yolo26n-seg_nxp.tflite | ✅ | imgsz, quantize, data, fraction, device |
| ST Edge AI | stedgeai | yolo26n-seg_stedgeai.onnx | ✅ | imgsz, quantize, data, fraction, opset, simplify, device |
nms=None 默认输出原始结果,以便进行外部 NMS(YOLO26 在 Axelera 上保留其无 NMS 检测头)。设置 nms=False 以选择可用的无 NMS 检测头;不支持的格式会回退到其原生输出路径。上方的 nms 条目指出可通过 nms=True 嵌入 NMS 的格式。
请参阅 Export 页面,了解完整的 export 详情。
常见问题#
要在自定义数据集上训练 YOLO26 分割模型,你需要先按照 YOLO 分割格式准备数据集。你可以使用内置的
convert_coco工具转换 COCO JSON 数据集。数据集准备就绪后,你可以使用 Python 或 CLI 命令训练模型:示例from ultralytics import YOLO # 加载预训练的 YOLO26 分割模型 model = YOLO("yolo26n-seg.pt") # 训练模型 results = model.train(data="path/to/your_dataset.yaml", epochs=100, imgsz=640)请查看配置页面,了解更多可用参数。
目标检测通过在对象周围绘制边界框来识别并定位图像中的对象,而实例分割除了识别边界框,还会勾勒每个对象的精确形状。YOLO26 实例分割模型会生成用于勾勒每个检测对象的掩码或轮廓线,特别适用于需要了解对象精确形状的任务,例如医学影像或自动驾驶。
Ultralytics YOLO26 将高准确率与实时推理速度相结合,适合在视频流和边缘设备上进行实例分割。YOLO26 Segment 模型使用 COCO 数据集进行预训练,因此开箱即可分割 80 种常见对象类别,并为使用自定义数据微调提供良好起点。同一个
YOLOAPI 可用于研究和工业应用中的训练、验证、预测与导出。加载并验证预训练的 YOLO 分割模型很简单。下面介绍如何使用 Python 和 CLI 完成这些操作:
示例from ultralytics import YOLO # 加载预训练模型 model = YOLO("yolo26n-seg.pt") # 验证模型 metrics = model.val() print("Mean Average Precision for boxes:", metrics.box.map) print("Mean Average Precision for masks:", metrics.seg.map)这些步骤会提供平均精度均值(mAP)等验证指标,这是衡量分割性能的标准指标。
将 YOLO 分割模型导出为 ONNX 格式很简单,可以使用 Python 或 CLI 命令完成:
示例from ultralytics import YOLO # 加载预训练模型 model = YOLO("yolo26n-seg.pt") # 将模型导出为 ONNX 格式 model.export(format="onnx")如需了解将模型导出为各种格式的更多详情,请参阅导出页面。


评论418
提出问题、分享结果,或帮助其他人。
hp0716
Thank you for sharing the YOLOV11-seg model. I have encountered a problem now. When using YOLOV11 to segment my ID card, there are many uneven areas on the edges of the segmentation result, which affects my fitting of the card certificate boundary. How can I obtain smooth segmentation results? Do you have any parameters that can be directly configured?
1Additionally, is there a method to fit the boundary of the ID card mask into four straight lines for locating the ID card?
 Glenn JocherUltralytics
@hp0716 for smoother segmentation results on ID cards, try using
retina_masks=Trueduring inference to get higher resolution masks:from ultralytics import YOLO model = YOLO('yolo11n-seg.pt') results = model(image, retina_masks=True)For post-processing to get smooth boundaries, you can apply morphological operations and contour approximation:
import cv2
import numpy as np

# Get mask from results
mask = results[0].masks.data[0].cpu().numpy()
mask = (mask * 255).astype(np.uint8)

# Apply morphological smoothing
kernel = cv2.getStructuringElement(cv2.MORPH_ELLIPSE, (5, 5))
mask = cv2.morphologyEx(mask, cv2.MORPH_CLOSE, kernel)
mask = cv2.morphologyEx(mask, cv2.MORPH_OPEN, kernel)

# Find contours and approximate to quadrilateral
contours, _ = cv2.findContours(mask, cv2.RETR_EXTERNAL, cv2.CHAIN_APPROX_SIMPLE)
if contours:
    largest_contour = max(contours, key=cv2.contourArea)
    epsilon = 0.02 * cv2.arcLength(largest_contour, True)
    approx = cv2.approxPolyDP(largest_contour, epsilon, True)

    # Force to 4 points for ID card corners
    if len(approx) >= 4:
        corners = approx[:4]
This approach combines higher resolution masks with geometric fitting to achieve the straight-line boundaries you need for ID card localization.
1
cyberpunk-edgerunner
Just to confirm, while auto annotating, instead of using SAM one can also use one's custom build model. right ??
1rugvedjalit
Yes, you can annotate using custom build model but please check the annotation class id after annotation.
LwpZoe
I have used yolo11x-seg.yaml to do instance segmentation on my dataset, my dataset is multiclassified medical endoscopic tissue instance segmentation task, but the metrics scores are very low, I don't know how to improve these metrics scores, can you please give me some ideas?
1The metrics score with ShuffleAttention added to the tenth layer of backbone is reduced compared to the metrics score for YOLO11x-seg.yaml alone.
Trained my dataset using YOLO11x-seg.yaml+ShuffleAttention with no other parameters changed the metrics scores are as follows:
Class Images Instances Box( P R mAP50 mAP50-95) Mask( P R mAP50 mAP50-95): all 58 332 0.583 0.504 0.519 0.238 0.551 0.456 0.468 0.195
Training my dataset using the official YOLO11x-seg.yaml alone, the metrics scores are as follows:
Class Images Instances Box( P R mAP50 mAP50-95) Mask( P R mAP50 mAP50-95): all 58 332 0.669 0.465 0.489 0.257 0.648 0.446 0.455 0.217
1- Glenn JocherUltralytics(已编辑)
@LwpZoe thank you for sharing these details. For medical instance segmentation with YOLO11x-seg, we recommend: 1) Verify your dataset quality and annotation consistency using the Dataset Guide, 2) Try increasing input resolution (
imgsz=1280) to capture fine tissue details, 3) Implement medical-specific augmentations like CLAHE or elastic transforms, and 4) Consider using our pretrained weights with progressive fine-tuning rather than architectural modifications initially. The segmentation documentation contains additional optimization strategies for medical imaging tasks.
Hello, here's a question: I want to use YOLO11 to train my dataset from scratch and make predictions, and don't want to use prepared pre-trained weights, so how do I write the training commands? Is this code below ok: yolo segment train data=datasets/yolo_seg/data.yaml model=yolo11n-seg.yaml epochs=300 batch=16 resume=True imgsz=640 device=0,1
1- Glenn JocherUltralytics
@LwpZoe your command is almost correct for training from scratch without pretrained weights. Ensure the
resume=Trueargument is removed, as it is only used to resume interrupted training. The corrected command would be:yolo segment train data=datasets/yolo_seg/data.yaml model=yolo11n-seg.yaml epochs=300 batch=16 imgsz=640 device=0,1This will train your YOLO11 segmentation model from scratch using your custom dataset. For more details, visit the Segment Task Documentation.
potatoandtomatowhy
how to use two camera segment with gpu?
1ZhaoHaoran0613
Same question
1 Paula DerrengerUltralytics
To use two cameras for segmentation with a GPU, you'll need to set up a multi-threaded or multi-process pipeline to handle the video streams concurrently. Each camera stream can be processed in a separate thread or process, ensuring efficient utilization of the GPU. You can use the
YOLOclass from the Ultralytics library to load your segmentation model and process the frames from each camera. For detailed steps and code examples, please refer to the Ultralytics segmentation documentation. If you encounter any issues, make sure you're using the latest version of the package.
Boaruzhanchik
Hi, can you tell me how I can get the detected car plates in separate windows (as many as I have detected and output), my code outputs only one window.
while True: ret, im0 = cap.read() if not ret: break results = model(im0,verbose=False,conf=0.4,retina_masks=True) boxes = results[0].boxes.xyxy.tolist() classes = results[0].boxes.cls.tolist() confidences = results[0].boxes.conf.tolist() masks = results[0].masks if results[0].masks is not None: clss = results[0].boxes.cls.cpu().tolist() masks = results[0].masks.xy coordinates_mask = masks[0] contour = coordinates_mask.reshape((-1, 1, 2)).astype(np.int32) epsilon = 0.04 * cv2.arcLength(contour, True) approx = cv2.approxPolyDP(contour, epsilon, True) auto_transform = four_point_transform(im0, approx.reshape(-2, 2)) cv2.imshow('automated', auto_transform)1- Paula DerrengerUltralytics
@Boaruzhanchik hey there! 👋 To display each detected car plate in separate windows, you can loop through the detected boxes and create a window for each. Here's a quick example to get you started:
for i, box in enumerate(boxes):
    x1, y1, x2, y2 = map(int, box[:4])
    plate = im0[y1:y2, x1:x2]
    cv2.imshow(f'Plate {i}', plate)
cv2.waitKey(0)
cv2.destroyAllWindows()
This code snippet extracts each detected plate based on its bounding box coordinates and displays it in a new window. Make sure to replace
im0with your frame variable if it's named differently. Hope this helps! 😊 Thanks a lot for the help, I did it this way, it seems to work too
if results[0].masks is not None: clss = results[0].boxes.cls.cpu().tolist() masks = results[0].masks.xy if len(masks) == 1: coordinates_mask = masks[0] auto_transformations_first(coordinates_mask) elif len(masks) <= 2: auto_transformations_first(coordinates_mask) coordinates_mask_2 = masks[1] auto_transformations_second_screen(coordinates_mask_2) def auto_transformations_first(coordinates_mask): contour = coordinates_mask.reshape((-1, 1, 2)).astype(np.int32) epsilon = 0.04 * cv2.arcLength(contour, True) approx = cv2.approxPolyDP(contour, epsilon, True) auto_transform = four_point_transform(im0, approx.reshape(-2, 2)) cv2.imshow('automated_first', auto_transform)- Paula DerrengerUltralytics
@Boaruzhanchik hey there! 👋 It looks like you've found a way to handle different numbers of masks with your approach. Nicely done! 🎉 Just a quick tip: you might want to ensure
coordinates_maskis defined before using it inauto_transformations_first(coordinates_mask)for theelif len(masks) <= 2:case, to avoid any potential errors. Other than that, your method seems solid. Keep up the great work, and if you have any more questions or need further assistance, feel free to ask. Happy coding! 😊
uqasha524
Hi everyone,
We have fine-tuned a YOLO model primarily for segmentation, but our dataset contains mixed annotation types—the main task is segmentation, while some classes/regions use standard bounding boxes and OBB (Oriented Bounding Boxes).
What is the recommended approach in Ultralytics for handling a dataset with mixed annotation formats in a single training pipeline, and could you explain how this is possible? Specifically, how should the data labels and model configuration be structured to handle multiple task types simultaneously?
Any guidance, workflow explanations, or examples would be greatly appreciated!
- Glenn JocherUltralytics
Ultralytics training uses one task per model (
detect,segment, orobb), so mixed label formats cannot be trained jointly in a standard pipeline. Use separate label directories/YAML files and train separate models, or convert box/OBB annotations to polygon labels so every object follows the segmentation format; note that a segmentation model returns masks and axis-aligned boxes, not native OBB predictions.1 Ultralytics YOLO does not support mixing detection, segmentation, and OBB annotations in a single training run. Each model/task expects a specific label format and corresponding loss function.
The recommended approach is to separate the annotations and train separate models for segmentation, detection, and OBB, then combine their outputs during inference if needed. A single multi-task model would require a custom architecture and training pipeline.
1- Glenn JocherUltralytics
@uqasha524, do you need masks, axis-aligned boxes, and OBBs as distinct outputs at inference, or would segmentation outputs alone meet your requirements? That distinction will help us suggest the appropriate dataset structure without introducing unnecessary custom training work.
TrieuCris
With yolo26-seg, when a small object is placed on top of a large object, I get a result where the mask of the large object is punctured right where the small object is covering it. How can I fix this?
- Glenn JocherUltralytics
That’s usually expected with standard instance segmentation:
yolo26-seglearns the visible region of each instance, so the larger object can appear “punctured” where it is occluded; if you want a filled large-object mask, you’ll need labels that include the full occluded shape or apply post-processing tor.masksafter inference, and the segmentation object isolation guide shows where to access those masks—if you share one image plus its label here, the Ultralytics team can help confirm whether it’s annotation or model behavior.
miracle101000
hello if I wanted to use your segmentation model for inference on a live camera preview, to only detect a single item at a time, how would I go about it? thank you.
- Glenn JocherUltralytics
Yes — use a
-segmodel on your webcam feed, setclasses=[...]if you only want one class, andmax_det=1if you want at most one instance per frame; if you share your use case here, the Ultralytics team can help refine it, and the Segment task docs cover the mask outputs you’ll use.from ultralytics import YOLO model = YOLO("yolo26n-seg.pt") results = model.predict(source=0, stream=True, classes=[0], max_det=1) Ok thx. I am actually trying to implement edge detection on android devices for rectangular objects. I have tried OpenCV but it's not enough. So I was thinking to use a segmentation model for my rectangular processor (overlay would only show on rectangular objects) but any time I try to implement this on android, I get serious lagging issues on the camera preview. Plus honestly new to this AI stuff.
- Glenn JocherUltralytics
If you only need a rectangle-style overlay, a segmentation model is usually heavier than necessary on Android; I’d start with a small OBB or detect model instead, export it with Export mode, and keep
imgszlow or run inference every few frames to reduce preview lag. If you share your device, export format, and current FPS here, the Ultralytics team can suggest the lightest setup.
Heyujie96
你是不是加载模型的时候没有写task=“segment”
------------------ Original ------------------ From: liyongkang2000 @.> Date: Sun,Feb 1,2026 1:12 AM To: ultralytics/ultralytics @.> Cc: Heyujie96 @.>, Comment @.> Subject: Re: [ultralytics/ultralytics] zh/tasks/segment/ (Discussion #8508)
您好我想问一下,在YOLOV8和V11测试下来,由于目标框的存在,不管如果在后处理阶段调整目标框的范围,被分割目标的上下左右边界始终会被目标框切割,导致分割结果的边缘不平滑。会出现很多直线,但是在YOLOV26上没有尝试过,YOLOV26是否优化了这个边界问题,或者说是否其他的解决方法可以解决这个分割结果的边缘不平滑问题
— Reply to this email directly, view it on GitHub, or unsubscribe. You are receiving this because you commented.Message ID: @.***>
liyongkang2000
result = model.predict(os.path.join(path,file), nms = True, )这是我的预测代码是官方提供的呀
- Glenn JocherUltralytics
你这段
predict()用法本身没问题;一般也不需要手动写task="segment",关键是确保加载的是分割权重(*-seg.pt),否则不会有result.masks输出;如果分割边缘出现“被框裁切/直线感强”的现象,可以在推理时尝试开启retina_masks=True并适当增大imgsz(NMS 默认就会做,通常不需要单独传nms=True),相关参数处理可参考 SegmentationPredictor 源码说明。from ultralytics import YOLO model = YOLO("yolo26n-seg.pt") # 确保是 -seg 权重 results = model.predict( os.path.join(path, file), retina_masks=True, imgsz=1024, conf=0.25, iou=0.7, ) 您好,您的建议是有效的,但边界还是没有那么光滑,以及大目标效果更差,有时会出现正方形,您这边还有其他的解决方案吗?期待您的回复
- Glenn JocherUltralytics
这个“边缘直线/大目标出现方块”的现象通常是分割头的掩码分辨率与“mask 会按预测框裁剪”的机制共同导致的(框越紧越容易看出裁剪痕迹,可参考这条 社区说明:inference 时 mask 是否会被 bbox 裁剪);如果你是自训练模型,想从根源提升大目标的边缘细节,建议在训练时把
mask_ratio调小(更高 mask 分辨率)并配合更大的imgsz/更大的*-seg模型,mask_ratio参数说明见 配置参数文档。from ultralytics import YOLO model = YOLO("yolo26s-seg.pt") # 也可以试试更大一点的 -seg 权重 model.train( data="path/to/your_dataset.yaml", imgsz=1024, epochs=100, mask_ratio=2, # 需要更细可再降到 1(显存占用会明显上升) )如果你只是想“导出/显示更光滑”的轮廓(不改变模型预测本身),可以按 Isolating Segmentation Objects 的方式拿到
result.masks.data后做一次轻量的blur + close再取轮廓;另外麻烦贴一张出现“正方形”的原图和对应可视化结果,并附上yolo checks的文本输出,我这边可以帮你确认主要瓶颈是分辨率、标注轮廓质量还是框裁剪造成的。