Link to this section간편 유틸리티#
ultralytics 패키지는 워크플로를 지원, 향상 및 가속화하기 위한 다양한 유틸리티를 제공합니다. 훨씬 더 많은 도구가 제공되지만, 이 가이드에서는 개발자에게 가장 유용한 도구들을 소개하며 Ultralytics 도구를 사용한 프로그래밍을 위한 실용적인 참조 자료로 활용할 수 있습니다.
Watch: Ultralytics Utilities | Auto Annotation, Explorer API and Dataset Conversion
Link to this section데이터#
Link to this section자동 라벨링 / 어노테이션#
데이터셋 어노테이션은 리소스가 많이 들고 시간이 걸리는 작업입니다. 적절한 양의 데이터로 학습된 Ultralytics YOLO 객체 탐지 모델이 있다면, 이를 SAM과 함께 사용하여 세그멘테이션 형식으로 추가 데이터를 자동 어노테이션할 수 있습니다.
from ultralytics.data.annotator import auto_annotate

auto_annotate(
    data="path/to/new/data",
    det_model="yolo26n.pt",
    sam_model="mobile_sam.pt",
    device="cuda",
    output_dir="path/to/save_labels",
)
이 함수는 값을 반환하지 않습니다. 자세한 내용은 다음을 참조하십시오:
- 함수 작동 방식에 대한 자세한 내용은
annotator.auto_annotate참조 섹션을 확인하십시오. segments2boxes함수와 함께 사용하여 객체 탐지 바운딩 박스도 생성할 수 있습니다.
Link to this section데이터셋 어노테이션 시각화#
이 함수는 학습 전 이미지에 YOLO 어노테이션을 시각화하여, 잘못된 탐지 결과로 이어질 수 있는 잘못된 어노테이션을 식별하고 수정하는 데 도움을 줍니다. 바운딩 박스를 그리고, 클래스 이름으로 객체에 라벨을 붙이며, 가독성을 높이기 위해 배경 휘도에 따라 텍스트 색상을 조정합니다.
from ultralytics.data.utils import visualize_image_annotations

label_map = {  # Define the label map with all annotated class labels.
    0: "person",
    1: "car",
}

# Visualize
visualize_image_annotations(
    "path/to/image.jpg",  # Input image path.
    "path/to/annotations.txt",  # Annotation file path for the image.
    label_map,
)
Link to this section세그멘테이션 마스크를 YOLO 형식으로 변환#
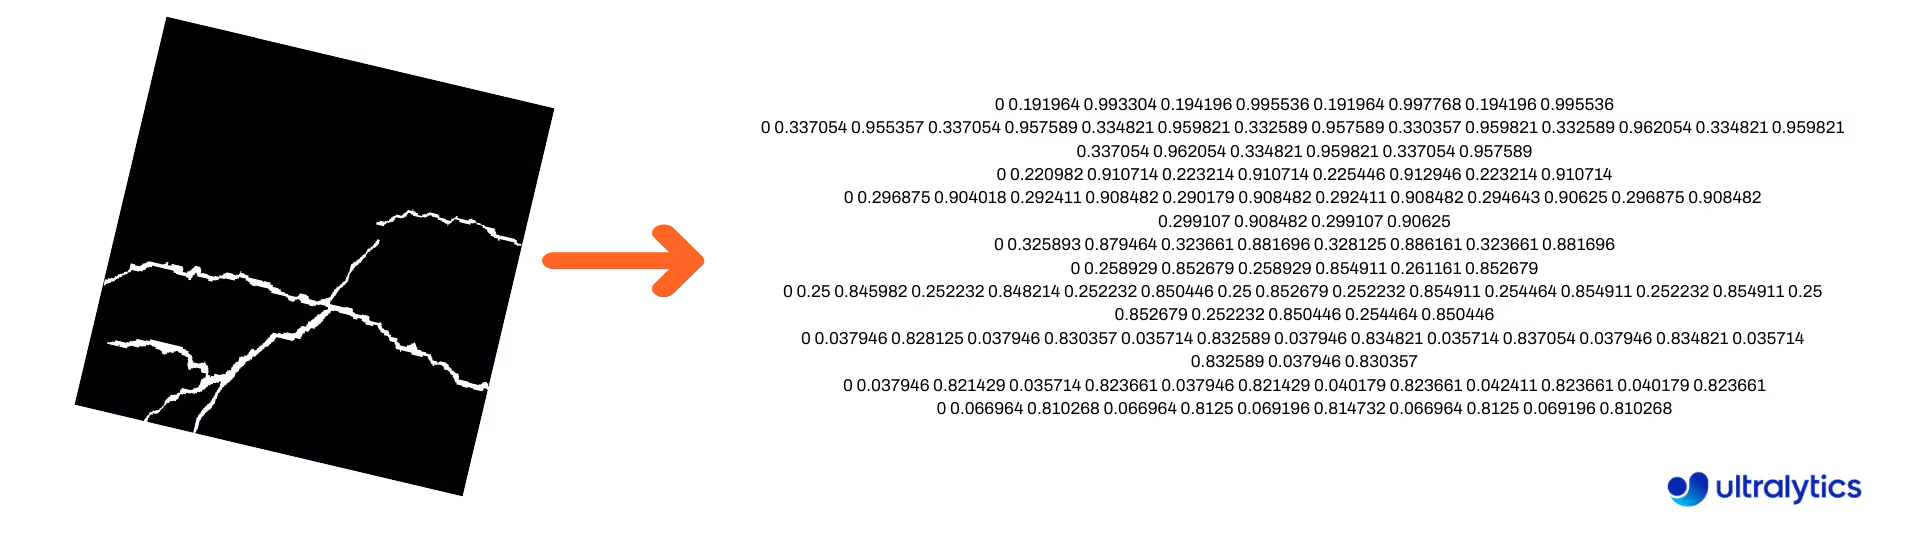
이 기능을 사용하여 세그멘테이션 마스크 이미지 데이터셋을 Ultralytics YOLO 세그멘테이션 형식으로 변환하십시오. 이 함수는 바이너리 형식의 마스크 이미지가 포함된 디렉터리를 가져와 YOLO 세그멘테이션 형식으로 변환합니다.
변환된 마스크는 지정된 출력 디렉터리에 저장됩니다.
from ultralytics.data.converter import convert_segment_masks_to_yolo_seg

# The classes here is the total classes in the dataset.
# for COCO dataset we have 80 classes.
convert_segment_masks_to_yolo_seg(masks_dir="path/to/masks_dir", output_dir="path/to/output_dir", classes=80)
Link to this sectionCOCO를 YOLO 형식으로 변환#
이 기능을 사용하여 COCO JSON 어노테이션을 YOLO 형식으로 변환할 수 있습니다. 객체 감지(BBox) 데이터셋의 경우 use_segments와 use_keypoints를 모두 False로 설정하십시오.
from ultralytics.data.converter import convert_coco

convert_coco(
    "coco/annotations/",
    use_segments=False,
    use_keypoints=False,
    cls91to80=True,
)
convert_coco 함수에 대한 자세한 정보는 참조 페이지를 방문하십시오.
Link to this section바운딩 박스 크기 가져오기#
import cv2

from ultralytics import YOLO
from ultralytics.utils.plotting import Annotator

model = YOLO("yolo26n.pt")  # Load pretrain or fine-tune model

# Process the image
source = cv2.imread("path/to/image.jpg")
results = model(source)

# Extract results
annotator = Annotator(source, example=model.names)

for box in results[0].boxes.xyxy.cpu():
    width, height, area = annotator.get_bbox_dimension(box)
    print(f"Bounding Box Width {width.item()}, Height {height.item()}, Area {area.item()}")
Link to this section바운딩 박스를 세그먼트로 변환#
기존의 x y w h 바운딩 박스 데이터가 있는 경우, yolo_bbox2segment 함수를 사용하여 세그먼트로 변환하십시오. 이미지와 어노테이션 파일을 다음과 같이 구성하십시오:
data
|__ images
    ├─ 001.jpg
    ├─ 002.jpg
    ├─ ..
    └─ NNN.jpg
|__ labels
    ├─ 001.txt
    ├─ 002.txt
    ├─ ..
    └─ NNN.txt
from ultralytics.data.converter import yolo_bbox2segment
yolo_bbox2segment(
im_dir="path/to/images",
save_dir=None, # saved to "labels-segment" in images directory
sam_model="sam_b.pt",
)함수에 관한 자세한 내용은 yolo_bbox2segment 참조 페이지를 방문하십시오.
Link to this section세그먼트를 바운딩 박스로 변환#
세그멘테이션 데이터셋 형식을 사용하는 데이터셋이 있는 경우, 이 함수를 사용하여 쉽게 수직(또는 수평) 바운딩 박스(x y w h 형식)로 변환할 수 있습니다.
import numpy as np

from ultralytics.utils.ops import segments2boxes

segments = np.array(
    [
        [805, 392, 797, 400, 812, 402, 808, 714, 808, 392],
        [115, 398, 113, 400, 150, 410, 150, 400, 149, 298],
        [267, 412, 265, 413, 300, 420, 300, 413, 299, 412],
    ],
    dtype=np.float32,
)

segments2boxes([s.reshape(-1, 2) for s in segments])
# >>> array([[804.5, 553. ,  15. , 322. ],
#           [131.5, 354. ,  37. , 112. ],
#           [282.5, 416. ,  35. ,   8. ]],
#           dtype=float32) # xywh bounding boxes
이 함수의 작동 방식을 이해하려면 참조 페이지를 방문하십시오.
Link to this section유틸리티#
Link to this section이미지 압축#
이미지 파일의 가로세로 비율과 품질을 유지하면서 파일 크기를 줄이도록 단일 이미지 파일을 압축합니다. 입력 이미지가 최대 치수보다 작으면 크기가 조정되지 않습니다.
from pathlib import Path

from ultralytics.data.utils import compress_one_image

for f in Path("path/to/dataset").rglob("*.jpg"):
    compress_one_image(f)
Link to this section데이터셋 자동 분할#
데이터셋을 자동으로 train/val/test로 분할하고 그 결과를 autosplit_*.txt 파일로 저장합니다. 이 함수는 무작위 샘플링을 사용하며, 학습을 위한 fraction 인수를 사용할 때는 제외됩니다.
from ultralytics.data.split import autosplit

autosplit(
    path="path/to/images",
    weights=(0.9, 0.1, 0.0),  # (train, validation, test) fractional splits
    annotated_only=False,  # split only images with annotation file when True
)
이 함수에 대한 자세한 내용은 참조 페이지를 확인하십시오.
Link to this section세그먼트 폴리곤을 바이너리 마스크로 변환#
Convert a single polygon (as a list) to a binary mask of the specified image size. The polygon should be a flat 1D array of N coordinates listing alternating x, y values defining the polygon contour.
N은 항상 짝수여야 합니다.
import numpy as np

from ultralytics.data.utils import polygon2mask

imgsz = (1080, 810)
polygon = np.array([805, 392, 797, 400, ..., 808, 714, 808, 392])  # (238, 2)

mask = polygon2mask(
    imgsz,  # tuple
    [polygon],  # input as list
    color=255,  # 8-bit binary
    downsample_ratio=1,
)
Link to this section바운딩 박스#
Link to this section바운딩 박스(수평) 인스턴스#
바운딩 박스 데이터를 관리하기 위해 Bboxes 클래스는 박스 좌표 형식 간 변환, 박스 크기 조정, 면적 계산, 오프셋 포함 등의 작업을 지원합니다.
import numpy as np

from ultralytics.utils.instance import Bboxes

boxes = Bboxes(
    bboxes=np.array(
        [
            [22.878, 231.27, 804.98, 756.83],
            [48.552, 398.56, 245.35, 902.71],
            [669.47, 392.19, 809.72, 877.04],
            [221.52, 405.8, 344.98, 857.54],
            [0, 550.53, 63.01, 873.44],
            [0.0584, 254.46, 32.561, 324.87],
        ]
    ),
    format="xyxy",
)

boxes.areas()
# >>> array([ 4.1104e+05,       99216,       68000,       55772,       20347,      2288.5])

boxes.convert("xywh")
print(boxes.bboxes)
# >>> array(
#     [[ 413.93, 494.05,  782.1, 525.56],
#      [ 146.95, 650.63,  196.8, 504.15],
#      [  739.6, 634.62, 140.25, 484.85],
#      [ 283.25, 631.67, 123.46, 451.74],
#      [ 31.505, 711.99,  63.01, 322.91],
#      [  16.31, 289.67, 32.503,  70.41]]
# )
더 많은 속성과 메서드는 Bboxes 참조 섹션을 확인하십시오.
다음 함수 중 다수는 Bboxes 클래스를 사용하여 액세스할 수 있지만, 함수를 직접 사용하려면 다음 하위 섹션에서 독립적으로 임포트하는 방법을 확인하십시오.
Link to this section박스 크기 조정#
이미지 크기를 확대하거나 축소할 때 ultralytics.utils.ops.scale_boxes를 사용하여 이에 맞게 바운딩 박스 좌표를 적절히 조정할 수 있습니다.
import cv2 as cv
import numpy as np

from ultralytics.utils.ops import scale_boxes

image = cv.imread("ultralytics/assets/bus.jpg")
h, w, c = image.shape
resized = cv.resize(image, None, (), fx=1.2, fy=1.2)
new_h, new_w, _ = resized.shape

xyxy_boxes = np.array(
    [
        [22.878, 231.27, 804.98, 756.83],
        [48.552, 398.56, 245.35, 902.71],
        [669.47, 392.19, 809.72, 877.04],
        [221.52, 405.8, 344.98, 857.54],
        [0, 550.53, 63.01, 873.44],
        [0.0584, 254.46, 32.561, 324.87],
    ]
)

new_boxes = scale_boxes(
    img1_shape=(h, w),  # original image dimensions
    boxes=xyxy_boxes,  # boxes from original image
    img0_shape=(new_h, new_w),  # resized image dimensions (scale to)
    ratio_pad=None,
    padding=False,
    xywh=False,
)

print(new_boxes)
# >>> array(
#     [[  27.454,  277.52,  965.98,   908.2],
#     [   58.262,  478.27,  294.42,  1083.3],
#     [   803.36,  470.63,  971.66,  1052.4],
#     [   265.82,  486.96,  413.98,    1029],
#     [        0,  660.64,  75.612,  1048.1],
#     [   0.0701,  305.35,  39.073,  389.84]]
# )
Link to this section바운딩 박스 형식 변환#
Link to this sectionXYXY → XYWH#
바운딩 박스 좌표를 (x1, y1, x2, y2) 형식에서 (x, y, width, height) 형식으로 변환합니다. 여기서 (x1, y1)은 왼쪽 상단 모서리이고 (x2, y2)는 오른쪽 하단 모서리입니다.
import numpy as np

from ultralytics.utils.ops import xyxy2xywh

xyxy_boxes = np.array(
    [
        [22.878, 231.27, 804.98, 756.83],
        [48.552, 398.56, 245.35, 902.71],
        [669.47, 392.19, 809.72, 877.04],
        [221.52, 405.8, 344.98, 857.54],
        [0, 550.53, 63.01, 873.44],
        [0.0584, 254.46, 32.561, 324.87],
    ]
)
xywh = xyxy2xywh(xyxy_boxes)

print(xywh)
# >>> array(
#     [[ 413.93,  494.05,   782.1, 525.56],
#     [  146.95,  650.63,   196.8, 504.15],
#     [   739.6,  634.62,  140.25, 484.85],
#     [  283.25,  631.67,  123.46, 451.74],
#     [  31.505,  711.99,   63.01, 322.91],
#     [   16.31,  289.67,  32.503,  70.41]]
# )
Link to this section모든 바운딩 박스 변환#
from ultralytics.utils.ops import (
    ltwh2xywh,
    ltwh2xyxy,
    xywh2ltwh,  # xywh → top-left corner, w, h
    xywh2xyxy,
    xywhn2xyxy,  # normalized → pixel
    xyxy2ltwh,  # xyxy → top-left corner, w, h
    xyxy2xywhn,  # pixel → normalized
)

for func in (ltwh2xywh, ltwh2xyxy, xywh2ltwh, xywh2xyxy, xywhn2xyxy, xyxy2ltwh, xyxy2xywhn):
    print(help(func))  # print function docstrings
각 함수의 독스트링을 보거나 ultralytics.utils.ops 참조 페이지를 방문하여 자세한 내용을 읽어보십시오.
Link to this section플롯#
Link to this section어노테이션 유틸리티#
Ultralytics는 다양한 데이터 유형을 어노테이션하기 위한 Annotator 클래스를 포함합니다. 이는 객체 탐지 바운딩 박스, 포즈 키포인트, 방향 바운딩 박스와 함께 사용할 때 가장 적합합니다.
Link to this section박스 어노테이션#
import cv2 as cv
import numpy as np

from ultralytics.utils.plotting import Annotator, colors

names = {
    0: "person",
    5: "bus",
    11: "stop sign",
}

image = cv.imread("ultralytics/assets/bus.jpg")
ann = Annotator(
    image,
    line_width=None,  # default auto-size
    font_size=None,  # default auto-size
    font="Arial.ttf",  # must be ImageFont compatible
    pil=False,  # use PIL, otherwise uses OpenCV
)

xyxy_boxes = np.array(
    [
        [5, 22.878, 231.27, 804.98, 756.83],  # class-idx x1 y1 x2 y2
        [0, 48.552, 398.56, 245.35, 902.71],
        [0, 669.47, 392.19, 809.72, 877.04],
        [0, 221.52, 405.8, 344.98, 857.54],
        [0, 0, 550.53, 63.01, 873.44],
        [11, 0.0584, 254.46, 32.561, 324.87],
    ]
)

for nb, box in enumerate(xyxy_boxes):
    c_idx, *box = box
    label = f"{str(nb).zfill(2)}:{names.get(int(c_idx))}"
    ann.box_label(box, label, color=colors(c_idx, bgr=True))

image_with_bboxes = ann.result()
Names can be used from model.names when working with detection results.
Also see the Annotator Reference Page for additional insight.
Link to this sectionUltralytics 스윕 어노테이션#
import cv2
import numpy as np

from ultralytics import YOLO
from ultralytics.solutions.solutions import SolutionAnnotator
from ultralytics.utils.plotting import colors

# User defined video path and model file
cap = cv2.VideoCapture("path/to/video.mp4")
model = YOLO(model="yolo26s-seg.pt")  # Model file, e.g., yolo26s.pt or yolo26m-seg.pt

if not cap.isOpened():
    print("Error: Could not open video.")
    exit()

# Initialize the video writer object.
w, h, fps = (int(cap.get(x)) for x in (cv2.CAP_PROP_FRAME_WIDTH, cv2.CAP_PROP_FRAME_HEIGHT, cv2.CAP_PROP_FPS))
video_writer = cv2.VideoWriter("ultralytics.avi", cv2.VideoWriter_fourcc(*"mp4v"), fps, (w, h))

masks = None  # Initialize variable to store masks data
f = 0  # Initialize frame count variable for enabling mouse event.
line_x = w  # Store width of line.
dragging = False  # Initialize bool variable for line dragging.
classes = model.names  # Store model classes names for plotting.
window_name = "Ultralytics Sweep Annotator"

def drag_line(event, x, _, flags, param):
    """Mouse callback function to enable dragging a vertical sweep line across the video frame."""
    global line_x, dragging
    if event == cv2.EVENT_LBUTTONDOWN or (flags & cv2.EVENT_FLAG_LBUTTON):
        line_x = max(0, min(x, w))
        dragging = True

while cap.isOpened():  # Loop over the video capture object.
    ret, im0 = cap.read()
    if not ret:
        break
    f = f + 1  # Increment frame count.
    count = 0  # Re-initialize count variable on every frame for precise counts.
    results = model.track(im0, persist=True)[0]

    if f == 1:
        cv2.namedWindow(window_name)
        cv2.setMouseCallback(window_name, drag_line)

    annotator = SolutionAnnotator(im0)

    if results.boxes.is_track:
        if results.masks is not None:
            masks = [np.array(m, dtype=np.int32) for m in results.masks.xy]

        boxes = results.boxes.xyxy.tolist()
        track_ids = results.boxes.id.int().cpu().tolist()
        clss = results.boxes.cls.cpu().tolist()

        for mask, box, cls, t_id in zip(masks or [None] * len(boxes), boxes, clss, track_ids):
            color = colors(t_id, True)  # Assign different color to each tracked object.
            label = f"{classes[cls]}:{t_id}"
            if mask is not None and mask.size > 0:
                if box[0] > line_x:
                    count += 1
                    cv2.polylines(im0, [mask], True, color, 2)
                    x, y = mask.min(axis=0)
                    (w_m, _), _ = cv2.getTextSize(label, cv2.FONT_HERSHEY_SIMPLEX, 0.5, 1)
                    cv2.rectangle(im0, (x, y - 20), (x + w_m, y), color, -1)
                    cv2.putText(im0, label, (x, y - 5), cv2.FONT_HERSHEY_SIMPLEX, 0.5, (255, 255, 255), 1)
            else:
                if box[0] > line_x:
                    count += 1
                    annotator.box_label(box=box, color=color, label=label)

    # Generate draggable sweep line
    annotator.sweep_annotator(line_x=line_x, line_y=h, label=f"COUNT:{count}")

    cv2.imshow(window_name, im0)
    video_writer.write(im0)
    if cv2.waitKey(1) & 0xFF == ord("q"):
        break

# Release the resources
cap.release()
video_writer.release()
cv2.destroyAllWindows()
sweep_annotator 메서드에 대한 자세한 내용은 참조 섹션 여기에서 확인할 수 있습니다.
Link to this section적응형 라벨 어노테이션#
Ultralytics v8.3.167부터 circle_label과 text_label은 통합된 adaptive_label 함수로 대체되었습니다. 이제 shape 인수를 사용하여 어노테이션 유형을 지정할 수 있습니다:
- 사각형:
annotator.adaptive_label(box, label=names[int(cls)], color=colors(cls, True), shape="rect") - 원:
annotator.adaptive_label(box, label=names[int(cls)], color=colors(cls, True), shape="circle")
Watch: In-Depth Guide to Text & Circle Annotations with Python Live Demos | Ultralytics Annotations 🚀
import cv2

from ultralytics import YOLO
from ultralytics.solutions.solutions import SolutionAnnotator
from ultralytics.utils.plotting import colors

model = YOLO("yolo26s.pt")
names = model.names
cap = cv2.VideoCapture("path/to/video.mp4")

w, h, fps = (int(cap.get(x)) for x in (cv2.CAP_PROP_FRAME_WIDTH, cv2.CAP_PROP_FRAME_HEIGHT, cv2.CAP_PROP_FPS))
writer = cv2.VideoWriter("Ultralytics circle annotation.avi", cv2.VideoWriter_fourcc(*"MJPG"), fps, (w, h))

while True:
    ret, im0 = cap.read()
    if not ret:
        break

    annotator = SolutionAnnotator(im0)
    results = model.predict(im0)[0]
    boxes = results.boxes.xyxy.cpu()
    clss = results.boxes.cls.cpu().tolist()

    for box, cls in zip(boxes, clss):
        annotator.adaptive_label(box, label=names[int(cls)], color=colors(cls, True), shape="circle")
    writer.write(im0)
    cv2.imshow("Ultralytics circle annotation", im0)

    if cv2.waitKey(1) & 0xFF == ord("q"):
        break

writer.release()
cap.release()
cv2.destroyAllWindows()
추가적인 통찰을 얻으려면 SolutionAnnotator 참조 페이지를 참조하십시오.
Link to this section기타#
Link to this section코드 프로파일링#
with 문을 사용하거나 데코레이터로 사용하여 코드가 실행/처리되는 시간을 확인하십시오.
from ultralytics.utils.ops import Profile

with Profile(device="cuda:0") as dt:
    pass  # operation to measure

print(dt)
# >>> "Elapsed time is 9.5367431640625e-07 s"
Link to this sectionUltralytics 지원 형식#
Ultralytics에서 지원하는 이미지 또는 비디오 형식을 프로그래밍 방식으로 사용해야 합니까? 필요에 따라 이러한 상수를 사용하십시오:
from ultralytics.data.utils import IMG_FORMATS, VID_FORMATS

print(IMG_FORMATS)
# {'avif', 'bmp', 'dng', 'heic', 'heif', 'jp2', 'jpeg', 'jpg', 'mpo', 'png', 'tif', 'tiff', 'webp'}

print(VID_FORMATS)
# {'asf', 'avi', 'gif', 'm4v', 'mkv', 'mov', 'mp4', 'mpeg', 'mpg', 'ts', 'wmv', 'webm'}
Link to this section나누어 떨어지게 만들기#
x보다 크거나 같으면서 y로 나누어떨어지는 가장 작은 정수를 계산합니다.
from ultralytics.utils.ops import make_divisible

make_divisible(7, 3)
# >>> 9
make_divisible(7, 2)
# >>> 8
Link to this sectionFAQ#
Link to this section머신 러닝 워크플로를 향상하기 위해 Ultralytics 패키지에 포함된 유틸리티는 무엇인가요?#
Ultralytics 패키지에는 머신 러닝 워크플로우를 간소화하고 최적화하도록 설계된 유틸리티가 포함되어 있습니다. 주요 유틸리티로는 데이터셋 라벨링을 위한 자동 어노테이션, COCO를 convert_coco를 사용하여 YOLO 형식으로 변환, 이미지 압축, 데이터셋 자동 분할 등이 있습니다. 이러한 도구는 수작업을 줄이고 일관성을 보장하며 데이터 처리 효율성을 향상시킵니다.
Link to this sectionUltralytics를 사용하여 데이터셋을 자동 라벨링하려면 어떻게 해야 하나요?#
사전 학습된 Ultralytics YOLO 객체 탐지 모델이 있다면, SAM 모델과 함께 사용하여 데이터셋을 세그멘테이션 형식으로 자동 어노테이션할 수 있습니다. 다음은 예제입니다:
from ultralytics.data.annotator import auto_annotate

auto_annotate(
    data="path/to/new/data",
    det_model="yolo26n.pt",
    sam_model="mobile_sam.pt",
    device="cuda",
    output_dir="path/to/save_labels",
)
자세한 내용은 auto_annotate 참조 섹션을 확인하거나, 호스팅된 노코드(no-code) 대안으로 Ultralytics Platform을 사용하여 SAM 2.1 또는 SAM 3을 통한 클릭 기반 마스킹, 혹은 탐지(detect), 분할(segment), OBB 작업을 위한 사전 훈련 및 파인 튜닝된 YOLO 모델의 예측을 활용하십시오.
Link to this sectionUltralytics에서 COCO 데이터셋 어노테이션을 YOLO 형식으로 어떻게 변환하나요?#
COCO JSON 어노테이션을 객체 탐지를 위한 YOLO 형식으로 변환하려면 convert_coco 유틸리티를 사용할 수 있습니다. 다음은 샘플 코드 스니펫입니다:
from ultralytics.data.converter import convert_coco

convert_coco(
    "coco/annotations/",
    use_segments=False,
    use_keypoints=False,
    cls91to80=True,
)
추가 정보를 보려면 convert_coco 참조 페이지를 방문하십시오.
Link to this section데이터셋 구성과 분포를 어떻게 분석할 수 있나요?#
Ultralytics Platform은 자동 데이터셋 분석을 제공합니다: Charts 탭에서는 분할 분포, 상위 클래스 수, 이미지 차원 히스토그램, 어노테이션 위치의 2D 히트맵을 보여주어 학습 전에 불균형과 이상치를 찾아낼 수 있도록 돕습니다.
Link to this sectionUltralytics에서 바운딩 박스를 세그먼트로 어떻게 변환하나요?#
기존 바운딩 박스 데이터(x y w h 형식)를 세그먼트로 변환하려면 yolo_bbox2segment 함수를 사용할 수 있습니다. 이미지와 라벨을 별도의 디렉터리로 구성해야 합니다.
from ultralytics.data.converter import yolo_bbox2segment

yolo_bbox2segment(
    im_dir="path/to/images",
    save_dir=None,  # saved to "labels-segment" in the images directory
    sam_model="sam_b.pt",
)
더 많은 정보를 보려면 yolo_bbox2segment 참조 페이지를 방문하십시오.