Simple Utilities
The ultralytics package provides a variety of utilities to support, enhance, and accelerate your workflows. While there are many more available, this guide highlights some of the most useful ones for developers, serving as a practical reference for programming with Ultralytics tools.
Watch: Ultralytics Utilities | Auto Annotation, Explorer API and Dataset Conversion
Data
Auto Labeling / Annotations
Dataset annotation is a resource-intensive and time-consuming process. If you have an Ultralytics YOLO object detection model trained on a reasonable amount of data, you can use it with SAM to auto-annotate additional data in segmentation format.
from ultralytics.data.annotator import auto_annotate

auto_annotate(
    data="path/to/new/data",
    det_model="yolo26n.pt",
    sam_model="mobile_sam.pt",
    device="cuda",
    output_dir="path/to/save_labels",
)
This function does not return any value. For further details:
- See the reference section for
annotator.auto_annotatefor more insight on how the function operates. - Use in combination with the function
segments2boxesto generate object detection bounding boxes as well.
Visualize Dataset Annotations
This function visualizes YOLO annotations on an image before training, helping to identify and correct any wrong annotations that could lead to incorrect detection results. It draws bounding boxes, labels objects with class names, and adjusts text color based on the background's luminance for better readability.
from ultralytics.data.utils import visualize_image_annotations

label_map = {  # Define the label map with all annotated class labels.
    0: "person",
    1: "car",
}

# Visualize
visualize_image_annotations(
    "path/to/image.jpg",  # Input image path.
    "path/to/annotations.txt",  # Annotation file path for the image.
    label_map,
)
Convert Segmentation Masks into YOLO Format
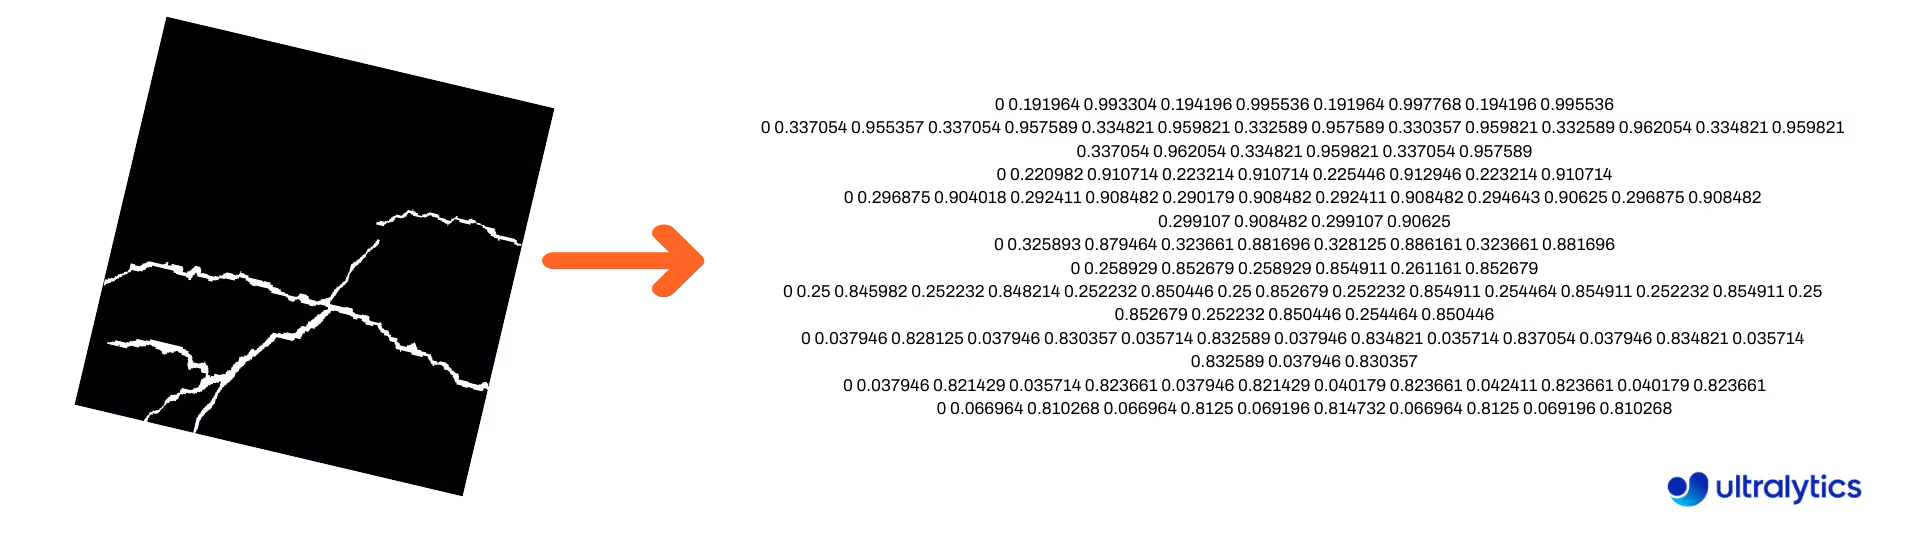
Use this to convert a dataset of segmentation mask images to the Ultralytics YOLO segmentation format. This function takes the directory containing the binary format mask images and converts them into YOLO segmentation format.
The converted masks will be saved in the specified output directory.
from ultralytics.data.converter import convert_segment_masks_to_yolo_seg

# The classes here is the total classes in the dataset.
# for COCO dataset we have 80 classes.
convert_segment_masks_to_yolo_seg(masks_dir="path/to/masks_dir", output_dir="path/to/output_dir", classes=80)
Convert COCO into YOLO Format
Use this to convert COCO JSON annotations into the YOLO format. For object detection (bounding box) datasets, set both use_segments and use_keypoints to False.
from ultralytics.data.converter import convert_coco

convert_coco(
    "coco/annotations/",
    use_segments=False,
    use_keypoints=False,
    cls91to80=True,
)
For additional information about the convert_coco function, visit the reference page.
Get Bounding Box Dimensions
import cv2

from ultralytics import YOLO
from ultralytics.utils.plotting import Annotator

model = YOLO("yolo26n.pt")  # Load pretrain or fine-tune model

# Process the image
source = cv2.imread("path/to/image.jpg")
results = model(source)

# Extract results
annotator = Annotator(source, example=model.names)

for box in results[0].boxes.xyxy.cpu():
    width, height, area = annotator.get_bbox_dimension(box)
    print(f"Bounding Box Width {width.item()}, Height {height.item()}, Area {area.item()}")
Convert Bounding Boxes to Segments
With existing x y w h bounding box data, convert to segments using the yolo_bbox2segment function. Organize the files for images and annotations as follows:
data
|__ images
    ├─ 001.jpg
    ├─ 002.jpg
    ├─ ..
    └─ NNN.jpg
|__ labels
    ├─ 001.txt
    ├─ 002.txt
    ├─ ..
    └─ NNN.txt
from ultralytics.data.converter import yolo_bbox2segment

yolo_bbox2segment(
    im_dir="path/to/images",
    save_dir=None,  # saved to "labels-segment" in images directory
    sam_model="sam_b.pt",
)
Visit the yolo_bbox2segment reference page for more information regarding the function.
Convert Segments to Bounding Boxes
If you have a dataset that uses the segmentation dataset format, you can easily convert these into upright (or horizontal) bounding boxes (x y w h format) with this function.
import numpy as np

from ultralytics.utils.ops import segments2boxes

segments = np.array(
    [
        [805, 392, 797, 400, ..., 808, 714, 808, 392],
        [115, 398, 113, 400, ..., 150, 400, 149, 298],
        [267, 412, 265, 413, ..., 300, 413, 299, 412],
    ]
)

segments2boxes([s.reshape(-1, 2) for s in segments])
# >>> array([[ 741.66, 631.12, 133.31, 479.25],
#           [ 146.81, 649.69, 185.62, 502.88],
#           [ 281.81, 636.19, 118.12, 448.88]],
#           dtype=float32) # xywh bounding boxes
To understand how this function works, visit the reference page.
Utilities
Image Compression
Compress a single image file to a reduced size while preserving its aspect ratio and quality. If the input image is smaller than the maximum dimension, it will not be resized.
from pathlib import Path

from ultralytics.data.utils import compress_one_image

for f in Path("path/to/dataset").rglob("*.jpg"):
    compress_one_image(f)
Auto-split Dataset
Automatically split a dataset into train/val/test splits and save the resulting splits into autosplit_*.txt files. This function uses random sampling, which is excluded when using the fraction argument for training.
from ultralytics.data.split import autosplit

autosplit(
    path="path/to/images",
    weights=(0.9, 0.1, 0.0),  # (train, validation, test) fractional splits
    annotated_only=False,  # split only images with annotation file when True
)
See the Reference page for additional details on this function.
Segment-polygon to Binary Mask
Convert a single polygon (as a list) to a binary mask of the specified image size. The polygon should be in the form of [N, 2], where N is the number of (x, y) points defining the polygon contour.
Warning
N must always be even.
import numpy as np

from ultralytics.data.utils import polygon2mask

imgsz = (1080, 810)
polygon = np.array([805, 392, 797, 400, ..., 808, 714, 808, 392])  # (238, 2)

mask = polygon2mask(
    imgsz,  # tuple
    [polygon],  # input as list
    color=255,  # 8-bit binary
    downsample_ratio=1,
)
Bounding Boxes
Bounding Box (Horizontal) Instances
To manage bounding box data, the Bboxes class helps convert between box coordinate formats, scale box dimensions, calculate areas, include offsets, and more.
import numpy as np

from ultralytics.utils.instance import Bboxes

boxes = Bboxes(
    bboxes=np.array(
        [
            [22.878, 231.27, 804.98, 756.83],
            [48.552, 398.56, 245.35, 902.71],
            [669.47, 392.19, 809.72, 877.04],
            [221.52, 405.8, 344.98, 857.54],
            [0, 550.53, 63.01, 873.44],
            [0.0584, 254.46, 32.561, 324.87],
        ]
    ),
    format="xyxy",
)

boxes.areas()
# >>> array([ 4.1104e+05,       99216,       68000,       55772,       20347,      2288.5])

boxes.convert("xywh")
print(boxes.bboxes)
# >>> array(
#     [[ 413.93, 494.05,  782.1, 525.56],
#      [ 146.95, 650.63,  196.8, 504.15],
#      [  739.6, 634.62, 140.25, 484.85],
#      [ 283.25, 631.67, 123.46, 451.74],
#      [ 31.505, 711.99,  63.01, 322.91],
#      [  16.31, 289.67, 32.503,  70.41]]
# )
See the Bboxes reference section for more attributes and methods.
Tip
Many of the following functions (and more) can be accessed using the Bboxes class, but if you prefer to work with the functions directly, see the next subsections for how to import them independently.
Scaling Boxes
When scaling an image up or down, you can appropriately scale corresponding bounding box coordinates to match using ultralytics.utils.ops.scale_boxes.
import cv2 as cv
import numpy as np

from ultralytics.utils.ops import scale_boxes

image = cv.imread("ultralytics/assets/bus.jpg")
h, w, c = image.shape
resized = cv.resize(image, None, (), fx=1.2, fy=1.2)
new_h, new_w, _ = resized.shape

xyxy_boxes = np.array(
    [
        [22.878, 231.27, 804.98, 756.83],
        [48.552, 398.56, 245.35, 902.71],
        [669.47, 392.19, 809.72, 877.04],
        [221.52, 405.8, 344.98, 857.54],
        [0, 550.53, 63.01, 873.44],
        [0.0584, 254.46, 32.561, 324.87],
    ]
)

new_boxes = scale_boxes(
    img1_shape=(h, w),  # original image dimensions
    boxes=xyxy_boxes,  # boxes from original image
    img0_shape=(new_h, new_w),  # resized image dimensions (scale to)
    ratio_pad=None,
    padding=False,
    xywh=False,
)

print(new_boxes)
# >>> array(
#     [[  27.454,  277.52,  965.98,   908.2],
#     [   58.262,  478.27,  294.42,  1083.3],
#     [   803.36,  470.63,  971.66,  1052.4],
#     [   265.82,  486.96,  413.98,    1029],
#     [        0,  660.64,  75.612,  1048.1],
#     [   0.0701,  305.35,  39.073,  389.84]]
# )
Bounding Box Format Conversions
XYXY → XYWH
Convert bounding box coordinates from (x1, y1, x2, y2) format to (x, y, width, height) format, where (x1, y1) is the top-left corner and (x2, y2) is the bottom-right corner.
import numpy as np

from ultralytics.utils.ops import xyxy2xywh

xyxy_boxes = np.array(
    [
        [22.878, 231.27, 804.98, 756.83],
        [48.552, 398.56, 245.35, 902.71],
        [669.47, 392.19, 809.72, 877.04],
        [221.52, 405.8, 344.98, 857.54],
        [0, 550.53, 63.01, 873.44],
        [0.0584, 254.46, 32.561, 324.87],
    ]
)
xywh = xyxy2xywh(xyxy_boxes)

print(xywh)
# >>> array(
#     [[ 413.93,  494.05,   782.1, 525.56],
#     [  146.95,  650.63,   196.8, 504.15],
#     [   739.6,  634.62,  140.25, 484.85],
#     [  283.25,  631.67,  123.46, 451.74],
#     [  31.505,  711.99,   63.01, 322.91],
#     [   16.31,  289.67,  32.503,  70.41]]
# )
All Bounding Box Conversions
from ultralytics.utils.ops import (
    ltwh2xywh,
    ltwh2xyxy,
    xywh2ltwh,  # xywh → top-left corner, w, h
    xywh2xyxy,
    xywhn2xyxy,  # normalized → pixel
    xyxy2ltwh,  # xyxy → top-left corner, w, h
    xyxy2xywhn,  # pixel → normalized
)

for func in (ltwh2xywh, ltwh2xyxy, xywh2ltwh, xywh2xyxy, xywhn2xyxy, xyxy2ltwh, xyxy2xywhn):
    print(help(func))  # print function docstrings
See the docstring for each function or visit the ultralytics.utils.ops reference page to read more.
Plotting
Annotation utilities
Ultralytics includes an Annotator class for annotating various data types. It's best used with object detection bounding boxes, pose keypoints, and oriented bounding boxes.
Box Annotation
Python Examples using Ultralytics YOLO 🚀
import cv2 as cv
import numpy as np

from ultralytics.utils.plotting import Annotator, colors

names = {
    0: "person",
    5: "bus",
    11: "stop sign",
}

image = cv.imread("ultralytics/assets/bus.jpg")
ann = Annotator(
    image,
    line_width=None,  # default auto-size
    font_size=None,  # default auto-size
    font="Arial.ttf",  # must be ImageFont compatible
    pil=False,  # use PIL, otherwise uses OpenCV
)

xyxy_boxes = np.array(
    [
        [5, 22.878, 231.27, 804.98, 756.83],  # class-idx x1 y1 x2 y2
        [0, 48.552, 398.56, 245.35, 902.71],
        [0, 669.47, 392.19, 809.72, 877.04],
        [0, 221.52, 405.8, 344.98, 857.54],
        [0, 0, 550.53, 63.01, 873.44],
        [11, 0.0584, 254.46, 32.561, 324.87],
    ]
)

for nb, box in enumerate(xyxy_boxes):
    c_idx, *box = box
    label = f"{str(nb).zfill(2)}:{names.get(int(c_idx))}"
    ann.box_label(box, label, color=colors(c_idx, bgr=True))

image_with_bboxes = ann.result()
import cv2 as cv
import numpy as np

from ultralytics.utils.plotting import Annotator, colors

obb_names = {10: "small vehicle"}
obb_image = cv.imread("datasets/dota8/images/train/P1142__1024__0___824.jpg")
obb_boxes = np.array(
    [
        [0, 635, 560, 919, 719, 1087, 420, 803, 261],  # class-idx x1 y1 x2 y2 x3 y2 x4 y4
        [0, 331, 19, 493, 260, 776, 70, 613, -171],
        [9, 869, 161, 886, 147, 851, 101, 833, 115],
    ]
)
ann = Annotator(
    obb_image,
    line_width=None,  # default auto-size
    font_size=None,  # default auto-size
    font="Arial.ttf",  # must be ImageFont compatible
    pil=False,  # use PIL, otherwise uses OpenCV
)
for obb in obb_boxes:
    c_idx, *obb = obb
    obb = np.array(obb).reshape(-1, 4, 2).squeeze()
    label = f"{obb_names.get(int(c_idx))}"
    ann.box_label(
        obb,
        label,
        color=colors(c_idx, True),
    )

image_with_obb = ann.result()
Names can be used from model.names when working with detection results.
Also see the Annotator Reference Page for additional insight.
Ultralytics Sweep Annotation
Sweep Annotation using Ultralytics Utilities
import cv2
import numpy as np

from ultralytics import YOLO
from ultralytics.solutions.solutions import SolutionAnnotator
from ultralytics.utils.plotting import colors

# User defined video path and model file
cap = cv2.VideoCapture("path/to/video.mp4")
model = YOLO(model="yolo26s-seg.pt")  # Model file, e.g., yolo26s.pt or yolo26m-seg.pt

if not cap.isOpened():
    print("Error: Could not open video.")
    exit()

# Initialize the video writer object.
w, h, fps = (int(cap.get(x)) for x in (cv2.CAP_PROP_FRAME_WIDTH, cv2.CAP_PROP_FRAME_HEIGHT, cv2.CAP_PROP_FPS))
video_writer = cv2.VideoWriter("ultralytics.avi", cv2.VideoWriter_fourcc(*"mp4v"), fps, (w, h))

masks = None  # Initialize variable to store masks data
f = 0  # Initialize frame count variable for enabling mouse event.
line_x = w  # Store width of line.
dragging = False  # Initialize bool variable for line dragging.
classes = model.names  # Store model classes names for plotting.
window_name = "Ultralytics Sweep Annotator"


def drag_line(event, x, _, flags, param):
    """Mouse callback function to enable dragging a vertical sweep line across the video frame."""
    global line_x, dragging
    if event == cv2.EVENT_LBUTTONDOWN or (flags & cv2.EVENT_FLAG_LBUTTON):
        line_x = max(0, min(x, w))
        dragging = True


while cap.isOpened():  # Loop over the video capture object.
    ret, im0 = cap.read()
    if not ret:
        break
    f = f + 1  # Increment frame count.
    count = 0  # Re-initialize count variable on every frame for precise counts.
    results = model.track(im0, persist=True)[0]

    if f == 1:
        cv2.namedWindow(window_name)
        cv2.setMouseCallback(window_name, drag_line)

    annotator = SolutionAnnotator(im0)

    if results.boxes.is_track:
        if results.masks is not None:
            masks = [np.array(m, dtype=np.int32) for m in results.masks.xy]

        boxes = results.boxes.xyxy.tolist()
        track_ids = results.boxes.id.int().cpu().tolist()
        clss = results.boxes.cls.cpu().tolist()

        for mask, box, cls, t_id in zip(masks or [None] * len(boxes), boxes, clss, track_ids):
            color = colors(t_id, True)  # Assign different color to each tracked object.
            label = f"{classes[cls]}:{t_id}"
            if mask is not None and mask.size > 0:
                if box[0] > line_x:
                    count += 1
                    cv2.polylines(im0, [mask], True, color, 2)
                    x, y = mask.min(axis=0)
                    (w_m, _), _ = cv2.getTextSize(label, cv2.FONT_HERSHEY_SIMPLEX, 0.5, 1)
                    cv2.rectangle(im0, (x, y - 20), (x + w_m, y), color, -1)
                    cv2.putText(im0, label, (x, y - 5), cv2.FONT_HERSHEY_SIMPLEX, 0.5, (255, 255, 255), 1)
            else:
                if box[0] > line_x:
                    count += 1
                    annotator.box_label(box=box, color=color, label=label)

    # Generate draggable sweep line
    annotator.sweep_annotator(line_x=line_x, line_y=h, label=f"COUNT:{count}")

    cv2.imshow(window_name, im0)
    video_writer.write(im0)
    if cv2.waitKey(1) & 0xFF == ord("q"):
        break

# Release the resources
cap.release()
video_writer.release()
cv2.destroyAllWindows()
Find additional details about the sweep_annotator method in our reference section here.
Adaptive label Annotation
Warning
Starting from Ultralytics v8.3.167, circle_label and text_label have been replaced by a unified adaptive_label function. You can now specify the annotation type using the shape argument:
- Rectangle:
annotator.adaptive_label(box, label=names[int(cls)], color=colors(cls, True), shape="rect") - Circle:
annotator.adaptive_label(box, label=names[int(cls)], color=colors(cls, True), shape="circle")
Watch: In-Depth Guide to Text & Circle Annotations with Python Live Demos | Ultralytics Annotations 🚀
Adaptive label Annotation using Ultralytics Utilities
import cv2

from ultralytics import YOLO
from ultralytics.solutions.solutions import SolutionAnnotator
from ultralytics.utils.plotting import colors

model = YOLO("yolo26s.pt")
names = model.names
cap = cv2.VideoCapture("path/to/video.mp4")

w, h, fps = (int(cap.get(x)) for x in (cv2.CAP_PROP_FRAME_WIDTH, cv2.CAP_PROP_FRAME_HEIGHT, cv2.CAP_PROP_FPS))
writer = cv2.VideoWriter("Ultralytics circle annotation.avi", cv2.VideoWriter_fourcc(*"MJPG"), fps, (w, h))

while True:
    ret, im0 = cap.read()
    if not ret:
        break

    annotator = SolutionAnnotator(im0)
    results = model.predict(im0)[0]
    boxes = results.boxes.xyxy.cpu()
    clss = results.boxes.cls.cpu().tolist()

    for box, cls in zip(boxes, clss):
        annotator.adaptive_label(box, label=names[int(cls)], color=colors(cls, True), shape="circle")
    writer.write(im0)
    cv2.imshow("Ultralytics circle annotation", im0)

    if cv2.waitKey(1) & 0xFF == ord("q"):
        break

writer.release()
cap.release()
cv2.destroyAllWindows()
import cv2

from ultralytics import YOLO
from ultralytics.solutions.solutions import SolutionAnnotator
from ultralytics.utils.plotting import colors

model = YOLO("yolo26s.pt")
names = model.names
cap = cv2.VideoCapture("path/to/video.mp4")

w, h, fps = (int(cap.get(x)) for x in (cv2.CAP_PROP_FRAME_WIDTH, cv2.CAP_PROP_FRAME_HEIGHT, cv2.CAP_PROP_FPS))
writer = cv2.VideoWriter("Ultralytics text annotation.avi", cv2.VideoWriter_fourcc(*"MJPG"), fps, (w, h))

while True:
    ret, im0 = cap.read()
    if not ret:
        break

    annotator = SolutionAnnotator(im0)
    results = model.predict(im0)[0]
    boxes = results.boxes.xyxy.cpu()
    clss = results.boxes.cls.cpu().tolist()

    for box, cls in zip(boxes, clss):
        annotator.adaptive_label(box, label=names[int(cls)], color=colors(cls, True), shape="rect")

    writer.write(im0)
    cv2.imshow("Ultralytics text annotation", im0)

    if cv2.waitKey(1) & 0xFF == ord("q"):
        break

writer.release()
cap.release()
cv2.destroyAllWindows()
See the SolutionAnnotator Reference Page for additional insight.
Miscellaneous
Code Profiling
Check the duration for code to run/process either using with or as a decorator.
from ultralytics.utils.ops import Profile

with Profile(device="cuda:0") as dt:
    pass  # operation to measure

print(dt)
# >>> "Elapsed time is 9.5367431640625e-07 s"
Ultralytics Supported Formats
Need to programmatically use the supported image or video formats in Ultralytics? Use these constants if needed:
from ultralytics.data.utils import IMG_FORMATS, VID_FORMATS

print(IMG_FORMATS)
# {'avif', 'bmp', 'dng', 'heic', 'heif', 'jp2', 'jpeg', 'jpeg2000', 'jpg', 'mpo', 'png', 'tif', 'tiff', 'webp'}

print(VID_FORMATS)
# {'asf', 'avi', 'gif', 'm4v', 'mkv', 'mov', 'mp4', 'mpeg', 'mpg', 'ts', 'wmv', 'webm'}
Make Divisible
Calculate the nearest whole number to x that is evenly divisible by y.
from ultralytics.utils.ops import make_divisible

make_divisible(7, 3)
# >>> 9
make_divisible(7, 2)
# >>> 8
FAQ
What utilities are included in the Ultralytics package to enhance machine learning workflows?
The Ultralytics package includes utilities designed to streamline and optimize machine learning workflows. Key utilities include auto-annotation for labeling datasets, converting COCO to YOLO format with convert_coco, compressing images, and dataset auto-splitting. These tools reduce manual effort, ensure consistency, and enhance data processing efficiency.
How can I use Ultralytics to auto-label my dataset?
If you have a pretrained Ultralytics YOLO object detection model, you can use it with the SAM model to auto-annotate your dataset in segmentation format. Here's an example:
from ultralytics.data.annotator import auto_annotate

auto_annotate(
    data="path/to/new/data",
    det_model="yolo26n.pt",
    sam_model="mobile_sam.pt",
    device="cuda",
    output_dir="path/to/save_labels",
)
For more details, check the auto_annotate reference section.
How do I convert COCO dataset annotations to YOLO format in Ultralytics?
To convert COCO JSON annotations into YOLO format for object detection, you can use the convert_coco utility. Here's a sample code snippet:
from ultralytics.data.converter import convert_coco

convert_coco(
    "coco/annotations/",
    use_segments=False,
    use_keypoints=False,
    cls91to80=True,
)
For additional information, visit the convert_coco reference page.
What is the purpose of the YOLO Data Explorer in the Ultralytics package?
The YOLO Explorer is a powerful tool introduced in the 8.1.0 update to enhance dataset understanding. It allows you to use text queries to find object instances in your dataset, making it easier to analyze and manage your data. This tool provides valuable insights into dataset composition and distribution, helping to improve model training and performance.
How can I convert bounding boxes to segments in Ultralytics?
To convert existing bounding box data (in x y w h format) to segments, you can use the yolo_bbox2segment function. Ensure your files are organized with separate directories for images and labels.
from ultralytics.data.converter import yolo_bbox2segment

yolo_bbox2segment(
    im_dir="path/to/images",
    save_dir=None,  # saved to "labels-segment" in the images directory
    sam_model="sam_b.pt",
)
For more information, visit the yolo_bbox2segment reference page.


