Link to this sectionHow to View YOLO Inference Results in a VSCode Terminal#
Image from the libsixel website.
Link to this sectionMotivation#
When connecting to a remote machine over SSH, visualizing image results normally is not possible or requires moving data to a local device with a GUI. The VSCode integrated terminal can render images directly, so you can inspect prediction results right where you run inference, without copying files back to your laptop. This guide walks through enabling the setup, wiring up the code, and answers common questions.
Only compatible with Linux and macOS. Check the VSCode repository, check Issue status, or documentation for updates about Windows support to view images in terminal with sixel.
The VSCode compatible protocols for viewing images using the integrated terminal are sixel and iTerm. This guide will demonstrate use of the sixel protocol.
Link to this sectionProcess#
-
First, you must enable settings
terminal.integrated.enableImagesandterminal.integrated.gpuAccelerationin VSCode."terminal.integrated.gpuAcceleration": "auto" # "auto" is default, can also use "on" "terminal.integrated.enableImages": true
-
Install the
python-sixellibrary in your virtual environment. This is a fork of thePySixellibrary, which is no longer maintained.pip install sixel -
Load a model and execute inference, then plot the results and store in a variable. See more about inference arguments and working with results on the predict mode page.
from ultralytics import YOLO # Load a model model = YOLO("yolo26n.pt") # Run inference on an image results = model.predict(source="ultralytics/assets/bus.jpg") # Plot inference results plot = results[0].plot() # (1)!- See plot method parameters to see possible arguments to use.
-
Now, use OpenCV to convert the
np.ndarraytobytesdata. Then useio.BytesIOto make a "file-like" object.import io import cv2 # Results image as bytes im_bytes = cv2.imencode( ".png", # (1)! plot, )[1].tobytes() # (2)! # Image bytes as a file-like object mem_file = io.BytesIO(im_bytes)- It's possible to use other image extensions as well.
- Only the object at index
1that is returned is needed.
-
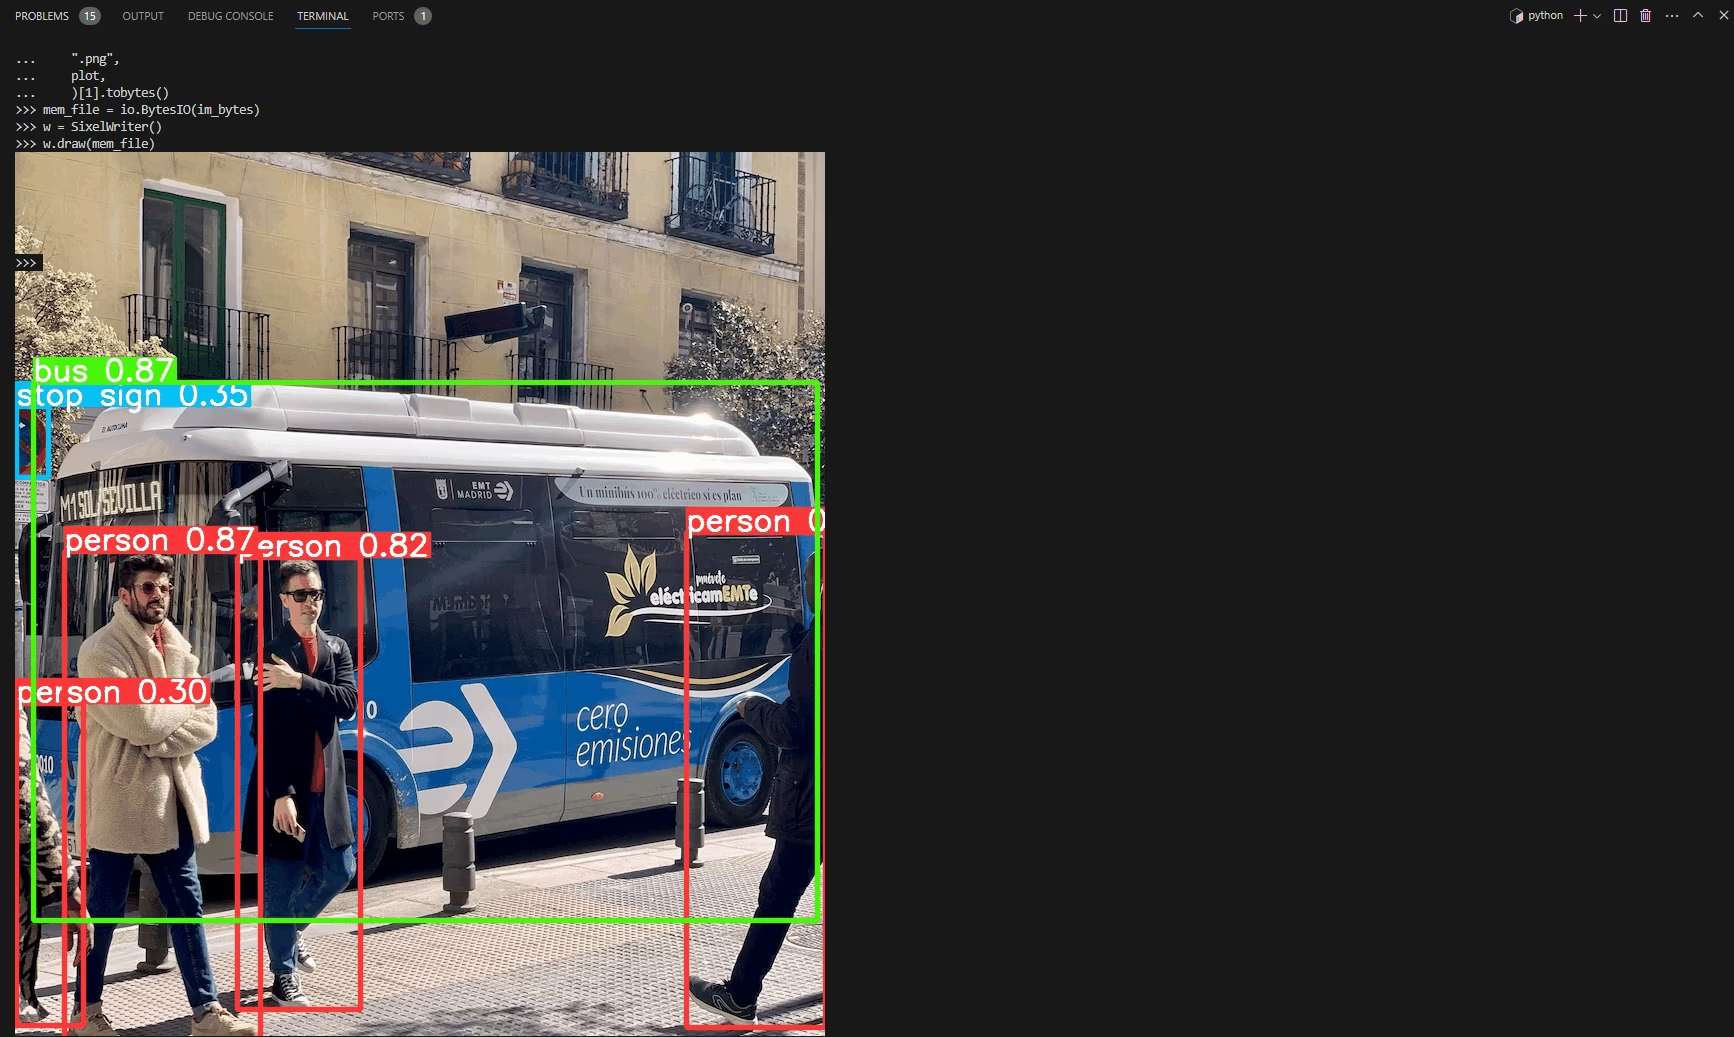
Create a
SixelWriterinstance, and then use the.draw()method to draw the image in the terminal.from sixel import SixelWriter # Create sixel writer object w = SixelWriter() # Draw the sixel image in the terminal w.draw(mem_file)
Link to this sectionExample Inference Results#
Using this example with videos or animated GIF frames has not been tested. Attempt at your own risk.
Link to this sectionFull Code Example#
import io

import cv2
from sixel import SixelWriter

from ultralytics import YOLO

# Load a model
model = YOLO("yolo26n.pt")

# Run inference on an image
results = model.predict(source="ultralytics/assets/bus.jpg")

# Plot inference results
plot = results[0].plot()  # (3)!

# Results image as bytes
im_bytes = cv2.imencode(
    ".png",  # (1)!
    plot,
)[1].tobytes()  # (2)!

mem_file = io.BytesIO(im_bytes)
w = SixelWriter()
w.draw(mem_file)- It's possible to use other image extensions as well.
- Only the object at index
1that is returned is needed. - See plot method parameters to see possible arguments to use.
You may need to use clear to "erase" the view of the image in the terminal.
Link to this sectionFAQ#
Link to this sectionHow can I view YOLO inference results in a VSCode terminal on macOS or Linux?#
To view YOLO inference results in a VSCode terminal on macOS or Linux, follow these steps:
-
Enable the necessary VSCode settings:
"terminal.integrated.enableImages": true "terminal.integrated.gpuAcceleration": "auto" -
Install the sixel library:
pip install sixel -
Load your YOLO model and run inference:
from ultralytics import YOLO model = YOLO("yolo26n.pt") results = model.predict(source="ultralytics/assets/bus.jpg") plot = results[0].plot() -
Convert the inference result image to bytes and display it in the terminal:
import io

import cv2
from sixel import SixelWriter

im_bytes = cv2.imencode(".png", plot)[1].tobytes()
mem_file = io.BytesIO(im_bytes)
SixelWriter().draw(mem_file)
For further details, visit the predict mode page.
Link to this sectionWhy does the sixel protocol only work on Linux and macOS?#
The sixel protocol is currently only supported on Linux and macOS because these platforms have native terminal capabilities compatible with sixel graphics. Windows support for terminal graphics using sixel is still under development. For updates on Windows compatibility, check the VSCode Issue status and documentation.
Link to this sectionWhat if I encounter issues displaying images in the VSCode terminal?#
If nothing renders, work through these checks in order:
- Confirm both
terminal.integrated.enableImagesandterminal.integrated.gpuAccelerationare enabled, as shown in the Process section, then restart the integrated terminal so the settings take effect. - Verify that
sixelis installed in the same virtual environment your script runs in (pip install sixel). - Make sure
plotis a validnp.ndarraybefore encoding it, sincecv2.imencoderaises an error if the image is empty or not a valid array. See the plot method parameters for the valuesresults[0].plot()accepts.
If problems persist, consult the VSCode repository for terminal-image support status.
Link to this sectionCan YOLO display video inference results in the terminal using sixel?#
Displaying video inference results or animated GIF frames using sixel in the terminal is currently untested and may not be supported. We recommend starting with static images and verifying compatibility. Attempt video results at your own risk, keeping in mind performance constraints. For more information on plotting inference results, visit the predict mode page.
Link to this sectionHow can I troubleshoot issues with the python-sixel library?#
The sixel package is a fork of the unmaintained PySixel library and is a thin Python wrapper over Pillow (PIL). If import sixel fails or SixelWriter().draw() raises an error, confirm the package installed into your active virtual environment, ensure Pillow is available, and check the python-sixel GitHub repository for platform-specific notes. For more on generating the image you pass to draw(), see the predict mode documentation.