クイックスタートガイド:Raspberry PiでUltralytics YOLO26を使用する
Raspberry Piは、小型で手頃な価格のコンピューターです。GPUがなくてもエッジでリアルタイム物体検出を行うために、Ultralytics YOLO26を実行できます。このガイドでは、Raspberry Pi 4および5へのYOLO26のデプロイ方法を説明します。OSの書き込み、Ultralyticsのインストール、ARM上で最速の推論を実現するNCNNへのエクスポート、ライブカメラ映像に対する予測の実行を取り上げます。また、8種類のエクスポート形式の性能ベンチマークも掲載しており、ハードウェアに最適な速度と精度のバランスを選べます。
Ultralyticsのセットアップ、NCNNへのエクスポートと推論の実行、ベンチマーク、またはカメラ推論に移動します。
視聴: Raspberry Pi 5のアップデートと改善
このガイドは、最新のRaspberry Pi OS Bookworm(Debian 12)を実行するRaspberry Pi 4およびRaspberry Pi 5で動作確認済みです。Raspberry Pi 3などの旧型Raspberry Piデバイスでも、同じRaspberry Pi OS Bookwormがインストールされていれば、このガイドを使用できる見込みです。
Raspberry Piとは何ですか?#
Raspberry Piは、小型で手頃な価格のシングルボードコンピューターです。趣味のホームオートメーションから産業用途まで、幅広いプロジェクトやアプリケーションで人気を集めています。Raspberry PiボードではさまざまなOSを実行でき、GPIO(汎用入出力)ピンを備えているため、センサー、アクチュエーター、その他のハードウェアコンポーネントを簡単に接続できます。仕様の異なる複数のモデルがありますが、低コスト、小型、多用途という基本設計の理念は共通しています。
Raspberry Piシリーズの比較#
| Raspberry Pi 3 | Raspberry Pi 4 | Raspberry Pi 5 | |
|---|---|---|---|
| CPU | Broadcom BCM2837、Cortex-A53 64Bit SoC | Broadcom BCM2711、Cortex-A72 64Bit SoC | Broadcom BCM2712、Cortex-A76 64Bit SoC |
| CPU最大周波数 | 1.4GHz | 1.8GHz | 2.4GHz |
| GPU | VideoCore IV | VideoCore VI | VideoCore VII |
| GPU最大周波数 | 400MHz | 500MHz | 800MHz |
| メモリ | 1GB LPDDR2 SDRAM | 1GB、2GB、4GB、8GB LPDDR4-3200 SDRAM | 2GB、4GB、8GB、16GB LPDDR4X-4267 SDRAM |
| PCIe | 該当なし | 該当なし | 1xPCIe 2.0インターフェース |
| 最大消費電力 | 2.5A@5V | 3A@5V | 5A@5V(PD有効時) |
Raspberry Pi OSとは何ですか?#
Raspberry Pi OS(旧称Raspbian)は、Raspberry Pi Foundationが配布するRaspberry Piシリーズの小型シングルボードコンピューター向けに、Debian GNU/Linuxディストリビューションをベースとして開発されたUnix系オペレーティングシステムです。Raspberry Pi OSはARM CPUを搭載したRaspberry Pi向けに高度に最適化されており、Raspberry Pi 4および5ではデフォルトでWayland上で動作する軽量なデスクトップ環境を使用します。Raspberry Pi OSは現在も活発に開発されており、Raspberry Pi上で可能な限り多くのDebianパッケージの安定性とパフォーマンスを向上させることに重点を置いています。
Raspberry Pi OSをRaspberry Piに書き込む#
Raspberry Piを入手したら、まずmicro-SDカードにRaspberry Pi OSを書き込み、デバイスに挿入してOSを起動します。初回使用に向けたデバイスの準備については、Raspberry PiのGetting Started Documentationに記載された詳細な手順に従ってください。
Ultralyticsをセットアップする#
次のコンピュータービジョンプロジェクトに向けて、Raspberry PiにUltralyticsパッケージをセットアップする方法は2つあります。
Dockerを使って開始#
Raspberry PiでUltralytics YOLO26を最も手早く使い始めるには、Raspberry Pi向けのビルド済みDockerイメージを実行します。
以下のコマンドを実行してDockerコンテナをプルし、Raspberry Pi上で実行してください。このコンテナは公式のPython 3.13-slimイメージをベースとしており、最新のDebianリリース上でPython 3.13を実行します。
t=ultralytics/ultralytics:latest-arm64
sudo docker pull $t && sudo docker run -it --ipc=host $tDockerイメージにはUltralyticsがすでに含まれているため、そのままモデルをNCNNにエクスポートできます。
Dockerを使わずに開始#
Ultralyticsパッケージをインストールする#
ここでは、Raspberry PiにUltralyticsパッケージをインストールします。NCNNなどの形式へのエクスポートに必要な依存関係は、PyTorchモデルを初めてエクスポートするときに自動でインストールされるため、ここでは基本パッケージのみが必要です。
-
パッケージリストを更新し、pipをインストールして最新バージョンにアップグレードする
sudo apt update sudo apt install python3-pip -y pip install -U pip -
ultralyticspipパッケージをインストールするpip install ultralytics -
デバイスを再起動する
sudo reboot
Raspberry PiでNCNNを使用する#
Ultralyticsがサポートするすべてのモデルエクスポート形式の中で、NCNNはARMなどのモバイルおよび組み込みプラットフォーム向けに高度に最適化されているため、Raspberry Piデバイスで最高の推論性能を発揮します。YOLO26nのPyTorchモデルをNCNNに変換し、エクスポートしたモデルで推論を実行します。
from ultralytics import YOLO

# YOLO26n PyTorchモデルを読み込む
model = YOLO("yolo26n.pt")

# モデルをNCNN形式にエクスポート
model.export(format="ncnn")  # creates 'yolo26n_ncnn_model'

# エクスポートしたNCNNモデルを読み込む
ncnn_model = YOLO("yolo26n_ncnn_model")

# 推論を実行
results = ncnn_model("https://ultralytics.com/images/bus.jpg")サポートされているエクスポートオプションの詳細については、モデルのデプロイオプションガイドをご覧ください。
YOLO11と比較したYOLO26のパフォーマンス向上#
YOLO26は、Raspberry Pi 5などのハードウェアリソースが限られたデバイスで動作するよう特別に設計されています。Raspberry Pi 5上で入力サイズ640のONNXエクスポートモデルを使用すると、YOLO26nはYOLO11nと比べてFPSが~15%向上(6.79 → 7.79)し、mAPも高くなります(40.1対39.5)。以下の表とチャートでこの比較を示します。
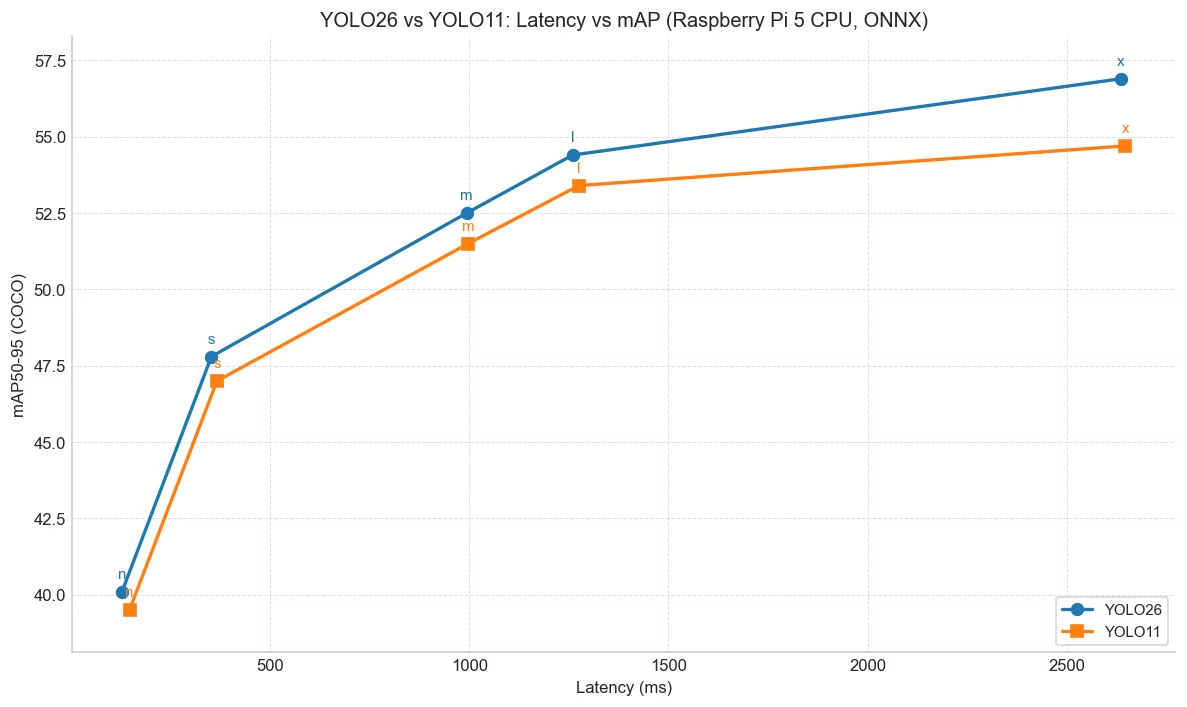
| モデル | mAP50-95(B) | 推論時間(ms/im) |
|---|---|---|
| YOLO26n | 40.1 | 128.42 |
| YOLO26s | 47.8 | 352.84 |
| YOLO26m | 52.5 | 993.78 |
| YOLO26l | 54.4 | 1259.46 |
| YOLO26x | 56.9 | 2636.26 |
Ultralytics 8.4.14でベンチマークを実施しました。
Raspberry Pi 5でのYOLO26ベンチマーク#
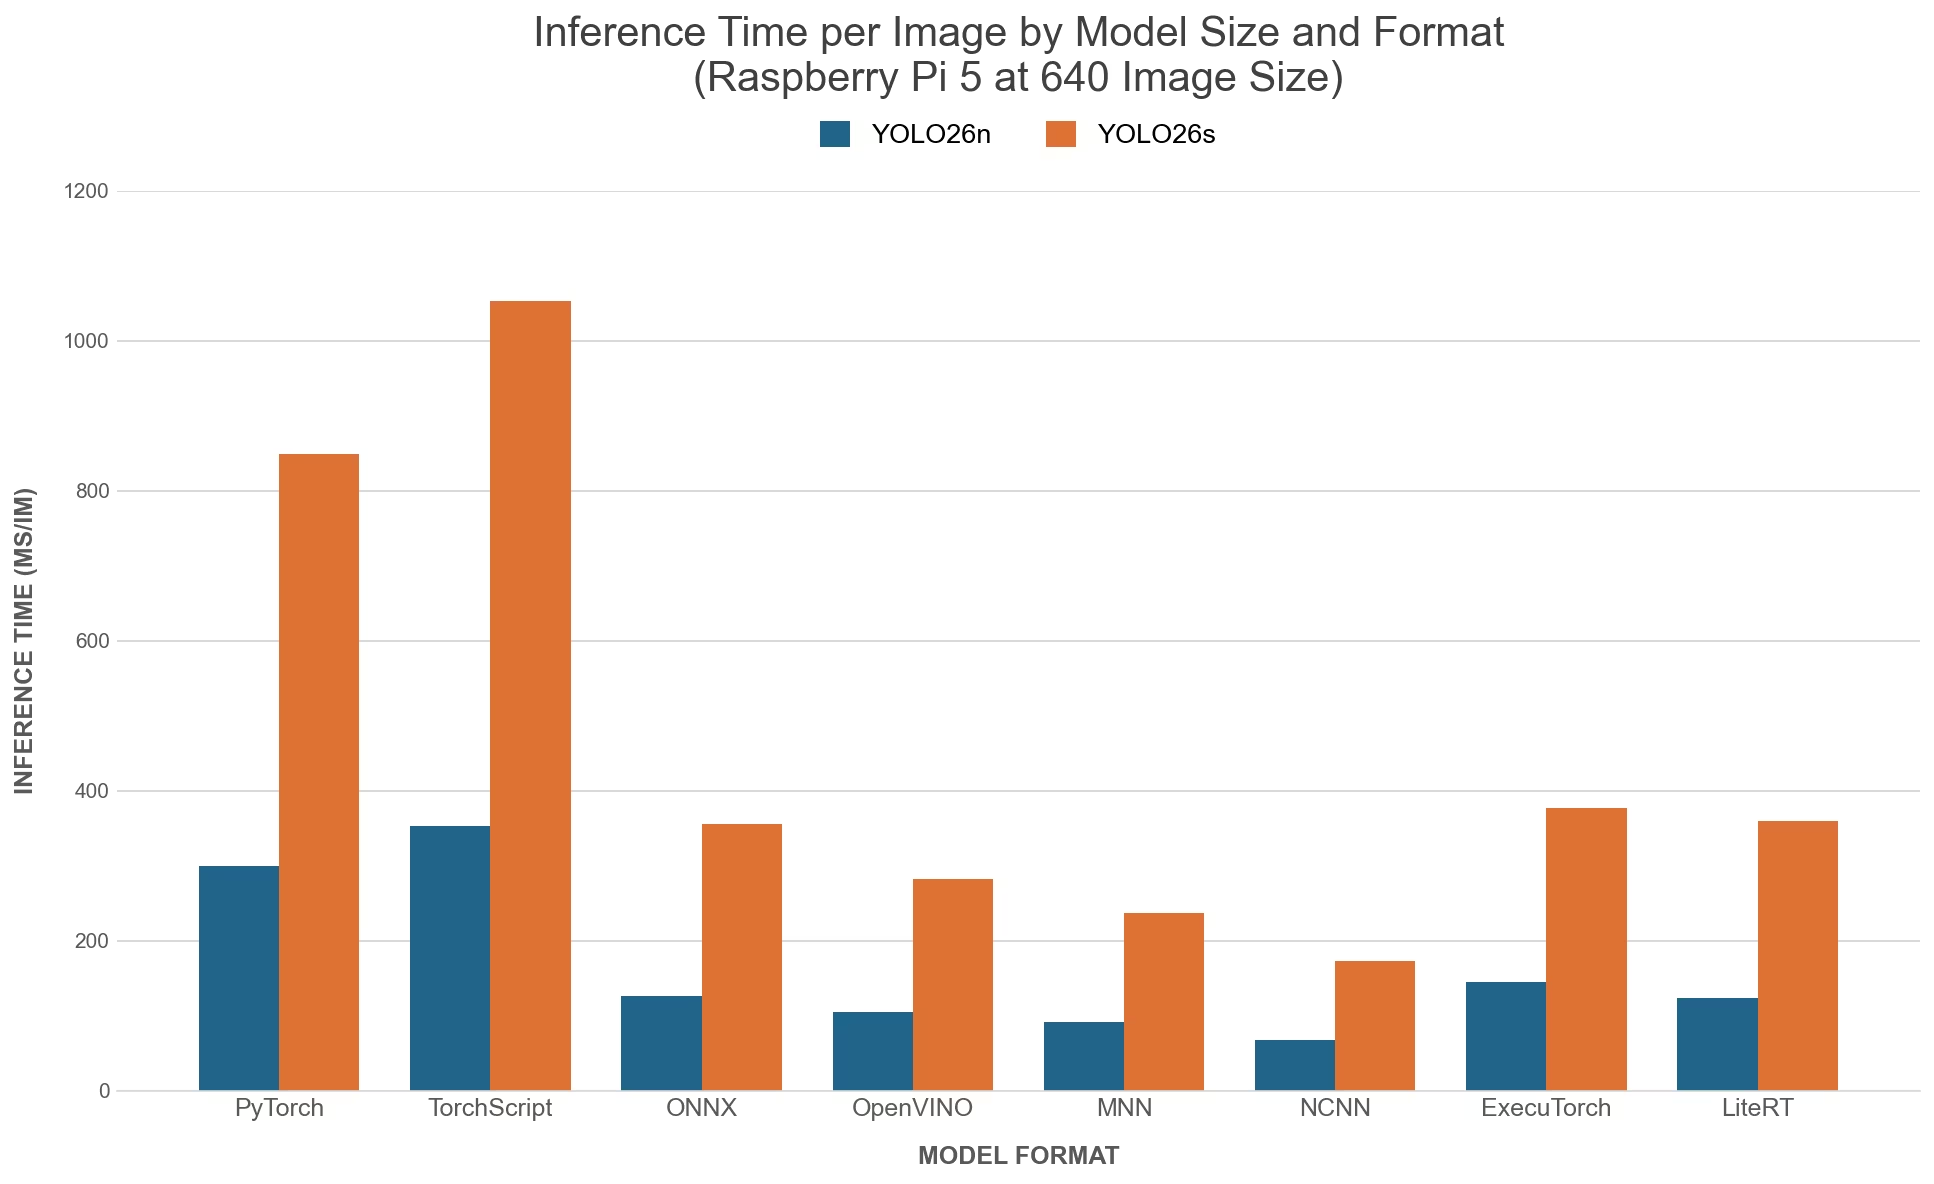
Ultralyticsチームは、PyTorch、TorchScript、ONNX、OpenVINO、LiteRT、MNN、NCNN、ExecuTorchの8種類のモデル形式について、速度と精度を測定するYOLO26のベンチマークを実施しました。ベンチマークは、Raspberry Pi 5でFP32精度、デフォルトの入力画像サイズ640を使用して実施しました。
比較グラフ#
大型モデルはRaspberry Piでは実用的な速度で動作しないため、YOLO26nとYOLO26sのみを掲載しています。
詳細比較表#
次の表は、Raspberry Pi 5で2種類のモデル(YOLO26n、YOLO26s)を8種類の形式(PyTorch、TorchScript、ONNX、OpenVINO、LiteRT、MNN、NCNN、ExecuTorch)で実行したベンチマーク結果を示しています。各組み合わせのステータス、サイズ、mAP50-95(B)指標、推論時間を掲載しています。
| 形式 | ステータス | ディスク上のサイズ(MB) | mAP50-95(B) | 推論時間(ms/im) |
|---|---|---|---|---|
| PyTorch | ✅ | 5.3 | 0.4760 | 299.09 |
| TorchScript | ✅ | 9.8 | 0.4734 | 353.20 |
| ONNX | ✅ | 9.5 | 0.4734 | 125.99 |
| OpenVINO | ✅ | 9.6 | 0.4734 | 104.55 |
| LiteRT | ✅ | 9.8 | 0.4730 | 123.30 |
| MNN | ✅ | 9.4 | 0.4749 | 91.87 |
| NCNN | ✅ | 9.4 | 0.4784 | 67.03 |
| ExecuTorch | ✅ | 9.4 | 0.4772 | 144.83 |
Ultralytics 8.4.108でベンチマークを実施しました
推論時間には前処理と後処理は含まれません。
結果を再現する#
上記のUltralyticsベンチマークをすべてのエクスポート形式で再現するには、次のコードを実行します。
from ultralytics import YOLO

# YOLO26n PyTorchモデルを読み込む
model = YOLO("yolo26n.pt")

# すべてのエクスポート形式でCOCO128データセットを使用してYOLO26nの速度と精度をベンチマークします
results = model.benchmark(data="coco128.yaml", imgsz=640)ベンチマーク結果は、システムのハードウェアとソフトウェアの構成や、ベンチマーク実行時のシステムの負荷によって異なる場合があります。最も信頼性の高い結果を得るには、data='coco.yaml'(検証画像5000枚)のような、画像数の多いデータセットを使用してください。
format=litertのエクスポート(litert-torch経由)はLinux x86_64とmacOSのみでサポートされており、Raspberry Pi本体ではサポートされていません。Linux x86_64マシンまたはMacで.tfliteモデルをエクスポートしてRaspberry Piにコピーし、Piで推論を実行してください。
Raspberry Piカメラを使用する#
Raspberry Piのコンピュータービジョンプロジェクトでは、推論にリアルタイムの動画映像が必要になることがよくあります。Raspberry Piに搭載されたMIPI CSIコネクターを使って、公式のRaspberry Piカメラモジュールを接続できます。このガイドでは、Raspberry Pi Camera Module 3を使って動画映像を取得し、YOLO26モデルで推論を実行します。
Raspberry Piが提供する各種カメラモジュールと、Raspberry Piカメラモジュールの使い始め方について詳しくご覧ください。
Raspberry Pi 5はRaspberry Pi 4より小型のCSIコネクター(22ピン対15ピン)を使用するため、Raspberry Piカメラを接続するには15ピンから22ピンへの変換ケーブルが必要です。
カメラをテストする#
カメラをRaspberry Piに接続した後、次のrpicam-helloコマンドを実行します。カメラのライブ映像が約5秒間表示されます。
rpicam-helloカメラで推論する#
Raspberry Piカメラを使ってYOLO26モデルの推論を実行する方法は2つあります。
Raspberry Pi OSにプリインストールされているpicamera2を使ってカメラにアクセスし、YOLO26モデルで推論を実行します。
import cv2
from picamera2 import Picamera2

from ultralytics import YOLO

# Picamera2を初期化する
picam2 = Picamera2()
picam2.preview_configuration.main.size = (1280, 720)
picam2.preview_configuration.main.format = "RGB888"
picam2.preview_configuration.align()
picam2.configure("preview")
picam2.start()

# YOLO26モデルを読み込む
model = YOLO("yolo26n.pt")

while True:
    # フレームを1つずつキャプチャする
    frame = picam2.capture_array()

    # フレームに対してYOLO26の推論を実行する
    results = model(frame)

    # フレーム上に結果を可視化する
    annotated_frame = results[0].plot()

    # 処理結果のフレームを表示する
    cv2.imshow("Camera", annotated_frame)

    # 'q'が押された場合にループを終了する
    if cv2.waitKey(1) == ord("q"):
        break

# リソースを解放してウィンドウを閉じる
cv2.destroyAllWindows()
Raspberry Pi使用時のベストプラクティス#
Raspberry PiでYOLO26の性能を最大限に引き出すには、以下のベストプラクティスに従ってください。
-
SSDを使用する
24時間365日の連続運用には、システム用にSSDを使用してください。連続書き込みによってSDカードが摩耗または故障する可能性があるためです。Raspberry Pi 5に搭載されたPCIeコネクターを使い、Raspberry Pi 5用NVMe BaseなどのアダプターでSSDを接続できます。
-
GUIなしで書き込む
Raspberry Pi OSを書き込む際、デスクトップ環境をインストールしない(Raspberry Pi OS Liteを選択する)ことで、デバイスのRAMを少し節約し、コンピュータービジョン処理により多くのメモリを割り当てられます。
-
Raspberry Piをオーバークロックする
Raspberry Pi 5でUltralytics YOLO26モデルを実行する際にパフォーマンスを少し向上させたい場合、CPUを標準の2.4GHzから3.0GHzに、GPUを800MHzから1GHzにオーバークロックできます。システムが不安定になったりクラッシュしたりする場合は、オーバークロック値を100MHzずつ下げてください。オーバークロックは発熱を増加させ、サーマルスロットリングを引き起こす可能性があるため、適切な冷却を確保してください。
a. ソフトウェアをアップグレードする
sudo apt update && sudo apt dist-upgradeb. 設定ファイルを開いて編集する
sudo nano /boot/firmware/config.txtc. 次の行を末尾に追加する
arm_freq=3000
gpu_freq=1000
force_turbo=1
d. CTRL + Xを押してからYを押し、ENTERを押して保存して終了する
e. Raspberry Piを再起動する
次のステップ#
Raspberry PiでYOLO26を正常にセットアップできました。さらに詳しく知るには、推論オプションについてはPredictモード、追加のデプロイ形式についてはExportモードをご覧ください。エッジでより多くの計算能力が必要な場合は、NVIDIA Jetsonガイドをご確認ください。ドキュメント全体については、Ultralytics YOLO26ドキュメントをご覧ください。
謝辞と引用#
このガイドは、絶滅危惧種の保護にYOLOを活用することに取り組む団体、Kashmir World FoundationのためにDaan Eeltinkが最初に作成しました。物体検出技術の分野における同団体の先駆的な取り組みと教育への注力に感謝します。
Kashmir World Foundationの活動について詳しくは、ウェブサイトをご覧ください。
よくある質問#
Dockerを使わずにRaspberry PiでUltralytics YOLO26をセットアップするには、次の手順に従ってください。
- パッケージリストを更新し、
pipをインストールします。sudo apt update sudo apt install python3-pip -y pip install -U pip - Ultralyticsパッケージをインストールします。
pip install ultralytics - 変更を適用するため、デバイスを再起動します。
sudo reboot
詳しい手順については、Dockerを使わずに開始のセクションをご覧ください。
- パッケージリストを更新し、
NCNNはモバイルおよび組み込みプラットフォーム向けに高度に最適化されているため、Raspberry PiデバイスでYOLO26を実行する際に有力な選択肢です。ARM向けに最適化されたカーネルにより、Pi上での推論は上記のベンチマークに示されている他のエクスポート形式より高速です。
PythonまたはCLIコマンドを使用して、PyTorchのYOLO26モデルをNCNN形式に変換できます。
例from ultralytics import YOLO # YOLO26n PyTorchモデルを読み込む model = YOLO("yolo26n.pt") # モデルをNCNN形式にエクスポート model.export(format="ncnn") # creates 'yolo26n_ncnn_model' # エクスポートしたNCNNモデルを読み込む ncnn_model = YOLO("yolo26n_ncnn_model") # 推論を実行 results = ncnn_model("https://ultralytics.com/images/bus.jpg")詳しくは、Raspberry PiでNCNNを使用するセクションをご覧ください。
主な違いは次のとおりです。
- CPU:Raspberry Pi 4はBroadcom BCM2711、Cortex-A72 64ビットSoCを使用し、Raspberry Pi 5はBroadcom BCM2712、Cortex-A76 64ビットSoCを使用します。
- 最大CPU周波数:Raspberry Pi 4の最大周波数は1.8GHzですが、Raspberry Pi 5は2.4GHzです。
- メモリ: Raspberry Pi 4は最大8GBのLPDDR4-3200 SDRAMを搭載し、Raspberry Pi 5は2GB、4GB、8GB、16GBの各モデルでLPDDR4X-4267 SDRAMを搭載しています。
これらの強化により、Raspberry Pi 5でのYOLO26モデルのパフォーマンスベンチマークは、Raspberry Pi 4と比較して向上しています。詳細については、Raspberry Piシリーズの比較表をご覧ください。
YOLO26の推論用にRaspberry Pi Cameraを設定する方法は2つあります。
-
picamera2を使用する方法:import cv2 from picamera2 import Picamera2 from ultralytics import YOLO picam2 = Picamera2() picam2.preview_configuration.main.size = (1280, 720) picam2.preview_configuration.main.format = "RGB888" picam2.preview_configuration.align() picam2.configure("preview") picam2.start() model = YOLO("yolo26n.pt") while True: frame = picam2.capture_array() results = model(frame) annotated_frame = results[0].plot() cv2.imshow("Camera", annotated_frame) if cv2.waitKey(1) == ord("q"): break cv2.destroyAllWindows() -
TCPストリームを使用する方法:
rpicam-vid -n -t 0 --inline --listen -o tcp://127.0.0.1:8888from ultralytics import YOLO model = YOLO("yolo26n.pt") results = model("tcp://127.0.0.1:8888")
詳しい設定手順については、カメラを使用した推論のセクションをご覧ください。
-


コメント134
質問したり、結果を共有したり、ほかの人をサポートしたりできます。
smhty
Works great on Raspberry Pi 5. A tutorial for the AI kit that comes with Raspberry Pi 5 would be great as well: https://www.raspberrypi.com/products/ai-kit/
1 Glenn JocherUltralytics(編集済み)
Hi there!
Thank you for your feedback and for sharing your positive experience on the Raspberry Pi 5! 😊
Creating a tutorial for the AI kit that comes with the Raspberry Pi 5 is a fantastic idea. In the meantime, you can refer to our comprehensive Quick Start Guide for Raspberry Pi with Ultralytics YOLO26, which provides detailed instructions on setting up and running YOLO on Raspberry Pi devices, including performance benchmarks.
For those interested in using the AI kit, the setup process should be quite similar. Here’s a quick overview to get you started:
-
Flash Raspberry Pi OS: Ensure you have the latest Raspberry Pi OS Bookworm (Debian 12) installed. Follow the Getting Started Documentation by Raspberry Pi to prepare your device.
-
Set Up Ultralytics:
- With Docker:
t=ultralytics/ultralytics:latest-arm64 && sudo docker pull $t && sudo docker run -it --ipc=host $t - Without Docker:
sudo apt update sudo apt install python3-pip -y pip install -U pip pip install ultralytics[export] sudo reboot
- With Docker:
-
Use NCNN for Best Performance: Convert your YOLO26 model to NCNN format for optimal performance on Raspberry Pi:
from ultralytics import YOLO # Load a YOLO26n PyTorch model model = YOLO("yolo26n.pt") # Export the model to NCNN format model.export(format="ncnn") # creates 'yolo26n_ncnn_model' # Load the exported NCNN model ncnn_model = YOLO("yolo26n_ncnn_model") # Run inference results = ncnn_model("https://ultralytics.com/images/bus.jpg") -
Using the Raspberry Pi Camera: For real-time video feeds, you can use the
picamera2library or set up a TCP stream:-
Using
picamera2:import cv2 from picamera2 import Picamera2 from ultralytics import YOLO picam2 = Picamera2() picam2.preview_configuration.main.size = (1280, 720) picam2.preview_configuration.main.format = "RGB888" picam2.preview_configuration.align() picam2.configure("preview") picam2.start() model = YOLO("yolo26n.pt") while True: frame = picam2.capture_array() results = model(frame) annotated_frame = results[0].plot() cv2.imshow("Camera", annotated_frame) if cv2.waitKey(1) == ord("q"): break cv2.destroyAllWindows() -
Using TCP Stream:
rpicam-vid -n -t 0 --inline --listen -o tcp://127.0.0.1:8888from ultralytics import YOLO model = YOLO("yolo26n.pt") results = model("tcp://127.0.0.1:8888")
-
We hope this helps you get started with the AI kit on your Raspberry Pi 5. For more detailed instructions and additional resources, please visit our Raspberry Pi Guide.
Happy coding! 🚀
-
wnelis
Today I've installed module ultralytics on a Raspberry Pi 4 with 4 [GiB] memory running Trixie. Some remarks about what I've learned: . Use the 64-bit variant of Raspberry OS; . Use an microSD card of at least 32 [GiB]; . Disable /tmp becoming a file system in memory (tmpfs):
sudo systemctl mask tmp.mount; . OpenCV is installed using apt, module ultralytics is installed in a virtual Python environment: 'python -m venv --system-site-packages `.It is found that YOLO runs into a hardware error: "Illegal instruction". This can be reproduced by using the Python script shown above to export the model in NCNN format. The output is:
Downloading https://github.com/ultralyti…: 100% ━━━━━━━━━━━━ 5.3MB 1.4MB/s 3.8s Ultralytics 8.4.191 🚀 Python-3.13.5 torch-2.14.1+cu130 CPU (aarch64) Illegal instruction
How can this issue be solved?
 Paula DerrengerUltralytics
@wnelis the most likely cause is a native PyTorch binary using instructions unsupported by the Pi 4’s CPU, rather than faulty hardware; similar crashes are documented in Ultralytics #19091 and upstream PyTorch, although your exact version is not confirmed affected. (github.com) Your log shows a CUDA build (
+cu130); first replace it with the matching official CPU-only packages inside your activated virtual environment, then retry the export: (pytorch.org)python -m pip install --force-reinstall torch==2.14.1 torchvision==0.29.1 --index-url https://download.pytorch.org/whl/cpuIf it still crashes, please share the text output of
yolo checksandpython -m pip show torch torchvisionfrom that same environment so we can identify package/path conflicts.
hm-zeroone(編集済み)
"We haven’t validated Orbit OS yet, but if it supports tflite or onnx runtimes you should be able to deploy an exported Ultralytics YOLO26 model there using Export mode and the deployment options guide; if you try it, please share the exact device, export format, and any text error logs here in Discussions so the Ultralytics team can take a look."
Hi @glenn-jocher,
I added a new feature to my Orbit OS app to test YOLO models directly on edge devices, in this case a Raspberry Pi. The app now allows adding new models, and by default includes YOLO v8, v11 and v26.
We also introduced a benchmark mode, where you can select an image and run all models to compare performance and results.
In the example shown in the image, YOLOv8 achieved the highest number of correct object detections by time.
This demo video shows the remote deployment, no SSH, no Docker, of the app in action on Raspberry Pi 5 vs Arduino UNO Q and a comparison (“VS”) between the RPi 5 and UNO Q running YOLO v8. https://youtu.be/aiFJmosYVAI?si=v3Jo_TbswU3n-sZU
- Glenn JocherUltralytics
Thanks for sharing the Orbit OS benchmark; for a fair cross-model comparison please include the exact export/runtime backend,
imgsz, confidence/IoU thresholds, and per-image latency/FPS, since on Raspberry Pi CPU deployments NCNN is usually the best baseline for YOLO26. Hey! Thanks for the feedback. All models were tested under the same conditions — TFlite runtime, same image, same thresholds (conf=0.50, IoU=0.45), same imgsz 640×640 with letterbox preprocessing.
Everything runs through the OrbitOS SDK which currently has TFLite and ONNX embedded. NCNN is something we'll look into adding in a future release.
Quick question — for RPi deployments, would you recommend INT8 or float16 as the default export format?
Orbit OS SDK 26.0.1 Inference example.
Orbit OS is multi-language — For now only Go SDK is available, Python, Java and C++ SDKs are coming soon.
model, _ := device.AIManager.UploadAndLoadModel( "yolo8n", "models/yolo26n_float16.tflite", aiv26.ModelBackend_TFLITE, aiv26.ExecutionMode_EXEC_HIGH_THREADS, ) resp, _ := model.Infer(ctx, tensor.Data, tensor.Shape, tensor.Dtype) fmt.Println(resp.GetOutputShape()) // [1 84 8400] fmt.Println(resp.GetLatencyUs()) // e.g. 528000- Glenn JocherUltralytics(編集済み)
For plain Raspberry Pi CPU deployment with
LiteRT(.tflite), I’d usually default toINT8for the best speed and memory savings, and usefloat16only if quantization hurts accuracy too much or your runtime performs better with FP kernels; if you benchmark both, the LiteRT export guide is the right reference, while our Raspberry Pi guide showsNCNNas the strongest baseline once you add that backend.1
safdarhamid64-cpu
when i write in raspberry pi terminal : from ultralytics import yolo error msg illegal instruction pops up , i have trained model and even i have first created environment and installed pip install ultralytics but still i am not able to run model yolo11n on my Raspberry Pi 4 , Guide me plzz
- Glenn JocherUltralytics
That
Illegal instructionon Raspberry Pi usually means an incompatible binary wheel (most oftentorch/numpypulled for the wrong arch/OS), and also note the correct import isfrom ultralytics import YOLO(capitalized), notyolo; please paste the text output ofyolo checksplus the full traceback here in this discussion, and confirmuname -m+ whether you’re on Raspberry Pi OS Bookworm 64-bit as in the Raspberry Pi YOLO26 guide; as a quick way to rule out env issues you can also try our ARM64 Docker flow from that guide:```bash t=ultralytics/ultralytics:latest-arm64 sudo docker pull $t && sudo docker run -it --ipc=host $t python -c "from ultralytics import YOLO; YOLO('yolo11n.pt')"
inuropix
Hi.. I get an error when implement botsort with reid is True and the model is ncnn(exported from yolo26n-cls.pt)
Here’s the full traceback from the error:
    self.tracks = self.model.track(
                  ^^^^^^^^^^^^^^^^^
 File "/home/sbr/people_counting/lib/python3.11/site-packages/ultralytics/engine/model.py", line 579, in track
    return self.predict(source=source, stream=stream, **kwargs)
           ^^^^^^^^^^^^^^^^^^^^^^^^^^^^^^^^^^^^^^^^^^^^^^^^^^^^
  File "/home/sbr/people_counting/lib/python3.11/site-packages/ultralytics/engine/model.py", line 536, in predict
    return self.predictor.predict_cli(source=source) if is_cli else self.predictor(source=source, stream=stream)
                                                                    ^^^^^^^^^^^^^^^^^^^^^^^^^^^^^^^^^^^^^^^^^^^^
  File "/home/sbr/people_counting/lib/python3.11/site-packages/ultralytics/engine/predictor.py", line 225, in __call__
    return list(self.stream_inference(source, model, *args, **kwargs))  # merge list of Results into one
           ^^^^^^^^^^^^^^^^^^^^^^^^^^^^^^^^^^^^^^^^^^^^^^^^^^^^^^^^^^^
  File "/home/sbr/people_counting/lib/python3.11/site-packages/torch/utils/_contextlib.py", line 40, in generator_context
    response = gen.send(None)
               ^^^^^^^^^^^^^^
  File "/home/sbr/people_counting/lib/python3.11/site-packages/ultralytics/engine/predictor.py", line 338, in stream_inference
    self.run_callbacks("on_predict_postprocess_end")
  File "/home/sbr/people_counting/lib/python3.11/site-packages/ultralytics/engine/predictor.py", line 509, in run_callbacks
    callback(self)
  File "/home/sbr/people_counting/lib/python3.11/site-packages/ultralytics/trackers/track.py", line 93, in on_predict_postprocess_end
    tracks = tracker.update(det, result.orig_img, getattr(result, "feats", None))
             ^^^^^^^^^^^^^^^^^^^^^^^^^^^^^^^^^^^^^^^^^^^^^^^^^^^^^^^^^^^^^^^^^^^^
  File "/home/sbr/people_counting/lib/python3.11/site-packages/ultralytics/trackers/byte_tracker.py", line 361, in update
    dists = self.get_dists(unconfirmed, detections)
            ^^^^^^^^^^^^^^^^^^^^^^^^^^^^^^^^^^^^^^^
  File "/home/sbr/people_counting/lib/python3.11/site-packages/ultralytics/trackers/bot_sort.py", line 220, in get_dists
    emb_dists = matching.embedding_distance(tracks, detections) / 2.0
                ^^^^^^^^^^^^^^^^^^^^^^^^^^^^^^^^^^^^^^^^^^^^^^^
  File "/home/sbr/people_counting/lib/python3.11/site-packages/ultralytics/trackers/utils/matching.py", line 128, in embedding_distance
    cost_matrix = np.maximum(0.0, cdist(track_features, det_features, metric))  # Normalized features
                                  ^^^^^^^^^^^^^^^^^^^^^^^^^^^^^^^^^^^^^^^^^^^
  File "/home/sbr/people_counting/lib/python3.11/site-packages/scipy/spatial/distance.py", line 2903, in cdist
    raise ValueError('XA must be a 2-dimensional array.')
ValueError: XA must be a 2-dimensional array.
Any idea?
- Glenn JocherUltralytics
That traceback usually means BoT-SORT didn’t get valid (2D) ReID embeddings; also note that
.track()should run with a Detect/Seg/Pose model, whileyolo26n-clsis only meant to be the ReID feature extractor configured insidebotsort.yaml(viawith_reid/model). (docs.ultralytics.com)yolo track model=yolo26n.pt source=path/to/video.mp4 tracker="botsort.yaml"# in a copy of botsort.yaml with_reid: True model: yolo26n-cls.pt # first confirm this works before swapping to an exported backendIf you just need stable tracking on Raspberry Pi, try
tracker="bytetrack.yaml"(no ReID); if you still hit this, please paste yourbotsort.yamland the output ofyolo checksso we can reproduce from the same environment. (docs.ultralytics.com)
hananabuzainab
I can't install ultralytics on rasspbery pi 5...with python 3.11 version,why??
I used: pip install ultralytics
How can i fix this problem ??
- Glenn JocherUltralytics
Can you paste the full
pip install ultralyticserror text (as text, not a screenshot) and the output ofpython3 -Vhere so we can pinpoint what’s failing? On Raspberry Pi 5 this is most often a Python/pip mismatch or non-Bookworm/32-bit setup—please also confirm you’re on Raspberry Pi OS Bookworm 64-bit as in the Raspberry Pi with Ultralytics YOLO26 guide.python3 -V python3 -m pip install -U pip setuptools wheel python3 -m venv .venv source .venv/bin/activate python -m pip install -U pip python -m pip install ultralytics
avasanjesh
Hi,
I want to use python version of raspberry pi 32 bit OS. can you please tell me if i can export yolo detection model in 32 bit raspberry pi?
Edward-YS
Hello,I'm wondering if there is Benchmarking Results of Two Different Models (YOLO8n, YOLO8s) Across Ten Formats: PyTorch, TF, ONNX, OpenVINO, TF SavedModel, TF GraphDef, TF Lite, PaddlePaddle, MNN, NCNN.
zyt2011
Installing a single Hailo-5 is sufficient.
发件人: Beautifulboy111 @.> 发送时间: 2025年4月22日 14:24 收件人: ultralytics/ultralytics @.> 抄送: zyt2011 @.>; Mention @.> 主题: Re: [ultralytics/ultralytics] zh/guides/raspberry-pi/ (Discussion #19489)
Why does my Raspberry Pi 5 have a high inference latency of 150ms when using NCNN for video recognition, even after overclocking? How can I reduce the inference time?
― Reply to this email directly, view it on GitHubhttps://github.com/orgs/ultralytics/discussions/19489#discussioncomment-12906311, or unsubscribehttps://github.com/notifications/unsubscribe-auth/BJ7DFR53TAD7QVJNO3TTXJL22XOAJAVCNFSM6AAAAABYEEJCHCVHI2DSMVQWIX3LMV43URDJONRXK43TNFXW4Q3PNVWWK3TUHMYTEOJQGYZTCMI. You are receiving this because you were mentioned.Message ID: @.***>
- Glenn JocherUltralytics(編集済み)
@Beautifulboy111 150ms inference latency with NCNN on Raspberry Pi 5 is higher than expected. Here are some steps to reduce it:
-
Use a smaller YOLO26 model - our benchmarks show YOLO26n is significantly faster than YOLO26s with NCNN on Pi 5 (67ms vs 173ms)
-
Reduce input resolution - try 320x320 instead of 640x640, which can cut inference time by up to 70%
-
Optimize memory allocation by running without GUI (Raspberry Pi OS Lite)
-
Ensure you're using proper cooling for sustained performance when overclocked
-
Consider processing at lower FPS if your application allows it
Regarding @zyt2011's suggestion, while accelerators like Hailo can boost performance, they're a separate investment. I'd recommend optimizing your current setup first using the techniques in our Raspberry Pi guide.
What's your specific use case? This would help us provide more targeted optimization advice.
-
Beautifulboy111
Why does my Raspberry Pi 5 have a high inference latency of 150ms when using NCNN for video recognition, even after overclocking? How can I reduce the inference time?