Link to this sectionYOLO26 모델을 위한 MNN 내보내기 및 배포#
Link to this sectionMNN#
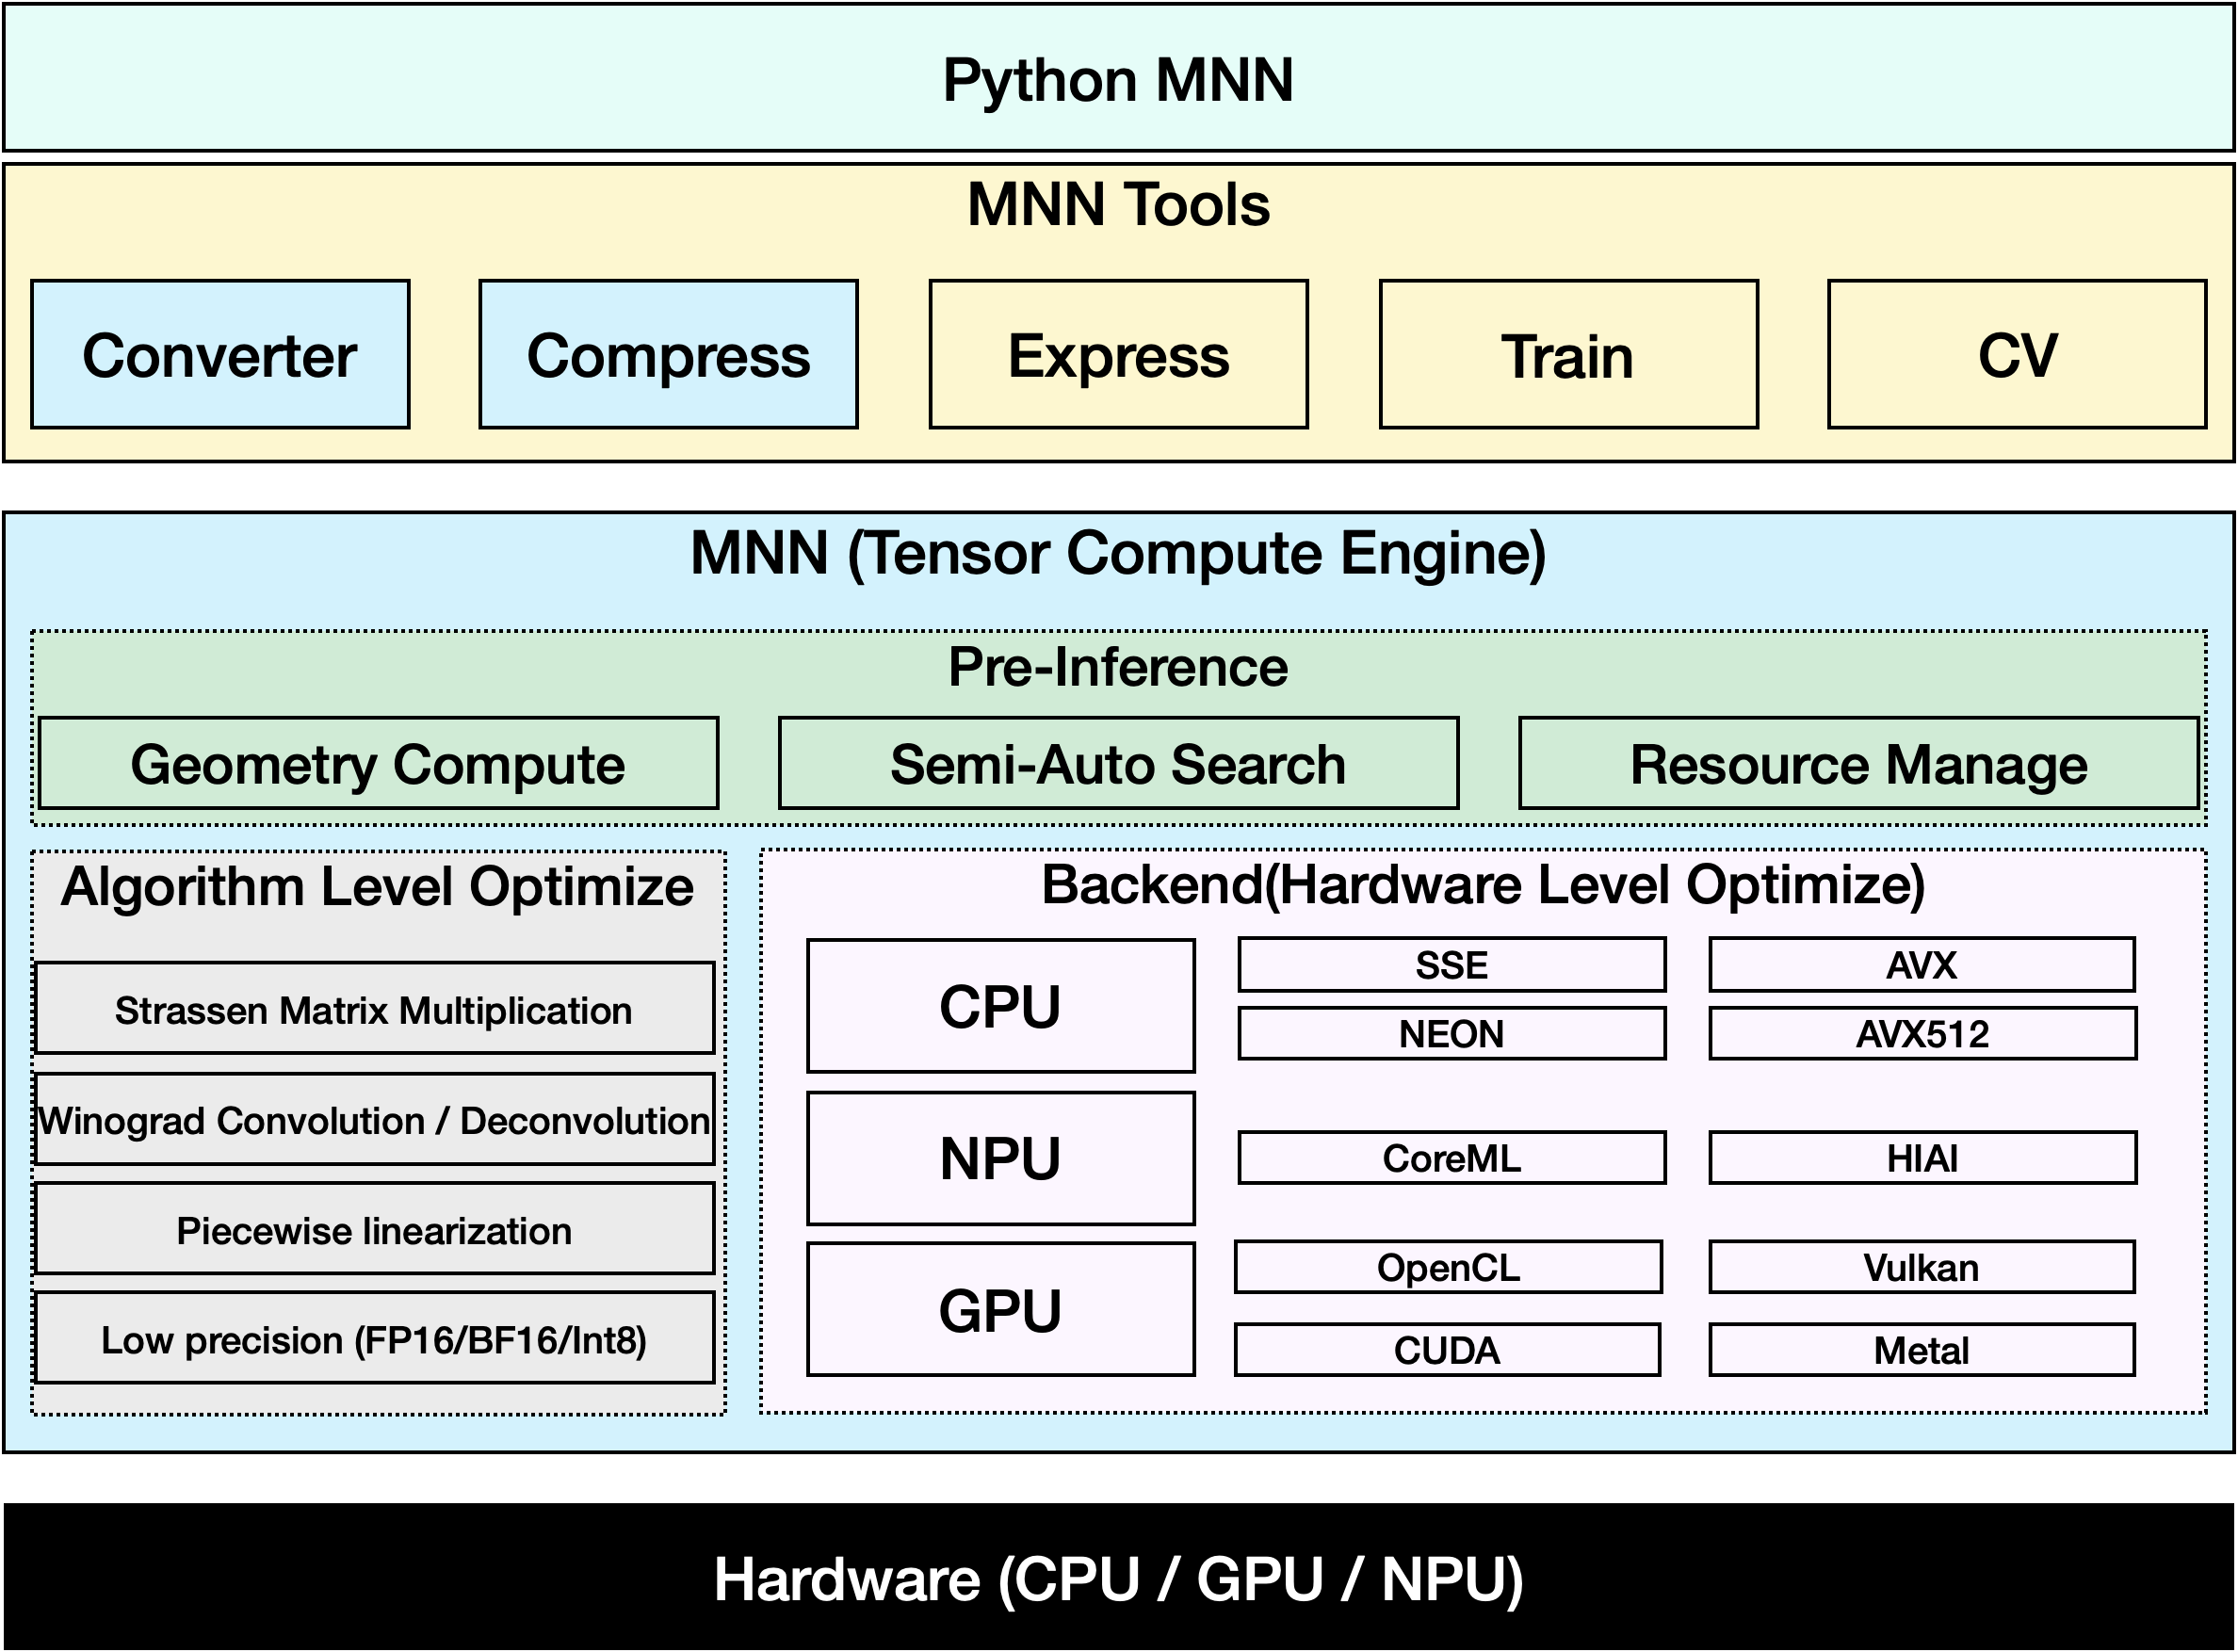
MNN은 매우 효율적이고 가벼운 딥러닝 프레임워크입니다. 이 프레임워크는 딥러닝 모델의 추론 및 학습을 지원하며, 온디바이스(on-device) 추론 및 학습 분야에서 업계 최고의 성능을 자랑합니다. 현재 MNN은 타오바오, 티몰, 유쿠, 딩딩, 셴위 등 Alibaba Inc의 30개 이상의 앱에 통합되어 라이브 방송, 숏폼 영상 캡처, 검색 추천, 이미지 기반 상품 검색, 인터랙티브 마케팅, 자산 분배, 보안 위험 제어 등 70개 이상의 사용 사례를 포괄합니다. 또한 MNN은 IoT와 같은 임베디드 장치에서도 사용됩니다.
Watch: How to Export Ultralytics YOLO26 to MNN Format | Speed up Inference on Mobile Devices📱
Link to this sectionMNN으로 내보내기: YOLO26 모델 변환#
Ultralytics YOLO 모델을 MNN 형식으로 변환하여 모델 호환성과 배포 유연성을 확장할 수 있습니다. 이 변환은 모바일 및 임베디드 환경에 맞게 모델을 최적화하여 리소스가 제한된 장치에서 효율적인 성능을 보장합니다.
Link to this section설치#
필수 패키지를 설치하려면 다음을 실행하십시오:
# Install the required package for YOLO26 and MNN
pip install ultralytics
pip install MNN
Link to this section사용법#
모든 Ultralytics YOLO26 모델은 즉시 내보내기를 지원하도록 설계되어 있어 선호하는 배포 워크플로우에 쉽게 통합할 수 있습니다. 전체 지원 내보내기 형식 및 구성 옵션 목록을 보고 애플리케이션에 가장 적합한 설정을 선택할 수 있습니다.
MNN 형식은 Export, Predict 및 Validate 모드를 지원합니다. 모델을 내보낸 후 내보낸 모델을 로드하여 추론을 실행하거나 정확도를 검증하십시오.
from ultralytics import YOLO

# Load a YOLO26 model
model = YOLO("yolo26n.pt")

# Export the model to MNN format
model.export(format="mnn") # creates 'yolo26n.mnn'from ultralytics import YOLO
# Load the exported MNN model
model = YOLO("yolo26n.mnn")
# Run inference
results = model("https://ultralytics.com/images/bus.jpg")from ultralytics import YOLO
# Load the exported MNN model
model = YOLO("yolo26n.mnn")
# Validate accuracy on the COCO8 dataset
metrics = model.val(data="coco8.yaml")Link to this section내보내기 인수#
| 인수 | 유형 | 기본값 | 설명 |
|---|---|---|---|
format | str | 'mnn' | 내보낸 모델의 대상 형식이며, 다양한 배포 환경과의 호환성을 정의합니다. |
imgsz | int 또는 tuple | 640 | 모델 입력에 필요한 이미지 크기입니다. 정사각형 이미지의 경우 정수를 사용할 수 있으며, 특정 치수의 경우 (height, width) 튜플을 사용할 수 있습니다. |
quantize | int 또는 str | None | 양자화 정밀도: 16 (FP16), 8 (INT8 가중치 양자화), 또는 32/설정 안 함 (FP32). 기존에 사용되던 half/int8 플래그를 대체합니다. |
batch | int | 1 | 내보낸 모델의 배치 추론 크기 또는 내보낸 모델이 predict 모드에서 동시에 처리할 최대 이미지 수를 지정합니다. |
dynamic | bool | False | 동적 입력 이미지 크기를 활성화합니다. nms=True와 함께 사용할 수 없습니다. |
nms | bool | False | 탐지 및 포즈 모델을 위한 NMS를 추가합니다. dynamic=True와 함께 사용할 수 없습니다. |
device | str | None | 내보내기를 위한 장치를 지정합니다: GPU(device=0), CPU(device=cpu), Apple silicon용 MPS(device=mps). |
내보내기 프로세스에 대한 자세한 내용은 내보내기에 대한 Ultralytics 문서 페이지를 참조하십시오.
Link to this sectionMNN 전용 추론#
YOLO26 추론 및 전처리를 위해 MNN에 전적으로 의존하는 함수가 구현되어 있으며, 모든 시나리오에서 쉽게 배포할 수 있도록 Python 및 C++ 버전을 모두 제공합니다.
import argparse

import MNN
import MNN.cv as cv2
import MNN.numpy as np

def inference(model, img, precision, backend, thread):
    config = {}
    config["precision"] = precision
    config["backend"] = backend
    config["numThread"] = thread
    rt = MNN.nn.create_runtime_manager((config,))
    # net = MNN.nn.load_module_from_file(model, ['images'], ['output0'], runtime_manager=rt)
    net = MNN.nn.load_module_from_file(model, [], [], runtime_manager=rt)
    original_image = cv2.imread(img)
    ih, iw, _ = original_image.shape
    length = max((ih, iw))
    scale = length / 640
    image = np.pad(original_image, [[0, length - ih], [0, length - iw], [0, 0]], "constant")
    image = cv2.resize(
        image, (640, 640), 0.0, 0.0, cv2.INTER_LINEAR, -1, [0.0, 0.0, 0.0], [1.0 / 255.0, 1.0 / 255.0, 1.0 / 255.0]
    )
    image = image[..., ::-1]  # BGR to RGB
    input_var = image[None]
    input_var = MNN.expr.convert(input_var, MNN.expr.NC4HW4)
    output_var = net.forward(input_var)
    output_var = MNN.expr.convert(output_var, MNN.expr.NCHW)
    output_var = output_var.squeeze()
    # output_var shape: [84, 8400]; 84 means: [cx, cy, w, h, prob * 80]
    cx = output_var[0]
    cy = output_var[1]
    w = output_var[2]
    h = output_var[3]
    probs = output_var[4:]
    # [cx, cy, w, h] -> [y0, x0, y1, x1]
    x0 = cx - w * 0.5
    y0 = cy - h * 0.5
    x1 = cx + w * 0.5
    y1 = cy + h * 0.5
    boxes = np.stack([x0, y0, x1, y1], axis=1)
    # ensure ratio is within the valid range [0.0, 1.0]
    boxes = np.clip(boxes, 0, 1)
    # get max prob and idx
    scores = np.max(probs, 0)
    class_ids = np.argmax(probs, 0)
    result_ids = MNN.expr.nms(boxes, scores, 100, 0.45, 0.25)
    print(result_ids.shape)
    # nms result box, score, ids
    result_boxes = boxes[result_ids]
    result_scores = scores[result_ids]
    result_class_ids = class_ids[result_ids]
    for i in range(len(result_boxes)):
        x0, y0, x1, y1 = result_boxes[i].read_as_tuple()
        y0 = int(y0 * scale)
        y1 = int(y1 * scale)
        x0 = int(x0 * scale)
        x1 = int(x1 * scale)
        # clamp to the original image size to handle cases where padding was applied
        x1 = min(iw, x1)
        y1 = min(ih, y1)
        print(result_class_ids[i])
        cv2.rectangle(original_image, (x0, y0), (x1, y1), (0, 0, 255), 2)
    cv2.imwrite("res.jpg", original_image)

if __name__ == "__main__":
    parser = argparse.ArgumentParser()
    parser.add_argument("--model", type=str, required=True, help="the yolo26 model path")
    parser.add_argument("--img", type=str, required=True, help="the input image path")
    parser.add_argument("--precision", type=str, default="normal", help="inference precision: normal, low, high, lowBF")
    parser.add_argument(
        "--backend",
        type=str,
        default="CPU",
        help="inference backend: CPU, OPENCL, OPENGL, NN, VULKAN, METAL, TRT, CUDA, HIAI",
    )
    parser.add_argument("--thread", type=int, default=4, help="inference using thread: int")
    args = parser.parse_args()
    inference(args.model, args.img, args.precision, args.backend, args.thread)
Link to this section요약#
이 가이드에서는 Ultralytics YOLO26 모델을 MNN으로 내보내고 추론에 MNN을 사용하는 방법을 소개합니다. MNN 형식은 edge AI 애플리케이션에 뛰어난 성능을 제공하므로 리소스가 제한된 장치에 컴퓨터 비전 모델을 배포하는 데 이상적입니다.
더 자세한 사용법은 MNN 문서를 참조하십시오.
Link to this sectionFAQ#
Link to this sectionUltralytics YOLO26 모델을 MNN 형식으로 어떻게 내보내나요?#
Ultralytics YOLO26 모델을 MNN 형식으로 내보내려면 다음 단계를 따르십시오:
from ultralytics import YOLO

# Load a YOLO26 model
model = YOLO("yolo26n.pt")

# Export to MNN format
model.export(format="mnn")  # creates 'yolo26n.mnn' with fp32 weight
model.export(format="mnn", quantize=16)  # creates 'yolo26n.mnn' with fp16 weight
model.export(format="mnn", quantize=8)  # creates 'yolo26n.mnn' with int8 weight
상세한 내보내기 옵션은 문서의 Export 페이지를 확인하십시오.
Link to this section내보낸 YOLO26 MNN 모델로 어떻게 예측하나요?#
내보낸 YOLO26 MNN 모델로 예측하려면 YOLO 클래스의 predict 함수를 사용하십시오.
from ultralytics import YOLO

# Load the YOLO26 MNN model
model = YOLO("yolo26n.mnn")

# Run inference
results = model("https://ultralytics.com/images/bus.jpg")  # predict with `fp32`
results = model("https://ultralytics.com/images/bus.jpg", quantize=16)  # predict with `fp16` if device support

for result in results:
    result.show()  # display to screen
    result.save(filename="result.jpg")  # save to disk
Link to this sectionMNN에서 지원하는 플랫폼은 무엇인가요?#
MNN은 범용성이 뛰어나며 다양한 플랫폼을 지원합니다:
- 모바일: Android, iOS, Harmony.
- 임베디드 시스템 및 IoT 장치: Raspberry Pi 및 NVIDIA Jetson과 같은 장치.
- 데스크톱 및 서버: Linux, Windows 및 macOS.
Link to this section모바일 장치에 Ultralytics YOLO26 MNN 모델을 어떻게 배포할 수 있나요?#
모바일 장치에 YOLO26 모델을 배포하려면 다음을 수행하십시오:
- Android용 빌드: MNN Android 가이드를 따르십시오.
- iOS용 빌드: MNN iOS 가이드를 따르십시오.
- Harmony용 빌드: MNN Harmony 가이드를 따르십시오.