빠른 시작 가이드: Seeed Studio reCamera와 Ultralytics YOLO26
reCamera는 Ultralytics의 연례 하이브리드 행사인 YOLO Vision 2024 (YV24)에서 AI 커뮤니티에 처음 소개되었습니다. 이 제품은 주로 엣지 AI 애플리케이션을 위해 설계되었으며 온디바이스 AI 처리와 간편한 배포를 제공합니다.
다양한 하드웨어 구성과 오픈 소스 리소스를 지원하므로 엣지에서 컴퓨터 비전 솔루션을 프로토타이핑하고 배포하기에 적합합니다.
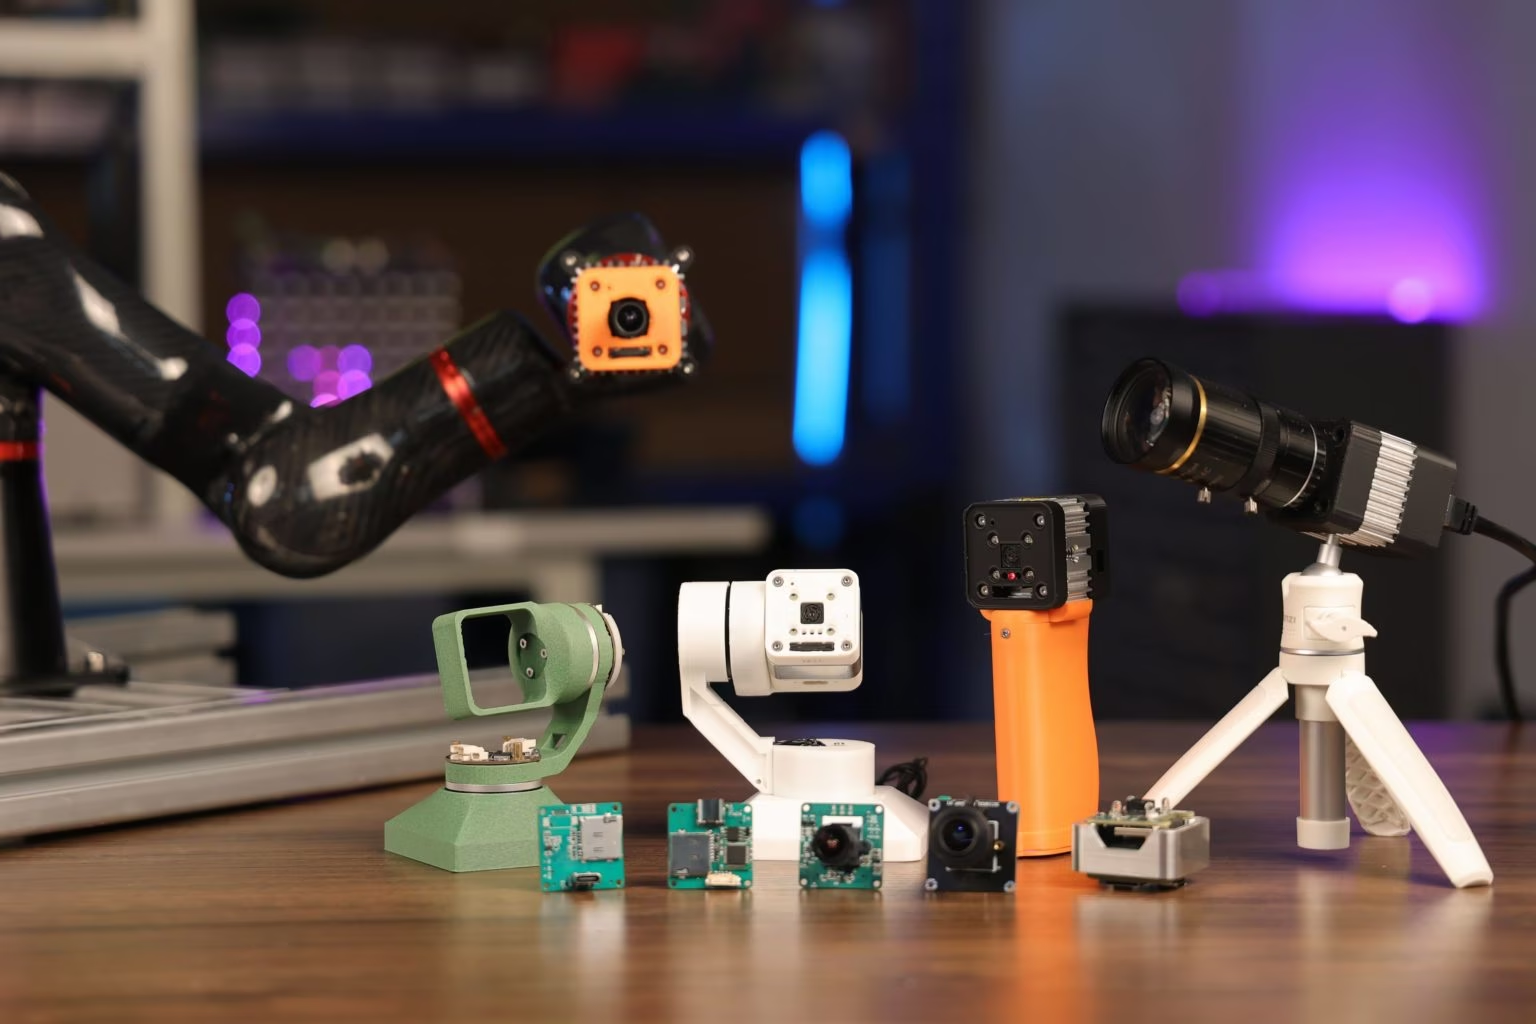
reCamera를 선택해야 하는 이유#
reCamera 시리즈는 엣지 AI 애플리케이션을 위해 개발자 요구 사항에 맞춰 특별히 설계되었습니다. 주요 기능은 다음과 같습니다.
-
RISC-V 기반 성능: 핵심에는 RISC-V 아키텍처 기반의 SG200X 프로세서가 탑재되어 엣지 AI 작업에 효율적인 성능을 제공합니다. 초당 1조 회 연산(1 TOPS)을 수행할 수 있어 실시간 객체 탐지와 같은 작업을 처리합니다.
-
최적화된 비디오 기술: H.264 및 H.265를 비롯한 고급 비디오 압축 표준을 지원하여 품질 저하 없이 스토리지 및 대역폭 요구 사항을 줄입니다. HDR 이미징, 3D 노이즈 감소, 렌즈 보정 등의 기능은 까다로운 환경에서도 이미지 품질을 유지합니다.
-
에너지 효율적인 듀얼 프로세싱: SG200X가 복잡한 AI 작업을 처리하는 동안 소형 8비트 마이크로컨트롤러가 간단한 작업을 관리해 전력을 절약하므로, reCamera는 배터리 구동 환경이나 저전력 구성에 적합합니다.
-
모듈식 및 업그레이드 가능한 설계: reCamera는 코어 보드, 센서 보드, 베이스보드의 세 가지 주요 구성 요소로 이루어진 모듈식 구조로 설계되었습니다. 이 설계를 통해 프로젝트가 발전함에 따라 개발자가 구성 요소를 교체하거나 업그레이드할 수 있습니다.
reCamera 하드웨어 빠른 설정#
reCamera 시작하기 페이지를 참조하고 장치(예: reCamera 2002 Series, Gimbal 또는 HQ POE)를 선택하여 장치를 네트워크에 연결하고 Node-RED 웹 UI에 접속해 감지 결과를 빠르게 미리 보는 등 장치의 초기 설정을 위한 빠른 시작 가이드를 여세요.
사전 설치된 YOLO 모델을 사용한 추론#
reCamera에는 Ultralytics YOLO 모델 4개가 사전 설치되어 있으며, Node-RED 대시보드에서 원하는 모델을 선택할 수 있습니다.
1단계: reCamera를 네트워크에 연결했다면 웹 브라우저에 reCamera의 IP 주소를 입력하여 Node-RED 대시보드를 여세요. reCamera를 USB로 PC에 연결했다면 192.168.42.1을 입력할 수 있습니다. 감지 모델은 기본적으로 로드됩니다.
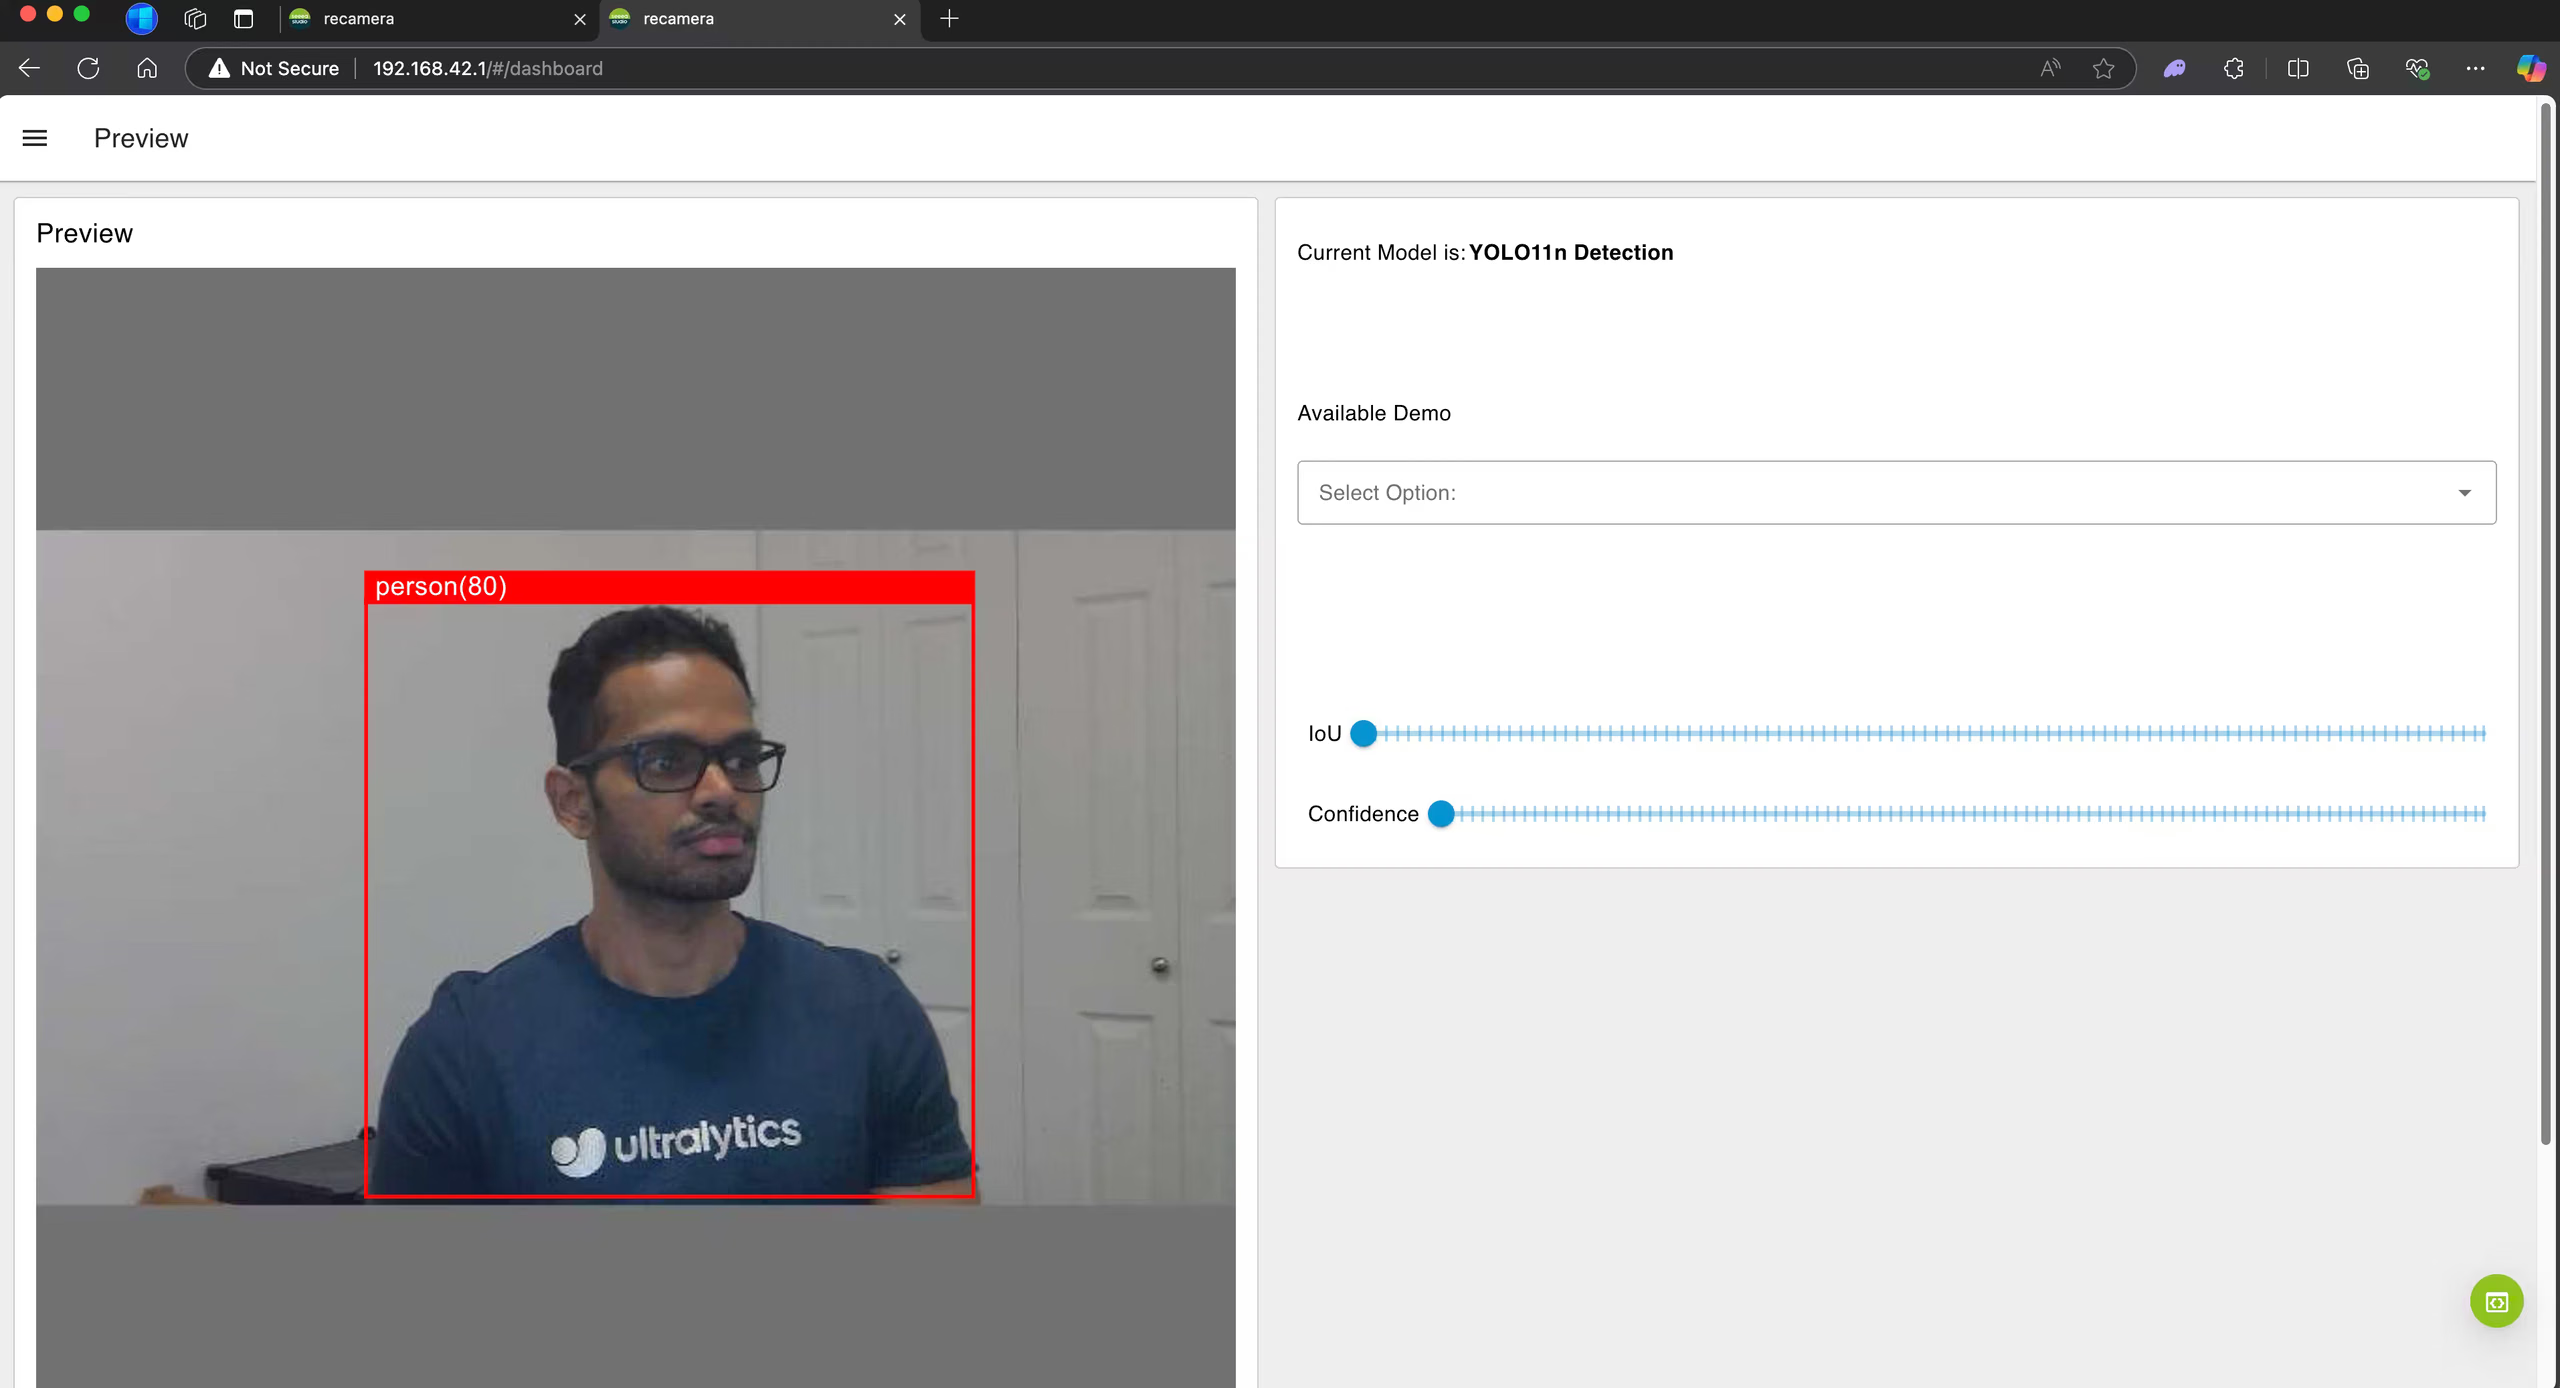
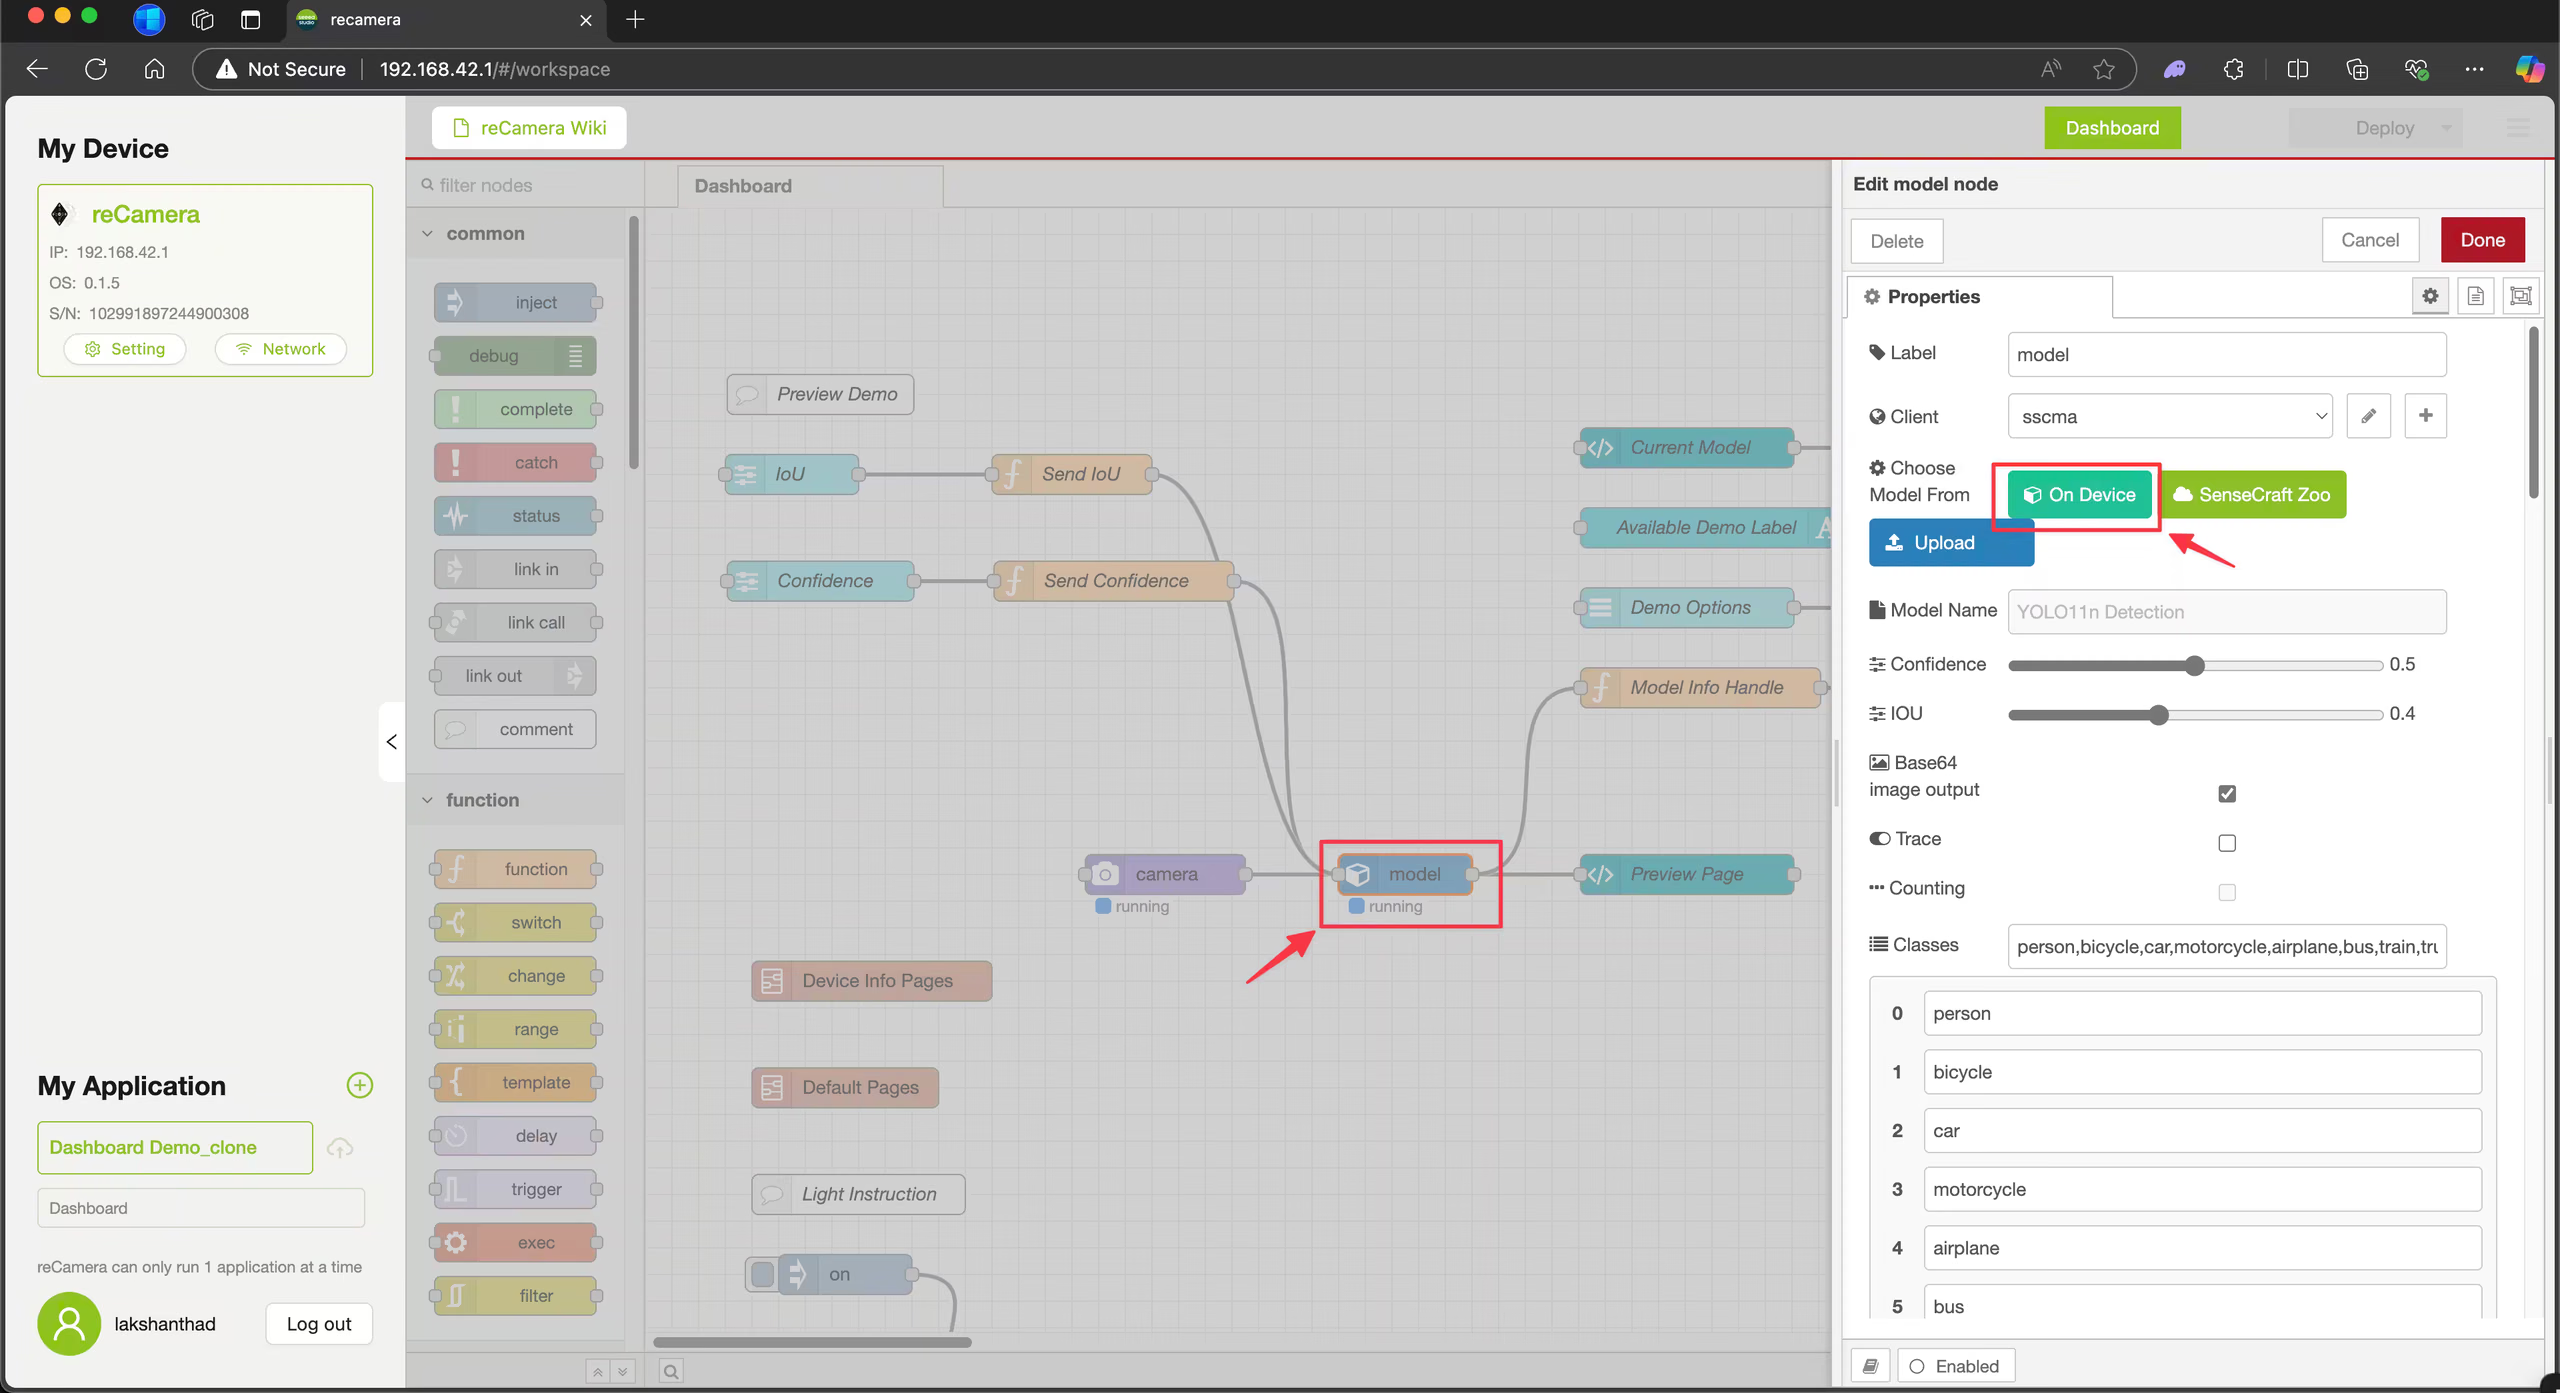
2단계: 오른쪽 아래 모서리에 있는 녹색 원을 클릭하여 Node-RED 플로 편집기에 접속하세요.
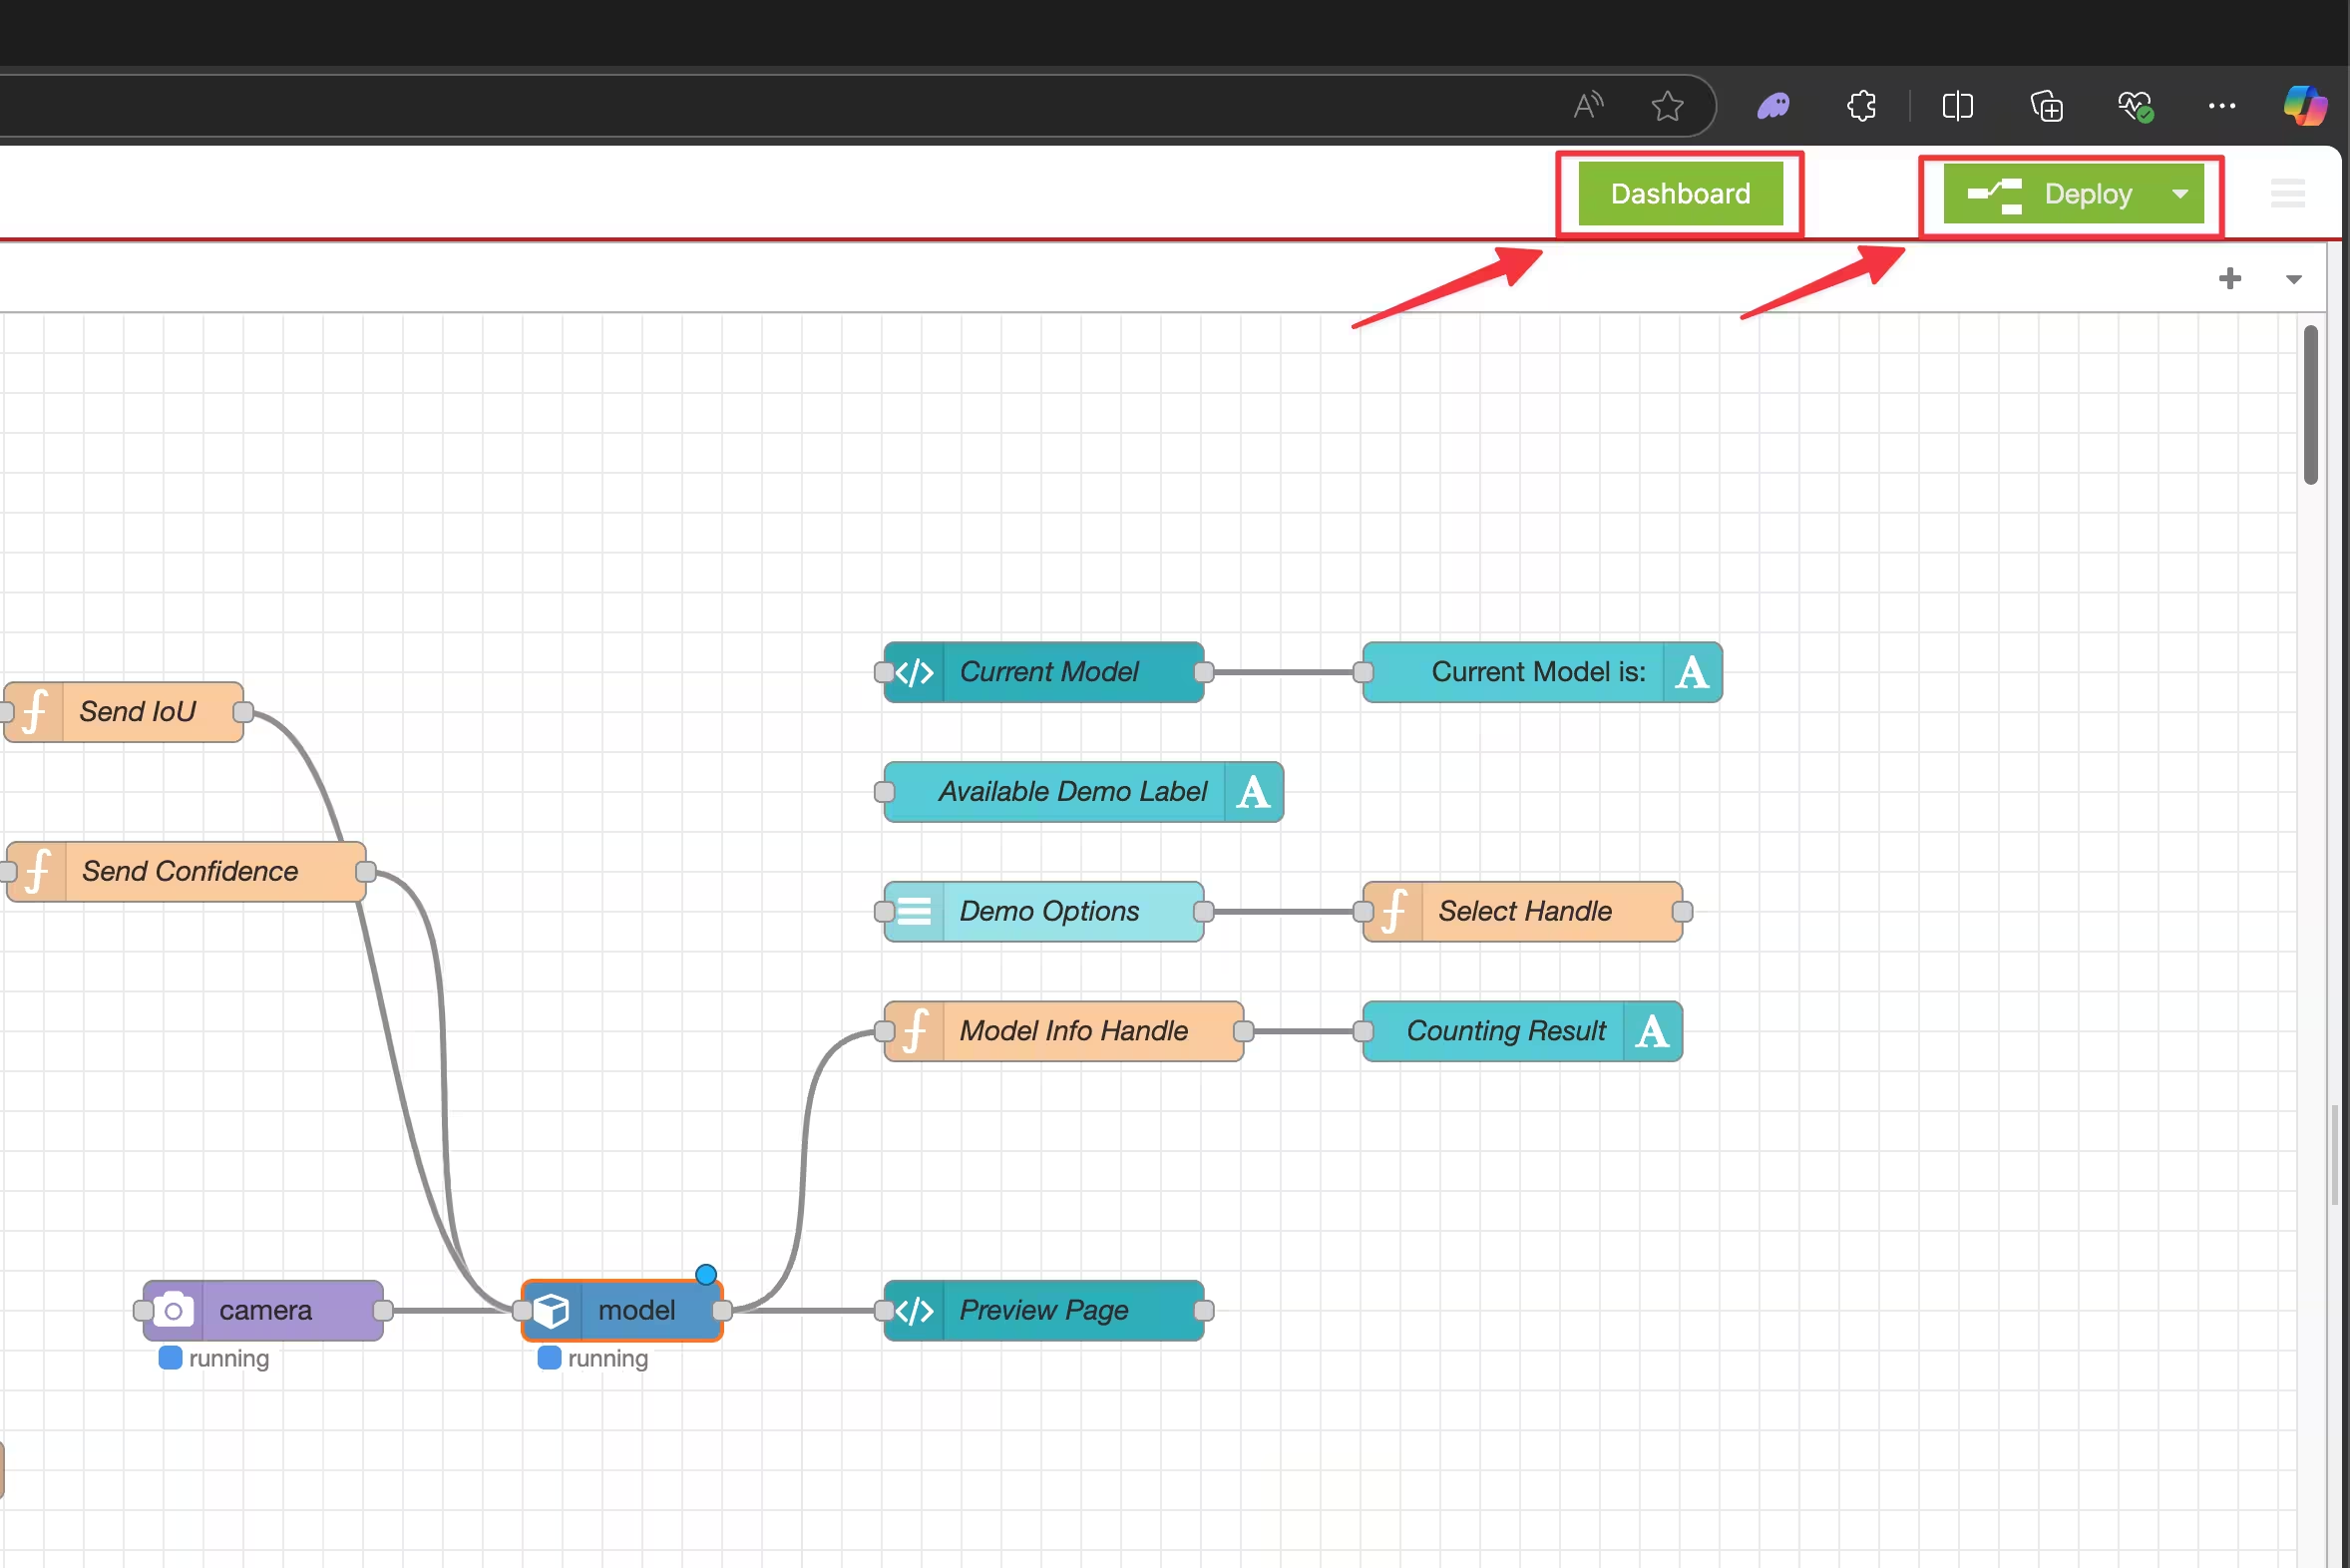
3단계: model 노드를 클릭한 다음 On Device을 클릭합니다.
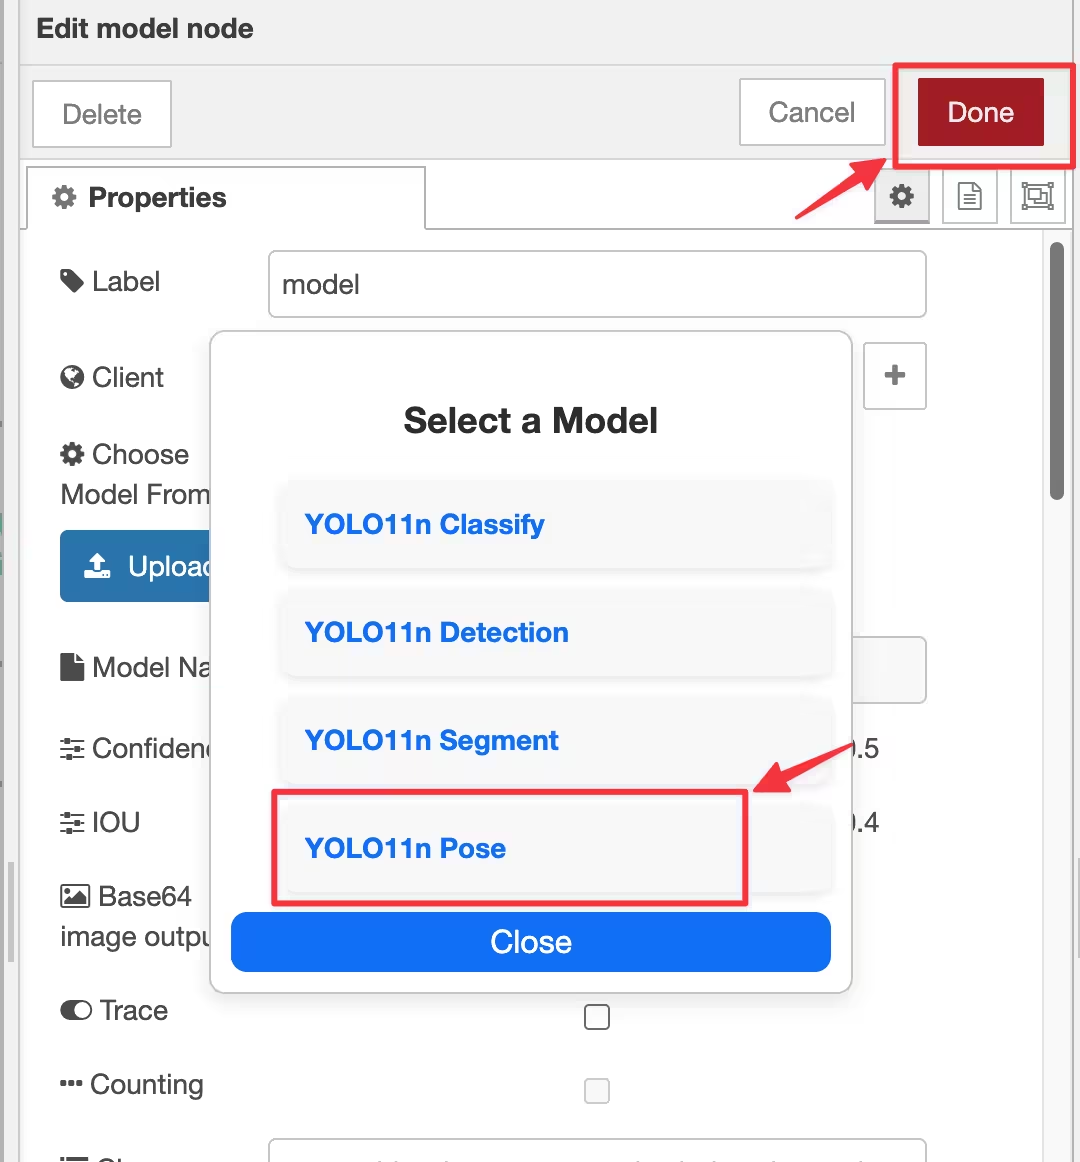
4단계: 사전 설치된 모델 4개 중 하나를 선택하고 Done을 클릭하세요. 이 예시에서는 포즈 모델을 선택합니다.
5단계: Deploy을 클릭하고 배포가 완료되면 Dashboard을 클릭합니다.
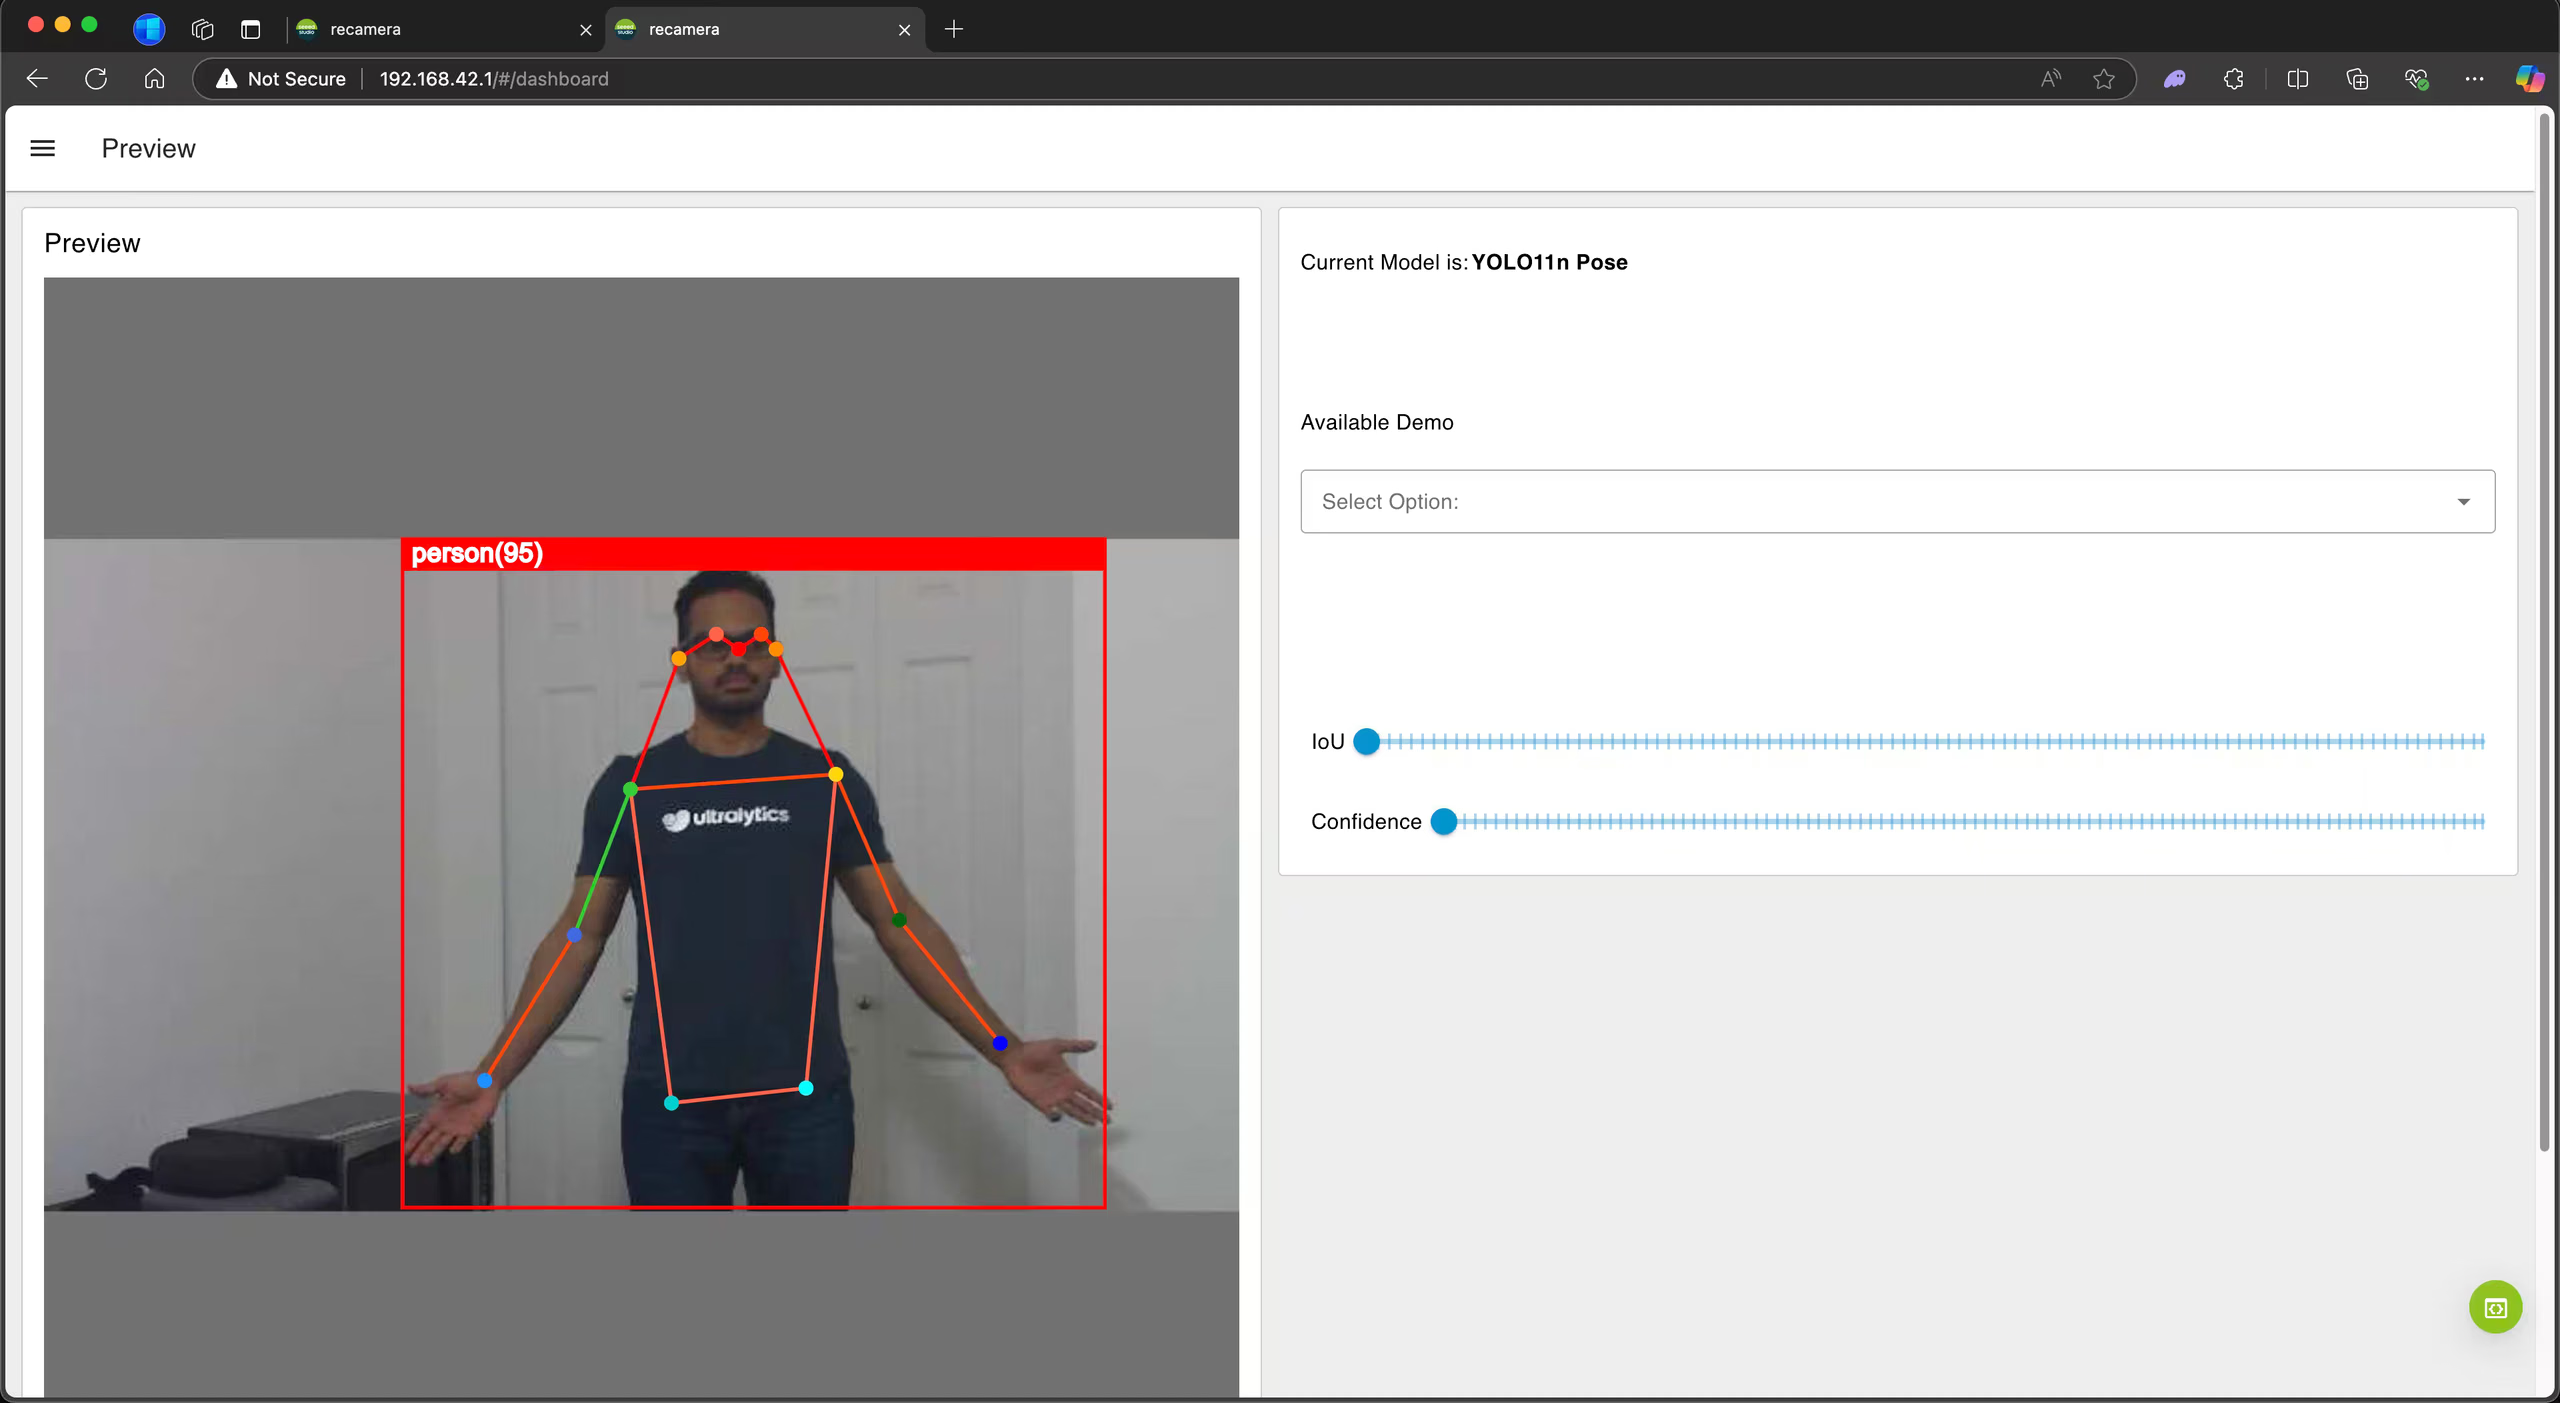
이제 대시보드에 카메라 영상에서 실행 중인 포즈 추정 모델이 표시됩니다.
cvimodel로 내보내기: YOLO26 모델 변환#
reCamera에서 사용자 지정 학습 YOLO26 모델을 사용하려면 아래 단계를 따르세요.
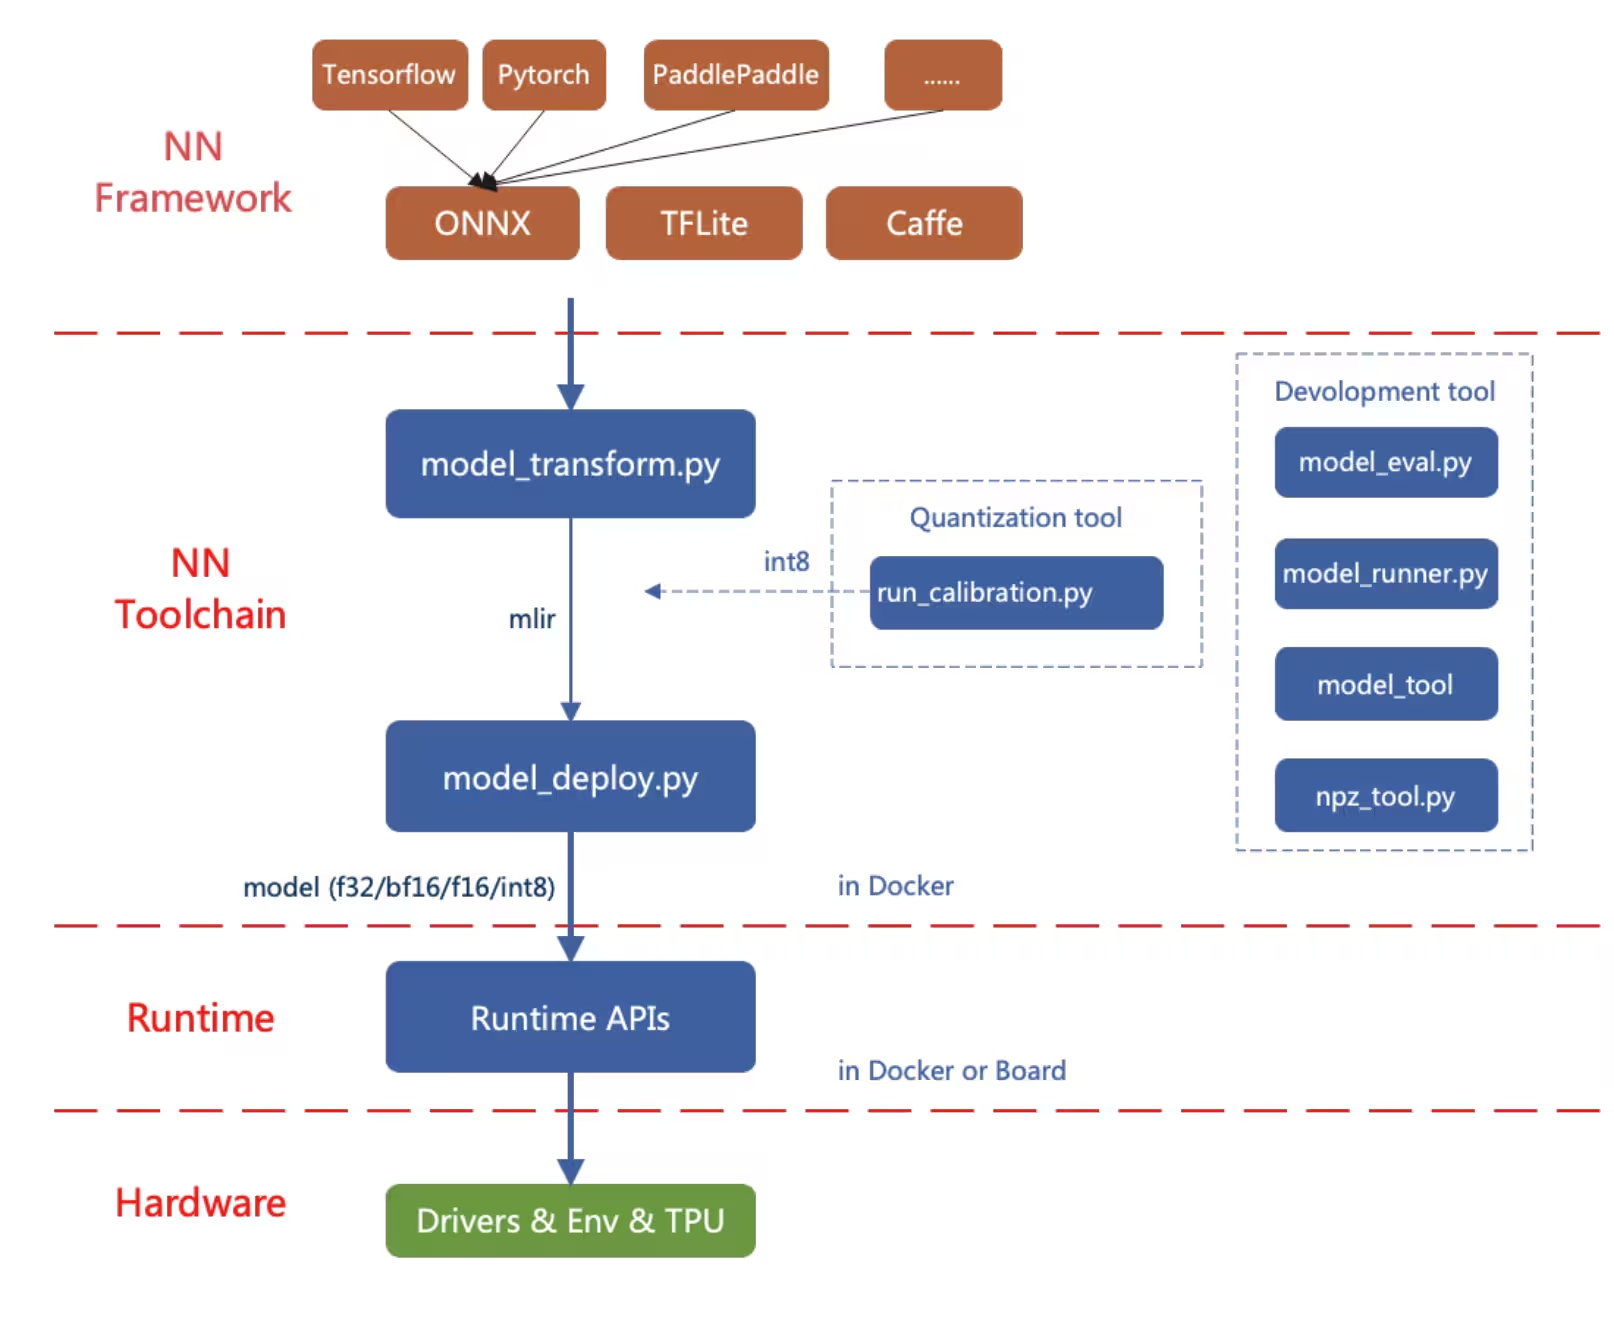
먼저 PyTorch 모델을 ONNX로 내보낸 다음, 이를 MLIR 모델 형식으로 변환하고, 마지막으로 MLIR을 cvimodel로 변환하여 장치에서 추론을 실행합니다.
ONNX로 내보내기#
Ultralytics YOLO26 모델을 ONNX 모델 형식으로 내보냅니다.
설치#
필수 패키지를 설치하려면 다음을 실행하세요:
pip install ultralytics설치 절차에 대한 자세한 지침과 모범 사례는 Ultralytics 설치 가이드를 참조하세요. YOLO26에 필요한 패키지를 설치하는 중 문제가 발생하면 해결 방법과 팁을 확인할 수 있는 일반적인 문제 가이드를 참조하세요.
사용법#
from ultralytics import YOLO

# YOLO26 모델 로드
model = YOLO("yolo26n.pt")

# 모델을 ONNX 형식으로 내보내기
model.export(format="onnx", opset=14)  # 'yolo26n.onnx' 생성
내보내기 프로세스에 관한 자세한 내용은 내보내기에 관한 Ultralytics 문서 페이지를 참조하세요.
ONNX를 MLIR 및 cvimodel로 내보내기#
ONNX 모델을 얻은 후 AI 모델 변환 및 양자화 페이지를 참조하여 ONNX 모델을 MLIR로 변환한 다음 cvimodel로 변환하세요.
reCamera의 실제 활용 사례#
reCamera는 장치 내 컴퓨터 비전 처리 기능과 모듈식 설계를 갖추어 다양한 실제 환경에 적합합니다.
-
낙상 감지: 안전 및 의료 분야의 애플리케이션을 위해 설계된 reCamera는 실시간으로 낙상을 감지할 수 있으므로 신속한 대응이 중요한 노인 돌봄 시설, 병원, 산업 현장에 적합합니다.
-
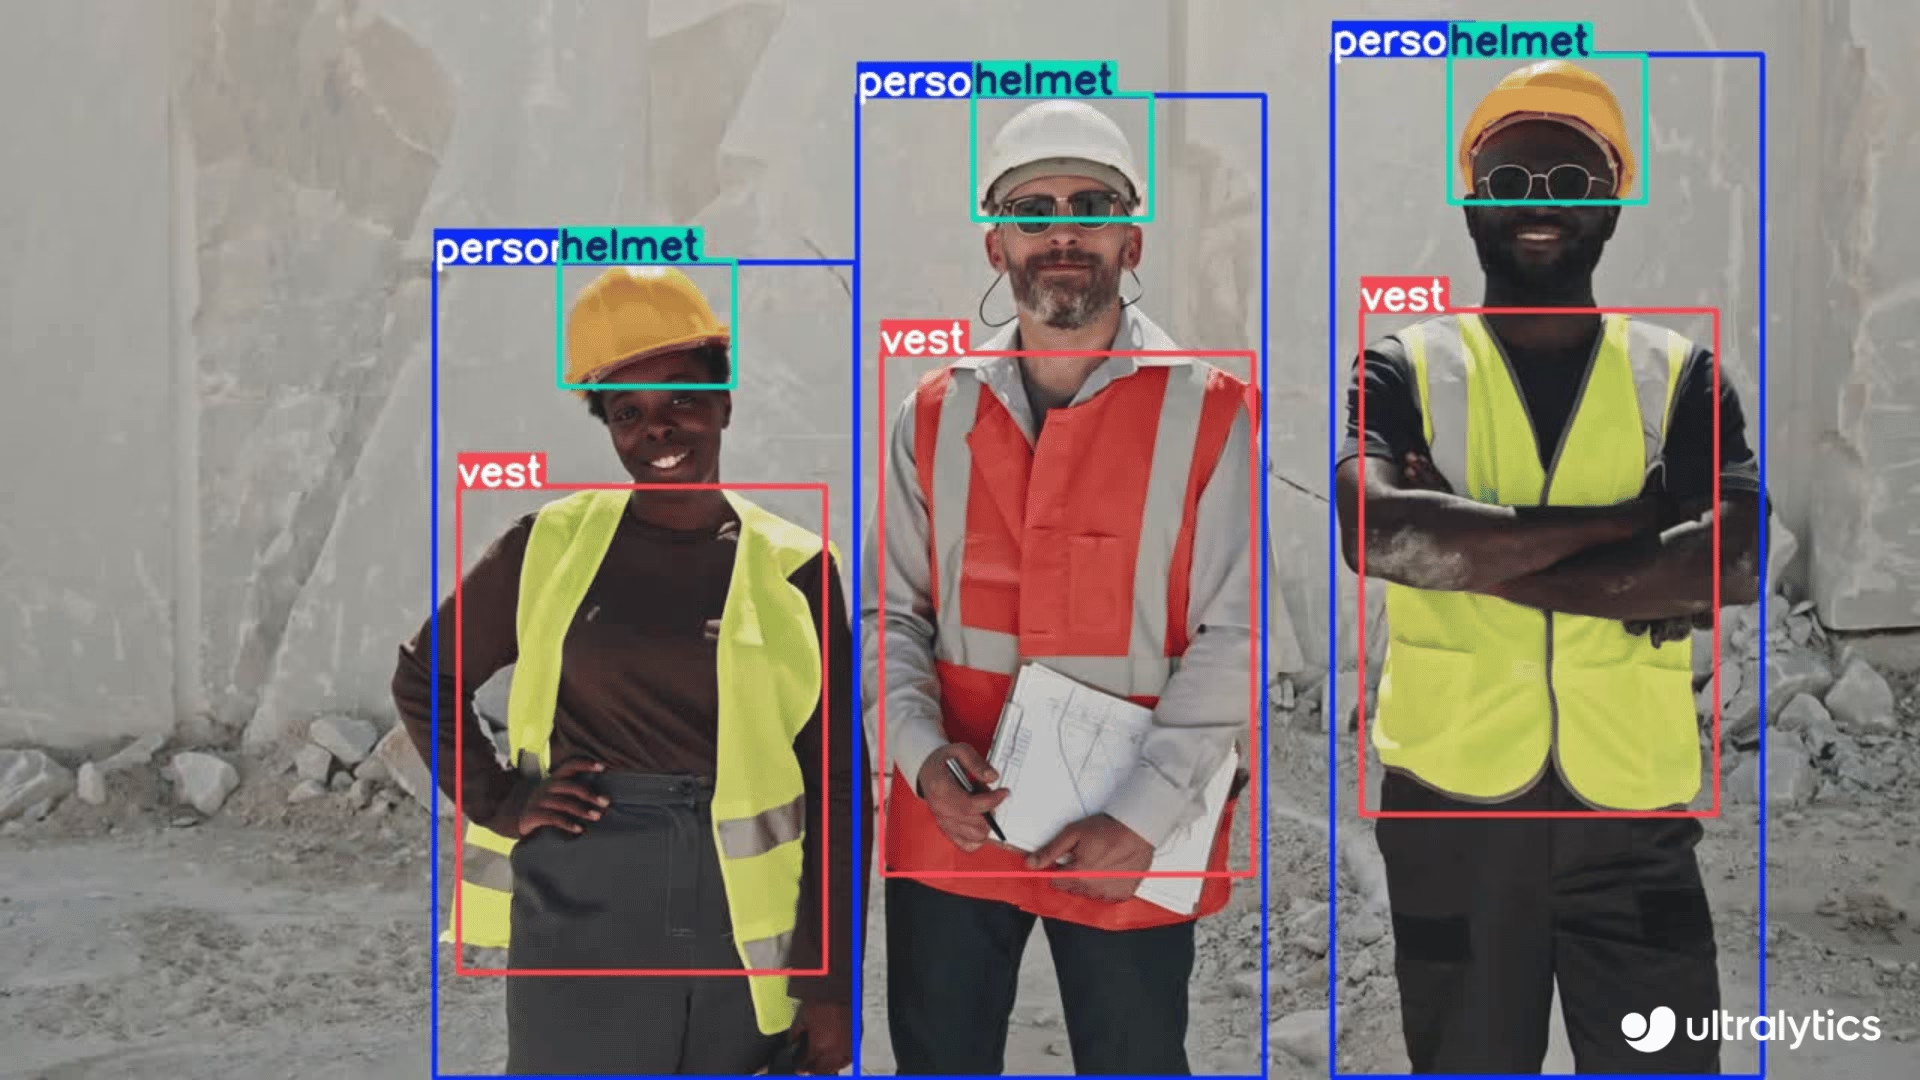
개인 보호 장비 감지: reCamera는 실시간으로 PPE 착용 규정 준수 여부를 감지하여 작업장 안전을 지원할 수 있습니다. 작업자가 헬멧, 장갑 또는 기타 안전 장비를 착용하고 있는지 식별하여 산업 환경의 위험을 줄이는 데 도움을 줍니다.
-
화재 감지: reCamera의 실시간 처리 기능은 산업 및 주거 지역의 화재 감지에 적합하며, 잠재적인 재난을 예방할 수 있도록 조기에 경고합니다.
-
폐기물 감지: 환경 모니터링 및 YOLO11을 활용한 폐기물 관리에서 폐기물 감지에도 사용할 수 있습니다.
-
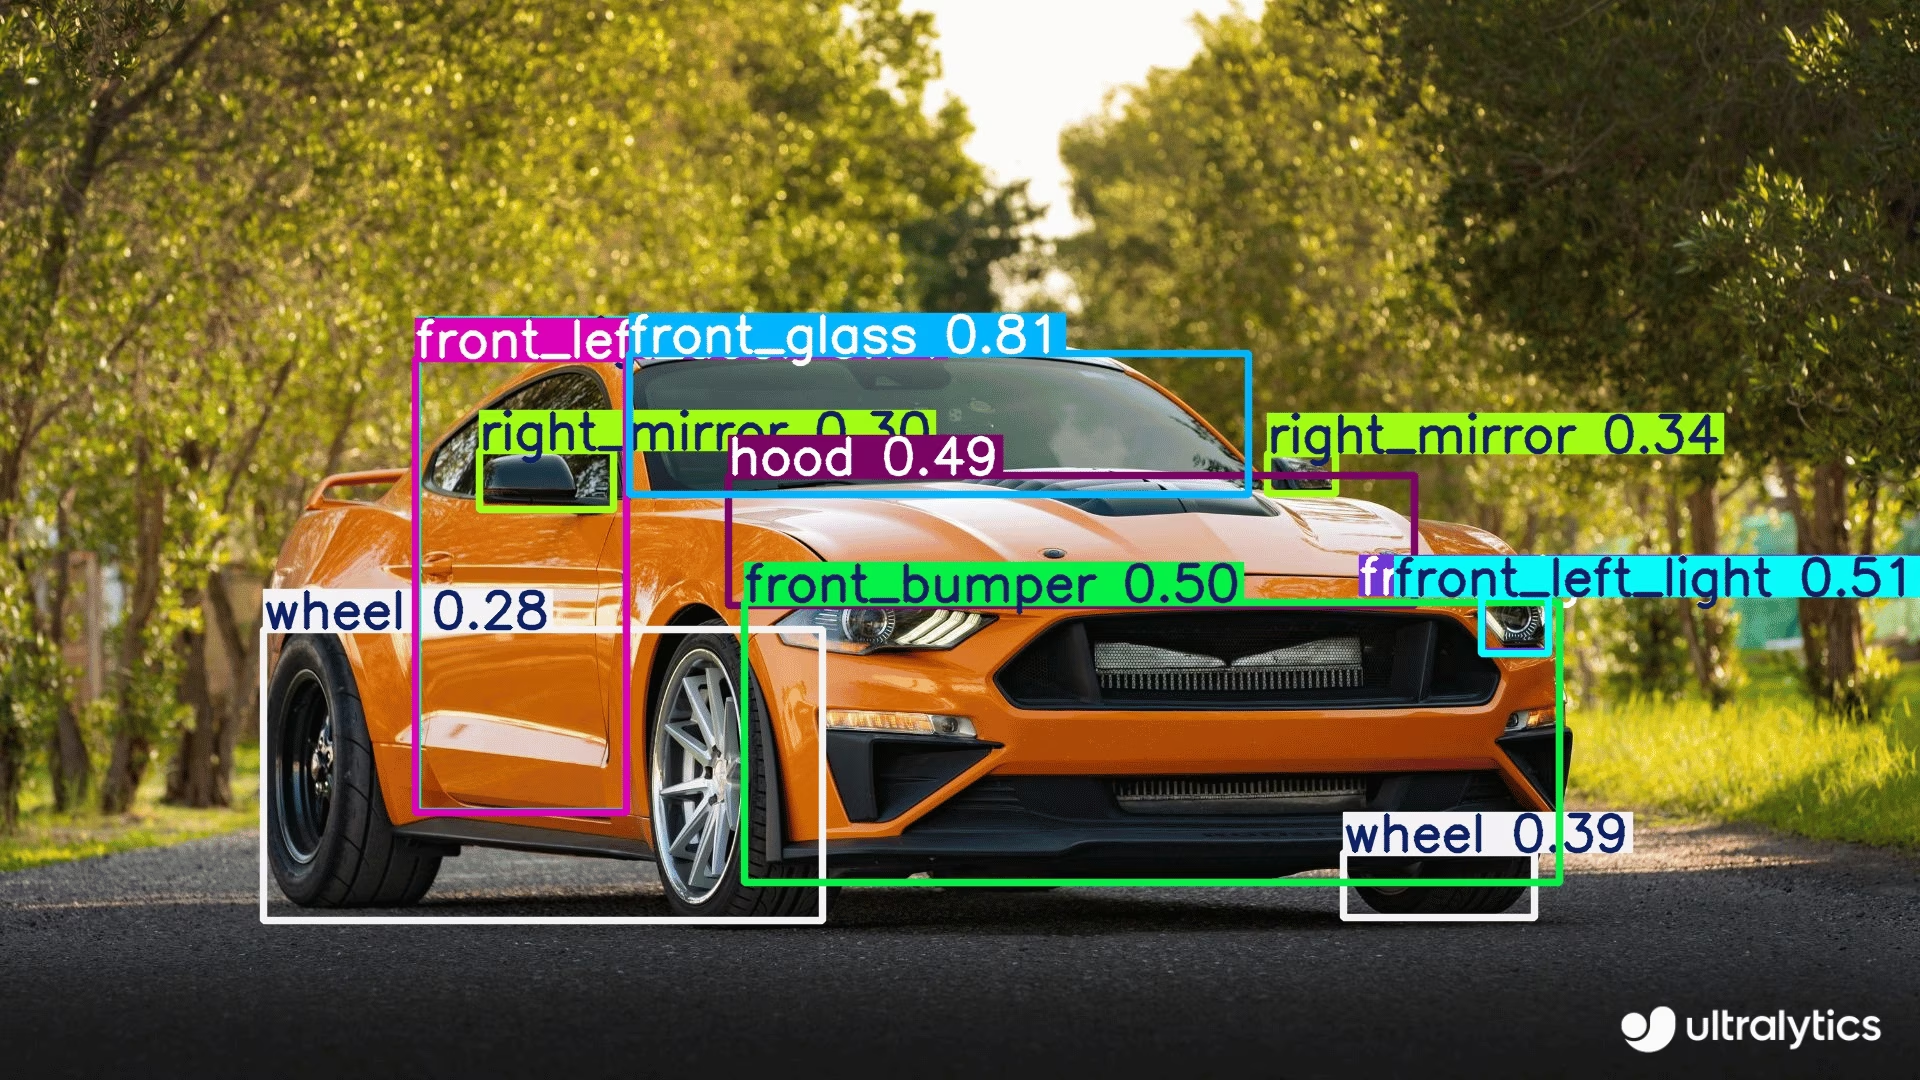
자동차 부품 감지: 제조 및 자동차 산업에서 품질 관리, 조립 라인 모니터링, 재고 관리를 위해 자동차 부품을 감지하고 분석하는 데 도움이 됩니다.
자주 묻는 질문#
reCamera를 처음 설정하려면 다음 단계를 따르세요.
- reCamera를 전원에 연결합니다.
- reCamera 시작하기 페이지에서 기기를 선택해 빠른 시작 가이드를 연 다음, 네트워크에 연결합니다.
- 웹 브라우저에 기기의 IP 주소를 입력해 Node-RED 웹 UI에 접속합니다(USB로 연결된 경우
192.168.42.1을 사용합니다). - 대시보드 인터페이스를 통해 사전 설치된 YOLO 모델을 즉시 사용하기 시작합니다
예, reCamera에서 직접 학습한 YOLO26 모델을 사용할 수 있습니다. 절차는 다음과 같습니다.
model.export(format="onnx", opset=14)을 사용해 PyTorch 모델을 ONNX 형식으로 내보냅니다.- ONNX 모델을 MLIR 형식으로 변환합니다.
- MLIR을 기기 내 추론용 cvimodel 형식으로 변환합니다.
- 변환한 모델을 reCamera에 로드합니다.
자세한 지침은 AI 모델 변환 및 양자화 가이드를 참조하세요.
처리를 위해 외부 하드웨어가 필요한 기존 IP 카메라와 달리 reCamera는 다음과 같은 특징이 있습니다.
- RISC-V SG200X 프로세서를 사용해 AI 처리를 기기 내에 직접 통합합니다.
- 실시간 엣지 AI 애플리케이션을 위해 1 TOPS의 연산 성능을 제공합니다.
- 구성 요소 업그레이드와 사용자 지정이 가능한 모듈형 설계를 갖추고 있습니다.
- H.264/H.265 압축, HDR 이미징 및 3D 노이즈 감소와 같은 고급 비디오 기술을 지원합니다.
- 즉시 사용할 수 있도록 Ultralytics YOLO 모델이 사전 설치되어 있습니다
이러한 기능 덕분에 reCamera는 추가 외부 처리 하드웨어 없이 엣지 AI 애플리케이션을 위한 독립형 솔루션으로 사용할 수 있습니다.


댓글50
질문을 하거나 결과를 공유하거나 다른 사람을 도와주세요.
tcpipchip
we wrote a book and trainned to yolo26 on ultralytics...i recall that works
 Glenn JocherUltralytics
Yes, a custom-trained
YOLO26model can run onreCamerausing theONNX -> MLIR -> cvimodelworkflow in the reCamera guide; if you hit a blocker, please share the exact step and full error here so the Ultralytics team can help.
HanJammer
This site mentions recamera comes with YOLO26 (which is why I bought two of them) yet YOLO11 is installed (which is visible on screenshots as well) and I can't load YOLO26 - how to do that? I can't find reliable guide :(
Ah nevermind, I think I got it, still it would be better not to advertise the camera "reCamera comes pre-installed with four Ultralytics YOLO26 models" which is basically not true.
I whipped out some 'single click' tool to convert YOLO26 onnx-es which makes it a bit easier... I need to test it a bit, for now it supports the base model. Perhaps I will push it to my github later this week.
This is fantastic.
When you finish it, i will add to the BOOK.
Here is the first version of the converter util (it's just GUI and few scripts over the actual workflow). For now it was tested with a base detection model under Windows. More to come.
https://github.com/HanJammer/reCamera_YOLO26
Video presentation here: https://youtu.be/XgPjyj2U8YQ
Here is the first version of the converter util (it's just GUI and few scripts over the actual workflow). For now it was tested with a base detection model under Windows. More to come.
https://github.com/HanJammer/reCamera_YOLO26
Video presentation here: https://youtu.be/XgPjyj2U8YQ
wow!!!!!!!!!!!!!!!!!!!!!!!!!!!!!!!!!!!!!!!!!!!!!!!!!!!!!!!
i will test soon!
- Glenn JocherUltralytics
Thanks for sharing this; for anyone testing, the supported path today is still the reCamera integration guide together with Seeed’s model conversion guide, and we’ll review the docs wording around preinstalled models since some devices appear to ship with YOLO11 rather than YOLO26.
@glenn-jocher Have you a recamera ?
- Glenn JocherUltralytics
I don’t personally keep a reCamera on my desk, but the workflow in the Seeed Studio reCamera guide is the supported path; if you have a specific setup or export question, please drop it here and the Ultralytics team can take a look.
I tested on recamera with my trainned pose keypoint model... Same problem...no keypoint
Need to test on yolo8 on tdl sdk
- Glenn JocherUltralytics
Thanks for checking this; for custom pose models on reCamera, please drop the exact export and conversion steps here in the discussion so the Ultralytics team can take a look, since keypoints should work only after a correct
ONNX -> MLIR -> cvimodelpipeline as outlined in the reCamera guide and Seeed’s conversion guide, and it’s worth first confirming your exportedONNXmodel still produces keypoints before converting.
did you do calibration ? where the images to me to the calibration :(
- Glenn JocherUltralytics
Calibration isn’t done in the Ultralytics export step; for reCamera, you export to ONNX first with the reCamera guide, then calibration happens during Seeed’s ONNX→MLIR→
cvimodelflow using a small representative set of your own images, as described in Seeed’s Convert and Quantize AI Models guide. If you hit an error in that step, please drop the full log here and we’ll take a look.
still waiting...
send me your cvimodel too...yolo11 and yolo8
please, send me arguments used in your scripts...
did you train keypoints on animals and persons, right ?
tiruvijayakumar
NOO, i didnt train on animals, i trained on these classes for pose detection for persons using yolov11n-pose.pt weights. I fine‑tuned the YOLOv11n‑pose.pt model on my custom classes:
Running Walking Golf Skate Horse riding Kicking Diving I just uploaded animal detection model to justify that custom model deployment with quantization for object detection(yolo11n.pt) on recamera has no issues, it was another cvi model which i had no issues, it worked PERFECTLY. i only issue what i am facing is the pose detection quantized model where i am not able to see the keypoints on the inference output but bounding box is drawn along with predicted class label refer below:
now just trying to train the model for pose detection using yolov8 and then i would try quantizing the model and check if the keypoints are shown in the inference output
- Glenn JocherUltralytics
Thanks, that helps narrow it down — since detection
cvimodels work and only the quantized pose model loses keypoints, this looks more like a pose conversion or postprocessing issue in the ONNX → MLIR →cvimodelstep than a training problem. Please keep the details here so the Ultralytics team can see them, and share the exact conversion commands and full text logs from the reCamera guide and Seeed model conversion guide, plus whether the same pre-quantized ONNX shows keypoints before conversion. i ran predictions on ultralytics hub on the .pt model format, i attached the whole problem scenario and image content :https://github.com/orgs/ultralytics/discussions/22090?sort=new#discussioncomment-16346206 Any ways uploading the prediction on ultralytics hub in this thread also :
so on the model.pt file inference shows this data, this confirms that pose estimation model works. { "images": [ { "shape": [ 426, 640 ], "speed": { "preprocess": 1.41517, "inference": 130.14456, "postprocess": 0.99221 }, "results": [ { "name": "Kicking", "class": 5, "confidence": 0.80929, "box": { "x1": 0.26068, "y1": 0.10738, "x2": 0.55882, "y2": 0.85426 }, "keypoints": { "x": [ 0.41923001408576965, 0.42656999826431274, 0.4166699945926666, 0.45181000232696533, 0.42857998609542847, 0.488209992647171, 0.43380001187324524, 0.543470025062561, 0.41604000329971313, 0.5516700148582458, 0.4164600074291229, 0.46198999881744385, 0.4427199959754944, 0.357340008020401, 0.427839994430542, 0.29197001457214355, 0.43891000747680664 ], "y": [ 0.2315099984407425, 0.21907000243663788, 0.21740999817848206, 0.21602000296115875, 0.21322999894618988, 0.2783600091934204, 0.2824600040912628, 0.3255299925804138, 0.35097000002861023, 0.32879000902175903, 0.3619599938392639, 0.5179499983787537, 0.5104399919509888, 0.6517800092697144, 0.6389099955558777, 0.7586100101470947, 0.7324900031089783 ], "visible": [ 0.9994300007820129, 0.9990299940109253, 0.9990000128746033, 0.999019980430603, 0.9988300204277039, 0.9995700120925903, 0.9996600151062012, 0.998960018157959, 0.9992700219154358, 0.9985499978065491, 0.997439980506897, 0.9995700120925903, 0.9995700120925903, 0.9988800287246704, 0.9989299774169922, 0.982990026473999, 0.9852499961853027 ] } } ] } ], "metadata": { "imageCount": 1, "functionTimeAlive": 78321.917, "functionTimeCall": 0.138, "model": "best.pt", "version": { "ultralytics": "8.4.30", "torch": "2.11.0+cpu", "torchvision": "0.26.0+cpu", "python": "3.14.3" } }, "networkTime": 1.214 }
I didnt capture the conversion commands and text logs during the onnx->mlir->cvimodel, would repeat the same steps and paste the images in this thread itself.
Exported the yolov11n-pose.pt(finetuned) on google colab to onnx format
Uploaded the model on netron to view the structure, onnx is in the format IRv9 ,opset v20(would downgrade it). Classes are running, walking, golf-swing, skateboarding, riding-horse and kicking
Seeed studio guide for downgrading
Initial structure of workspace folder
Step1: pull sopho/tpuc_dev:v3.1
Step2: starting the container
Step3: installing onnx
Step4: Clone Downgrade Script
Step5: Downgrade Script settings IR v8 and Opset v17
Step6: Install TPU-MLIR tools inside container:
Step7: clone tpu-mlir
Step8: setup environment tpu-mlir(long step)
Step9: according to seeed studio guide, i have to include outputs before the model's head as the parameter for this particular step model_transform
--model_name yolo11n
--model_def yolo11n.onnx
--input_shapes "[[1,3,640,640]]"
--mean "0.0,0.0,0.0"
--scale "0.0039216,0.0039216,0.0039216"
--keep_aspect_ratio
--pixel_format rgb
--output_names "/model.23/cv2.0/cv2.0.2/Conv_output_0,/model.23/cv3.0/cv3.0.2/Conv_output_0,/model.23/cv2.1/cv2.1.2/Conv_output_0,/model.23/cv3.1/cv3.1.2/Conv_output_0,/model.23/cv2.2/cv2.2.2/Conv_output_0,/model.23/cv3.2/cv3.2.2/Conv_output_0"
--test_input ../image/dog.jpg
--test_result yolo11n_top_outputs.npz
--mlir yolo11n.mlir i have the onnx file, could someone of the team help me identify the outputs before the model's head? @glenn-jocher here is the onnx file https://drive.google.com/file/d/1UF25DK2zXx0GCWdcx55SPYHL71SylDeg/view?usp=sharing
and some animal pictures...