Link to this sectionROS (Robot Operating System) 快速入门指南#
本指南将向你展示如何将 Ultralytics YOLO 与 ROS1 (rospy) 或 ROS2 (rclpy) 集成,以便在 RGB 图像、深度图像和点云上运行实时 object detection 和 segmentation。
跳转至 设置 YOLO 与 ROS 的连接,然后使用 RGB 图像、深度图像 或 点云 进行操作。
ROS Introduction (captioned) from Open Robotics on Vimeo.
Link to this section什么是 ROS?#
Robot Operating System (ROS) 是一个在机器人研究和工业界广泛使用的开源框架。ROS 提供了一系列库和工具,旨在帮助开发者创建机器人应用程序。ROS 旨在与各种机器人平台协同工作,使其成为机器人专家手中灵活且强大的工具。
Link to this sectionROS 的主要功能#
-
模块化架构:ROS 具有模块化架构,允许开发者通过组合称为节点的小型、可重用组件来构建复杂的系统。每个节点通常执行特定功能,节点之间通过主题或服务使用消息进行通信。
-
通信中间件:ROS 提供了强大的通信基础设施,支持进程间通信和分布式计算。这是通过用于数据流(主题)的发布-订阅模型和用于服务调用的请求-回复模型实现的。
-
硬件抽象:ROS 在硬件之上提供了一层抽象,使开发者能够编写与设备无关的代码。这允许同一代码用于不同的硬件设置,从而促进了更轻松的集成和实验。
-
工具和实用程序:ROS 附带了一套丰富的工具和实用程序,用于可视化、调试和仿真。例如,RViz 用于可视化传感器数据和机器人状态信息,而 Gazebo 则为测试算法和机器人设计提供了强大的仿真环境。
-
广泛的生态系统:ROS 生态系统庞大且不断增长,有大量软件包可用于不同的机器人应用,包括导航、操作、感知等。社区积极参与这些软件包的开发和维护。
ROS 版本演进
自 2007 年开发以来,ROS 经历了 multiple versions 的演变,分为 ROS 1 和 ROS 2。下方现有的示例使用 ROS1 Noetic;Using ROS2 中的紧凑型适配器展示了适用于当前 ROS2 版本的相应 rclpy 接口。
Link to this sectionROS 1 与 ROS 2#
虽然 ROS 1 为机器人开发奠定了坚实的基础,但 ROS 2 通过提供以下功能解决了其缺陷:
- 实时性能:改进了对实时系统和确定性行为的支持。
- 安全性:增强了安全功能,可在各种环境中实现安全可靠的操作。
- 可扩展性:更好地支持多机器人系统和大规模部署。
- 跨平台支持:扩展了与 Linux 以外的各种操作系统的兼容性,包括 Windows 和 macOS。
- 灵活的通信:使用 DDS 以实现更灵活、更高效的进程间通信。
Link to this sectionROS 消息和主题#
在 ROS 中,节点之间的通信通过消息和主题来实现。消息是一种数据结构,定义了节点之间交换的信息;而主题是一个命名通道,通过它发送和接收消息。节点可以向主题发布消息或从主题订阅消息,从而实现相互通信。这种发布-订阅模型允许异步通信和节点间的解耦。机器人系统中的每个传感器或执行器通常都会向主题发布数据,然后其他节点可以消费这些数据进行处理或控制。在本指南中,我们将重点介绍 Image、Depth 和 PointCloud 消息以及相机主题。
Link to this section设置 Ultralytics YOLO 与 ROS#
ROS1 示例是使用 this ROS environment 进行测试的,它是 ROSbot ROS repository 的一个分支。在 ROS2 中应用相同的 YOLO 和 NumPy 处理方式;仅节点生命周期和消息转换有所不同。
Link to this section依赖项安装#
除了 ROS 环境外,你还需要安装以下依赖项:
-
ROS NumPy 包:这是在 ROS Image 消息和 NumPy 数组之间进行快速转换所必需的。
pip install ros_numpy -
Ultralytics 包:
pip install ultralytics
Link to this section使用 ROS2#
ROS2 replaces rospy with rclpy and ros_numpy image conversion with cv_bridge. The following node is the complete ROS2 equivalent of the RGB detection flow below; instantiate models once and reuse them across callbacks.
import cv_bridge
import rclpy
from rclpy.node import Node
from rclpy.qos import qos_profile_sensor_data
from sensor_msgs.msg import Image

from ultralytics import YOLO

class UltralyticsNode(Node):
    """Run YOLO detection on ROS2 image messages."""

    def __init__(self):
        super().__init__("ultralytics")
        self.bridge = cv_bridge.CvBridge()
        self.model = YOLO("yolo26m.pt")
        self.publisher = self.create_publisher(Image, "/ultralytics/detection/image", 5)
        self.create_subscription(Image, "/camera/color/image_raw", self.callback, qos_profile_sensor_data)

    def callback(self, message):
        """Publish the annotated camera frame."""
        image = self.bridge.imgmsg_to_cv2(message, desired_encoding="bgr8")
        annotated = self.model(image)[0].plot(show=False)
        self.publisher.publish(self.bridge.cv2_to_imgmsg(annotated, encoding="bgr8"))

def main(args=None):
    """Start the ROS2 node."""
    rclpy.init(args=args)
    node = UltralyticsNode()
    rclpy.spin(node)
    node.destroy_node()
    rclpy.shutdown()

if __name__ == "__main__":
    main()
对于深度图像,请复用下方的深度处理代码,仅需替换消息获取和转换部分:
self.create_subscription(Image, "/camera/color/image_raw", self.rgb_callback, qos_profile_sensor_data)
self.create_subscription(Image, "/camera/depth/image_raw", self.depth_callback, qos_profile_sensor_data)

def rgb_callback(self, message):
    self.rgb_image = self.bridge.imgmsg_to_cv2(message, desired_encoding="bgr8")

def depth_callback(self, message):
    depth_image = self.bridge.imgmsg_to_cv2(message, desired_encoding="passthrough")
    # Apply the NumPy mask and distance calculation from the depth example below.
对于点云,ROS2 提供了 sensor_msgs_py.point_cloud2;只需转换一次有序点云,然后复用下方的 NumPy 分割和 3D 映射即可:
from sensor_msgs_py import point_cloud2

points = point_cloud2.read_points_numpy(message, field_names=("x", "y", "z", "rgb"))
points = points.reshape(message.height, message.width, 4)
Link to this section使用 Ultralytics 与 ROS sensor_msgs/Image#
sensor_msgs/Image 消息类型在 ROS 中通常用于表示图像数据。它包含编码、高度、宽度和像素数据字段,因此适合传输由相机或其他传感器捕获的图像。图像消息广泛用于机器人应用中,用于视觉感知、目标检测和导航等任务。
Link to this section图像分步使用指南#
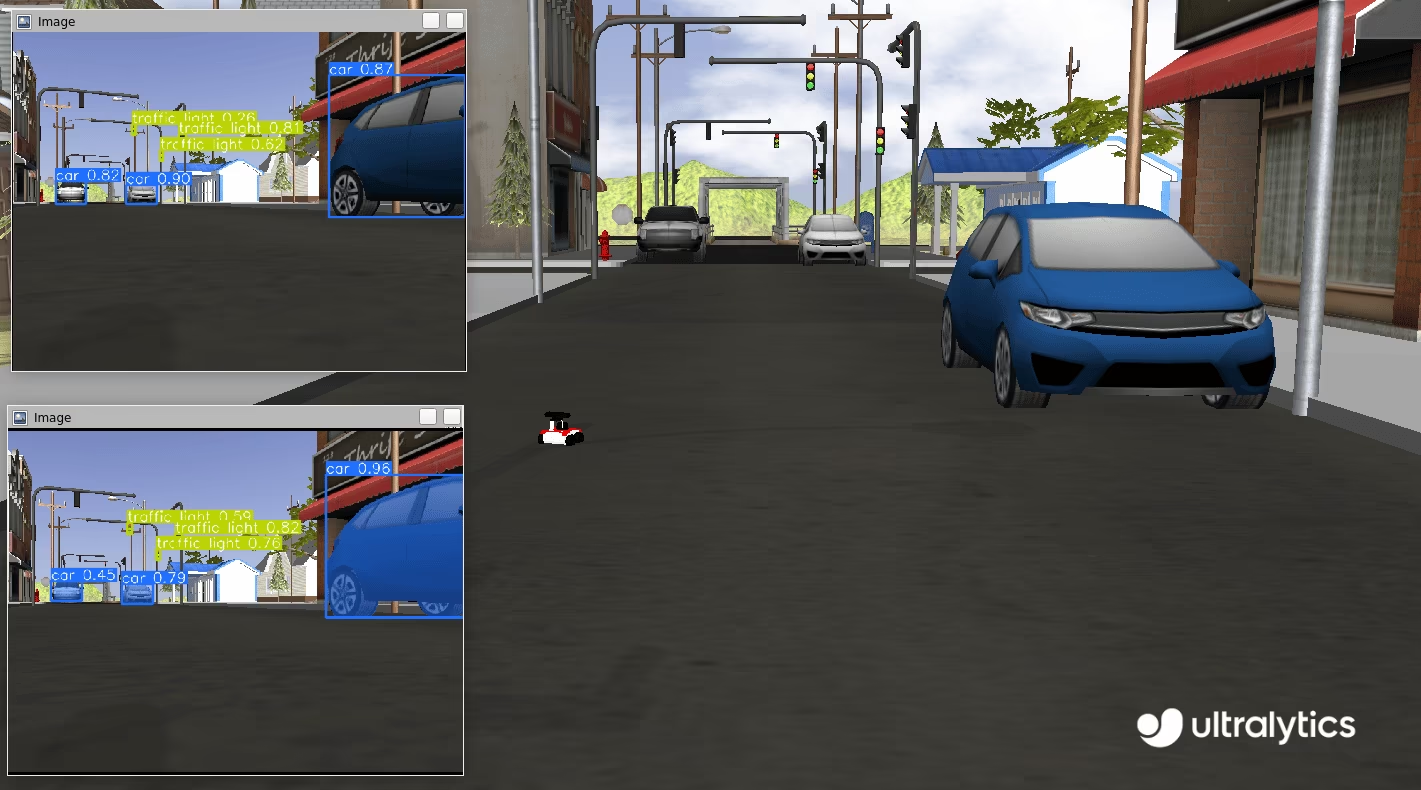
以下代码片段演示了如何将 Ultralytics YOLO 包与 ROS 一起使用。在此示例中,我们订阅一个相机主题,使用 YOLO 处理传入的图像,并将检测到的对象发布到用于检测和分割的新主题中。
首先,导入必要的库并实例化两个模型:一个用于分割,另一个用于检测。初始化一个 ROS 节点(名称为 ultralytics)以启用与 ROS 主节点的通信。为了确保连接稳定,我们加入了一个简短的暂停,让节点有足够的时间在继续之前建立连接。
import time

import rospy

from ultralytics import YOLO

detection_model = YOLO("yolo26m.pt")
segmentation_model = YOLO("yolo26m-seg.pt")
rospy.init_node("ultralytics")
time.sleep(1)
初始化两个 ROS 主题:一个用于检测,一个用于分割。这些主题将用于发布标注后的图像,使其可供进一步处理。节点之间的通信使用 sensor_msgs/Image 消息完成。
from sensor_msgs.msg import Image

det_image_pub = rospy.Publisher("/ultralytics/detection/image", Image, queue_size=5)
seg_image_pub = rospy.Publisher("/ultralytics/segmentation/image", Image, queue_size=5)
最后,创建一个订阅者,监听 /camera/color/image_raw 主题上的消息,并为每条新消息调用一个回调函数。此回调函数接收 sensor_msgs/Image 类型的消息,使用 ros_numpy 将其转换为 NumPy 数组,使用之前实例化的 YOLO 模型处理图像,标注图像,然后将它们发布回各自的主题:/ultralytics/detection/image(用于检测)和 /ultralytics/segmentation/image(用于分割)。
import ros_numpy

def callback(data):
    """Callback function to process image and publish annotated images."""
    array = ros_numpy.numpify(data)
    if det_image_pub.get_num_connections():
        det_result = detection_model(array)
        det_annotated = det_result[0].plot(show=False)
        det_image_pub.publish(ros_numpy.msgify(Image, det_annotated, encoding="rgb8"))

    if seg_image_pub.get_num_connections():
        seg_result = segmentation_model(array)
        seg_annotated = seg_result[0].plot(show=False)
        seg_image_pub.publish(ros_numpy.msgify(Image, seg_annotated, encoding="rgb8"))

rospy.Subscriber("/camera/color/image_raw", Image, callback)

while True:
    rospy.spin()
完整代码
import time

import ros_numpy
import rospy
from sensor_msgs.msg import Image

from ultralytics import YOLO

detection_model = YOLO("yolo26m.pt")
segmentation_model = YOLO("yolo26m-seg.pt")
rospy.init_node("ultralytics")
time.sleep(1)

det_image_pub = rospy.Publisher("/ultralytics/detection/image", Image, queue_size=5)
seg_image_pub = rospy.Publisher("/ultralytics/segmentation/image", Image, queue_size=5)

def callback(data):
    """Callback function to process image and publish annotated images."""
    array = ros_numpy.numpify(data)
    if det_image_pub.get_num_connections():
        det_result = detection_model(array)
        det_annotated = det_result[0].plot(show=False)
        det_image_pub.publish(ros_numpy.msgify(Image, det_annotated, encoding="rgb8"))

    if seg_image_pub.get_num_connections():
        seg_result = segmentation_model(array)
        seg_annotated = seg_result[0].plot(show=False)
        seg_image_pub.publish(ros_numpy.msgify(Image, seg_annotated, encoding="rgb8"))

rospy.Subscriber("/camera/color/image_raw", Image, callback)

while True:
    rospy.spin()
调试
由于系统的分布式特性,调试 ROS (Robot Operating System) 节点可能具有挑战性。一些工具可以协助此过程:
rostopic echo <TOPIC-NAME>:此命令允许你查看发布在特定主题上的消息,帮助你检查数据流。rostopic list:使用此命令列出 ROS 系统中所有可用的主题,让你概览活动的数据流。rqt_graph:此可视化工具显示节点之间的通信图,提供有关节点如何互连以及它们如何交互的见解。- 对于更复杂的视觉效果(例如 3D 表示),你可以使用 RViz。RViz (ROS Visualization) 是一个功能强大的 ROS 3D 可视化工具。它允许你实时可视化机器人及其环境的状态。使用 RViz,你可以查看传感器数据(例如
sensor_msgs/Image)、机器人模型状态以及各种其他类型的信息,从而更轻松地调试和理解你的机器人系统的行为。
Link to this section使用 std_msgs/String 发布检测到的类别#
标准 ROS 消息还包括 std_msgs/String 消息。在许多应用中,不需要重新发布整个标注图像;相反,只需要机器人视野中存在的类别。以下示例演示了如何使用 std_msgs/String 消息在 /ultralytics/detection/classes 主题上重新发布检测到的类别。这些消息更轻量级并提供基本信息,因此对各种应用都非常有价值。
Link to this section用例示例#
考虑一个配备相机和对象检测模型的仓库机器人。机器人不必通过网络发送大型标注图像,而是可以将检测到的类别列表作为 std_msgs/String 消息发布。例如,当机器人检测到“盒子”、“托盘”和“叉车”等对象时,它会将这些类别发布到 /ultralytics/detection/classes 主题。此信息随后可被中央监控系统用于实时跟踪库存、优化机器人的路径规划以避开障碍物,或触发特定的操作(如捡起检测到的盒子)。这种方法减少了通信所需的带宽,并专注于传输关键数据。
Link to this section字符串分步使用指南#
This example demonstrates how to use the Ultralytics YOLO package with ROS. In this example, we subscribe to a camera topic, process the incoming image using YOLO, and publish the detected objects to new topic /ultralytics/detection/classes using std_msgs/String messages. The ros_numpy package is used to convert the ROS Image message to a NumPy array for processing with YOLO.
import time

import ros_numpy
import rospy
from sensor_msgs.msg import Image
from std_msgs.msg import String

from ultralytics import YOLO

detection_model = YOLO("yolo26m.pt")
rospy.init_node("ultralytics")
time.sleep(1)
classes_pub = rospy.Publisher("/ultralytics/detection/classes", String, queue_size=5)

def callback(data):
    """Callback function to process image and publish detected classes."""
    array = ros_numpy.numpify(data)
    if classes_pub.get_num_connections():
        det_result = detection_model(array)
        classes = det_result[0].boxes.cls.cpu().numpy().astype(int)
        names = [det_result[0].names[i] for i in classes]
        classes_pub.publish(String(data=str(names)))

rospy.Subscriber("/camera/color/image_raw", Image, callback)
while True:
    rospy.spin()
Link to this section将 Ultralytics 与 ROS 深度图像一起使用#
除了 RGB 图像外,ROS 还支持深度图像,它提供了关于对象与相机距离的信息。深度图像对于避障、3D 映射和定位等机器人应用至关重要。
深度图像是每个像素表示从相机到对象的距离的图像。与捕获颜色的 RGB 图像不同,深度图像捕获空间信息,使机器人能够感知其环境的 3D 结构。
可以使用各种传感器获取深度图像:
- 立体相机:使用两个相机根据图像视差计算深度。
- 飞行时间 (ToF) 相机:测量光从物体返回所需的时间。
- 结构光传感器:投影图案并测量其在表面上的变形。
Link to this section将 YOLO 与深度图像一起使用#
在 ROS 中,深度图像由 sensor_msgs/Image 消息类型表示,该类型包含编码、高度、宽度和像素数据字段。深度图像的编码字段通常使用诸如 "16UC1" 之类的格式,表示每个像素 16 位无符号整数,其中每个值表示到对象的距离。深度图像通常与 RGB 图像结合使用,以提供更全面的环境视图。
使用 YOLO,可以提取并结合 RGB 和深度图像中的信息。例如,YOLO 可以检测 RGB 图像中的对象,并且此检测可用于精确定位深度图像中的相应区域。这允许提取检测到的对象的精确深度信息,从而增强机器人理解其三维环境的能力。
处理深度图像时,必须确保 RGB 和深度图像正确对齐。Intel RealSense 系列等 RGB-D 相机提供同步的 RGB 和深度图像,从而更容易结合来自这两个来源的信息。如果使用单独的 RGB 和深度相机,则必须对它们进行校准以确保准确对齐。
Link to this section深度分步使用指南#
在此示例中,我们使用 YOLO 分割图像,并应用提取的掩码来分割深度图像中的对象。这使我们能够确定感兴趣对象的每个像素距相机焦点中心的距离。通过获得此距离信息,我们可以计算相机与场景中特定对象之间的距离。首先导入必要的库,创建一个 ROS 节点,并实例化一个分割模型和一个 ROS 主题。
import time

import rospy
from std_msgs.msg import String

from ultralytics import YOLO

rospy.init_node("ultralytics")
time.sleep(1)

segmentation_model = YOLO("yolo26m-seg.pt")

classes_pub = rospy.Publisher("/ultralytics/detection/distance", String, queue_size=5)
接下来,定义一个处理传入深度图像消息的回调函数。该函数等待深度图像和 RGB 图像消息,将它们转换为 NumPy 数组,并将分割模型应用于 RGB 图像。然后,它提取每个检测到的对象的分割掩码,并使用深度图像计算对象距相机的平均距离。大多数传感器都有一个最大距离(称为裁剪距离),超过该距离的值表示为 inf (np.inf)。在处理之前,重要的是过滤掉这些空值并为其分配 0 的值。最后,它将检测到的对象及其平均距离发布到 /ultralytics/detection/distance 主题。
import numpy as np
import ros_numpy
from sensor_msgs.msg import Image

def callback(data):
    """Callback function to process depth image and RGB image."""
    image = rospy.wait_for_message("/camera/color/image_raw", Image)
    image = ros_numpy.numpify(image)
    depth = ros_numpy.numpify(data)
    result = segmentation_model(image)

    all_objects = []
    for index, cls in enumerate(result[0].boxes.cls):
        class_index = int(cls.cpu().numpy())
        name = result[0].names[class_index]
        mask = result[0].masks.data.cpu().numpy()[index, :, :].astype(int)
        obj = depth[mask == 1]
        obj = obj[~np.isnan(obj)]
        avg_distance = np.mean(obj) if len(obj) else np.inf
        all_objects.append(f"{name}: {avg_distance:.2f}m")

    classes_pub.publish(String(data=str(all_objects)))

rospy.Subscriber("/camera/depth/image_raw", Image, callback)

while True:
    rospy.spin()
完整代码
import time

import numpy as np
import ros_numpy
import rospy
from sensor_msgs.msg import Image
from std_msgs.msg import String

from ultralytics import YOLO

rospy.init_node("ultralytics")
time.sleep(1)

segmentation_model = YOLO("yolo26m-seg.pt")

classes_pub = rospy.Publisher("/ultralytics/detection/distance", String, queue_size=5)

def callback(data):
    """Callback function to process depth image and RGB image."""
    image = rospy.wait_for_message("/camera/color/image_raw", Image)
    image = ros_numpy.numpify(image)
    depth = ros_numpy.numpify(data)
    result = segmentation_model(image)

    all_objects = []
    for index, cls in enumerate(result[0].boxes.cls):
        class_index = int(cls.cpu().numpy())
        name = result[0].names[class_index]
        mask = result[0].masks.data.cpu().numpy()[index, :, :].astype(int)
        obj = depth[mask == 1]
        obj = obj[~np.isnan(obj)]
        avg_distance = np.mean(obj) if len(obj) else np.inf
        all_objects.append(f"{name}: {avg_distance:.2f}m")

    classes_pub.publish(String(data=str(all_objects)))

rospy.Subscriber("/camera/depth/image_raw", Image, callback)

while True:
    rospy.spin()
Link to this section将 Ultralytics 与 ROS sensor_msgs/PointCloud2 一起使用#
sensor_msgs/PointCloud2 消息类型是一种用于在 ROS 中表示 3D 点云数据的结构。此消息类型是机器人应用不可或缺的一部分,可实现 3D 映射、对象识别和定位等任务。
点云是在三维坐标系中定义的一组数据点。这些数据点表示通过 3D 扫描技术捕获的对象或场景的外部表面。云中的每个点都有 X、Y 和 Z 坐标,这些坐标对应于它在空间中的位置,并且还可以包含附加信息,例如颜色和强度。
处理 sensor_msgs/PointCloud2 时,必须考虑获取点云数据的传感器的参考系。点云最初是在传感器的参考系中捕获的。你可以通过监听 /tf_static 主题来确定此参考系。但是,根据你的特定应用需求,你可能需要将点云转换为另一个参考系。此转换可以使用 tf2_ros 包完成,该包提供了用于管理坐标系和在坐标系之间转换数据的工具。
可以使用各种传感器获取点云:
- LIDAR(激光雷达):使用激光脉冲测量到物体的距离并创建高精度的 3D 地图。
- 深度相机:捕获每个像素的深度信息,允许进行场景的 3D 重建。
- 立体相机:利用两个或多个相机通过三角测量获取深度信息。
- 结构光扫描仪:将已知图案投影到表面上并测量变形以计算深度。
Link to this section将 YOLO 与点云一起使用#
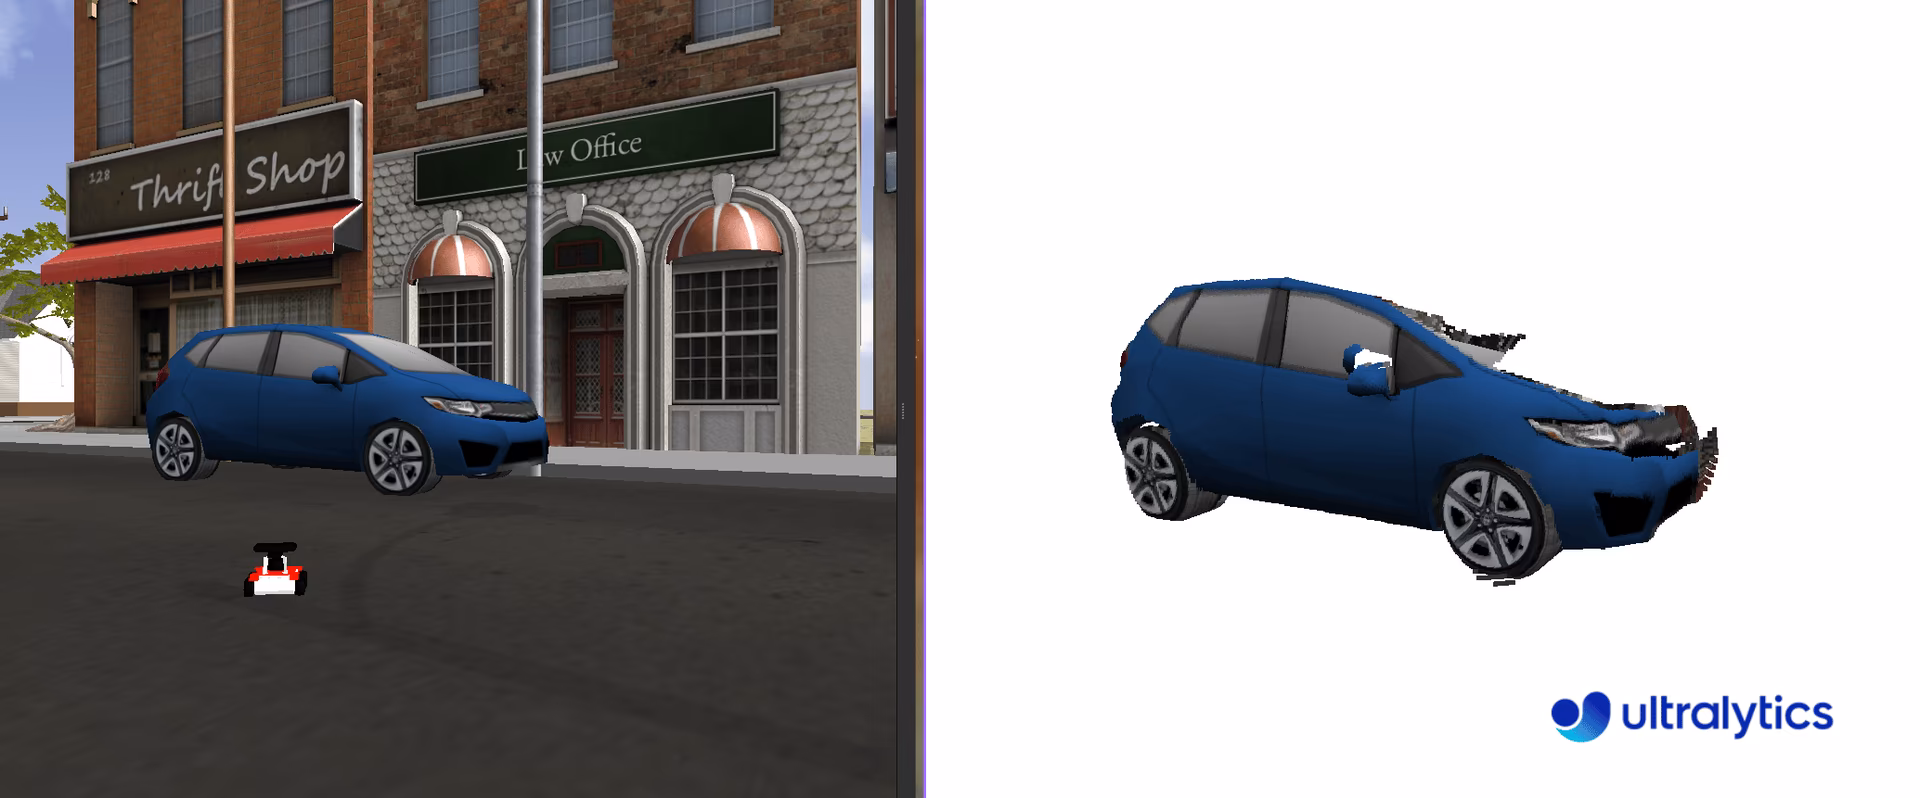
为了将 YOLO 与 sensor_msgs/PointCloud2 类型消息集成,我们可以采用类似于深度图的方法。通过利用嵌入在点云中的颜色信息,我们可以提取 2D 图像,使用 YOLO 对此图像执行分割,然后将生成的掩码应用于三维点以隔离感兴趣的 3D 对象。
对于处理点云,我们建议使用 Open3D (pip install open3d),这是一个用户友好的 Python 库。Open3D 提供了用于管理点云数据结构、可视化它们以及无缝执行复杂操作的强大工具。该库可以显著简化流程,并增强我们在基于 YOLO 的分割中操作和分析点云的能力。
Link to this section点云分步使用指南#
导入必要的库并实例化用于分割的 YOLO 模型。
import time

import rospy

from ultralytics import YOLO

rospy.init_node("ultralytics")
time.sleep(1)
segmentation_model = YOLO("yolo26m-seg.pt")
Create a function pointcloud2_to_array, which transforms a sensor_msgs/PointCloud2 message into two NumPy arrays. The sensor_msgs/PointCloud2 messages contain n points based on the width and height of the acquired image. For instance, a 480 x 640 image will have 307,200 points. Each point includes three spatial coordinates (xyz) and the corresponding color in RGB format. These can be considered as two separate channels of information.
The function returns the xyz coordinates and RGB values in the format of the original camera resolution (width x height). Most sensors have a maximum distance, known as the clip distance, beyond which values are represented as inf (np.inf). Before processing, it is important to filter out these null values and assign them a value of 0.
import numpy as np
import ros_numpy

def pointcloud2_to_array(pointcloud2: PointCloud2) -> tuple:
    """Convert a ROS PointCloud2 message to a numpy array.

    Args:
        pointcloud2 (PointCloud2): the PointCloud2 message

    Returns:
        (tuple): tuple containing (xyz, rgb)
    """
    pc_array = ros_numpy.point_cloud2.pointcloud2_to_array(pointcloud2)
    split = ros_numpy.point_cloud2.split_rgb_field(pc_array)
    rgb = np.stack([split["b"], split["g"], split["r"]], axis=2)
    xyz = ros_numpy.point_cloud2.get_xyz_points(pc_array, remove_nans=False)
    xyz = np.array(xyz).reshape((pointcloud2.height, pointcloud2.width, 3))
    nan_rows = np.isnan(xyz).all(axis=2)
    xyz[nan_rows] = [0, 0, 0]
    rgb[nan_rows] = [0, 0, 0]
    return xyz, rgb
接下来,订阅 /camera/depth/points 主题以接收点云消息,并将 sensor_msgs/PointCloud2 消息转换为包含 XYZ 坐标和 RGB 值的 NumPy 数组(使用 pointcloud2_to_array 函数)。使用 YOLO 模型处理 RGB 图像以提取分割后的对象。对于每个检测到的对象,提取分割掩码并将其应用于 RGB 图像和 XYZ 坐标,以便在 3D 空间中隔离该对象。
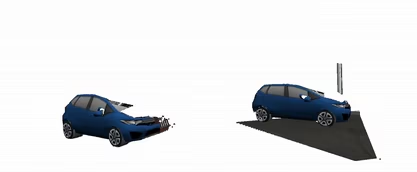
处理掩码非常简单,因为它由二进制值组成,1 表示对象存在,0 表示不存在。要应用掩码,只需将原始通道乘以掩码即可。此操作有效地隔离了图像中感兴趣的对象。最后,创建一个 Open3D 点云对象,并在 3D 空间中可视化带有相关颜色的分割对象。
import sys

import open3d as o3d

ros_cloud = rospy.wait_for_message("/camera/depth/points", PointCloud2)
xyz, rgb = pointcloud2_to_array(ros_cloud)
result = segmentation_model(rgb)

if not len(result[0].boxes.cls):
    print("No objects detected")
    sys.exit()

classes = result[0].boxes.cls.cpu().numpy().astype(int)
for index, class_id in enumerate(classes):
    mask = result[0].masks.data.cpu().numpy()[index, :, :].astype(int)
    mask_expanded = np.stack([mask, mask, mask], axis=2)

    obj_rgb = rgb * mask_expanded
    obj_xyz = xyz * mask_expanded

    pcd = o3d.geometry.PointCloud()
    pcd.points = o3d.utility.Vector3dVector(obj_xyz.reshape((ros_cloud.height * ros_cloud.width, 3)))
    pcd.colors = o3d.utility.Vector3dVector(obj_rgb.reshape((ros_cloud.height * ros_cloud.width, 3)) / 255)
    o3d.visualization.draw_geometries([pcd])
完整代码
import sys
import time

import numpy as np
import open3d as o3d
import ros_numpy
import rospy
from sensor_msgs.msg import PointCloud2

from ultralytics import YOLO

rospy.init_node("ultralytics")
time.sleep(1)
segmentation_model = YOLO("yolo26m-seg.pt")

def pointcloud2_to_array(pointcloud2: PointCloud2) -> tuple:
    """Convert a ROS PointCloud2 message to a numpy array.

    Args:
        pointcloud2 (PointCloud2): the PointCloud2 message

    Returns:
        (tuple): tuple containing (xyz, rgb)
    """
    pc_array = ros_numpy.point_cloud2.pointcloud2_to_array(pointcloud2)
    split = ros_numpy.point_cloud2.split_rgb_field(pc_array)
    rgb = np.stack([split["b"], split["g"], split["r"]], axis=2)
    xyz = ros_numpy.point_cloud2.get_xyz_points(pc_array, remove_nans=False)
    xyz = np.array(xyz).reshape((pointcloud2.height, pointcloud2.width, 3))
    nan_rows = np.isnan(xyz).all(axis=2)
    xyz[nan_rows] = [0, 0, 0]
    rgb[nan_rows] = [0, 0, 0]
    return xyz, rgb

ros_cloud = rospy.wait_for_message("/camera/depth/points", PointCloud2)
xyz, rgb = pointcloud2_to_array(ros_cloud)
result = segmentation_model(rgb)

if not len(result[0].boxes.cls):
    print("No objects detected")
    sys.exit()

classes = result[0].boxes.cls.cpu().numpy().astype(int)
for index, class_id in enumerate(classes):
    mask = result[0].masks.data.cpu().numpy()[index, :, :].astype(int)
    mask_expanded = np.stack([mask, mask, mask], axis=2)

    obj_rgb = rgb * mask_expanded
    obj_xyz = xyz * mask_expanded

    pcd = o3d.geometry.PointCloud()
    pcd.points = o3d.utility.Vector3dVector(obj_xyz.reshape((ros_cloud.height * ros_cloud.width, 3)))
    pcd.colors = o3d.utility.Vector3dVector(obj_rgb.reshape((ros_cloud.height * ros_cloud.width, 3)) / 255)
    o3d.visualization.draw_geometries([pcd])
Link to this section结论#
通过将 Ultralytics YOLO 集成到 ROS 中,你的机器人可以在 RGB 图像、深度图像和点云上运行 object detection 和 segmentation,将原始传感器流转化为可执行的感知信息。从这里开始,你可以探索 Predict mode 以获得更多推理选项,或者按照 计算机视觉项目步骤 将你的机器人应用从原型转为生产。
Link to this section常见问题解答#
Link to this section什么是机器人操作系统 (ROS)?#
Robot Operating System (ROS) 是机器人领域常用的开源框架,旨在帮助开发者创建强大的机器人应用程序。它提供了一系列用于构建和连接机器人系统的库和工具,使复杂应用程序的开发更加容易。ROS 支持节点之间使用消息通过主题或服务进行通信。
Link to this section如何将 Ultralytics YOLO 与 ROS 集成以进行实时目标检测?#
将 Ultralytics YOLO 与 ROS 集成涉及设置 ROS 环境并使用 YOLO 处理传感器数据。首先安装所需的依赖项,如 ros_numpy 和 Ultralytics YOLO:
pip install ros_numpy ultralytics接下来,创建一个 ROS 节点并订阅图像主题,以处理传入的数据进行 object detection。这是一个最小化示例:
import ros_numpy
import rospy
from sensor_msgs.msg import Image

from ultralytics import YOLO

detection_model = YOLO("yolo26m.pt")
rospy.init_node("ultralytics")
det_image_pub = rospy.Publisher("/ultralytics/detection/image", Image, queue_size=5)

def callback(data):
    array = ros_numpy.numpify(data)
    det_result = detection_model(array)
    det_annotated = det_result[0].plot(show=False)
    det_image_pub.publish(ros_numpy.msgify(Image, det_annotated, encoding="rgb8"))

rospy.Subscriber("/camera/color/image_raw", Image, callback)
rospy.spin()
Link to this section什么是 ROS 主题,它们如何在 Ultralytics YOLO 中使用?#
ROS 主题通过发布-订阅模型促进 ROS 网络中节点之间的通信。主题是一个命名通道,节点使用它异步发送和接收消息。在 Ultralytics YOLO 的上下文中,你可以让一个节点订阅图像主题,使用 YOLO 处理图像以执行 detection 或 segmentation 等任务,并将结果发布到新的主题中。
例如,订阅一个相机主题并处理传入的图像进行检测:
rospy.Subscriber("/camera/color/image_raw", Image, callback)Link to this section为什么要在 ROS 中将深度图像与 Ultralytics YOLO 一起使用?#
ROS 中的深度图像(由 sensor_msgs/Image 表示)提供物体与相机之间的距离,这对于避障、3D 映射和定位等任务至关重要。通过使用深度信息以及 RGB 图像,机器人可以更好地了解其 3D 环境。
使用 YOLO,你可以从 RGB 图像中提取分割掩码,并将这些掩码应用于深度图像以获得精确的 3D 对象信息,从而提高机器人导航和与周围环境交互的能力。
Link to this section我如何使用 ROS 中的 YOLO 可视化 3D 点云?#
要在 ROS 中通过 YOLO 可视化 3D 点云:
- 将
sensor_msgs/PointCloud2消息转换为 NumPy 数组。 - 使用 YOLO 分割 RGB 图像。
- 将分割掩码应用于点云。
这是一个使用 Open3D 进行可视化的示例:
import sys

import numpy as np
import open3d as o3d
import ros_numpy
import rospy
from sensor_msgs.msg import PointCloud2

from ultralytics import YOLO

rospy.init_node("ultralytics")
segmentation_model = YOLO("yolo26m-seg.pt")

def pointcloud2_to_array(pointcloud2):
    pc_array = ros_numpy.point_cloud2.pointcloud2_to_array(pointcloud2)
    split = ros_numpy.point_cloud2.split_rgb_field(pc_array)
    rgb = np.stack([split["b"], split["g"], split["r"]], axis=2)
    xyz = ros_numpy.point_cloud2.get_xyz_points(pc_array, remove_nans=False)
    xyz = np.array(xyz).reshape((pointcloud2.height, pointcloud2.width, 3))
    return xyz, rgb

ros_cloud = rospy.wait_for_message("/camera/depth/points", PointCloud2)
xyz, rgb = pointcloud2_to_array(ros_cloud)
result = segmentation_model(rgb)

if not len(result[0].boxes.cls):
    print("No objects detected")
    sys.exit()

classes = result[0].boxes.cls.cpu().numpy().astype(int)
for index, class_id in enumerate(classes):
    mask = result[0].masks.data.cpu().numpy()[index, :, :].astype(int)
    mask_expanded = np.stack([mask, mask, mask], axis=2)

    obj_rgb = rgb * mask_expanded
    obj_xyz = xyz * mask_expanded

    pcd = o3d.geometry.PointCloud()
    pcd.points = o3d.utility.Vector3dVector(obj_xyz.reshape((-1, 3)))
    pcd.colors = o3d.utility.Vector3dVector(obj_rgb.reshape((-1, 3)) / 255)
    o3d.visualization.draw_geometries([pcd])
这种方法提供了分割对象的 3D 可视化,这对于 机器人应用 中的导航和操作等任务非常有用。