DeepStream SDK 및 TensorRT를 사용하는 NVIDIA Jetson의 Ultralytics YOLO26
참고: Jetson Orin NX에서 NVIDIA Deepstream과 함께 Ultralytics YOLO26 모델 사용 방법 🚀
이 포괄적인 가이드는 DeepStream SDK 및 TensorRT를 사용하여 NVIDIA Jetson 장치에 Ultralytics YOLO26을 배포하기 위한 자세한 단계별 설명을 제공합니다. 여기서는 TensorRT를 사용하여 Jetson 플랫폼에서 추론 성능을 극대화합니다.
참고
이 가이드는 최신 안정적인 JetPack 릴리스인 JP6.1을 실행하는 NVIDIA Jetson Orin Nano Super Developer Kit, JetPack 릴리스인 JP5.1.3을 실행하는 NVIDIA Jetson Orin NX 16GB 기반의 Seeed Studio reComputer J4012 및 JetPack 릴리스인 JP4.6.4를 실행하는 NVIDIA Jetson Nano 4GB 기반의 Seeed Studio reComputer J1020 v2로 테스트되었습니다. 최신 및 레거시를 포함한 모든 NVIDIA Jetson 하드웨어 라인업에서 작동할 것으로 예상됩니다.
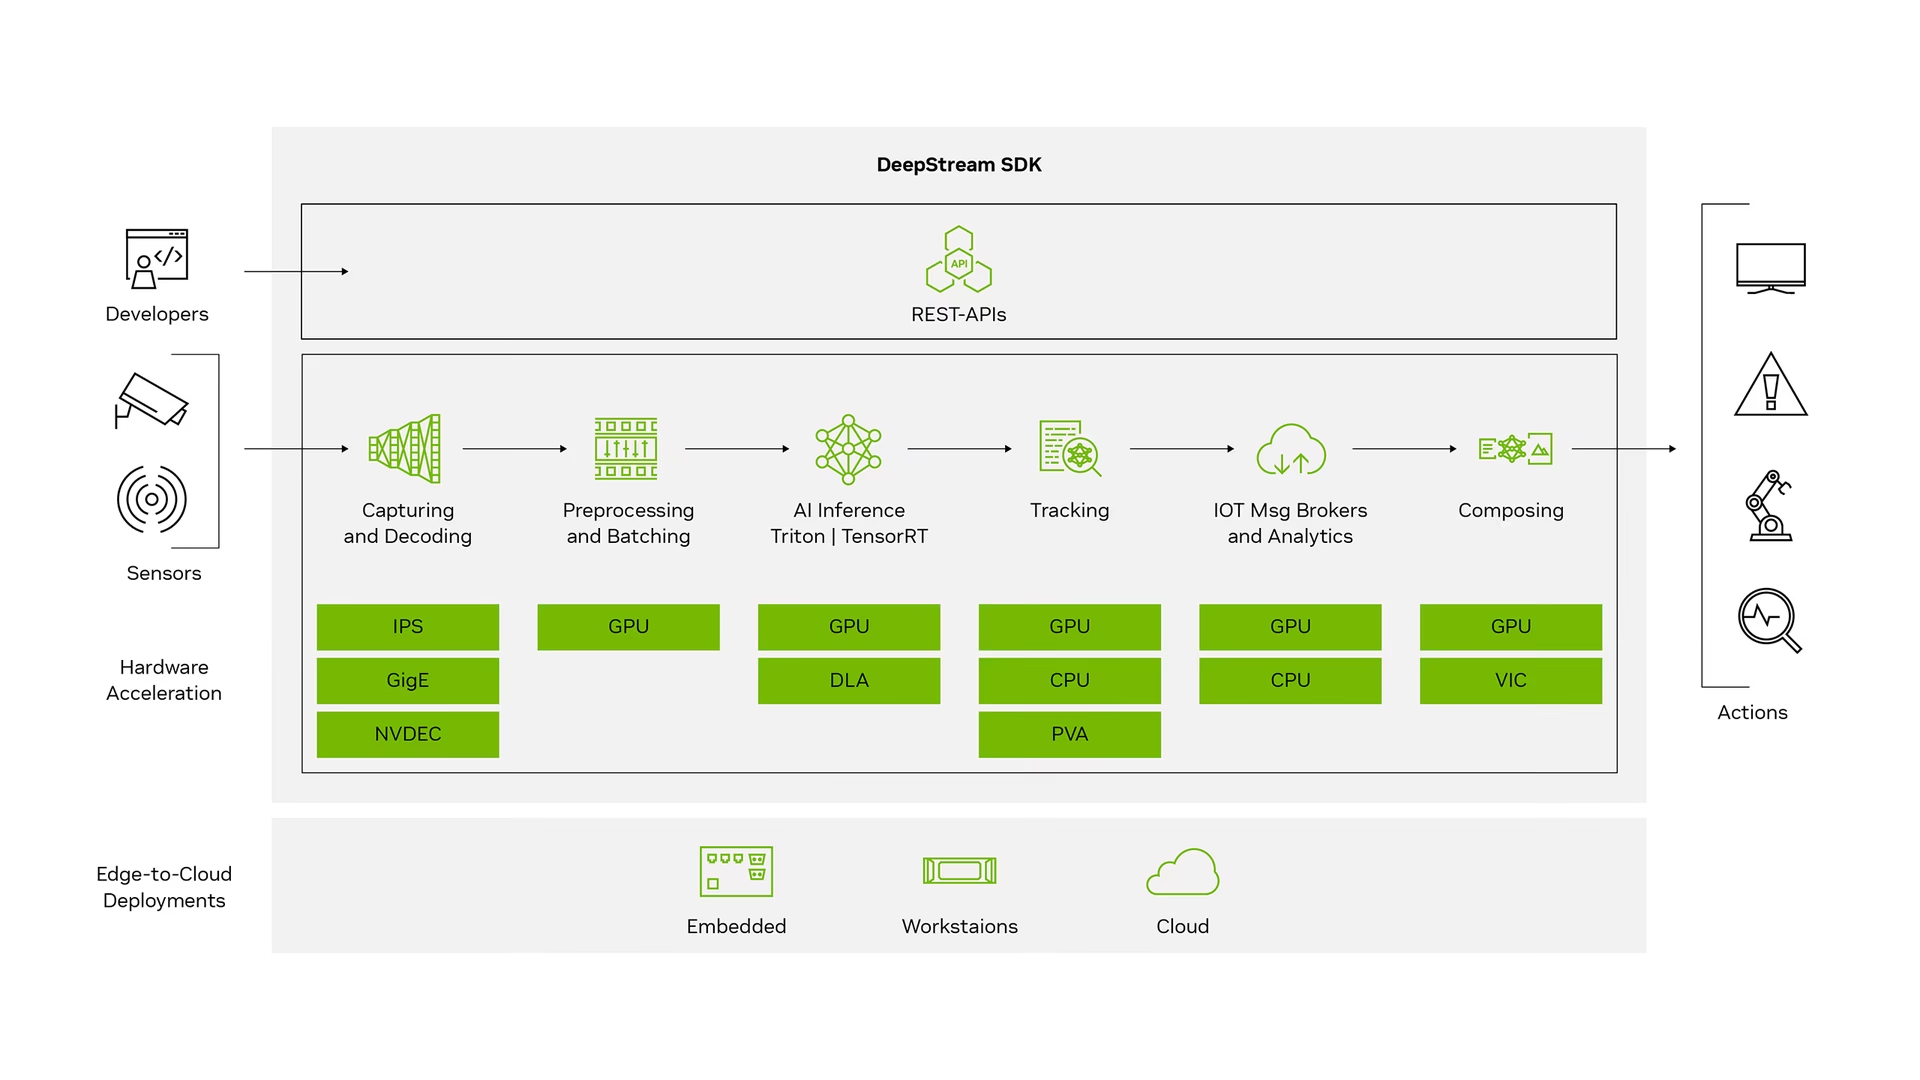
NVIDIA DeepStream이란 무엇입니까?
NVIDIA의 DeepStream SDK는 AI 기반 다중 센서 처리, 비디오, 오디오 및 이미지 이해를 위한 GStreamer 기반의 완전한 스트리밍 분석 툴킷입니다. IVA(Intelligent Video Analytics) 앱 및 서비스를 구축하는 비전 AI 개발자, 소프트웨어 파트너, 스타트업 및 OEM에 적합합니다. 이제 신경망 및 추적, 비디오 인코딩/디코딩 및 비디오 렌더링과 같은 기타 복잡한 처리 작업을 통합하는 스트림 처리 파이프라인을 만들 수 있습니다. 이러한 파이프라인은 비디오, 이미지 및 센서 데이터에 대한 실시간 분석을 가능하게 합니다. DeepStream의 다중 플랫폼 지원은 온프레미스, 에지 및 클라우드에서 비전 AI 애플리케이션 및 서비스를 개발할 수 있는 더 빠르고 쉬운 방법을 제공합니다.
필수 조건
이 가이드를 시작하기 전에:
- 저희 문서인 빠른 시작 가이드: Ultralytics YOLO26이 포함된 NVIDIA Jetson에서 Ultralytics YOLO26으로 NVIDIA Jetson 장치를 설정하세요.
- 설치 DeepStream SDK JetPack 버전에 따라
- JetPack 4.6.4의 경우 DeepStream 6.0.1을 설치합니다.
- JetPack 5.1.3의 경우 DeepStream 6.3을 설치하십시오.
- JetPack 6.1의 경우 DeepStream 7.1을 설치하세요.
- JetPack 7.1의 경우 DeepStream 9.0을 설치하십시오.
팁
이 가이드에서는 Jetson 장치에 DeepStream SDK를 설치하는 데 Debian 패키지 방식을 사용했습니다. Jetson의 DeepStream SDK (보관됨)을 방문하여 기존 버전의 DeepStream에 액세스할 수도 있습니다.
YOLO26용 DeepStream 구성
여기서는 YOLO 모델에 대한 NVIDIA DeepStream SDK 지원을 포함하는 marcoslucianops/DeepStream-Yolo GitHub 저장소를 사용하고 있습니다. 기여해 주신 marcoslucianops의 노력에 감사드립니다!
필수 종속성과 함께 Ultralytics 설치
cd ~
pip install -U pip
git clone https://github.com/ultralytics/ultralytics
cd ultralytics
pip install -e ".[export]" onnxslim
DeepStream-Yolo 저장소를 복제합니다.
cd ~
git clone https://github.com/marcoslucianops/DeepStream-Yolo
다음을 복사합니다.
export_yolo26.py파일을 다음에서 가져옵니다.DeepStream-Yolo/utils디렉터리를ultralytics폴더cp ~/DeepStream-Yolo/utils/export_yolo26.py ~/ultralytics cd ultralyticsYOLO26 릴리스에서 원하는 Ultralytics YOLO26 detect 모델(.pt)을 다운로드하세요. 여기서는 yolo26s.pt를 사용합니다.
wget https://github.com/ultralytics/assets/releases/download/v8.4.0/yolo26s.pt참고
사용자 지정으로 훈련된 YOLO26 모델을 사용할 수도 있습니다.
모델을 ONNX로 변환
python3 export_yolo26.py -w yolo26s.pt위 명령에 아래 인수를 전달합니다.
DeepStream 5.1의 경우 다음을 제거하십시오.
--dynamic인수 및 사용opset12 이하. 기본값opset17입니다.--opset 12추론 크기를 변경하려면 (기본값: 640)
-s SIZE
--size SIZE
-s HEIGHT WIDTH
--size HEIGHT WIDTH
1280의 예:
-s 1280
or
-s 1280 1280
ONNX 모델을 단순화하려면 (DeepStream >= 6.0)
--simplify동적 배치 크기를 사용하려면 (DeepStream >= 6.1)
--dynamic정적 배치 크기를 사용하려면 (배치 크기 = 4의 예)
--batch 4생성된 다음을 복사합니다.
.onnx모델 파일과labels.txt파일을 다음으로 설정하십시오.DeepStream-Yolo폴더cp yolo26s.pt.onnx labels.txt ~/DeepStream-Yolo cd ~/DeepStream-Yolo설치된 JetPack 버전에 따라 CUDA 버전을 설정하십시오.
JetPack 4.6.4의 경우:
export CUDA_VER=10.2JetPack 5.1.3의 경우:
export CUDA_VER=11.4JetPack 6.1의 경우:
export CUDA_VER=12.6라이브러리 컴파일
make -C nvdsinfer_custom_impl_Yolo clean && make -C nvdsinfer_custom_impl_Yolo다음을 편집하십시오.
config_infer_primary_yolo26.txt모델에 따른 파일 (80개 클래스를 가진 YOLO26s의 경우)[property] ... onnx-file=yolo26s.pt.onnx ... num-detected-classes=80 ...다음을 편집하십시오.
deepstream_app_config파일... [primary-gie] ... config-file=config_infer_primary_yolo26.txt다음에 비디오 소스를 변경할 수도 있습니다.
deepstream_app_config파일로 이동합니다. 여기에는 기본 동영상 파일이 로드됩니다.... [source0] ... uri=file:///opt/nvidia/deepstream/deepstream/samples/streams/sample_1080p_h264.mp4
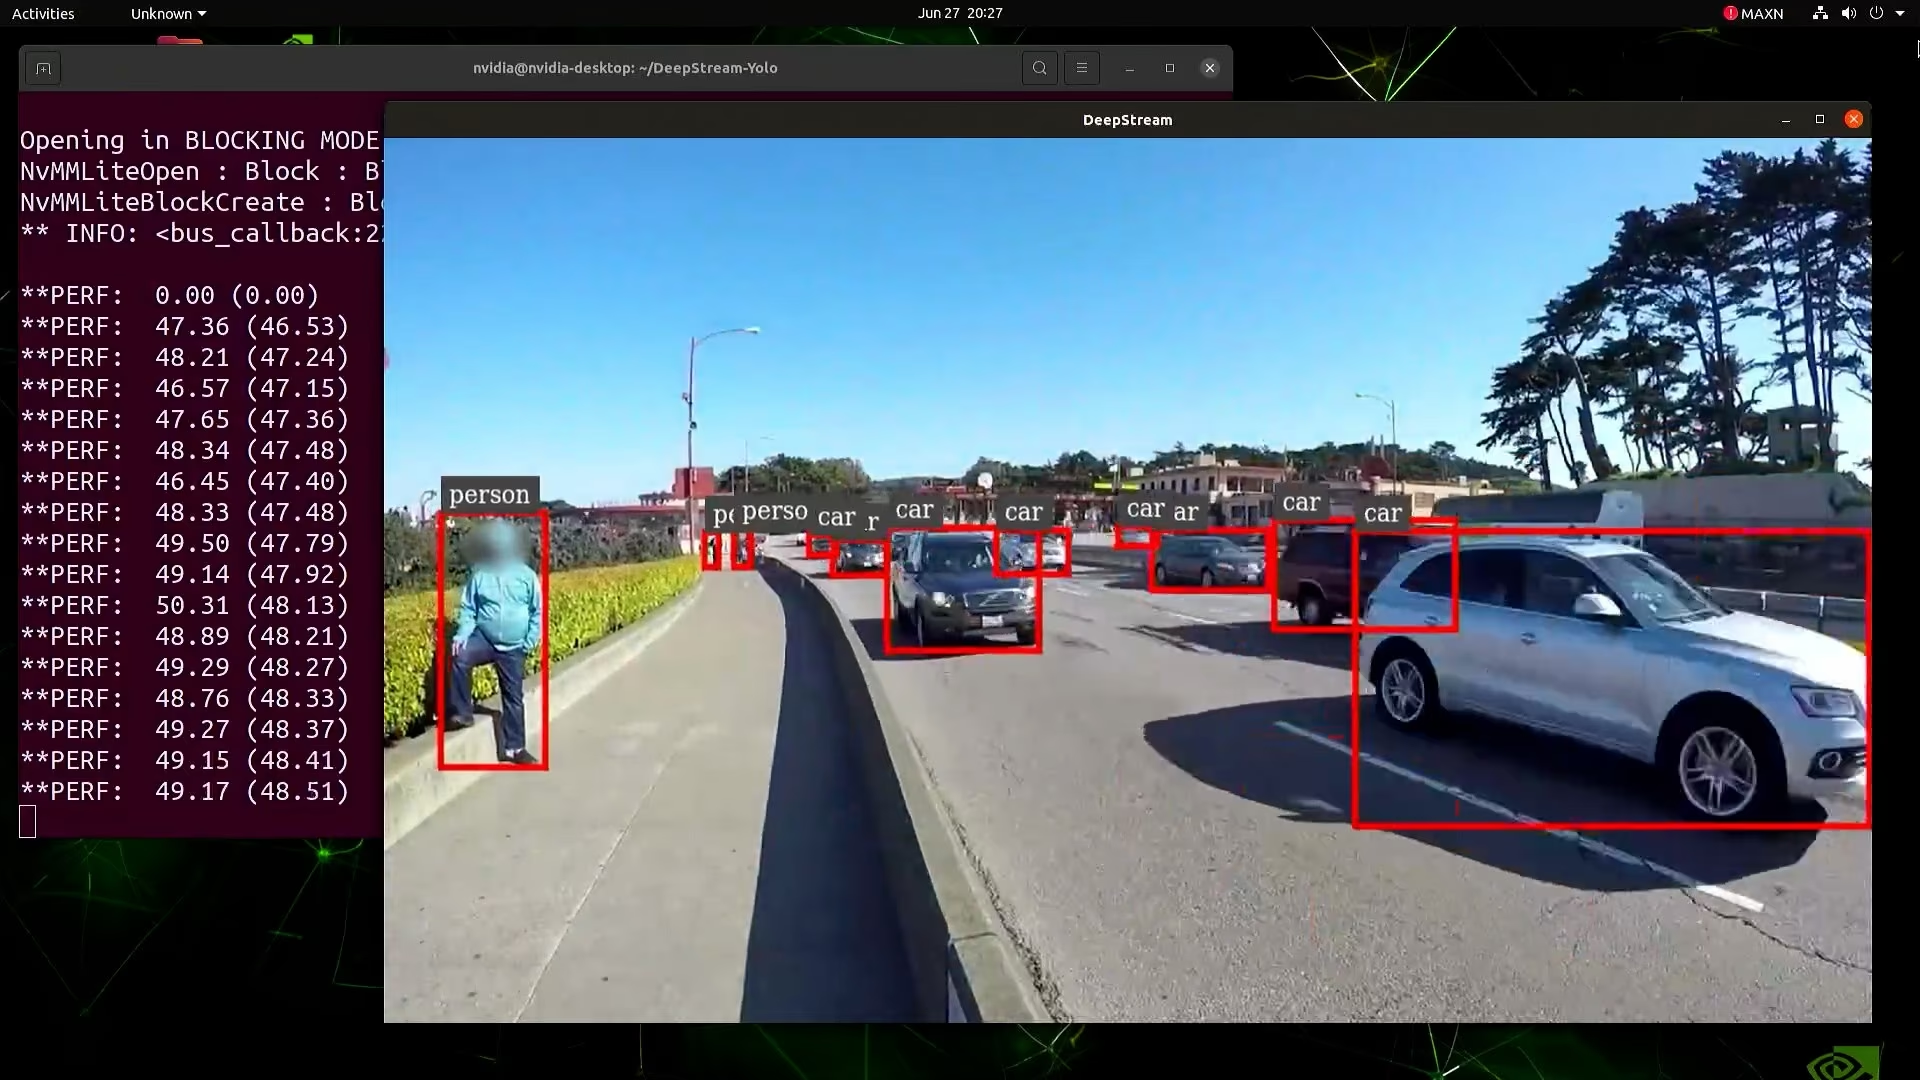
추론 실행
deepstream-app -c deepstream_app_config.txt
참고
추론을 시작하기 전에 TensorRT 엔진 파일을 생성하는 데 오랜 시간이 걸립니다. 잠시만 기다려 주십시오.
팁
모델을 FP16 정밀도로 변환하려면 다음을 설정하기만 하면 됩니다. model-engine-file=model_b1_gpu0_fp16.engine 및 network-mode=2 내부 config_infer_primary_yolo26.txt
INT8 보정
추론에 INT8 정밀도를 사용하려면 아래 단계를 따라야 합니다:
참고
현재 INT8은 TensorRT 10.x에서 작동하지 않습니다. 이 가이드의 섹션은 작동할 것으로 예상되는 TensorRT 8.x로 테스트되었습니다.
설정
OPENCV환경 변수export OPENCV=1라이브러리 컴파일
make -C nvdsinfer_custom_impl_Yolo clean && make -C nvdsinfer_custom_impl_YoloCOCO 데이터셋의 경우, 다음을 다운로드하십시오 val2017, 압축을 풀고 다음 폴더로 이동합니다.
DeepStream-Yolo폴더보정 이미지를 위한 새 디렉터리를 만듭니다.
mkdir calibrationCOCO 데이터셋에서 1000개의 무작위 이미지를 선택하여 보정을 실행하려면 다음을 실행하십시오.
for jpg in $(ls -1 val2017/*.jpg | sort -R | head -1000); do
  cp ${jpg} calibration/
done
참고
NVIDIA는 양호한 정확도를 얻기 위해 최소 500개의 이미지를 권장합니다. 이 예에서는 더 나은 정확도를 얻기 위해 1000개의 이미지를 선택합니다(이미지 수가 많을수록 정확도가 높아짐). head -1000에서 설정할 수 있습니다. 예를 들어 2000개의 이미지의 경우 head -2000입니다. 이 프로세스는 시간이 오래 걸릴 수 있습니다.
다음을 생성합니다.
calibration.txt선택한 모든 이미지가 포함된 파일realpath calibration/*jpg > calibration.txt환경 변수 설정
export INT8_CALIB_IMG_PATH=calibration.txt
export INT8_CALIB_BATCH_SIZE=1
참고
INT8_CALIB_BATCH_SIZE 값이 높을수록 정확도가 높아지고 보정 속도가 빨라집니다. GPU 메모리에 맞게 설정하세요.
다음을 업데이트합니다.
config_infer_primary_yolo26.txt파일다음에서
...
model-engine-file=model_b1_gpu0_fp32.engine
#int8-calib-file=calib.table
...
network-mode=0
...
다음으로
...
model-engine-file=model_b1_gpu0_int8.engine
int8-calib-file=calib.table
...
network-mode=1
...
추론 실행
deepstream-app -c deepstream_app_config.txt
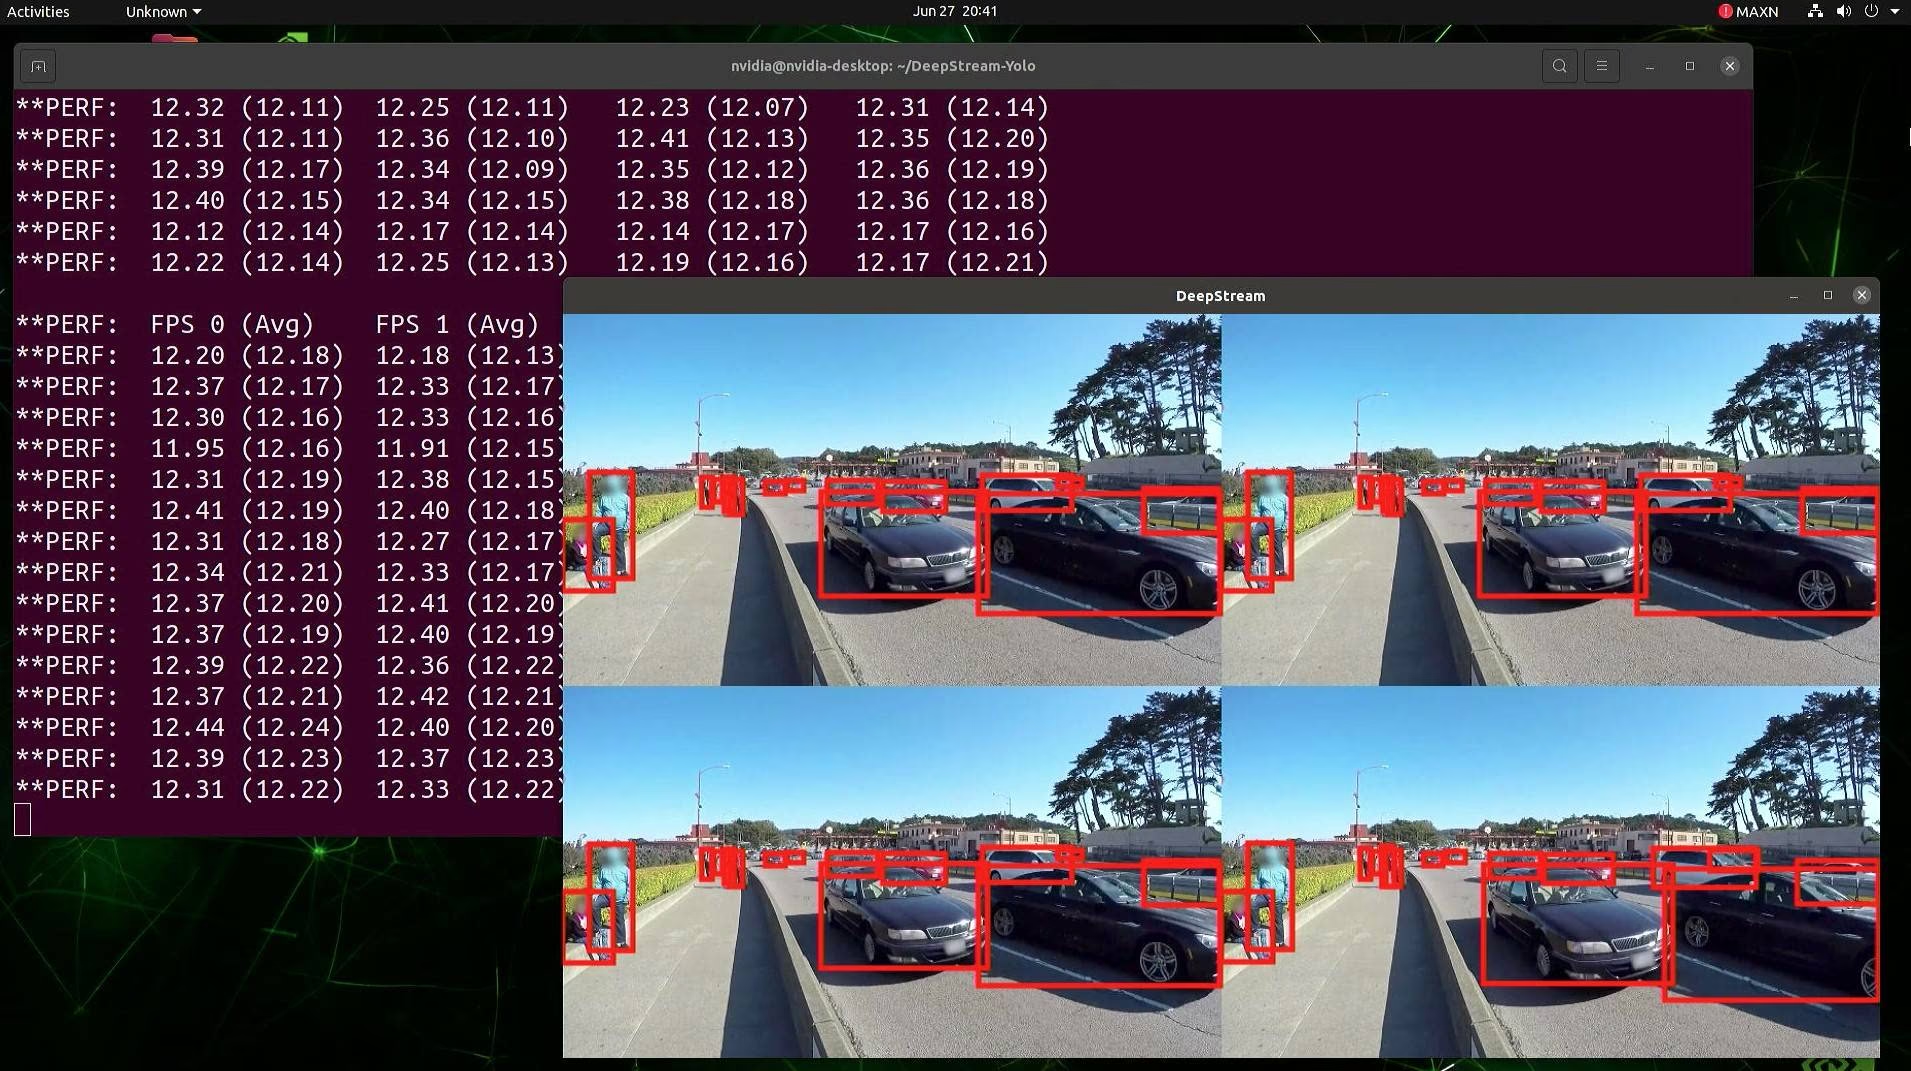
MultiStream 설정
참고: Jetson Orin에서 NVIDIA 활용해 Ultralytics 멀티 스트림 추론을 실행하는 방법 🚀
단일 DeepStream 애플리케이션에서 여러 스트림을 설정하려면, 다음과 같이 deepstream_app_config.txt 파일:
원하는 스트림 수에 따라 그리드 디스플레이를 만들도록 행과 열을 변경합니다. 예를 들어 4개의 스트림의 경우 2개의 행과 2개의 열을 추가할 수 있습니다.
[tiled-display]
rows=2
columns=2
설정
num-sources=4를 클릭하고uri네 가지 스트림 모두에 대한 항목을 입력합니다.[source0] enable=1 type=3 uri=path/to/video1.jpg uri=path/to/video2.jpg uri=path/to/video3.jpg uri=path/to/video4.jpg num-sources=4
추론 실행
deepstream-app -c deepstream_app_config.txt
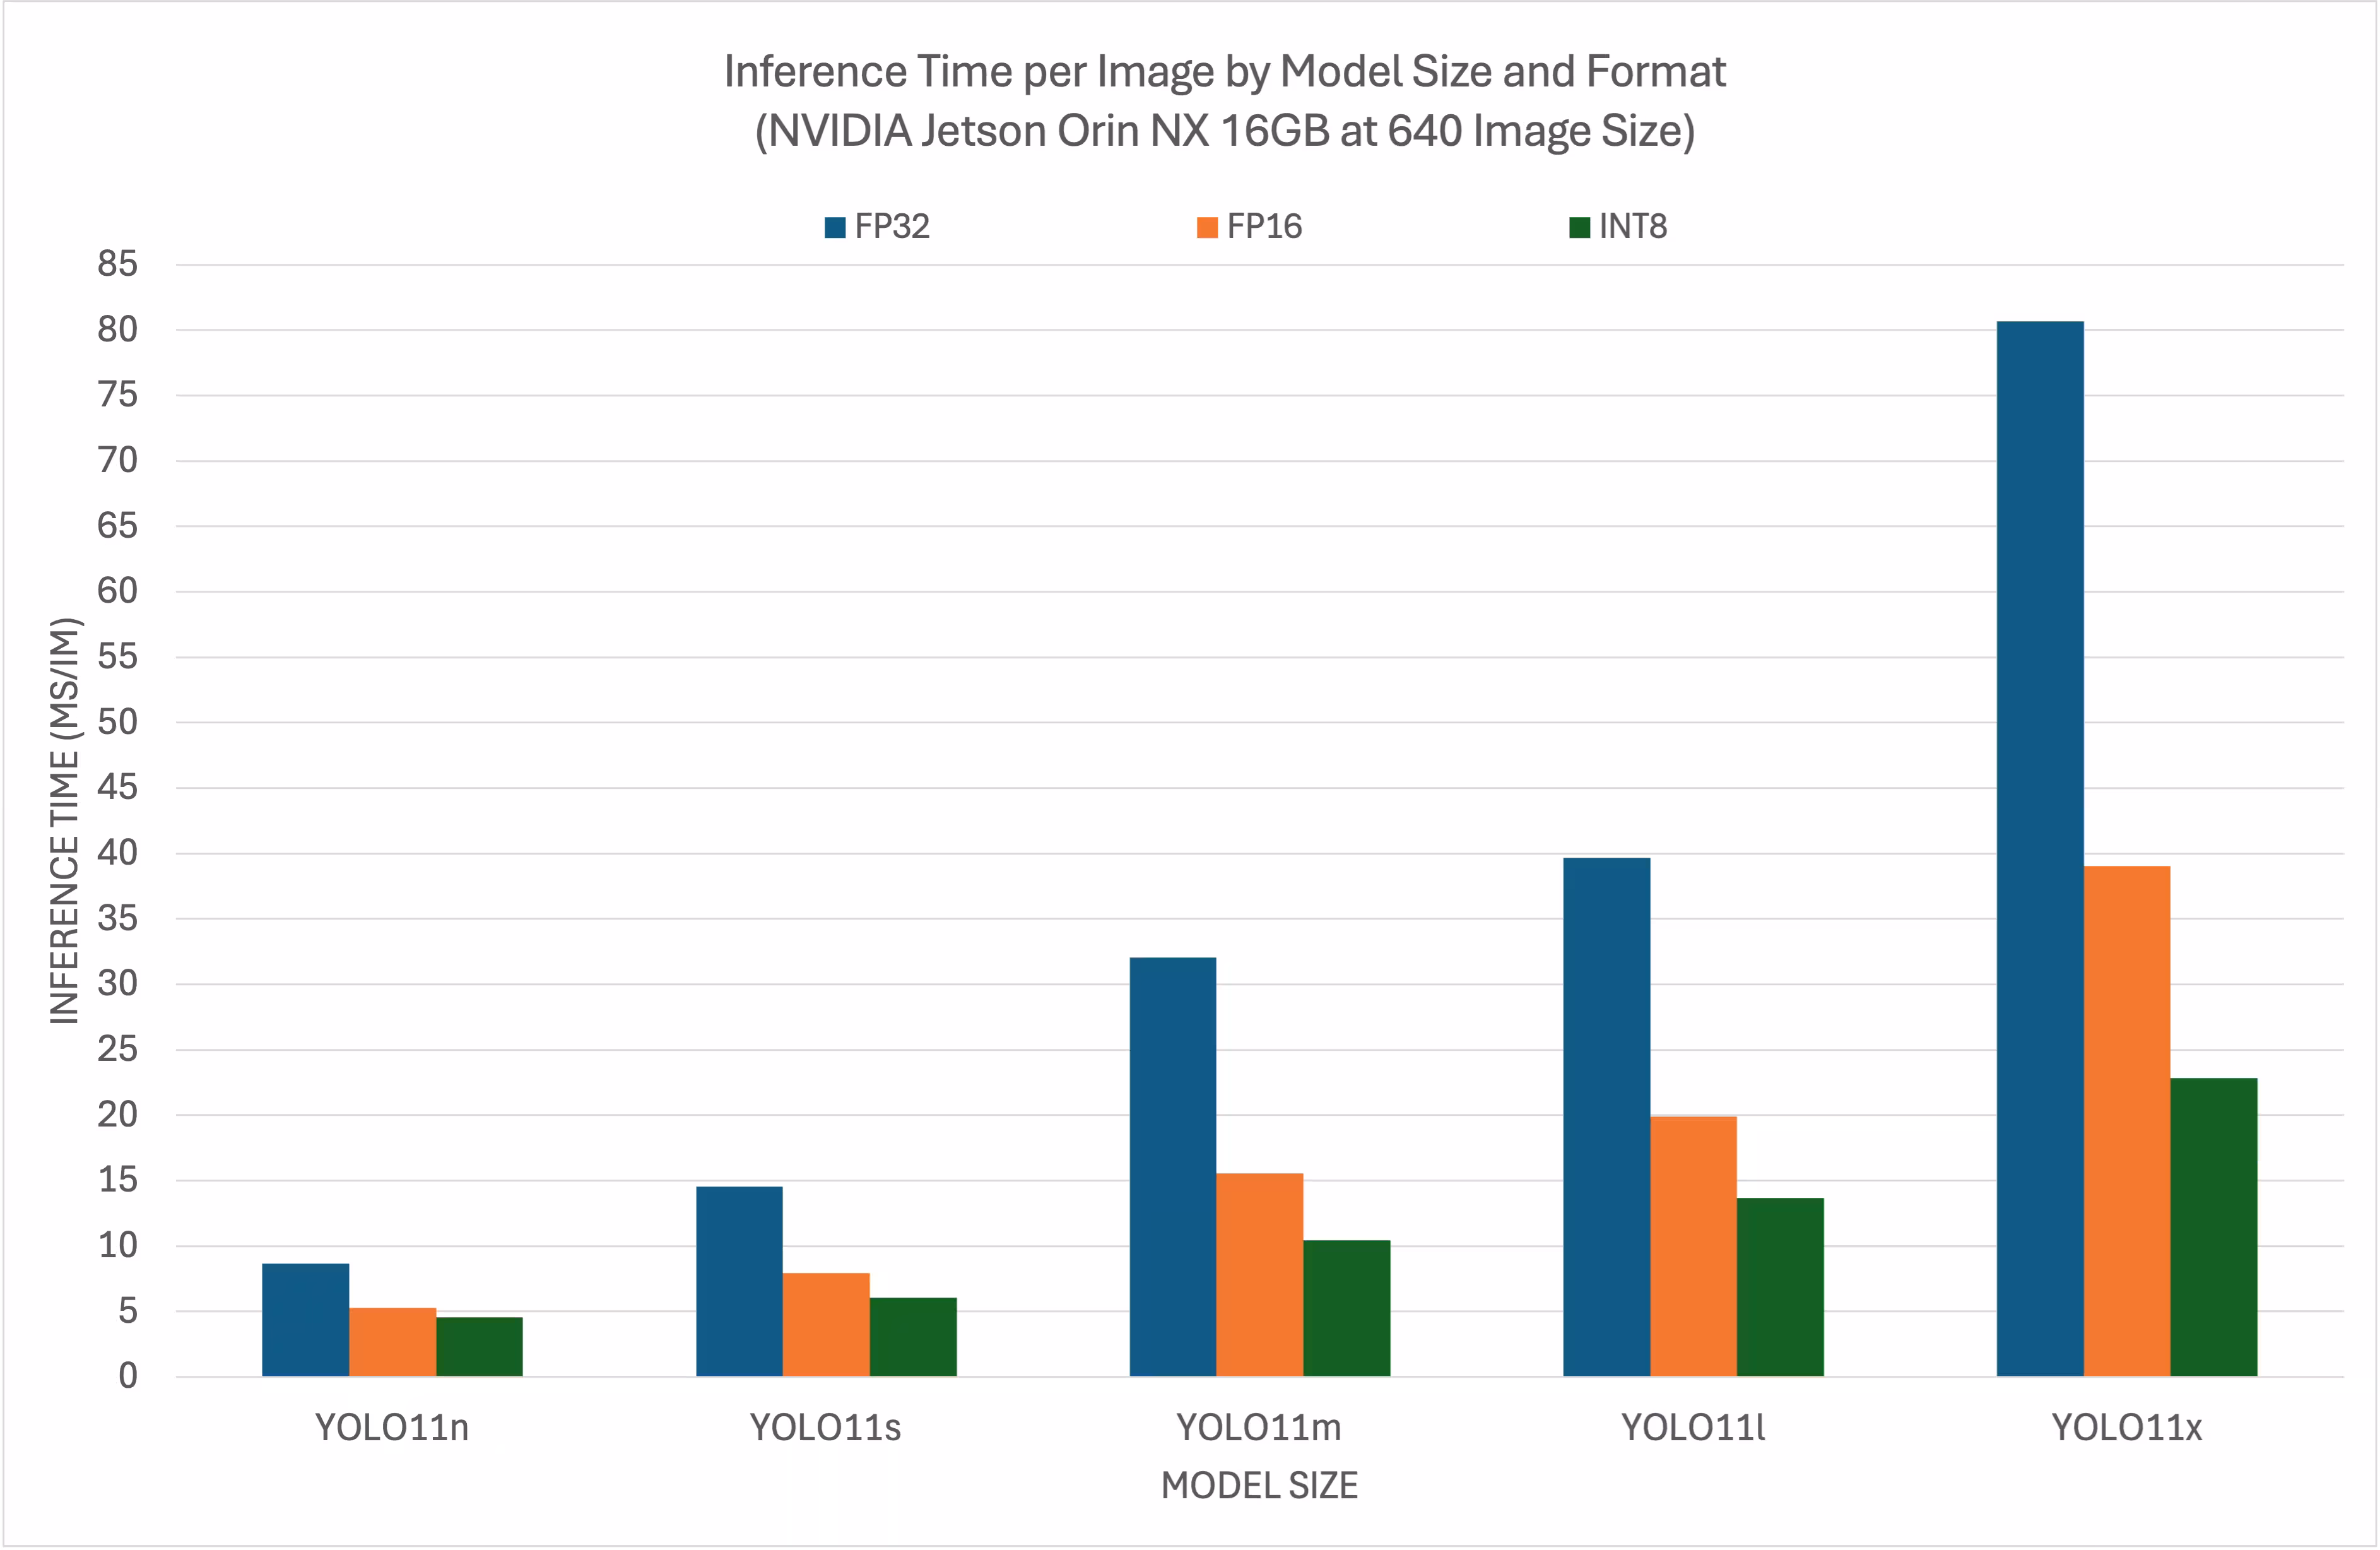
벤치마크 결과
다음 벤치마크는 NVIDIA Jetson Orin NX 16GB에서 640x640 입력 크기로 다양한 TensorRT 정밀도 수준에서 YOLO26 모델이 어떻게 성능을 발휘하는지 요약하여 보여줍니다.
비교 차트
자세한 비교 표
성능
| 형식 | 상태 | 추론 시간 (ms/im) |
|---|---|---|
| TensorRT (FP32) | ✅ | 8.64 |
| TensorRT (FP16) | ✅ | 5.27 |
| TensorRT (INT8) | ✅ | 4.54 |
| 형식 | 상태 | 추론 시간 (ms/im) |
|---|---|---|
| TensorRT (FP32) | ✅ | 14.53 |
| TensorRT (FP16) | ✅ | 7.91 |
| TensorRT (INT8) | ✅ | 6.05 |
| 형식 | 상태 | 추론 시간 (ms/im) |
|---|---|---|
| TensorRT (FP32) | ✅ | 32.05 |
| TensorRT (FP16) | ✅ | 15.55 |
| TensorRT (INT8) | ✅ | 10.43 |
| 형식 | 상태 | 추론 시간 (ms/im) |
|---|---|---|
| TensorRT (FP32) | ✅ | 39.68 |
| TensorRT (FP16) | ✅ | 19.88 |
| TensorRT (INT8) | ✅ | 13.64 |
| 형식 | 상태 | 추론 시간 (ms/im) |
|---|---|---|
| TensorRT (FP32) | ✅ | 80.65 |
| TensorRT (FP16) | ✅ | 39.06 |
| TensorRT (INT8) | ✅ | 22.83 |
감사의 말씀
이 가이드는 원래 Seeed Studio의 Lakshantha와 Elaine이 만들었습니다.
FAQ
NVIDIA Jetson 장치에 Ultralytics YOLO26을 어떻게 설정하나요?
NVIDIA Jetson 장치에 Ultralytics YOLO26을 설정하려면, 먼저 JetPack 버전에 호환되는 DeepStream SDK를 설치해야 합니다. YOLO26 배포를 위해 NVIDIA Jetson을 구성하려면 저희 빠른 시작 가이드의 단계별 지침을 따르십시오.
NVIDIA Jetson에서 YOLO26과 함께 TensorRT를 사용하는 이점은 무엇인가요?
YOLO26과 함께 TensorRT를 사용하면 추론을 위해 모델을 최적화하여 NVIDIA Jetson 장치에서 지연 시간을 크게 줄이고 처리량을 향상시킵니다. TensorRT는 레이어 융합, 정밀도 보정 및 커널 자동 튜닝을 통해 고성능, 저지연 딥러닝 추론을 제공합니다. 이는 더 빠르고 효율적인 실행으로 이어지며, 특히 비디오 분석 및 자율 기계와 같은 실시간 애플리케이션에 유용합니다.
다양한 NVIDIA Jetson 하드웨어에서 DeepStream SDK와 함께 Ultralytics YOLO26을 실행할 수 있나요?
네, DeepStream SDK 및 TensorRT를 사용하여 Ultralytics YOLO26을 배포하는 가이드는 전체 NVIDIA Jetson 라인업에서 호환됩니다. 여기에는 JetPack 5.1.3이 설치된 Jetson Orin NX 16GB 및 JetPack 4.6.4가 설치된 Jetson Nano 4GB와 같은 장치가 포함됩니다. 자세한 단계는 YOLO26용 DeepStream 구성 섹션을 참조하십시오.
DeepStream용으로 YOLO26 모델을 ONNX로 어떻게 변환할 수 있나요?
DeepStream으로 배포하기 위해 YOLO26 모델을 ONNX 형식으로 변환하려면 다음을 사용하십시오. utils/export_yolo26.py 스크립트는 DeepStream-Yolo 저장소에서 가져옵니다.
다음은 예제 명령어입니다.
python3 utils/export_yolo26.py -w yolo26s.pt --opset 12 --simplify
모델 변환에 대한 자세한 내용은 모델 내보내기 섹션을 확인하십시오.
NVIDIA Jetson Orin NX에서 YOLO의 성능 벤치마크는 무엇입니까?
NVIDIA Jetson Orin NX 16GB에서 YOLO26 모델의 성능은 TensorRT 정밀도 수준에 따라 달라집니다. 예를 들어, YOLO26s 모델은 다음을 달성합니다:
- FP32 정밀도: 14.6ms/im, 68.5 FPS
- FP16 정밀도: 7.94 ms/im, 126 FPS
- INT8 정밀도: 5.95 ms/im, 168 FPS
이러한 벤치마크는 NVIDIA Jetson 하드웨어에서 TensorRT로 최적화된 YOLO26 모델을 사용하는 것의 효율성과 기능을 강조합니다. 자세한 내용은 벤치마크 결과 섹션을 참조하십시오.


