Link to this sectionVSCode 터미널에서 YOLO 추론 결과를 확인하는 방법#
libsixel 웹사이트의 이미지입니다.
Link to this section동기#
SSH를 통해 원격 머신에 연결할 때, 일반적인 방법으로는 이미지 결과를 시각화할 수 없거나 GUI가 있는 로컬 기기로 데이터를 이동해야 합니다. VSCode 통합 터미널은 이미지를 직접 렌더링할 수 있으므로, 파일을 로컬 노트북으로 복사할 필요 없이 추론을 실행하는 바로 그 자리에서 예측 결과를 검사할 수 있습니다. 이 가이드에서는 설정 과정을 활성화하고, 코드를 연결하는 방법을 안내하며, 자주 묻는 질문에 답변합니다.
Only compatible with Linux and macOS. Check the VSCode repository, check Issue status, or documentation for updates about Windows support to view images in terminal with sixel.
통합 터미널을 사용하여 이미지를 보기 위한 VSCode 호환 프로토콜은 sixel 및 iTerm입니다. 이 가이드에서는 sixel 프로토콜의 사용법을 설명합니다.
Link to this section과정#
-
먼저 VSCode에서
terminal.integrated.enableImages및terminal.integrated.gpuAcceleration설정을 활성화해야 합니다."terminal.integrated.gpuAcceleration": "auto" # "auto" is default, can also use "on" "terminal.integrated.enableImages": true
-
Install the
python-sixellibrary in your virtual environment. This is a fork of thePySixellibrary, which is no longer maintained.pip install sixel -
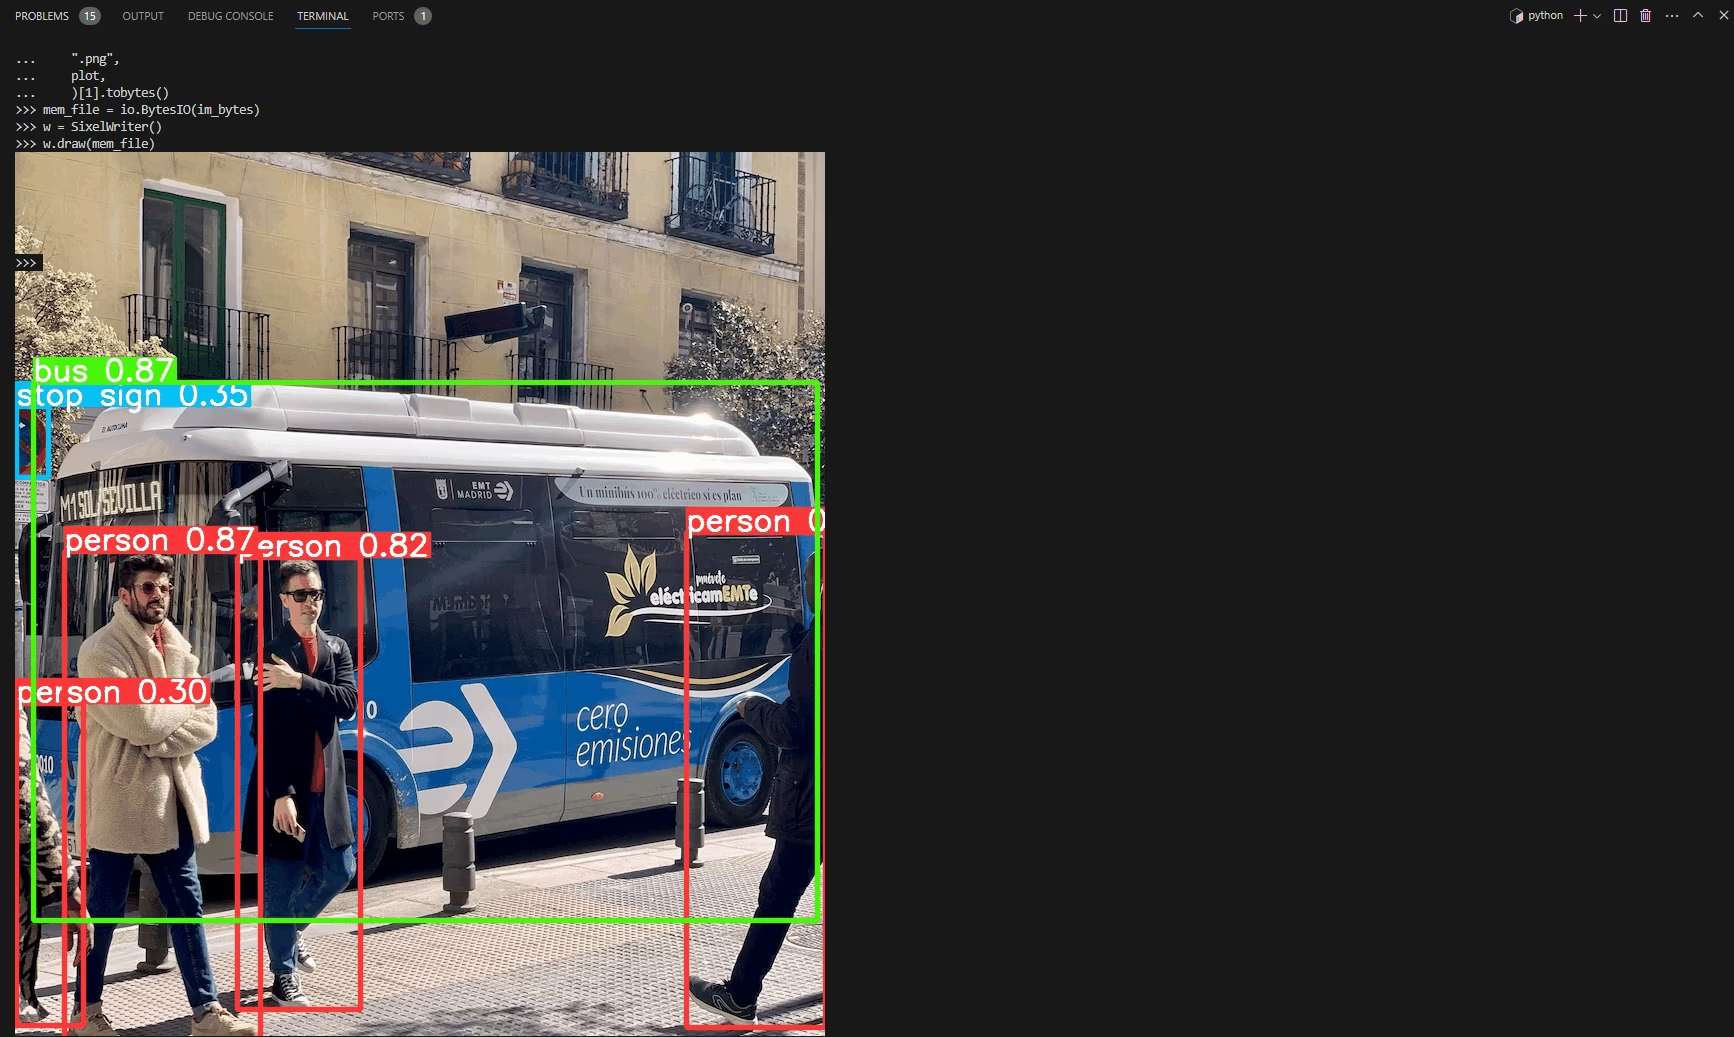
모델을 로드하고 추론을 실행한 다음, 결과를 플롯하여 변수에 저장하십시오. 추론 인수 및 결과 작업에 대한 자세한 내용은 예측 모드 페이지를 참조하십시오.
from ultralytics import YOLO # Load a model model = YOLO("yolo26n.pt") # Run inference on an image results = model.predict(source="ultralytics/assets/bus.jpg") # Plot inference results plot = results[0].plot() # (1)!- 사용 가능한 인수는 플롯 메서드 매개변수를 참조하십시오.
-
이제 OpenCV를 사용하여
np.ndarray를bytes데이터로 변환합니다. 그런 다음io.BytesIO를 사용하여 "파일과 유사한" 객체를 만듭니다.import io import cv2 # Results image as bytes im_bytes = cv2.imencode( ".png", # (1)! plot, )[1].tobytes() # (2)! # Image bytes as a file-like object mem_file = io.BytesIO(im_bytes)- 다른 이미지 확장자도 사용할 수 있습니다.
- 반환된 객체 중 인덱스
1인 객체만 필요합니다.
-
SixelWriter인스턴스를 생성한 다음,.draw()메서드를 사용하여 터미널에 이미지를 그립니다.from sixel import SixelWriter # Create sixel writer object w = SixelWriter() # Draw the sixel image in the terminal w.draw(mem_file)
Link to this section추론 결과 예시#
이 예제를 비디오나 애니메이션 GIF 프레임에 사용하는 것은 테스트되지 않았습니다. 사용자 책임하에 시도하십시오.
Link to this section전체 코드 예제#
import io

import cv2
from sixel import SixelWriter

from ultralytics import YOLO

# Load a model
model = YOLO("yolo26n.pt")

# Run inference on an image
results = model.predict(source="ultralytics/assets/bus.jpg")

# Plot inference results
plot = results[0].plot()  # (3)!

# Results image as bytes
im_bytes = cv2.imencode(
    ".png",  # (1)!
    plot,
)[1].tobytes()  # (2)!

mem_file = io.BytesIO(im_bytes)
w = SixelWriter()
w.draw(mem_file)- 다른 이미지 확장자도 사용할 수 있습니다.
- 반환된 객체 중 인덱스
1인 객체만 필요합니다. - 사용 가능한 인수는 플롯 메서드 매개변수를 참조하십시오.
clear 명령어를 사용하여 터미널에서 이미지 보기를 "삭제"해야 할 수도 있습니다.
Link to this sectionFAQ#
Link to this sectionmacOS나 Linux의 VSCode 터미널에서 YOLO 추론 결과를 어떻게 볼 수 있습니까?#
macOS나 Linux의 VSCode 터미널에서 YOLO 추론 결과를 보려면 다음 단계를 따르십시오:
-
필요한 VSCode 설정을 활성화하십시오:
"terminal.integrated.enableImages": true "terminal.integrated.gpuAcceleration": "auto" -
sixel 라이브러리를 설치하십시오:
pip install sixel -
YOLO 모델을 로드하고 추론을 실행하십시오:
from ultralytics import YOLO model = YOLO("yolo26n.pt") results = model.predict(source="ultralytics/assets/bus.jpg") plot = results[0].plot() -
추론 결과 이미지를 바이트로 변환하고 터미널에 표시하십시오:
import io

import cv2
from sixel import SixelWriter

im_bytes = cv2.imencode(".png", plot)[1].tobytes()
mem_file = io.BytesIO(im_bytes)
SixelWriter().draw(mem_file)
자세한 내용은 예측 모드 페이지를 방문하십시오.
Link to this section왜 sixel 프로토콜은 Linux와 macOS에서만 작동합니까?#
sixel 프로토콜은 현재 Linux와 macOS에서만 지원됩니다. 해당 플랫폼들이 sixel 그래픽과 호환되는 네이티브 터미널 기능을 갖추고 있기 때문입니다. sixel을 사용한 터미널 그래픽에 대한 Windows 지원은 현재 개발 중입니다. Windows 호환성에 대한 업데이트는 VSCode 이슈 상태 및 문서를 확인하십시오.
Link to this sectionVSCode 터미널에서 이미지를 표시할 때 문제가 발생하면 어떻게 해야 합니까?#
아무것도 표시되지 않으면 순서대로 다음 항목을 확인하십시오:
- Confirm both
terminal.integrated.enableImagesandterminal.integrated.gpuAccelerationare enabled, as shown in the Process section, then restart the integrated terminal so the settings take effect. - 스크립트가 실행되는 동일한 가상 환경에
sixel이 설치되어 있는지 확인하십시오 (pip install sixel). - Make sure
plotis a validnp.ndarraybefore encoding it, sincecv2.imencoderaises an error if the image is empty or not a valid array. See the plot method parameters for the valuesresults[0].plot()accepts.
문제가 지속되면 VSCode 저장소에서 터미널 이미지 지원 상태를 확인하십시오.
Link to this sectionYOLO가 sixel을 사용하여 터미널에 비디오 추론 결과를 표시할 수 있습니까?#
sixel을 사용하여 터미널에 비디오 추론 결과나 애니메이션 GIF 프레임을 표시하는 것은 현재 테스트되지 않았으며 지원되지 않을 수 있습니다. 정지 이미지부터 시작하여 호환성을 확인하는 것을 권장합니다. 성능 제약 사항을 고려하여 사용자 책임하에 비디오 결과를 시도하십시오. 추론 결과를 플롯하는 방법에 대한 자세한 내용은 예측 모드 페이지를 방문하십시오.
Link to this sectionpython-sixel 라이브러리 문제를 해결하려면 어떻게 해야 합니까?#
The sixel package is a fork of the unmaintained PySixel library and is a thin Python wrapper over Pillow (PIL). If import sixel fails or SixelWriter().draw() raises an error, confirm the package installed into your active virtual environment, ensure Pillow is available, and check the python-sixel GitHub repository for platform-specific notes. For more on generating the image you pass to draw(), see the predict mode documentation.