Link to this sectionLoading YOLOv5 from PyTorch Hub#
📚 This guide explains how to load YOLOv5 🚀 from PyTorch Hub at https://pytorch.org/hub/ultralytics_yolov5.
Link to this sectionBefore You Start#
Install requirements.txt in a Python>=3.8.0 environment, including PyTorch>=1.8. Models and datasets download automatically from the latest YOLOv5 release.
pip install -r https://raw.githubusercontent.com/ultralytics/yolov5/master/requirements.txtCloning ultralytics/yolov5 is not required — PyTorch Hub fetches the code automatically.
Link to this sectionLoad YOLOv5 with PyTorch Hub#
Link to this sectionSimple Example#
This example loads a pretrained YOLOv5s model from PyTorch Hub as model and passes an image for inference. 'yolov5s' is the lightest and fastest YOLOv5 model. For details on all available models please see the README.
import torch

# Model
model = torch.hub.load("ultralytics/yolov5", "yolov5s")

# Image
im = "https://ultralytics.com/images/zidane.jpg"

# Inference
results = model(im)

results.pandas().xyxy[0]
#      xmin    ymin    xmax   ymax  confidence  class    name
# 0  749.50   43.50  1148.0  704.5    0.874023      0  person
# 1  433.50  433.50   517.5  714.5    0.687988     27     tie
# 2  114.75  195.75  1095.0  708.0    0.624512      0  person
# 3  986.00  304.00  1028.0  420.0    0.286865     27     tie
Link to this sectionDetailed Example#
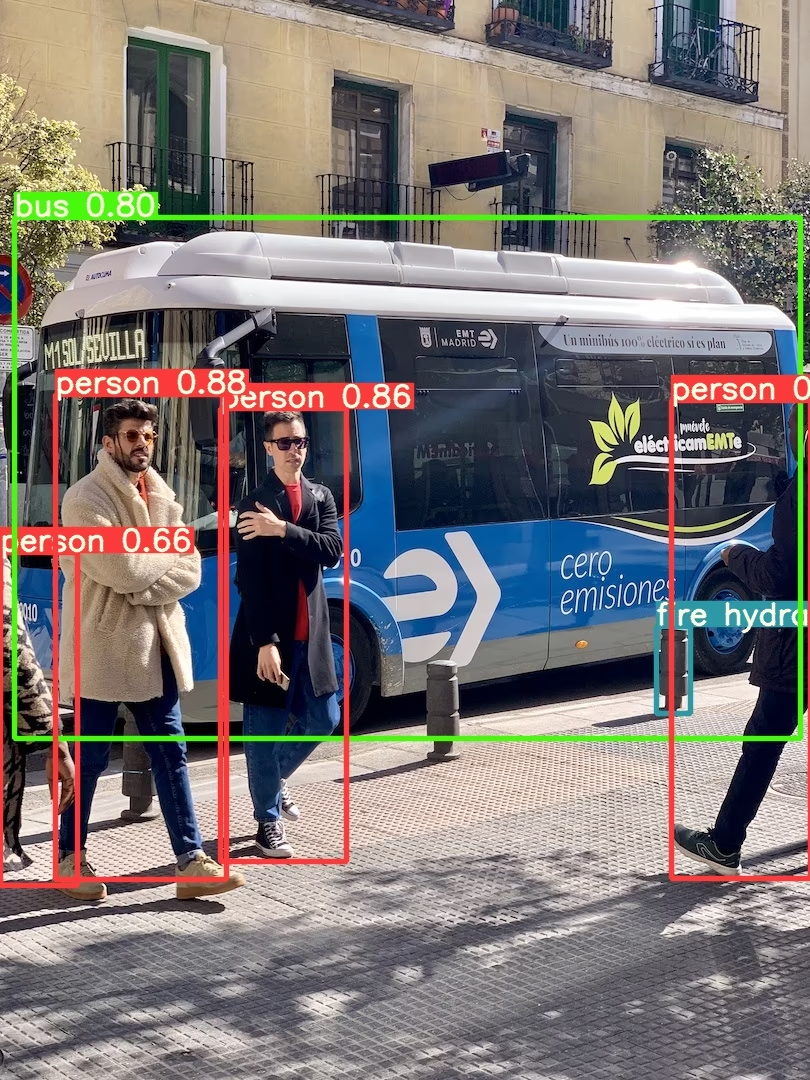
This example shows batched inference with PIL and OpenCV image sources. results can be printed to console, saved to runs/hub, showed to screen on supported environments, and returned as tensors or pandas dataframes.
import cv2
import torch
from PIL import Image

# Model
model = torch.hub.load("ultralytics/yolov5", "yolov5s")

# Images
for f in "zidane.jpg", "bus.jpg":
    torch.hub.download_url_to_file("https://ultralytics.com/images/" + f, f)  # download 2 images
im1 = Image.open("zidane.jpg")  # PIL image
im2 = cv2.imread("bus.jpg")[..., ::-1]  # OpenCV image (BGR to RGB)

# Inference
results = model([im1, im2], size=640)  # batch of images

# Results
results.print()
results.save()  # or .show()

results.xyxy[0]  # im1 predictions (tensor)
results.pandas().xyxy[0]  # im1 predictions (pandas)
#      xmin    ymin    xmax   ymax  confidence  class    name
# 0  749.50   43.50  1148.0  704.5    0.874023      0  person
# 1  433.50  433.50   517.5  714.5    0.687988     27     tie
# 2  114.75  195.75  1095.0  708.0    0.624512      0  person
# 3  986.00  304.00  1028.0  420.0    0.286865     27     tie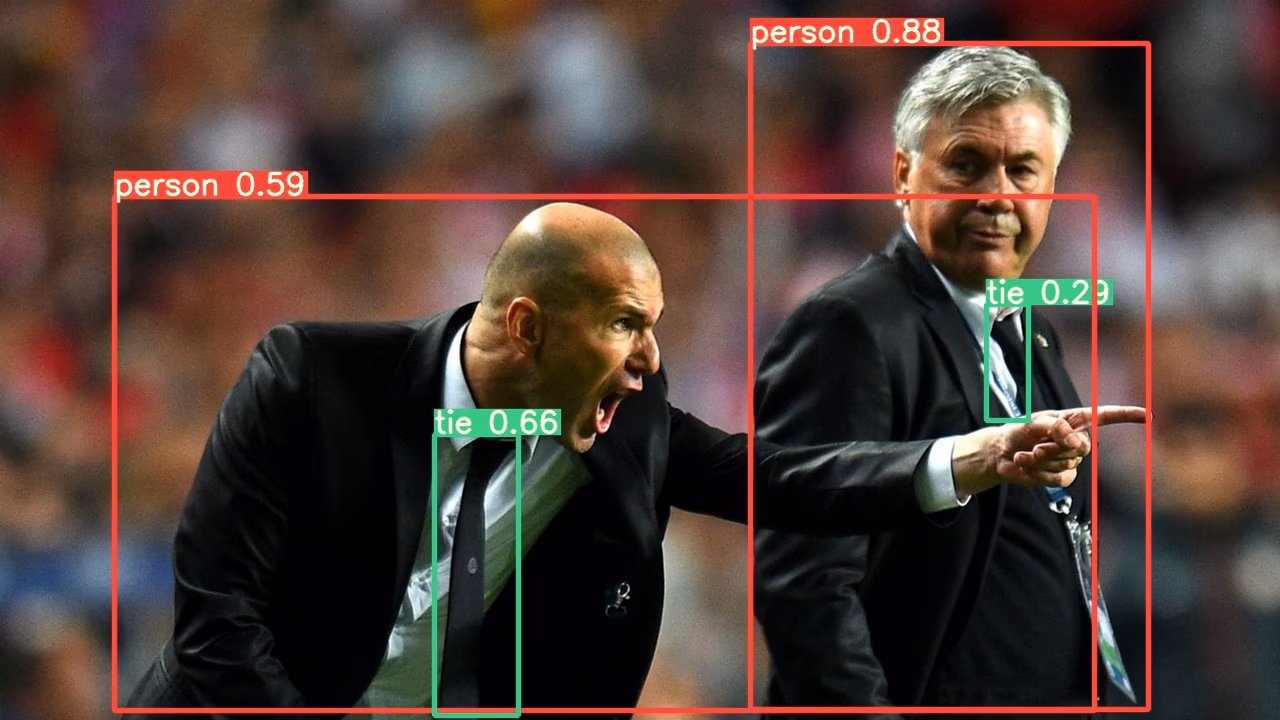
For all inference options see YOLOv5 AutoShape() forward method.
Link to this sectionInference Settings#
YOLOv5 models contain various inference attributes such as confidence threshold, IoU threshold, etc. which can be set by:
model.conf = 0.25  # NMS confidence threshold
model.iou = 0.45  # NMS IoU threshold
model.agnostic = False  # NMS class-agnostic
model.multi_label = False  # NMS multiple labels per box
model.classes = None  # (optional list) filter by class, i.e. = [0, 15, 16] for COCO persons, cats and dogs
model.max_det = 1000  # maximum number of detections per image
model.amp = False  # Automatic Mixed Precision (AMP) inference

results = model(im, size=320)  # custom inference size
Link to this sectionDevice#
Models can be transferred to any device after creation:
model.cpu()  # CPU
model.cuda()  # GPU
model.to(device)  # i.e. device=torch.device(0)
Models can also be created directly on any device:
model = torch.hub.load("ultralytics/yolov5", "yolov5s", device="cpu") # load on CPUInput images are automatically transferred to the correct model device before inference.
Link to this sectionSilence Outputs#
Models can be loaded silently with _verbose=False:
model = torch.hub.load("ultralytics/yolov5", "yolov5s", _verbose=False) # load silentlyLink to this sectionInput Channels#
To load a pretrained YOLOv5s model with 4 input channels rather than the default 3:
model = torch.hub.load("ultralytics/yolov5", "yolov5s", channels=4)In this case the model will be composed of pretrained weights except for the very first input layer, which is no longer the same shape as the pretrained input layer. The input layer will remain initialized by random weights.
Link to this sectionNumber of Classes#
To load a pretrained YOLOv5s model with 10 output classes rather than the default 80:
model = torch.hub.load("ultralytics/yolov5", "yolov5s", classes=10)In this case the model will be composed of pretrained weights except for the output layers, which are no longer the same shape as the pretrained output layers. The output layers will remain initialized by random weights.
Link to this sectionForce Reload#
If you run into problems with the above steps, setting force_reload=True may help by discarding the existing cache and force a fresh download of the latest YOLOv5 version from PyTorch Hub. Cached copies live in ~/.cache/torch/hub; deleting that folder achieves the same effect.
model = torch.hub.load("ultralytics/yolov5", "yolov5s", force_reload=True) # force reloadLink to this sectionScreenshot Inference#
To run inference on your desktop screen:
import torch
from PIL import ImageGrab

# Model
model = torch.hub.load("ultralytics/yolov5", "yolov5s")

# Image
im = ImageGrab.grab()  # take a screenshot

# Inference
results = model(im)
Link to this sectionMulti-GPU Inference#
YOLOv5 models can be loaded to multiple GPUs in parallel with threaded inference:
import threading

import torch

def run(model, im):
    """Performs inference on an image using a given model and saves the output; model must support `.save()` method."""
    results = model(im)
    results.save()

# Models
model0 = torch.hub.load("ultralytics/yolov5", "yolov5s", device=0)
model1 = torch.hub.load("ultralytics/yolov5", "yolov5s", device=1)

# Inference
threading.Thread(target=run, args=[model0, "https://ultralytics.com/images/zidane.jpg"], daemon=True).start()
threading.Thread(target=run, args=[model1, "https://ultralytics.com/images/bus.jpg"], daemon=True).start()
Link to this sectionTraining#
To load a YOLOv5 model for training rather than inference, set autoshape=False. To load a model with randomly initialized weights (to train from scratch) use pretrained=False. You must provide your own training script in this case. Alternatively see our YOLOv5 Train Custom Data Tutorial for model training.
import torch

model = torch.hub.load("ultralytics/yolov5", "yolov5s", autoshape=False)  # load pretrained
model = torch.hub.load("ultralytics/yolov5", "yolov5s", autoshape=False, pretrained=False)  # load scratch
Link to this sectionBase64 Results#
For use with API services. See Flask REST API example for details.
import base64
from io import BytesIO

from PIL import Image

results = model(im)  # inference

results.ims  # array of original images (as np array) passed to model for inference
results.render()  # updates results.ims with boxes and labels
for im in results.ims:
    buffered = BytesIO()
    im_base64 = Image.fromarray(im)
    im_base64.save(buffered, format="JPEG")
    print(base64.b64encode(buffered.getvalue()).decode("utf-8"))  # base64 encoded image with results
Link to this sectionCropped Results#
Results can be returned and saved as detection crops:
results = model(im)  # inference
crops = results.crop(save=True)  # cropped detections dictionary
Link to this sectionPandas Results#
Results can be returned as Pandas DataFrames:
results = model(im)  # inference
results.pandas().xyxy[0]  # Pandas DataFrame
Pandas Output (click to expand)
print(results.pandas().xyxy[0])
#      xmin    ymin    xmax   ymax  confidence  class    name
# 0  749.50   43.50  1148.0  704.5    0.874023      0  person
# 1  433.50  433.50   517.5  714.5    0.687988     27     tie
# 2  114.75  195.75  1095.0  708.0    0.624512      0  person
# 3  986.00  304.00  1028.0  420.0    0.286865     27     tie
Link to this sectionSorted Results#
Results can be sorted by column, i.e. to sort license plate digit detection left-to-right (x-axis):
results = model(im)  # inference
results.pandas().xyxy[0].sort_values("xmin")  # sorted left-right
Link to this sectionJSON Results#
Results can be returned in JSON format once converted to .pandas() dataframes using the .to_json() method. The JSON format can be modified using the orient argument. See pandas .to_json() documentation for details.
results = model(ims)  # inference
results.pandas().xyxy[0].to_json(orient="records")  # JSON img1 predictions
JSON Output (click to expand)
[
    {
        "xmin": 749.5,
        "ymin": 43.5,
        "xmax": 1148.0,
        "ymax": 704.5,
        "confidence": 0.8740234375,
        "class": 0,
        "name": "person"
    },
    {
        "xmin": 433.5,
        "ymin": 433.5,
        "xmax": 517.5,
        "ymax": 714.5,
        "confidence": 0.6879882812,
        "class": 27,
        "name": "tie"
    },
    {
        "xmin": 115.25,
        "ymin": 195.75,
        "xmax": 1096.0,
        "ymax": 708.0,
        "confidence": 0.6254882812,
        "class": 0,
        "name": "person"
    },
    {
        "xmin": 986.0,
        "ymin": 304.0,
        "xmax": 1028.0,
        "ymax": 420.0,
        "confidence": 0.2873535156,
        "class": 27,
        "name": "tie"
    }
]
Link to this sectionCustom Models#
This example loads a custom 20-class VOC-trained YOLOv5s model 'best.pt' with PyTorch Hub.
import torch

model = torch.hub.load("ultralytics/yolov5", "custom", path="path/to/best.pt")  # local model
model = torch.hub.load("path/to/yolov5", "custom", path="path/to/best.pt", source="local")  # local repo
Link to this sectionTensorRT, ONNX and OpenVINO Models#
PyTorch Hub supports inference on most YOLOv5 export formats, including custom-trained models. See TFLite, ONNX, CoreML, TensorRT Export tutorial for details on exporting models.
- TensorRT can be 2-5× faster than PyTorch on GPU benchmarks.
- ONNX and OpenVINO can be 2-3× faster than PyTorch on CPU benchmarks.
import torch

model = torch.hub.load("ultralytics/yolov5", "custom", path="yolov5s.pt")  # PyTorch
model = torch.hub.load("ultralytics/yolov5", "custom", path="yolov5s.torchscript")  # TorchScript
model = torch.hub.load("ultralytics/yolov5", "custom", path="yolov5s.onnx")  # ONNX
model = torch.hub.load("ultralytics/yolov5", "custom", path="yolov5s_openvino_model/")  # OpenVINO
model = torch.hub.load("ultralytics/yolov5", "custom", path="yolov5s.engine")  # TensorRT
model = torch.hub.load("ultralytics/yolov5", "custom", path="yolov5s.mlmodel")  # CoreML (macOS-only)
model = torch.hub.load("ultralytics/yolov5", "custom", path="yolov5s.tflite")  # TFLite
model = torch.hub.load("ultralytics/yolov5", "custom", path="yolov5s_paddle_model/")  # PaddlePaddle
Link to this sectionSupported Environments#
Ultralytics provides a range of ready-to-use environments, each pre-installed with essential dependencies such as CUDA, CUDNN, Python, and PyTorch, to kickstart your projects.
- Free GPU Notebooks:


- Google Cloud: GCP Quickstart Guide
- Amazon: AWS Quickstart Guide
- Azure: AzureML Quickstart Guide
- Docker: Docker Quickstart Guide

Link to this sectionProject Status#
![]()
This badge indicates that all YOLOv5 GitHub Actions Continuous Integration (CI) tests are successfully passing. These CI tests rigorously check the functionality and performance of YOLOv5 across various key aspects: training, validation, inference, export, and benchmarks. They ensure consistent and reliable operation on macOS, Windows, and Ubuntu, with tests conducted every 24 hours and upon each new commit.